


Classic Ribbed Hat
If you had to pick (or pack) one knit piece to see you through whatever the day throws your way, it would be hard to choose more wisely than our Classic Ribbed Hat.
In cozy Cashmere Merino Bloom, it is the most perfect be-warm, go-anywhere, look-good head topper we can imagine!

Wear it cuffed, wear it slouchy. Wear it bright, wear it neutral. Throw it in your bag just in case or don’t take it off all weekend. Wherever it goes, however it rolls (or doesn’t), the Classic Ribbed Hat is sized for everyone, from babies to adults, and only requires one skein to make it (okay, except for the largest size, which requires two). Cashmere Merino Bloom is a combo of incredibly soft and toasty cashmere, along with extra fine merino, a good addition for keeping the hat in shape! Plus, we just added 16 colors to the palette, so now you can go vivid with something like potent Red Poppy or purple-y Lotus Flower, or keep your warm head cool in Gray Pearl or Blue Rust. A classic among classics, this is the one!
Yarn lovers, if you adore the yarn used in this project, you’ll love exploring all of our other yarn collections! Discover over 45 thoughtfully designed yarns in nearly every natural fiber and in every spectacular color you can imagine. Only available here at Purl Soho’s online yarn store, where every skein is created with care and your creativity in mind!

UPDATE: NOW IN NEW COLORS
FEBRUARY 2023

We now have over twenty colors of Cashmere Merino Bloom and with sizes from tiny baby to big grandpa, you’re going to want more than one Classic Ribbed Hat. So pick a palette and cast on!
UPDATE: NOW IN NEW COLORS + STYLES
SEPTEMBER 2023
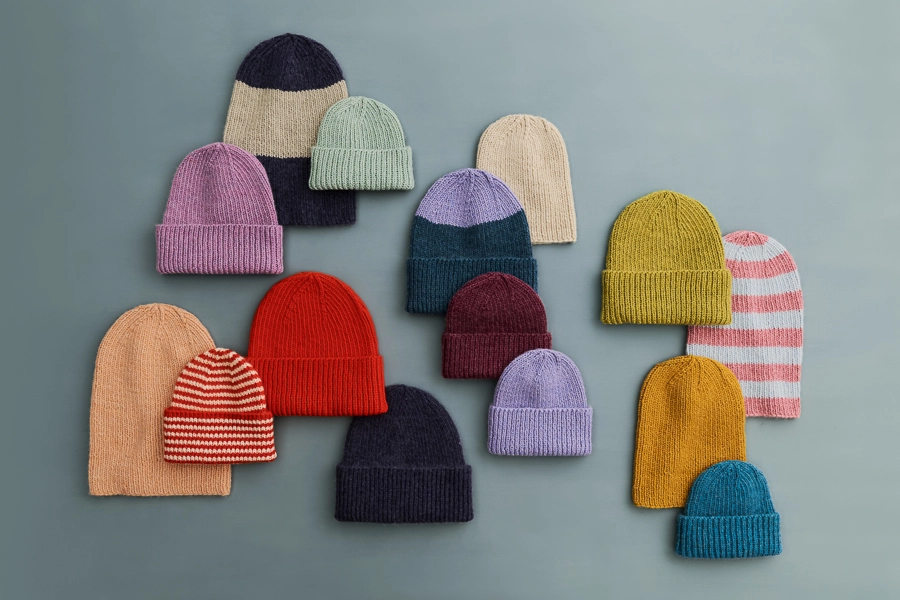
We’re so in love with this hat in Cashmere Merino Bloom that we whipped up a few more colors and added some striped and colorblocked versions to the mix, as well! If you’re opting to play with color, try a Classic Ribbed Hat Bundle for color combinations that have already been perfectly matched!
Designed by Purl Soho designer, Jake Canton. Click here to see even more of Jake’s designs!
Share your progress and connect with the community by tagging your pics with #PurlSoho. We can’t wait to see what you make!
Want to print this pattern? On desktop, find the “print” icon in the right margin, and on mobile, scroll to the end of the pattern for it. Use the on-screen instructions to remove anything you don’t want to print!
Materials
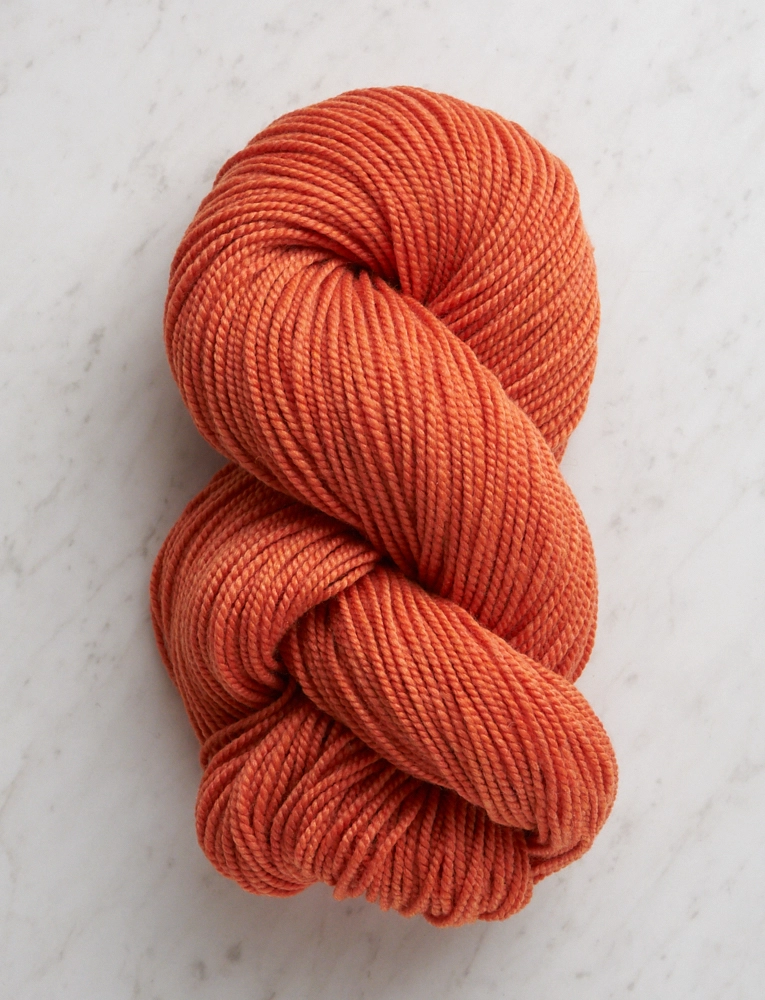
- 1 (1, 1, 1, 2) skein(s) of Purl Soho’s Cashmere Merino Bloom, 75% extra fine merino and 25% cashmere. Each skein of this light worsted/DK yarn is 218 yards/ 100 grams; approximately 94 (138, 181, 202, 264) yards required. We used the colors Bright Flamingo, Pink Apricot, and Autumn Oak.
- US 3 (3.25 mm), 16-inch circular knitting needles
- A set of US 3 double pointed needles OR US 3, 32-inch circular needles for Magic Loop
- Stitch markers, including one unique
Gauge
32 stitches and 33 rows = 4 inches in 1×1 rib unstretched
Size
UPDATE December 5, 2022: We’ve increased the range of stretch these hats have. In reality, that 1×1 rib is pretty stretchy!
Baby (Kid, Adult Small, Adult Medium, Adult Large)
- Finished Circumference (unstretched): 10½ (12, 13½, 15, 16½) inches, comfortably stretching to approximately 13–16 (15–18, 17–20, 19–23, 21–25) inches
- Finished Height (uncuffed): 8 (9¼, 10½, 11½, 12½)
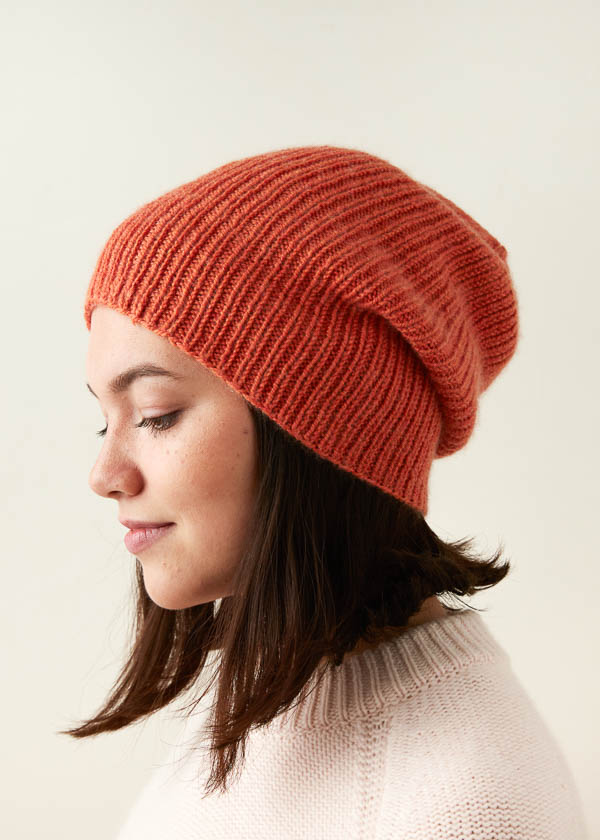
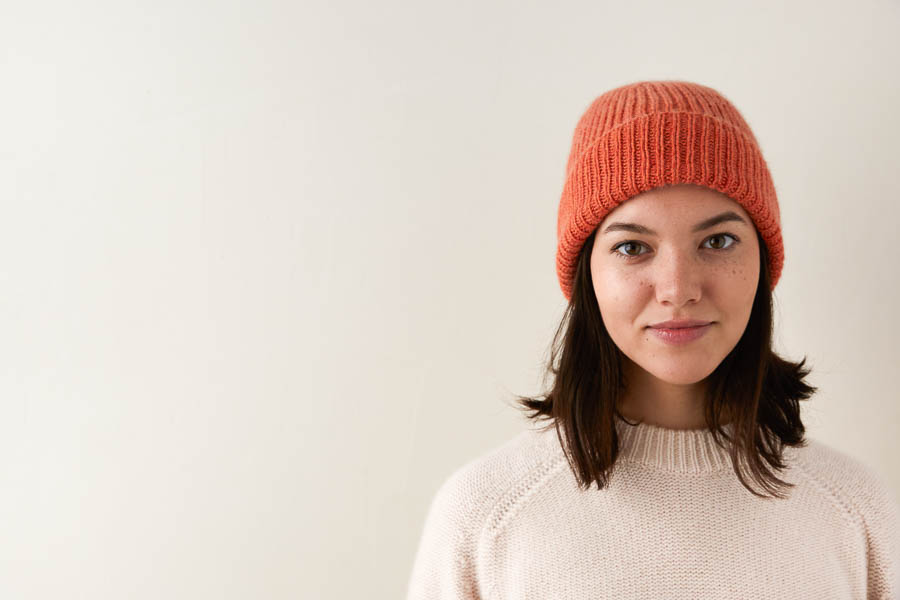
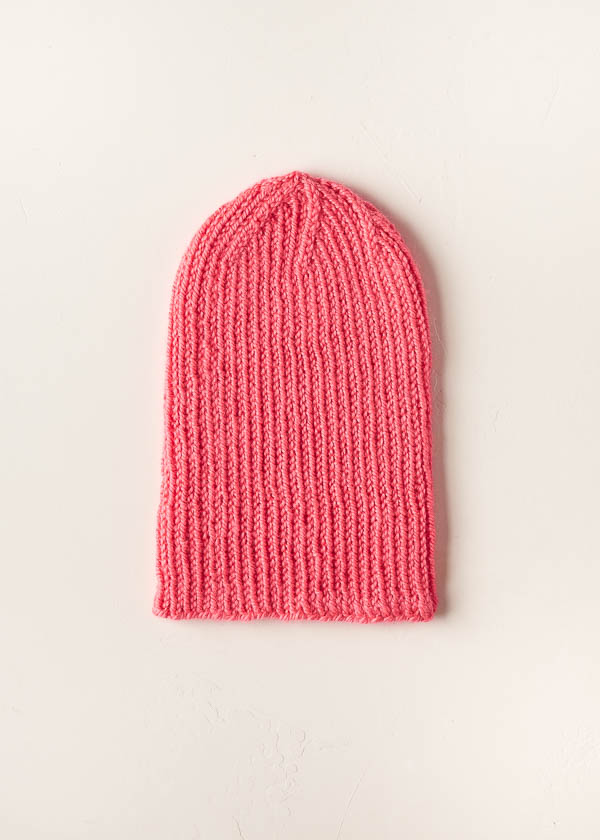
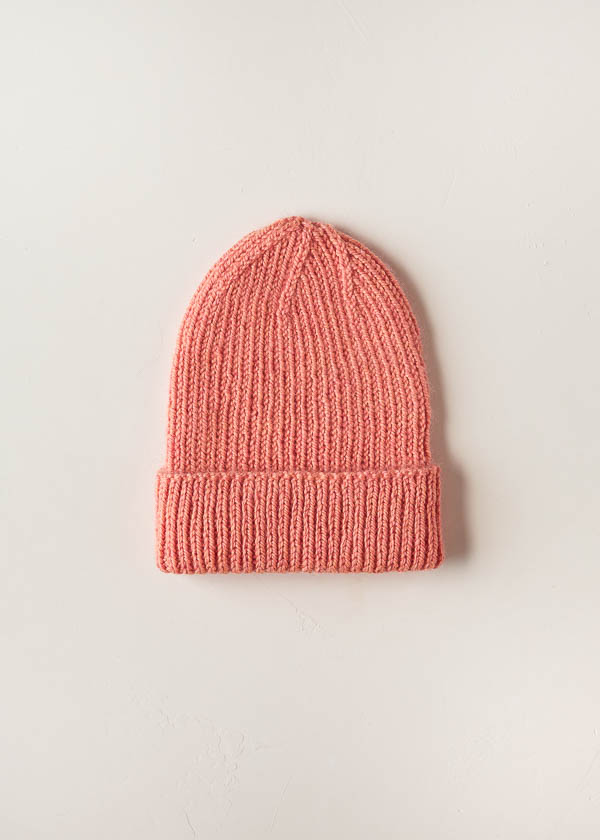
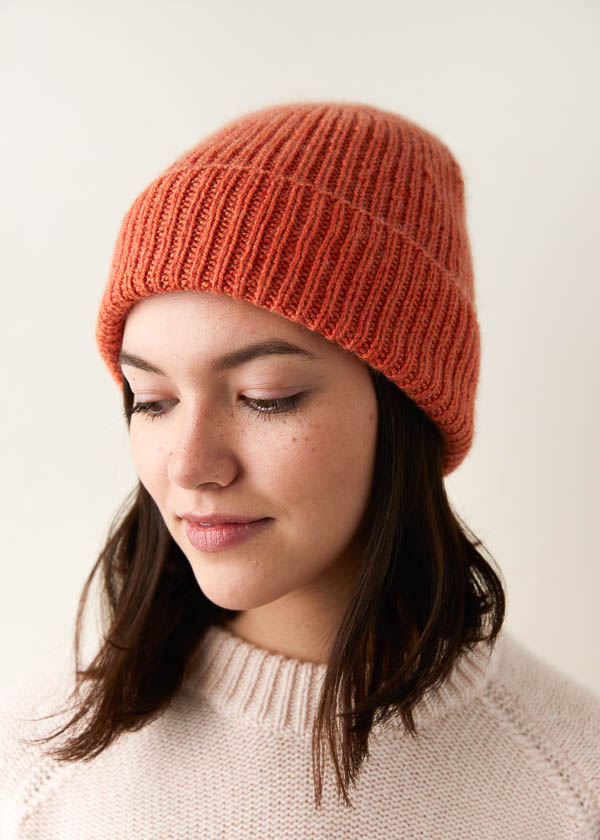
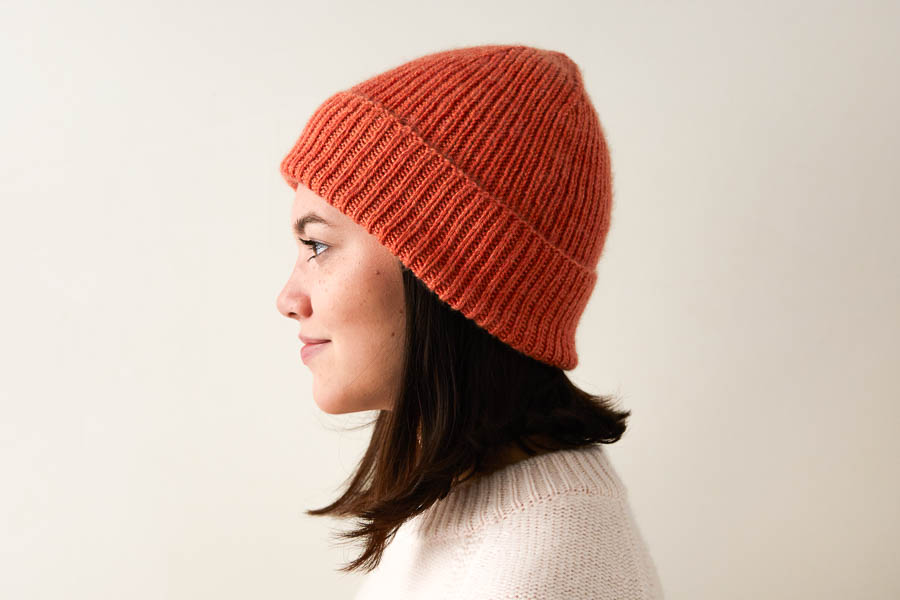
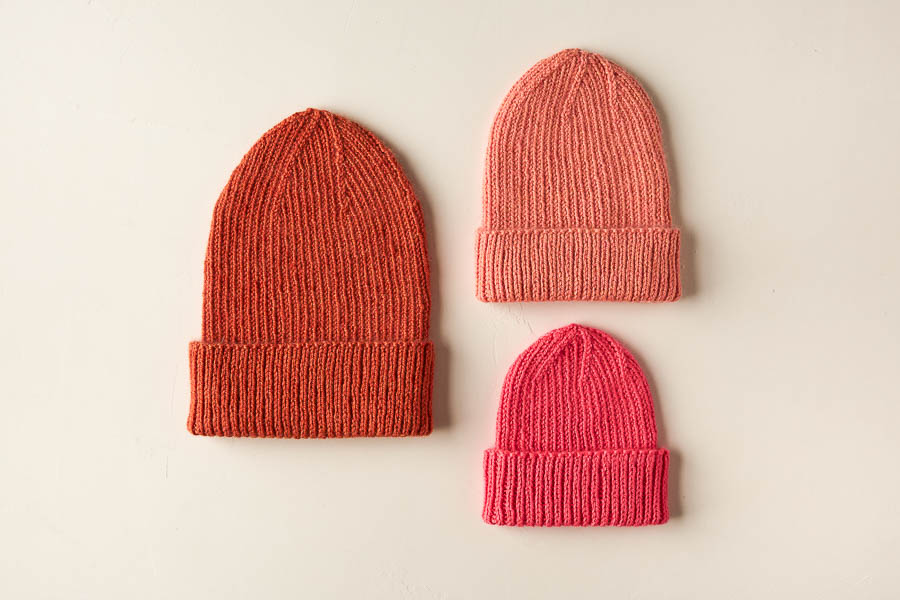
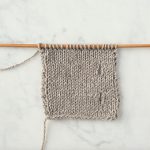
SAMPLES: The hats shown here are sizes Baby (in Bright Flamingo), Kid (in Pink Apricot) and Adult Medium (in Autumn Oak).
For help choosing a hat size, check out our complete guide on How to Knit the Right Hat Size!
Pattern
Begin
Cast 84 (96, 108, 120, 132) stitches onto circular needles. We used a basic Long Tail Cast On.
Place unique stitch marker and join for working in the round, being careful not to twist the stitches.
Round 1: *K1, p1, repeat from * to end of round.
Repeat Round 1 until piece measures 6¼ (7, 8¼, 9, 9½) inches from cast-on edge.
Crown
NOTE: Change to double pointed needles when necessary.
Set-Up Round: Remove unique end-of-round marker, k1, replace marker for new end-of-round, *[p1, k1] 7 (8, 9, 10, 11) times, pm (place marker), repeat from * to end of round, omitting final stitch marker which is end-of-round marker. [6 stitch markers placed, including unique end-of-round marker]
Kid, Adult Small, Adult Medium, Adult Large Sizes Only
Round 1: [*P1, k1, repeat from * to 2 stitches before next marker, k2tog] 6 times. [6 stitches decreased]
Round 2: [*P1, k1, repeat from * to 1 stitch before next marker, k1] 6 times.
Round 3: [*P1, k1, repeat from * to 3 stitches before next marker, p1, k2tog] 6 times. [6 stitches decreased]
Round 4: *P1, k1, repeat from * to end of round.
Repeat Rounds 1-4 – (0, 1, 2, 3) more time(s). [84 stitches remain]
All Sizes
Round 1: [*P1, k1, repeat from * to 2 stitches before next marker, k2tog] 6 times. [6 stitches decreased]
Round 2: [*P1, k1, repeat from * to 3 stitches before next marker, p1, k2tog] 6 times. [6 stitches decreased]
Repeat Rounds 1 and 2 four more times. [24 stitches remain]
Next Round: *P1, k1, k2tog, repeat from * to end of round. [18 stitches remain]
Next Round: *P1, k2tog, repeat from * to end of round. [12 stitches remain]
Next Round: *K2tog, repeat from * to end of round. [6 stitches remain]
Cut yarn and thread tail onto a tapestry needle. Thread tail through remaining stitches. Pull taught and bring tail to inside of hat to weave in.
Weave in the ends and block as desired.
Learn About Cashmere Merino Bloom + All Our Beautiful Yarns
Soft, supple, and toasty warm, Cashmere Merino Bloom is an absolute knitting joy! A light worsted/DK-weight yarn, it is made with 25% of the most exquisite cashmere in the world and 75% extra fine merino wool and benefits from both fibers: cashmere for over-the-top softness and beautiful bloom and merino for resilience, durability, and even more softness. Cashmere Merino Bloom has an incredible hand feel with a gentle halo that illuminates your knitting… A gorgeous choice!
More Free Knitting Patterns
- Be sure to explore our collection of (mostly free!) Cashmere Merino Bloom patterns and cast on!
More Light Worsted/ DK Weight Yarns
- Shop our entire collection of light worsted/DK-weight yarns (What does DK-weight yarn mean, really? Our guide to DK yarn will answer your questions and demystify.)
- If you want to use a different yarn, be sure to take the time to get the correct gauge. Need help? Check our All About Gauge Tutorial!
More Yarns With Similar Fiber
- Shop cashmere yarn (What makes cashmere so special? Learn all about this amazing fiber in our guide to cashmere yarn!)
- Shop merino wool yarn
Looking for more inspiration? Explore all of our free knitting patterns and knitting tutorials, buy one of our many knitting kits and yarn bundles, and shop for beautiful yarn. We have over 35 gorgeous natural fiber yarns in 100’s of magnificent colors, designed to bring integrity, beauty, and joy to your next knitting project and only available at Purl Soho!


The pattern of this lovely hat calls for a #3 needle while the product details say “Suggested Knitting Needle US 5 – 7 “. I am wondering why the #3 is specified? Will it make the fabric too tight with this like worsted weight yarn?
Hello Jane,
Thank you for reaching out! This hat is knit very tightly so that it will maintain it’s stretch over time. It is of course always a good idea to knit up a little gauge swatch before jumping in to avoid any surprises along the way!
Happy knitting!
Marilla
Although I can barely knit, just reading your wonderful emails makes me happy. I hope to visit your store one day. Keep the emails coming. They give me hope!
Joan
I can’t wear any type of wool. What yarn do you have that would be comparable to this to make the hat?
Hello Brenda,
Thank you for reaching out! This hat would be incredible in Jade Sapphire’s 6ply Cashmere, or alternatively you could try out Blue Sky’s Worsted Cotton, it is a bit thicker than the reccomended yarn so you might need to make a couple of adjustments, but I think it would come out beautifully.
Happy knitting!
-Marilla
Please mail me the pattern and the wool.
Hello Marina,
Thank you for reaching out! This pattern is free for download on this page. If you’re on a desktop version of the site, you will find a “print” icon in the right column just below the date and tags. If you’re on a mobile version of the site, you will find a “print” icon below the pattern and above the comments.
Follow the easy on-screen instructions to delete whichever parts of the pattern you don’t want to print or save. For example, you may decide to shorten the pattern by omitting certain images or the list of materials. To remove images, click the drop down next to the image icon and change from 100% to 0%.
To Purchase this yarn, you can simply follow this link to add it to your basket and then order it.
Happy knitting!
-Marilla
Thanks for sharing the tips for printing, including how to delete items not needed!!
When doing the set up for the crown, I am doing the 1st one in parentheses where 96 stitches were made and I’m supposed to place a marker every 8 stitches with only 6 markers. The numbers don’t add up I would actually need 12. What am I doing wrong? How many stitches between the 6 markers? Thank you
Hi Angela,
Thanks for writing in! For the Kid size, you’re actually placing as stitch marker every 16 stitches. You repeat [k1, p1] 8 times in between each marker, and since that’s 2 stitches, you’re really knitting a total of 16 stitches!
All the best,
Lili
Isn`t it a video tutorial, is it? Thanks!! Paula.
Hi Paula,
Thanks for writing in. Unfortunately we don’t have the resources at the moment to do a video tutorial of this. We will keep your request in mind though for the future!
Best,
Julianna
Love this hat pattern. (Well, I love all Purl Soho yarn and patterns!) I already have a skein of Understory. Would it work instead of the Cashmere Merino Bloom?
Thanks.
Hi Ruth,
Great question! Although I would recommend knitting a gauge swatch to make sure, Understory knits up to almost the same gauge as Cashmere Merino Bloom so it should make a great substitution!
Best,
Julianna
Quick question: what size hat is the model wearing in the picture? Thank you!
Hi Sarah,
Thanks for reaching out! Our model is wearing the Adult Medium sized hat.
Happy knitting!
Julianna
hi – is there a pattern for the sweater featured in the pictures? Thanks!
Hello Minu,
Thank you for reaching out! The lovely sweater pictured does not have a pattern, but you do have a couple of sweater patterns that are similar. I would check out our Classic Hemmed Crewneck Sweater pattern and our Hummingbird Pullover.
Happy knitting!
-Marilla
What is the weight of this yarn? How many strands in the yarn? (3-ply, 4-ply?)
Hi Maggie,
Thanks for writing in! Cashmere Merino Bloom is a 2-ply DK or light worsted weight yarn.
I hope that helps!
Julianna
How many skeins would be needed for a matching scarf and do you have a pattern?
Hi Mindy,
Thanks for reaching out! I think you could adapt our Lovely Ribbed Scarf pattern to match by substituting a 1×1 ribbing for the 2×2 ribbing. This will require four skeins of Cashmere Merino Bloom.
Best of luck, and please let us know how it turns out!
Julianna
Hi,
How do I select the best size to knit?
What would you suggest for a child with a 20.5″ head, and for an adult with a 22.5″ head circumference?
Hi Natalie,
Great question! Hats should fit a bit snugly, so I would choose a size with a stretched measurement that is the same as or a little smaller than the head of the person you are knitting for. In your case, I would choose the Adult Medium for the 20.5″ head, and the Adult Large for the 22.5″ head.
Happy knitting!
Julianna
Thanks for the reply Juliana,
I’m new at knitting hats, and I’ve recently made one that came out too small for my intended wearer, and another one that was too large, in spite of all my efforts to get the size right. (Frustrating but learning experiences.)
So, now I’m extra careful about choosing a size to knit.
That said, I want to add another comment about the pattern. A 2-year old I know measures 20″ head circumference. So I would consider either the Adult Small or Adult Medium, correct?….I’m baffled why he would fit into an “Adult” size hat. Is his head unusually large for a child, or perhaps I am not measuring correctly? (I am measuring the circumference where his head is the largest.)
My idea is to knit a gauge swatch, then measure it stretched with the ideal amount of stretch I would like it to have when worn. When I see how many stitches per inch I can multiply it by the size of the head and know approximately how many stitches to cast on, and choose the one that is closest (84, 96, or 108, etc….a multiple of 12). Would that work well??
Any additional help would be wonderful!
Hi Natalie,
I’m sorry to hear your last hat came out too small! Although most patterns list standard sizes such as Baby, Child, and so on, it’s really much more accurate to choose based on the recipient’s head measurement. Children especially can vary quite a bit from the standard – I myself have a child who has been wearing adult sized hats since he was three, and now that he is eight, his head is the same size as mine, which is a bit larger than even the adult large listed in this pattern! My other child, however, has a head that measures just one or two sizes larger than you would expect for his age.
Your plan for measuring a stretched gauge swatch is a perfect way to go about determining which size to knit! Especially since everyone’s personal gauge is a bit different and ribbing is so stretchy, this will give you the most precise fit possible.
Best,
Julianna
Thanks Julianna. I appreciate it!
Hi juliana,
I’m new to knitting and am using this hat to get better at the knit + purl combo. That said, I need to make this hat for 23” circumference. How would I figure out how many additional stitches I need when casting on? I assume this is more complicated than just casting on more than 132, say 134. Or is it that simple?
Hi and thanks for reaching out! This hat pattern can be knit on any multiple of 12 stitches – although you could start with any even number for the first part, once you got to the decreases, some of the rows would no longer match our instructions, so for a 23″ head, I would suggest starting with 144 or 156 stitches.
I hope that helps!
Julianna
Thanks for posting how to measure out and cast on the right number of stitches! I missed that initially! ?
I’m confused my the decrease directions, which give one set for 4 out 5 sizes and another for all sizes? Am I missing something? Thank you!
Hi Jonna,
Thanks for reaching out! Since the entire hat is knit in ribbing, the decreases have to be written out a bit more than usual as the stitches before the decreases and the rows in between do vary. The first set of decrease instructions, which refer to the Kid, Adult Small, Adult Medium, and Adult Large sizes, all have you decrease down to 84 stitches, which is the number of stitches for the Baby size. At that point the decreases are the same for all sizes since you are working from the same number of stitches.
I hope that clears things up!
Julianna
Dear Knitters at Purl Bee, I love your patterns and yarn and have knitted many up! My question is: I cannot afford Cashmere Merino Bloom. Is there another similar weight wool I can use? I am not good enough at math to figure out the pattern on a different weight yarn.
Hi Debi
We hear you! We totally understand that sometimes our yarn suggestions are more of an inspiration than a reality for many people. We are always happy to recommend less expensive (but still beautiful!) alternatives. In this case, we suggest that you try Good Wool. Not only is it less costly, at 383 yards, one skein would be plenty for even the largest size of this hat, and would even be enough for two hats in the Baby, Kid, or Adult Small sizes!
Thank you so much for asking. We’re sure that lots of other readers will thank you, too!
Best,
Julianna
Is the long tail cast on used here?
Hi Natalie,
Yes, we used a Long Tail Cast On for this hat!
Best,
Julianna
I’m tempted to try the long tail tubular cast on here.
After learning it while making the Lovely Ribbed Hat, I’ve come to really enjoy creating it- even though a regular long tail cast on is quicker.
Would the tubular cast on work fine here? What, if any, are the pros to the long tail cast on in this hat?
Hi Natalie,
Thanks for writing in! You could certainly use a Long Tail Tubular Cast On for this hat if you wish, as it works for any project that begins with 1×1 or 2×2 ribbing. The only real advantages of a regular Long Tail Cast On are that it’s faster and easier and more people are familiar with how to do it! It also looks different, which is either an advantage or disadvantage, depending how you feel about the appearance of both cast ons. If you prefer the tubular cast on, it is a great option for this hat!
Best,
Julianna
Would a tubular cast-on work with this pattern? I tried it and now love the feel of the tubular cast-on!
Hi Maxine,
Great idea! A tubular cast on would definitely work for this hat or for any other 1×1 or 2×2 ribbed hat to create an even stretchier edge. If you need to refer to it, our Tubular Cast On tutorial can be found here!
Best,
Julianna
Hi-
Is there a page on your website that that tells a beginning knitter on how to read knit patterns? There are a lot of numbers in parenthesis and acronyms/abbreviations and the * symbol and I don’t see a legend anywhere that explains that these mean. Example: *[p1, k1] 7 (8, 9, 10, 11)
Thank you!
Vedette
Hi Vedette,
Thanks for reaching out! Learning to read knitting patterns can sometimes feel like learning to read another language! We do have a Knitting Abbreviations + Terms guide, which can be found on the Create side of our website in the Knit menu and should be quite helpful. In your example, although it’s not a complete line of instructions, both the asterisk and brackets indicate sets of stitches that should be repeated in the row, and the numbers refer to the different sizes in the pattern – for the smallest size, you would repeat [p1, k1] 7 times, for the next size you would repeat it 8 times, and so on.
I hope that helps, and if you run into any other questions, please let us know!
Julianna
Bonjour Est-il possible d’ avoir les explications en français Merci de me répondre Vos modèles sont magnifiques
Hi Eveline,
Thank you for this lovely comment. We do not currently have the resources to translate our patterns, but hopefully at some point in the future this will be more of a possibility. In the mean time I will certainly pass along your suggestion!
Best,
Julianna
What are the sizes in the samples shown here?
Also, is there a way to be notified of a reply to my comments?
Hi Natalie,
Thanks for reaching out! The hats shown here are sizes Baby (in Bright Flamingo), Kid (in Pink Apricot) and Adult Medium (in Autumn Oak). You can find this information in our patterns at the end of the sizing information section. I believe if you include your email address with your post you should be notified of all replies, so you might want to check your spam or promotions folder if you haven’t been receiving notifications.
Best,
Julianna
I was wondering if you could give me the pattern, but with 2 needles. I know that there would be a seam but I don’t knit in the round. If so, I would purchase the three colors that the hats you show.
Hi Joan,
Thanks for reaching out! Unfortunately we do not have instructions for knitting this hat flat; however, it should be fairly easy to modify on your own! For the body of the hat, you will need to work the ribbing as *p1, k1* but otherwise, you should be able to knit the hat as written.
I hope that helps!
Julianna
I love this hat and knit it in lotus flower adult medium I want to knit an adult large now and use the lotus flower for stripes. Suggestions for the main color?
Hi Debby,
Thanks for reaching out! I think Lotus Flower would really pop against a dark neutral such as Pumpernickel Brown or Blue Rust, or you could pair it with another bright color like Bright Flamingo or True Turquoise for an allover vibrant hat!
I hope that helps, and please do let us know how it turns out!
Julianna
I hit a snag! I am knitting the baby sized hat and just completed the 61/4 inches. If I understand this correctly I start the set up round. I moved the marker one stitch and did the 7 stitches as instructed, placed a marker but then the instructions say to [P1, K1] my next stitch should be a knit stitch. It also says I will have a total of 6 stitch markers; I’m confused by this because if I only knit 7 stitches, I end up with a total of 11 stitch markers! What am I not understanding?
Hello Sue,
Thank you for reaching out! After you move your maker by one stitch you will then *[p1, k1] 7 (8, 9, 10, 11) times. This means that you will Purl 1 and Knit 1, 7 times, totaling 14 stitches. This will give you the needed 6 stitch markers to begin your decreases.
I hope this clears things up and let us know if you have any further questions!
-Marilla
Hi,
Do you think I could reasonably work this up using Posy? I impulsively bought some Black Cherry Posy and now I’m looking for a hat pattern like this style.
Thank you!
Hello Amy,
Thank you for reaching out! Posy does not have the correct gauge for this project, but it would work for the Boyfriend Hat which has a similar look. Another option is you could knit up a little gauge swatch holding two strands of Posy and see if you can get gauge.
I hope this helps and happy knitting!
-Marilla
Hi – this looks like a lovely hat and I would really like to print the pattern. However, for some reason, the ‘Materials’ part is not included in the pdf when I try to make the print. Any suggestions?
Hi Karin,
Thank you so much for reaching out and letting us know about this! We have had a few similar reports crop up recently of bits of patterns disappearing when trying to create a PDF, but it looks like everything has now been resolved. If you are still experiencing this error, please email us at [email protected] so we can try to troubleshoot this for you!
Best,
Julianna
Thank you for sorting it out! It works for me now.
Hi there, I began knitting this hat in a size medium adult, but became a bit confused with the crown. I ended up placing 40 sts on three DPNs each and then ktog2 on every DPN until there were no stitches left. Would someone be able to break down in simpler terms on how to complete the crown according to the pattern? It says to set up 6 stitch markers, so does that mean for 120 sts, a total of 12 sts are decreased every round until there are none left?
Hello Susan,
Thank you for reaching out! The decreases for this hat are spaced out into six sections, with one decrease at each marker. This means that six stitches are decreased on your decrease rows. These decreases are are spaced out in a specific way until you have 6 stitches remain and then cut yarn and thread tail onto a tapestry needle. Thread tail through remaining stitches. Pull taught and bring tail to inside of hat to weave in.
I hope this helps and happy knitting!
-Marilla
Hello,
Please tell me how many grams of the Cashmere Merino Bloom are used for each size?
Specifically, I wonder if I will be able to knit a gauge swatch and the Medium size using only one skein.
(If not, could I possibly knit the gauge swatch and not block it, so I could reuse the yarn? Does this particular yarn relax a lot after blocked/washed? In other words, does the blocking affect the gauge?)
Thanks!
Hello Natalie,
Thanks for reaching out! The size medium is about 88grams so you will have plenty of yarn for a swatch.
Happy knitting!
-Marilla
I would like to make this classic hat in an adult large. How much of the 2nd skein is needed?
Thank you! Susan.
Hi Susan,
Thanks for writing in! We used 264 yards today, or about 50 yards of the second skein, for the Adult Large hat.
Happy knitting!
Julianna
Hi,
Would you recommend wet-blocking the finished hat? I’m still learning the rules of blocking. Would it stretch out the ribbing? Would you just soak it and then let it sit out to dry rather than stretching it out and pinning?
Thanks!
Natasha
Hello Natasha,
Thank you for reaching out! For this hat I would reccomend blocking, but your instincts are correct that you should not stretch it out when blocking it and there is no need to pin it! Typically you only need to pin things out that need to be very specific measurements.
I hope this helps and happy knitting!
-Marilla
Hi,
I’m looking to make this in a Navy however I don’t see that color in the Cashmere Merino. Can you recommend a yarn that would work. I want to make sure it doesn’t stretch too much. I was thinking of using cotton so it could be thrown in the washer but I’m not sure that would work well with this pattern. Would love to hear your thoughts.
Cathy
Hello Cathy,
Thank you for reaching out! I think that this hat would be stunning in Woolfolk’s Far which has a classic Navy color option.
Happy knitting!
-Marilla
Hello
I love the look of this hat. Please can I ask if the pattern would suit a 3ply yarn?
Thank you,
Suzy
Hello Suzy,
Thank you for reaching out! This hat is knit up with a DK weight with a very small needle size to maintain the stretch of the rib.
Happy knitting!
-Marilla
Hello,
Love this pattern! I’m looking to knit a few of these in a couple of sizes, would it be possible to enquire about the meterage for the different sizes so I can buy the right amount of yarn?
Many Thanks!
Hello Kate,
Thank you for reaching out! Finished Circumference (unstretched): 25.4cm (30.48cm, 33.02cm, 38.1cm, 40.64), comfortably stretching to approximately 33.02cm (38.1cm, 43.18cm, 48.26cm, 53.34cm)
Finished Height (uncuffed): 20.32cm (22.86cm, 25.4cm, 27.94cm, 30.48)
I hope this helps and happy knitting!
-Marilla
How many yards or grams will the baby size require? I already made some socks with the skein I have and am wondering if I can make a hat to match out of what I have left. I believe I have about 75g, which I figured was about 160 yards? Thanks!
Hi Kelsey,
Great question! You will need between 94 and 100 yards of yarn for the baby size!
Best,
Cassy
This question may seem trivial, but how many double pointed needs should you use for the crown? 4 to hold the stitches and one to knit with? Thank you!
Hi Adriana,
Thanks for writing in, and this isn’t a silly question at all! It really depends on personal preference, as well as how many decreases there are in the crown of the hat. For this pattern, since there are 6 decreases worked per round, it will probably be easier to use 3 double pointed needles to hold the stitches and knit around with a fourth, but for a pattern like our Boyfriend Hat that has 8 decreases per round, you might want to use 4 needles to hold the stitches and a fifth to knit. For any pattern, though, if you prefer to use either 3 or 4 needles, you could do so as long as you don’t mind occasionally moving stitches around to accommodate the decreases.
I hope that helps!
Julianna
Hi Purl Bee,
I love this hat! I also love your Lanecardate camel yarn. Could you advise if the camel would work well as a substitute for the Merino Bloom? I see they are both listed as Light Worsted/DK weight. Any gauge adjustment advice would be most welcome.
Thanks!
Katlyn
Hi Katlyn,
Thanks so much for the kind words! Yes, I think Lanecardate Camel would be a wonderful yarn to substitute for this hat as it is the same weight as Cashmere Merino Bloom! As always, when substituting a different yarn, it is still a good idea to knit a gauge swatch to see if you will need to adjust the needle size at all.
Happy knitting!
Julianna
I’m stuck on trying to get the correct gauge for this project. I tried it with a size 3 needle and it’s too big, I then tried it with a size 2, with stitches as tight as I can make them. So tight it’s almost like a felted texture (given the weight of the yarn and the tightness of the stitches) but I still can’t get a small enough gauge. What am I missing? Is the cashmere merino bloom a heavier weight now than when the pattern was written? Or is it not supposed to be 32 stitches for 22 rows in 1×1=4” unstretched? Even with the size 2 I’m closer to 5”. I can’t imagine using a size 0 with this yarn to get the correct gauge. Help!
Hello Laura,
Thank you for reaching out! You are correct, This hat is knit up with a very tight gauge. This is so that your hat will maintain its ship for as long as possible. Getting gauge with a rib stitch can be tricky. The gauge we got is 32 stitches and 33 rows = 4 inches in 1×1 rib unstretched. When measuring a gauge swatch I will often just measure the center inch because the middle stitches will be the most accurate to your gauge – you will need 8 stitches in one inch.
I hope this is helpful and let us know how it goes!
-Marilla
Hi there. Do the 32 stitches include purls? It says I stretched, but just checking! Thanks.
Hi Jess,
Thanks for reaching out! Yes, the 32 stitches includes the purl stitches!
All the best,
Gianna
Hi there,
Can I substitute magic loop for the crown (instead of double pointed needles)? Or are double pointed needles best to tighten up the top of the hat? I know sometimes magic loop has left my stitches a little baggier looking than I’d like, but I haven’t learned to use double pointed needles yet.
Thanks!
Alison
Hi Alison,
Great question! Yes, you could certainly use Magic Loop for the decreases of a hat if you prefer! Both methods allow you to work in the round at a small circumference and both require some practice to match the tension of your regular knitting, so I would recommend using whatever technique you are most comfortable with. You could also try out Addi FexiFlips, which are a newer style of needle that can also substitute for double pointed needles!
I hope that helps!
Julianna
Hi Purl Soho,
I have finished knitting this classic ribbed hat in the size of adult large. When I was knitting the crown rounds, I have encountered a counting issue. After knitting the set-up round and 4 times’ decreasing rounds, there were 84 stitches remained. Moving to the next decreasing rounds (for all sizes), I have knitted a total of 6 times (1 plus repeating 5 more times) for the Round 1 and 2. However, only 12 stitches were left (84 – 12*6), instead of 18 stitches as mentioned in the pattern. And, I have tried to do the decreasing by moving to the next decreasing round until there are 6 stitches left. I am not sure if I have misunderstood the pattern. Please advise.
By the way, the pattern is easy to follow and the hat looks nice and fit.
Thanks so much for the free pattern.
Regards,
Jaz (from Hong Kong)
Hello Jaz,
Thank you for reaching out and for your keen eye! You are absolutely correct and we so appreciate you pointing this out to us. We have corrected the pattern and the math will all ad up now.
We are so happy to hear that your hat is working out so well and thanks again!
Happy knitting!
-Marilla
Hi, so the pattern for the Adult Large size decrease should read:
“Repeat Rounds 1-4 – (0, 1, 2, 4) more time(s). [84 stitches remain]”
Correct? Otherwise after 3 rounds of decreases it will be 96 stitches left.
Hello Jeong-A,
Thanks for reaching out! Wile you do decrease rounds 1-4 a total of 4 times, you repeat them 3 MORE times after you complete rounds 1-4 the first time.
I hope this clarifies things for you and happy knitting!
-Marilla
Is Baby Alpaca appropriate for this hat?
Hi Jessica,
Thanks for writing in! As long as your alpaca is DK weight and knits up to the correct gauge, yes, it would work in this hat! You may also be interested in our Lovely Ribbed Hat, which is quite similar and is written for sport weight Season Alpaca.
Happy knitting!
Julianna
I am knitting this hat as a baby shower gift–baby being born in December. Since it’s hard to know how big the baby’s head will be, is it safer to go with the kid size? Would that size work on a newborn baby no matter what if you just folded up the cuff more? I’m thinking then perhaps they would also get a few seasons out of the hat??? Thanks for weighing in!
Hello Heather,
Thank you for reaching out! If you want the baby to wear the hat this season I would recommend going with the baby size. It will be nice and stretchy so even if the baby has a larger head it should still fit nicely!
I hope this helps and happy knitting!
-Marilla
I want to make the lovely ribbed cowl and the lovely ribbed hat to match. I note you recommend different yarn for each. I would like to use the worsted twist for both pieces. Would my amount of yarn change when using the worsted twist instead of the Siri merino? Please advise.
Hi Mary Anne,
Thanks for writing in! Although the Lovely Ribbed Scarf and Lovely Ribbed Hat share a name, they are designed for different yarns which knit up at different gauges, and unfortunately neither of them are a good match for Worsted Twist. If you would like to knit the Lovely Ribbed Scarf in Worsted Twist, you could adjust the pattern by knitting a gauge swatch in 2×2 rib on a US 8 or 9 needle and then multiplying your stitches per inch by 11 and rounding to the nearest multiple of 4 plus 2 to determine how many stitches to cast on. It’s difficult to say exactly how much yarn you will need when altering the pattern like this, but I think you will need about 5 skeins of Worsted Twist.
Unfortunately, the Lovely Ribbed Hat pattern relies heavily on gauge and cannot be easily altered when making such a big leap from sport weight to worsted – I’m so sorry about that! You may be interested in some of our worsted weight hats, such as our Essential Hat or Classic Cuffed Hat.
I hope that helps!
Julianna
I just learned the chinese waitress stretchy cast on technique. I am wondering if this would work for this hat.
Hello Rebecca,
Thank you for reaching out! Yes, this cast on method will certainly work for this project.
I hope this helps and happy knitting!
-Marilla
I love the look of the hat how it is cuffed your photos.
Can you tell me how many inches is the cuff as shown here on the model? How many inches is it stretched to fit the model, and what would it measure simply relaxed (not stretched)?
Hello Natalie,
Thank you for reaching out! While we didn’t record that information while taking the photos, but the finished circumference (unstretched): 10½ (12, 13½, 15, 16½) inches, comfortably stretching to approximately 13¾ (15¾, 17¾, 19¾, 21¾) inches.
I hope this is helpful and happy knitting!
-Marilla
A Question: Can this hat be finished off using magic loop instead of dpn’s? Thank you.
Hi Janet,
Great question! Yes, if you are comfortable with the Magic Loop method, you can certainly substitute it for double pointed needles at the top of this hat!
Best,
Julianna
Do you think this would work with baby alpaca? Or would the boyfriend pattern work better with that yarn?
Hi Regina,
Thanks for reaching out! If you are looking to knit a ribbed hat out of our Season Alpaca, which is a sport weight yarn, our Lovely Ribbed Hat is a written for Season Alpaca and would be a great choice!
Best,
Julianna
Hi, can we knit this pattern with straight needles?
Thank you in advance
Hi Alba,
Thanks for reaching out! Although the body of the hat can easily be knit flat, unfortunately we do not have instructions for knitting the crown of the hat on straight needles. I will certainly pass your suggestion along to the design team!
Best,
Julianna
Do you think the hat would work as slightly less slouchy? For example, making the Adult Medium 7” from the cast on row to the start of the crown?
Hi Jessica,
Thanks for writing in! Yes, if you prefer a more fitted or watch-cap style hat, you could certainly make the body of the hat shorter before beginning the decreases! You could also wear the hat cuffed if you would like to keep both options.
Happy knitting!
Julianna
I purchased sock yarn and size 3s for this hat. Will that work?
Hello Debbie,
Thanks for reaching out! We knit this hat up fairly tightly with a DK/Worsted yarn on a US3 needle. Sock Weight will likely be to thin for this project. Depending on your yarns gauge, our Lovely Ribbed Hat might be a better fit.
Happy knitting!
-Marilla
Hi there,
Is it possible to do the Crown part continuing on circular needles or does it have to be with double ended?
Many thanks
Hi Lydia,
Thanks for reaching out! As you work the decreases for the crown, it will eventually become too small for the circular needle you used for the rest of the hat; however, if you are familiar with the Magic Loop method, you could certainly substitute that for double pointed needles!
Happy knitting!
Julianna
Hi there. I swear that when I started this project last month the number of cast on stitches for the adult large size was 160. Now it’s 132. Oops. Is there any math to save this or is the hat just going to be too big? Trying very hard to resist the temptation to rip it all out and scream :^)
Hi Madison,
Yikes – I hope I can help! Is it possible that you were actually following our Boyfriend Hat pattern, which starts with 160 stitches for the Women’s Medium/Men’s Small size? I would recommend measuring your gauge on what you have completed so far to see which pattern it matches, and unfortunately, if you are knitting at the gauge for the Classic Ribbed Hat, I think you will have to start over as your hat will turn out quite large.
Best of luck and happy knitting!
Julianna
When doing the crown set up round it says to omit the final stitch marker. Is that correct? Then I’d have 44 stitches between markers instead of 22. Is that correct? Remove final stitch marker so that I’d have 22 stitches between 4 markers and 44 between the last? I’m doing adult large. It seems to make more sense to keep the final stitch marker so I’d have a total of 6 markers for the decrease with 22 between all markers. Thank you!
Hi Ellen,
Thanks for reaching out! This instruction simply means that you will not be placing an extra marker, as is indicated by the instructions in the repeat, when you get to the end of the round – you should still leave the end-of-round marker in place!
Happy knitting!
Julianna
Thank you very much!
I’m so looking forward to making this beautiful pattern! I think I’d like to try it with the decrease method for the Color Dipped hat – if I divide the stitches appropriately and replace the k1b/p1b stitches with k1/p1 as appropriate, do you think this would work?
Hello Clarissa,
Thanks for reaching out! Yes, I don’t see any reason why this shouldn’t work out. Let us know how it goes and happy knitting!
-Marilla
Hi! I’m really excited to make this for my brother and his head measures 24.5”. What is the next size up? Thank you!
Hi Kas,
Thanks for writing in! I believe the largest size should still fit your brother, as 1×1 ribbing creates a very stretchy fabric that should be able to accommodate an extra half inch of stretch; however, you can add 12 stitches to the cast on to create a larger hat. The only modification to the pattern would be to knit one additional stitch between placing markers on the crown shaping set-up round.
I hope that helps, and happy knitting!
Julianna
When you say one additional stitch, do you mean p1 k1 or just K1? Won’t that mess up the rib?
I also have another problem. I thought I had 144 stitches, but instead I have 142. Knitted and purled up to the set up round. Is there any way to salvage that or do I have to just start over??
Hi Jessica,
Thanks for writing in again! Unfortunately I think you may need to start over with the correct stitch count to insure that all of the crown shaping instructions will work.
All the best,
Gianna
I had the same problem, with 148 stitches, because the wool I had was slightly thinner than yours. (Never been good at maths.) I’m not at the crown yet, but I do not plan to start over. I have four extra stitches, so on the first decrease round I will decrease 4 times only – in the right places of course – and then everything will be in order.
Hi Jessica,
Thanks for writing in! Yes, just one additional K1 so that the rib pattern is still consistent throughout the hat!
I hope this helps!
All the best,
Gianna
Hi, can you please explain this more? I have 144 stitches and am ready to shape the crown. Since I have 144 stitches I placed 6 markers by doing [p1,k1] 12 times. I don’t understand what you mean when you say one additional k1. Where do I add an addition k1? Thank you, I hope my question isn’t confusing!
Hi Rosy,
Thanks for reaching out! My previous comment about an additional k1 stitch was for another customer who had an incorrect stitch count and needed an additional stitch to make the rib pattern work. If you followed the pattern and cast on the correct amount of stitch you will be fine and don’t need an additional stitch.
All the best,
Gianna
My adult son has a pretty big head so i’m just making the Largest size offered but now i’m wondering if i should make the Adult Medium and wondering why there isn’t an in between option as there is a large number of stitch difference. Thanks.
Hi Susan,
Thanks for reaching out! It’s hard to say which size would be exactly right without knowing your son’s exact head circumference, but fortunately, 1×1 ribbing is quite stretchy so the fit of the hat is very forgiving! Due to the way the decreases of the hat are worked, you must cast on a multiple of 12 stitches, so the difference between each size can’t be less than 12 stitches, but at this gauge, that only makes a difference of a little more than an inch.
I hope that clears things up!
Julianna
Hello,
Love how the hat has turned out so far. I am at the crown and working with the magic loop and a bit confused…I have placed the 6 markers to include the special start of row marker but that only covers one side of my magic loop, 66 stitches. Do I repeat on the other side?
Hi Karena,
Thanks for reaching out! Your stitch markers should be evenly distributed through all the stitches, not just half, and for the largest size, there should be 22 stitches between the stitch markers. It sounds like you may have worked the set-up round by knitting [k1, p1] for 11 stitches, instead of repeating the bracketed stitches 11 times for a total of 22 stitches.
I hope that clears things up!
Julianna
I’d like to make this hat to match the scarf I’m knitting which has a K3,P1 pattern. With 120 stitches cast on (for adult medium), the main part of the hat should work out ok, I think?? Just not sure what to do when I get to the crown! Can the directions be adjusted?
Thanks!
Hi Lorna,
Thanks for reaching out! As long as you continue your stitch pattern between the markers while working the decreases, this pattern will actually work out wonderfully in a 3×1 rib – what a clever idea!
Happy knitting, and please do let us know it turns out!
Julianna
Thank you for this pattern. I just finished my hat in the largest size and I am very happy with it. My head is 23″ (59 cm) and I used Tosh DK (a smidge lighter than the suggested yarn at 225 yds/100g) on size 3 needles. My gauge came out to only 3 1/2″ per 32 sts, which I am happy about because otherwise the hat would have been too large.
I pulled the yarn through when 12 stitches remained for a less pointy crown.
Next up, an adult medium for my 11 year old.
Hi! I love this pattern & have already made 3 hats. My son would like one in red, but the cashmere merino bloom doesn’t have a bright red. Is there another yarn I can use & still get the same results? Thanks!!
Hi Janet,
Thanks for reaching out! I would suggest using Brooklyn Tweed Arbor as a substitute. It is the correct weight for this pattern and comes in several shades of red that might be suitable! Since it doesn’t have as much yardage as Cashmere Merino Bloom, you will need 1 (1, 2, 2, 2) skeins for each size.
Happy knitting!
Julianna
Hi,
I have 8ply wool but would love to knit a small adult ribbed hat. What adjustments to the pattern would I need to do?
Love all your yarns/patterns.
Hi Gaylene,
Thanks for reaching out! This pattern is written for a DK or 8-ply yarn, so I don’t think you will have to make any adjustments! It would still be a good idea to knit a gauge swatch, but 1×1 ribbing is very stretchy and forgiving. I imagine the hat will turn out wonderfully!
Best,
Julianna
Hi,
I’m a new knitter. My question is why do you use size 3 needles for this pattern if it’s written for a DK weight yarn? The yarn I plan to use recommends size 6 needle. Which size hat from this pattern should I follow. (ultimately I want an Adult Medium)
Thank you!
Hi Pam,
Thanks for reaching out! Because moving the yarn back and forth between knits and purls can create a bit of looseness, ribbing usually turns out much tidier and is more elastic when worked on a needle that is two to three sizes smaller than is recommended for the yarn. Even though we usually use a US 5 to 7 needle with Cashmere Merino Bloom, we found that this 1×1 rib looked the best on a US 3 needle! It is tricky to modify a pattern that relies on gauge to fit, so I would recommend knitting a gauge swatch in pattern on US 3 needles to see if you can match our gauge. You can then follow the instructions for the Adult Medium as written!
Best,
Julianna
could you recreate this with brooklyn tweed peerie yarn?
Hi Vanessa,
Thanks for reaching out! Unfortunately, Peerie is not the correct weight for this pattern, but Brooklyn Tweed Arbor is! It also comes in a wide range of colors and has a lovely bouncy quality that makes it wonderful for ribbed hats like this one!
Best,
Julianna
I also wondered if Brooklyn Tweed Peerie would work, if it was held double?
Hi Jane,
This sounds like a great idea for a substitution! I would definitely recommend a swatch to check gauge, and to see how you like the fabric using Peerie held double. This pattern is a great one for experimenting with!
Happy Knitting!
Cassandra
Thank you so much for your reply and for your suggestions!
Hi!
I’m knitting this beanie, the size I’m doing is the Adult Small. I’m a little bit confused what I should do with the crown. If I follow the instructions for Adult Small size beanie, what happens after I have repeated rounds 1-4 3 times and I should have 84 stitches remaining? Should I then follow the All Sizes instructions, Round 1, Round 2 etc.?
Love all your yarns and designs, hope to some day to travel to New York and visit your store. 🙂 Greetings from Finland!
Br,
Katja
Hi Katja,
Thank you so much for writing in! I’m happy to clarify this part of the pattern for you! For the Adult Small, you will only be repeating the first set of crown decreases twice to get to 84 stitches. Since this set of instructions doesn’t apply to the baby size, a dash is substituted in the number of times to repeat this section, but you should still take the dash into account when counting over to the instructions for the third size. After that, yes, you will move on to the instructions for All Sizes and work them as written! I hope that helps, and we very much hope you can visit us in person some day!
Best,
Julianna
Hello! Can you let me know if it’s possible to buy the cashmerino yarn in the UK? Thanks in advance. K
Hi Kerry,
Thanks for reaching out! Our yarns are only available from purlsoho.com, but we do ship to the UK! Plus, right now we are offering a special low international shipping rate of just $12! You can learn more about our international shipping rates and policies on our Shipping Page.
Happy knitting!
Julianna
Question from a beginner! When you join in the round do you decrease by a stitch? AKA when I start knitting should I have an odd number of stitches so that I’m knitting the knits and purling the purls?
Hi Lizzie,
You won’t decrease when you join the work. When working a 1×1 rib, you’ll want an even number of stitches. That way you’ll have a seamless rib all around.
I hope this helps!
Oscar
Should each round begin with a knit stitch? Or should I alternate which stitch starts first so that I knit the knits and purl the purls? Thanks!
Hi Sam,
Thanks for reaching out! Each round should begin with a knit stitch, if you alternate it would create a seed stitch and would change the hat completely!
All the best,
Gianna
After wasting 14 pages of color ink there was NO pattern included ! Why do you say FREE pattern when it does NOT exist . This is SO annoying.
Hi Brenda
I’m so sorry that our pattern didn’t print out correctly. Let me see if I can help you with this. If you click on the print link on the right side of the page, below the picture banner, you’ll get a pop-up window. If you put 0% next to the picture icon on the top right, you will be able to print out a more printer-friendly copy of the pattern.
I hope this helps!
Best,
Oscar
Hi everyone,
I’d like to knit this hat for my daughter, but she’s chosen a skein from my Linen Quill stash. Can I make this work … somehow?
Thanks, Gigi.
ps … I’ve made the terrace wrap in cattail silk 4 times … I’m obsessed!! Love it!!
Hi Gigi,
Thanks for writing in and for your kind words! I am so happy to hear that you love the Terrace Wrap! I think it is definitely doable to knit this hat with Linen Quill! Since it is a fingering weight and the Cashmere Merino Bloom that we used for this pattern is a DK I would recommend doubling the Linen Quill up. I would also work up a gauge swatch with the yarn doubled and see how it compares to the pattern working on the size 3 we use to see if you need to make any little adjustments to the gauge!
Please let us know how this works out!
Gianna
Hi!
I’m a novice knitter, and wondering if it’s possible to knit the whole hat on double pointed needles rather than circular? Any advice for how to do so? Thanks!
Hi Eliza,
Thanks for writing in! You could certainly work the whole hat on double pointed needles but it may be a little tricky keeping all of the stitches on the needles from slipping off. I would recommend buying the US 3 8″ double pointed needles rather than the 6″ to add a little bit more room while you are working the body of the hat!
I hope this helps!
Gianna
Hello! I am learning to knit and don’t understand what these instructions mean for the crown?
“*[p1, k1] 7 (8, 9, 10, 11) times, pm (place marker)”
does this mean that you [p1,k1] 7 times, place a stitch marker, then do it 8 times and place a stitch marker, and then 9 and so on? if so that only leaves 5 markers?
or do you do [p1,k1] 7 times each time and place a marker?
Just wanting to clarify how to read that instruction
Hi Sam,
Thanks for reaching out! The numbers within the parentheses indicate the number of times you should repeat depending on what size you are knitting! The sizes are for Baby (Kid, Adult Small, Adult Medium, Adult Large) so if you are knitting the Baby size then you would p1, k1 7 times and then place maker repeating that until you reach the end of the round. If you are knitting Adult Small then you would be p1, k1 9 times and then place marker and repeat that until you reach the end of the round!
I hope this clarifies things for you! Happy knitting!
All the best,
Gianna
Updating question, so I realized everything in the parenthesis is for the different sizes. If I am learning how to knit on the baby size, I still don’t know how it will lead to 6 even stitch markers instead of 12 markers (84 divided by 7 is 12… so why wouldn’t there be 12 stitch markers??) Thanks
Hi Samantha,
Thanks for reaching out again! I realized I just responded to your last question before seeing this one. It looks like your calculation is counting the repeats but not the actual stitches within the repeat. So you are actually repeating the k1, p1 seven time (14 stitches total) so if you divide 84 by 14 then you should get 6!
I hope this helps!
Gianna
Hi there, I made an x- large using 144 stitches as you recommended, however on the set up round I kept to your original instructions of k1, then shifted my marker over. When I did k2 – as recommended in your comments, my rib pattern shifted over! I did do * [p1, k1] 12 times to accommodate for the additional stitches. Otherwise a lovely pattern that will fit my father in law’s 24.25 inch head.
When do I switch to double pointed needles? I just finished knitting the body so its time for those decrease rows.
Hi Emily,
Thanks for reaching out! You can switch to DPNs whenever you feel it is necessary after starting the decrease rounds! When making this pattern I usually work 2 or 3 rounds of the decrease rows and then switch to the DPNs when it starts to get a little tight on the circular needles!
I hope this helps, happy knitting!
Gianna
Hi!
I am trying to make this for my husband, and I wanted to clarify joining in the round.
I cast 132 and then knitted together. But there was a big gap and didn’t get better in row 2, so I removed the stitches and started over.
Should I cast on 133 for the joining where you drop a stitch? Or stick with 132?
Is there a joining in the round “method” you would recommend?
Thank you!
Hi Kimberly,
Thanks for reaching out! Once you cast on the stitches you will join the work in the round before knitting the first row, I like to transfer the first stitch that I cast on to the left needle, next to the last stitch I cast on, placing the maker and then knitting that stitch first to join in the round! You don’t want to cast on an additional stitch as you need an even number to work the rib pattern and shaping for the crown accurately!
I hope this helps, happy knitting!
Gianna
Hello! I made this hat in Autumn Oak in Adult Medium and absolutely LOVE it.
I want to make the other colors shown in the pattern, but it doesn’t look like Bright Flamingo or Pink Apricot colors are available in Cashmere Merino Bloom. Will you be restocking those colors in this yarn?
Alternatively, I did find these two colors in the Line Weight yarn, but can not tell if it would be the right size for this pattern. Could Line Weight yarn be substituted?
Thank you!
Hi Rosie,
Thanks for reaching out! I am so glad to hear that you love this hat (it is one of my favorite hat patterns!) Unfortunately, both Bright Flamingo and Pink Apricot have been discontinued so we will not be restocking them. Line Weight is a fingering weight yarn and Cashmere Merino Bloom is a DK/light worsted weight so Line Weight on its own would be too thin for this pattern but you could hold the Line Weight double (knitting with two strands) which would achieve a similar gauge! I recommend working a gauge swatch to insure its similar to the pattern prior to beginning in the event you need to make any adjustment! I would also like to share another pattern of ours, the Boyfriend Hat is another excellent hat that uses 2 strands of Line Weight as well!
I hope this helps and please feel free to reach out with any more questions!
All the best,
Gianna
Thank you Gianna! What about the Linen Quill Worsted or Season Alpaca, would either of those yarns work with this pattern?
My hesitation to double up Line Weight yarn for this pattern is just that it was so hard for me to make with a single strand, I’d be worried that two strands would really be difficult. It’s a great but detailed pattern for a beginner! TY!
Hi Rosie,
Thanks for reaching out again! I know doubling up sounds intimidating but it is actually a very easy technique, but I totally understand your hesitation! I think Season Alpaca would be the best option to substitute for this pattern, since Linen Quill Worsted is a but chunky to work on a US 3 needle. I do recommend working a gauge swatch to insure you are in line with the pattern before beginning and you can make any adjustments from there!
Please feel free to reach out with any more questions you may have!
All the best,
Gianna
Hi there! I knit this flat in the K1P1 pattern. I noticed you commented on someone else’s question saying that if you want to knit it flat you have to do P1K1….. do I need to start over? Or is there a way to work the crown knitting flat instead of in the round?
Hi Alysia,
Thanks for reaching out! K1 P1 or P1 K1 doesn’t matter so much since they are virtually the same except one you start with a purl stitch and one you start with a knit stitch so you definitely don’t need to start over and that should not have an effect on the overall outcome of the hat! Just be sure that whichever stitch you end the row with is the opposite of what you start with so that when you seam the hat it will be consistent with the 1×1 rib pattern.
I hope this helps!
Gianna
Hello!
I just got to the crown part of the large adult size hat (132st) hat and I’m wondering if this pattern calls for 6 double pointed needles? Right now I have 23 stitches (from k1 and repeating [p1k1] 11 times) on my first double pointed needle and then I have 22 stitches on the other 4 double pointed needles but I still have 21st left on my circular needle.
Hi Schy,
Thanks for reaching out! I would recommend working the first few round of decreases on the circular needles till it starts getting tight across the circulars and then evenly transferring your stitches onto 4 DPNs so that they are not overwhelmed with stitches since you only want to be using 4.
I hope this helps!
All the best,
Gianna
Hey there!! This is my 3rd hat in this pattern! I love it SO MUCH! However, each time i make the adult small, I get to the section where 84 stitches remain perfectly. Then when I finish the next section (1. P1, K1 to 2 sts before marker K2 Tog 6x. 2. P1, K1 to 3 sts before marker, P1 K2tog 6x) and repeat that 4 more times for a total of 5x) I end up with 36 stitches rather than 24 as the pattern indicates. The first 2 hats I chalked up to just losing my place…but I did the crown this time with total focus and wrote down each row! What am I doing wrong?? It doesnt seem like anyone else is having this problem!
Should I just keep doing the repeat rows until I get to 24 sts? Or just move ahead to the P1, K1, K2tog etc??
I bought a bunch of merino bloom to make these for gifts, so want to figure this out!
Hi Sarah,
Thanks for reaching out and for your kind words! I am so glad to hear that you are enjoying this pattern! Hmm, I am not sure entirely what might be happening. If you have 84 stitches going into the next decrease section then working rows 1 and 2 and then working them 4 more times should be a total of 60 stitches decreased leaving you with the 24 stitches. My best guess is that somehow you are just missing a few of the decreases along the way. Writing out the steps and checking them off as you work is a great way to keep track, I would also recommend that after you complete a row to count every stitch to make sure you decreased a total of 6 stitches before moving onto the next row, I think it would be best to go back and try one more time rather than keep going. I wouldn’t recommend to keep going till you get to 24 stitches since that would result in a taller hat than you may want and if you continue on to the next step you will still have too many stitches at the end to bind off the top.
I would give it one more go but if you are still having issues please feel free to reach out to our email [email protected] and we may be able to troubleshoot further from there!
All the best,
Gianna
Hi there, I’m knitting this flat and am wondering how the crown reduction would work in flat ? Thanks for your pattern !
Hi Ella,
Thanks for reaching out! Unfortunately, since this pattern is written in the round we do not have written instructions for shaping the crown flat. It may take a bit of trial and error but it should be fairly easy to follow the pattern as written still working flat!
All the best,
Gianna
Hi!
This looks like a great and simple beanie, I’d like to make it with chunky yarn (recommended needle size 9-10), how many stitches would I need to start with for Adult Medium and Large?
I’m pretty new to knitting ♥
Hi Seraphinit,
Thanks for reaching out! This is a really fun and easy hat to knit! However if you are more of a beginner knitter and not planning on using a dk weight like we did in this pattern, it might be easier to work a pattern that is already written in the gauge you are planning on using! If you are up for a bit of a challenge you can adjust the gauge of this hat to work with the yarn you want to use. I would recommend working up a gauge swatch in the 1×1 stitch pattern using an appropriate size needled, you can calculate the cast on from there based on the stitches per inch you are getting in your swatch! Our tutorial All About Gauge is an excellent resource to use!
All the best,
Gianna
Loved how this little hat turned out! I ended up adding a pom pom on the top of it. Love it and will use this as my go-to hat making pattern. Thanks, y’all!
do you think it would be possible to line this hat somehow with silk or satin? if yes, how would you recommend doing that?
Hi Emily,
Thanks for reaching out! I haven’t heard of anyone lining this hat and we don’t line our patterns here, but I am sure it could be possible! I would recommend doing some research on lining knit hats and see if there are any tips or tricks out there!
All the best,
Gianna
Hi! I’m excited to start this hat soon. My head measures 22.5” at the brows and I am wondering if I should knit the adult medium or adult small. (I just knit the beginner’s cable hat and started in adult large, but it it was too long. I ended up unraveling and re-starting it in adult small. The result was just right.) It leaves me wondering if I should start this project as adult medium, even though my head circumference is a 1/2” wider than its stretch range.
Thank you,
Jenny
Hi Jenny,
Thanks for reaching out! I would recommend working the Adult Small size since this hat stretches quite a bit (even more than expected!) This is one of my favorite hat pattern and I have knit it several time, I have a 21.5″ circumference and always knit the adult small and it fits me very comfortably even a little on the bigger side so I think it would fit you very comfortably!
All the best,
Gianna
Hello! Love this pattern. I’ve made one hat with it and am about to start a second. I’m wondering if it’s possible to do this in 2×2 rib? If so, do I need to make any adjustments? Thanks!
Hi Chellie,
Thanks for reaching out! I am so glad to hear that you have enjoyed making this hat (it is one of my favorites too!) You could knit this is 2×2 rib but would need to adjust the decreases for the crown a bit, in that case I would follow our Watch Cap + Mitts pattern, it is a very similar gauge and will work perfectly with Cashmere Merino Bloom!
Happy knitting!
Gianna
I’ve done over half of the crown and have noticed that my k2tog decreases are somewhat uneven and bumpy. What should I do differently? Is it the plastic marker rings? Am I not pulling the stitch tightly each time? Any way to smooth it out now?
Hi Emily,
Thanks for reaching out! When working a k2tog, as your needle goes into the 2 stitches it is possible to over stretch them when knitting them together. This will cause a bigger stitch and sometimes even gaps. The best way to avoid this is to be extra carefully when knitting 2 together that the stitches are not being stretched and then follow up with a tight knit stitch!
Luckily this is something that you can fix a bit in the end when you block the hat! You will be able to even out and re-distribute the stitches for a clean look.
I hope this helps, happy knitting!
Gianna
I’m making my 3rd hat with that pattern this time using a camel/merino blend that is slightly finer. My gauge sample in US 3 is 10 stitches per inch unstretched. My head is 22.5”. I’m debating between adult medium (120 stitches) and large (132 stitches). Which would you suggest?
Hi Emily,
Thanks for reaching out! I would suggest knitting the Adult Medium! The adult large I believe would be too big and fit a bit loose. The Adult Medium Should fit very well (keep in mind that the 1×1 rib is very stretchy!) and would be a safe option since your gauge is a bit different!
I hope this helps and please let me know if you have any more questions!
Warmly,
Gianna
If I knitted this with a line weight yarn (held double) should I follow the pattern for a larger size than I really want? For example- the cast-on for an adult large in this pattern is 132 stitches with a DK weight but casting on for a medium with line held double in the boyfriend hat is like 160 stitches… so if I want a medium to large hat here should I cast on 144 maybe? I like the top of this hat and the decreases better than the boyfriend hat, but I have some line weight I want to use.
Hi Caroline,
Thanks for reaching out! I would recommend working a gauge swatch and comparing it to the gauge of the pattern, you can see if you will need to adjust the cast on from there!
All the best,
Gianna
Hi! I am working on this pattern in an adult small. I just finished the first round of shaping the crown (Round 1: [*P1, k1, repeat from * to 2 stitches before next marker, k2tog] 6 times. [6 stitches decreased])
But after I did k2tog six times the pattern says to continue p1,k1 until one stitch before the next marker- my next stitch looks like it should be knit, not purled. Do I start with p1,k1 regardless of what my knitting looks like, or should I knit the knits and purl the purls?
Hi Olivia,
Thanks for reaching out! That is correct, if you worked the decrease round correctly you should end with a knit stitch before the next marker. So that is why we say for round 2: P1, k1, repeat from * to 1 stitch before next marker, k1, so that last stitch before the next maker should be a knit stitch for this round!
I hope this clarifies things, happy knitting!
Gianna
Hi!
I’m working on an adult medium and I’ve gotten to the crown with 2 extra stitches. Is there a way I can get back on track? I’m very new to knitting and have never made a hat before!
Thanks!
Hi Sally,
Thanks for reaching out! You can work 2 decreases to get to the correct number of stitches, I would do one on either side of the hat so that they are evenly spaced, they will be slightly noticeable but it will help insure you have the correct amount going into the crown shaping and is easier than starting over with the right stitch count!
I hope this helps and please feel free to reach out with any more questions you may have!
Warmly,
Gianna
Hi!
I hope my question makes sense…
Is there any reason why I can’t simply decrease the Adult Small like where it says “All Sizes”? I understand I have more stitches, but would it be detrimental to the shape of the crown?
I am using a bulky yarn and guaged Adult Small to fit the way the Adult Medium would using size 4 needles.
I don’t plan on folding it because the yarn is bulkier.
I was running out of yarn and began decreasing every row like the Baby size, but I ran out anyway. Before I continue with a new skein I just wanted to be sure decreasing more rapidly wouldn’t ruin the hat?
Thank you so much!!
I love this pattern.
Hi Toni,
Thanks for reaching out! The decreases are written in the two section to insure that for the larger sizes there is adequate space and height at the crown rather than a rapid decrease like we did for the baby size!
I hope this makes sense!
Warmly,
Gianna
I’m wondering if it would work to knit this using a twisted rib stitch – my ribbing looks so much neater with twisted rib! Would that switch work do you think?
Hi Dori,
Thanks for reaching out! I don’t see why a twisted rib stitch wouldn’t work for this pattern!
Please let us know how this turns out and if you run into any more questions!
Warmly,
Gianna
I am also interested in knitting this hat in twisted rib. I’m assuming that the decreases would be k2tog tbl (through the back loop) correct. ?
Hi Amy,
Thanks for reaching out! If you are planning on knitting this in twisted rib, we actually have a pattern written for this yarn in a twisted rib! You can find the pattern here: Twisted Rib Hat + Mittens In Cashmere Merino Bloom
This pattern is worked in 2 colors, but you can easily work it in a solid color instead, and you can extend the body section a bit to add in a cuff, but this will be easier to follow for twisted rib, especially the crown shaping/decreasing section!
I hope this helps, happy knitting!
Gianna
Love this pattern!! I am a complete beginner. This was my second project ever, and I found it really easy to follow and very fulfilling to make! I made the adult medium, and I love how the hat turned out. I plan to make more!
Hi Julia,
Thanks for reaching out and for your kind words! I am so glad to hear that you enjoyed this pattern (it is one of my favorites as well!) and love you final hat!
Warmly,
Gianna
Do you have a video that shows this pattern? It’s much easier to follow the stitches
Thanks
Hi Madhuri,
Thanks for reaching out! We do not have a video tutorial for this pattern, only the written instructions! This is a very basic 1×1 rib pattern and we do offer tutorials for how to work the Knit Two Together (k2tog) decrease.
I hope this helps!
Warmly,
Gianna
Hi,
I want my hat to be 21-24”, so I thought I should do the Adult Large, but I’m confused about the # of stitches to cast on. My gauge came out to be 32 stitches = 4”, so if I cast on 132 stitches as it says in the pattern, wouldn’t I only end up with a 16.5” hat?
Thank you!
Hi Molly,
Thanks for reaching out! The hats Finished Circumference (unstretched) comes out to be 10½ (12, 13½, 15, 16½) inches. Since this is a 1×1 rib patter the hat will comfortably stretch to approximately 13 – 15 (15 – 17, 17 – 19, 19 – 22, 21 – 24) inches. If you made the circumference bigger the hat bigger than 16.5″ unstretched it would far too big to stay on your head since the rib is so stretchy!
For example, I have a 21″ head so I have made the Adult Small size (13.5″ unstretched and 17-19″ stretched) for myself several times! The hat fits very comfortably and is not too tight or too loose! So I definitely recommend considering the ribbing in mind when selecting your size since it will stretch an additional 3-5 inches!
I hope this clears things up and please let me know if you have any more questions!
Warmly,
Gianna
Hello, I have made it all the way to the crown. However now am lost.
I am probably a beginner but have knitted hats before. From the UK.
I just don’t understand what this instruction means or really how to start the crown.
For example, I don’t understand what the * refers too or how the stitches decrease?
It states 2 stitches before the marker but does that stitch get dropped?
I have spent ages getting the main body of the hat ready so would appreciate any help.
This is the piece that I am referring too:
Round 1: [*P1, k1, repeat from * to 2 stitches before next marker, k2tog] 6 times. [6 stitches decreased]
Etc.
Thank you,
Rebecca
Hi Rebecca,
Thanks for reaching out! The * just indicates the part of the pattern you will be repeating. So you should have worked the set up round, evenly placing your stitch markers throughout. You will then P1, k1 till you reach 2 stitches before the marker, you will then knit these two stitches together (k2tog) and continue on with the rest of the round, repeating the P1, k1, to 2 stitches before next marker, k2tog. There should be 1 stitch decreased next to every stitch marker, 6 stitches decreased total!
I hope this clears things up!
Warmly,
Gianna
Hi Gianna,
I would like to make the baby sized beanie for a 3 month old. Will I need to reduce the baby size at all? Also I am thinking of making this with 2 colours so the foldup would be in a different colour – how many rows would you recommend for doing this please? I want it to look good both folded up or not – any tips for doing this? Thanks
Hi Cynthia,
Thanks for reaching out! I think you should be fine working the baby size as written! I would recommend starting off with your 1st color, casting on and then working 2-2.5″ depending on how big of a cuff you want, and once you reach your end of round marker you can start the new row off with your second color! Since the hat is a 1×1 rib, bringing in another color will be a super clean transition that would look good both folded and unfolded!
I hope this helps and please let me know if you have any more questions!
Warmly,
Gianna
Hi. I’d like to make this hat for a 7 month old baby. His grandmother measured his head above the eyebrows as 18” and from earlobe (bottom) to earlobe over the head as 17”. Can you recommend what size and length I should make? Thanks!
Hi Pat,
Thanks for reaching out! Based on those measurements, I would recommend making the Kid Size hat! Since he is a baby I would suggest knitting the body to 6¼ or 6½” instead of 7″ before moving into the crow shaping, but then following the crown shaping for the Kid size.
I hope this helps and please let me know if you have any more questions!
Warmly,
Gianna
You are a great help for us! Thanks- we appreciate you.
I want to make a 1)beanie cap and 2)headband. My head circumference with ears covered is 22 inches. I like the purl twist stitch. How many stitches do I cast for the two projects to knit on straight needles.
Thanks.
Anita again, forgot to mention, I m using 100% cashmere, 1.75oz, 50gm weight.
How many stitches on straight needles. Thank you 🙏
Hi Anita,
Thanks for reaching out! I would love to help you figure this out, the first thing you need to do is work a gauge swatch with the yarn and needles you plan on using! Once you finish your swatch (I recommend making a 6×6″ swatch) you can measure how many stitches per inch you have. If you plan on using a 1×1 rib stitch like this pattern then I would compare your gauge to the gauge of the pattern in order to select your size (for a 22″ head circumference I would recommend making the Adult Small or Adult Medium depending on the fit you are going for.) I also recommend checking out our tutorial All About Gauge, it is an excellent resource to use and will walk you through the process in more depth!
I hope this helps and please let me know if you have any more questions!
Warmly,
Gianna
yarn is in short supply!
can I use Posy yarn for this, and if so what needle size would you recommend?
Hi May,
Thanks for reaching out! Posy is a bit too fine for this pattern and would change the overall gauge quite a bit since it is a fingering weight yarn and this pattern is written for a light worsted/dk weight! However, we do have every color of Cashmere Merino Bloom in stock (and it is actually on sale today only!!) If you aren’t interested in that yarn then I would suggest using Flax Down or Understory!
Warmly,
Gianna
Do you happen to have a video of this pattern? I have never worked in the round like this for a hat and I am a bit confused by the end of the pattern.
Thanks
Hi Erin,
Thanks for reaching out! We do not have a video for this hat in particular but we do have a few videos of the specific techniques used in the pattern! I am happy to help you figure this out, what section of the pattern are you confused by?
Warmly,
Gianna
Thank you for sharing this pattern. Can I ask: what cast-on was used in the hats in the photos? Just a regular long-tail cast on?
Hi Chris,
Thanks for reaching out! Yes that is correct, we used a basic Long Tail Cast On for this hat!
Warmly,
Gianna
Hello,
Merino Bloom is sold out of the Ballet Pink color. Can you suggest another yarn with a similar color that would work well for this pattern?
Thank you.
Alternately, would you tell me when Bloom may be restocked?
Thanks again.
Hi Maria,
Thanks for reaching out! We should be getting Cashmere Merino Bloom back in stock very soon! I would estimate within the next few weeks! The best way to be notified is to add your email on the Cashmere Merino Bloom product page under Ballet Pink and we will send you a message as soon as it is available again! Alternatively, I would recommend Flax Down! It is the same dk/light worsted weight as CMB and also comes in Ballet Pink!
Warmly,
Gianna
I bought US size 3 ….16 inch circular needles. I am making the adult small. The 16 inch length looks too small. Just want to check that it will work before I start my knitting. I bought the needles from you and the US 3 double pointed as well.
Thanks,
Andrea
Hi Andrea,
Thanks for reaching out! The US 3 16″ needles will work perfectly! Don’t worry if they look a bit small, but all of the stitches will fit comfortably!
Warmly,
Gianna
Hi– I have one skein of mulberry merino. Can I use that to make this hat? Will it be enough to make the adult large? And what size needles should I use?
Thanks,
Liz
Hi Liz,
Thanks for reaching out! You could certainly use Mulberry Merino for this hat! It is a bit thinner than Cashmere Merino Bloom so I would recommend working a gauge swatch first, but you may want to use a US 2 needles instead of a US 3!
For the Adult Large we use approximately 264 yards (and recommend 2 skeins of Cashmere Merino Bloom for this size) so unfortunately one skein of Mulberry Merino would not be quite enough as the skein is only 247 yards. I would suggest 2 skeins to insure you have enough to finish that size!
I hope this helps and please let me know if you have any questions!
Warmly,
Gianna
Hello,
I made this hat for myself and it ended up stretching out quite a bit after several wears. Is this typical? My sister wants the same hat, and I am thinking of sizing down, considering how much mine stretched.
Hi Johanna,
Thanks for reaching out! It is possible for this hats to stretch a bit with wear! I actually recommend sizing down a bit, especially since the rib stitch is so stretchy! For example, my head is 21.5″ and for myself I always make the Adult Small (13½” circumference, stretching 17 – 19″) it fits me perfectly and I haven’t had any problems with the hat overly stretching out! For your hat I would recommend re-blocking it, that will help tremendously to re-shape!
I hope this helps and please let me know if you have any more questions!
Warmly,
Gianna
Hi! I’ve been enjoying making this beanie and I am just starting on the crown diminutions. I have a question as just before I get to the first marker it says I should knit 2 together, however the way my knit is looking it falls to purl 2 together so that my pattern doesnt get disrupted starting on the next marker. Did I go wrong somewhere? Thanks for your help 🙂
Hi Alicia,
Thanks for reaching out! Since this pattern is a 1×1 rib pattern, when you are working the decreases it is normal that you will end up with a k1 and then k2tog right next to each other! No need to worry, this wont disrupt the pattern, and it will actually create that beautiful spiral pattern at the top!
So for row 1 you will P1, k1 till two stitches before the marker (ending with a k1) then you will k2tog! Then for row 2 you P1, k1, repeat to 1 stitch before next marker, k1. So for this row you will also have 2 knits together!
Keep in mind when working the decreases you will only be using k2tog, there wont be any point in the pattern where you will be using a p2tog.
I hope this clears things up, please let me know if you have any other questions!
Warmly,
Gianna
Hi – I am allergic to wool and would like to know if you can suggest another yarn that can be substituted and still fit and wear as well as your yarn. Thank you – can’t wait to try making this.
Hi Debbie,
Thanks for reaching out! I would recommend using our yarn Understory (50% baby alpaca, 25% undyed baby yak, 25% silk), Simply Yak (100% Yak), or Morning (75% organically grown cotton and 25% yak) for this hat! Understory is probably the best option to use for this pattern, it will be the most consistent! Then Simply Yak will be a similar consistency and softness to the cashmere and Morning will be a bit stiffer and hold its shape pretty well! I would also recommend working a gauge swatch prior to beginning to ensure you are consistent with the pattern!
I hope this helps, happy knitting!
Gianna
Hello. The pattern calls for size 3 needles but the yarn calls for size 7. How does this work?
Hi Carol,
Thanks for reaching out. We designed this pattern to be knit with a tighter gauge, creating a denser fabric, perfect for keeping you warm on cold days! While we recommend using size 3 needles (since that’s what the designer used), you should use whichever size allows you to achieve the correct gauge (32 stitches and 33 rows = 4 inches in 1×1 rib unstretched). I’d recommend starting by knitting a gauge swatch with size 3s, but you may need to size up or down depending on your natural tension with the yarn. Hope this helps clarify things!
All the best,
Lili
Hi there. Apologies if you’ve already clarified this problem for someone else but I lost my unique stitch marker place whilst completing the first step. So I am confused about the ‘k1’ and replacing the stitch marker step in terms of keeping the rib going. I have an approximate place based on my slip knot and had thought as my first stitch was a knit I will then ‘k1’ a purl stitch, replace marker and continue to purl a knit and knit a purl and thereby throw off the rib pattern. Is this correct and it will fix itself or should my marker be at purl stitch with the intention of knitting 1 knit stitch and replacing the marker from there.
I hope this makes sense !
Thank you.
Hi Lauren,
Thanks for reaching out! Basically, when you k1 and then move the marker it should not change the rib pattern at all, it just sets you up for the crown shaping!
For the body of the hat you k1, p1 to the end of the round and have the unique marker to indicate the end/beginning for you. Luckily this is easy to keep track of through the body section. If you misplace your marker, you can always use the yarn tail from your cast on to trace up and find the beginning of the round which will be a knit stitch.
When it comes time to begin the crown you will remove the unique end-of-round marker and k1. You should be knitting a knit stitch here, not a purl stitch. If you are knitting a purl stitch that means you are not in the correct spot and either need to go back a stitch or forward a stitch to re-orient the correct beginning of round (again, here you can use your yarn tail to help you find the correct beginning of round knit stitch!) Once you have this correct and knit the knit stitch, you will replace the marker for the new end-of-round and p1. When you do this you will then no longer be k1, p1, but instead, you will switch and p1, k1 to maintain the same rib pattern!
I hope this clears things up, please let me know if you have any more questions!
Gianna
Thank you ! That all makes sense and I managed to figure it out!
Love the hat pattern. Can I use PS’s Flax Down yarn as a substitute? Thank you!
Hi Judy,
Thanks for reaching out! Flax Down would be a great option for this hat! It is the same weight as Cashmere Merino Bloom so you should be good to go, however, I do recommend working a gauge swatch prior to beginning to ensure you are consistent with the pattern!
Please let us know how this turns out, happy knitting!
Gianna
What cast on method do you recommend? Thanks!
Hi Anna,
Thanks for reaching out! I recommend a basic Long Tail Cast-On for this hat!
Happy knitting!
Gianna
I’m knitting this hat for my 3 year old son and opted for the kid size. So I cast on 96, but the hat will be WAY too small for him. He doesn’t have an unusually large sized head at 19inches in diameter. Where did I go wrong?
Hi Nichole,
Thanks for reaching out, although I’m sorry to hear that the hat you made turned out smaller than expected! Our Kid size for this pattern has a 12-inch circumference, comfortably stretching to only 15-17 inches. Since your son has a 19-inch head circumference, I’d actually recommend making the Adult Small size for the best fit.
I’m actually going to bring up the sizes offered in this pattern with our design team though! We’ll look into providing the most accurate sizing for this pattern. Thank you again for bringing this to our attention!
All the best,
Lili
Can you advise what the UK equivalent wool would be for this hat?
Hi Eve,
Thanks for reaching out! For this hat, we used a light worsted/dk weight yarn, or a size 3 yarn, with a recommended needle size of 3.75 – 4.5 mm!
I hope this helps and please let me know if you have any more questions!
Gianna
Hi,
I just finished making an the adult medium and I would now like to make one for a baby. Would the baby hat fit a newborn?
Thanks
Hi Rosie,
Thanks for reaching out! The baby size is pretty tiny (10.5″ unstretched, comfortably stretching to approximately 13″ – 15″), so it should fit a newborn depending on the circumference of the newborn’s head!
Warmly,
Gianna
Hi!
I was wondering what size is the hat you are wearing on the picture?
Thank you!
Hi Alex,
Thanks for reaching out! The model is wearing the size Adult Medium!
Warmly,
Gianna
Hi,
I love the idea of using small needles to make a warm beanie. What size do you suggest for an average 8 year old please?
Hi Susan,
Thanks for writing in! The circumference of an average 8-year-old’s head seems to be fairly similar to an adult’s head, so I’d recommend going with the Adult Medium size, which fits heads between 19″ and 22″ around. Hope this helps!
All the best,
Lili
This is the 3rd hat pattern that i try, and this one was great.
The Crown shaping is really nice, and tidy.
Will use it in future projects.
Thanks a lot!!!
Hi Purl,
I read all the comments for the Classic Ribbed Hat and noticed that many people were as confused as I was when it came to shaping the crown. I’m wondering if you would consider making a tutorial for it, or charging something to reword the instructions? Or, my other idea is to ask if I make it without the ribs, using stockinette only, can I use the same yarn?
Thanks so much for your time!
Hi Dale,
Thanks for reaching out! What part of the crown shaping are you finding confusing, I am happy to help explain! But thank you for expressing your interest in a tutorial, I will certainly pass this along.
As for working this hat in stockinette instead, you could and you could use the same yarn, but it would require quite a few alterations to the pattern since the gauge would be much different.
Looking forward to your response!
Gianna
Hi Gianna,
Thanks for getting back! I think I had trouble following the instructions when it came to shaping the crown, maybe because I’m barely more than a beginner knitter and the wordage didn’t seem to explain the process clearly enough…for me. So I decided to just knit the crown without the ribs. It worked out, but looks funny, like a skullcap, when worn. 🙁 I want to try it again and do it right, but was hoping someone would clarify, the crown instructions part. But perhaps this is just going to be up to me, to try to figure it out again.
Hi Dale,
Thanks for your response! I am happy to explain the CROWN section in more detail, at first glance, it can look a bit complicated but it is actually very simple and pretty standard for a ribbed hat pattern.
First off, you will start with the set-up round. for this you will remove the unique end-of-round marker that was placed in the beginning, you will then k1 and replace that marker for new end-of-round. Then you will start the repeat, *[p1, k1] 7 (8, 9, 10, 11) times, place marker (keep in mind that you repeat the p1, k1 7 (8, 9, 10, 11) times so there should be 14 (16, 18, 20, 22) stitches between each marker.) You will then repeat from * till you reach the end of the round, omitting the final stitch marker which is the end-of-round marker. At this point, you should have 6 stitch markers placed, including the unique end-of-round marker.
Next, if you are working the KID, ADULT SMALL, ADULT MEDIUM, ADULT LARGE SIZES ONLY, you will start with round 1, and you will *P1, k1, and repeat from * till you reach 2 stitches before the next marker, you will k2tog (knit 2 together). you will repeat this 6 times, at every marker. [6 stitches decreased]
For round 2 you will repeat the *P1, k1, repeat from * to 1 stitch before next marker, k1] 6 times total.
For round 3 you will again *P1, k1, and repeat that from * till you reached 3 stitches before the next marker, you will then p1, and k2tog] 6 times. [6 more stitches decreased] Lastly, for Round 4 you will simply *P1, k1, repeat from * to end of round. From there and depending on what size you are making you will repeat Rounds 1-4 – (0, 1, 2, 3) more time(s) till you have only 84 stitches remaining.
Next, you will move to the ALL SIZES section to finish off the crown, with round 1 you will *P1, k1, repeat from * to 2 stitches before the next marker, then k2tog, 6 times. [6 stitches decreased] then for Round 2 you will *P1, k1, repeat from * to 3 stitches before next marker, p1, k2tog 6 times. [6 more stitches decreased] From there you will repeat Rounds 1 and 2 four more times till you have 24 stitches remaining.
From there you are down to the final few rows, you will work the next round *P1, k1, k2tog, repeat from * to end of round. [18 stitches remain] then *P1, k2tog, repeat from * to end of round. [12 stitches remain] Once you get to the 12 remaining stitches you will simply *K2tog, repeat from * to end of round. [6 stitches remain]
Once you have 6 stitches left you will then cut the yarn and thread tail onto a tapestry needle, then you will thread the tail through each remaining stitch, securing them. Then pull tight and bring the tail to the inside of the hat to weave in the end.
I hope this clears things up!
Gianna
Gianna, that was so patient and generous of you to do! Many thanks!
On my hat, I did get the 6 stitch markers placed correctly, on my second try, after reading other people’s comments. But you’ve made the instructions more clear altogether and I’m grateful. I have two more skeins of cashmere merino for two more hats and will get going, with more ease, thanks to you❤️.
Hi Dale,
I am so happy I could help! Please feel free to reach out at any point with any more questions you may have!
Warmly,
Gianna
Thank you so much Gianna!
🌷💞❣️🌻
i am missing a stitch. Have 83 instead of 84 stitches. what should I do?
Hi Karen,
Thanks for writing in! That is a great question, do you know if you dropped a stitch or if you only cast on 83 instead of 84?
Looking forward to hearing your response!
Gianna
Thank you so much for this! I was confused as well with the crown set up 🙃 this is perfect thank you
Hello PS
Am I right to assume I could also use Anzula Cricket to make the Classic Ribbed Hat? Cricket has slightly more yardage than Cashmere Merino Bloom and I’m wondering if one skein would be just enough for the large size?
Thank you for your advice.
Hi Miriam,
Thanks for writing in. You could certainly use Anzula’s Cricket for this hat! The large size requires at least 264 yards, and 1 skein of Cricket is only 250, so I would still recommend buying 2. However, we always overestimate on yardage, so you could very well only need 1 skein! I would still suggest buying two, and then if you don’t end up using the second one, just returning it to us in exchange for store credit. Hope this advice helps!
All the best,
Lili
Thank you Lili!
I followed the Adult large instructions for a 23″ head, but it has been knitting up as quite a bit smaller than the suggested size.. pattern reads that unstretched at large should be 16.5″ but mine is 14.5″… used same needles etc. How could it be this off?? Do you have a suggestion for cast on # stitches to make a hat true to 23″ size head?
Hi Em,
Thanks for reaching out about this. It seems that your gauge is off, which means that you’ll need to use different needles! Since you’re finding that the hat is coming out small, then I’d recommend redoing the hat with larger needles. I’d highly recommend checking out our handy tutorial called All About Gauge, which has a ton of helpful information about this!
All the best,
Lili
Do you know if Frond Green is coming back in Cashmere Merino Bloom?
Thanks!
Hi Andrea,
Thanks for reaching out! Unfortunately, Frond Green has been discontinued. For our full selection of available colors please check out our Cashmere Merino Bloom product page!
Warmly,
Gianna
What percentage of the yarn is used prior to the crown (in Adult Medium, if that matters)? I’ve got a lovely skein with slightly less yarn that I’d love to use, and figure I’ll just make the body a bit shorter.
Hi Carol,
Thanks for reaching out. The body of the hat takes up about 82% of the total yardage for this pattern in the adult medium size! Hope this helps.
All the best,
Lili
Thank you, Lili! Off to start a hat…
Hello
I am a beginner knitter and using the magic loop method- I am at the crown part and I have done the 1st round with 6 markers – 20 sitches between markers ( doing the adult med size) and somehow I have 2 stiches left at the end before the next marker for the next round- I kept going doing the next round knitting the last 2 together but still have 2 stiches extra before marker of next round???
Hi Sylvie,
Thanks for writing in! It sounds like you might have cast on an additional 2 stitches at the beginning since the number of stitches in between each marker is matching what the pattern lists, up until the last section where there’s 2 extra. One option you could try is that you could continue as is and just have 2 extra stitches for the rest of the crown shaping, meaning you would end up with 8 stitches to sew through and pull taut at the end rather than 6 stitches. This would not greatly affect the look of your hat and you would still be able to sew up the top. Another option is to un-knit your work back to the set-up round and before the extra 2 stitches and do a 2-stitch decrease. We don’t currently have a tutorial on decreases specifically for 1×1 rib, but if you search on Google, there are many options that come up! I would suggest searching something along the lines of ‘invisible decrease knitting ribbing’ or checking out how to do a Ribbed Double Decrease for starters. If you find a decrease technique that works for you, you can reduce your stitch count back to 20 between the markers for that section and continue in the pattern as is.
I hope this helps! Please feel free to reach out if you have any other questions!
All the best,
Cat
Hi, I used a tubular cast on and am worried my hat will be too tight! Does a tubular cast on stretch when blocked? I have only knit a few rows so I want to start over if it’s not going to stretch much when blocked. My head circ. is 22″. Thanks!
I only CO 84 stitches. My gauge is 20 st/4″ in stockinette.
Hi Evan,
Thanks for reaching out. I see from your other comment that you only cast on 84 stitches, which seems really small to me! Based on your measurement of 22″ for your head circumference, I’d recommend knitting the Adult Large size, for which you’d want to cast on 132 stitches. It’s likely that your cast-on is feeling tight mainly because you have so few stitches right now. Hope this helps!
All the best,
Lili
Hi there,
I am using Lang cashmere yarn – can I use a US 4 knitting needle?
Also if I want a little bit more slouch with the cuffed hat, how many inches would you suggest I knit for an Adult Medium?
Thanks so much for your help.
C
Hi Cara-Anne,
Thanks for writing in. I would recommend knitting up a gauge swatch in pattern in order to figure out what needle size to use! If this is daunting, I’d recommend checking out a tutorial called All About Gauge, which covers some incredibly helpful information.
In answer to your other question, I’d recommend adding about 2 or 3 more inches to give the hat more slouch while cuffed. Hope this helps!
All the best,
Lili
Is it okay if I used double sided needles as a substitute for the circular ones?
Hi Rae,
Thanks for reaching out. You can absolutely use DPNs instead of circular needles!
All the best,
Lili
Hello,
I have a question about selling hats I knit up in this particluar pattern. Some designers has requested not to and some do not mind. What are your restrictions on selling items made with your patterns across the board?
Hi KK,
Thank you for your interest in our pattern! While we’re happy you like our Classic Ribbed Hat, our patterns and designs are copyrighted and are for home use only. This means that you can’t use our patterns to make things for sale. We hope you understand!
All the best,
Lili
Hi, it’s my first time knitting a hat and I love this pattern. I made a swatch and ended up with 54 stitches for an adult medium because I’m using a bulkier yarn. What do you recommend for the crown? Should I just half the numbers from the baby instructions? Thank you!
Hi Sara,
Thanks for reaching out. To set up for the CROWN section, you’ll need to start by placing each of your six stitch markers 9 stitches apart! Then, all you’ll need to do is follow the pattern as written, except start on Round 3 instead of Round 1. I hope this helps!
All the best,
Lili
Thanks for replying, Lili!
Would the odd number of stitches mean I need to k2tog at a different spot? Also, did you mean round 3 where it says ‘Repeat Rounds 1 and 2 four more times. [24 stitches remain]’ or a different spot?
Thanks,
Sara
Hi Sara,
Nope, not at all! The odd number of stitches is actually why I recommended starting on Round 3! To explain more in depth, with every decrease round, the stitches between the markers change from even to odd to even to odd, etc. All the sizes in the original pattern begin with an even number, so they start from Round 1, which changes it to odd by the end. But since you’re starting with an odd number, then you’ll need to start on Round 3, which changes it to even by the end, so you can continue the repeat with Round 1 after you work Round 4.
The point I’m referring to is the subsection within the CROWN section labeled KID, ADULT SMALL, ADULT MEDIUM, ADULT LARGE SIZES ONLY!
All the best,
Lili
Thank you, Lili!
I made the large size, it came out just fine but when I wear it, it tends to slip up on my head and I’m constantly pulling it down. Is this because it’s to large, should I try a smaller size or just decrease some stitches. Thank you in advance
Hi Ronda,
Thanks for writing in. I believe that the slipping could be a result not of the circumference of the hat, but of the length! I would recommend knitting the body of the hat for a few more inches, so that you have enough fabric to pull further down on your head. I hope this helps!
All the best,
Lili
Hello, I would like to say thank you for the pattern, I made the hat for my daughter and she loves it!!
I have posted the pictures on my IG and added the link of this page to the website ❤️ Thank u again
Hey!
I’m knitting the adult large but I want to make it shorter (kind of like a fisherman’s cap), I’m wondering if anyone would be able to please measure from where the decreasing/crown pattern starts to the top of the hat? So I can use it to work out when to stop knitting the length on my hat. Thank you!
Hi Lizzy,
Thanks for writing in! The crown section of the hat measures approximately 4 inches!
I hope this helps!
Gianna
Hi! My stitches are uniform except the decreases look wonky and uneven. Any tips for fixing this? I’ve gone back twice and tried evening out the stitches with a darning needle. Nothing is working and I’m afraid blocking won’t fix it. My decreases in your 2×2 hat looked good, so I’m confused. Thanks!
Hi Julia,
Thanks for reaching out! I have actually made this hat several times, and the first few times I had the exact same issue! For me, it ended up being a problem with slightly overstretching the decreased stitches, making them more visible and uneven. Luckily blocking the finished hat helped even out and re-distribute the stitches! Alternatively, if you would like to go back and try out the crown shaping again, I would suggest being extra careful not to stretch the stitches when inserting your needle into them when decreasing.
I hope this helps, happy knitting!
Gianna
Thank you!
Hi: I’m having trouble understanding the Set-Up Round instructions. My stitch gauge is 24 sts x 20 rows =. 4”. I cast on 100 sts.I’m using a thicker yarn. I tried (p1k1) 10 times (20 stitches) and it doesn’t come out evenly. I guess I need some kind of evenly divided by 24 total sts ? Can you help me fudge this crown?
Thanks, Carol
HI:
I’m having trouble with the Set-Up Round. I’m using my own yarn, with a gauge of 24 sts. x 20 rows = 4 “. I cast on 100 stitches, so the p1k1 10 times doesn’t work. Can you help me fudge the crown?
Thank you.
Carol Carlson
Hi Carol,
Thank you for writing in! Just to double check, are you making the Adult Large size hat? I compared your gauge with the pattern gauge and calculated that your cast-on of 100 stitches is closest to the Adult Large. Let me know if you’re making a different size, though!
For the Set-Up Round and for the Adult Large size, right after replacing your marker for the new end of round, I’d suggest doing: *[p1, k1] (10) times, pm (place marker), repeat from *. The pattern originally states doing the [p1, k1] 11 times for every section in between the markers, but since 100 isn’t cleanly divisible by 22, doing it just 10 times would work better. This leaves you with 5 markers placed after the Set-Up Round with each section containing 20 stitches.
After that, I would proceed with the decrease and shaping instructions as written for the “KID, ADULT SMALL, ADULT MEDIUM, ADULT LARGE SIZES ONLY” section. Bear in mind though, you would be decreasing 5 stitches every decrease round and have 60 stitches left going into the “ALL SIZES” section. Once you get to ALL SIZES, I would suggest only doing Rounds 1 and 2 three times, leaving you with 30 stitches left. After that, you would just follow the the “Next Round” instructions as is and have 20, 10, and then 5 stitches remaining after each of those 3 rounds respectively. At that point, you can cut the yarn, close up the top of the hat, and finish weaving in!
The last thing I want to mention is that doing the crown shaping in this manner will result in a crown that is about 5 inches in height based on your current gauge. Since the ribbing portion for the Adult Large size before the shaping goes for 9.5 inches, you’d have a total hat height (un-cuffed) of around 14.5 inches, which is 2 inches more than the finished height listed in the pattern (12.5 inches). If you’d like to get closer to 12.5 for the height, I’d suggest going back and un-doing about 2 inches of ribbing before proceeding to the crown shaping.
I hope this helps! Let us know if you have any other questions.
All the best,
Cat
I actually cast on 90 stitches. I divided by 6 (15 sts.) and am doing it this way, but the purls and knits don’t work as in the original pattern.
Carol
Hi Carol,
Just saw this new comment from you! In that case, I’d still recommend splitting up the decreases into 5 sections so you would have 18 stitches per section. The ribbing requires an even number of stitches in between each marker to look cohesive so this way the rib pattern will work as in the original pattern. Then, I would proceed with the “KID, ADULT SMALL, ADULT MEDIUM, ADULT LARGE SIZES ONLY” as written, noting that you’d be decreasing 10 stitches with every 4 round repeat. After this section, you should have 50 stitches remaining. Then, for the “ALL SIZES” section, I would suggest repeating Rounds 1 and 2 only twice, meaning you’d decrease another 20 stitches and your stitch count at this point would be 30 stitches on your needles. Then, you could proceed with the final 3 “Next Round” instructions and end up with 5 stitches that you can sew up and close for the top of the hat.
With this adjustment, your crown shaping would be around 4.6 inches high so I would still recommend adjusting the amount of ribbing that comes beforehand if you’d like the hat to still be 12.5 inches in height when un-cuffed.
Let us know if you have any other questions! Take care!
All the best,
Cat
I just saw your last response! I’ll follow those guidelines. I wanted the Adult Medium size. For now, I’ll attempt the crown as you’ve stated and if I still have some problems, I’ll write again. Many thanks!
Hello, I am now obsessed with this Autumn Oak color. Was going to purchase and then saw I guess it’s sold out??! Will it be restocked?
Hi Hannah,
Thanks for reaching out! Unfortunately, Autumn Oak has been discontinued, so it will not be coming back in stock. If you would like, you can email our customer service team at [email protected] and they can see if we can locate any Autumn Oak for you!
I hope this helps, happy knitting!
Gianna
I would like to make the adult large using bulky yarn. Do you have suggestions for # to caste on and needle size?
Hi Lela,
Thanks for reaching out. To figure out your cast-on number, you will want to first knit a gauge swatch in pattern with which ever needles you feel work best for the yarn you have (if this is daunting, we have a wonderful tutorial called All About Gauge: https://www.purlsoho.com/create/2020/08/20/all-about-gauge/). Once you know how many stitches you are getting per inch, you can multiply that number by the finished circumference of the Adult Large size (16.5 inches) and cast on the nearest multiple of 12. Then you can follow the pattern as written!
All the best,
Lili
Hello,
I have two skeins of The Fibre Company’s Road to China light yarn that I received as a gift . Would this yarn work for Classic Ribbed hat pattern? If so, would you use a US 3 or US 4 size needle? The yarn seems very stretchy. For reference, I have a 23” head circumference. Lastly, I have a lot of difficulty with DPN’s and am wondering if I can switch to the magic loop on the decreases and any advice in doing so. Thanks so much!
Hi Robin,
Thanks for reaching out. The yarn you have looks to be a worsted weight yarn, whereas the Classic Ribbed Hat was designed for a DK weight yarn! It may be difficult to get the correct gauge because of this different in weight, but since you already have the yarn on hand, you can always make a gauge swatch to test that out! As long as you’re getting the correct gauge (32 stitches and 33 rows = 4 inches in 1×1 rib unstretched), then you can use the yarn. However, if you’d like to try a similar hat that’s actually written for a worsted weight yarn, I’d recommend checking out the Lovely Ribbed Hat!
In answer to your other questions, first, you can absolutely use magic loop for the decrease section! And the size of needle you use will always depend on your gauge swatch. You may need to size up or down your needles in order to get the correct gauge!
All the best,
Lili
Thank you for getting back to me Lili. The label on “The Road to China” yarn is labeled a sport weight. (Tension, 24-26st/10cm/4”) size US 3-4 needles. The Lovely Ribbed Hat calls for US size 5 needles. Is there perhaps another hat pattern that would use the US 3-4 needles that you would recommend for this yarn? Thank you so much.
Hi Robin!
For a size 3 needle, we suggest the Top-Down Earflap Hat or the Pigment Hat! We always recommend making a gauge swatch before starting a project, though, just to be sure your hat will turn out as intended, as you may need to adjust your needle size to obtain gauge. If you would like to learn more about gauge swatching, we have a full tutorial called All About Gauge!
All the best,
Margaret
Sorry I’m posting this a second time as I made an error. I’m knitting baby size, pattern reads kid. I have cast on 84 stitches. I have completed firdt part of crown. It says i should have 84 stitches remaining but i have 72 stitches. Now i start the all sizes section is this correct?
Hi Joan!
Thank you for your question. For the smallest size of this hat, you will work the Set-Up Round under “Crown” before moving directly the the “All Sizes” instructions. This way, you will be starting the “All Sizes” section with 84 stitches on your needles! It sounds like you may have worked the instructions under “KID, ADULT SMALL, ADULT MEDIUM, ADULT LARGE SIZES ONLY” which do not pertain to the smallest size, so I suggest taking out these four rows until you are back to the set-up round with 84 stitches on your needles.
I hope this helps clarify things!
All the best,
Margaret
Hallo Gianna,
I have casted on 100 stitches. How do I re-do the math to set up the crown? how many times should repeat the p1k1 until I place the marker?
Could you give me some guidance on that?
Thanks,
Serafina
Hi Serafina,
Thanks for reaching out! Unfortunately though, a cast-on of 100 stitches will not work for this pattern. You’ll need to cast on a multiple of 12! I’d recommend redoing your cast on and using either 96 or 108 stitches. Then, when you get to the CROWN section, you can follow these instructions to know exactly where to place your markers:
Set-Up Round: Remove unique end-of-round marker, k1, replace marker for new end-of-round, *[p1, k1] (stitch count divided by 12) times, pm (place marker), repeat from * to end of round, omitting final stitch marker which is end-of-round marker. [6 stitch markers placed, including unique end-of-round marker]
I hope this helps, and please let me know if you have any other questions!
All the best,
Lili
Hello Lili,
Thanks a lot for your answer. In the end, since I had already knitted 8 inches of hat, I found a way to decrease in the most invisible manner the number of stitches inI had to in order to reach the number of 96 stitches and set up the crown. It worked out and I am pretty satisfied of the results 🙂 I love the shape of the crown, super easy to do, considering it was the first time I tried!
Thanks.
Warmly,
Serafina
You’re very welcome, Serafina!
All the best,
Lili
To set up for the crown on the adult large (132 stitches) would I use 22 stitches between markers for a total of 6 markers?
Hi Joan!
Thank you for your question. Yes, you are correct! There will be 6 markers (including your end-of-round marker) with 22 stitches between each marker after the set-up round for the crown.
I hope this helps you continue on with your hat!
All the best,
Margaret
Thank You!😊
Hi there! I was a bit silly when I was casting on. My measurements were a bit between the adult medium and large so I decided to just split the difference, and I casted on 126 stitches. Now I’m ready to start the crown, and I am not sure which instructions to use. Also, will the extra stitches impact the final look of the hat at all? Thanks so much!
Hi Anna,
Thanks for reaching out! This pattern actually works over a multiple of 12 stitches, so 126 won’t quite work with the CROWN decreases as written. But not to worry! There is absolutely a way to make it work with the stitch count you have.
First, you’ll need to decrease from 126 stitches to 120 stitches. To do this, work the Set-Up Round as follows to place your stitch markers: Work in pattern, placing a stitch marker after 20 stitches, then 22, three times, so that you have 6 total sections, alternating between 20 and 22 stitches each. Then, work two rounds of decreases (with a plain round in between them) in only the sections with 22 stitches.
Now you should have 120 stitches, in line with the Adult Medium size. After working one round in pattern, you can then just start following the instructions for the Adult Medium, beginning with Round 1 of the decreases! The extra decreases will not impact the look of the overall hat at all, since this method of dealing with them does so in line with the structure of the pattern.
I hope this helps, but please let me know if you have any other questions!
All the best,
Lili
Good morning! I am hoping to make this hat for my son in a yarn that is soft but slightly more affordable because it is going to get some hard use. 🙂 Do you think that Good Wool would work – or maybe Good Wool with a strand of Line Weight held together? Any suggestions would be appreciated! Thanks so much . I really appreciate being able to ask questions!
Hi Sue,
Thanks for writing in! I’d actually recommend using Knitting Yarn, since it’s also a DK weight yarn, so it would work perfectly for this pattern. Knitting Yarn is 100% merino wool, so it’s super soft, and it’s a very durable yarn!
All the best,
Lili
I’m confused about why this pattern calls for #3 needles, but the Twisted Rib Hat, using the exact same yarn, calls for #6 needles. Can you advise? I recently made the Twisted Rib Hat, size Adult Large, and it came out perfectly. Can I use #6 needles for this pattern and get a similar result?
Hi Megan,
Thanks for reaching out. The size of the needle for each of these two patterns was a design choice, and it has to do with what sort of fabric quality the designer was aiming for! Twisted ribbing is naturally more dense than normal 1 x 1 ribbing, so the designer likely went with a larger needle size to make sure that the knit fabric still had some drape to it.
The best way to make sure that the needles you use for a pattern are the right choice for you is to make a gauge swatch! For the Classic Ribbed Hat, I would recommend trying with a size US 3 first, but you may need to go up or down a size or two if your gauge doesn’t match. If you would like to learn more about this, we have a handy tutorial called All About Gauge. Hope this helps!
All the best,
Lili
I finished making the hat in an adult medium a couple days ago and it looked great and fit well but after wearing it for a full day it has stretched out a ton. So much so that it just slides down my head into my eyes. Any suggestions for how to fix this?
Hi Stephanie,
Thanks for writing in, although I’m sorry to hear that your hat stretched out so much after only a day! Have you blocked your hat yet? I would definitely recommend re-blocking (or just blocking!) the hat. It’s not uncommon for ribbed hats to stretch out when worn over a long period of time, but soaking and blocking again should get it back into shape. When you lay the hat flat to dry, you can push the knit fabric as narrow as it can go so that the hat relaxes into those dimensions, instead of the stretched-out dimensions. Hope this helps!
All the best,
Lili
Hi, I was delighted to find this pattern; thank you.
I think there is an error in the crown shaping section of the pattern under the decreasing instructions for the ‘kid, Adult Small, Adult Medium, Adult Large categories’. The Adult large size should only be repeated twice in order to leave 84 stitches.
I’m knitting mine on straight needles, but I presume this makes no difference to the amount of stitches.
Many thanks for making these patterns available.
Kind regards,
Finola
Hi Finola,
Thanks for reaching out. I’ve just taken a look over the pattern instructions, and I can confirm that they’re correct as written! By working Rounds 1 – 4 once and then repeating them 3 more times, you’ll be decreasing a total of 48 stitches (12 stitches per repeat of Rounds 1 – 4). If you subtract 48 from the cast-on number for the Adult Large size, which was 132 stitches, you get 84 stitches!
I hope this helps clarify things!
All the best,
Lili
Hi! When you say “omitting final stitch marker” am I k2tog right before i reach the unique marker. Meaning after the 6th stitch marker is placed i P1,K1 8 times and then k2tog?
Hi Becci,
Thanks for reaching out. Because the instructions state to omit placing the final stitch marker (it’s already in position, since it’s your unique end-of-round marker), you will only be placing 5 new stitch markers on this round! After you place the 5th one, you will repeat the instructions from the first asterisk until you reach “pm.” This means you’ll just work in 1 x 1 ribbing (there are no k2tog decreases yet) until you reach the end of the round! Hope this helps clarify things!
All the best,
Lili
This pattern looks great! I am wondering if I could use your Knitting yarn for it?
Hi Lexie,
Thanks for writing in! You could definitely use Knitting Yarn for this pattern, since it’s also a DK weight yarn! With any yarn substitutions, we also suggest doing a gauge swatch beforehand to make sure your gauge is consistent with the pattern. Here’s our tutorial on this in case you’d like more information (https://www.purlsoho.com/create/2020/08/20/all-about-gauge/)! Hope this helps!
All the best,
Cat
Hello! I am working on the adult small hat and I’m having some issues with the crown. I accidentally cast on 106 stitches instead of 108, so I’m not sure if that’s why I’m confused, but for round 2 am I just supposed to go around P1,K1 like normal or am I supposed to skip a stitch 1 before the marker? Please let me know!
Hi Niamh,
Thanks for reaching out. Since the CROWN for this pattern will only work properly over a multiple of 12 stitches, I’d recommend getting back to the correct stitch count! Here’s how to do that:
1. Begin with a modified version of the Set-Up Round: Follow the Set-Up Round as written up until you place the 5th stitch marker. Then just work in pattern to the end of the round. You will end up with 2 fewer stitches between the 5th stitch marker and the end-of-round marker than you have between the other markers, but this is on purpose!
2. Work Round 1 as written, but omit the final k2tog that occurs right before the end-of-round marker.
3. Work Round 2 as written, but omit the final k1, since your final stitch will still be a purl stitch.
4. Work Round 3 as written, but omit the final k2tog, as you did on Round 1.
After you’ve done this, your stitch count will be back to the correct amount for this stage of the pattern, and you can finish up the crown without any other modifications!
All the best,
Lili
Hello! I am trying to knit the adult small hat, but I accidentally only cast on 106 stitches instead of 108 so maybe that’s why I am having trouble, but for round 2 of the crown am I supposed to just P1,K1 like regular or am I supposed to skip on stitch before the stitch marker? Or maybe is it something else? Please let me know!
Hi Niamh,
Thanks for reaching out! You can keep knitting the crown shaping as is; one of the sections between your markers will just be a tiny bit smaller! Basically you will have one less purl and knit stitch since you cast on 106, but that should not be noticeable at all if you’ve placed the markers in the way that the set-up row describes. I think you’re all set to continue on in the pattern! I hope this helps!
All the best,
Cat
Is it totally necessary to switch to double pointed needles before doing the crown? If so, is that as simple as slipping the stitches from my circular needs to the double pointed? This is my first time knitting in the round/knitting a hat.
Thank you!
Hi Bella,
Thanks for writing in! We’re so excited that this is your first hat project! We recommend using DPNs for the crown shaping because the decreases will greatly reduce the number of stitches on your needles by the end, making it pretty impossible to keep knitting in the round as you normally would! And for sure, you can just slip your stitches purl-wise to avoid twisted stitches onto the DPNs when you get to that part of the pattern. Here’s our tutorial on using DPNs in case it’s helpful: https://www.purlsoho.com/create/double-pointed-needles/
Let us know if you have any other questions! We’re alway happy to help.
All the best,
Cat
Hi guys!!
This is my first knitting project ever! All has gone smoothly until now… I’m beginning the crown but realised I have cast on 144 stitches (no idea how I miscounted that!). I rather like the fit anyway so I’m happy to leave it this large.. but could I please have some guidance on how to work the crown? Xxx
Hi Maddie,
Thanks for reaching out, and congrats on starting your very first project! I’m glad to hear that you like the fit of the hat with 144 stitches, and fortunately, this pattern can be knit with any multiple of 12 stitches, so the crown decreases will work out perfectly. The only thing you’d need to alter a bit is the Set-Up Round to ensure that you have the correct number of stitches between each decrease. Just follow these instructions instead, and once you’ve finished the round, you can continue onto the pattern as written:
Set-Up Round: Remove unique end-of-round marker, k1, replace marker for new end-of-round, *[p1, k1] 12 times, pm (place marker), repeat from * to end of round, omitting final stitch marker which is end-of-round marker. [6 stitch markers placed, including unique end-of-round marker]
Hope this helps you move forward and finish up your hat!
All the best,
Lili
Which size do you recommend for a 23” head circumference? Adult large?
Hi Hanh,
Thanks for reaching out. Yes, I would recommend the Adult Large size for a head circumference of 23 inches!
All the best,
Lili
Quick question because I over analyze everything in patterns. After the first section of the pattern there is the crown section, then the section that says kids , adult small, medium and large only then a section that says all sizes. Should I be working all of these sections in the order they appear ?
Hi Britt,
Thanks for reaching out, and I’m happy to clarify this for you! In this pattern, you will work any sections that specifically mention the size you’re knitting as well as any sections for all the sizes. So for example, if you’re knitting the Adult Small size, you’ll work the KID, ADULT SMALL, ADULT MEDIUM, ADULT LARGE SIZES ONLY section and then move onto the ALL SIZES section. But if you’re knitting the Baby size, then you’ll skip the first section and move straight from the Set-Up Round to the ALL SIZES section. Hope this helps!
All the best,
Lili
Thank you!
Hi. I am making the hat for myself in the kid size. Most hats are too big for my head. I wanted a larger fold so I am going to knit the brim up to 8 inches. Have you had any others making this hat for a adult female using the kid hat measure?
Hi Suzanne,
Thanks for reaching out! You could certainly go down a size for this hat if you’re finding that most hats are fitting a bit looser than you’d prefer. I’d recommend trying on your hat as you knit by placing the stitches on a stitch holder or scrap yarn so you can double check how it fits. I hope this helps!
All the best,
Cat
Thank you for your quick reply. After looking at the finished measurements I decided to start over using the adult small directions, Sigh.
I am befuddled by the sizing of this hat. It’s my aim to make it for my 3 year old son who has a typical, if slightly large head. It’s right around 19 inches in circumference which puts him at an adult medium if we want a 19 (plus) inch stretch.
I knit on the tighter side so I sized up to a 4 for the needles. The yarn weight is correct as verified by the river store I purchased it from. I cannot for the life of me understand how even an adult medium will not fit over his head! Any thoughts?
Hi Nichole,
Thanks for checking in about this! It looks like I replied to your earlier comment about the sizing of this hat–have you gotten a chance to read that yet?
There have been a few updates since, though! Because we’ve found that this hat stretches more than most, we’ve revised the finished circumference measurements, which now read:
Finished Circumference (unstretched): 10½ (12, 13½, 15, 16½) inches, comfortably stretching to approximately 13 – 16 (15 – 18, 17 – 20, 19 – 23, 21 – 25) inches
All the best,
Lili
Hi there,
This is a beautiful pattern – thank you!
I’ve knitted up a gauge and using 3.25mm needles it’s coming up as 9.5cm to 32 stitches – or 35 stitches to 4 inches. Do you have a suggestion of what would be best to do from this info?
TIA for any help you can offer.
Best wishes,
Vanessa
Hi Vanessa,
Thanks for reaching out. It sounds like your gauge is a bit tight, so I’d recommend swatching again with larger needles! If this is daunting, I’d recommend checking out our All About Gauge tutorial, which includes some very useful information. I hope this helps!
All the best,
Lili
My apologies if I already posted this but I want to make this hat as my first hat project. How will I know when to switch to double pointed needles? Thank you!
Hi Gabrielle,
Thanks for writing in! We’re so excited and grateful that you’re interested in making our Classic Ribbed Hat for your first hat project! You’ll know to switch to DPNs when the number of stitches on your circular needles becomes too few to comfortably spread out over your needles! DPNs are useful for knitting smaller circumferences, so once you find that it’s difficult to knit the rounds of the hat on circular needles, you can switch to DPNs. Hope this helps and we hope you give this hat pattern a try!
All the best,
Cat
Hi there. Id love to knit up this pattern or another you’d recommend for my newborn soon to arrive in a week lol. I have cashmere merino bloom I’d like to use. Any recommendations on pattern adjustments for a newborn size?
Hi Evie,
Thanks for reaching out! I would recommend making the Baby size. 1 x 1 ribbing has a ton of stretch, so the hat should fit a newborn in its unstretched form, and then will continue to fit as they grow!
All the best,
Lili
Hi! Would it work to use Good Wool in this pattern instead of cashmere merino bloom? Thanks!
Hi Emma,
You can absolutely use Good Wool for this pattern! Since Good Wool is thinner than Cashmere Merino Bloom though, you may just need to adjust the number of stitches you cast on in order to make sure the hat comes to the correct size.
To figure out your cast-on number, you will want to first knit a gauge swatch in pattern. Once you know how many stitches you are getting per inch, you can multiply that number by the finished circumference of your size and cast on the nearest multiple of 12. Then you can follow the pattern as written, just making sure to evenly divide the stitches at the Set-Up Round for the CROWN.
Here’s how to work Set-Up Round of CROWN with any multiple of 12 stitch count:
Set-Up Round: Remove unique end-of-round marker, k1, replace marker for new end-of-round, *[p1, k1] (cast-on / 12) times, pm (place marker), repeat from * to end of round, omitting final stitch marker which is end-of-round marker. [6 stitch markers placed, including unique end-of-round marker]
Hope this helps!
All the best,
Lili
Hi,
I’m
Making this for a 2 1/2 years old girl. Her head circumference is 19” around.
I am choosing to make adult small size for her based on pattern specs. Since kid size will only stretch comfortably to 18”.
Does she have an abnormally large
Size head? Would the kid size work?
If I make adult small should I follow instructions exactly or adjust for the height?
I like a pretty thick cuff too.
Thanks!
Thanks!
Hi Natalie,
Thanks for your question! Your little one will be so cute in her new hat! I recommend knitting the small adult size and checking how you like the fit at around 5″ with the brim folded. My little ones also have larger heads but it means we get to swap hats in the winter! Once you are at a point where you are happy with the folded cuff and body length, you can start on your decrease section, this will add around an additional 4.5 inches to the top of your hat. I hope this helps but if you need further assistance, please feel free to let me know!
Happy knitting,
Gavriella
Hello. I definitely want to make this hat! Is there a less expensive material that would also work with this pattern? I am a novice. I will be back for the cashmere if it works out well but too worried to start with that.
Hi Emily,
Thanks for reaching out. Since this pattern was designed for a DK weight yarn, you can generally use another DK weight yarn as a substitute! In particular, Knitting Yarn would be a great (and much less expensive) choice!
As always though, we recommend knitting a gauge swatch before casting on your project, especially when you are substituting yarns. You may need to size up or down your needles in order to get the correct gauge! If you would like to learn more about this, we have a handy tutorial called All About Gauge.
Hope this helps!
All the best,
Lili
Do you have the yarns seen in the picture for the purl bee? Thanks in advance.
Hi Gail,
Thanks for reaching out! Can you let me know what picture you’re referencing? I’m not sure I know what you’re asking about. In the meantime, I wanted to let you know that the yarn we knit the Classic Ribbed Hat in is Cashmere Merino Bloom, in case that’s useful!
All the best,
Lili
Hi! Is it possible to make this hat with the magic loop technique? If so, can I just use the same number of stitches for each row?
Thank you very much and sorry if you have already answered it!
Hi Carolina,
Thanks for reaching out. You can absolutely use magic loop for this hat, since it’s worked in the round! I’d recommend using at least 40-inch-long circular needles though, since the circumference of the hat is fairly large for magic loop. And the stitch count would be the same no matter what needle technique you use!
All the best,
Lili
For my gauge swatch, is that to be knit in the round? And if so, is the four inches a circumference or the layed flat measurement?
Hi Valerie,
Thanks for writing in! Since this hat is knit in the round, we recommend also swatching in the round so you can get the most accurate gauge measurement. When swatching, it’s always best to make a large gauge swatch (larger in both length and width than 4 inches), so that you can take the measurement from the central stitches, avoiding the edge stitches where the tension is uneven. I would recommend making a 6×6 inch swatch, which in the case of this pattern, would need a cast-on of about 48 stitches. Once you’ve made a 6×6 inch square, you can measure the number of stitches and rows in the central 4 inches!
All the best,
Lili
Thank you so much I am a knitter just can not find patterns I already have some just was curious about this pattern
Hi Elizabeth,
Thanks for writing in! We’re always happy to answer questions about any of our patterns, so please don’t hesitate reach out regarding anything you’re curious about.
All the best,
Lili
Firstly I would like to thank your amazing team for all the beautiful patterns and assistance offered. I am wondering of this pattern be suitable for your beautiful cashmere Nigh as they appear to be a similar weight?
Hi Dianne,
Thank you so much for your kind words! Nigh would be perfect for this hat pattern. I’d just recommend knitting a gauge swatch before casting on your project, to make sure you get the correct gauge. You may need to size up or down your needles!
Hope this helps!
All the best,
Lili
Hello,
I want to make a hat that is sized between an Adult Medium and Adult Large by casting on 126 stitches. Can I then get to the 84 stitches at the end of the first set of decreases by doing one more round of decreases? I think it would go like this:
Knit Rounds 1-4 two times
Knit Rounds 1, 2, 3
Knit Round 1 again before finishing with Round 4 (P1,K1)
I think that would get me to 84 stitches and I can continue on with the remaining decreases as written in the pattern?
Thanks,
Kelsey
Hi Kelsey,
Thanks for reaching out! This pattern actually works over a multiple of 12 stitches, so 126 won’t quite work with the CROWN decreases as written. But not to worry! There is absolutely a way to make it work with the stitch count you have.
First, you’ll need to decrease from 126 stitches to 120 stitches. To do this, work the Set-Up Round as follows to place your stitch markers: Work in pattern, placing a stitch marker after 20 stitches, then 22, three times, so that you have 6 total sections, alternating between 20 and 22 stitches each. Then, work two rounds of decreases (with a plain round in between them) in only the sections with 22 stitches.
Now you should have 120 stitches, in line with the Adult Medium size. After working one round in pattern, you can then just start following the instructions for the Adult Medium, beginning with Round 1 of the decreases! The extra decreases will not impact the look of the overall hat at all, since this method of dealing with them does so in line with the structure of the pattern.
I hope this helps, but please let me know if you have any other questions!
All the best,
Lili
Perfect – I can do the decreases in that way. Thanks so much!
I need help with the decreases because I only cast on 88 stitches! How to do?? Thanks so much.
Hi Evan,
Unfortunately, this hat only works over a multiple of 12 stitches. However, you could make some modifications to the pattern in order to make it work with 88 stitches! Here’s how to do that:
Set-Up Round: Remove unique end-of-round marker, k1, replace marker for new end-of-round, *([p1, k1] 7 times, pm) twice, [p1, k1] 8 times, pm, repeat from * to end of round, omitting final stitch marker. [6 stitch markers placed, including unique end-of-round marker]
You should now have 6 sections of stitches on your needles, 2 groups of 14 stitches, 1 group of 16 stitches, 2 more groups of 14 stitches, and 1 final group of 16 stitches.
Round 1: *([p1, k1] to next marker, sm) twice, [p1, k1] to 2 stitches before next marker, k2tog, sm, repeat from * to end of round. [2 stitches decreased]
Round 2: *([p1, k1] to next marker, sm) twice, [p1, k1] to 1 stitch before next marker, k1, sm, repeat from * to end of round.
Round 3: *([p1, k1] to next marker, sm) twice, [p1, k1] to 3 stitches before next marker, p1, k2tog, sm, repeat from * to end of round. [2 stitches decreased]
Round 4: *P1, k1, repeat from * to end of round.
You will now have 84 stitches on your needles, so you can continue to normal decrease section of pattern, following the instructions for here Baby size!
All the best,
Lili
So I’m using the magic loop and on the crown it says k1, pm then *p1,k1 9 times, pm* until I’ve got 6 stitch markers but I’m stumped bc the first knit stitch I can’t get to bc it’s at the beginning of my work if that makes since.
Hi Samantha,
Thanks for reaching out! I’m a little bit confused about what you’re describing. Would you be able to send a photo of your work to [email protected]? That way we can better visualize what’s going on!
All the best,
Lili
The KAL looks like fun! Is this on Ravelry?
You instruct to put in a hashtag. Never done this before! Is this on Instagram or TicToc or something like that? Obviously I don’t participate in those….just Ravelry. Is it still possible to participate in the KAL? Thanks
Hello,
Thanks for reaching out! Our KAL is not being run on Ravelry, but there are other ways to participate even if you don’t have social media. For instance, you can browse through the latest projects on our KAL landing page, and you can also join our Zoom + Knit meetings throughout the KAL!
All the best,
Lili
I would like to knit a hat using yarn that is washable. Can you suggest some that would work for this knit along project?
Thanks!
Hi Micki,
For a machine washable alternative, I would recommend using Morning! This yarn is a blend of cotton and yak, and it can be put in the washer and dryer (it says lay flat to dry on the product page, but we’ve had great success putting it in the dryer on low/gentle).
As always though, we recommend knitting a gauge swatch before casting on your project, especially when you are substituting yarns. You may need to size up or down your needles in order to get the correct gauge!
All the best,
Lili
Hi there,
Thanks for this ace pattern. I’m having a bit of a brain melt understanding the decrease, when it says (p1,k1) 9 times, does that mean the stitches in brackets count as “one” stitch? So essentially you would do 18 individual stitches? Thank you!
Hi Sarah,
Thanks for reaching out, and yes, exactly! You’ll work both of the two stitches within the brackets 9 times, which adds up to 18 total stitches. Hope this helps clarify things!
All the best,
Lili
Hi! I’m hoping to knit five of these for Christmas gifts and was wondering approximately how long it takes to knit each one?
Thanks!
Hi Samantha,
I’m afraid that this is something that’s pretty hard to give an accurate estimate for, since every knitter knits at a different speed! But I asked my coworkers, who have knit the Adult Small size, and they said it took them about a week (knitting about 1 hour per day on average) to complete the hat. Hope this helps you plan ahead!
All the best,
Lili
Can I use magic loop instead of double pointed needles? Thank you!
Hi Claire,
Yes! You can absolutely use magic loop instead of DPNs.
All the best,
Lili
I’m a bit confused on your gauge? The yarn you show you used has 5-5.5 stiches per inch on a size 5-7 needle. But your gauge on the pattern says 8stiches per inch? So do I find a replacement yarn for 8 stiches per inch or match the yarn gauge?
Hi Nora,
Thanks for writing in! This pattern is in a 1 x 1 ribbing stitch pattern, which will almost always have a much narrower gauge than stockinette stitch since it’s so stretchy and pulls inward. The recommended gauge we give on our product pages is in stockinette, and it’s also more of a general approximation of the average gauge for that yarn than a requirement!
All the best,
Lili
Hello! I just completed this pattern and it turned out beautifully (except for a few tricky dropped stitches and held breaths towards the end 🙂 ). I’m interested in making this again for my husband, but I’m curious if I could translate this pattern to a ribbed cuff and just stockinette stitch for the rest. Will the crown look okay if done that way (using the same decrease sequence but just using knit stitch the whole time?). Thank you!!
Hi Sara,
Yay, we’re so happy to hear that you finished your Classic Ribbed Hat! That is a great question! You could try making this with a ribbed brim and stockinette for the rest of the hat, but it would require some alterations since stockinette stitch has a much different gauge than ribbing. I recommend checking out our Basic Hats For Everyone in Nigh DK pattern, which you can get for free! These hats also utilize DK weight yarn like Cashmere Merino Bloom and there’s a style that is exactly what you’re looking for.
With any yarn substitutions, we also highly recommend doing a gauge swatch to make sure your gauge is consistent with the pattern. You might find that you need to adjust your needle size! Here’s our guide on swatching, All About Gauge, if you’d like more information!
I hope this helps!
All the best,
Cat
Hi! Hoping you can help! I want to make this for my husband, but I started the adult large and fear it won’t be big enough. I know it has a lot of stretch, but my husband does have a pretty big head LOL should I begin again, adding 12-24 stitches? What is your recommendation? Thank you!
& Thank you for the pattern, it really is lovely!
Hi Kari,
I promise, it’ll stretch a ton once you’ve knit more! The Adult Large can fit up to a 25-inch head circumference, which is very, very large. So it should probably fit your husband just fine, but if you’re uncertain, I’d recommend measuring his head to be sure!
All the best,
Lili
Thank you for the response, I measured his head and did a bit more knitting – enough to try on & it should work without adding stitches, thankfully.
I have another question, unfortunately. I’ve just finished the set up round for the crown & I’m not sure how to continue. I have a k1 at the start of my row with a marker. & Then I have 6 p1k1 (x11) sections, with a marker in the last stitch of each set (minus the last set, having omitted the k1 with the marker). I’m still not 100% sure I’ve done the set up correctly with the marker placement. And if I start the next round in that k1, I’ll be putting a purl in a knit stitch and so everything will be off by a stitch. All of that to say, am I misreading the pattern, did I miss something, or do I have it correct? I’m thoroughly confused.
Hi Kari,
When you begin your decreases, you will first move your BOR marker one stitch over to the left. This means you will be set up to start your section with a P1! In this section, you should have a total of 6 stitch markers separating 22 stitches each. After you have placed these markers, each section will have the (p1,k1) x11 for a total of 22 sts in each section. I hope this helps but please let us know if you have any more questions!
All the best,
Gavriella
Hi
sorry to disturb you but i think the shape crown is wrong for the Size Adult medium with 108 stitches the repetition is 6 and not 8 so there 12 stitches between each stitches markers
At list 9 stitches markers placed, including unique end-of-round marker]
I hope i can help someone doesn’t understood
See you 💁🏻♀️🌸
Hello,
Thanks for writing in! I took a look over the pattern, and I can confirm that it’s correct as written. However, I noticed that you mentioned you have 108 stitches on your needles, and I wanted to let you know that that’s the stitch count for the Adult Small size, not the Adult Medium! I’d recommend following the instructions for the Adult Small hat, and everything should work out! You’ll end up with 6 groups of 18 stitches each, which adds up to 108 total stitches.
All the best,
Lili
Hey! I cast on 154 stitches (24 extra) because the gauge was a bit smaller with this yarn. Do you recommend continuing with the 6 stitch markers and just adding 4 extra stitches, or adding an extra stitch marker to have 7 instead of 6?
Hi Ali,
Thank you for writing in! I would recommend going with an additional increase section to keep all your sticthes proportional. I hope this helps but if you need further assistance we would be happy to answer any questions!
Happy knitting,
Gavriella
How would you fix and prevent laddering when using dpns? I started with dpns as I’m very new to knitting and find them easier than the circular needles.
Hi Aleasha,
Thanks for writing in. We are happy to hear you have found a method that works for you. Laddering is unfortunately a common effect of DPNs, frustrating as it is! It is caused by the uneven tension between each needle, but there are solutions!
One way to pretty much get rid of laddering is to shift the stitches around on your DPNs after every couple of rounds. This displaces the junctions between needles, so that they fall between different stitches along the length of the sleeve, thus distributing the uneven tension so that it doesn’t all fall in one column.
We also recommend a slightly aggressive block to help even out those stitches once you are finished. I hope this helps!
Happy knitting,
Gavriella
Hello! I’m a very beginner knitter and this is my first time knitting in the round and using DPNs, so please excuse my naiveté. I am about to begin the crown, and the pattern says to change to DPNs “when necessary”. How do I know when that is?
Hi Anna,
That’s a great question! You will want to switch to DPNs when your stitches are stretching far too much to fit around your circular cable. You will notice it will become more difficult to get stitches from one needle to the next and at that point you can switch to your DPN needles. I hope this helps but please let us know if you have any other questions!
Happy knitting,
Gavriella
Hi there! Does the hat stay cuffed as shown in the photos? I have seen other knitters put in a specific stitch or double knit to ensure the “cuff” stays “cuffed” but don’t see anything about that in this pattern. Thanks in advance!
Hi Rachael,
Thank you for writing in! The brim of this hat stays folded but is not sewn down or attached in any way. My Classic Ribbed Hat stays cuffed as long as I am wearing it and it’s actually slightly larger than my head. I hope this helps but please let me know if you have any other questions!
Happy making,
Gavriella
Pattern is relatively easy to follow. As a beginner took me about two weeks to complete. Downside is the length of the hat. I made the adult medium. The ‘crown’ adds about another 3-5 inches on top of the 9 inches so it looks absolutely ridiculous. Kind of upset about it but whatevs.
Hi Angel,
We are so sorry to hear you are not happy with your hat! We would like to suggest cuffing your brim for a better fit or even a double cuff could look really lovely! In the future, knitting fewer rounds for the body could help get the fit you’d like! Especially if the height is longer than you’d like. I hope this helps!
Warmly,
Gavriella
Hi, would this pattern still work if i did 2×2 vs 1×1?
thanks
Hi Simone,
Thank you for writing in! Unfortunately, this pattern won’t translate for a 2 x 2 rib but we think you would quite enjoy our Watch Cap Hat which uses this thicker ribbing! This pattern even includes instructions for matching mitts! Please let us know if you have any other questions!
Happy knitting,
Gavriella
Hi!
I accidentally cast on 116 stitches. Is there a way to make this work?
Hi Jenna,
Thank you for writing in! I am sorry to hear you have accidentally cast on the wrong number of stitches but I would recommend starting over as this pattern works over a multiple of 12. Since 116 isn’t divisible by 12, you will run into trouble at the crown increases. If you are comfortable doing so, I would recommend decreasing by 8 stitches in pattern to be able to work the crown decreases correctly, but would recommend adding a lifeline to your work before doing this in the case you have to rip back. Please let us know if you have any other questions and we would be happy to help!
All the best,
Gavriella
Hi – hoping you can clarify one of the steps in the crown decrease section!
In the All Sizes part, the first two steps say to decrease by six stitches and then repeat both steps four times, with 24 stitches remaining at the end. The previous step (at the end of the first set of instructions, after the set-up round) has the remaining stitch count at 84. If I were to repeat those two decrease rounds a total of four times, wouldn’t I wind up with 36 stitches rather than 24? (I’m knitting the adult small).
Thanks so much!
-Rachel
Hi Rachel,
Thank you for writing in! Since you will be decreasing 6 stitches for each of the two rounds, you will repeat those 2 rounds four MORE times, working them 5 times each total for a remainder of 24 stitches. I hope this helps but please let me know if you have any other questions.
Happy knitting,
Gavriella
Like the pattern
Hello! I’m curious why the stitch marker is necessary before the decreases/crown begin? This is my first time knitting in the round, but can I just look down the rows at where the tail is to identify where to start the crown? My last stitch before starting crown should be a purl, right? Also, any tips on by exactly how much I should reduce the 8.25 pre-crown inches (I’m making the adult small) if I want it to be a bit more fitted to the scalp like a fisherman’s beanie? Thanks so much for the awesome pattern and in advance for the help on my first project in the round!!
Hi Natalie,
Thanks for writing in! The reason you need to move the end-of-round marker at this point is so that your first stitch of the round can be a purl stitch. It’s been a knit stitch up until this point, but for the crown decreases to work properly, it needs to begin as a purl! But you’re totally right, it doesn’t really matter where on the round you begin the crown. Just as long as the first stitch of the round is a purl stitch, it will work!
In answer to your other question, I would actually just recommend trying on the hat as you go. That’ll give you a more exact answer to how long you should knit the hat before starting the crown!
All the best,
Lili
Super helpful- thanks so much, Lili!
Any tips on blocking the beanie?
Hi Natalie,
Thank you for your question! We recommend either spray blocking (laying it on a flat surface and spraying it with water) or wet blocking (soaking it in water and laying it flat to air dry).
All the best,
Gavriella
Hi
Making the Kids Size hat pattern. I have completed the 7 inches of rib, and have 96 stitches on the needles.
If I P1,K1 X7 that equals 14 stitches between markers.
14 x 7 = 98 stitches, not 96.
what am I doing wrong?
Hi Marypat,
For the Kid size, you actually work a total of 16 stitches between each marker! You repeat [p1, k1] eight times (not seven) between placing each marker, and you work those 16 stitches a total of six times throughout the round (not seven). Then the math works out like this: 16 x 6 = 96. I hope this helps clarify things!
All the best,
Lili
I’m making an adult medium and wanting to use up as *much* of my 100g skein as possible. Any chance anyone has measured the weight of yarn needed for the crown (starting of the decreases) . Or recommends to estimate this?
Thanks always for the fab patterns!
Hi CeCe,
I’m afraid that we did not keep track of that specific amount of yardage in the design process, and it’s not something that’s easily estimated! But what you could do instead is place a lifeline at a few points throughout the body of the hat. If you find you have extra (or not enough) yarn after completing the crown, then you can easily rip back and adjust the length of the body before trying again!
All the best,
Lili
Hello! I am a little confused about the way the pattern reads. I chose to do the Adult Medium and am about to enter the “crown” portion of the pattern. My question is: do I follow the section where it specifically says “Kid, Adult Small, Adult Medium and Adult Large,” or do I follow “All sizes?” Or, do I follow both sections? Thanks!
Hi Emily,
Thanks for writing in! You’ll follow the KID, ADULT SMALL, ADULT MEDIUM, ADULT LARGE SIZES ONLY section first, and then when you’re done with that, you’ll work the ALL SIZES section. Hope this helps!
All the best,
Lili
I’d like to make the adult large or extra large size. Is there a more reasonably priced yarn that is the same gauge?
Thank you for your wonderful patterns!
Hi Robyn,
Since this pattern was designed for a DK weight yarn, many of our other DK weight yarns would be great choices! In this case, I’d recommend Knitting Yarn as a lovely and more cost-effective substitute. As always though, we recommend knitting up a gauge swatch to make sure you choose the best needle size for the project. You may need to size your needles up or down in order to achieve the gauge!
All the best,
Lili