

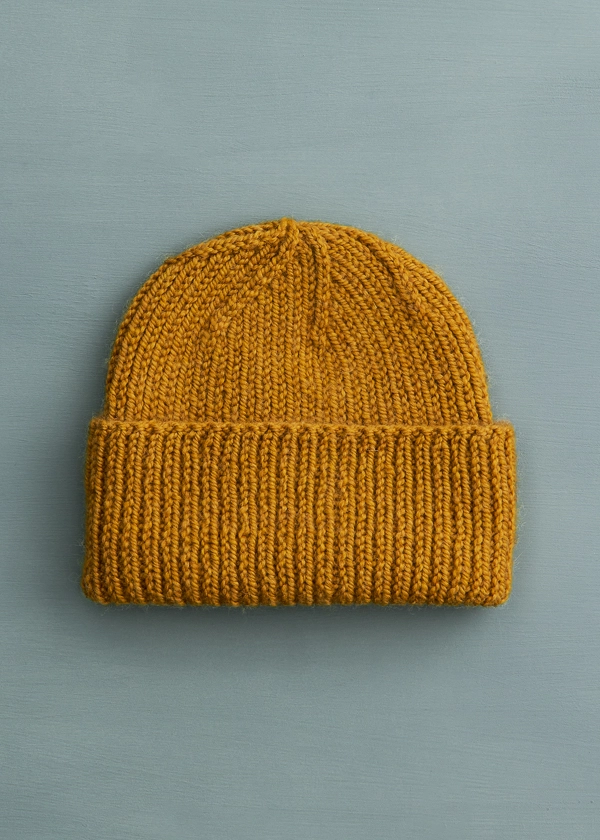


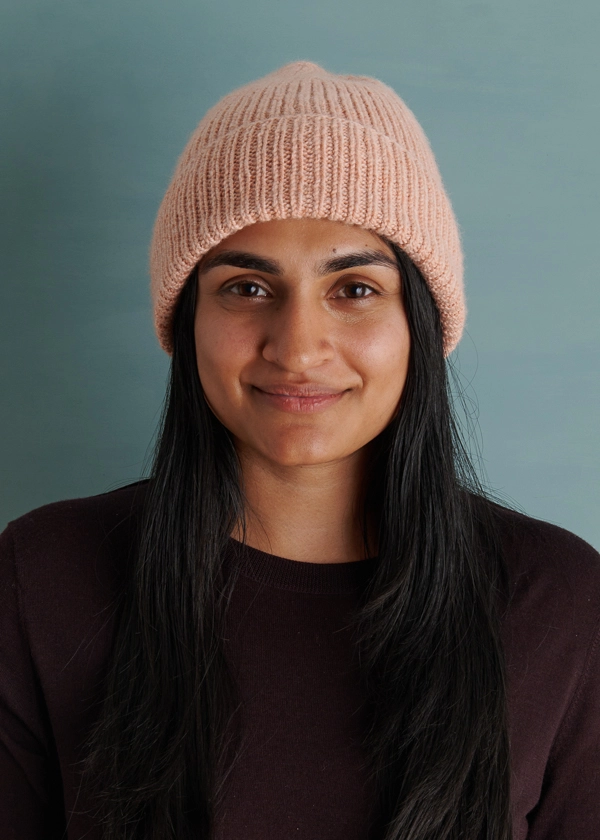
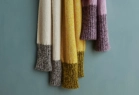
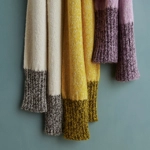
Classic Ribbed Hat In New Colors + Styles
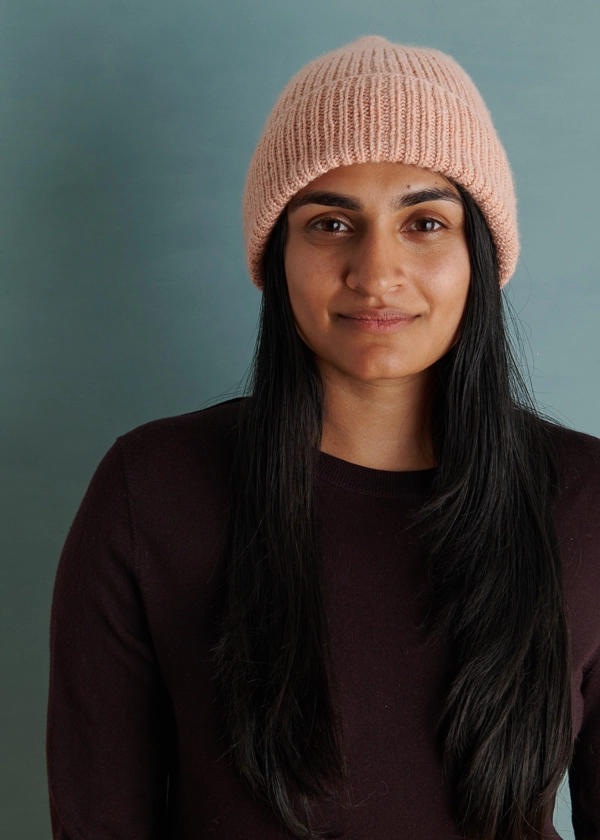
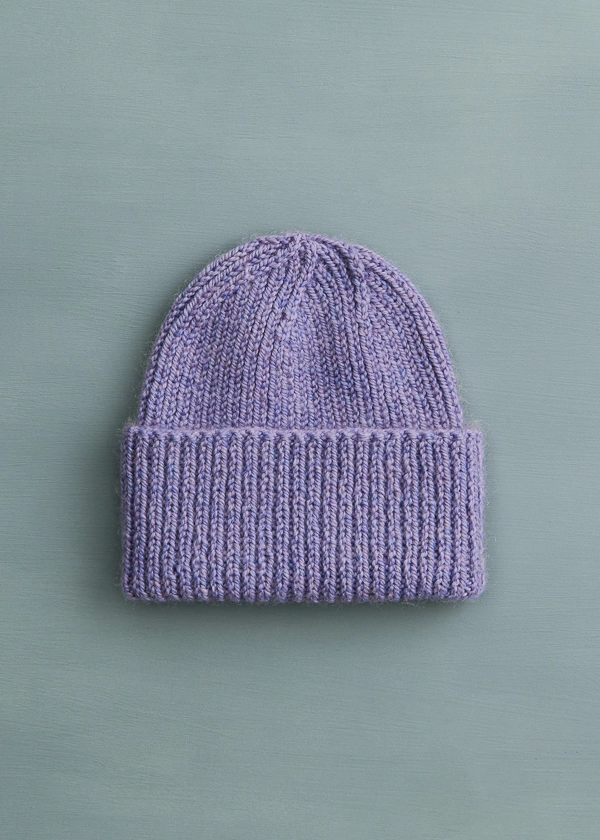
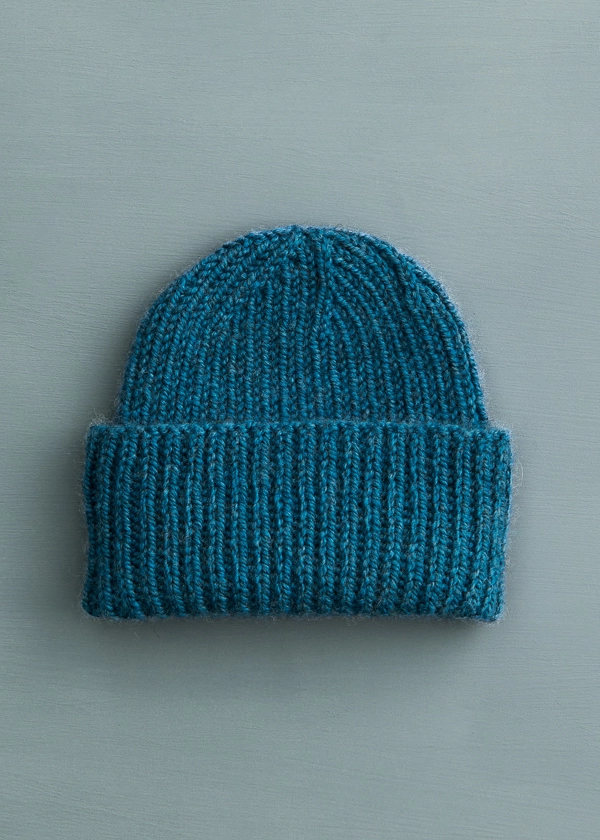
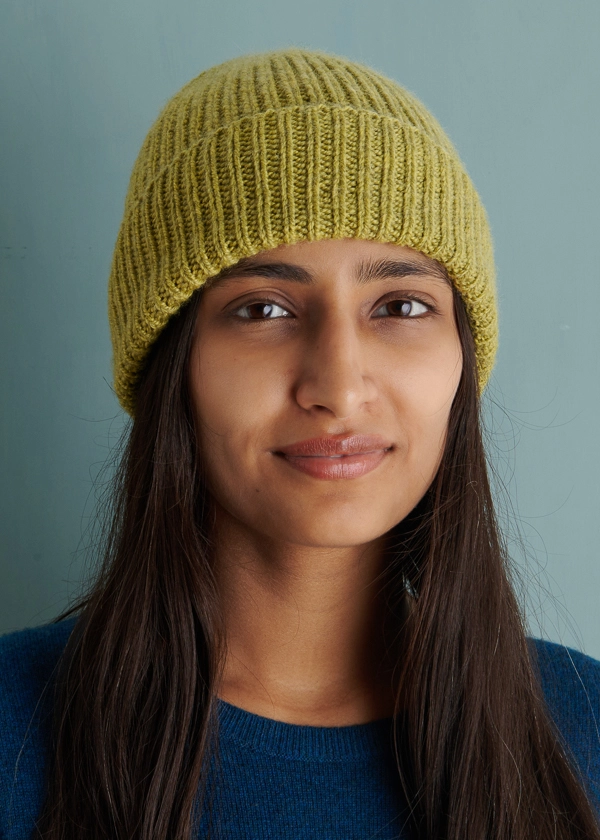
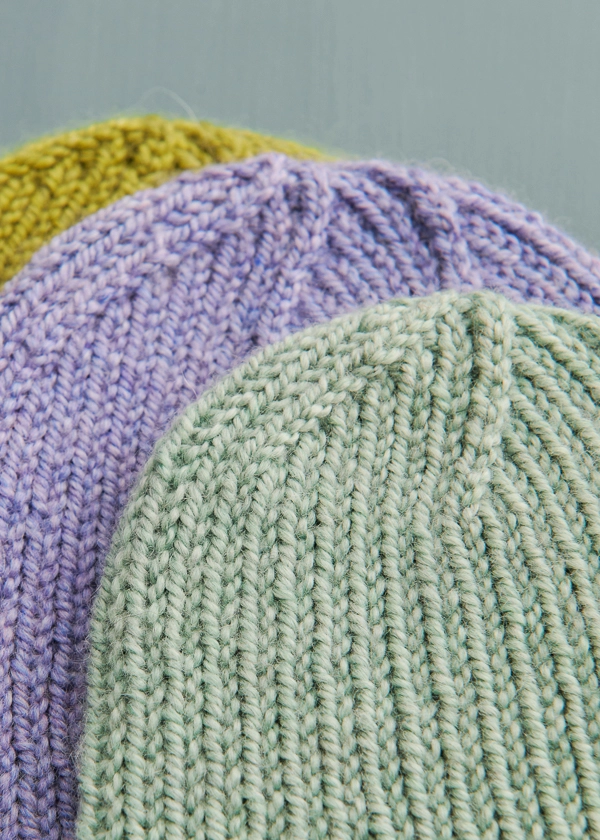
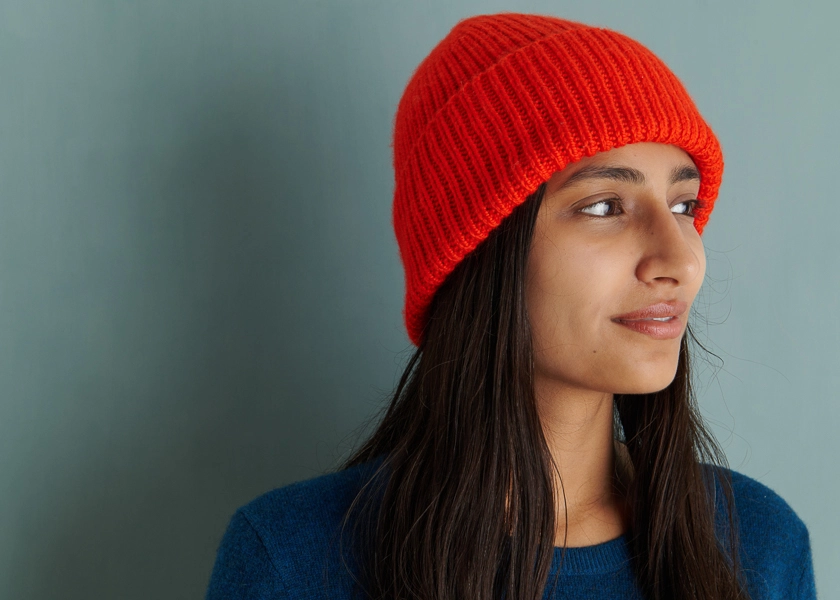
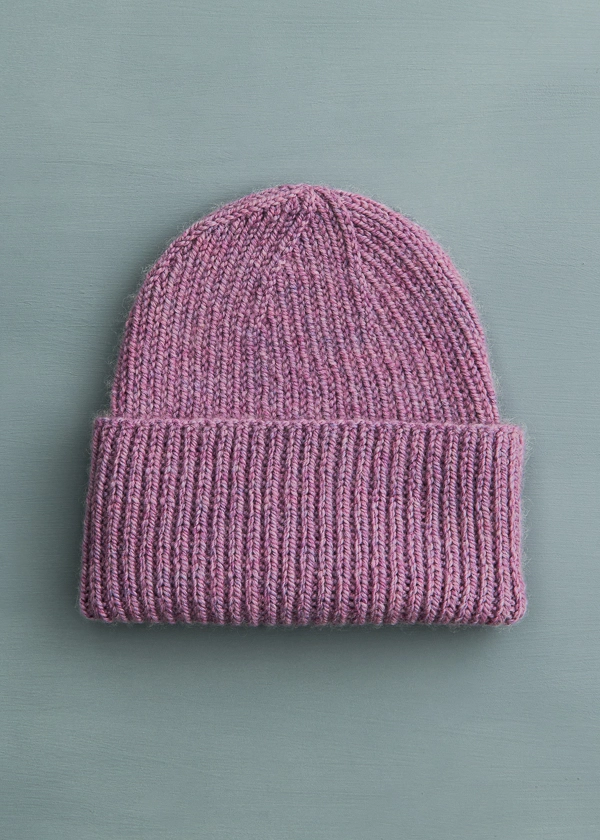
A combination of its simplicity, practicality, and of course, beauty, has made our Classic Ribbed Hat in Cashmere Merino Bloom a favorite for years.

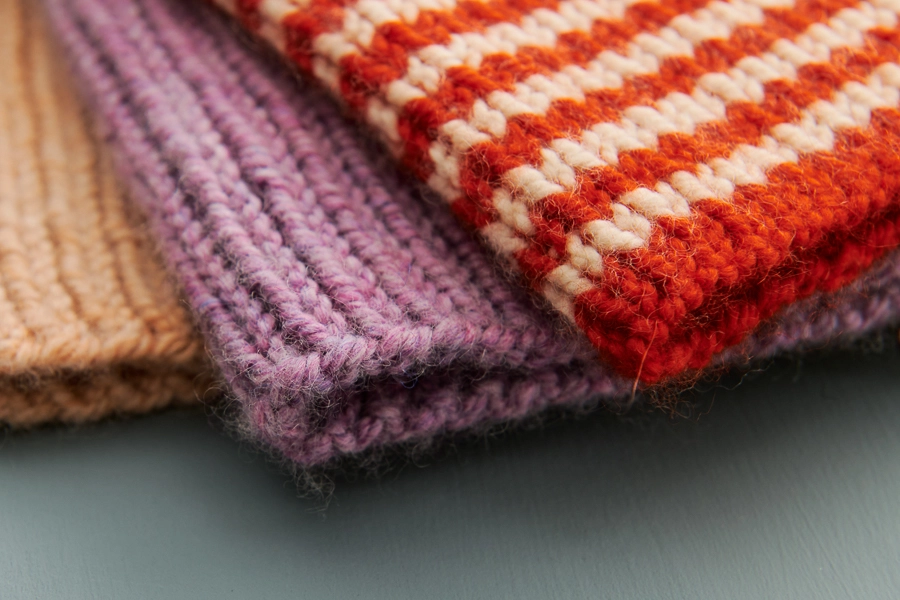
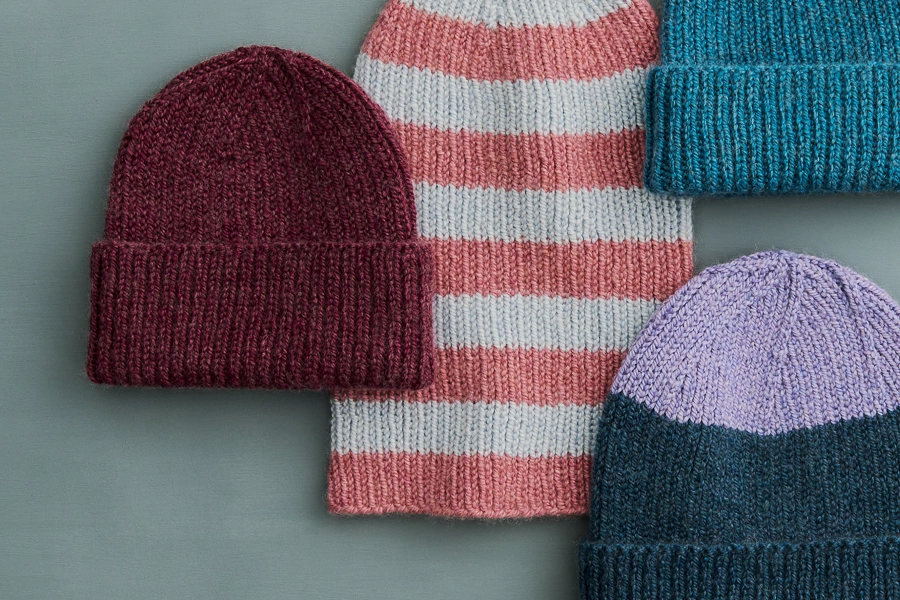
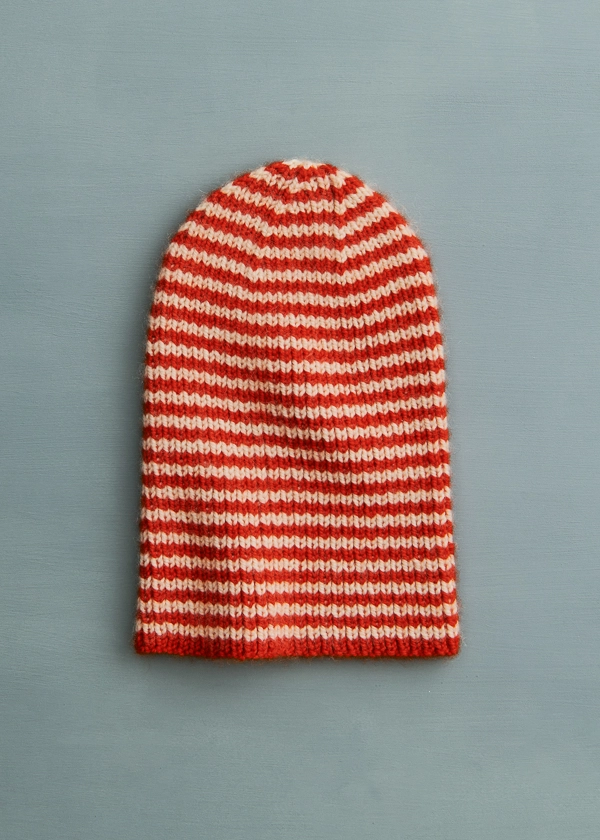
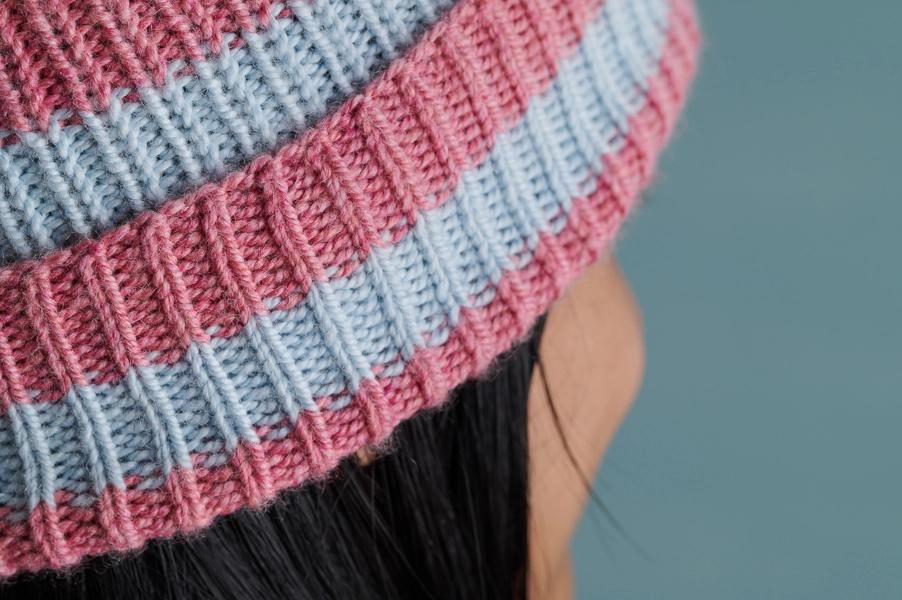
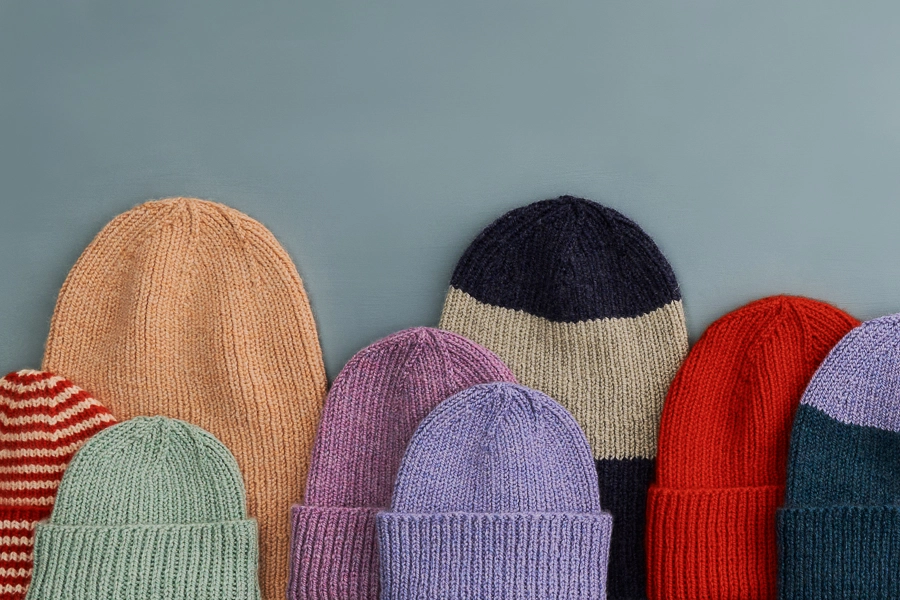
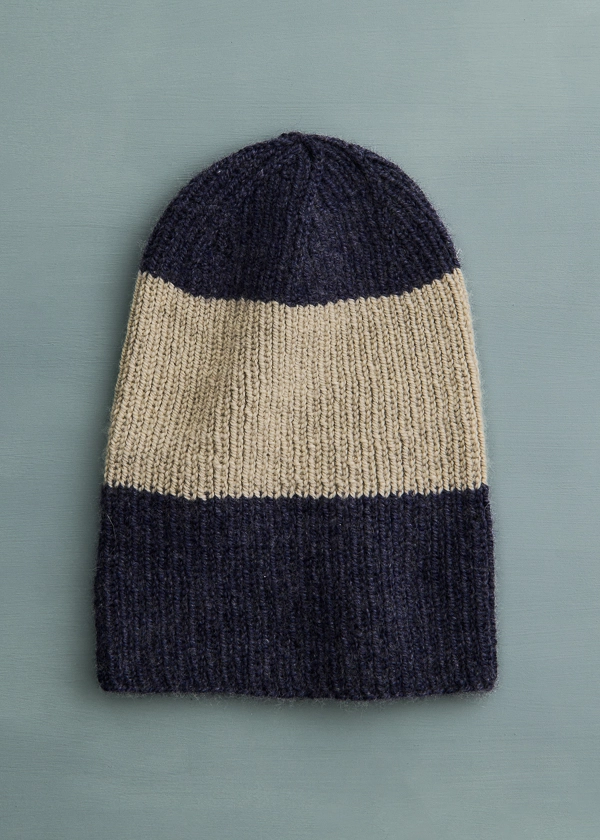
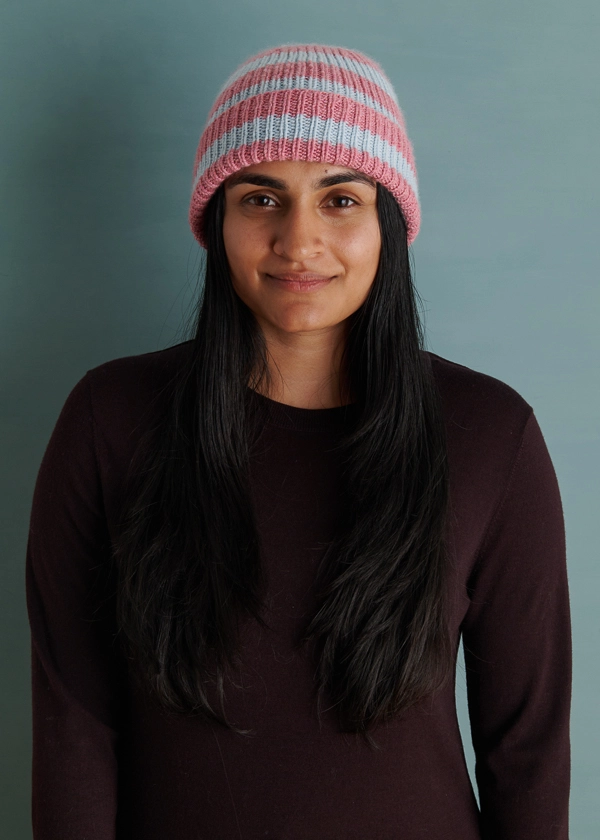
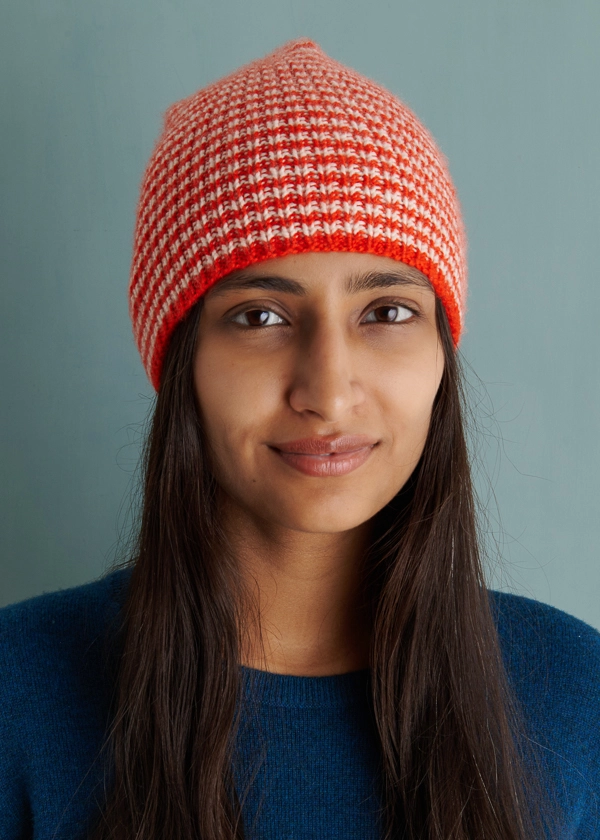
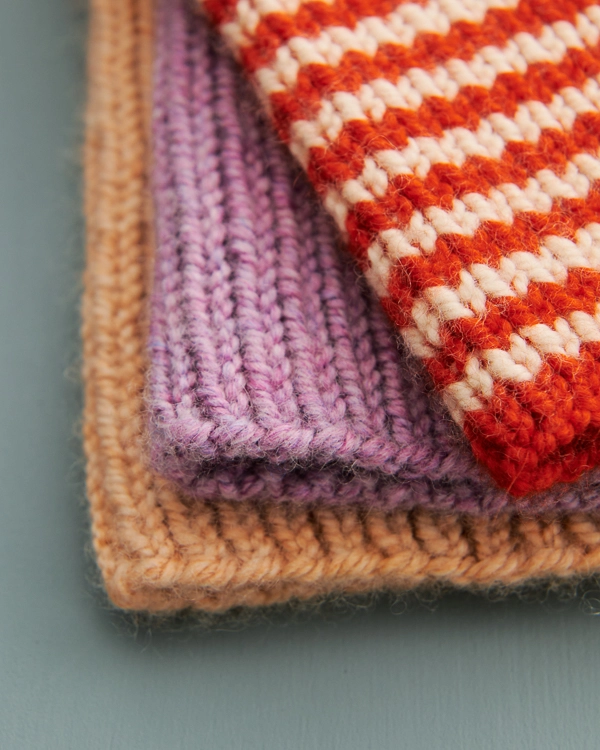
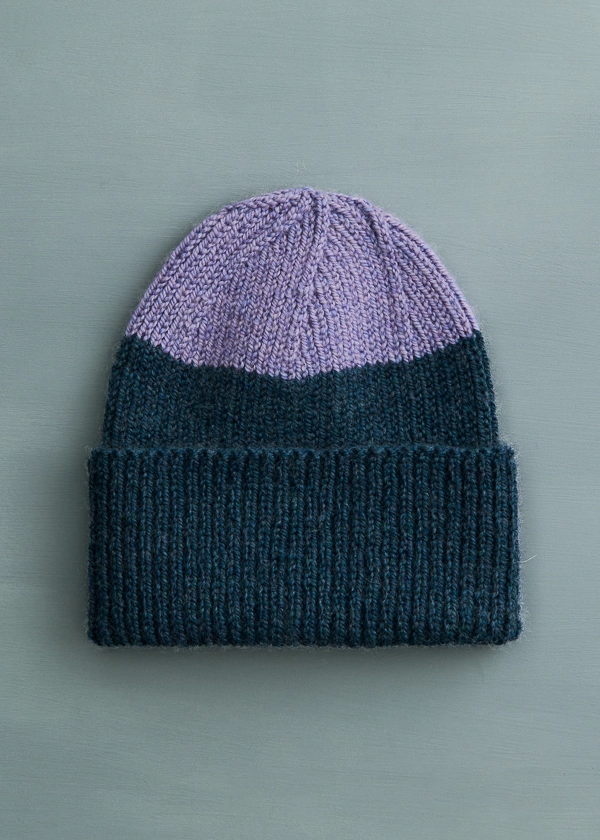
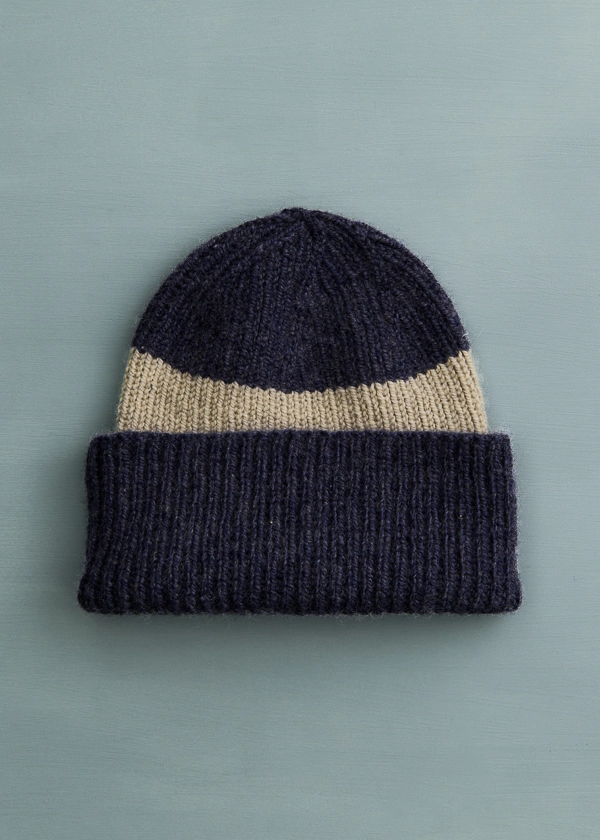
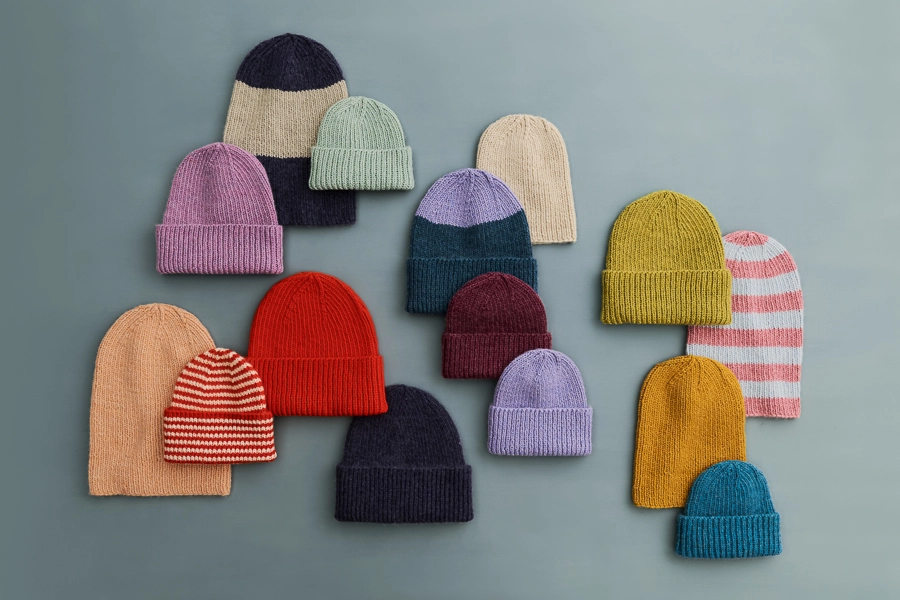
Its reputation was built on a one-color design, but a variation on a classic is always welcome, and so, we’ve branched out with four new design options: thick or thin stripes and two or three colorblocks. And still sized for babies, kids, and grownups large and small, everyone gets just what they want!

You knit this hat in an easy 1×1 rib (that means, knit 1 stitch, purl 1 stitch, and repeat!). This kind of ribbing is quintessential for a watchman-style hat because the fabric naturally contracts, keeping your hat firmly on your head. It also creates a deep and lofty texture, which traps air and keeps your head insulated, too!
You work the 1×1 rib for long enough that you’ll have a generous folded cuff, if you want one, and then you shape the crown with regularly spaced knit-2-together decreases, which create a lovely spiral detail.

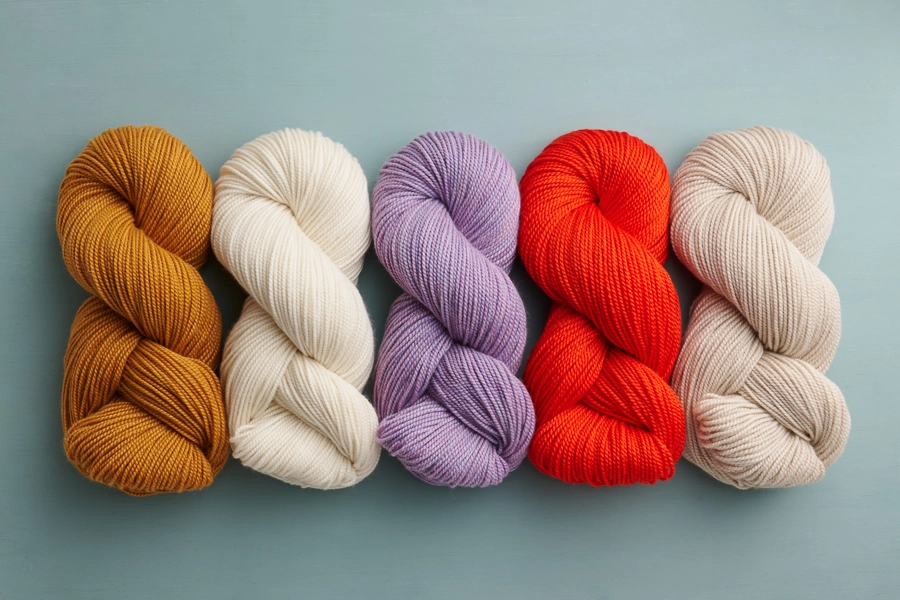
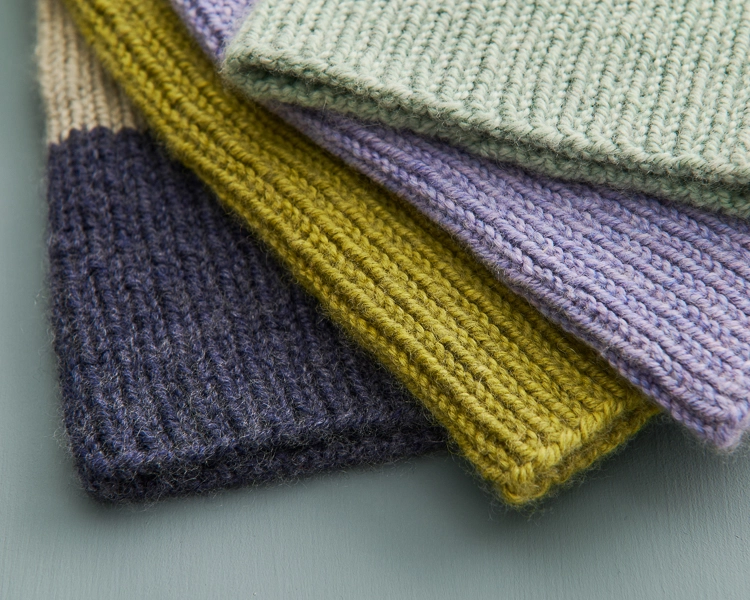
Something else that makes this hat so special? Our over-the-top gorgeous Cashmere Merino Bloom. Twenty-five percent of this yarn is the softest Mongolian cashmere you can imagine, enough that you really feel its incredible softness and wonderful warmth and enough that you see a delicate halo bloom around your hat.
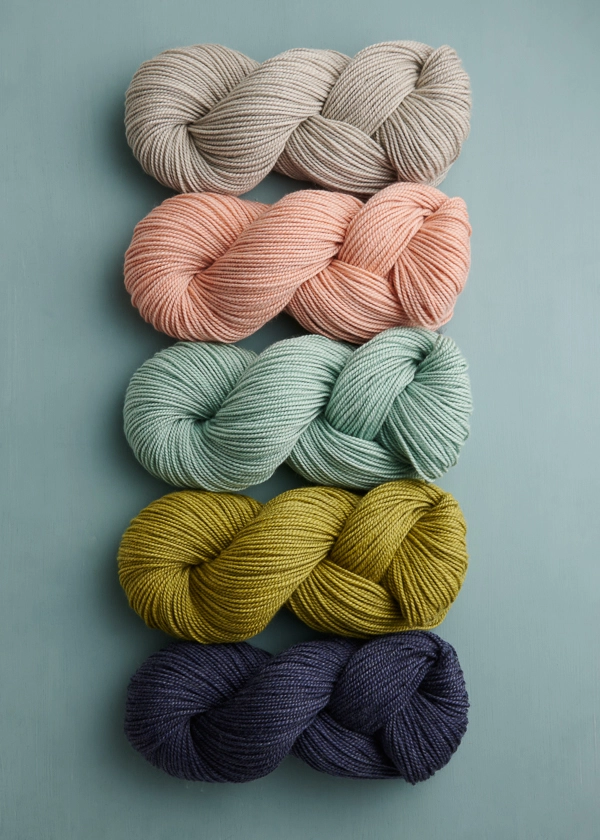
The other 75% of Cashmere Merino Bloom is extra fine merino… Also very soft but with the characteristics of wool: sproingy-ness to help the hat keep its shape and durability so it has a nice, long life.

You only need one skein for a solid hat in any size, except the largest, which requires two, so dive into our palette of over twenty gorgeous colors. If stripes or colorblocks are calling to you, we also have two-skein Classic Ribbed Hat Bundles for ready-to-go color combinations!
Designed by Purl Soho designer, Jake Canton. Click here to see even more of Jake’s designs!
Share your progress and connect with the community by tagging your pics with #PurlSoho, #PurlSohoBusyHands, #PurlSohoClassicRibbedHat, and #PurlSohoCashmereMerinoBloom. We can’t wait to see what you make!
Materials

Purl Soho’s Cashmere Merino Bloom, 75% extra fine merino and 25% cashmere. Each skein is 218 yards/ 100 grams.
- Solid Color Version
- Color A: 1 (1, 1, 1, 2) skein(s); approximately 110 (140, 180, 215, 260) yards required.
For our Baby samples, we used Vintage Jade, Wheat Flour, and True Turquoise; for Kid samples, we used Hydrangea Blossom, Fresh Fig, and Warm Honey; for Adult Small, we used Crocus Bud and Golden Green; for Adult Medium, we used Red Poppy and Conch Shell; and for Adult Large, we used Night Blue.
- Thin Stripe Version
- Color A: 1 skein; approximately 55 (70, 95, 110, 135) yards required
- Color B: 1 skein; approximately 55 (70, 95, 110, 135) yards required
For an Adult Small sample, we used Red Poppy and Heirloom White.
- Thick Stripe Version
- Color A: 1 skein; approximately 65 (85, 115, 130, 160) yards required
- Color B: 1 skein; approximately 60 (75, 100, 120, 145) yards required
For another Adult Small sample, we used Rosebud Pink and Icicle Blue.
- Two Colorblocks Version
- Color A: 1 skein; approximately 90 (110, 145, 175, 210) yards required
- Color B: 1 skein; approximately 20 (30, 35, 45, 50) yards required
For an Adult Medium sample, we used High Tide and Hydrangea Blossom.
- Three Colorblocks Version
- Color A: 1 skein; approximately 70 (90, 115, 140, 165) yards required
- Color B: 1 skein; approximately 40 (50, 65, 75, 90) yards required
For another Adult Medium sample, we used Night Blue and Reed Gray.
You’ll also need . . .
- US 3 (3.25 mm), 16-inch circular needles, for Adult sizes
- A set of US 3 double pointed needles, for all sizes
- Stitch markers, including one unique
Another option is to pick up a Classic Ribbed Hat Bundle! It includes 2 skeins of Cashmere Merino Bloom in two different colors. One bundle makes 1-3 Classic Ribbed Hats, depending on the size and style (see yardage recommendations above to make your calculations!). Choose from 11 pretty pairs…
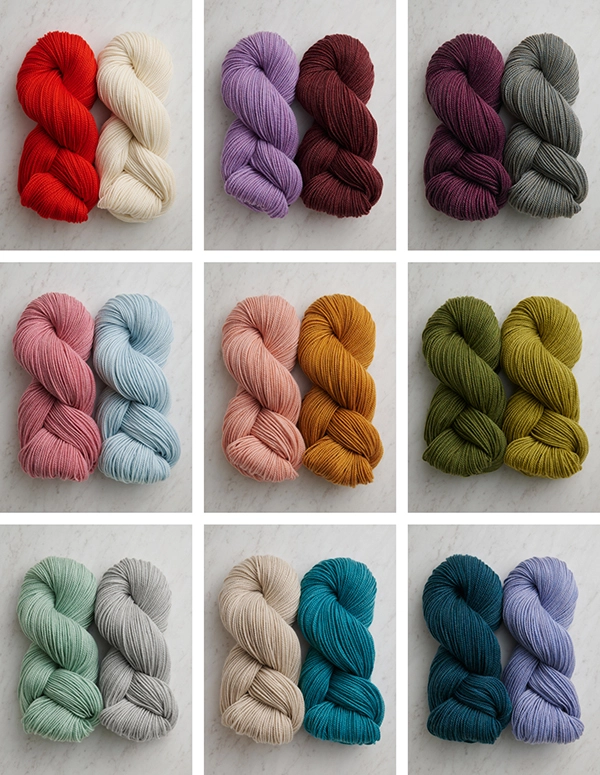
TOP ROW: Red Poppy + Heirloom White, Crocus Bud + Red Mulberry, Fresh Fig + Tide Pool
MIDDLE ROW: Rosebud Pink + Icicle Blue, Conch Shell + Warm Honey, Fresh Pickle + Golden Green
BOTTOM ROW: Vintage Jade + Dove Gray, Wheat Flour + True Turquoise, High Tide + Hydrangea Blossom
NOT PICTURED: Night Blue + Reed Gray, Charcoal Onyx + Heirloom White
GAUGE
32 stitches and 33 rounds = 4 inches in 1×1 rib, unstretched
SIZES
Baby (Kid, Adult Small, Adult Medium, Adult Large)
- Finished Circumference (unstretched): 10½ (12, 13½, 15, 16½) inches, comfortably stretching to approximately 13–16 (15–18, 17–20, 19–23, 21–25) inches
- Finished Height (uncuffed): Approximately 7¾ (9, 10¼, 11¼, 12¼) inches (Striped versions may be slightly longer than solid and colorblock versions.)
NOTES
SWITCHING BETWEEN KNIT + PURL
For help switching between knit and purl stitches, visit our Switching Between Knit + Purl Tutorial!
DOUBLE POINTED NEEDLES
For tips on using double pointed needles to knit smaller sizes or for the Crown of any size hat, visit our Double Pointed Needle Tutorial!
PATTERN
Cast On: All Versions
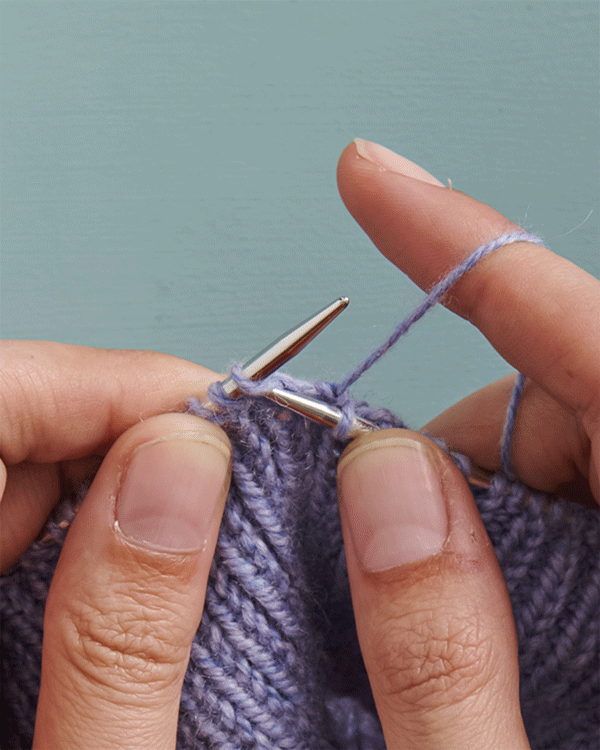
With Color A, cast 84 (96, 108, 120, 132) stitches onto double pointed or circular needles. We used a basic Long Tail Cast On.
Place unique marker and join for working in the round, being careful not to twist the stitches.
Continue on with the instructions for the version you are making.
Body: Choose A Version
SOLID COLOR VERSION
Round 1: With Color A, *k1, p1, repeat from * to end of round.
Repeat Round 1 until piece measures 6¼ (7, 7¾, 8¼, 8¾) inches from cast-on edge.
Go on to Crown section, below.
THIN STRIPE VERSION
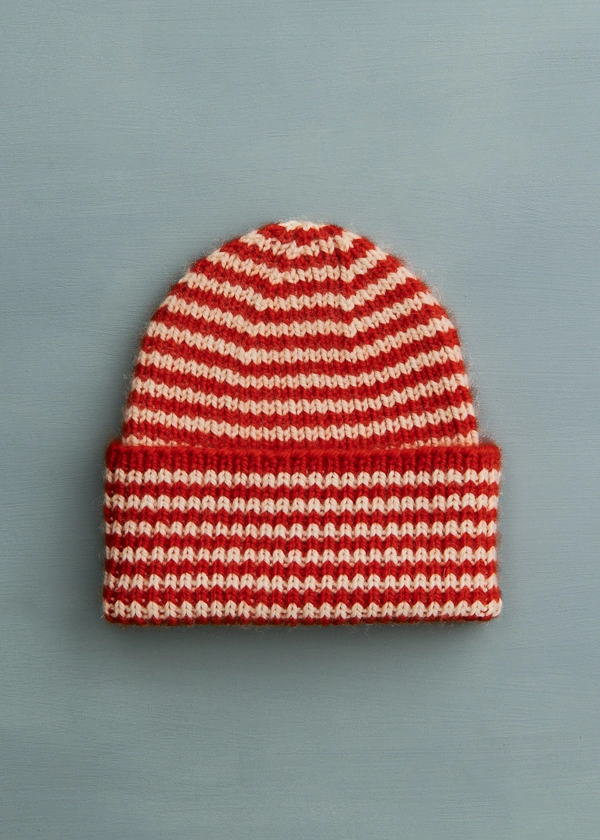
NOTE: For this version, be sure to carry non-working yarn up inside of hat when changing colors. For help, please visit our Stripes In The Round Tutorial.
Rounds 1 and 2: With Color A, *k1, p1, repeat from * to end of round.
Rounds 3 and 4: With Color B, *k1, p1, repeat from * to end of round.
Repeat Rounds 1–4 until piece measures approximately 6¼ (7¼, 7¾, 8¼, 8¾) inches from cast-on edge, ending with Round 4, then repeat Rounds 1–3 one more time.
Go on to Crown section, below.
THICK STRIPE VERSION
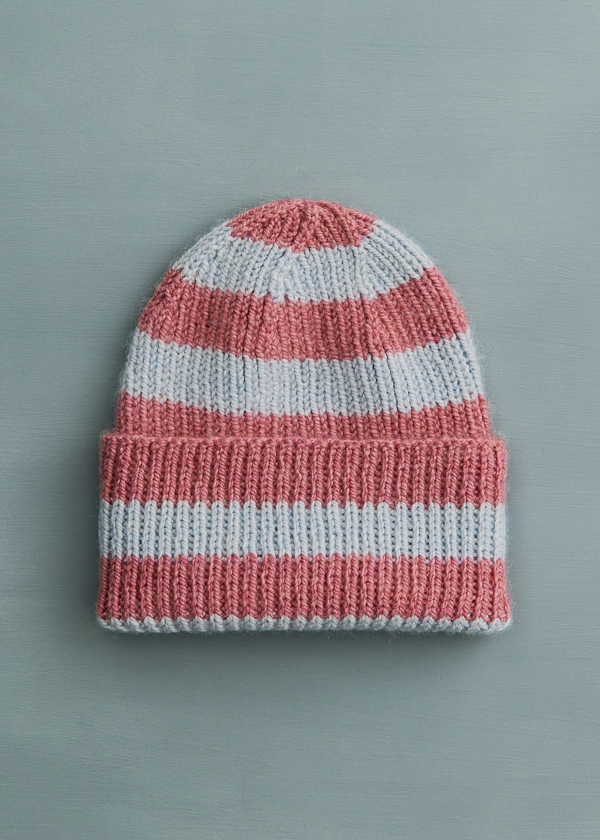
Rounds 1–8: With Color A, *k1, p1, repeat from * to end of round.
Cut Color A and join Color B.
Rounds 9–16: With Color B, *k1, p1, repeat from * to end of round.
Cut Color B and join Color A.
Repeat Rounds 1–16 two (2, 3, 3, 3) more times.
Baby + Adult Medium Sizes Only
Repeat Rounds 1–4 one time.
Go on to Crown section, below.
Kid + Adult Large Size Only
Repeat Rounds 1–10 one time.
Go on to Crown section, below.
Adult Small Size Only
Repeat Rounds 1 and 2 one time.
Go on to Crown section, below.
TWO COLORBLOCKS VERSION
Round 1: With Color A, *k1, p1, repeat from * to end of round.
Repeat Round 1 until piece measures 6 (6¾, 7½, 8, 8½) inches from cast-on edge.
Cut Color A and join Color B.
With Color B, repeat Round 1 two times.
Go on to Crown section, below.
THREE COLORBLOCKS VERSION
Round 1: With Color A, *k1, p1, repeat from * to end of round.
Repeat Round 1 until piece measures 2½ (3, 3½, 3¾, 4¼) inches from cast-on edge.
Cut Color A and join Color B.
With Color B, repeat Round 1 until piece measures 6 (6¾, 7½, 8, 8½) inches from cast-on edge.
Cut Color B and join Color A.
With Color A, repeat Round 1 two times.
Go on to Crown section, below.
Crown: All Versions
NOTE: If using circular needles, change to double pointed needles when necessary (see Notes). And, for Thin Stripe and Thick Stripe Versions, be sure to continue working stripes in pattern, and do not change colors for the final round.
Continuing with current working yarn . . .
Set-Up Round: Remove unique end-of-round marker, k1, replace marker for new end of round, *[p1, k1] 7 (8, 9, 10, 11) times, pm (place marker), repeat from * to end of round, omitting final stitch marker. [6 stitch markers placed, including unique end-of-round marker]
KID, ADULT SMALL, ADULT MEDIUM + ADULT LARGE SIZES ONLY
Round 1: [*P1, k1, repeat from * to 2 stitches before next marker, knit 2 together (k2tog)] 6 times. [6 stitches decreased]
Round 2: [*P1, k1, repeat from * to 1 stitch before next marker, k1] 6 times.
Round 3: [*P1, k1, repeat from * to 3 stitches before next marker, p1, k2tog] 6 times. [6 stitches decreased]
Round 4: *P1, k1, repeat from * to end of round.
Repeat Rounds 1–4 – (0, 1, 2, 3) more time(s). [84 stitches remain]
ALL SIZES
Next Round: [*P1, k1, repeat from * to 2 stitches before next marker, knit 2 together (k2tog)] 6 times. [6 stitches decreased]
Next Round: [*P1, k1, repeat from * to 3 stitches before next marker, p1, k2tog] 6 times. [6 stitches decreased]
Repeat last 2 rounds four more times. [24 stitches remain]
Next Round: *P1, k1, k2tog, repeat from * to end of round. [18 stitches remain]
Next Round: *P1, k2tog, repeat from * to end of round. [12 stitches remain]
Next Round: *K2tog, repeat from * to end of round. [6 stitches remain]
Cut yarn and thread tail onto a tapestry needle. Thread tail through remaining stitches. Pull taut and bring tail to inside of hat to weave in.
Finishing
Weave in the ends and block as desired.


The join for working in the round link is not working – gives a page not found.
Hi Rebecca,
Thanks so much for alerting us to the broken link! We’ll get that fixed as soon as possible, and in the meantime, you can access the tutorial here.
All the best,
Lili
Would the Knitting Yarn be an OK substitute for the Cashmere Merino Bloom?
Hi Sarah,
Thanks for reaching out! Knitting Yarn is a perfect substitute for Cashmere Merino Bloom since they’re both DK weight yarns and have similar fiber properties. As always though, we recommend knitting a gauge swatch before casting on your project, especially when you are substituting yarns. You may need to size up or down your needles in order to get the correct gauge!
All the best,
Lili
If you wanted to knit this using larger needles… does that change how you shape the crown?
Hi Rey,
Thanks for reaching out! If you’re knitting this pattern with larger needles, it’s likely that your gauge will be larger, so you’ll need to cast on fewer stitches so that the hat comes to the correct size.
To figure out your cast-on number, you will want to first knit a gauge swatch in pattern (if this is daunting, we have a wonderful tutorial called All About Gauge). Once you know how many stitches you are getting per inch, you can multiply that number by the finished circumference of your size and cast on the nearest multiple of 12 stitches. Then you can follow the pattern essentially as written!
The only place you’d need to do something differently is the beginning of the CROWN, as you mentioned. Here’s how to work Set-Up Round of CROWN with any multiple of 12 stitch count:
Set-Up Round: Remove unique end-of-round marker, k1, replace marker for new end-of-round, *[p1, k1] (cast-on / 12) times, pm (place marker), repeat from * to end of round, omitting final stitch marker which is end-of-round marker. [6 stitch markers placed, including unique end-of-round marker]
Hope this helps!
All the best,
Lili
Can you advise on sizing for this pattern? Is it worth buying into an extra skein of yarn to make the large size?
Hi Susan,
Thanks for reaching out! These hats are extremely stretchy, so most people will likely wear an Adult Small or Adult Medium. If you’d like to order an additional skein and try the Adult Large, then I wanted to let you know that we accept returns of skeins in their original condition. So if you purchase 2 skeins, I’d recommend only winding each one until you’re certain you need to use it. That way, you can return the 2nd one for store credit if you don’t end up using it!
All the best,
Lili
Can I use Plenty for this hat? I have some leftover from a cowl and want to now knit a hat. Thank you
Hi Renee,
You can definitely use Plenty for this hat, but you’ll need to adjust how many stitches you cast on so that your hat comes to the correct size! To figure out your cast-on number, you will want to first knit a gauge swatch in pattern. Once you know how many stitches you are getting per inch, you can multiply that number by the circumference of the size you’re making and cast on the nearest multiple of 12. Then you can follow the pattern essentially as written!
The only place you’d need to do something differently is the beginning of the CROWN. Here’s how to work Set-Up Round of CROWN with any multiple of 12 stitch count:
Set-Up Round: Remove unique end-of-round marker, k1, replace marker for new end-of-round, *[p1, k1] (cast-on / 12) times, pm (place marker), repeat from * to end of round, omitting final stitch marker which is end-of-round marker. [6 stitch markers placed, including unique end-of-round marker]
Hope this helps!
All the best,
Lili
Thank you! Recommendation on needle size for Plenty? I know gauge is important here as well but which size to start with?
And can I also assume that if a knit a 2 color version that two skeins is sufficient ?
Also, how can I exchange a blue skein for another color in Plenty?
Thank you!
Hi Renee,
We recommend using sizes US 8, 9, or 10 for Plenty! Since your gauge will be different from the pattern gauge no matter what, you can use whichever one you like best. And yes, 2 skeins of Plenty will definitely be enough for a 2-color hat! Regarding the exchange, I’d recommend taking a look at our Return Policy page–but let me know if you have any questions about that!
All the best,
Lili
Thank you!surprised to see the size needles you recommend since the pattern recommends a size 3. I actually did a small sample using size 3 with Plenty and I liked it. I will do the same with the bigger size, but I did like the smaller ones. Would that make sense? Thanks for your patience. I am still a bit of a beginner knitter so this is all new to me!
Hi Renee,
Oh wow, I’m surprised to hear that you like knitting with Plenty on size 3 needles! Since you’re using a much thicker weight yarn for the pattern, I recommended the needle size that would go with that yarn. Because the yarn is thicker, you’ll be changing the gauge no matter what, so it doesn’t matter what needles you use, as long as you’re comfortable knitting with the yarn on them. Once you settle on what needles to use and make a gauge swatch with them, you can follow the instructions in my first comment to determine your cast-on number. Let me know if you’d like any assistance with those calculations though!
All the best,
Lili
Thank you!
Hi Lily,
I have begun this project and using size 8 needles as recommended. Good so far. As I am rereading your instructions above for the crown, would I really follow the pattern as written? If I do that many rows for the crown as written in the pattern, won’t the hat be too big?
Thanks once again for your help.
Renee
Hi Renee,
Since you’ll have cast on fewer stitches, you’ll also end up working fewer rows for the Crown! Just repeat Rounds 1 – 4 until you have 84 stitches left, and then follow the rest of the pattern as written until the end!
All the best,
Lili
Hello, I’m looking forward to this autumn KAL. Thank you for offering this to the knitting community.
In the pattern, you offer a link to the long tail cast-on, which opens as the tubular long tail cast-on. If I were to choose this method, would I do the two foundation rows as the first two rounds?
Thanks for your advice,
Angela
Hi Angela,
We’re so sorry about the incorrect link! It’s been fixed in the PDF now, but the older version of the PDF still has the wrong link. I’d be happy to send you a new PDF if you’d like, just let me know!
We used the normal long tail cast-on for our samples of this hat, but you can also totally use the tubular cast-on! If so, then yes, you would need to work the foundation rows after casting on.
All the best,
Lili
I’m not able to find the needle size for this hat, I bought the cashmere merino bloom?
🤷🏼♀️
Hi Wendy,
Thanks for reaching out! We used size US 3 needles to knit our samples of this hat, but we highly recommend knitting up a gauge swatch in pattern to determine what size you should use. You may need to size up or down your needles in order to get the correct gauge! If you would like to learn more about this, we have a handy tutorial called All About Gauge, which you can find right here.
All the best,
Lili
Hi,
I’m sorry if this is a silly question but can you knit this hat using the magic loop technique?
Also, is the yarn needed for knitting the gauge swatch included in the estimates for length of yarn needed?
Hi Catherine,
That’s not a silly question at all, and yes, you can absolutely use the magic loop technique for this hat! It’s a great alternative to using DPNs.
In answer to your other question–sort of! The yardage we list is just the yardage for the hat, but since you can reuse your swatch yarn for the hat, it does technically include it, if that makes sense!
All the best,
Lili
I am knitting a child size of this hat. Is the circular needle size the same for all sizes.
Hi Suzanne,
Yes, you should be able to use 16-inch circulars for the Kid size, since 1 x 1 ribbing is so stretchy! If you feel like the stitches don’t quite fit around the needles though, I’d recommend switching to DPNs or magic loop for the entire hat.
All the best,
Lili
Hi would like to make this hat again but need it to be quick. I have bulky yarn but not sure how many stitches. It there a chart to help figure this out? or anther hat pattern I could follow?
Thank you
Hi Desiree,
Thanks for writing in! To figure out your cast-on number for a different weight yarn, you will want to first knit a gauge swatch in pattern (if this is daunting, we have a wonderful tutorial called All About Gauge). Once you know how many stitches you are getting per inch, you can multiply that number by the circumference of the size you’re making and cast on the nearest multiple of 12. Then you can follow the pattern essentially as written!
The only place you’d need to do something differently is the beginning of the CROWN, as you mentioned. Here’s how to work Set-Up Round of CROWN with any multiple of 12 stitch count:
Set-Up Round: Remove unique end-of-round marker, k1, replace marker for new end-of-round, *[p1, k1] (cast-on / 12) times, pm (place marker), repeat from * to end of round, omitting final stitch marker which is end-of-round marker. [6 stitch markers placed, including unique end-of-round marker]
Hope this helps!
All the best,
Lili
What is the best way to join the yarn in a 1 by 1 rib using the Cashmere Merino Bloom ?
Hi Carrie,
Thanks for reaching out! We recommend just beginning with the new skein and leaving the yarn tails be for the moment. Then, once you’re done with the project, you can weave in the ends on the inside of the hat! This creates the most invisible join.
All the best,
Lili
I love this Merino Bloom. I am interested in decreasing for a more “ flat” , non pointy top of hat. Any advice as how to proceed? Thank you so much for this lovely pattern.
Hi Cynthia,
Thanks for reaching out! For a flatter fitting hat, I would recommend just knitting the body to a slightly shorter length. The point at the top is really just created by the extra fabric when the hat is worn, but if the hat is worn more fitted to the top of the head, it’ll end up being much more flat!
All the best,
Lili
At what point do you switch from using circular needles to double pointed needles?
Hi Hannah,
Great question! You’ll need to switch to DPNs once your stitches feel tight or stretched out across the circulars as you work the decreases for the crown of the hat. That’ll indicate that the circumference of the stitches is smaller than that of the circular needles, so you’ll need to switch to DPNs to be able to knit around the smaller circumference. Hope this helps!
All the best,
Lili
I have a skein of the worsted Hedgerow. Could I use that for this and what would the needle size be? Thanks!
Hi Blair,
Hedgerow is a great option for this hat! We recommend using size US 6 or 7 with this yarn, but this hat is knit at a particularly tight gauge, so you could go down even further.
To figure out your cast-on number with Hedgerow, you will want to first knit a gauge swatch in pattern (if this is daunting, we have a wonderful tutorial called All About Gauge). Once you know how many stitches you are getting per inch, you can multiply that number by the finished circumference of your size and cast on the nearest multiple of 12 stitches. Then you can follow the pattern essentially as written!
The only place you’d need to do something differently is the beginning of the CROWN, as you mentioned. Here’s how to work Set-Up Round of CROWN with any multiple of 12 stitch count:
Set-Up Round: Remove unique end-of-round marker, k1, replace marker for new end-of-round, *[p1, k1] (cast-on / 12) times, pm (place marker), repeat from * to end of round, omitting final stitch marker which is end-of-round marker. [6 stitch markers placed, including unique end-of-round marker]
Hope this helps!
All the best,
Lili
How do you get the cuff to lay down so smoothly?
Hi Jodie,
Thanks for writing in! Since this hat is knit in 1 x 1 ribbing, the edge should naturally lay flat and shouldn’t curl at all. If you’re experiencing curling, would you be able to send a photo of your work to customerservice@purlsoho.com? That way, we can better visualize what’s going on!
All the best,
Lili
Do you recommend knitting one entire round where you want the hat to bend for the brim?
Hi Christie,
We didn’t do that for our samples of this hat, since it would leave a ridge of purl bumps on the bottom edge of the hat. But I can totally see the benefits of a knit round, so you can absolutely give it a try for your own hat!
All the best,
Lili
I see it mentioned that you can knit this hat using magic loop instead of dpn’s. Please explain or refer me to a video for help.
Hi Deborah,
You can find our tutorial on the magic loop technique right here!
All the best,
Lili
Im just not connecting the dots on the set up round for crown. I have 120 stitches, medium size, p1 k1 10 times place marker, BUT that only brings me to half the hat. What about other half of hat? Thank you so much for your time in helping me.
Hi Siobhan,
Thanks for writing in, and I’m happy to help! You’ll actually need to repeat the “[p1, k1] 10 times, pm” instructions 6 times total over the course of this round. Each repeat of this segment covers 20 stitches, so to cover all 120, you need to repeat the whole thing a few more times. Hope this helps clarify things!
All the best,
Lili
I’m not so good to knit with DPN so I would like to knit with circular needles but I think I need short needles and a short cable, isn’t it?
What length should the cable be?
Thanks 🇮🇹
Hi Simonetta,
If you want to avoid having to use DPNs, then the best option is to use the magic loop technique! If you’re unfamiliar with magic loop, it’s a super helpful way of using circular needles to knit really small circumferences, and we have a wonderful tutorial here. You’ll need longer circular needles actually, and I recommend using 40-inch needles in particular. Hope this helps!
All the best,
Lili
You can also use two same sized circular needles. Divide the number of stitches between the two needles and then just knit your pattern. You have to be careful that you always use the correct needle or you will end up with all the stitches on one needle. Oops! But that is easy to correct by slipping those stitches back onto the dropped off needle.
I always knit two rows before I enclose the round so that I can better see the rows and not get them twisted. The cast on thread is used to seam up.
I’m having fun knitting this pattern, but I’m not exactly sure about the length notation before I start the crown.
For the child size in a solid color it states “ repeat round one until piece measures 6 1/4 inches from the cast on edge”. Does this account for any cuff in the final piece? The picture shows a cuff so I’m a bit confused. Shall I knit beyond the 6 1/4 inch to get a cuff of a desired width?
Hi Shannon,
Thank you for reaching out! The 6 1/4 inches includes the length needed to wear the hat with the brim folded up, so you can proceed to the Crown shaping section of the pattern. I hope this helps!
All the best,
Cat
I must be missing something. I have knit and ripped out the crown multiple times. I am using the small adult size. When doing my set up row (k1, place marker then P1, K1 for 9 stitches, however then the 10th stitch that is currently a Knit stitch would need to be purled? When I do this it looks wrong. What am I missing. Please help!
Hi TerryAnn,
Thanks for writing in! The instructions for the Set-Up Round for the CROWN actually have you repeat [p1, k1] 9 times. This means that you’ll be knitting a total of 18 stitches, since you’re repeating 2 stitches 9 times. Hope this helps clarify things!
All the best,
Lili
I want to make this hat in an adult large but without a cuff. How long should the body of the hat be in order to wear it without a cuff?
Hi Phyllis,
Thank you for writing in. For a shorter hat in the largest size, I recommend knitting the body to about 6″ before starting your decrease section. This should give you a great fit without a cuff. If you aren’t totally sure, you could also try on the hat as you go but I would stop no longer than 6″. I hope this helps!
Happy knitting,
Gavriella
Hi,
I’m
Making this for a 2 1/2 years old girl. Her head circumference is 19” around.
I am choosing to make adult small size for her based on pattern specs. Since kid size will only stretch comfortably to 18”.
Does she have an abnormally large
Size head? Would the kid size work?
If I make adult small should I follow instructions exactly or adjust for the height?
I like a pretty thick cuff too.
Thanks!
Thanks!
Hi Natalie,
I think the Adult Small size is the perfect choice! It should fit her perfectly and allow some room for her to grow. And you can absolutely knit the hat shorter if necessary! I’d recommend having her try it on as you knit so that you can make sure it fits her, or adjust accordingly.
All the best,
Lili
Thank you Lili!
I’m just beginning to work the crown. I don’t oh destined the difference between rounds 2 and 4. Can you clarify what round 2 is instructing please?
Round 1: [*P1, k1, repeat from * to 2 stitches before next marker, knit 2 together (k2tog)] 6 times.
[6 stitches decreased]
Round 2: [*P1, k1, repeat from * to 1 stitch before next marker, k1] 6 times.
Round 3: [*P1, k1, repeat from * to 3 stitches before next marker, p1, k2tog] 6 times. [6 stitches
decreased]
Round 4: *P1, k1, repeat from * to end of round.
Thank you!
Hi Robin,
Great question! The only difference here is that one round is having you decrease at the end of those marked-off sections and the next round is instructing you to work in pattern. Ultimately, for rounds 2 + 4, you are just knitting the knit stitches, and purling the purls. Please let me know if you have any more questions!
Happy knitting,
Gavriella
Dear Purl Soho, I love you so much, but when I print this simple hat pattern it is 34 pages long! I understand there are numerous stripe variations, but it would be so appreciated if I could just print the basic pattern with gauge, sizes, cast on and crown shaping. I did edit the PDF to only print certain pages, but that was a long and tedious process. This is such a popular pattern, think of the trees we could save by not having everyone copy 34 pages!
Hi there,
Thank you for writing in! We completely understand and agree with you! By using the Print function on the pattern, you can actually get rid of the extra information you don’t want to print!
If you’re on a desktop version of the site, you will find a “print” icon in the right column just below the “Save To Favorites” button. If you’re on a mobile version of the site, you will find a “print” icon below the pattern and above the comments.
You can follow the easy on-screen instructions to delete whichever parts of the pattern you don’t want to print or save. For example, you may decide to shorten the pattern by omitting certain images or the list of materials. To remove images, click the drop down next to the image icon and change from 100% to 0%. You can also hover your mouse over any portions of the pattern you wish to delete, and click the trash can icon that appears. Then, you can click “Print” or “PDF” along the top left of the pattern preview box to print or save the pattern!
I hope this makes things a little easier but if you have any questions I would be happy to help!
Happy knitting,
Gavriella
I’m working the crown for adult xl. When I finish r1 and r2 of the decrease 4times each. I end up with 24 stitches on each of my 3 dpns instead of 24 total. Can you help me figure out what to do next? Thank you for sharing this gorgeous hat pattern.
Hi Melody,
Thank you for writing in! After taking a quick look at the math for this size, it seems that the first set of decrease instructions might have been missed. One way to backtrack is to identify the round right before the decreases, use scrap yarn/extra needle to pick all those stitches up, and then pull back to that round. You will want to then insert your needles to begin the decreases at the first set of instructions labeled KID, ADULT SMALL, ADULT MEDIUM + ADULT LARGE SIZES ONLY where you will knit your increases over 4 rounds. I hope this helps but please let us know if you have any other questions!
Warmly,
Gavriella
I’d like to knit this hat for a friend who has a 23″ head circumference in just one color. I have one ball of the cash merino bloom and was would like to have a 4 inch brim. Should I made the medium size or the large size hat? Will I have enough yarn to make the 4 inch brim?
Hi Kay,
Thank you for your question! This hat is tremendously stretchy so you should be fine with a medium size with a 4″ brim. If you want to play it completely safe, I would recommend knitting the large size and purchasing an additional skein just in case. I would wait to wind it until you know you need more yarn. That way, if you end up not using it, you could return the unwound skein for a full refund within 30 days or if after 30 days, we could issue you a store credit. I hope this helps!
Happy knitting,
Gavriella
Could you please email me this pattern? Thank you. Last minute birthday project I have to ship out. Thank you!
Hi Deb,
Thank you for writing in! You can enter your email directly into the box at the top of this pattern page and you should receive an email that says “Download your free Classic Ribbed Hat” straight away! I hope this helps but please let us know if you are running into any difficulty!
Warmly,
Gavriella
Hi! Could I possibly knit this hat using two strands of Quartz held together?
Hi Angela,
Thank you for writing in! You can definitely make this hat with two strands of Quartz. We always recommend making a gauge swatch when using alternative yarns just to be sure you can get the same gauge as the pattern. I hope this helps but please let me know if you have any other questions!
Happy knitting,
Gavriella
Hi Gavriella,
When casting on is it standard cast on or rib cast on slip knot, p1, k1 etc?
Hi Ash,
That is a great question! Since this hat has quite a bit of stretch, we were able to use a simple Long Tail Cast On but you can absolutely use a ribbed cast on as well if you prefer. I hope this helps!
Happy knitting,
Gavriella
Thanks for always supporting our questions!
I’m making this hat in a cashmere worsted for my son. I’d like to do a 3-1 stripe repeat. I know he will want to fold up the brim and am noticing that the front (main side) looks a bit better than the inside.
So, when he folds up the brim, the inside (less attractive) will be showing. Can you think of a fix for this? (Reversing the knit direction somehow…?)
Also, for a 3-1 repeat, which method would you recommend to avoid stripe jogs?
Thanks so much!
Hi Jenny,
Great question–and this is something many knitters notice about their 1 x 1 ribbing! You can definitely reverse the knitting direction midway through the hat. To do so, knit the length of the brim as normal, then flip the knit fabric so that it’s inside-out. Then, just keep knitting! The working yarn will be on the wrong side for the first stitch, but that’s okay. There will also be a little gap at the end of the round where you flipped the hat, but you can cinch that up with some scrap yarn at the end of the project.
In answer to your other question, I would not recommend using any technique to avoid a jog for this hat, especially with 3-1 stripes. There aren’t very many techniques to avoid the jog for 1-round stripes, and they’ll just make everything even more complicated! We’ve found that the purled ribs in the 1 x 1 ribbing obscure the jog significantly though, so it won’t be very noticeable anyway!
All the best,
Lili
Great advice, thank you!
I’m making the adult large hat in this pattern. My questions is: since the person doesn’t want a brim rolled back on the hat, how many inches is the crown decrease portion of the hat? I have to figure out when to start the crown decreases. Thanks so much. It’s difficult to know from the photos.
Hi Elizabeth,
Thank you for writing in! For the adult size large, the decrease section will add an additional 3.5 inches of length to your hat! I hope this helps but please let us know if you have any more questions!
Happy knitting,
Gavriella
Thanks so much. I appreciate it.
Hi! If I wanted to switch after the brim to stocking stitch, can I still follow the same decrease pattern for the crown but knit every stitch?
Hi Natasha,
Thank you for writing in! We wouldn’t recommend knitting stockinette stitch for the top of your hat as it would probably be quite larger due to the difference in gauge of the ribbing to stockinette. If you’d like to give it a try, I’d recommend adding in a lifeline before continuing on just to be sure you are happy with the fabric. I hope this helps!
Happy knitting,
Gavriella