Long Tail Cast On
Before you knit, you have to get the yarn onto the needle. This process is called “casting on.” There are lots of ways to cast on, but the most common method is the Long Tail Cast On.
And even under the rubric of Long Tail Cast On, there are several variations! Below you’ll find two: the Thumb Method and the Slingshot Method. They look exactly the same in the end, but perhaps the Thumb Method is a little easier for beginners. Try them both and tell us which you prefer!
Video Tutorial: Thumb Method
Step-By-Step Tutorial: Thumb Method
Here’s the same information as our video, but this time shown with still photos and text…

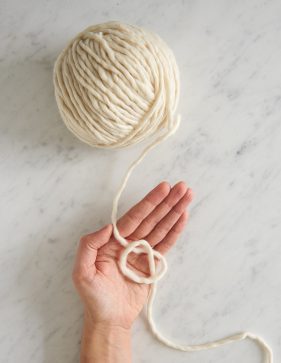
To figure out where to tie your slip knot, first measure out a length of yarn 3½ times the width of what you plan to make. So for a 6-inch wide scarf, measure out approximately 21 inches of yarn, and at that point, make a loop.
Bring the yarn that is on top around to the back of the loop.
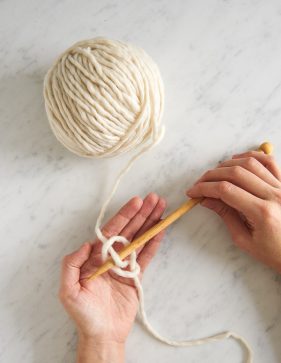
Slide the knitting needle under the yarn that is behind the loop.
Pull both lengths of yarn so that the slip knot is just grazing the needle. Try to resist the temptation to tug on the yarn, making your stitches too snug around the needle. If your cast on is too tight, your first row of knitting will be quite unpleasant and your finished piece will have a taut edge, so be gentle.
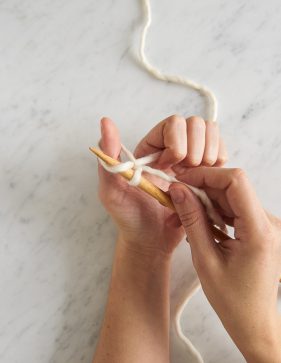
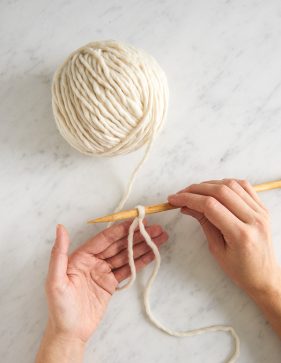
Loop the terminus end of the yarn (the “tail”) around your thumb. The tail should come from the needle, around the back of your thumb to the front of your thumb.
With the tip of the needle, pick up the front strand of the loop in an away-from-you motion (i.e. from front to back), sliding the needle up your thumb.
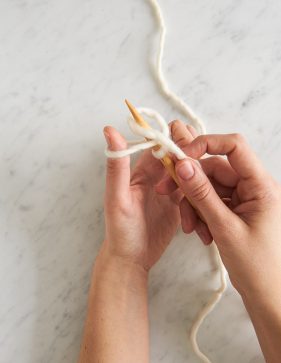

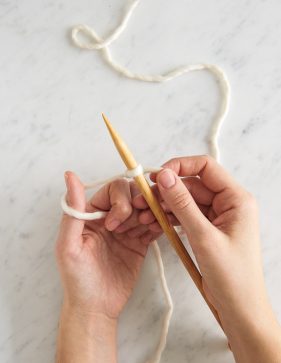
With your right hand, bring the yarn that is coming from the ball (the “working yarn”) behind and around the needle in a counter clockwise direction.
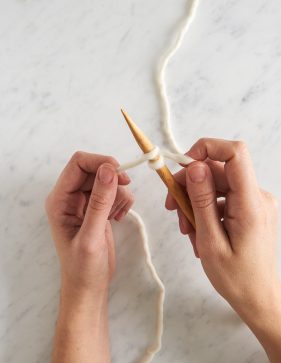
Now, with a toward-you motion (i.e. from back to front), bring the needle through the loop on your thumb, allowing the loop to pass over the tip of the needle.
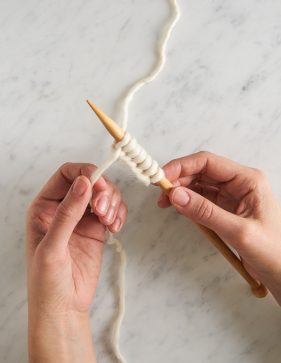
Slip your thumb out of the loop and pull both strands of yarn to gently secure the stitch on the needle.
Position a new loop on your thumb and continue to cast on in this manner until you have the correct number of stitches. (All patterns tell you how many stitches to cast on.)


I just got done visiting your we site and found it facinating. I had seen it mentioned at other sites and decided today was going to be the day that I checked it out. Needless to say, I am going to be a frequent visitor. Keep up your amazing work! Thank you very much.
Thank you so much for this thumb method! I’d only found the slingshot version before and found that really complicated. But the thumb method is so simple – just one extra movement followed by pretty much a normal knit stitch – so much easier to remember!!!
I just found a pattern where they ask for casting on with two threads. You seem like someone who knows a lot. Have you ever heard of such a method? And if yes, do you know where I could find a good tutorial? Thanks.
Thank you so very much for long tail cast on “thumb ” method.
I find it really hard to do normal long tail cast on as my fingers are numb on my left hand (nerve problem).
I am making tubular socks and need to gather up the toe.
🌸
Hi Katarina,
Can you give us a little more info? Does the pattern give the cast-on a name, does it have any directions at all? What is the pattern for?
Hi, just been looking at the pattern for needle/hook bag and I have no idea how to start off casting onto three needles? Could you post sone pictures or steps how to do that?
Thanks
A/x
P.S. I stumbled across your site today and love and will be recommending it to all of my craft-friends here in the UK!
My question is, how long of a tail should I use so I cast on the correct number of stitches without a lot of waste? Any formula? Or do I have to keep casting on until I leave a long enough tail? I keep having to undo it because I am not using a long enough tail….as fun as casting on is over and over. 🙂
Hi Jen B-
The rule is to use 3 times the length of the final cast on edge. So if you're making a scarf that's 6-inches wide you'd start with an 18-inch tail.
Thank you!
Molly
Thank you Molly! And thank you Jen B for asking this, I have just recently gotten into knitting and I hadn’t heard the going rule before. So glad to have an idea of a guideline now! Thanks again!
Hi, I was just wondering, is this the one you use in the DPN tutorial?
Hi Kiki-
Yes, this is the cast on we use for almost everything!
Thanks for your question!
Molly
A few words of instruction beyond the photos might help.
Hi,
getting back to long tail cast on and how much “tail” to use to cast on. If I am knitting in the round (an eternity scarf) and the finished size is approx. 52″ I should have a 156″ tail? That sounds SOO long!
Thanks for your help. I have also heard that wrapping the yarn around two needles (once around for each cast on) will also give the correct tail length. Any thoughts? THANK YOU>
Hi Lisa-
I know it sounds really long but it is called the long tail cast on afterall! There is nothing worse than getting to the end of a long cast on and running out of tail! I actually usually use more than the recommend 3X the length just to make extra sure I don’t run out!
Thanks for getting in touch and please let us know if you have any more questions!
Molly
Thank you for the 3X rule of thumb for the Long Tail Cast On!
Been there! Done that!
I have abandoned more than one project in frustration without knitting stitch #1!
We used to say use 1 inch for each cast-on stitch plus a bit at the end for holding on to.
Hi to all Purl bees! I wish you a very happy and creative 2015!
I have on little question for this marvellous scarf, that I plan to knit in red. When you put down the project, how do you know in witch row you are stopped?
Many wishes
Nancy
Nancy
Hi Nancy-
Thanks for getting in touch and happy new year to you as well!
I’m not sure which scarf you are referring to since this comment was left on the cast on tutorial. If you let me know I can give you some tips about figuring out where you are!
Best-
Molly
Please clarify: the photos seem to indicate that first move is — under the nearest thumb yarn then under the finger yarn and over and through. I have used a slight variation: under the thumb yarn then over the finger yarn and through — this gives a slightly stretchier cast on. The differences are interesting. I find that the under and under presents on the next row as slightly twisted and so you can knit that row through the back leg — or not, for an interesting variation.
Hi Em!
If I understand you correctly, our photos actually show under the nearest thumb, and then over first and around the index finger yarn. In either case, do what works best for you!
Happy Knitting!
Thomas
Thanks so much for this tutorial!
I’m practicing the long tail cast on and something weird keeps happening. The plies of the yarn on the long-tail side keep coming untwisted or unraveled from each other no matter how tightly or loosely I hold the yarn. The more I cast on, the more untwisted the plies on that side of the yarn become. Is this common?
Hi Rachael,
Thanks for writing us! This is a great question! I have found that when doing a long tail cast on there’s a lot of twisting that does cause plied yarns to untwist a bit. It should not effect the outcome of the cast on at all. One thing to be careful of is to make sure you don’t accidentally split the yarn.
Feel free to write back if you have anymore questions!
Happy Knitting!
Jake
Thanks Jake!
I have just finished the chevron baby blanket but I cannot, for the life of me, figure out how to bind off; the directions just don’t make sense. It says “bind off 5 stitches” – no problem here, then it says knit into the next stitch and leave the stitch on the left needle, bind off 1 stitch (what stitch do I bind off? This is horribly confusing and I am devastated that I can’t finish this blanket. Please help me.
Sandy Miller
Hi Sandy,
Thanks for writing us. This thread of comments is usually reserved for the long tail cast on but I’d be happy to clarify the Chevron Baby Blanket bind off. Firstly, you’ll bind off 5 stitches. Your next move is like a kfb (knit front and back), which is an increase you do on this blanket. Instead of doing a regular kfb, you will bind off the increase after it happens. So, you now have one stitch on your right needle. Knit into the next stitch on your left needle without dropping off the old stitch and then pass the stitch on the right needle over the stitch you just made. You will now knit into the back loop of the stitch on the left needle, dropping this stitch off and binding off as usual. I hope this clears things up a little. Best of luck on your bind off!
-Adam
If we are doing the long-tail-cast-on for two yarns (ie. Boyfriend Hat), are we casting on as if it were one yarn?
Hi Jean,
You’ve got it spot on! For the whole of this pattern, you will be treating the two strands of Line Weight as a single yarn.
Happy knitting!
Cassy
I’m just starting to learn how to knit, and since I crochet I thought I’d try starting with Continental knitting (because of the way tension is held in the left hand–as a rightie–similar to my crochet method). I’ve seen elsewhere that the “long tail cast-on” is another name for Continental casting on. Is this the case?
Thank you!
Hi Seonkoon,
Thanks you for writing in and welcome to knitting! Casting on methods are not specific to whether you knit English or Continental style. Both types of knitters can use the same cast on methods!
I hope that this helps and please let us know if you have any further questions!
Cassy
I’M GOING TO MAKE A SCARF FOR MY HUSBAND IN A HERRINGBONE PATTERN. IN SETTING UP THE ROWS IT SAYS TO USE THE WASTE YARN TO CAST ON 227 STITCHES. THEN TO USE THE WORKING YARN IN ROW 1 TO K1, [K1,YO] TOLAST STITCH,K1. WHEN I FINISH AND REMOVING THE WASTE YARN, HOW DO I NOT LOSE THE YO AND UNRAVEL ALL MY STITCHES? OR SHOULD I USE THE WASTE YARN OVER MY THUMB AND THE WORKING YARN ON MY FINGER TO CAST ON? I’M CONFUSED AND DON’T WANT TO LOSE IT ALL WHEN I PULL THE WASTE YARN!
Hi Dianne,
Thanks for writing in. If the pattern says to yarn over in the first row after the provisional cast on, I’d trust it. You want to make sure that you eventually work those yarn overs so they get locked in to the cast on edge. I hope I’ve helped. If not, feel free to write back!
-Adam
Thank you for the cast on tutorial . When working the first row do you recommend working into the back of the stitches ? I am try g to avoid a slack edge, or is there something I am omitting in the cast on?
Thanks
Hi Annette,
Thanks for writing in! Generally, after the long tail cast on, you can begin working your piece with no additional rows or alternations. If you are getting a slack edge, it may be that you are casting on a bit loosely. Try tightening up your cast on and seeing if that helps!
I hope that this helps!
Cassy
Hi!
I learned a different method of measuring out the tail yarn (wrapping the yarn around the needle for the same number of stitches you’ll be casting on) and I have quite a bit of a tail left over hanging off of my piece. What do I do with the leftover? Do I weave it in to the cast-on row? I’m working in linen stitch, if that matters.
Thanks,
Jill
Hello Jill!
Thank you for writing in! We recommend weaving in about an inch or two of your tail into the knit fabric and then snipping off the remainder. We’ve got a great tutorial on Weaving in Your Ends, which you can find by clicking the link! Please let us know if you have any more questions!
Best wishes,
Kumeko
very basic (dumb?) question: in using this method to cast on, will i use up the long tail in casting on, or will i be using the working yarn?
THANK YOU!
Hello Dawn,
Thank you for writing us- no question is a dumb question! When using this cast on method you will be working your tail with your working yarn to create your cast on.
I hope this clears things up. Happy knitting!
-Marilla
I have been knitting for over 60 years and never could get the hang of long tail cast on…;((((
I LOVE your thumb method–makes perfect sense to me–great tutorial and video…thank you so much hugs, Julierose ;)))
Hi Julierose,
Thank you so much for your kind words!
Happy knitting!
Carly
In patterns that call for long-tail cast on do we have to do that?
I usually use the slingshot method to cast on but I’m using the working yarn, not the tail. Is that called a “short tailed cast on”?
I guess I’m not really sure why you would do one over the other. I’d love to know though! It might make my life easier in some way.
Thanks!
Angella
Hi Angella,
Good question! Different styles of casting on look unique and provide different amounts of stretch. The long-tail method is good for stretchy edges and has a neat braided look. It is possible to use other cast on methods but be sure to use one that is well suited to your projects!
I hope this helps!
Carly
Thank you soooo much!! I love this long tail cast on! I have short fingers so most of the long tail cast on methods do not work for me!
I usually cast on using the long tail method, which means my first row of knitting is on the wrong side. but so many patterns assume that the first row of knitting is on the right side. This always ends up being confusing. I want the cast on edge to be properly oriented for the finished piece. Any suggestions?
Hi Katherine,
Thanks for reaching out! This is actually completely normal for the Long Tail Cast On – it does create a row of bumps similar to purl stitches which, if you are working flat and beginning with a right side row, will appear on the right side of the work. Most people consider this decorative or just an ordinary part of the cast on and don’t change anything, but if you are feeling particular about your cast on, we do have a tutorial for the Long Tail Cast On, Purlwise, which reverses the placement of the purl bumps so they will be on the wrong side of your project.
I hope that helps!
Julianna
The best, easily explained making it really easy to do. Thanks so much!
Hi there! I just watched your video for the thumb method of the long tail cast on. Since I’ve started knitting I’ve been doing something similar that has less steps. Often I make my slip knot and wrap the working yarn around my thumb, then I slip the needle under the thumb as many times as necessary to get the right number of CO stitches. Is there something about my method that makes the stitches fundamentally different? I don’t understand why you would do all the extra looping for the same effect.
Hi Dawn,
Thanks for reaching out! It sounds like you are describing a Backwards Loop Cast On – we don’t have a tutorial on this method, but if you search for “Backwards Loop Cast On” you will find many videos showing this to see if it’s the cast on you are used to. While the backwards loop cast on is easy to learn and fast to perform, it’s generally not recommended except in very specific circumstances. It creates a very loose, unstable edge that often has a loopy appearance and can easily stretch out and not bounce back to the original width. Most of the time, you will want to save the backwards loop cast on for situations where you need to cast on stitches in the middle of a row, such as at the underarm of a top down sweater or when creating a gusset for a mitten thumb.
Although it’s a bit more work to do the Long Tail Cast On, it’s much more attractive, stable, and elastic! If you aren’t sure, you could always do two swatches with scrap yarn, one cast on with your usual method and the other with a long tail cast on, and compare the edges to see how the two cast ons perform.
I hope that clears things up!
Julianna
Thanks how do u decide how many stitches to cast on
Hi Usha,
Thanks for writing in! If you are following a pattern, your pattern should tell you how many stitches to start cast on. If you are just practicing, you can cast on however many you like!
Best,
Julianna
I found the slingshot method much easier! Holding both the tail arms the working yarn in one hand helped me keep them straight and with adequate tension. The thumb method was tying me in knots!
Is this method good for a ribbed cuff (say a glove)? How do I work out how much long tail to leave with a cast on of 43 stitches?
Hello Diane,
Thank you for reaching out! I use this cast on for ribbed things all the time, you will just want to make sure your cast on isn’t to tight so that it will maintain stretch. To figure out where to tie your slip knot, first measure out a length of yarn 3½ times the width of what you plan to make. So for a 6-inch wide scarf, measure out approximately 21 inches of yarn, and at that point, make a loop.
Happy knitting!
-Marilla
For a pattern that calls for long tail cast on of 160, how much yarn would you need to hold back for the cast on???? Thanks
Hello Carole,
Thank you for reaching out! To figure out where to tie your slip knot, first measure out a length of yarn 3½ times the width of what you plan to make. So for a 6-inch wide scarf, measure out approximately 21 inches of yarn, and at that point, make a loop.
Happy Knitting!
-Marilla
Great job. This tutorial helped.
Hello,
I love your tutorials, thank you
from Montréal
That is the best advise ever. Everyone in NZ does it so quickly. Thank you. Am knitting socks from a pattern of yours they’re lovely ?
Has anyone else noticed that the tail end of the long tail cast on unravels? Is there a way to stop this from happening? Is it just me?
Hi Vanessa,
Thanks for writing in! Are you referring to the loose end of the yarn untwisting or separating? This can happen with certain yarns but, while it’s not particularly pretty, it won’t be an issue when you weave in your ends as it will be well hidden! If you like, you can always tie up the loose end in a slip knot or weave it in before you finish knitting to keep it from dangling and fraying.
Best,
Julianna
I appreciate the clear instructions for both methods. Definitely adding these to my YouTube library for reference.
Surprisingly, I prefer the slingshot method. Perhaps because it is reminiscent of playing cat’s cradle. Or that I can literally trace the steps with the tip of my needle.
Would it be possible for you to post instructional photos and videos for left-handers, as well? Sometimes it’s very confusing to try and transpose the directions. It would help us in the minority here. Thank you!
Hi Erica,
Thanks for writing in! I will certainly pass your request along to the design team, but in the meantime, if you’re just starting out, I would also consider learning to knit in the same way as a right-handed person! Knitting is a two-handed activity no matter which one is your dominant hand, and if you are able to knit in the usual manner, you will have a much easier time following patterns in the future. If you give it a try, you might prefer the continental method, which still results in knitting from right to left, but has you hold your yarn in your left hand!
I hope that helps!
Julianna
Another way to handle a very long cast on is to use two balls of yarn. Tie them together about 4 inches from the end, then use them like one long piece of yarn. Make your slip knot near the knot then cast on using either the thumb or slingshot method. When you have cast on all the stitches you need, cut off the “tail” end of the yarn at least 4 inches from your stitches and continue knitting from the other ball of yarn. No need to estimate the amount of yarn to use and little waste. Before weaving in the ends, you may chose to untie the knot you started with. Then weave in both ends.
I have been knitting for over 40 years, but have mostly been self-taught. I usually knit my stitches on to cast on, but am interested in the long tail cast on tutorial on your site. Is there an advantage to this type of cast on, rather than just knitting the stitches on the first needle? Does it end up being more elastic?
Hi Mary,
Thanks for writing in! Long Tail Cast on is probably the most common and easy to use of the cast on methods! It is especially great to use when you are casting on a large amount of stitches since it can go much faster than working a cable cast on method as you are describing!
All the best,
Gianna
I am new to knitting and have noticed that my cast-on row and my bind-off row don’t generally look the same. I have been using the knit cast on method, which is so much like a regular knit stitch and was thus very easy and quick to learn. I have wondered if my cast-on and bind-off rows looking different is because of which type of cast-on I am using. What method results in the edges looking more alike? (assuming they are supposed to look more alike)
Hi TA,
Thanks for reaching out! Cast on and bind off generally wont look the same since they are two very different processes!
Warmly,
Gianna
Okay, thank you. I thought I was doing something wrong! It’s good to know they aren’t supposed to look alike.
Thank you for all the tutorials you make, they are a great help for me,
Greetings from Luxemburg
Monette
Could someone please tell me what is the point of using this clumsy cast-on method? Unfortunately it seems to have become the new norm in your patterns. It seems absurd to me, and I don’t see any advantage at all to it. If there are any could you please tell us what they are?
Hi Lola,
Thank you so much for reaching out to us about this! It’s true that the long tail cast on has become a favorite for us and is featured in many of our patterns. This is because the long tail cast on creates a smooth edge that is nearly identical to a classic bind-off, but the fabric is stretchier than other cast-on methods. This method also makes it a lot faster to cast on, and easier to knit the first row of pattern since the stitches have extra stretch. However, can absolutely use whichever preferred cast on method you’d like if the long tail cast on doesn’t work for you!
I hope this helps, and please let us know if you have any other questions!
All the best,
Carly
What should I do with that first bit of yarn that wasn’t a stitch, but used instead of a slip knot?
Thanks,
Judith
Hi Judith,
Thanks for reaching out. If you’re beginning your cast-on without a slip knot, that first bit of yarn still counts as the first stitch!
All the best,
Lili
Good comments. Tutorials really work better for me.
Hi Penni,
We’re so glad this tutorial is helpful to you! If you’d like to see more of our tutorials, you can find those here (https://www.purlsoho.com/create/knit/tutorials/)!
Thanks so much for your comment!
All the best,
Cat
Help,
I am making the striped triangle wrap from purl soho.
I am a new knitter and confused by the long tail description since this is a triangle piece. When you discuss the finished project it is
73 1/4”. Using your calculation of 3.5 x the finished project width I would have 256” of tail.
Please let me know for your pattern how long the tail should be to start.
Thank you
Hi Sherri,
Thanks for reaching out. The finished width/length of the Striped Half + Half Triangles Wrap is only 40 3/4 inches, so you would only need about 143 inches for your tail! Hope this helps clarify things!
All the best,
Lili
I’m working on the nine-note seed stitch wrap as a brand new knitter. Maybe a tad ambitious. I don’t understand how to count stitches. I need to cast on 65 stitches. To keep count, is it 65 knots or 65 loops around the needle or something else?
Hi Debbie,
That’s a great question! You will always want to count the stitches on your needle. They will look like little loops and are where you are inserting your needle when working stitches. I hope this helps!
Happy knitting,
Gavriella