Long Tail Tubular Cast On
You know how a knit 1, purl 1 rib is nice and stretchy except for that taut line along the cast on edge? The Long Tail Tubular Cast On is designed to fix that problem! Once you try this cast on, you will appreciate how magical it is. The technique is surprisingly simple and very similar to the traditional long tail cast on, but it creates a beautiful, elastic edge, perfect for hats, socks, cuffs or anywhere you need a little give!
PHOTO INSTRUCTION
Note
If you are an especially tight knitter, try this cast on using a needle 1 or 2 sizes larger than the needle you will use for the ribbing. Test your tension out on a gauge swatch to see what’s right for you!
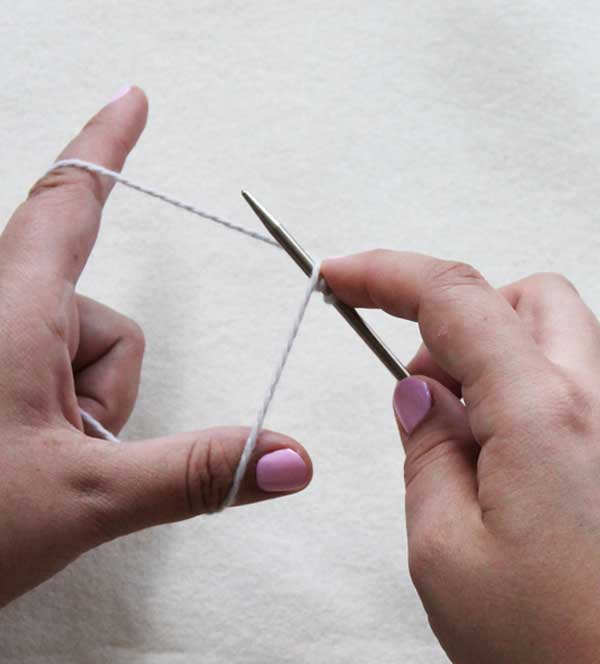
SETTING UP

The Long Tail Tubular Cast On begins exactly like a regular Long Tail Cast On: Pull a length of yarn 3 or 4 times the width of what you will knit. Tie a slipknot. Thread the slipknot onto the needle. Holding the needle in your right hand, grasp the yarn and the tail with your left hand, exactly as you would for a Long Tail Cast On.
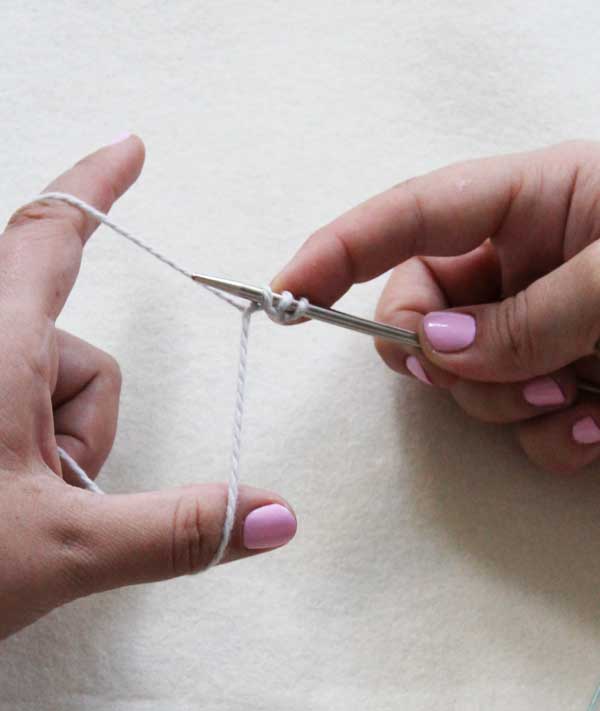
CASTING ON A PURL STITCH
Usually, the first cast-on stitch is a purl stitch. Here’s how to work one…
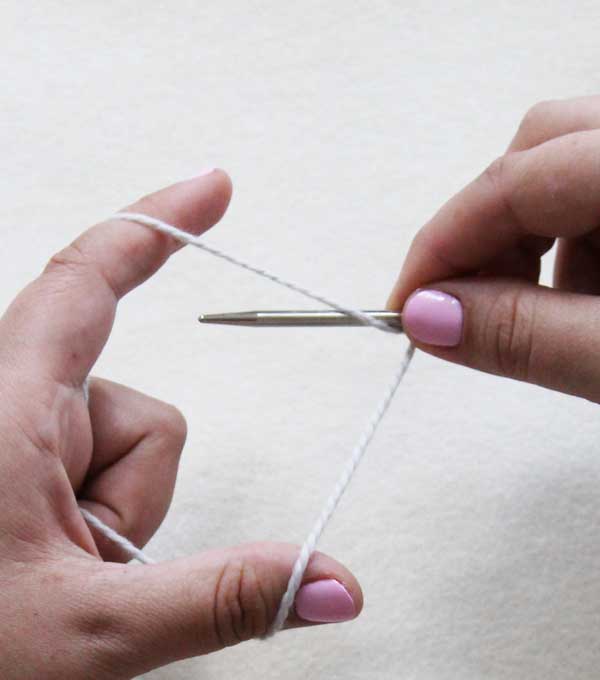
From back to front in a towards-you motion, dip the needle under the yarn coming off your left index finger.
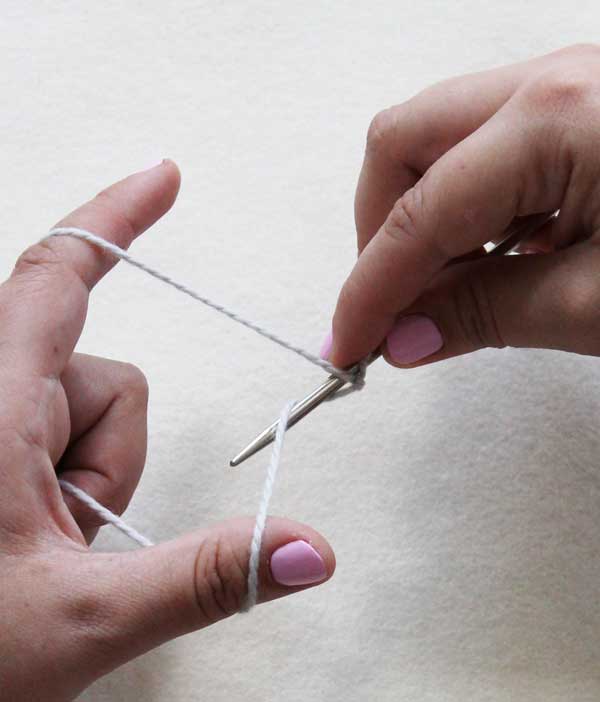
From front to back in an away-from-you motion, grab the yarn coming off your thumb, then pass the needle under the yarn coming off your index finger.
Gently pull to take up the slack. You can tell you’ve cast on a purl stitch because of the small bump below the stitch.
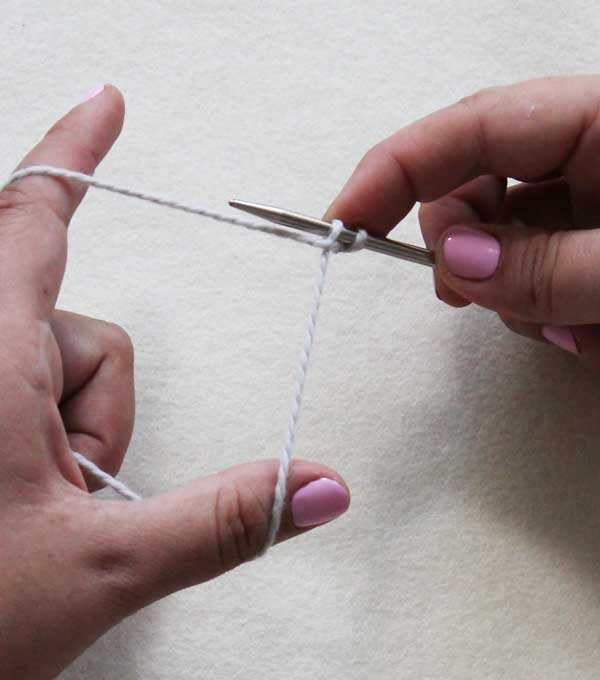
CASTING ON A KNIT STITCH
Now you will learn to make a knit stitch.
From front to back in an away-from-you motion, grab the yarn coming off your thumb.
From back to front in a towards-you motion, grab the yarn coming off your index finger and pass the needle under the yarn coming off your thumb.
Gently pull to take up the slack. The stitch you just cast on is a knit stitch. You can tell it is a knit stitch because it doesn’t have a bump below it.
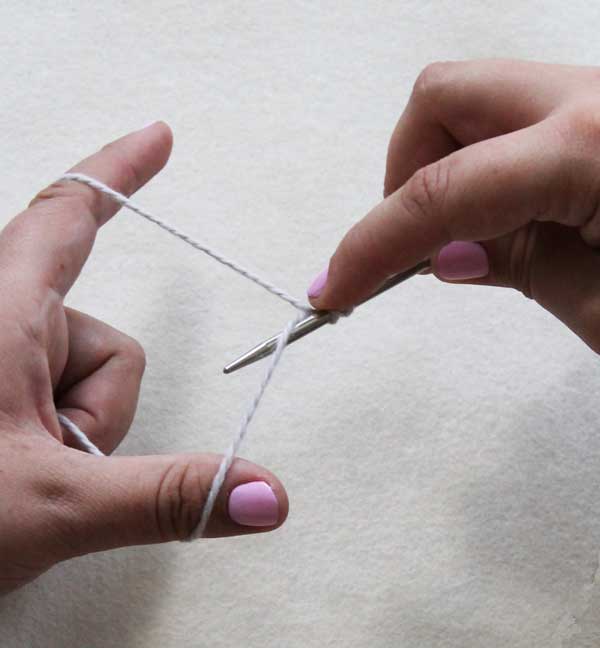
CONTINUE CASTING ON
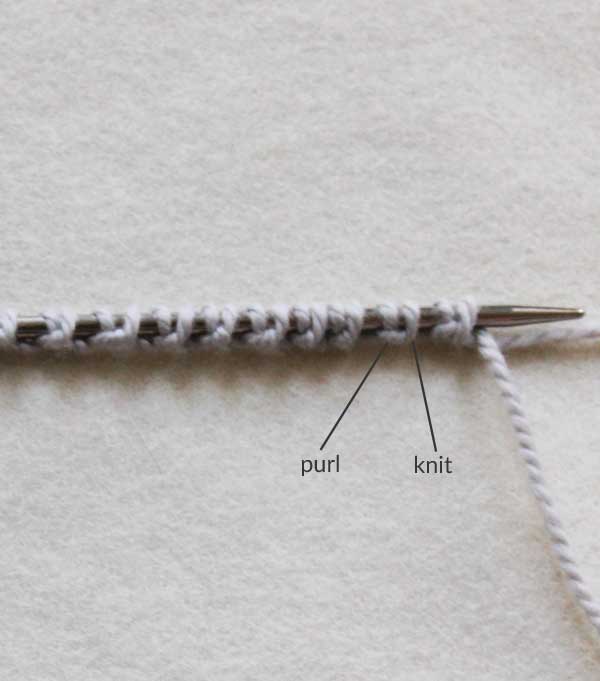
Repeat the above steps, making alternating purl and knit stitches, until you have cast on the correct number of stitches. Some patterns might ask you to start with a knit stitch after the slip knot, but most will start with a purl as shown above. And remember, as with any cast on, the slip stitch is the first stitch of your cast-on row.
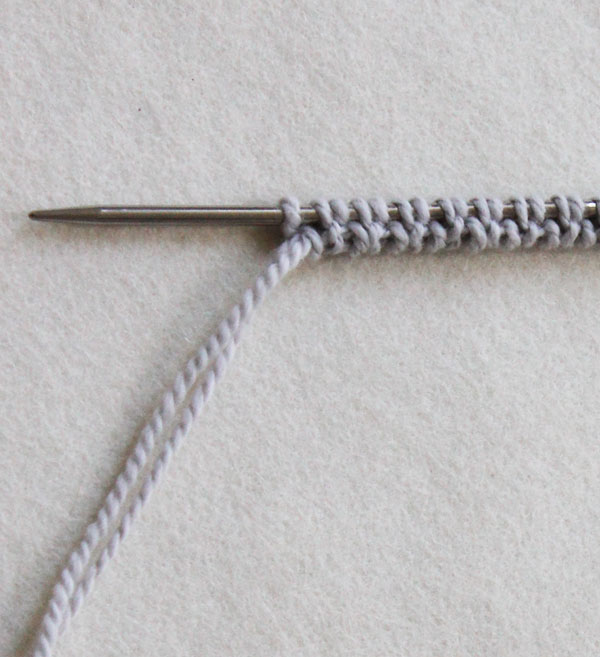
When you’ve cast on the required number of stitches, twist the tail around the working yarn once or twice and go on to the foundation rows.
FOUNDATION ROWS
Now you will work two foundation rows. Whether you’re making a hat in the round or a flat scarf, these two foundation rows are always worked flat. Find the foundation rows below that apply to your pattern.
AN EVEN NUMBER OF CAST-ON STITCHES, STARTING WITH A PURL STITCH AFTER THE SLIP KNOT
Foundation Row 1: *K1 through the back loop, slip 1 with yarn in front (wyif), repeat from * to end of row.
Foundation Row 2: *K1, slip 1 wyif, repeat from * to end of row.
AN EVEN NUMBER OF CAST-ON STITCHES, STARTING WITH A KNIT STITCH AFTER THE SLIP KNOT
Foundation Row 1: *Slip 1 with yarn in front (wyif), k1 through the back loop, repeat from * to end of row.
Foundation Row 2: *Slip 1 wyif, k1, repeat from * to end of row.
AN ODD NUMBER OF CAST-ON STITCHES, STARTING WITH A PURL STITCH AFTER THE SLIP KNOT
Foundation Row 1: *Slip 1 with yarn in front (wyif), k1 through the back loop, repeat from * to last stitch, slip 1 wyif.
Foundation Row 2: *K1, slip 1 wyif, repeat from * to last stitch, k1.
AN ODD NUMBER OF CAST-ON STITCHES, STARTING WITH A KNIT STITCH AFTER THE SLIP KNOT
Foundation Row 1: *K1 through the back loop (tbl), slip 1 (wyif), repeat from * to last stitch, k1 tbl.
Foundation Row 2: *Slip 1 with yarn in front (wyif), k1, repeat from * to last stitch, slip 1 wyif.
CONTINUE TO PATTERN
Your cast on is complete! Some patterns may have you work a third foundation row to set up for 2×2 rib or something more complicated. In most cases, you’ll be ready to continue to the rest of your pattern by following one of the two instructions below.
IF WORKING IN THE ROUND
Without turning the work, transfer all stitches to the circular needles you will use for the ribbing. With the working needle in your right hand, place a marker on the right needle and join to work in the round, being careful not to twist the stitches.
IF WORKING FLAT
Turn the work and continue to work in regular 1×1 rib.
FINISHING
When you weave in the ends, use cast-on tail to sew together the two sides of the cast-on edge.


When casting on for a top-down sock in the round, do I do the two foundation rows on straight needles and then join in the round or do I follow the foundation rows sequence with the stitches in the round and then continue in K1, p1 ribbing?
Your web site and patterns and yarns are terrific! Thanks for all your help, too!
Hello Doris,
Thank you for question and your kind words! I would recommend doing the foundation rows on straight needles. I find that it is much easier to do the foundation rows on straight needles because it gives you more stability.
I hope this helps and happy knitting!
-Marilla
Such a beautiful lovely video on long tail tubular cast on. This helped me immensely. The instructions in the video are so clear and explained so well . Lovved learning this. Thanks a million ?
I just wanted to leave a thank you for this guide and the video. It really helped to have a visual to get the method down to get started.
Can I use this cast on for 2×1 ribbing?
How about for 2×1 ribbing.
If so, do the foundation rows change at all?
Thank you….
Sorry, meant to say 2×2 or 2×1 ribbing
Hi Liz,
Thanks for writing in! Although this cast on will not work for 2×1 ribbing, you can modify it for 2×2 ribbing! We have outlined how to do this in our Lovely Ribbed Hat pattern. After working Foundation Rows 1 and 2, while working Foundation Round 1, you will switch the positions of every other stitch so that they are in a Knit 2, Purl 2 configuration, and then continue on with your 2×2 ribbing.
I hope that helps!
Julianna
Thank you for showing how to create a 2×2 rib!
I have been trying to do this cast on for two days,!
Can you please do it for me??
Hi Elizabeth,
If only I could!! Is there a particular step you are getting stuck on? If you are not already, I would strongly suggest working your tubular cast on with a straight needle rather than a circular needle, since it is much easier to keep everything from twisting and to keep track of where you are.
Best of luck!
Julianna
Thanks so much Purl Bee, your explanation and video are clear and simple! Just what I needed.
I tried this cast on with a hat and it worked perfectly. But now I plan to do a pair of mitts and wanted to knit them two at a time with magic loop. Is that possible?
Hello Sarah,
Thanks for reaching out! Yes, this should be fine. I would reccomend casting them on separately and then knit them onto the same needle just to make it easier on yourself.
Happy knitting!
-Marilla
I used a tubular cast on technique to make an Irish-style pullover sweater for my brother-in-law. All the pieces are done but during the time the pieces were ‘dormant,’ something happened to the cast-on edge of the back. When I pulled it out of the bag, the edge was gathered as for making an apron. When I pulled it flat, whatever was holding that tubular edge together was no longer there! The first line of defense is gone. It is unraveling backwards and I don’t have a clue how to repair it. I would love some direction to a video or person who could step me through my problem. Of course, I’m wanting to get this last piece blocked and the collar done for Christmas.
Hi Christy,
Oh no, that sounds like every knitter’s worst fear! The best thing to do would be to pick up the live stitches before they unravel any further, re-knit any ribbing that unraveled completely so the back is the same length as the front, and then work a Long Tail Tubular Bind Off. This should match the cast on edge of the front so you won’t be able to tell that there was any mishap!
Best of luck, and I hope that helps!
Julianna
Hi,
Thank you for this helpful tutorial and all your patterns. I am wondering if you have any tips for the best way to join in the round after the foundation rows? When I’ve used this technique, I get a large gap at the beginning of the row and its very visible when the rubbing is stretched. Or maybe tips for best way to weave in the ends after?
Thanks!
Hello Sarah,
Thank you for reaching out! You will always get a slight gap after connecting to knit in the round after completing your foundation rows. I always just sew it together using my leftover tail. I try to weave it in on the looser side as to maintain the stretch.
I hope this helps and happy knitting!
-Marilla
Hi
I am using the long tail tubular cast on to start your verse + reverse pattern as I prefer the way it looks compared to the normal long tail and I’ve used the tubular bind off for other patterns and intend to use it for this one. I wonder whether I should have used the set up rows called for in the pattern instead of the foundation rows described above? Or should I work the foundation rows above followed by the set up rows described in the verse + reverse pattern?
Hi Davinia,
Great question! You are on the right track – to use a tubular cast on for the Verse + Reverse scarf, you will need to first complete the setup rows above, which are considered part of the cast on. You will now need to work the set-up rows in the scarf pattern to establish the Double Knitting pattern.
Happy knitting!
Julianna
Thank you for such an amazing tutorial! Your mannerism and voice make you a wonderful teacher! Can’t wait to try this, I know this will be a great cast on method for so many of my projects! Do you have a tutorial on a similar cast off? I’m relatively new to knitting the correct way, lol….thank you so very much!
Hi Diane,
Thank you so much for writing in and the kind words! The Long Tail Tubular Bind Off is a perfect match for this cast on!
I hope that helps!
Julianna
I have been practicing this cast on and the foundation rows flat for the classic cuffed hat. I’m getting stuck when transferring the cast on from the straight needles to the circular needles. The instructions say not to turn my work. If all of my stitches are on the right needle after I’ve completed the 2nd foundation row, how do I transfer to the circular needles, so I’m not turning my work? Do I start with my left circular needle and slip the stitches from the right straight needle on? Then the first stitch I’ve slipped on to the circular needle would be on the right needle by the time they are all transferred?
Hi Emily,
Thanks for reaching out! If the end of the needle with the working yarn attached is on the wrong side after transferring the stitches, you can simply flip your circular needle around or change hands so that the needle with the working yarn is in your right hand before joining for working in the round.
I hope that clears things up!
Julianna
Could you please guide to work for 2k 1p ribbing. Thank you.
Hi ThuHa,
Thanks for writing in! Unfortunately we don’t have the resources at the moment to do a video tutorial of this variation of the Long Tail Tubular Cast On. We will keep your request in mind though for the future!
Best,
Julianna
Thank you so much for your tutorials! I always come back to your site when I’m looking for how-to’s! I had a question, after knitting the two foundation rows, does that mean I’ve finished one row, or is it two?
Hello Jo Ann,
Thank you for reaching out! This is such a good question, your foundation rows don’t actually count as pattern rows and are still considered part of the cast on.
I hope this helps and happy knitting!
-Marilla
Thank you for the tutorial. I’m knitting ankle warmers in a fisher man’s rip. I need the equivalent cast off for the other end, so to speak. Do you have also a tutorial for that? Or a keyword that I can look for?
Hi Jane,
Thanks for reaching out! We certainly do have a tutorial for the Long Tail Tubular Bind Off, which perfectly matches the cast on and is great for fisherman’s rib or brioche.
Happy knitting!
Julianna
I am trying to do a long tail tubular cast on for the color dipped hat and am having the hardest timekeeping my stitches all facing the right way. They keep rotating and I have a hard time determining what is front and what is back. Any tips for this?
Hi Michelle,
Thanks for writing in! This is probably the most challenging part of working a tubular cast on! I would suggest working the cast on using straight needles rather than circular needles, as this makes it much easier to keep the stitches aligned properly. Once you have completed the first or second foundation row, you should then be able to switch to your circular needles without any problems.
I hope that helps!
Julianna
Hi, thanks for this great tutorial. However, I am a little confused about what to do when casting on for a 1×1 rib with an odd # of stitches. If I cast on as instructed in your tutorial, my last cast on stitch will be a knit stitch instead of a purl stitch. This means that the first stitch when I start the first foundation row will look like a purl stitch (instead of a knit stitch like in your tutorial). So does this mean that I should slip the first stitch instead of knitting it like in your tutorial (since I’m supposed to knit the knits and slip the purls)? Or should I be casting on my first stitch as a knit stitch instead of a purl stitch so that my last cast on stitch is a purl stitch? Thanks for your help!
Hello Annie,
Thank you for reaching out! This is a great question. You have the exact right idea. You can do either options you present, but I reccomend casting on your first stitch as a knit so that when you turn your work and knit your first stitch it will be more secure.
I hope this helps and happy knitting!
-Marilla
I love learning a new way in knitting each time one comes up to
Do I hurray over to your website and get the instructions needed
To do the stitch. Thanks always for being there with such clear
8nstructions and demos.
Do you have a tutorial for left handed tubular rib cast on (and off)? I knit right handed but have problems casting on right handed. I know left handed casts on a bit differently from right handed but I can usually work that out. Many thanks. Your patterns are gorgeous and your yarns are as well.
Hello Elizabeth,
Thank you for reaching out! Sadly we do not have a reversed tubular cast on. I would reccomend trying it out with a small swatch to see what happens. I wish I had more of a helpful response than this!
Good luck and let us know how it goes.
-Marilla
Thank you for the tutorial! One question…how do you recommend joining in the round with this method? I typically cast on one extra stitch and then k2tog to join…but it seems like maybe this isn’t ideal with this CO?
Hi Lauren,
Thanks for reaching out! You are correct that casting on an extra stitch wouldn’t work well with this cast on. You can join in the round by simply beginning your first row working into the first stitch you cast on. This does usually leave a small gap, but you can easily close it up when you weave in your ends.
I hope that helps!
Julianna
I have watched tons of videos about the tubular cast on and this is just the best and easiest way to do it. And it looks fabulous. I can’t understand why anyone would want to use those other more complicated methods when you can get the same results with Purl Soho’s method.
Thanks for the tutorial!!
Love this cast on. Would it be appropriate to use if continuing in seed stitch?
Hi Lynne,
Thanks for reaching out! The tubular cast on would be a great choice for doing seed stitch. After you do the cast on (including foundation rows) you will want to go straight into the seed stitch pattern knitting knit stitches over the purl bumps from the previous row and purl stitches over the knits. This will give you very clean edges with a little more stretch.
Happy knitting!
Julianna
I am supposed to cast on 99 stitches for my project so do I start with a knit or a purl because my last stitch on my first row says it is supposed to be a purl stitch. or can you end with a knit stitch. Does it matter when you turn your needle to work the next row if you do a knit or purl stitch? I am knitting The Weekender and I can’t get this tubular cast on figured out with the odd number of stitches. Thanks
Hi Shelia,
Thanks for reaching out! I think that I can help! For the Weekender (which I am also working on), your first row after the cast on will begin with a purl. This means that the last stitch that you cast on will be a knit. Then you turn the work from the cast on to begin working the first row, this will set you up to purl your first stitch.
I hope that this helps!
Cassy
Thanks so much for your help. I want to make sure I get this right. So after my first row you said to start with a purl so does that mean to slip that first stitch with yarn in front then the next stitch will be knit in the back of the stitch? I hope this makes sense
Hi Shelia,
Thanks for writing back! After you cast on, you turn the work so that you are set up to begin. With this in mind, the last stitch that you cast on, which was a knit on the side you cast it on, is now a purl on the front side of your work. There is no need to slip the stitch! Just begin as instructed in the pattern!
Best,
Cassy
Ok I think I understand. So one row and I am ready to start my pattern instructions ? For some reason I thought I would have 3 foundation rows then I started the pattern.
I am in the same boat, casting on odd stitches for the Weekender. Referring to your first reply, if the last stitch is cast on as a knit, then you turn to begin the 2 foundation rows, don’t you need to slip the first stitch on foundation row 1? Then when you end that row and begin foundation row 2, what should that first stitch be? A slipped purl or a knit? After foundation row 2 it needs to be set up to begin the pattern, Row 1, with a P1, then K1, P1 to the end.
Hi Julia,
While I am not an expert on the Weekender and it is not one of our patterns (so I am not able to give insight into it), I am happy to try to help! The first row after the cast on begins with a P1 so you will purl the first stitch. For our tutorial we do have 2 foundation rows but I do not see them mentioned in Andrea’s pattern. It may be worth reaching out to her for some clarification if she is suggesting working the foundation rows as we do or if they are omitted.
Best,
Cassy
Hello – what would one do to fix a dropped a stitch during the first foundation row? I accidentally dropped the “purl” stitch from my left hand needle and now it is an open loop. Is there a way to save it or will I have to start from the beginning again? Thank you!
Hi Aleks,
Oh no, that is a tough one! Picking up a dropped stitch that has unraveled all the way through the cast on is always very difficult, and even more so in a tubular cast on. Because you are only on the foundation rows, I would recommend starting the cast on over. It’s always a let down to start over, but it will look much better in the end!
Best,
Julianna
I am using your long tail tubular cast on for a hat.I need 72 cast on stitches and am having a terrible time keeping it from getting twisted on a straight needle when I try to do my first foundation row. Then I am not sure how much to turn to untwist the row. Any tips?
Thank you
Hi Rita,
Thanks for reaching out! It is almost unavoidable that the cast on twists around the needle when starting a tubular cast on and it can be quite frustrating! To add to the frustration, because the initial cast on is very unstructured, at times it can look like it is twisted when it actually isn’t. Rather than trying to untwist the whole cast on before beginning, I would go ahead and start Set-Up Row 1 and pay careful attention to what each stitch looks like as you work it. As you become familiar with what the knit and purl stitches look like, you should be able to decipher each stitch when you come to it in the twisty sections.
Best of luck, and I hope that helps!
Julianna
Hello!
I guess this applies to this and the regular long tail cast on, but I am looking to make the Double Knit Blanket, hence the comment here.
Do you have any recommendations/tips for figuring out how long the long tail should be for a blanket? Or how to manage that much tail? I know the instructions say 3-4 times the amount of yarn to project width, but for a blanket, that amount of tail seems quite a lot.
Thanks for any help you can provide!
-Amber
Hi Amber,
Great question! There are a few ways to determine how much yarn is needed to work a long tail cast on. My favorite is to cast on about 10 stitches and then unravel those stitches, carefully holding on to the tail and first stitch, so you can use the length of yarn that was used to cast on 10 stitches to measure out how much you will need for the full amount. Another method that is almost as accurate but a bit faster is to wrap your yarn around your needle once for each stitch and use that tail to cast on. If your tail is very long, it might be helpful to wind it around a yarn bobbin or just into a ball on itself to keep it contained while you cast on.
I hope that helps, and happy knitting!
Julianna
I would like to move forward to make the Double Knit Blanket however, I would like to clear up the Tubular Cast on. My question or where I am getting confused is on the 2 foundation, would I use just yarn A or both A and B yarn? If so how?
Hi Cate,
Thank you for writing in! If you want to use the Long Tail Tubular Cast On for this blanket, cast on 294 stitches (or 414 for the larger size) with Yarn A and your larger needles and stop before knitting the two foundation rows on the tutorial page. Instead of working the foundation rows, switch back to your Double Knit Blanket instructions and work the Set-Up Rows instead (I inserted them below for your convenience):
Set-Up Row 1 (wrong side): Turn work (see Notes) and with Yarn A,*k1, slip 1 with yarn in front (wyif), repeat from * to end of row.
Set-Up Row 2 (right side): Turn work and with Yarn B, *k1, slip 1 wyif, repeat from * to end of row.
I hope this helps! Happy knitting!
Gaby
Does the beginning slip knot count as the first stitch? For example, my pattern says to cast on 88 stitches, so do I begin with the slip knot and then cast 88 more stitches on (starting w/ pearl & ending w/ a knit stich), or do I cast on 87 stitches after the slip knot (starting w/ pearl and ending w/ a pearl stitch)? I’m making the Classic Cuffed Hat and having a hard time with this tubular cast on. I am also confused on what type of stitch to start with for the 2 foundation rows. The pattern says start with a knit for both of the foundation rows, but wouldn’t you alternate since you are turning work? So if I end with a knit stitch on cast on row, then should I start with a pearl stitch for the first foundation row and then start with a knit stitch for the 2nd foundation row?
Hi Maranda,
Thanks for reaching out! This is a great question- the slip knot does count in your total cast on number, so as you mentioned you’ll only need to work the tubular cast on for 87 stitches. Although the tutorial above has you work the first stitch as a knit, patterns often will often have their own directions. In this case you’ll want to follow the specific instructions from the Classic Cuffed Hat pattern, which asks you to start with a purl stitch. I’ve included those Beginning instructions from the hat pattern below for your convenience:
BEGIN
With the straight needle (or the larger circular needles, if you wish), use a Tubular Cast On to cast on 72 (80, 88) stitches. The first stitch you cast on, after the beginning slipknot, should be a purl stitch. Turn the work and do not join.
With the same needle, work two Foundation Rows, as explained in our Long Tail Tubular Cast On Tutorial:
Row 1: *K1 through the back loop, slip 1 with yarn in front, repeat from * to end of row. Turn.
Row 2: *K1, slip 1 with yarn in front, repeat from * to end of row. Do not turn.
I hope this is helpful, but feel free to reach out if you have any further questions!
Happy knitting!
Gaby
I don’t see FOR DOUBLE KNITTING
Hi Lisa,
Thanks for reaching out! Our Double Knit Blanket offers some guidance for how to use the Long Tail Tubular Cast On in double knit projects. Once you have completed the initial cast on from the tutorial above, rather than moving on to the foundational rows, switch to the Cast On + Set Up section in the Double Knit Blanket pattern and proceed to Set-Up Row 1 & 2. I hope this helps!
Happy knitting!
Gaby
Hi! This was so helpful in helping me to bind on my first ever sweater! Does it matter if I end on a Purl or knit stitch? My pattern calls for an odd number! So then I think on my First foundation row is have to start with the yarn in front slip instead of the knit TBL or does it not matter and I always should start w knit TBL? Thanks!
Hi Emma,
Congrats on starting your first sweater! This cast-on method will work perfectly with an odd number of stitches. Another cast-on method I would try is the Make 1 Backwards Loop method. This is a super simple method that I use on all of my projects. It also has a nice elasticity, making it perfect for ribbing. If you find that the cast-on is too tight, try sizing up 1 needle size for the cast on then size back down when you start knitting. Both of these methods shouldn’t affect how you work the first stitch of each row, so I would just follow the instructions!
I hope this helps!
Happy Knitting!
Oscar
Can you use this tubular cast on method for 1X1 ribbing? I’m using Shibui Pebble to make a Julie Hoover pattern sweater in the round (bottom up, one piece) and I’ve seen a tubular cast on method for 1×1 ribbing using a provisional cast on with a crochet hook. I’m really confused about which tubular cast on would work best for such a fine yarn as Shibui Pebble. Perhaps your suggestion of starting on a straight needle would help. I’ve already tried doing this on a round needle and it came out very sloppy looing. Any suggestions would be greatly appreciated.
Hi Lisa,
This cast-on method would great on a 1×1 rib with your yarn! The looseness that occurs when doing a long cast-on with circular needles can be frustrating but is something that will even itself out as you continue working on the piece and with blocking. Casting on with a straight needle then transferring to a circular needle is a great way to keep the stitches even while working on a piece! Another suggestion I have is to cast on some of the stitches onto one needle and then the rest onto another circular or double-pointed needle of the same size. This way, you won’t have to transfer stitches onto a circular needle and won’t be pulling and stresses out the stitches so much, keeping them tidy!
I hope this helps!
Happy Knitting!
Oscar
Thank you so much for this very clear picture of making a stretchy cast on. I’d like to use it for a hat, but knitted in the round. It wasn’t clear to me how to do this. Should I do the initial set up rows on flat needles? Then transfer to circular? Won’t that leave a gap or separation where the set up rows are? Is there a visual tutorial that would explain this better?
Hi Rita,
Thanks for writing in! I am so glad to hear that you have enjoyed this tutorial! Unfortunately we don’t have a tutorial of working this cast on method in the round, but we do explain exactly how to work this cast on in the round for a hat in our Lovely Ribbed Hat pattern!
I hope this helps, happy knitting!
Gianna
For K2P2 ribbing, could one not just do two of the “knit” cast on, and then two of the “purl” cast on, right in the very first row? Instead of switching the stitches later? Or would that mess up the slipping of the purls in the other foundations rows?
Hi Susan,
Thanks for reaching out! That is an interesting thought! It may add an extra complication to working the foundations rows since the cast on stitches would be twisted in different directions, I would recommend sticking to the original cast on method to insure a clean and net look of your cast on and also that it will work correctly with the foundation row!
Warmly,
Gianna
This is a great tutorial. At this point all my straight needles are shorter double points. Is there any trick if you have to cast on many stitches for a larger sized project / sweater. Can I move stitches to circular needles in stages, or do I just have to find some longer straight needles that will fit the entire # of cast on stitches?
Hi Maureen,
Thanks for reaching out! I would recommend working with a longer straight needle for larger projects like sweaters! Using shorter DPNs and working in batches could get pretty confusing and unnecessarily complicate things!
I hope this helps, happy knitting!
Gianna
I’m trying to learn this cast on and I was curious what length of straight needles would you recommend for doing it on if you were making an adult beanie that’s recommends tubular cast on? Would you go for the 12 incl crystal palace or are the ones in the crystal palace straight needles set (I think 8.5 inch) sufficient?
Hi Evie,
Thanks for reaching out! The length of your needle depends a bit on how many stitches you’re casting on; you want to make sure that you’ve got enough room for all the stitches to sit comfortably on the needles. The 12″ would certainly give you enough room, but the 8.5″ might be fine as well (particularly if the hat is being knit flat and then seamed together). If you have a pattern that you’re working from, it might specify which length needle to use. If you were looking for circular needles, I’d say a 16″ would be sufficient for an adult size beanie.
I hope this helps, and please let us know if you have any other questions!
Warmly,
Kelsey
You are amazing! Not only are the instructions so easy to follow, but the way you present everything in such a light and pleasant way, I just feel like, “I will be able to do this, no problem!” Keep the tutorials coming!
Hi Linda,
Thank you for reaching out and for your kind words! I am so glad to hear that you have found our tutorial helpful!
Happy knitting!
Gianna
This is the best Long-tail Tubular Cast-on Tutorial I have seen. At last, I understand. All of your tutorials are clear and easy to follow. Thank you, so much.
I always find Purl Soho to have the most clear and concise instructions for knitting techniques, and the long-tail tubular cast-on is another wonderful demonstration! I did successfully complete a swatch with this cast-on, but I found the initial placement of the cast-on stitches to be rather fiddly. In my normal long-tail cast-on method, each CO stitch creates an individual knot (which will not easily unravel). With this tubular method, my CO stitches resemble slip knots; they do not have a strong knot and they unravel very easily. Is this normal for the tubular technique? Thank you!
Hi Prana,
Thanks for reaching out, and I’m so glad you found this tutorial helpful! What you’re describing sounds pretty typical of the long tail tubular cast-on (as well as the regular long tail cast-on). The cast-on stitches are definitely not knotted, so there is the potential to unravel. However, as long as you keep careful track to make sure they don’t fall off the needle, the stitches will be completely anchored into place once you complete the first row and as you continue knitting. Hope this helps!
All the best,
Lili
I love this cast on thanks to your wonderful videos. Is the tubular cast on also used for stockinette? All the tutorials refer to ribbing?
Hi Mimi,
Thanks so much for reaching out! Because of how the Long Tail Tubular Cast On method is worked, it provides a neat and stretchy edge for ribbed fabric. You can knit a similar edge for stockinette stitch by following our tutorial for a Knit-Hem!
I hope this helps!
All the best,
Carly
are you saying that I would do a regular cast on, knit 3-4 rows and then do this knit-hem to create the tube effect? Then continue in pattern beyond that ?
Hi Mimi,
The cast on for this technique is up to you and you can knit as many rows as you would like for the hem. You can change the width of the hem by knitting more rows or less rows of stockinette after your cast on!
All the best,
Carly
Suggestions for casting on 414 stitches for double-knit blanket? Straight needle isn’t long enough.
Hi Julie,
Thanks for reaching out. For our Double Knit Blanket, we recommend using 32-, 40-, or 47-inch circular needles, so that all the stitches fit! Hope this helps!
All the best,
Lili
I’m not a knitter😔 I love your format and the beautiful colors you post💕👍🏼.
Hi Trisha,
Thanks for the kind words! We’re always happy to help you become a knitter if you ever want to take those next steps and try!
All the best,
Gavriella