Long Tail Tubular Cast On
You know how a knit 1, purl 1 rib is nice and stretchy except for that taut line along the cast on edge? The Long Tail Tubular Cast On is designed to fix that problem! Once you try this cast on, you will appreciate how magical it is. The technique is surprisingly simple and very similar to the traditional long tail cast on, but it creates a beautiful, elastic edge, perfect for hats, socks, cuffs or anywhere you need a little give!
PHOTO INSTRUCTION
Note
If you are an especially tight knitter, try this cast on using a needle 1 or 2 sizes larger than the needle you will use for the ribbing. Test your tension out on a gauge swatch to see what’s right for you!
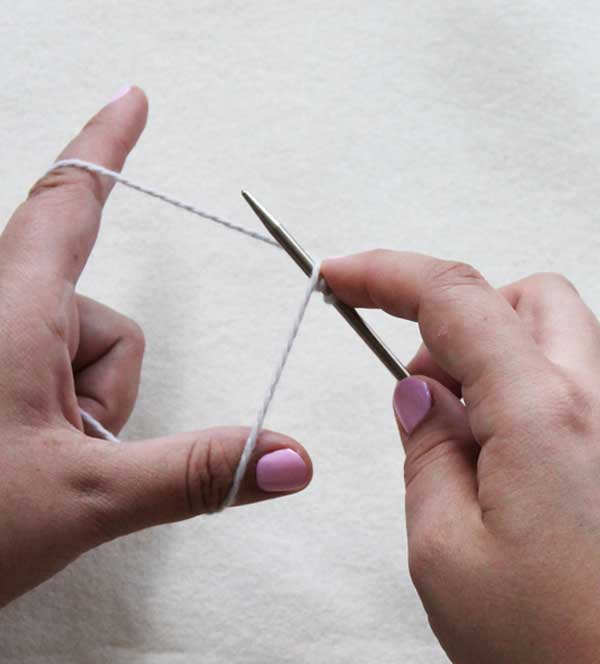
SETTING UP

The Long Tail Tubular Cast On begins exactly like a regular Long Tail Cast On: Pull a length of yarn 3 or 4 times the width of what you will knit. Tie a slipknot. Thread the slipknot onto the needle. Holding the needle in your right hand, grasp the yarn and the tail with your left hand, exactly as you would for a Long Tail Cast On.
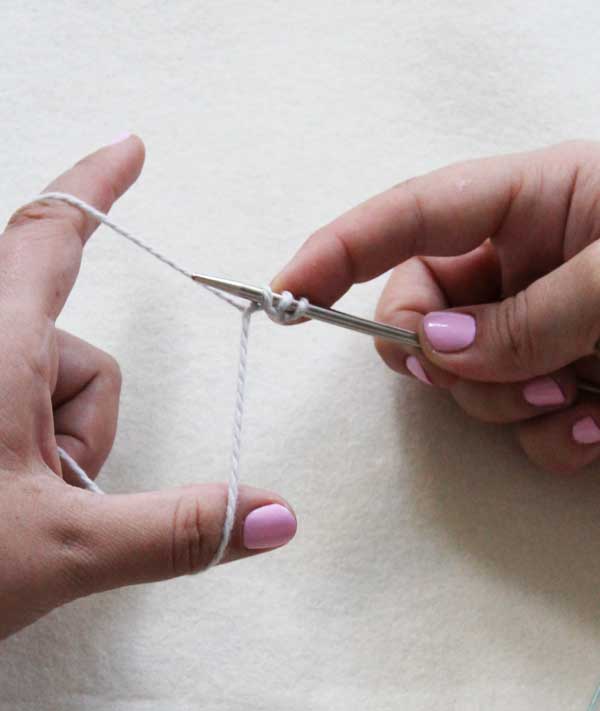
CASTING ON A PURL STITCH
Usually, the first cast-on stitch is a purl stitch. Here’s how to work one…
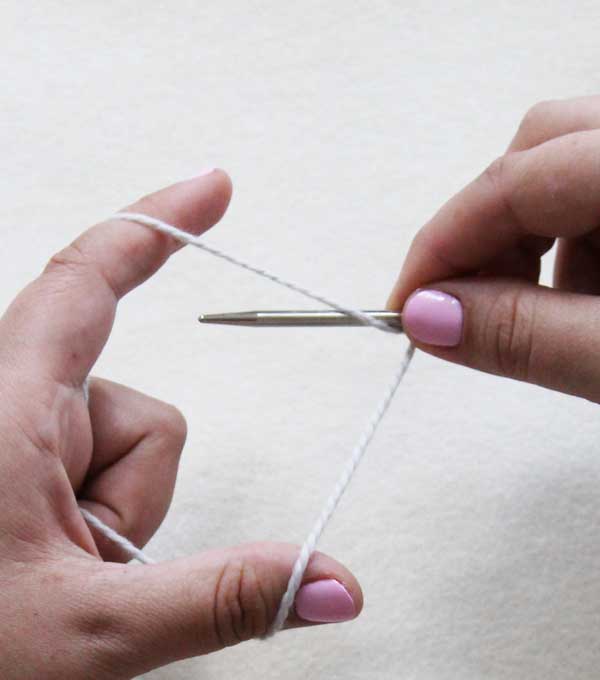
From back to front in a towards-you motion, dip the needle under the yarn coming off your left index finger.
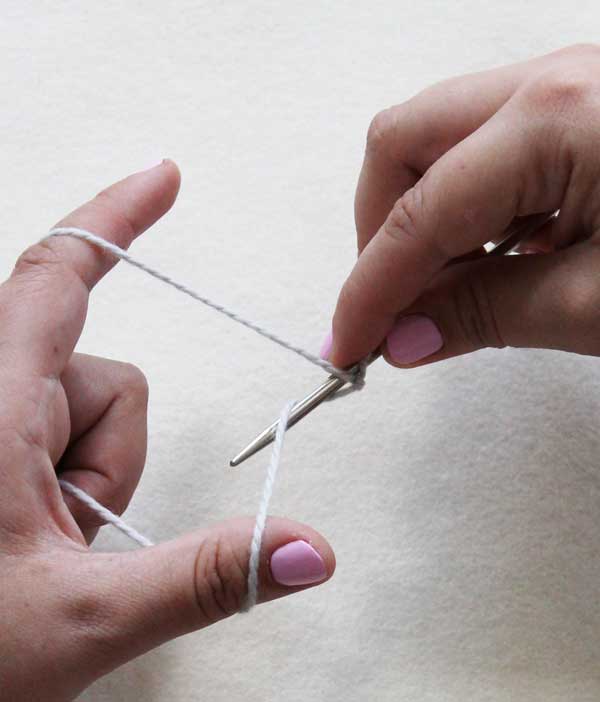
From front to back in an away-from-you motion, grab the yarn coming off your thumb, then pass the needle under the yarn coming off your index finger.
Gently pull to take up the slack. You can tell you’ve cast on a purl stitch because of the small bump below the stitch.
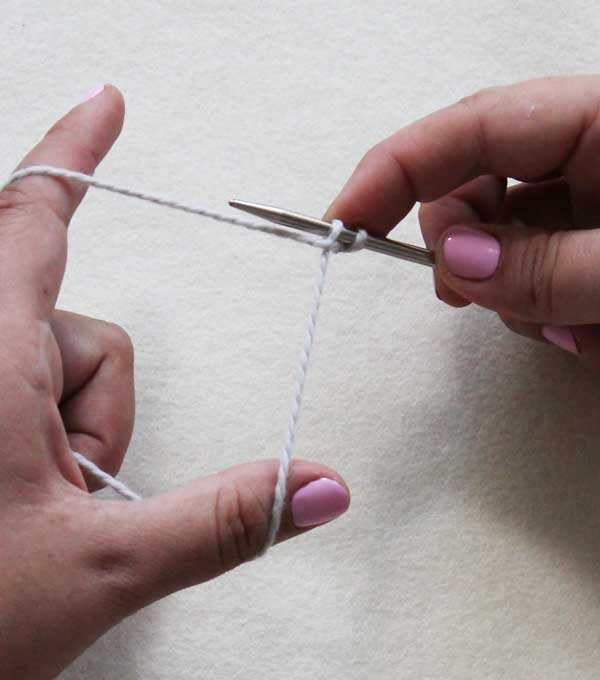
CASTING ON A KNIT STITCH
Now you will learn to make a knit stitch.
From front to back in an away-from-you motion, grab the yarn coming off your thumb.
From back to front in a towards-you motion, grab the yarn coming off your index finger and pass the needle under the yarn coming off your thumb.
Gently pull to take up the slack. The stitch you just cast on is a knit stitch. You can tell it is a knit stitch because it doesn’t have a bump below it.
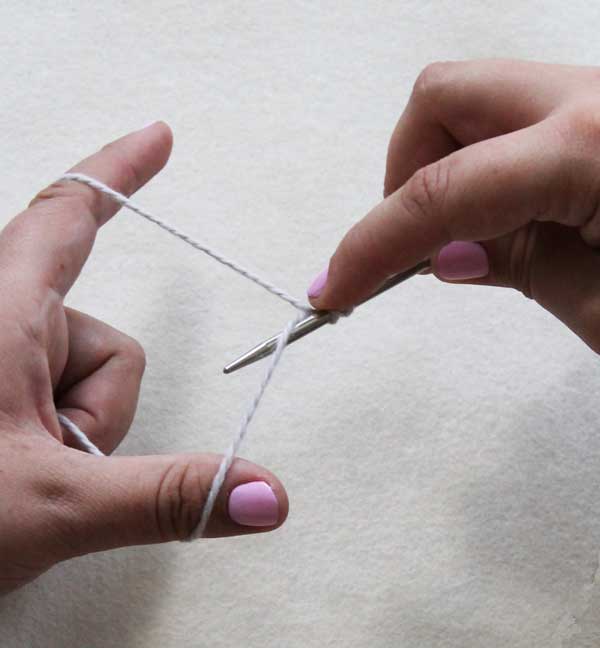
CONTINUE CASTING ON
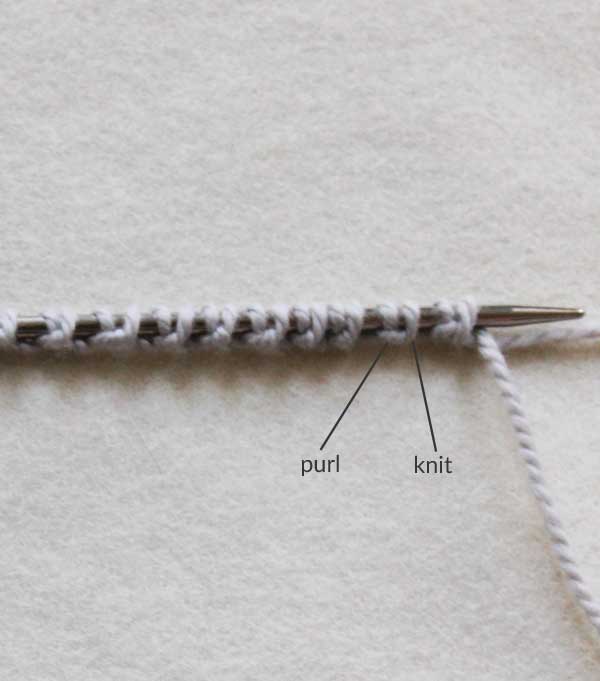
Repeat the above steps, making alternating purl and knit stitches, until you have cast on the correct number of stitches. Some patterns might ask you to start with a knit stitch after the slip knot, but most will start with a purl as shown above. And remember, as with any cast on, the slip stitch is the first stitch of your cast-on row.
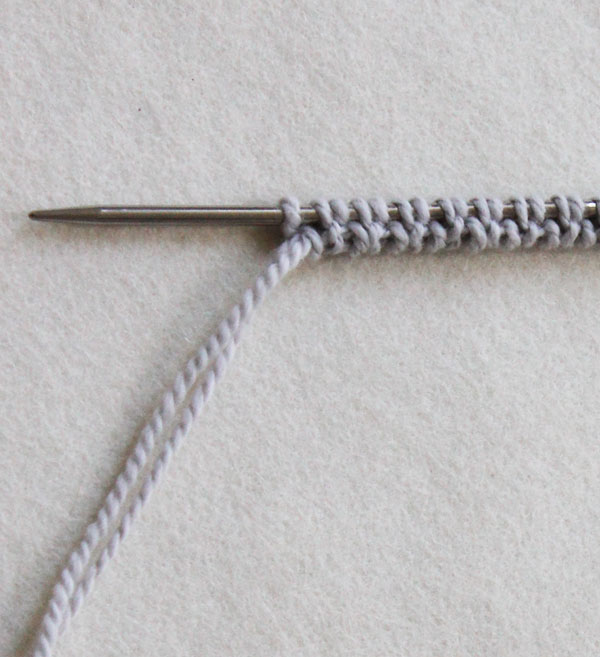
When you’ve cast on the required number of stitches, twist the tail around the working yarn once or twice and go on to the foundation rows.
FOUNDATION ROWS
Now you will work two foundation rows. Whether you’re making a hat in the round or a flat scarf, these two foundation rows are always worked flat. Find the foundation rows below that apply to your pattern.
AN EVEN NUMBER OF CAST-ON STITCHES, STARTING WITH A PURL STITCH AFTER THE SLIP KNOT
Foundation Row 1: *K1 through the back loop, slip 1 with yarn in front (wyif), repeat from * to end of row.
Foundation Row 2: *K1, slip 1 wyif, repeat from * to end of row.
AN EVEN NUMBER OF CAST-ON STITCHES, STARTING WITH A KNIT STITCH AFTER THE SLIP KNOT
Foundation Row 1: *Slip 1 with yarn in front (wyif), k1 through the back loop, repeat from * to end of row.
Foundation Row 2: *Slip 1 wyif, k1, repeat from * to end of row.
AN ODD NUMBER OF CAST-ON STITCHES, STARTING WITH A PURL STITCH AFTER THE SLIP KNOT
Foundation Row 1: *Slip 1 with yarn in front (wyif), k1 through the back loop, repeat from * to last stitch, slip 1 wyif.
Foundation Row 2: *K1, slip 1 wyif, repeat from * to last stitch, k1.
AN ODD NUMBER OF CAST-ON STITCHES, STARTING WITH A KNIT STITCH AFTER THE SLIP KNOT
Foundation Row 1: *K1 through the back loop (tbl), slip 1 (wyif), repeat from * to last stitch, k1 tbl.
Foundation Row 2: *Slip 1 with yarn in front (wyif), k1, repeat from * to last stitch, slip 1 wyif.
CONTINUE TO PATTERN
Your cast on is complete! Some patterns may have you work a third foundation row to set up for 2×2 rib or something more complicated. In most cases, you’ll be ready to continue to the rest of your pattern by following one of the two instructions below.
IF WORKING IN THE ROUND
Without turning the work, transfer all stitches to the circular needles you will use for the ribbing. With the working needle in your right hand, place a marker on the right needle and join to work in the round, being careful not to twist the stitches.
IF WORKING FLAT
Turn the work and continue to work in regular 1×1 rib.
FINISHING
When you weave in the ends, use cast-on tail to sew together the two sides of the cast-on edge.


This looks great, thank you for the clear instructions! Could I use this technique to cast on a 2×2 rib as well (or a variation on that)? I would like to try this on the traveling cable hat. Thanks!
Hi Dianne,
You could certainly use this cast on for 2×2 rib! The only limitation, and you will see why when I explain how to do it, is whatever ribbing you end up working must have an equal number of knit and purl stitches. The traveling cable hat has a slightly irregular ribbing in order to lead seamlessly into the cable pattern, so it does not have an equal number of knit and purl stitches in the ribbing.
Here’s how you would set up to work 2×2 rib: Follow the tutorial, working the foundation rows as directed. While you work the first round of 2×2 ribbing, simply rearrange the order of the stitches on the needle so that you have 2 knits followed by 2 purls and repeat until the end. The following round will be a regular round of 2×2 rib.
Let me know if I can answer any more questions! Thanks for writing in.
– Gina
for the 2×2 ribbing: Can you please explain what you mean by “arranging the order of stitches so that you have 2 knits &2 purls”? Do you actually move a stitch, or just knit 2 purl 2 over the foundation. Or is it something else?
Thanks.
Hi Allison, Thanks for writing in with your question! There is a great tutorial here: http://ysolda.com/tutorial/tubular-cast-on/ Let me know if that answers your question. All my best, Gina
What is the purpose of the foundation rows? Why can one not simply start working with the stitches as cast on?
Hi Barclay –
That’s a great question. The foundation rows, essentially two rows of double knitting, form the “tubular” part of the cast on. Once I did try omitting the foundation rows, and the cast on edge ended up flaring away from the body of the hat, not how I wanted my hat to look! They are essential to making the cast on look correct. Thank you for writing in with your question! – Gina
I had the same question. I have been using this cast on for a while now and I just found out that I need to do the foundation rows.
I usually use smaller needles for the first 3 rows and it always comes out looking great. (I wish I could submit a photo showing it).
Hi Anya,
Thanks for the comment! If omitting the foundation rows yields the same result, then that is fine. I would imagine that your cast on is not as stretchy as one with the foundation rows, but I could be wrong — I’d have to see. Thanks for sharing!
-Adam
Can this cast on also be done in a 2 x 2 rib or 4 x 4?
Hi Ruth,
Unfortunately this cast on does not work for 4×4 rib, but it does work for 2×2 rib!
Another commenter asked a similar question, this is what I told them:
Here’s how you would set up to work 2×2 rib: Follow the Long Tail Cast On tutorial, working the foundation rows as directed. While you work the first round of 2×2 ribbing, simply rearrange the order of the stitches on the needle so that you have 2 knits followed by 2 purls and repeat until the end. The following round will be a regular round of 2×2 rib.
Thank you for your question! – Gina
If I’m doing a k2 p2 ribbing, do I do the cast on in the same pattern, instead of k1 p1?
Hi Judy,
Thank you so much for your question!
Here’s how you would set up to work 2×2 rib: Follow the long tail tubular cast on tutorial, working the foundation rows as directed. While you work the first round of 2×2 ribbing, simply rearrange the order of the stitches on the needle so that you have 2 knits followed by 2 purls and repeat until the end. The following round will be a regular round of 2×2 rib.
I hope that is clear! Let me know if I can help with any other questions. – Gina
Thank-you! This works perfectly for the Boyfriend Hat!
I am a relatively new knitter and am rather confused by this. Are these loops really secured on, or are they just twisted on? The way I am doing it while trying to follow the directions seems just twisted on, doesn’t feel like a regular long tail or basic loop at all (these are the only two cast on methods I know right now). Do you have a link to a good video of this? I am making the boyfriend hat for several of my coworkers for Christmas, and this sounded like it would be an excellent start, but perhaps it is too advanced for me? How would the boyfriend hat work out with just a regular long tail cast on?
Hi Marci-
Unfortunately we don’t have a video of this but the stitches are not just twisted on. Rather, you are kind of knitting them on with your fingers! I would recommend that you Google “long tail cast on video” to find a video to walk you through it.
Thank you for getting in touch!
Molly
New knitter here…after the foundation row, what exactly do you mean by knit one and slip one? I know how to knit, but I’m not sure what slip means. Slip stitch?
Thanks!
Hi Sarah-
It means that you knit one stitch and then you slip one stitch. To slip a stitch you place your right needle into the stitch on the left needle as if you were going to purl the stitch. Then, without wrapping the yarn around to knit or purl, simply slip that stitch from your left needle to your right needle. You are basically passing it from the left needle to the right needle without doing anything to it.
Hope this helps. Please let us know if you need any more help!
Molly
Your projects and yarns are the best! The only thing you are missing is video tutorials. I have a hard time understanding written instructions. Anyway, thanks for the amazing projects!
I agree, I’ve only just come across your site but am already excited to get my needles out, but as a fairly new beginner the only thing putting me off is the lack of video’s. Even though the instructions are clear, I think for things like tutorials I find it much easier to follow a video….any chance of there being any, any time soon? or could you recommend another person who does good video tutorials for the things your describing?
Thanks anyway
Hi Beth,
Thank you so much for writing us! We do offer some video tutorials and are working on adding more in the new year. For this particular technique, there is a tutorial on youtube I will recommend: https://www.youtube.com/watch?v=SrOoX-pBwts
I hope that helps! All my best,
Gina
I hope you can help me. I love the boyfriend hat, but I would actually like to make it for my boyfriend, and, well, he doesn’t have the smallest head. What do I have to do to make the hat that little bit bigger?
Just found your site. Love it!
Thanks.
Hi Michele,
Thanks for writing in with your question! The Boyfriend hat is very stretchy and can fit most any head size, so you shouldn’t need to alter the pattern. Please let me know if I can help with any other questions! -Gina
When you say rearrange the order of the stitches do you mean move the stitches? Won’t that create a twist in your knitting? Maybe I’m misunderstanding. Thank you.
Hi Alex,
Yes! Almost like making a tiny cable, I mean change the position of the stitches on the needle so that the stitches go Knit Knit Purl Purl. A twist in the knitting would only happen if you were to twist the cast on around the needle like a spiral. I hope that makes sense! Please let me know if I can help answer any other questions. Thanks! -Gina
Is there a difference between the Long tail tubular cast on and just a tubular cast on? When I looked on YouTube for a video I found a very different way of doing this that involved starting with scrap yarn, and using a backwards loop cast on to cast on half your stitches then do yarn overs then slip one, knit one etc… (it was a little more involved than that but you get the point). The video was simply called a tubular cast on. What is the difference and will it work for this hat? Thank you for your time. 🙂
Hi Stephanoe!
I’ve used that method of creating a tubular cast on before and I like it! The only thing with that technique is you must use a needle at least 2 sizes larger for the cast on only, the part where you cast on half the number of stitches you eventually want to work with. The difference is only in the technique, the end result is the same. It will definitely work for this hat! Good luck – I know it’s a little scary trying a new technique, but I know it will be great. Thanks for writing in! – Gina
When you described the 2×2 rib and switching the stitches what did you mean. Switch how you cast them on or as you knit. I’m visual but am forcing myself to try to understand written like this. Sorry for the silly question.
Hi Cindy! No such thing as a silly question! There’s a great tutorial here: http://ysolda.com/tutorial/tubular-cast-on/ that should help explain. Please let me know if I can help clarify further! All my best wishes to you, Gina
Thank you so much for this clear tutorial. As I’ve become a more skilled and adventurous knitter, I’ve become unhappy with the look of the traditional long tail cast on on my small items such as mitts and socks. This tutorial was so easy to follow, and the cuffs on my knitted mitts and socks are beautiful!
This is amazing! Thank you so much for this tutorial. I struggled with the tubular cast on many times before but this helped me tremendously.
If you are making a hat or anything in the round, can you start with a set up row(s) and really transfer to circulars and it will look ok? Or should I practice on straights but use circs for an actual pattern? I have a few Brooklyn Tweed patterns and they all seem to have tubular cast ons in the round. Thanks – Audrey
Hi Audrey!
I do tubular cast-ons in the round all the time. I usually do all the way through the set up rows knit flat, and then join in the round after. Then, when you weave in your end, use that to close up the gap!
Happy Knitting!
Thomas
I am having trouble finding the Classic Cable Hat Pattern mentioned in the first paragraph if this post. The link takes me to a different hat, the Classic Cuffed Hat pattern, and a search doesn’t get it for me either. Thanks
Hi Janice-
This cast on was used in our Classic Cuffed Hat pattern. The “Classic Cabled Hat” you refer to was actually just a typo and we don’t have a project with that title. I have fixed the typo and thank you very much for bringing it to our attention.
While we don’t have a “Classic Cabled Hat” we do have a very lovely recent cabled hat patter, called the Traveling Cable Hat which may interest you: https://www.purlsoho.com/create/2014/09/04/traveling-cable-hat/
Please let us know if you have any more questions and thanks so much for getting in touch!
Molly
I have a pattern for a cowl that is worked in the round with the option of this cast on or a regular long tail. This one calls for half the number of stitches (117 vs 234) to be worked at the beginning. How does this play out since it amounts to a significant portion of the length around it?
Hi Deb, Typically when you start the tubular cast on with half the intended number of stitches, you work those first couple of rows (the rows with half the number of stitches) at a much looser gauge. This keeps the edge from pulling in or being too tight. Then when you go to pick up the other half of the stitches, you will switch to the needles that give you the correct gauge for the remainder of the project. Let me know if that doesn’t make sense! I know it’s a little confusing until you’ve practiced a couple times. Thanks for writing in! -Gina
Hi I know people have been seeking a video (myself included) I found this great video that has step by step. I hope this is helpful.
http://youtu.be/gFT1rbPV9UI
I am hoping to use this case on for a Thermis cowl – I normally use a knitted cast on so this is new to me.
Is the ‘tail’ held in front with the thumb or behind with the finger? It’s impossible to tell from the pictures.
Thanks.
Hi Lucie! Thank you for sending your question.
The tail is held in front with the thumb, just like you would for a regular long tail cast on. Please let me know if you have any other questions! Kind regards, Gina
Hi How does tubular cast on differ from alternative cable cast on? Can’t seem to figure out how the end result is different…
Thanks
Hi Lisa, I had never heard of an alternating cable cast on! Thank you so much for mentioning it! I learned something new. It’s a great technique. The end result is not too different from a tubular cast on. You could certainly use this cast on in place of the tubular cast on. Thanks so much again for writing in! -Gina
I’m working on the Color-Dipped Hat in an Adult Large and I think that I’m going to opt for the alternating cable cast on. This cast on is best with an uneven number of cast on stitches according to this video: https://youtu.be/xphGoutbgq4. I need an even number for the hat. When I finish casting on 136 + 1 stitches, and I come back and work my foundation row, can I just purl the last 2 stitches in the foundation row together right before I join to work in the round, or is there a better solution? Thank you. Purl Soho is so beautiful!
Hello, Emma!
Thank you so much for writing in! I am not terribly familiar with the alternating cable cast on, so I shall do my best to answer your question. It seems that when you use the alternating cable cast on you need an uneven number of stitches so that you end with the same stitch that you began with, namely, a purl stitch. This way you have symmetry in your finished piece and this symmetry is great if your knitting something flat, but it seems to me that once you join in the round you’d end up with 2 purl stitches next to each other which would disrupt the 1×1 rib pattern. So, I recommend doing the alternating cable cast on with the 136 cast on stitches. Does that make sense?
Also, if you do decided to do the 136 + 1 cast on and then purl the last 2 stitches together you might end up with a tiny eyelet-like hole.
I hope that you find this helpful. Perhaps someone in our knitting community has more insight into the alternating cable cast on!
Happy knitting!
Kumeko
I worry that you might end up with a little hole similar to an eyelet in your fabric.
Where you say that if you’ve caston an odd number, the 2nd row will end with a k1, doesn’t the 2nd row instead begin (& end) with a slip 1 with yarn in front?
Hi Judy, Thanks for writing us! It depends on whether you cast on a knit stitch or a purl stitch first, that will determine what the end of the row is. Please let me know if I can help with any other questions! -Gina
I have been using this cast on, and love it! I wanted to ask why you knit into the back of the knit stitches in the first set up row. Are they twisted with this cast on, and need to be “untwisted?” Thanks!
Hi Kris, Thanks for writing us! You’re exactly right. This cast on makes the knit stitches twisted, so the first time you work them, you have to untwist them. I’m glad to hear you’re loving this cast on. We were so excited to learn it, we had to share. Happy knitting! -Gina
I’ve always done the purl portion of the cast-on with the same motion as a regular purl stitch; i.e., bring needle from the back under both strands (rather than one), and pull up a loop from the near strand under the front strand. This creates an untwisted knit on the reverse. You really are just doing a purl motion, then a knit motion for this cast-on if you take a look at what your needle is doing. (That’s how I initially was able to remember how to do it in the beginning, without always looking it up).
Are the two foundation rows the same if you work on a circular needle?
Hi Elsje,
Thank you for the comment! Yes the two foundation rows are the same when working on circular needles. I recommend knitting the foundation rows flat, turning the work for row 2, before you join the round as it’s easier to keep the stitches from twisting.
I hope this helps and feel free to write back if you have anymore questions!
Happy Knitting!
Jake
Ok, it was the cold medicine.
I ripped out my work and cast on again, this time counting the slip knot as the first (knit) stitch. That worked out. I think adding that clarification in the tutorial would be helpful.
I find for tubular cast ons that I need to use a smaller needle, instead of a larger needle, for the cast on and subsequent foundation rows. Otherwise, my stitches flare out when I switch to the needle for the cuff/brim.
Hi Katharine,
Thanks for sharing these great tips with everyone!
Happy Knitting!
Jake
Hi! In the first foundation row do you slip the purl stitches knitwise or purlwise? Thank you!
Hi Kirsten,
Thank you for the comment! For the foundation rows the slip stitches are done purlwise.
Feel free to respond if you have anymore questions!
Happy Knitting!
Jake
Hi! Is there a tutorial that explains how to transfer to circular needles and then join in the round? I’m unsure of how to do this after 2 foundation rows have already been knitted.
Thanks for your help!
Hi Alex-
We don’t have a tutorial on this but it’s fairly simple. You just slip the stitches onto the circular needle one by one and then join them in the round as you normally would. If you have never joined in the round I’d suggest going on you tube and searching “join in the round”
I hope this helps, please let us know if you have any more questions!
Molly
Excellent explanation. Some very good tutorials out there but this one clinches it. Thank you!
Hi:
How did you accomadate knitting 90 stitches with super bulky yarn on jumbo #19s flat for the long tail tubular cast on? Somehow I managed with the 14″ 19s I have. But it was VERY tight and difficult to count. Makes me think that there is a gadget or technique out there for this. Love this type of cast on. Thanks very much for your help.
So sorry…this is for the Mountain Cowl project. Thx.
Hello, Crissy!
Thank you for writing in! I think the problem has to do with the length of the needle you used, a 14″ needle is a bit too short. We used a US size 19 32-inch circular needle and that accomodated the 90 stitches well, but I am so glad that you were able to make to make it work on your needles!
I am glad you like the long tail tubular cast on! It makes such a beautiful edge!
If you have any further questions, please write back!
Happy knitting,
Kumeko
Who are you people? (HA!) You come up with the coolest, classy and classic, fun, and creative projects I have ever seen!! Thank you so much!! I am amazed with all you create and it just plain makes me smile!! You are the best!!
Hi, Su!
Thank you so much for your kind words! We couldn’t exist without folks like you. Thank you for being apart of our knitting community!
Best wishes,
Kumeko
Thank you for great explanations, great cast on technique. I switched stitches,as instructed in first row of ribbing to get 2×2 rib and it looks pretty good.
However, I did not expect it to loose elasticity – it tightened up the rib so much, I will have to rip out the mitt and do it again.
Did I do something wrong?
Susan
Hi Susan,
The long tail tubular cast on is built for elasticity but when you adjust the stitches for the 2×2 you are twisting stitches around. This can definitely restrict the stretch at the bottom. Try casting on a larger needle and then adjusting your stitches for 2×2 rib. This will loosen up the cast on and shouldn’t affect the look too much!
Best,
Adam
I’m attempting to make the color dipped hat with the long tail tubular cast on. All sizes call for an even number of stitches to be cast on. After the cast on, you say that for every knit stitch you knit one through the back loop and start with this stitch. Shouldn’t the first stitch of Foundation Row #1 be a slip stitch since you end with a purl stitch on the cast on row? I hope this question makes sense.
Hello Kathy,
Thanks for writing in. After casting on your last stitch purl-wise you will turn your work, leaving you with a knit (opposite of a purl) when you turn your work for foundation row 1. You will knit this stitch through the back loop and then slip the purls. I hope this sheds some light on the cast on technique!
Best,
Adam
Hello,
When a slipknot is used and you get to the end of the 2nd foundation row, is the slipknot used as a knit stitch? Is it counted as a stitch?
Thank you very much ,
Tricia
Hello Tricia,
Thanks for writing in! The slip knot is considered as a knit stitch in this tutorial. Happy knitting!
Best,
Adam
Adam, thank you so much;-)
If you are doing a basic knit purl when making something special
Do you end with an odd # or even
Hi Pat,
Thanks for writing in. The tubular cast on works best with an even number of stitches but you can certainly cast on an odd amount too. Your foundation rows will be the same except that you will slip the first stitch of the first foundation row with the yarn in front and then knit through the back loop. Good luck!
Best,
Adam
Hello, I’m confused by how to weave in the ends of the tubular cast on/off. Please help!
Hi Maggie,
Thanks for writing in! How you weave your ends on a tubular cast on depends on if you’ve joined in the round or not. If your piece is flat, then you just hide your tail up the side of the work. If you’ve joined in the round, then you’ll want to close up the gap formed by the foundation rows and then weave your end in on the inside of the work. Weaving in your ends to look invisible may take a few attempts but the trick is to keep trying new ways until you’ve got it! Good luck and happy knitting!
-Adam
Hi guys! I was wondering if you can do the tubular cast on for a stockinette stitch, and how would that look like. Or maybe there is a special elastic stitch for stockinette.
I’m knitting my first sweater, top down, and my cast on is not stretchy enough.
Thanks!!
Hi Sole,
Thanks for writing in! I wouldn’t recommend the long tail tubular cast on if you are just working in stockinette right after. Rather, I would cast on with a larger needle and see if that works. There are also many, many types of stretchy cast ons that you can find tutorials for on YouTube. One of them is bound to give you the edge you want! Happy hunting and good luck knitting!
-Adam
Could you please explain the recommended method for joining in the round? I’ve tried a few different ones and keep ending up with something unsightly. Do you cast on an extra stitch, just start knitting, or do something else? Thanks!
Hi Allie,
Thanks for writing in. With this cast on you will have two rows unjoined because of the foundation stitches. Is this what you are seeing as unsightly? I like to sew this up at the end of the project while I’m weaving my tails. When I do the tubular cast on I just start to knit when joining in the round. I don’t think that there is any technique, other than tightening up your tension, that will resolve your problems with the join. Let me know if you have any other questions!
-Adam
Thank you so much for the tutorial. I know others have asked about using this for 2×2 rib, and as recommended I’ve watched Ysolda’s video, but the video doesn’t actually show how to rearrange the stitches. So can you please explain it? When you start your first regular 2×2 rib row, after you knit the first stitch then you’ll have a purl stitch where you want a knit stitch to be. So do you swap the second and third stitches on the left needle? Do you slip them on a cable needle and twist the needle so the order of the stitches is reversed? Or is there a different way? Thanks.
Hi Marly,
Thanks for the kind words! Yep, you are correct! The purl stitch following the first knit stitch is swapped with the third knit stitch. This way you end up with two knits and two purls together. You’ll keep swapping stitches to maintain the 2×2 pattern. Thanks!
-Adam
Thank you for clarifying. This cast on creates such a nice edge!
I never knew how to do this purl and knit cast on until now thank you for the detailed pictures.
Hi there 🙂 I’ve started a hat that has k2p2, k4p2 ribbing. I don’t think the tubular cast on or alternate cable cast on can work with that, right? What cast on would you recommend for ribbing that isn’t symmetric?
Thanks!
Natalie
Hello there,
Thanks for your question! I have explored this extensively for my personal endeavors and have found nothing that allows for stretchability and that tubular look with an irregular rib. Sad, I know! The best method for an irregular rib is to do a long-tail cast on or to do a folded hem. Sorry to disappoint!
Best,
Adam
Can this cast on be done with a 2×1 ribbing?
Hi Teresa,
Thanks for the question! This cast on can be done for 1×1 or 2×2 ribbing but not for 2×1 ribbing. For 2×1 ribbing I’d try using a cable cast on (you can cable cast on purl-wise) to get a tubular look. Best of luck!
-Adam
would love a video of this. its hard to hold string and scroll at the same time 😉
Hi Marie,
Thanks for writing in and for the suggestion! We will certainly keep it in mind for the future!
Best,
Cassy
I know this is an older topic, but I can’t find the answer anywhere! I have a hat with p1, k1, p2, k1, p2, k2, p1 repeated around as the ribbing section. Is it possible to do this cast on with that stitch arrangement since it’s not evenly spaced?
Hi Pam,
Thanks for the question! Unfortunately the long tail tubular cast on doesn’t work for any variation that is not 1×1 or 2×2 rib. I would try to do the cable cast on which you can cast on knitwise and purlwise. There are many tutorials on YouTube!
All the best,
-Adam
Would you do everything the same, including the foundation rows, if you are using round needles instead of straight needles. I don’t like seams in my knitted hats, so I’ve always used round needles.
Thank you for the video, it’s really very clear on what to do. Love it.
Karen
Hi Karen,
Yes, you would do it the same, you would just want to start off the tubular cast on with either double pointed needles, or two circular needles of the same size.
I hope this helps,
Melissa
How do I join the foundation rows when I move the rows onto a round needle?
Hi Irene,
If you’re working on a circular needle the only difference is that you don’t turn your work after your foundation rows!
I hope this helps!
Carly
Thank you for the great tuturial. I´ve regarded myself as an experienced knitter, but there is still a lot to learn, it seems. This will definitely be my preferred cast-on method from this day on.
Hi Kirsten,
Thank you so much! I am so glad that you find our tutorial helpful!
Best,
Cassy
I realize this is an older thread.. hopefully I will still get a response?? So I am knitting a hat from a different pattern but wanted to try this method of casting on. I have my cast and 2 foundation rows (I did those on straight needles as suggested) and then wanted to transfer to the round. I wasn’t exactly sure how to do this, so I just K1 P1 (1 round) using the circular needles. Now I have my work on the needles I want to use.. but I’m not sure if I did it correctly. How do I join now that I already have about 3 rows worked? Hopefully this all makes sense!
Hi Alexis,
Thanks for writing in! We are always happy to help! Joining in the round on the tubular cast on can feel a bit weird as you have already knit a few rows. You will join in the round as usual and there will be a small gap where the previously knit rows don’t join. When you finish knitting your item, you will use the remaining tail to sew up this little gap!
I hope that this clears things up!
Cassy
Thanks for sharing this video – it’s very clear & I will definitely give this method a try! 🙂
This is a very frustrating tutorial. I started off like I would for a long-tail cast on but the pictures and instructions looked totally different from the long-tail cast on I am familiar with. I clicked on the link to the long-tail cast on and found that to be identical to the long-tail cast on I’m familiar with. I came back to the tubular cast on page and watched the video, thinking I must be misunderstanding the instructions, but the technique for the purl stitch is still different from the one in the long-tail cast on method.
Hi Kelly,
Thanks for reaching out! I am sorry to hear that you found this tutorial frustrating. This cast on is a different cast on than the standard long tail cast on. It is created in a very different fashion and has a very different result than you standard long tail cast on. The long tail tubular cast on gives you a nearly invisible cast on for 1×1 ribbing whereas the long tail cast on is more of a standard look and feel.
If you are interested in a tutorial for the standard long tail cast on, it can be found here: https://www.purlsoho.com/create/long-tail-cast-on/
I hope that this clears things up!
Cassy
I am trying to use this cast on method for the double knit baby blanket and have had to rip it out 3times now! I’m casting on 294 sts and I can’t seem to keep the sts from rolling! Very difficult to keep it all lined up properly. I’m using a circular needle. Any tips?
Thanks
Hi Simone,
Thanks for writing in! This certainly can be a bit of a challenge as any longer cast on could be but with a bit of an added challenge due to tubular nature of the cast on! I would suggest trying to be a bit looser than you normally would about the cast on as this will help the cast on not spiral while you are working it. I also, generally, lay my needle down on a flat surface after completing the cast on and then making sure that each stitch is in the correct orientation before I pick it up and begin my knitting. It can be a bit of a challenge but in the end, it is worth the bit of extra work as it creates such a pleasing cast on!
I hope that this helps!
Cassy
Thank you for a great tutorial! I have a hat pattern that lists P2, [k2,p2] as the first round. Is there anyway to make a tubular cast on work with a purl 2 start?
Hi Bev,
Thanks for writing in! You definitely can start with purl stitches in the Long Tail Tubular Cast On! If you have reviewed the other comments, there are lots of good tips in here for how to modify this to work with a 2×2 rib. In addition to that, when doing the initial cast on, I would count the slip knot as a purl instead of a knit and begin with a knit cast on after that. This will reduce a few stitch swaps when you are working the first set-up row and rearranging the stitches for the 2×2 rib.
I hope this helps!
Julianna