
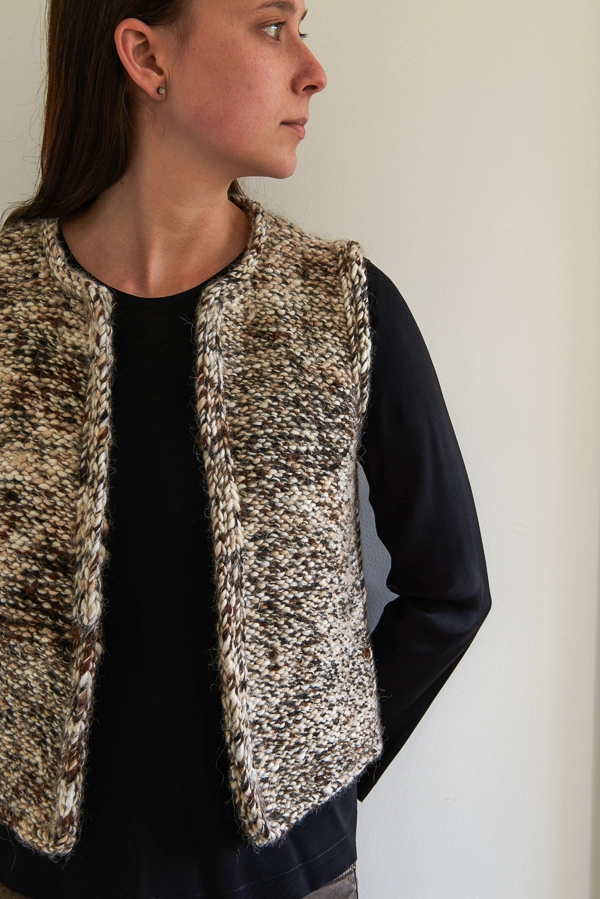


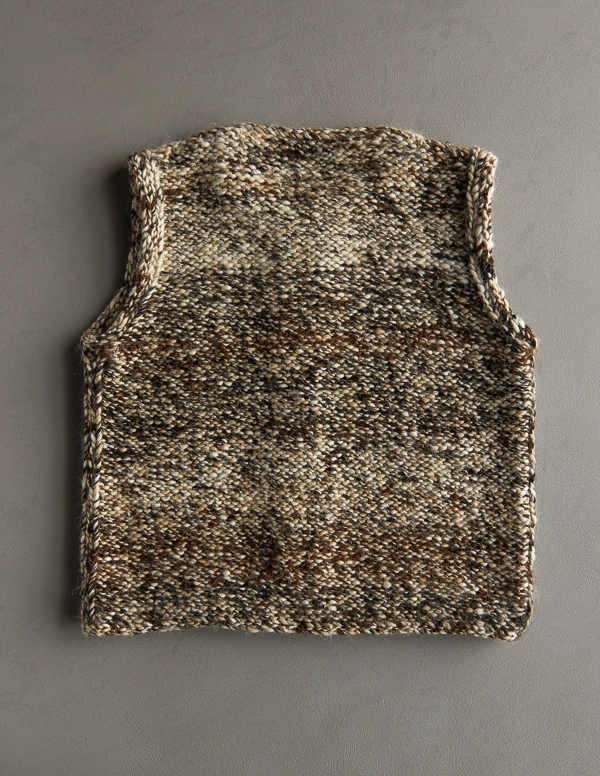
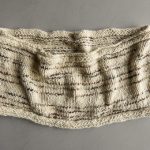
Drift Vest
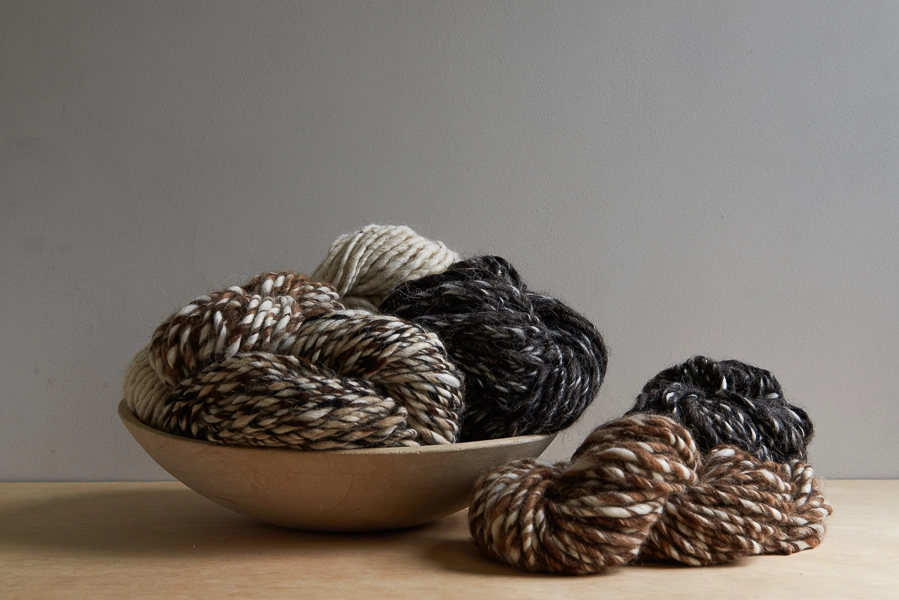
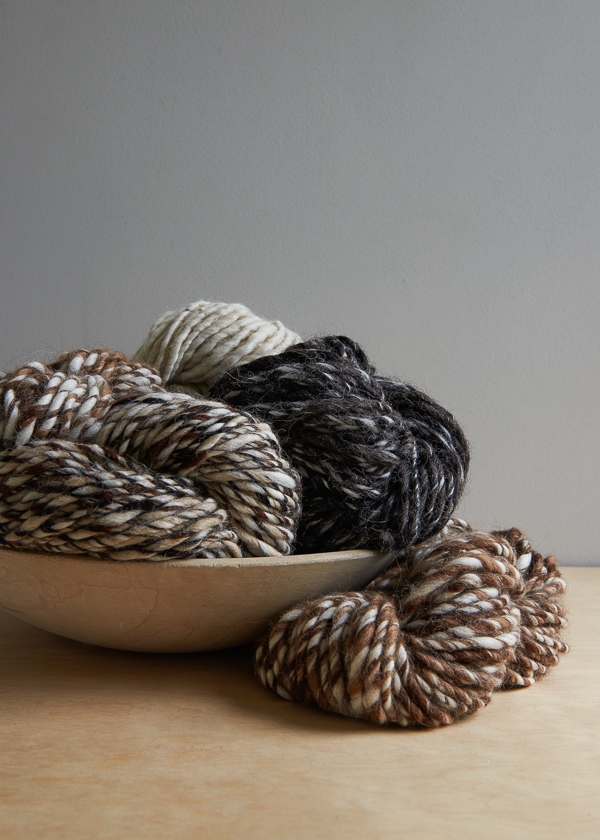
Shepherdess Alpaca is the kind of yarn you might buy just to have around (you know what we mean!). On its own it is so stunning and so beautiful, the design challenge is to do as little as possible, just enough to make it wearable while not getting in the way of its natural charisma.
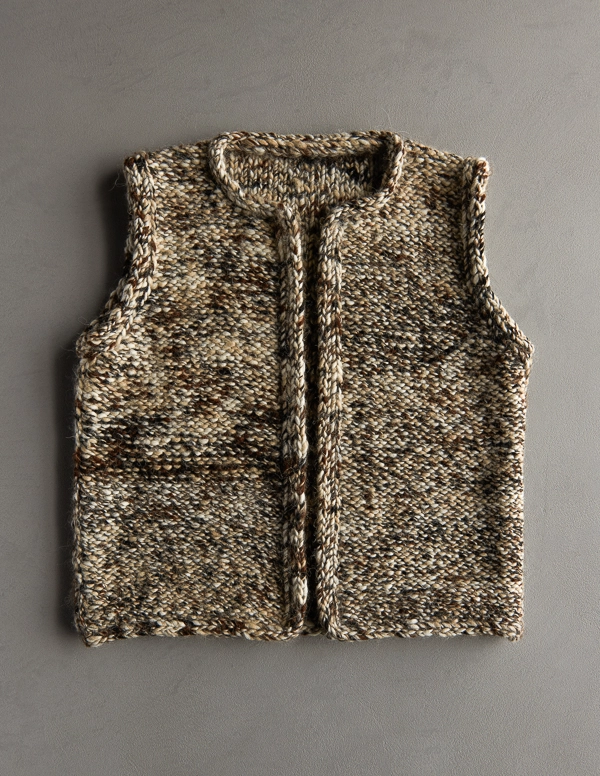
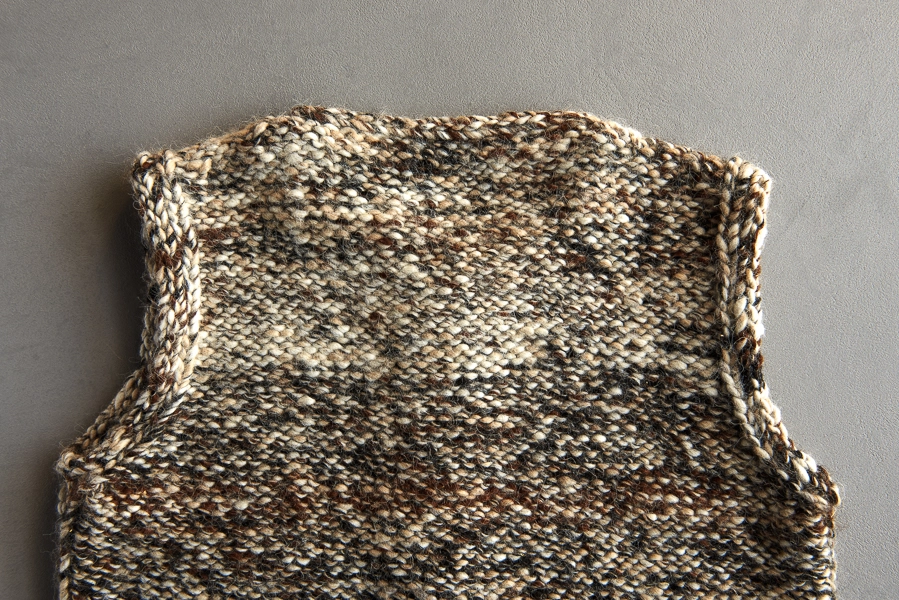
Our Drift Vest does just that. It is an approachable knit with an up-the-back, over-the-shoulders, down-the-front construction, but such simplicity magnifies the details. And so, we added some short rows for shaping and stockinette selvedge stitches against a reverse stockinette ground. The resulting two side seams match the attached I-cord edge, both framing plains of purl bumps with smooth knit stitches.
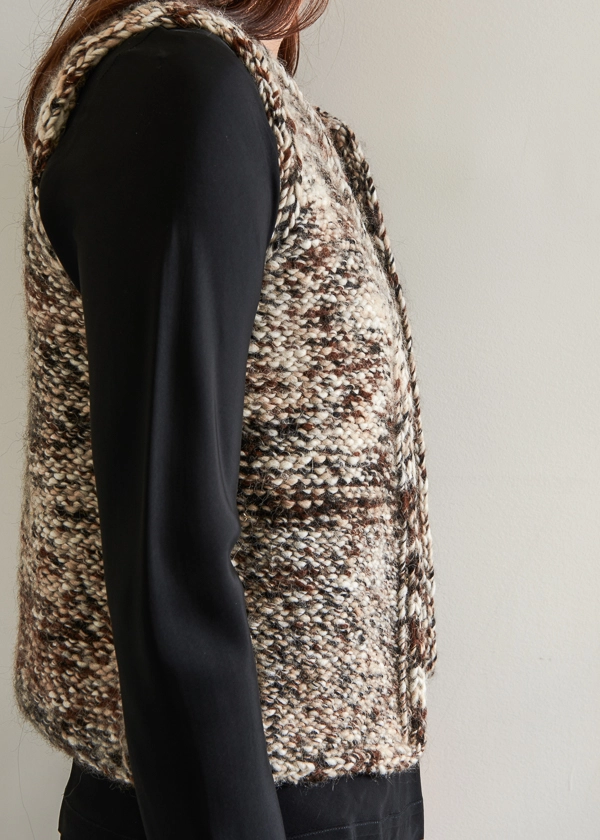
Shepherdess Alpaca is 100% undyed, handspun alpaca, making the Drift Vest a wonderfully warm layer for under your coat this winter and come spring, your sole outerwear. As you drift from season to season, it’ll have you covered! -Laura
Update: New Yarn + Sizes!
November 5, 2021
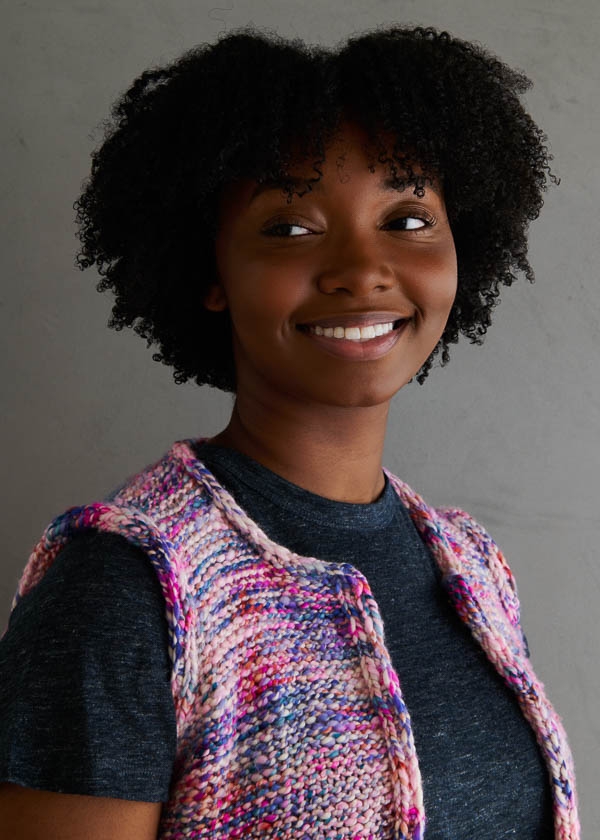
Nothing brightens a fall day like a big splash of color, and our Lovebird delivers! We gave this classic vest a brand new look in our hand-dyed Manos Del Uruguay collaboration yarn, plus a wider range of sizes for everyone to enjoy. See the new version here!
Originally designed by Purl Soho designer, Laura Ferguson.
Share your progress and connect with the community by tagging your pics with #PurlSoho, #PurlSohoBusyHands, and #PurlSohoDriftVest. We can’t wait to see what you make!
Materials
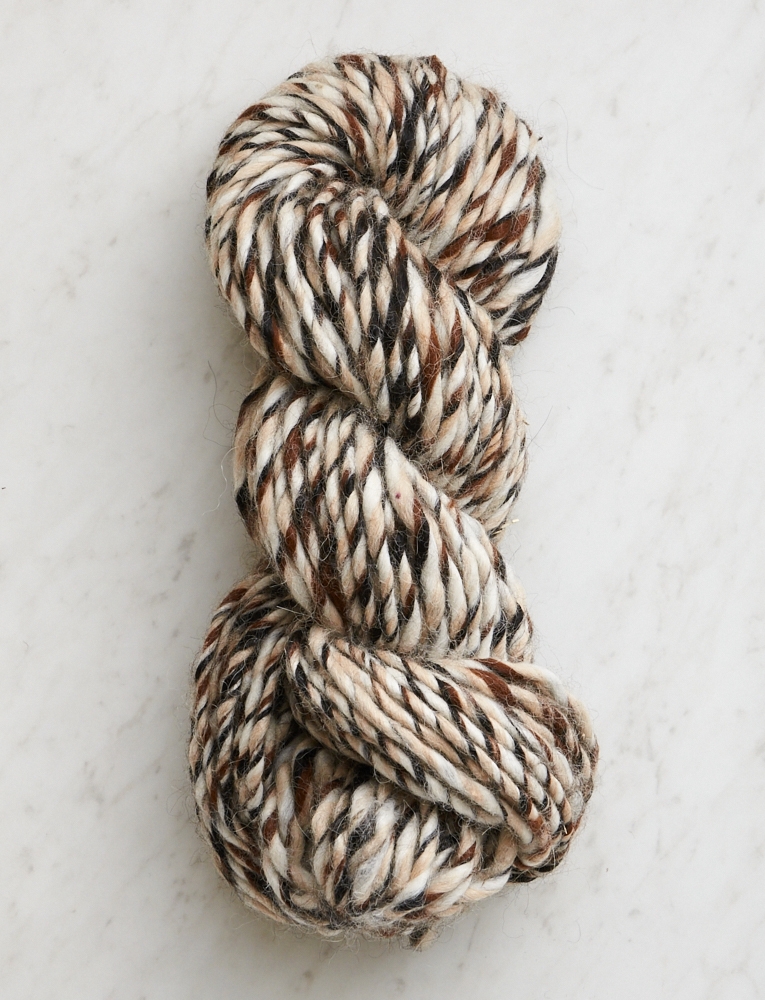
- 6 (7, 8, 8, 9, 10) skeins of Purl Soho’s Shepherdess Alpaca, 100% undyed, handspun alpaca. Approximately 350 (380, 430, 464, 535, 565) yards required. We used the color Bantam Hen. (NOTE: We no longer offer Shepherdess Alpaca, but choose from one of our other super bulky weight yarns.)
- US 11 (8mm), 20 to 32-inch circular needles
- Two US 11 double pointed needles
- Two locking markers or scrap yarn
- Stitch holders or scrap yarn
Gauge
11 ¼ stitches and 15 rows = 4 inches in stockinette stitch
Sizes
NOTE For help picking a size, please check out our Understanding Ease + Selecting Size Tutorial!
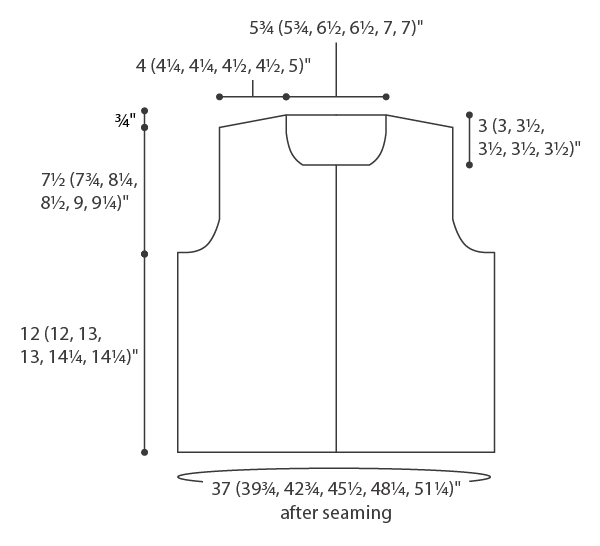
37 (39 ¾, 42 ¾, 45 ½, 48 ¼, 51 ¼)
To fit actual chest circumference of 33–36 (36–39, 39–42, 42–45, 45–48, 48–51) inches, with 1–4 inches of ease.
- Finished Chest Circumference: 37 (39 ¾, 42 ¾, 45 ½, 48 ¼, 51 ¼) inches
- Finished Length from Shoulder to Bottom Edge: 20 ¼ (20 ½, 22, 22 ¼, 24, 24 ¼) inches
- Finished Length of Armhole: 7 ½ (7 ¾, 8 ¼, 8 ½, 9, 9 ¼) inches
- Finished Length from Underarm to Bottom Edge: 12 (12, 13, 13, 14 ¼, 14 ¼) inches
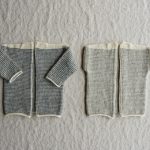
SAMPLE: The sample pictured here is size 37 inches, modeled with 1 inch of ease.
Notes
Construction
This piece is worked flat in reverse stockinette stitch. This means that the purl side of the fabric is the right side, and the knit side of the fabric is the wrong side.
Special Abbreviations + Techniques
K3tog (knit three together): Insert the right needle into the next three stitches, knit together. [2 stitches decreased]
M1pL (make one purlwise left): Pick up the strand between the previous and next stitch from front to back, (as you would to m1L), purl through the back loop. [1 stitch increased]
M1pR (make one purlwise right): Pick up the strand between the previous and next stitch from back to front (as you would to m1R), purl through the front loop. [1 stitch increased]
Sssk (slip slip slip knit): Slip 3 stitches knitwise one at a time, insert the left needle into the front of the slipped stitches, knit together. [2 stitches decreased]
Wrp-t (wrap and turn): If you visit our Short Row Tutorial, keep in mind that this pattern is worked in reverse stockinette stitch rather than in the tutorial’s stockinette stitch, so the right and wrong sides are flipped.
- On the right (purl) side: Keeping the yarn in front, slip the next stitch purlwise from the left needle to the right needle. Bring the yarn to the back. Return the slipped stitch to the left needle. Bring the yarn to the front. Turn the work so the wrong side is facing you.
- Wrong side (knit) side: Keeping the yarn in back, slip the next stitch purlwise from the left needle to the right needle. Bring the yarn to the front. Return the slipped stitch to the left needle. Bring the yarn to the back. Turn the work so the right side is facing you.
Working wrapped stitches with their wrap: This technique is also a little different than we explain in our Short Row Tutorial…
- When picking up wraps on the wrong side of the fabric, work them together with wrapped stitches as follows: Work to the wrapped stitch, lift the back of the wrap and place it on the left needle tip next to the wrapped stitch, then knit wrap together with wrapped stitch.
- When picking up wraps on the right side of the fabric, work them together with wrapped stitches as follows: Work to the wrapped stitch, slip wrapped stitch to right needle, lift the front of the wrap and place it on the right needle tip next to the wrapped stitch, insert left needle through front of wrap and wrapped stitch and purl them together.
Pattern
Back
Begin at Bottom Edge
Cast 54 (58, 62, 66, 70, 74) stitches onto the straight or circular needles. We used a basic Long Tail Cast On.
Row 1 (wrong side): P2, knit to last 2 stitches, p2.
Row 2 (right side): K2, purl to last 2 stitches, k2.
Repeat Rows 1 and 2 until piece measures approximately 12 (12, 13, 13, 14 ¼, 14 ¼) inches from cast-on edge, ending with a wrong-side row.
Shape Armholes
Row 1 (right side): K1, sssk (see Notes), purl to last 4 stitches, k3tog (see Notes), k1. [4 stitches decreased]
Row 2 (wrong side): P1, p2tog, knit to last 3 stitches, ssp, p1. [2 stitches decreased]
Repeat Rows 1 and 2 zero (0, 0, 0, 1, 1) more time(s). [48 (52, 56, 60, 58, 62) stitches remain]
Next Row (right side): K1, ssk, purl to last 3 stitches, k2tog, k1. [2 stitches decreased]
Next Row (wrong side): P2, knit to last 2 stitches, p2.
Repeat last two rows 4 (5, 6, 7, 5, 6) more time(s). [38 (40, 42, 44, 46, 48) stitches]
Continue Working Back
Row 1 (right side): K2, purl to last 2 stitches, k2.
Row 2 (wrong side): P2, knit to last 2 stitches, p2.
Repeat Rows 1 and 2 until piece measures 7 ½ (7 ¾, 8 ¼, 8 ½, 9, 9 ¼) inches from beginning of Armhole shaping, ending with a right-side row.
Shape Shoulders
NOTE: For this portion of the pattern, you will be working back and forth in short rows, turning the work partway through each row rather than continuing to the end. For extra help, see both the Notes section and our Short Rows Tutorial. Please note that our tutorial is demonstrated on stockinette stitch, while this pattern is worked in reverse stockinette stitch.
Short Row 1 (wrong side): P2, knit to last 4 (4, 4, 5, 5, 5) stitches, wrp-t.
Short Row 2 (right side): Purl to last 4 (4, 4, 5, 5, 5) stitches, wrp-t.
Short Row 3: Knit to last 8 (8, 8, 9, 9, 10) stitches, wrp-t.
Short Row 4: Purl to last 8 (8, 8, 9, 9, 10) stitches, wrp-t.
Short Row 5: Knit to last 2 stitches working wrapped stitches with their wraps so that the wraps fall to the wrong (knit) side of the fabric (see Notes), p2.
Next Row (right side): K2, p9 (10, 10, 11, 11, 12), place previous 11 (12, 12, 13, 13, 14) stitches on stitch holder or scrap yarn for Right Front, bind off following 16 (16, 18, 18, 20, 20) stitches knitwise for Back Neck, purl to last 2 stitches working wrapped stitches with their wraps as you come to them, k2. [22 (24, 24, 26, 26, 28) total stitches: 11 (12, 12, 13, 13, 14) stitches on hold for Right Front, 11 (12, 12, 13, 13, 14) stitches on needle for Left Front]
Place a locking marker or piece of scrap yarn in the last row at each Armhole edge to use as a reference point later.
Front
Left Front
Work Shoulder Even
Row 1 (wrong side): P2, knit to end.
Row 2 (right side): Purl to last 2 stitches, k2.
Repeat Rows 1 and 2 two more times.
Shape Neckline
Row 1 (wrong side): P2, knit to last 2 stitches, m1L, k2. [1 stitch increased]
Row 2 (right side): Purl to last 2 stitches, k2.
Repeat Rows 1 and 2 one (1, 2, 2, 2, 2) more time(s). [13 (14, 15, 16, 16, 17) stitches]
Next Row (wrong side): P2, knit to end of row, turn work so that right (purl) side is facing you, cable cast on 6 (6, 6, 6, 7, 7) stitches, [19 (20, 21, 22, 23, 24) stitches]
Continue Working Front
Row 1 (right side): K2, purl to last 2 stitches, k2.
Row 2 (wrong side): P2, knit to last 2 stitches, p2.
Repeat Rows 1 and 2 until piece measures 4 ½ (4 ¼, 4 ¼, 4, 5, 4 ¾) inches from marker at Shoulder, ending with a right-side row. Remove marker.
Shape Armhole
Row 1 (wrong side): P2, m1R, knit to last 2 stitches, p2. [1 stitch increased]
Row 2 (right side): K2, purl to last 2 stitches, k2.
Repeat Rows 1 and 2 three (4, 5, 6, 4, 5) more times. [23 (25, 27, 29, 28, 30) stitches]
Repeat Row 1. [24 (26, 28, 30, 29, 31) stitches]
Next Row (right side): K2, purl to last 2 stitches, m1pR (see Notes), k2. [1 stitch increased]
Next Row (wrong side): P2, m1R, k1, m1R, knit to last 2 stitches, p2. [2 stitches increased]
Repeat the last 2 rows 0 (0, 0, 0, 1, 1) more time(s). [27 (29, 31, 33, 35, 37) stitches]
Continue Working Front
Row 1 (right side): K2, purl to last 2 stitches, k2.
Row 2 (wrong side): P2, knit to last 2 stitches, p2.
Repeat Rows 1 and 2 until piece measures 12 (12, 13, 13, 14 ¼, 14 ¼) inches from end of Armhole shaping, ending with a wrong-side row.
With right side facing you, bind off knitwise.
Right Front
Work Shoulder Even
Return 11 (12, 12, 13, 13, 14) on-hold Right Shoulder stitches to needle, and with wrong side facing you, rejoin yarn…
Row 1 (wrong side): Knit to last 2 stitches, p2.
Row 2 (right side): K2, purl to end.
Repeat Rows 1 and 2 two more times.
Shape Neckline
Row 1 (wrong side): K2, m1R, knit to last 2 stitches, p2. [1 stitch increased]
Row 2 (right side): K2, purl to end.
Repeat Rows 1 and 2 one (1, 2, 2, 2, 2) more time(s). [13 (14, 15, 16, 16, 17) stitches]
Next Row (wrong side): Cable cast on 6 (6, 6, 6, 7, 7) stitches, working across newly cast-on stitches first, p2, knit to last 2 stitches, p2. [19 (20, 21, 22, 23, 24) stitches]
Continue Working Front
Row 1 (right side): K2, purl to last 2 stitches, k2.
Row 2 (wrong side): P2, knit to last 2 stitches, p2.
Repeat Rows 1 and 2 until piece measures 4 ½ (4 ¼, 4 ¼, 4, 5, 4 ¾) inches from marker at Shoulder, ending with a right side row. Remove marker.
Shape Armhole
Row 1 (wrong side): P2, knit to last 2 stitches, m1L, p2. [1 stitch increased]
Row 2 (right side): K2, purl to last 2 stitches, k2.
Repeat Rows 1 and 2 three (4, 5, 6, 4, 5) more times. [23 (25, 27, 29, 28, 30) stitches]
Repeat Row 1. [24 (26, 28, 30, 29, 31) stitches]
Next Row (right side): K2, m1pL (see Notes), purl to last 2 stitches, k2. [1 stitch increased]
Next Row (wrong side): P2, knit to last 3 stitches, m1L, k1, m1L, p2. [2 stitches increased]
Repeat the last 2 rows 0 (0, 0, 0, 1, 1) more time(s). [27 (29, 31, 33, 35, 37) stitches]
Continue Working Front
Row 1 (right side): K2, purl to last 2 stitches, k2.
Row 2 (wrong side): P2, knit to last 2 stitches, p2.
Repeat Rows 1 and 2 until piece measures 12 (12, 13, 13, 14 ¼, 14 ¼) inches from end of Armhole shaping, ending with a wrong-side row.
With right side facing you, bind off knitwise.
Finish
Sides
Fold the piece in half at the Shoulders so that the wrong (knit) sides are together and the right (purl) side is facing out. Using Mattress Stitch, seam along the knit selvedge stitches at each side, working from the bottom edge to Underarm.
Body Edging
Turn the piece inside out so that the wrong (knit) side is facing you. Cast 2 stitches onto a double pointed needle (for the neatest possible finishing, use a Provisional Cast-On). Do not turn. Slide the stitches to the other end of the needle.
Starting at the left side seam (as you look at the piece), work an Attached I-cord along the front bottom edge of the vest as follows: *Knit 1, slip 1 purlwise with yarn in back, pick up and knit 1 stitch from edge (3 stitches on needle), pass the slipped stitch over the picked-up stitch and off right needle, without turning, slide stitches to other end of needle, repeat from * along bottom edge, picking up 1 stitch for each of the bound-off stitches.
Continue to work an Attached I-cord up the cardigan opening, now picking up 3 stitches for every 4 rows as you go. In the same manner, continue around the neckline, down the other side of the cardigan opening, and around the bottom edge to the side where you began.
If you used a Provisional Cast-On, join the beginning and end of the I-cord with the Kitchener Stitch. If you just cast on normally, bind off the I-cord stitches and sew the beginning and end together.
Armhole Edgings
Cast 2 stitches onto a double pointed needle and with the piece still inside out and beginning at center of Underarm, work an Attached I-cord around each Armhole, picking up 3 stitches for every 4 rows and working up one side, over the shoulder, and down the other side back to where you began. Join ends of I-cord together, as for Body Edging.
Ends + Blocking
Weave in the ends and block as desired.


Thank you for this wonderfull patern
I just love it
Trudi X
Kudos to you for offering up temptation to me to knit a garment when I am strictly a blanket, accessories and socks fan! You all continue to be my favorite go to store to design and yarn!
I just made a similiar vest … freelancin’ with same construction (up back, over shoulder, down front) WITHOUT A PATTERN! Thank you! Thank you! Now I can knit #2 WITH THIS PATTERN! And this alpaca looks TOO LUSCIOUS TO NOT PURCHASE FOR #2!
Enjoy your well deserved SNOW DAY! Happy Knitting!
Diane (happy in sunny Florida!)
I love this vest! I rarely make things for myself – but this is one I hope to do this very month! I love the look, the texture, the simplicity, and it actually comes in my size! Thank you and I can’t wait to order the yarn!
How does the yarn feel? is it scratchy or soft?
Hi Angela,
Thanks for the question. The yarn, being 100% alpaca, is very soft and silky. Hope you’ll like it!
-Adam
I am wondering how to download your free patterns. I am particularly interested in the above vest and also some old fashioned children/adult toques that I just love. I don’t want to download all the coloured pictures, just the written instructions. Thank you.
Hi Jeanne,
Thanks for writing in! You certainly can download all of our patterns as PDFs. If you’re on a desktop version of the site, you will find a “print” icon in the right column just below the date and tags. If you’re on a mobile version of the site, you will find a “print” icon below the pattern and above the comments.
Follow the easy on-screen instructions to delete whichever parts of the pattern you don’t want to print or save. For example, you may decide to shorten the pattern by omitting certain images or the list of materials. Then, you will want to select PDF in the top left hand of the print bar and follow the prompts!
I hope that this helps!
Cassy
hi, thank you so much for this great and simple pattern. I was sweating by doing the wrap turn the first time but after reading the instructions a feeled 20 times it finally worked.
I wondered whether there is an error in the pattern under right side – form neckline – row 1: shouldn’t it be k2 to start and p2 to end row 1?
Hi Nadia,
Thanks for writing us. In the previous shoulder shaping section you end on a right side row. Row 1 of the neck shaping is a wrong side row, so it is correct that you P2, M1R, K to last two stitches, etc. The purl side is the face side of this fabric, so the wrong side will always have mostly knit stitches. Best of luck!
-Adam
Thank you for this adorable vest pattern
Does this vest really take 6 skeins of the yarn? Seems like a lot to me and I want to make sure before I place an order.
Thanks, Loretta
Hi Loretta,
Thanks for writing in! For the smallest size, we used roughly 5 and a half skeins. To achieve the smallest size, you will need the 6 skeins stated.
Best,
Cassy
Thank you for the beautiful vest pattern! I love the simplicity!
Hello,
Can this pattern be created with any of your other yarns with minimal adjustments?
– Elizabeth
Hi Elizabeth,
Thanks for writing us. I suggest Super Soft Merino if you’d like to make this in one of our other yarns. It knits beautifully on a US 11 and you won’t need to change the pattern!
-Adam
Can’t wait to make this vest. We are just coming into autumn in NZ, so will have to get my needles working. How many metres/yards are there in each skein?
Hi Pip,
Thanks for writing in and for your interest in our newest yarn! Shepherdess comes in 100 gram skeins that measure 123 yarns and yield 2.25 – 3 stitches per inch on US 10-13 needles. It is undyed alpaca harvested and spun in Peru. All the particulars for each of yarns can be found on their product pages on the Product Details tab. Shepherdess can be found here: https://www.purlsoho.com/yarn/shepherdess-alpaca.html
I hope that this helps!
Cassy
I really like this vest but I am not a fan of Reverse Stockinette; can this completed vest be turned inside-out and worn or is there a normal Stockinette pattern available? By the way, that Shepherdess Alpaca is to die for!
Hi Richard,
Thanks for the lovely compliment! You can knit this vest as is and turn it inside out. The only difference is when you do the seam you’ll want to do the mattress stitch with the knit side facing up. When doing the i-cord edging you’ll want to have the purl side facing you at the beginning. It’s that simple! Best of luck and happy knitting!
-Adam
Love this vest! I’m wondering if your Super Soft Merino is a reasonable substitute? I am interested in doing the pattern in a solid color as a gift for someone who prefers wool over alpaca.
It looks a bit thicker…maybe going up a needle size and down a pattern size?
Hi Linda,
Thanks for the compliment! You can knit this vest in Super Soft Merino if you’d like. It might be a bit denser than the Shepherdess Alpaca but it does knit nicely on a US 11. Best of luck!
-Adam
Can you recommend a simple way to add a zipper or some sort of closure system to this sweet vest?
Hi Nita,
Thanks for writing us! I suggest looking at our Zippers in Knits tutorial for adding a zipper to this vest. I also suggest adding about an inch to the total width of the vest so you have a half inch on each side of the front opening for the zipper seam allowance. Hope this helps!
-Adam
What would I have to do to work this in regular stockinette stitch?
Hi Felicia,
Thanks for writing us. You can knit the pattern as is if you want the knit side to be the face. The only difference is that you will seam up the sides with mattress stitch with the knit side facing up. This way the seam will be facing the purl side. You’ll also want to have the purl side facing you when knitting the i-cord edging. Hope this helps!
-Adam
Hi
I’m a french fan . Do you think it’s possible to get the pattern in french ? I’ll try to translate but it’s a little tricky for me .
Or if not just put the size conversion to french size.
Thank you so much . Merci
Hi Luciana,
Thanks for writing in! At this time we are only able to provide our patterns and support in English. Thank you for your request!
Best,
Cassy
Hi
Could you advise on how to adjust this for a smaller chest measurement of 30 inches with 2 to 4 inches of ease.
Thank you in advance and I found your tutorials to be a wonderful resource.So helpful!
Hi Sabina,
Thanks for the question! While I can’t customize the pattern, I can tell you that you’ll want to cast on approximately 46 stitches for the back and end up with 23 stitches for each front section to get a total chest circumference of approximately 33″. I hope this helps! Good luck and let me know if you have any other questions!
-Adam
I have just started knitting the Drift Vest with Shepherdess Alpaca. I am in love with this yarn.
I love the simplicity of this vest but would like to knit it with lighter weight yarn – worsted or Aran. Is there a mathematical way for a really dumb math person to resize it? I am talking math moron.
Thank you,
Monica
Hi Monica,
Thanks for writing in and for your kind words! I am afraid that there is not a simple way to alter this pattern for a thinner yarn. We do have vest patterns for thinner yarns that may appeal to you:
Autumn Equinox Vest
Foxglove Vest
Sideways Garter Vest
Cardigan Vest
I hope that this helps!
Cassy
Thank you for sharing such a pretty pattern!
I’m already working on at the right front.
I’m confusing the instruction of Shape Neckline of Right Front which goes:
Row 1: P2, m1R, k to last 2, k2
I think I should go
Row 1: K2, m1R, k to last 2, P2
So I’m stopping here. Please help me that.
By the way, I also posted this comment on your project page too 🙂
Hi there,
Thanks for looking out but the pattern is correct. The purl side is the right side of this vest but we are increasing on the wrong side. Hope this helps!
-Adam
As a male knitter what would need to do to adjust this pattern for a man
Hi J D,
Thanks for writing in! This lovely vest does not have any shaping that would make it specifically for a man or a woman. It does fit in more of a cropped fashion so you may want to lengthen it. I would measure an item that you like the length of and use that as a model for how long to knit the back and front!
Happy knitting!
Cassy
Evenings still are cool and I can’t wait to wear my Drift Vest on sunset walks. I have completed the knitting. Reading the pattern on-line, when I click on what look like links for directions for doing the mattress stitch and i-cord finish, the cursor freezes. Is there another way to access this information?
Hello Dana,
Thanks for writing in! Sorry about the technical difficulties. I just tested out the links and they seem to be working now, but just in case here is the link for the attached-i-cord and the mattress stitch. I hope this helps.
Happy knitting!
-Marilla
The only way I get the look of the Cord edging as shown , is doing the applied I-Cord with the Purl side facing me not as the directions state ( turning it inside out to knit side facing) Am I doing something wrong ? Also it is not lying flat but rolling–will blocking fix the rolling edge?
Janis Hoffman
Hi Janis,
Thanks for writing in! We have found that for some knitters, applying the I-cord as you are describing here works better for them. If it looks lovely and works better for you, you should go for it! As for the curling, I would suggest blocking the item and that should mitigate the issue a bit. It might also be that you are knitting the applied I-cord a little too tightly. You can try easing up a bit on your tension and see if that helps as well.
Happy knitting!
Cassy
Love the pattern but am having the same issue with the I-Cord. In the first photo of the vest the I-Cord is clearly on the exterior of the right side (purl side) of the vest but when I follow the directions it ends up on the inside. Help?
Hi Nancy,
Thanks for reaching out! While we did knit this lovely vest as written in the pattern, we have found that some knitters have found it easier to knit the I-cord from the outside rather than the inside. Both will work and both should look lovely! One of the things that I love most about knitting is how we can all alter the way we do things to make our projects our own!
Best,
Cassy
Hello! I am loving this vest…such a great pattern and very yummy yarn! I am finishing it and doing the attached i-cord along the edges . In the directions, it asks us to have the wrong side facing out. And we pick up stitches as we go along the bottom edge doing the attached i cord. It seems that the i cord border then faces the inside, with very little of the border showing on the correct (Purl side -out) side. Is this correct? Thanks!
HI Anne,
Thanks for writing in! We did knit this lovely vest as written in the pattern. However, if you like the look of having the i-cord show a bit more, I would go for it! One of the things that I love most about knitting is how we can all alter the way we do things to make our projects our own!
Happy knitting!
Cassy
Love your pattern. Is it possible to make it in garter stitch? How would that change the measurements?
Thanks,
Betty
Hi Betty,
Thanks for writing in! Garter tends to be wider and shorter than stockinette stitch. I would suggest knitting a gauge swatch in each stitch pattern and measuring how much wider and shorter the garter sample is. You can then choose a size based on how different the stitch patterns measure. For instance if you are a 39″ chest, and the swatch is 10% larger, you would choose the size 37. The only complication that I could foresee would be in the armhole shaping where you may need to add additional plain rows between the decrease rounds. It will be a bit of work to alter it, but if you prefer the look, it may be well worth it!
Best,
Cassy
Question. Does this alpaca tend to stretch thru time without a knit-in stabilizing yarn, like wool or nylon? Barbara. Denver. Beautiful yarn!
Hi Barbara,
Thanks for writing in! Though all alpaca will grow and stretch over time, we have found that the store sample and those made by staff have only minimally grown over the past year. It may be in part due to how this yarn spun. A handspun yarn, it spun quite tightly which does keep stretching at bay!
I hope that this helps!
Cassy
I am finishing the Drift Vest and am at the “Body Edging” and have seen the video for Provisional Cast-On: One Step Method and also the Provisional Cast on: Two Step Method and am confused as to whether I should use the One Step Method and my working yard with extra crochet stitches and cut the yarn off after several crochet stitches or the Two Step Method with a contrast yarn and then knit the beginning of the Attached I-Cord on the contrast yarn using my working yarn and then continue on with the Attached I-Cord with the working yarn on the bound off stitches at the bottom edge of the vest. Help, please!
Emma Hampton
Hi Emma,
Thanks for writing in! For this lovely vest, we used the one step provisional cast on for the i-cord!
I hope that this helps!
Cassy
Thank you! And did you add the extra crochet stitches and cut off the end? Then “knit 1, slip 1 purl wise with yarn in back” from those cast on stitches before you then “pick up and knit 1 stitch from edge (3 stitches on needle)”? [These are the instructions from the pattern.].
I’ve never done the Attached I-cord before (I did watch the video) so I am still a little confused about how to do this. Thank you for you help.
Emma
Hi Emma,
Thanks for writing back! For the provisional cast on here, we cast on just the 2 stitches while and then chained a few more stitches and cut the scrap yarn as demonstrated in the video for the provisional cast on. Once you have those 2 stitches on the needle, you will slide the stitches to the other end of the needle and then knit 1, slip 1 purlwise with yarn in back, pick up and knit 1 stitch from edge. In essence, you are correct!
The great thing about the attached i-cord is that you can try it a few times and always pull it out. The first few rounds can be a bit challenging until you get the hang of it but you can practice as much as you like!
I hope that this helps!
Cassy
I’m stitching the side seams and lined them up with the wrong (knit) sides facing in. This puts the mattress seam to the outside (right side purl) of the garment. Is this correct?
Hi Angela,
Thanks for writing in! You are correct! For this lovely pattern, we used the mattress stitch on the outside!
Best,
Cassy
Thanks for your reply. Now I’m ready to knit the attached i-cord and I’m confused about which stitch to pick up. Do I pick up the bar of the first V stitch in each column of stitches or do I pick up the loop from the bound off edge stitching?
Hi Angela,
Thanks for writing back! For this vest we dip the needle into the edge of the knitting, and bringing the yarn around to knit, picking up a stitch. Were you to pick up the bar of the v of the knit stitches, the i-cord will be worked in from edge a bit and may not look correct on the right side (purl side) of this vest.
I hope that this helps!
Cassy
Hello!
I am just about done this project, and am wondering what is the best way to get the edges to stay flat. I have completed half of the i-cord, and can already tell that it is going to be a struggle to get the edges to stop curling. Do you have any suggestions? A particular way to block, perhaps? (I’ve never blocked anything before, just for reference).
Thank you!
Emma
P.S. I’m in Canada so did not purchase your yarn; I am using Lopi yarn.
Hello Emma,
Thank you for reaching out! You are correct, blocking should relax the fiber and help it stay flat. I would recommend wet blocking this project.
Happy knitting!
-Marilla
any chance to get this pattern for newborn – size 7
such a great one. thank you.
Hello Sophie,
Thank you for reaching out! Unfortunately we do not have a newborn size for this pattern, but I will pass along your request!
Happy knitting,
Marilla
Hello from sunny but cool Australia ( Winter here). Many, many thanks for the beautiful and elegant Drift Vest pattern. So lovely, but sadly can’t find how much wool must I order . My chest ( bust ) is 46 inches.
I’m sure I will make probably in the future two more (in small sizes as as a present).
Kindly direct me please where to look for the amount of wool I need. Can’t wait to get the soft Alpaca wool.
Such an easy knitting pattern and so elegant !
I am a knitting novice but confident that I will succeed, except the edging. Will need probably some help.
Sending you my warm greetings,
Irene
Hi Irene,
Thanks for writing in! If you look at the beginning of the pattern, in the section under the heading “Sizes,” you will see that for your bust measurement, you will be making the 5th size, which has a finished measurement of 48 1/4 inches, to fit bust measurements from 45-48 inches. Just above that, in the section under the heading “Materials,” you can see that the 5th size requires 9 skeins of Shepherdess Alpaca. Whenever you are ordering, you can check how many skeins you need in the Materials section of the pattern!
Thank you so much for the kind words, and happy knitting!
Julianna
I am working on shape shoulders, short row 5 “knit to last two stitches..” it doesn’t state what to do with the last two stitches -knit them? Please help so I can continue – LOVE the yarn!
Hi Joy,
Thanks for writing in! At the very end of Short Row 5, on the next line down, it does say “p2” for the last two stitches! I hope this clears things up so you can carry on and please let us know if you have any other questions!
Best,
Julianna
I love this vest, but am also having a problem with curling of the edges. My I cord stitches are loose and I’ve wet blocked it. I did the I cord one stitch larger than the instructions – could that be the problem? I feel like the I cord needs to be more rigid to stay in place.
Hello Madge,
Thank you for reaching out! Just to clarify, you cast on 3 stitches instead of 2 for the attached I-cord? You are correct that our sample’s I-cord does have a rigidity to it, so this could be the issue. How much curling are you getting and is it all along the edge or just at the corners?
I hope I can help!
-Marilla
Marilla – thank you so much for your help. I did cast on 2 stitches instead of two to make a wider edging. It’s curling back across the entire length of the front so I think it needs to be more rigid. As much as I hate to do it, do you think I should redo the I-cord with a 2 stitch cast on? Other than the curling, it’s such a beautiful design and so soft and comfortable.
Hello Madge,
I’m sorry to say that re-doing the cast on might be the way to go – we have all been there! I am so happy to hear that hoe much you have enjoyed the rest of the project. Keep us posted on how it goes!
-Marilla
HOORAY! The promised free pattern appears immediately without going thro page after page of ads and other diversions. Others should take note that we haven’t got all that time to waste. I had almost lost the will to live but now looking fwd to knitting it.
Hi, I am casting on..I am used to cable cast on, and you don’t specify here, will it matter what method I use?? my swatch really curled, so and guessing the I chord runs around all edges? could not tell..
many thanks for you help..
Hello Robyn,
Thank you for reaching out! You are correct, you can use any cast on method for the project. The I-cord edging goes along the edge of the whole vest.
I hope this helps and happy knitting!
-Marilla
Loved the pattern and the wool. Did the smallest size. Added zipper. Added 4 rows of chrochet at the bottom. Did the cord but separately and then sewed on. Put cord a the bottom but not at the sleeves. Used 5 skeins of wool.
What yarn would you recommend since Shepherdess Alpaca is apparently no longer available? Thx!
Hi Betsy,
Great question! I would suggest using either Super Soft Merino or Brooklyn Tweed Quarry – as always, when substituting a different yarn, you should knit a gauge swatch, but both of these yarns should knit up to the same gauge as Shepherdess Alpaca!
Happy knitting!
Julianna
Hello — I would love to make this vest but would like to add maybe 3 loops and toggle-type bottoms. I am a relatively new knitter. Any tips on how to do that? Thank you!
Hi Trish,
Great question! The easiest way to create this kind of button loop is with a crochet chain – even though you aren’t a crocheter, I promise it’s really easy! You can see how to work a crochet chain in our Crochet Basics Tutorial, and you will simply chain to the length you need to go around your toggle, finish off the chain by passing the tail of yarn through the final loop of the chain, and then secure your chain loop to the vest using the two tails.
I hope that helps, and please do let us know how it turns out!
Julianna
Thank you very much, Juliana! Actually I do a little crochet so I am not intimidated by this at all. This will be fun. Thanks again!
Trish
Hello
I just finished knitting the vest using ribbon xl cotton and it worked up really lovely. I knitted this vest as a gift for a very special friend of mine. However, now that I’m at the end I see that I will need to apply an I-cord and maybe its just me but looking at online tutorial and trying to figure out the instructions given has me feeling blue. I just can’t seem to figure it out. Is there a tutorial showing exactly how to do this method with an actual garment that has been completed. That seems to be the only way I can have my aha moment. Hoping for some help as I would like to have this finished before the second week of March 2020.
Any help would be greatly appreciated.
Hi Eurydice,
Thanks for writing in, and I’m sorry that you are feeling discouraged! I assure you that the attached i-cord really is quite easy once you get the hang of it – you will be knitting the same row over and over as you go around the vest. We don’t have another tutorial or video for this technique unfortunately, but I would recommend trying it out on a swatch to see how it goes before trying it on the actual vest. It really is much easier than it seems!
I hope that helps!
Julianna
Love this pattern! Would love to get started but I don’t see this yarn on your site any more. Are there any other yarns that you would suggest?
Thank you!
Hi Jess,
Great question! Shepherdess Alpaca has been discontinued, but our Super Soft Merino is an excellent substitute for this vest! You may also be able to use Big Good Wool or Brooklyn Tweed Quarry, but you would need to knit a swatch to make sure you are able to match our gauge, since both of those yarns are slightly lighter weight.
Happy knitting!
Julianna
I love the drift vest but think I want a red with that marled look. Might there be a yarn that two colors (off white and red) could be held together to acquire the gauge?
Hi Sal,
What a wonderful idea! Although you should definitely knit a gauge swatch, you should be able to match the gauge using a heavy DK to light worsted weight yarn. Both Cashmere Merino Bloom and Brooklyn Tweed Arbor come in a variety of reds and creams!
I hope that helps, and please do let us know how it turns out!
Julianna
Hello! _ Since the Shepardess Alpaca was discontinued, I am trying to knit this pattern in Plymouth Baby Alpaca Grande, which says the gauge is 3 stitches per inch with size 10.5 which seemed to me to be close enough to the 11.25 to 4 inches gauge called for in the pattern. But when I knit my gauge sample on size 11 , I am getting 14 stiches to the inch. What am I doing wrong? It does not seem to me if I go up one needle size that I can get to the right gauge since I am off by so much. Any advice? Is my yarn too thin???
Hi Joanne,
Thanks for writing in! I would try swatching again with a size 13 needle to see if you can get the correct gauge and you still like the way your yarn is knitting up. Another option would be to try holding a fingering weight yarn together with your yarn to increase the overall thickness. I hope this helps!
Happy Knitting
Jessica
Thank you, I have tried going up to a 13 needle, but the gauge is still way off. I think I am going to try a different yarn type, thank you for your advice.
Hi,
I have been looking for one of your patterns to make with the new Lovebird. I think that this one might work just right.
Checking with you to see if you think that it will and also, what is the original yardage on the Shepardess Alpaca so that I can make sure to order the correct amount of Lovebird.
If you have any other suggestions for sweaters/vests/shawls with Lovebird, I would appreciate those as well.
Much thanks and be well!!!
Hi Lisa,
Thanks for reaching out and for your kind words! I think that Lovebird would be an excellent option for this vest! The gauge should be very comparable to our Shepherdess Alpaca so the pattern should stay consistent, I do recommend working a gauge swatch just to be sure its the same! Each skein of Lovebird is approximately 82 yards and we used 350 (380, 430, 464, 535, 565) yards for this pattern so depending on what size you plan on making you will need 5 (5, 6, 6, 7, 7) skeins!
All the best,
Gianna