Attached I-Cord
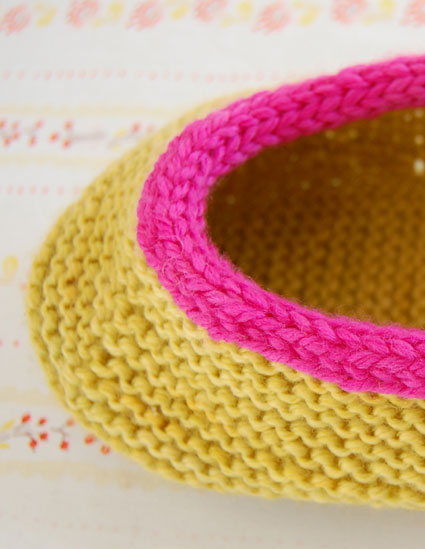
The pink edge in the image above above is an Attached I-cord. Attached I-cords are a great way to finish a knit edge. They’re a clean alternative to messy selvedges; they help flatten a rolling edge; and they can add an exciting blast of color. There are lots of ways to knit an attached I-cord. Here’s how I do it. –Whitney
If the cast on end of the I-cord is going to meet the bind off end, I suggest using a provisional cast on so you can graft the two ends for a neat finish (for instructions on grafting two live ends, please visit our Kitchener Stitch Tutorial). If the ends aren’t going to meet, use a regular long tail cast on. Since this tutorial comes from the Mary Jane Slippers where the ends do meet, I’ll use a provisional cast on here (see our Provisional Cast On Tutorial for help).
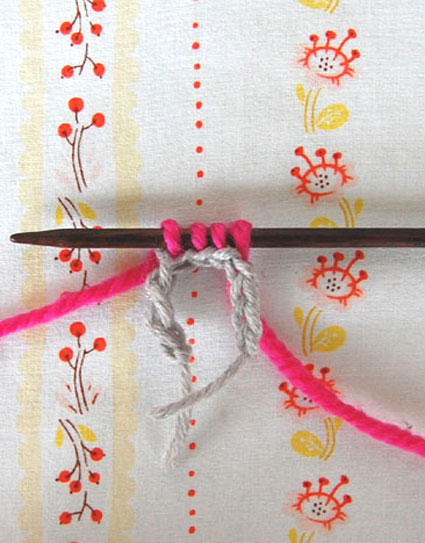
After casting on, do not turn the work the way you normally would to knit the next row. Instead, slide the stitches down the double pointed needle to the right end. The working yarn is coming from the far left stitch. Bringing the yarn around the back, knit the first stitch. (If you’ve never knit an I-Cord, you may want to consult our basic I-Cord Tutorial for in-depth instructions of the steps.)

Knit until there is 1 stitch remaining on the left needle. Slip this stitch as if to purl.
Bring the yarn forward in a yarn over. Dip the needle into the edge of the knitting, and bringing the yarn around to knit, pick up a stitch.

There are now 2 more stitches on the needle than the original cast on (in this case, 6). Pass the 2nd and 3rd stitches (ie the slipped stitch and the yarn over) over the picked up stitch. You should now have the original number of stitches on the needle (4).

Slide the stitches down to the right end of the needle and repeat the process: k to the last stitch, slip 1, yo, pick up a st, sl 2 st over.
Note: These instructions are especially suited for a contrasting color I-cord. If the I-cord is the same color as the knitting, you don’t need to yarn over and you can just slip the last stich, pick up a stitch, and pass the slipped stitch over the picked up stitch.
If you are following this tutorial in order to make the Mary Jane Slippers, you will complete the two ends of your Attached I-cord by grafting them together using the Kitchener Stitch. Please visit our Kitchener Stitch Tutorial for complete instructions.


Hi,
I’m knitting the Drift vest and followed the link for the attached Icord tutorial. It says to knit one, slip a stitch, yarn over then dip the needle into to work and pick up a stitch, so double the amount of stitches ( in this case 4 st). The written directions for the drift vest icord are different as they say to knit one, slip one and pick up and kit one stitch from edge ( 3 stitches on needle. So which directions are correct? Also the patterns says to do this to the wrong side of the vest ( so pick up the stitch on the wrong side). the tutorial icord I tried (picking up the stitch on the wrong side), lays nicely on the wrong side instead of the right side. The picture of the vest looks like the icord is laying on the right side so it seems to me the picked up stitch should be done to the right side of the vest so the Icord lays nicely on the right side. thank you for clarifying the pattern and which icord instructions are correct for the Drift vest and which side to apply it to. Denise
Hello Denise,
Thank you for reaching out! For the Drift Vest you will be working 3 stitches (1 knit, 1 slip and 1 picked up and knit). Both directions are correct ( you can use different stitch numbers depending on how large or small you would like your i-cord), but for the Drift Vest the directions in the pattern are correct. We did knit the I-cord on the wrong side (knit side) as written in the pattern. However, if you like the look of having the i-cord show a bit more, I would go for it!
I hope this all helps and Happy knitting!
-Marilla
Hi, I’ve knitted up the original Eleventh Hour Blanket and am now starting on the applied icord edging. How many stitches is the icord? 3 or 4 or more? Also, I’m following the directions for the icord and am getting a neat edge on the side I’m facing but not so much on the back side. What am I doing wrong? Lastly, is every stitch picked up? I’ve read that you should skip the fourth stitch when applying an icord to seed stitch body.
Thank you very much for any help. This blanket is super cozy!
Anne
Hi Anne,
Thanks for reaching out! If you check back in the pattern for the Eleventh Hour Blanket, you will see that we used a 3 stitch I-Cord, and picked up one stitch in every row and every stitch around the entire blanket. We also have instructions for turning the corners to avoid corners that pucker or pull up! It is not unusual for the wrong side of an attached I-Cord to look a little different from the right side, and you can even see the difference in some of our pictures that have the corner flipped up to show the wrong side of the blanket, but if they are drastically different, it may help to tug the yarn a bit tighter when knitting the first stitch of each row to pull the I-Cord closed in the back.
I hope that helps!
Julianna
Dommage qu’il n’y est pas le traducteur car tout me parait bien intéressant mais je ne parle ni ne lit l’anglais
Bonne journée
Eliane
Hello Eliane,
Thank you for your interest in our patterns! While we don’t have the resources to translate our patterns I will certainly pass along the suggestion!
Happy knitting!
-Marilla
I’m making a blanket with LOTS of ends. It was suggested that I use an attached I cord to bury the ends more efficiently. If I do this should I start the cord at the BO edge, the bottom??? ALL of the ends that need burying are on the left side if I’m looking at the wrong side of the work. Just for reference the blanket is called Watercolors on Rav. It’s a striped baby blanket
Thx in advance.
Hello Carol,
Thank you for reaching out! You can begin your attached I-cord at any point around the edges of your blanket. Are you planning on creating the I-cord around all of your ends rather than weaving them in?
Happy knitting!
-Marilla
Learn how to knit an attached i-cord. This technique is useful for giving your knitted pieces a fully finished look.
The best I-Cord ever! I only use this method and I get never tired to recommend it,
I would love to see a tutorial for grafting i-cord exactly as it is done in this project. I know you have a link there to how to do kitchener stitch on flat knitting, but it’s not quite the same as joining two tubes. There are many tutorials out there joining live i-cord stitches to a cast-on edge, but I can’t find any showing live stitches to live stitches in i-cord. Pretty please!
Hi Sarah,
Thank you so much for writing in! We don’t have the resources to create a tutorial for this step at the moment, but I will certainly pass your request along to the design team!
All the best,
Julianna
I just purchased the Gentle Cardigan, and I am not understanding how the two I cords are attached at all. . . . I think I have the same question as Sarah, but this pattern has you create a left and a right side I Cord, and then “With wrong side of Right Side facing you and continuing with yarn attached to Left Side stitches
(and smaller 40-inch circular needles), p. . . .” I cannot visualize what I am being told to do with the two I Cords. If there’s another tutorial will happily check it out!
Hi Eileen,
Thanks for reaching out! Unfortunately we don’t have a tutorial for this technique, but the instructions to work it are written out in the pattern! You will rotate the i-cord clockwise so that you can beginning picking up stitches from right to left, starting with the top leg of the stitch immediately below the last stitch of the i-cord.
I hope this clears things up!
Gianna
I don’t understand what to do with the two I Cords, and the part I copied in are all the pattern says. It’s just not clear to me. . . .
Hi Eileen,
Thanks for reaching out again! I am sorry that my response wasn’t clear before. You will be merging the left and right sides of the i-cord together so that they are seamless in the back of the sweater. You should have [64 (72, 80, 88) (96, 104, 112, 120) total stitches] on the smaller 40″ circular needles before you continue on to the BODY section of the sweater.
I hope this is more clarifying!
Gianna
Do you necessarily have to bdo me off the slipper stitches if you’re going to be picking them up again? What’s the point of binding off the stitches if you’re going to pick them up again?
I’m making the market bag – love love love the pattern, btw – and am ready to do the attached i-cord. The instructions for an attached I-cord says to knit the to the last stitch on the needle, slip a stitch then pick up a stitch from the cast off edge of the bag. The first time doing this step, do you slip the last provisional stitch then pick up the stitch with the unique marker then pass that last provisional stitch over the picked up stitch? I hope that makes sense. Thanks for any insights!
Beth
Hi Beth,
Thanks for reaching out, and I’m so glad to hear that you love the Market Bag pattern! You have exactly the right idea already. You’ll knit to the last provisional stitch, slip this stitch, pick up the stitch marked by the unique marker, and then pass the provisional stitch over the stitch you just picked up. (Since you’re working with the same color, you don’t need to worry about the yarn over step at all.) Hope this helps clarify things! You’re already on the right track.
All the best,
Lili
Got it! Thank you sooo very much. What a great finishing technique. I’m grateful for the opportunity to learn it.
Hi!
I’m working on the Silken Straw Tee pattern, which requires an attached I cord. However my question is really about the gray bit of knitting or crocheting in this tutorial. I don’t see any reference to it in the tutorial text, and I’m not sure what it does. It doesn’t look like the I cord or the provisional cast on. Help? Thanks!
Hi Lisa,
Thanks for reaching out. The gray bit of yarn is used for the provisional cast-on! You can find our tutorial on that right here. Hope this helps clear things up!
All the best,
Lili
May this new year bring happiness, peace, and prosperity to each of you !
I guess I have the same question about how to attach both ends of the I-cord.
Once I have picked up the last stitch of the round and bound it off with YO and previous slipped stitch, should I leave the yarn to the left and do the Kitchener on the top stitch knitted on the provisional cast on or on the bottom one ? That’s the way I did it but I’m not sure if this is the right method.
Thank you in advance
Pat
Hi Pat,
Thanks for your question! When completing the Kitchener stitch, you will be working with live stitches on each needle instead of binding off. If you are happy with the result, then I would recommend leaving as it but if not you can slowly unravel your bind off to pick those stitches up again.
I hope this helps but let me know if you have any other questions and I’d be happy to help get you back on track!
Happy knitting,
Gavriella