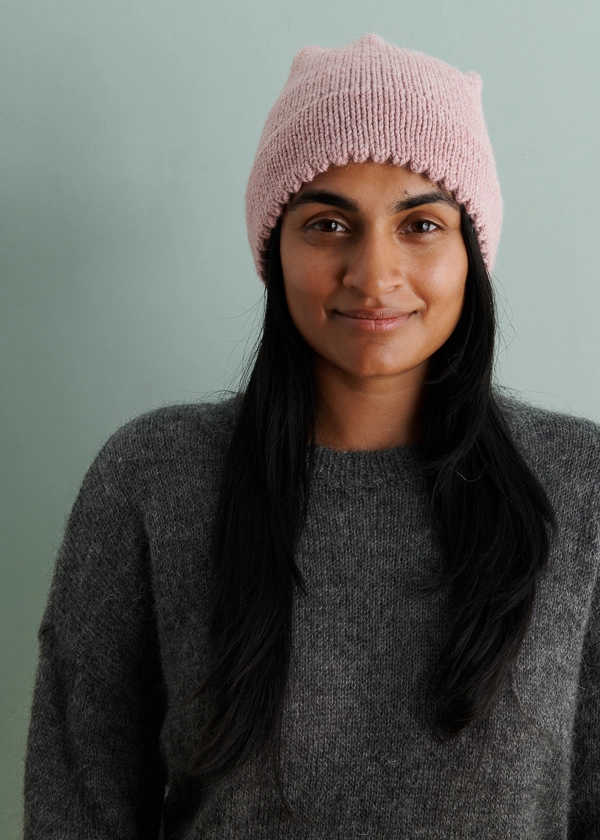
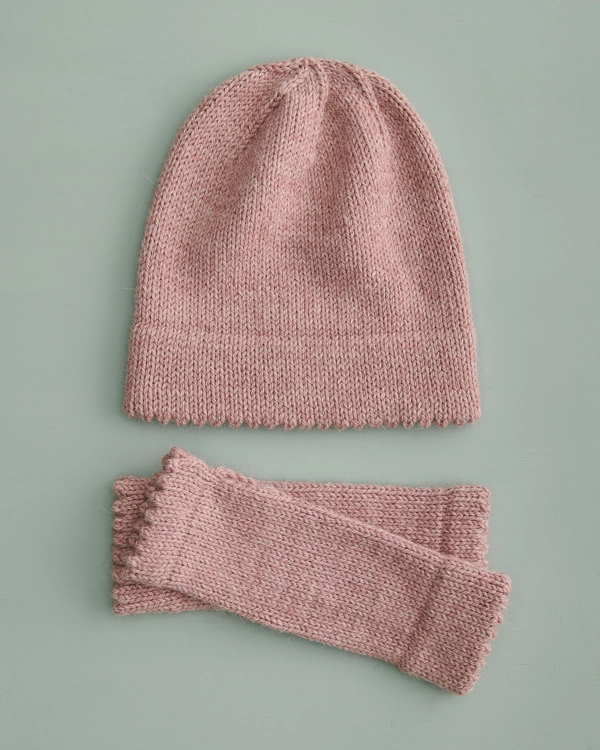
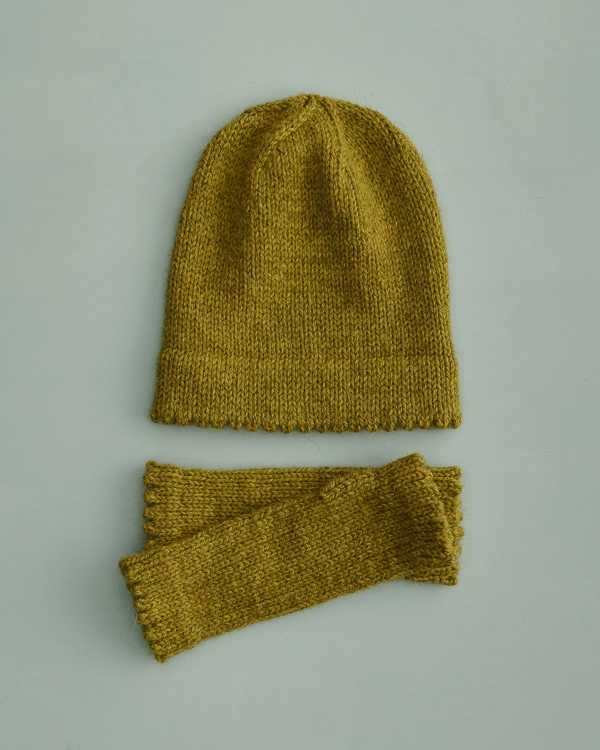
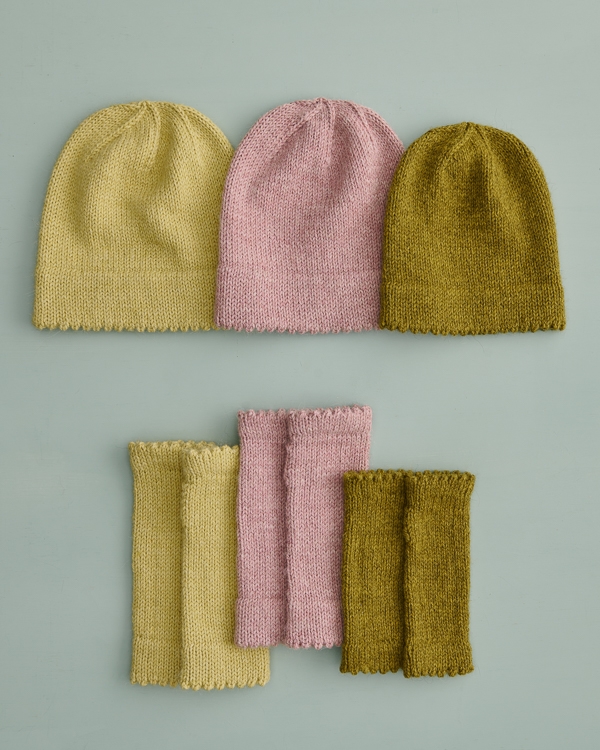
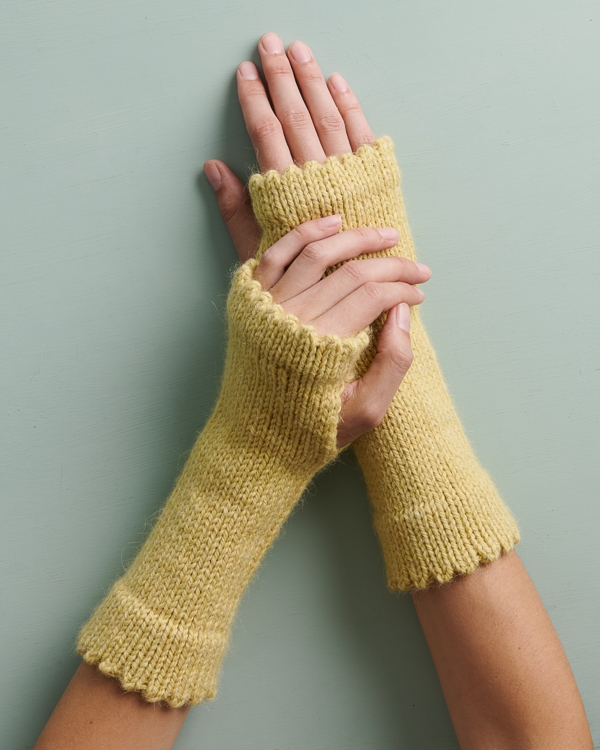
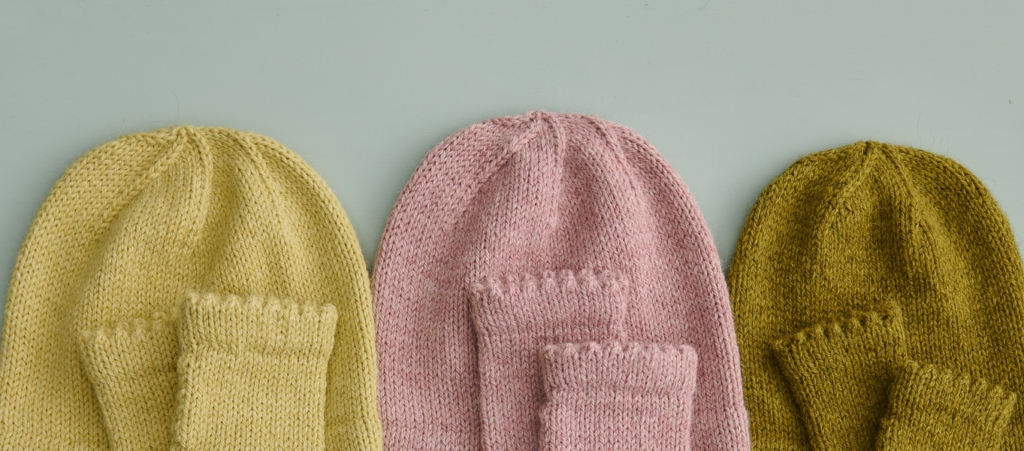
Picot Hat + Hand Warmers
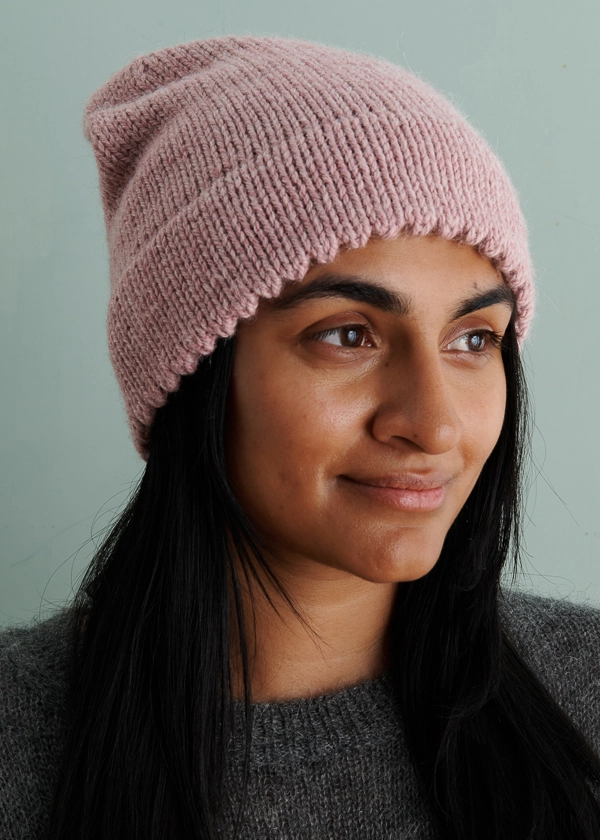
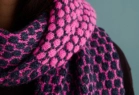
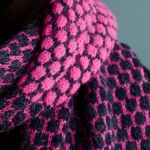
Our new Yonder brings its robust and earthy beauty to the sweet world of picot edges… A picot with some impact!

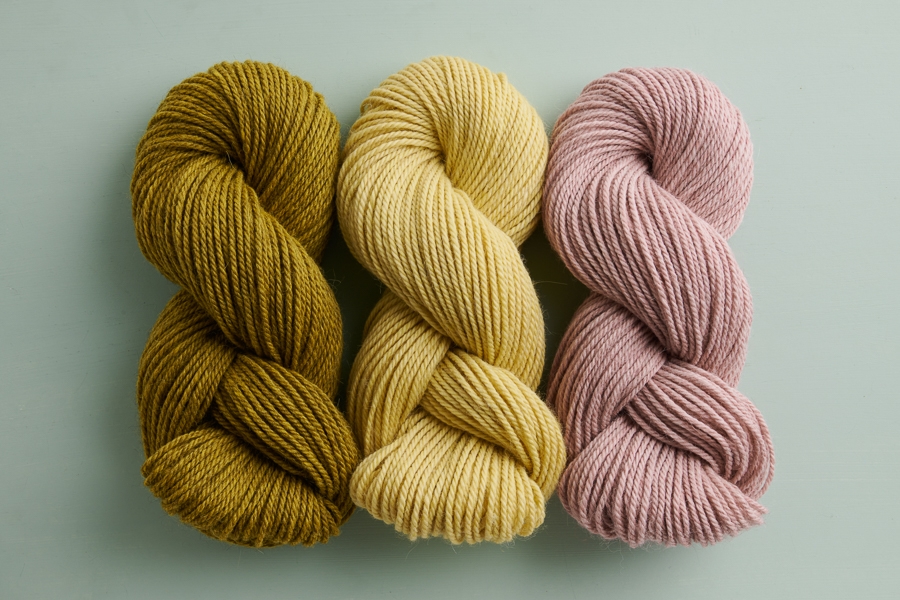
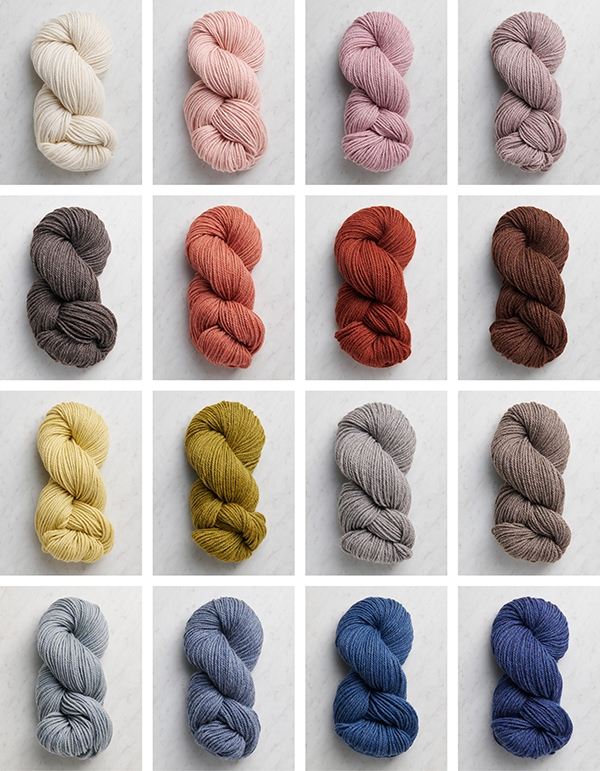
When you get Yonder in your hands, you will feel like you’re meeting an old friend, the one who tells it like it is and never lets you down. Fifty percent highland wool and 50% alpaca and a classic worsted weight, it has a traditional, homey feel that just makes you want to nestle in.
Yonder is so compelling for a number of reasons: its plump 3-ply spin, its great-outdoors palette (complex, rich, beautiful!), and most of all, its feeling that is rustic but very soft, hard-working but subtle.
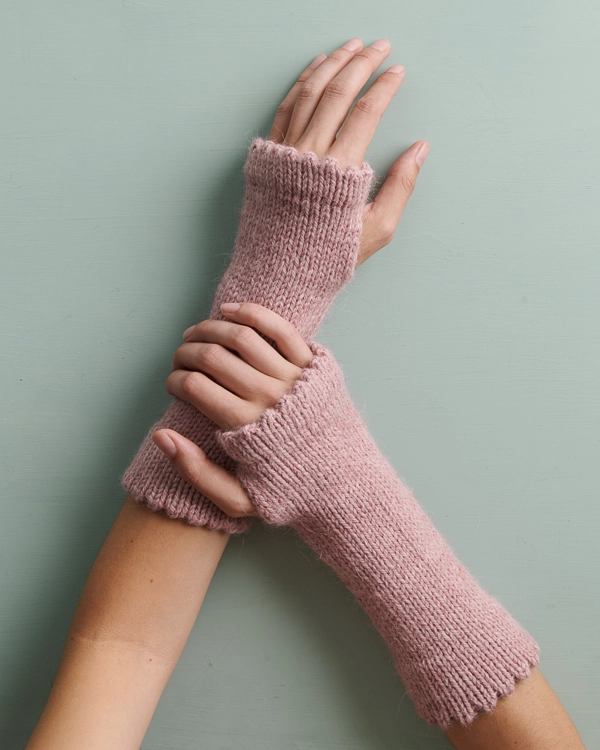
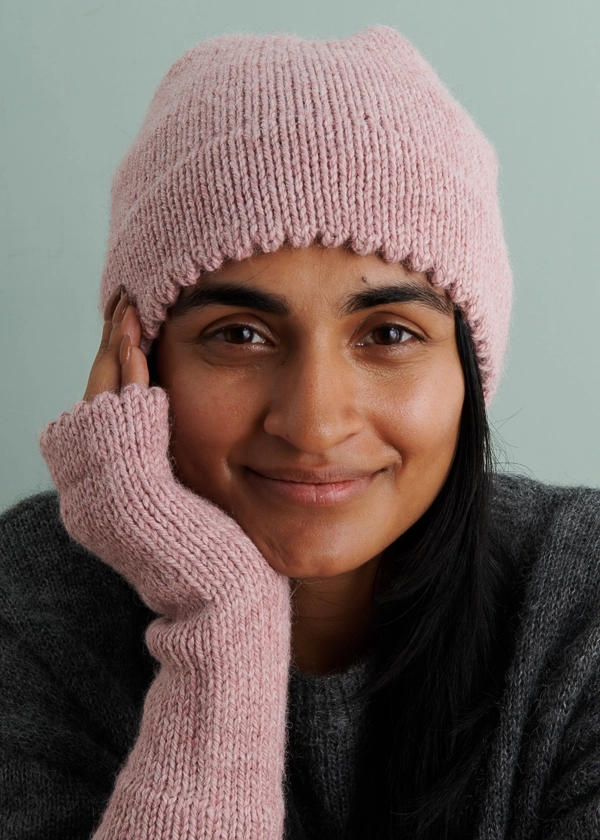
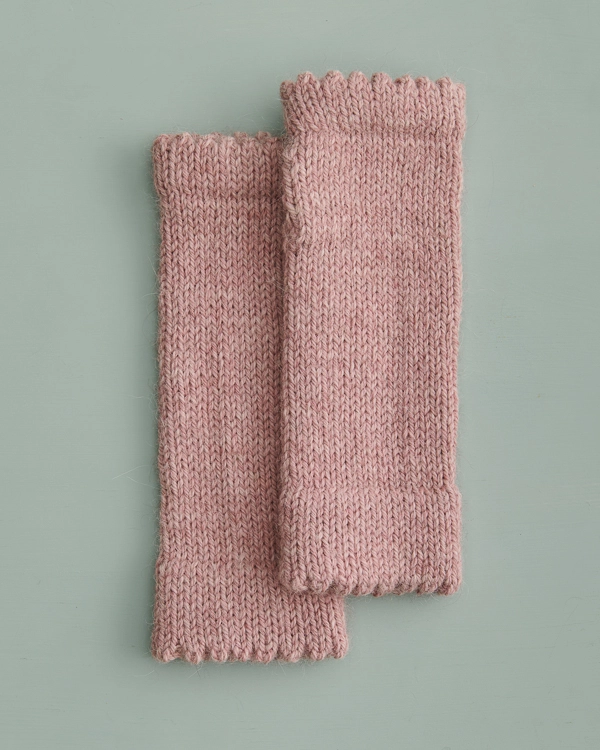
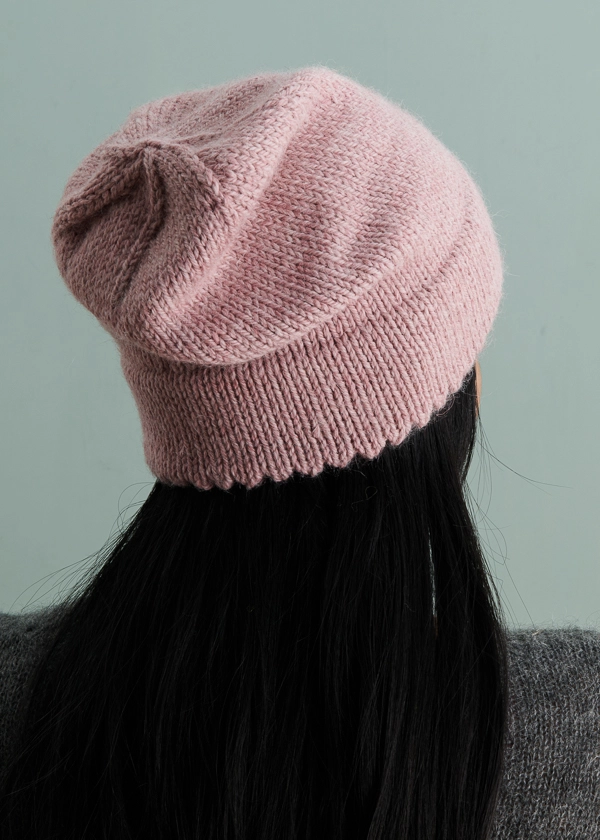
Yonder brings this down-to-earth character to our Picot Hat + Hand Warmers, ensuring that charming doesn’t get too cute. How about that picot edge, anyway? If you’ve never knit one, it’s a lot of fun to discover how it’s done!

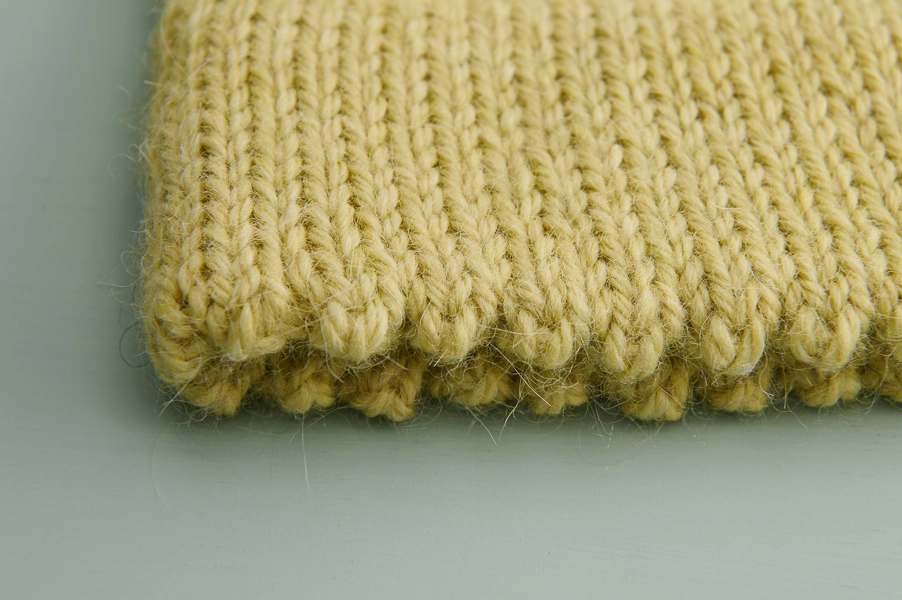
You’ll basically make a knit hem, which starts with a provisional cast one and ends with folding your piece in half and joining the cast-on edge to the working stitches. We have tutorials for all of that, by the way, so even if you’ve never done any of it, you can learn!
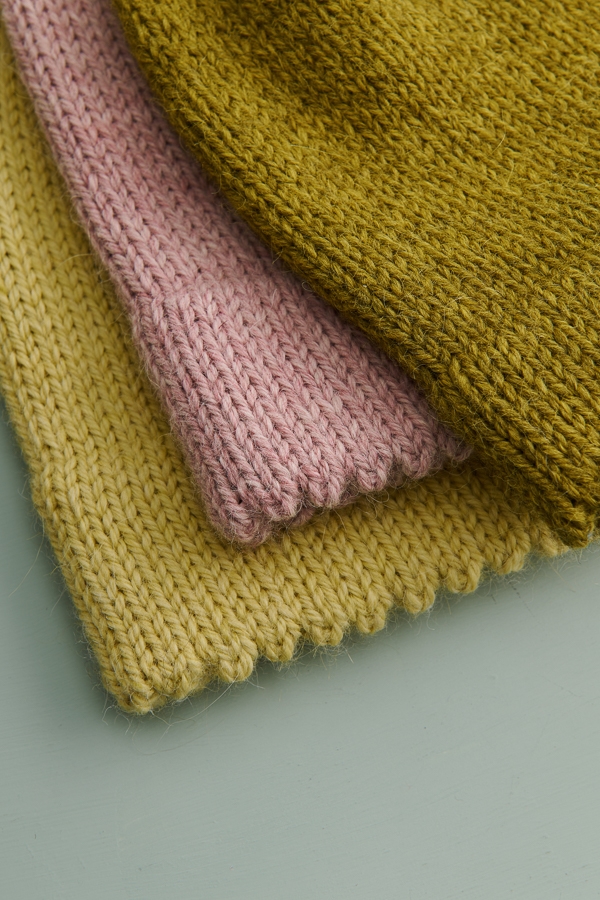
The picot secret comes halfway through the knit hem, when you work a round of eyelets (knit 2 together, yarn over, repeat). When you fold your hem along that round, the eyelets get folded in half and create little scallops, classically known as a picot edge!
Give your picot the tone you’re going for with Yonder‘s earthy heathered palette. It includes four undyed neutrals that come from naturally occurring shades of alpaca and wool, and the remaining 13 colors are dyed over these natural hues. Yonder plus picot… It’s inspired!
Designed by Purl Soho designer, Hiromi Glover. Click here to see even more of Hiromi’s work!
Please Note: Designer Maria Bergman reached out to us to remark on the similarity of our picot hat designs, and indeed, they are very similar! For sure, a coincidence and case of great minds thinking alike, we would like to shout out Maria’s Jiddes Mössa hat, which came first and is a close relative to our Picot Edge Hat. Please check out all of Maria’s designs on her Ravelry page… So many lovely things to knit!
Share your progress and connect with the community by tagging your pics with #PurlSoho, #PurlSohoBusyHands, #PurlSohoPicotHatAndHandWarmers, and #PurlSohoYonder. We can’t wait to see what you make!
Materials
HAT
- 1 (1, 2, 2) skein(s) of Purl Soho’s Yonder, 50% alpaca and 50% highland Wool. Each skein is 140 yards/ 100 grams; approximately 110 (140, 180, 220) total yards required.
- US 7 (4.5 mm), 16-inch circular needles
- US 8 (5 mm), 16-inch circular needles
- A set of US 8 double pointed needles
- Stitch markers, including one unique
- A crochet hook and scrap yarn for Provisional Cast On
HAND WARMERS
- 1 (1, 1, 2) skein(s) of Purl Soho’s Yonder, 50% alpaca and 50% highland Wool. Each skein is 140 yards/ 100 grams; approximately 85 (120, 140, 190) total yards required.
- A set of US 7 (4.5 mm) double pointed needles
- A set of US 8 (5 mm) double pointed needles
- A stitch marker
- A crochet hook and scrap yarn for Provisional Cast On
NOTE: For the Adult Small/Medium Hand Warmers, we used the entire skein of Yonder, so if you want to be sure you have enough, consider ordering an extra skein. If you don’t end up needing it, you can return unwound yarn for a refund within 30 days of purchase, or within 6 months, for store credit. Our Return Policy has all the details!
To make both the Hat and Hand Warmers, you will need 2 (2, 3, 3) skeins of Yonder; approximately 195 (260, 320, 410) yards required!
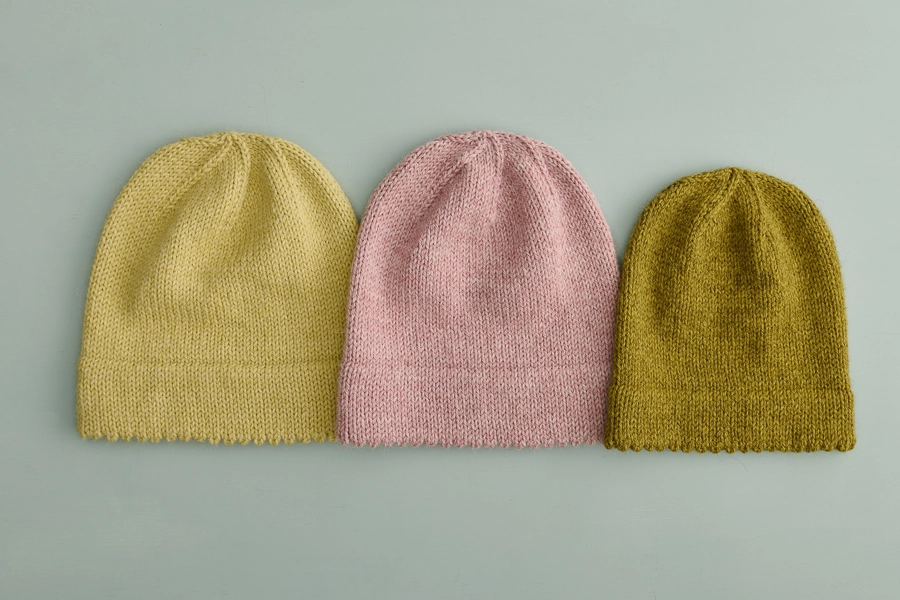
We knit our samples in the following sizes and colors…
- Kid set: Kelp Forest
- Adult Small/Medium set: Yellow Dune
- Adult Small/Medium set: Mountain Rose
GAUGE
18 stitches and 24 rounds = 4 inches in stockinette stitch, on larger needles
SIZES
HAT
Toddler (Kid, Adult Small/Medium, Adult Medium/Large)
- Finished Circumference: 13¼ (16, 18½, 21¼) inches, comfortably stretching 1–4 inches
- Finished Height, Uncuffed: 8½ (9½, 10½, 11½) inches
- Finished Height, Cuffed: 6½ (7½, 8, 9) inches
HAND WARMERS
Toddler (Kid, Adult Small/Medium, Adult Medium/Large)
- Finished Circumference: 5¼ (6¼, 7, 8) inches, comfortably stretching 1–2 inches
- Finished Length: 7 (9, 10, 11) inches
NOTES
PROVISIONAL CAST ON
For help with this cast on, including how to put live stitches back onto needles, please visit our Provisional Cast-On: A One-Step Method Tutorial.
LIFTED INCREASES (RLI + LLI)
RLI (Right Lifted Increase): Lift right leg of the stitch below the next stitch on the left needle onto the left needle and knit it. [1 stitch increased]
LLI (Left Lifted Increase): Lift the left leg of the stitch 2 rows below the stitch on right needle onto left needle and knit it through the back loop. [1 stitch increased]
To see both techniques in action, visit our Lifted Increase Tutorial!
SLIP STITCHES
Slip all slipped stitches purlwise.
HAT PATTERN
PICOT BRIM
With crochet hook and scrap yarn, use a Provisional Cast On (see Notes) to cast 60 (72, 84, 96) stitches onto smaller circular needles.
Place unique marker and join for working in the round, being careful not to twist the stitches.
With main yarn, knit 12 (12, 16, 16) rounds even.
Picot Round: *Yarn over (yo), knit two together (k2tog), repeat from * to end of round.
Change to larger circular needles.
Knit 11 (11, 15, 15) rounds even.
Carefully remove scrap yarn from Provisional Cast On, slipping stitches onto smaller circular needles as you go.
Fold piece in half so wrong sides are facing each other and needles are parallel, with larger working needles in front and smaller needles in back.
Continuing with larger needles…
Next Round: *Knit first stitch on front needles together with first stitch on back needles, repeat from * to end of round.
BODY
Knit every round for 5 (5¼, 5, 5½) inches.
CROWN
NOTE: Change to double pointed needles when necessary.
Set-Up Round: [K10 (12, 14, 16), place marker] 5 times, knit to end of round. [5 stitch markers placed; 6 markers total]
Decrease Round: [Knit to 2 stitches before next marker, k2tog, slip marker] 6 times. [6 stitches decreased]
KID, ADULT SMALL/MEDIUM, ADULT MEDIUM/LARGE ONLY
Continuing in stockinette stitch, repeat Decrease Round every other round – (2, 4, 6) more time(s). [54 stitches remain]
ALL SIZES
Repeat Decrease Round every round 7 more times. [12 stitches remain]
Next Round: *K2tog, remove marker, repeat from * to end of round. [6 stitches remain]
Cut yarn and thread tail onto a tapestry needle. Thread tail through remaining stitches, pull taut, and bring tail to inside of hat.
FINISHING
Weave in ends and gently block.
HAND WARMERS PATTERN
PICOT CUFF
With crochet hook and scrap yarn, use a Provisional Cast On (see Notes) to cast 24 (28, 32, 36) stitches onto smaller double pointed needles.
Place unique marker and join for working in the round, being careful not to twist the stitches.
With main yarn, knit 9 (9, 12, 12) rounds even.
Picot Round: *Yarn over (yo), knit two together (k2tog), repeat from * to end of round.
Change to larger double pointed needles.
Knit 8 (8, 11, 11) rounds even.
Fold tube in half so wrong sides are facing each other and needles are parallel, with larger working needles in front and cast-on edge in back.
Carefully remove scrap yarn from Provisional Cast On, slipping stitches onto smaller double pointed needles as you go.
Continuing with larger double pointed needles…
Next Round: *Knit first stitch on front needles together with first stitch on back needles, repeat from * to end of round.
WRIST
Knit every round for 3½ (4½, 5, 6) inches.
THUMB HOLE
NOTE: For the Thumb Hole you will work flat, working back and forth in rows.
Row 1 (right side): RLI (see Notes), knit to end of row, LLI (see Notes). [26 (30, 34, 38) stitches]
Row 2 (wrong side): Purl to last stitch, slip 1 (see Notes) with yarn in front.
Row 3 (right side): Knit to last stitch, slip 1 (see Notes) with yarn in back.
Repeat Rows 2 and 3 one (2, 3, 3) more time(s).
Next Row (wrong side): Purl to end of row.
Next Row (right side): K2tog, knit to last 2 stitches, slip slip knit (ssk). Do not turn. [24 (28, 32, 36) stitches remain]
HAND
NOTE: For the Hand section you will work in the round again with the right side of the piece facing you.
Place unique marker for beginning of round.
Knit 7 (9, 9, 9) rounds even.
PICOT TOP
Change to smaller double pointed needles.
Picot Round: *Yarn over (yo), knit two together (k2tog), repeat from * to end of round.
Knit 4 (6, 6, 6) rounds even.
With right side facing you, fold body of Hand Warmer up through center of double pointed needles so piece is folded at Picot Round and wrong sides are facing each other.
NOTE: To see the following technique in action, visit our Knit Hem Tutorial. Note, though, that in this pattern we recommend picking up just one stitch at a time using your left needle instead of a spare needle.
Next Round: Using left needle tip, [pick up purl bump on wrong side in same column as next working stitch, knit next working stitch and picked-up stitch together] 2 times, pass first stitch on right needle over second stitch to bind off, *pick up next purl bump on wrong side in same column as next working stitch, knit next working stitch and picked-up stitch together, pass first stitch on right needle over second stitch to bind off, repeat from * to end of round.
Cut yarn and pull last stitch through.
FINISHING
Weave in ends and make another Hand Warmer just like the first.
Gently wet block your finished Hand Warmers!


I’m confused on the picot round. After the YO and K2Tog round, I will now have half as many stitches, but the instructions say to knit X rows after that with out adding back in the stitches. I haven’t started the knitting process, so maybe it will work and I just can’t “see” it.
Hi L,
Thanks for reaching out, and I’m happy to help explain how this row works! When you work a k2tog stitch, you’re decreasing by 1 stitch, but when you work a yarn over stitch, then you’re increasing a stitch. Since there are an equal number of k2tog’s and yo’s in this round, your stitch count will even out perfectly! Hope this helps clarify things, but please let me know if you have any other questions!
All the best,
Lili
Hi,
Thank you for such lovely designs, love the picot finishes !
I was wondering where to get the right measures for choosing the circumference of the hand warmers… is it the hand, the wrist or the forearm?
Many thanks for your time.
Meli
Hi Meli,
That’s a great question! I would recommend taking the circumference measurement around the widest part of your palm (not including your thumb). This would be around where your knuckles are. Once you have that measurement, choose a size that has a finished circumference of roughly 1 – 2 inches smaller! The negative ease will make sure the hand warmers fit snugly and don’t fall off your hands!
All the best,
Lili
Hi! After I join the brim do I knit 5 inches from where the brim is joined or from the pivot edge? Thank you!
Hi Shelli,
Thanks for reaching out! The 5 (5¼, 5, 5½) inches is measured from where the brim is joined. Hope this helps clear things up!
All the best,
Lili
Thank you! It turned out so beautiful – the recipient loved it! I’m now working on another. This is a fantastic pattern.
Good morning. Great pattern so far! I’m at the decrease rounds for the crown and for the set up round with 5 new stitch markers – there is one section that has fewer stitches than the rest. What do I do in this section when those stitches have all been k2tog? Does the SM go away and I continue w the pattern? Thanks fo your help.
Hi Melissa,
I’m so glad to hear that you’re having fun knitting this hat! Hmmmm, the stitch markers should actually divide all the stitches evenly. Can you let me know what size you’re making and how many stitches you have on your needles currently? There’s a chance that your stitch count is off by a stitch or two.
All the best,
Lili
I love this design! Quick question–on the row after the row where you create yarn overs, do you knit into the front or back of those yarn overs?
Hi Nancy,
We’re so happy to hear that you love this pattern, and that’s a great questions! You’ll need to knit through the front leg of the stitch in this pattern. That’ll make sure that the yarn overs stay “open” and create little holes in the round. These holes will then become the dips in the picot edge once you fold up the hem!
All the best,
Lili
This hat/mitts bring me back to shopping in your store for my baby girl…. I’ve been making my own version, that looks exactly the same, for decades… I never even wrote it down because it’s so simple yet is perfect to show off beautiful hand dyed yarn… which brings me back to Sullivan street. I made the hat in ALCHEMY “TEMPLE” in “dragon” I’ve bugged everyone in your shop forever to bring that yarn back into the shop. I loved each and every color. I can’t find that yarn anywhere anymore and i’ve searched. Do they still make it AND can you special order it? I’ve been using anzula, which I love too but I cannot get the alchemy temple out of my head!! Can you help me, please? More importantly, that’s the only wool my daughter can wear without itching. I’ve even been so desperate that I’ve recycled that yarn by ripping out old scarves, hats, and sweaters but it’s not ideal. I’m hoping you can help me.
Hi April,
Thanks for writing in, and what lovely memories! I would recommend reaching out to Alchemy Yarns themself to see if they can locate this yarn for you. I searched online, and it looks like their email address is alchemyyarns@pacbell.net!
I’d also love to give you some more recommendations for yarns that your daughter will be able to wear. Alchemy’s Temple is 100% merino wool, which is the softest type of wool, and we have many yarn that are made from 100% merino wool as well! Some yarns I’d recommend are Plenty, Partridge, Super Soft Merino, Line Weight, and Wigeon.
I hope this gives you some options to move forward with, whether it’s tracking down Temple or trying a new merino yarn!
All the best,
Lili
Can I use a magic loop for these?
Hi Steph,
Yes, you can absolutely use magic loop to knit the hand warmers, as well as for the hat once the circumference gets too small for the 16-inch circulars (or for the entire hat, if you’re knitting a smaller size)!
All the best,
Lili
Love love this hat pattern. Thank you so much for offering it for free. Quick questions. Based on pattern gauge how many rows or inches would I eliminate to have a closer fitted hat? Or how many inches does the decrease section take up? Also would a skein or two of your Simply Camel be enough for a fitted or slouchy version of the picot hat? Or is the camel a smaller weight yarn. I adore your camel yarn! You guys are the best!
Hi Maria,
Thanks for reaching out! You can absolutely make this hat shorter for a more fitted look. I’d recommend trying it on as you go and starting the crown decreases once it fits how you’d like it to. The height of the crown itself will depend on the size you’re making. You can calculate this using the number of rounds worked in that section and the round gauge, but if you’d like help doing that, just let me know what size you’re making!
You can absolutely use Simply Camel for this pattern, but you’d need to change the number of stitches you cast on so that it comes to the correct size. To figure out your cast-on number, you will want to first knit a gauge swatch in pattern (if this is daunting, we have a wonderful tutorial called All About Gauge). Once you know how many stitches you are getting per inch, you can multiply that number by the circumference of your size and cast on the nearest multiple of 6 stitches. Then you can follow the pattern essentially as written!
The only thing you’ll need to change is the Set-Up Round for the crown. Here’s how to work this round with any multiple of 6 stitch count:
Set-Up Round: [K(cast-on / 6), place marker] 5 times, knit to end of round. [5 stitch markers placed; 6 markers total]
I hope this helps!
All the best,
Lili
Thank you for this lovely picot hat pattern. I would like some clarification on the decrease rows. According to my math, beginning with the first decrease round , per the instructions to decrease 7 more times, would end up with 18 stitches, rather than 12. At the “60 stitches remaining” round, then doing 7 more rounds of decreases, by my calculations that 60-42=18. Subtracting the 6 decreases of the final round of all K2tog’s, makes the final count 12 stitches. What am I missing? Also, is there a plain stockinette round after Round 5 and after the 7 more rounds of decreases? I’m ready to start decreasing, so I look forward to your reply!
Maria
Hi Maria,
Thank you so much for pointing this out! You’re absolutely right–this instruction should actually say “8 more times” to get the stitch count all the way down to 12. We’ll fix this in the pattern as soon as possible, and thanks again for bringing this to our attention!
Regarding your other question, can you let me know where “Round 5” is? I’m not sure what you’re referring to!
All the best,
Lili
Love these hand warmers! I’m stuck trying to knit the tube ends together after folding along the picot line. No YouTube tutorials show how to do this in the round. Do I push the edge with the smaller needles up through the tube (with wrong sides facing) so the two ends containing needles are together with the larger needles on the outside and small needles on the inside? Would love to see a video tutorial of this step.
Hi Jean,
You have exactly the right idea! You want to make sure that the wrong sides are facing each other (they’ll get hidden on the inside of the hem), and then you knit into the stitches from both the needles at once. Let us know if any other questions come up as you knit!
All the best,
Lili
With respect to making the picot hat, I found that when I made it to the folding step, that the 15 knit rows with the larger needles gave me too much length. I had to pull out 2 rows in order to make the picot edge expose itself correctly. Not all of us achieve a perfect gauge despite trying and switching needle sizes. I think it would be helpful to add a note about this at that stage in the pattern for those of us who will need to make adjustments. Love the pattern. I will be making it again. Thank you for sharing it.
Hi Julia,
I’m sorry that you ran into this problem while knitting your hat, and it sounds like you came up with the perfect solution! I’ll pass along your comment to our design team, and in the meantime, I’m sure your comment will be really helpful to anyone else encountering the same issue!
All the best,
Lili
Do you have a 100% baby alpaca yarn that can be used for this pattern? I have a daughter allergic to wool and very sensitive skin. Thank you.
Hi Julia,
Season Alpaca would be a great choice for this pattern, if you’re up for a little modification! Since this yarn is much thinner than Yonder, you’d need to cast on a different number of stitches so that the hat comes out the correct size.
To figure out your cast-on number, you will want to first knit a gauge swatch in pattern (if this is daunting, we have a wonderful tutorial called All About Gauge). Once you know how many stitches you are getting per inch, you can multiply that number by the circumference of your daughter’s size and cast on the nearest multiple of 6 stitches. Then you can follow the pattern essentially as written!
The only thing you’ll need to change is the Set-Up Round for the crown. Here’s how to work this round with any multiple of 6 stitch count:
Set-Up Round: [K(cast-on / 6), place marker] 5 times, knit to end of round. [5 stitch markers placed; 6 markers total]
I hope this helps!
All the best,
Lili
Thank you Lili!
I received the Picot hat pattern with my order for 2 skeins of the Purl Soho’s Nigh DK. Thank you very much.
My question is….this pattern calls for Purl Soho’s Yonder. Is Nigh DK the same weight/gauge?
Thanks, Judy
Hi Judith,
Thank you for reaching out! Yonder is actually just a bit heavier than Nigh DK. They are both great yarns but I would highly recommend knitting a gauge swatch before beginning your pattern to ensure you are able to get the same gauge as the pattern. I personally think the pattern would look great in either yarn but a gauge swatch will help you tell if you like the result of the fabric as well. I hope this helps!
Happy knitting,
Gavriella