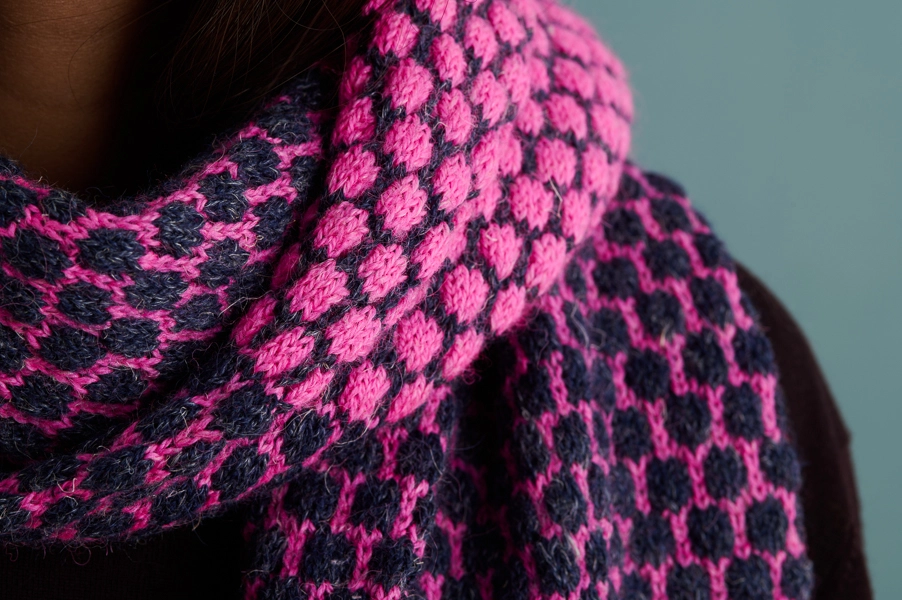
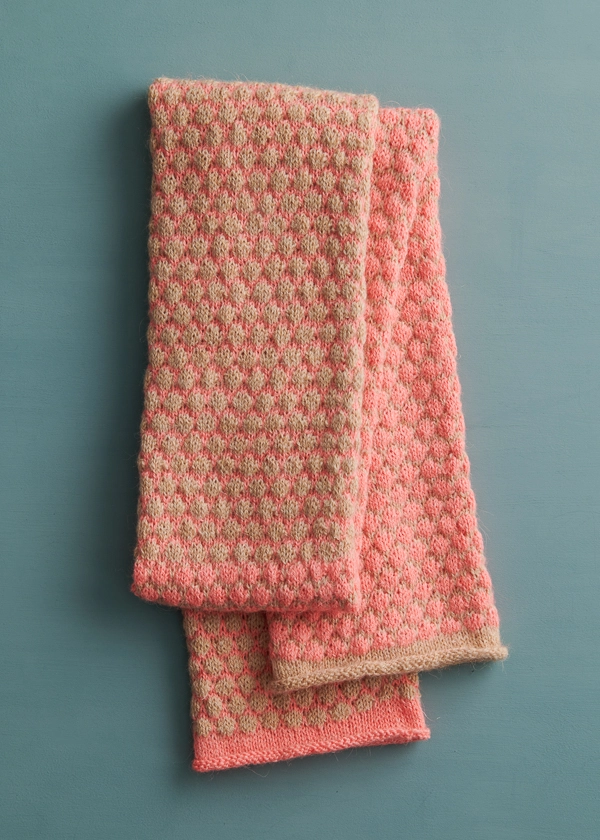
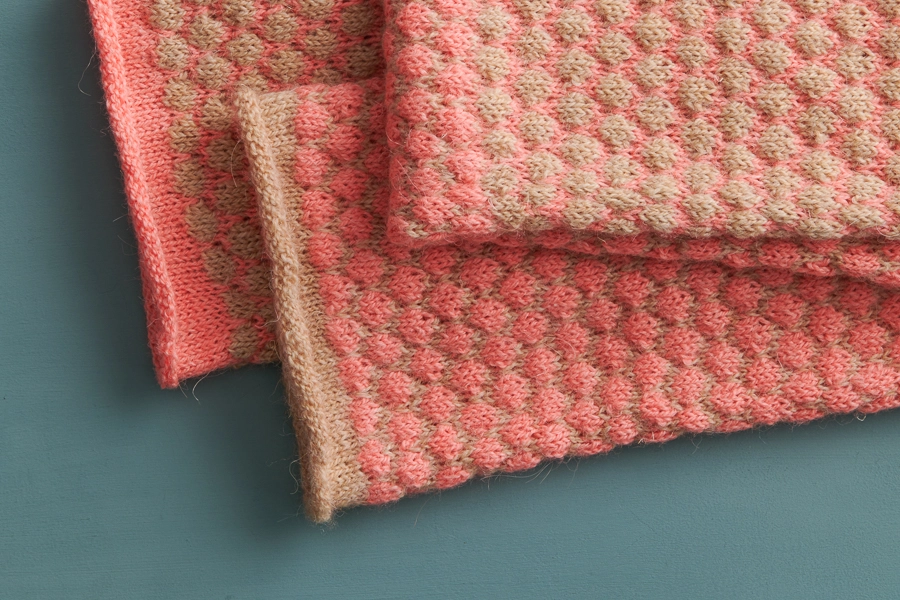

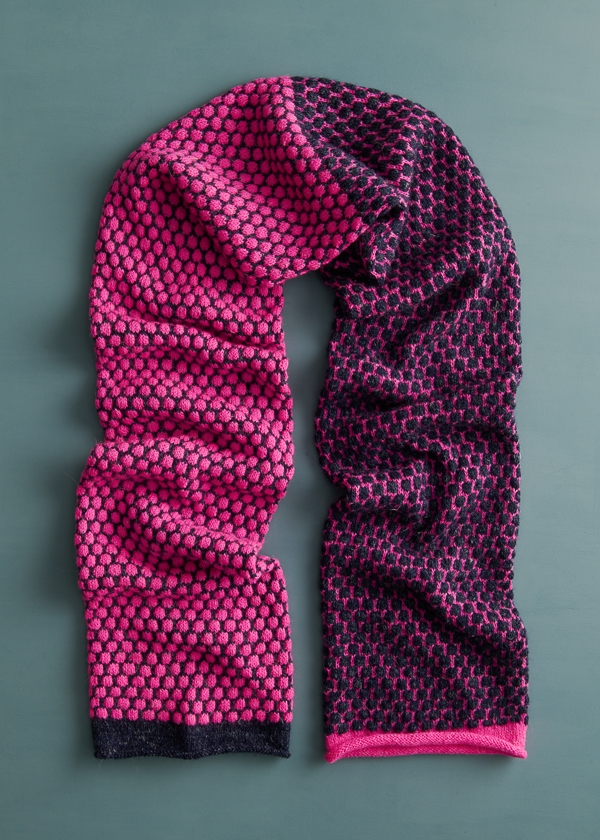
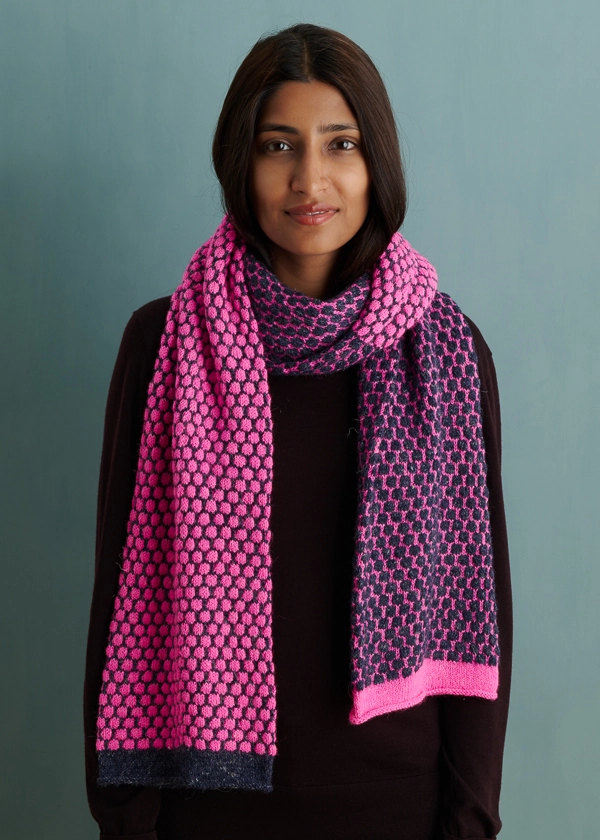
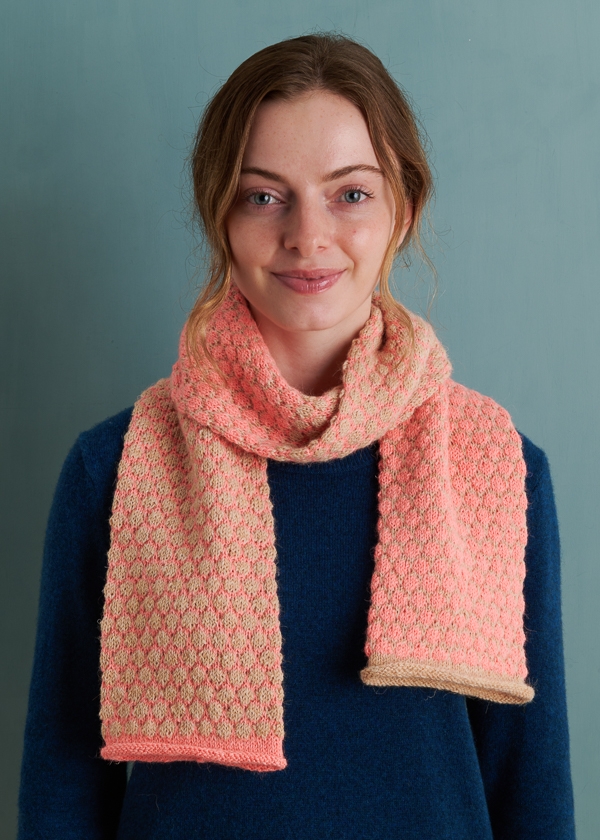
Penny Tile Scarf
When you think of colorwork, you likely think of stranded knitting, but there are lots of ways to make your colors sing. Our Penny Tile Scarf may look intricate, but it is, in fact, super-duper easy… Presenting colorwork, without the work!

The good news? The base of this stitch pattern is just stripes (two rounds in one color, four rounds in another color). The bad news? There is none! All you do to create each adorable bubble of color is knit into a stitch four rounds below the one you’re on… Easy! And we walk you through each step, so you can add a simple polka-dot technique to your quiver!
One more thing! For a little extra twist, you switch colors at the midway point, so the second half of the scarf reverses the colors of the dots and the background… Splendid!
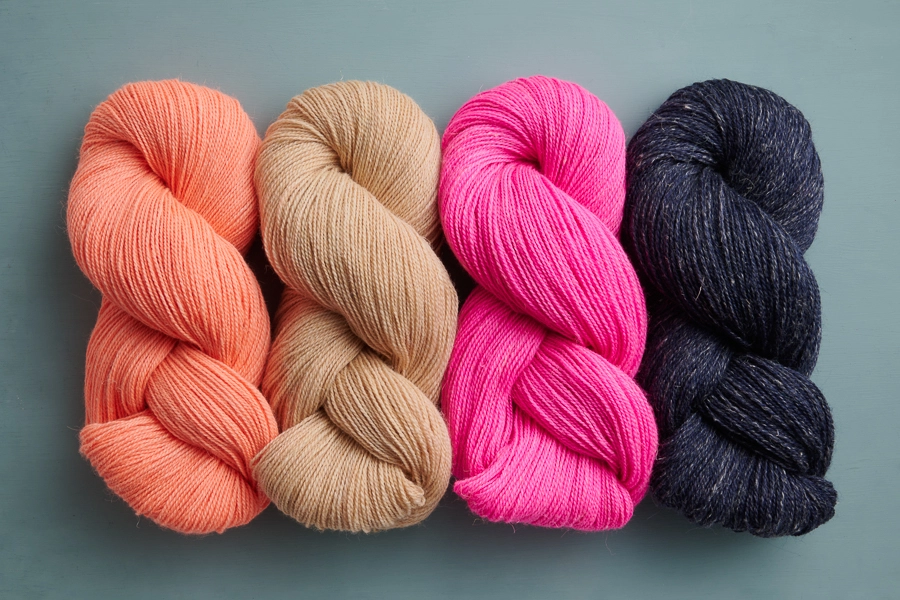
Any time you’re getting creative with color, Linen Quill is an amazing choice, with its dazzling palette of over fifty colors.
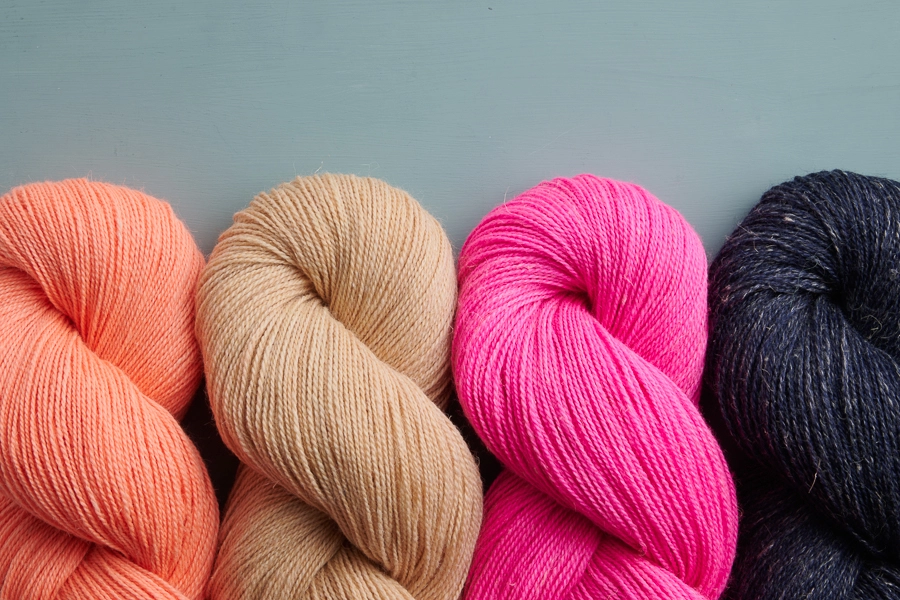
Half of Linen Quill‘s fiber comes from highland sheep who have adapted to the harsh conditions of the Peruvian Altiplano. This wool is particularly durable, springy, and warm, and Linen Quill uses the softer fibers from these sheep and combines them with even-softer alpaca, adding even more warmth and lovely drape.
With a penchant for sprouting out of the strand, the bit of linen in Linen Quill is an essential part of its very special beauty. The way it takes dye differently than the animal fibers creates a yarn with magnificent beauty and depth of color. If you haven’t tried it yet, you really should! Together, these three fibers are soft and supple in your hand, with lots of character and nuance.

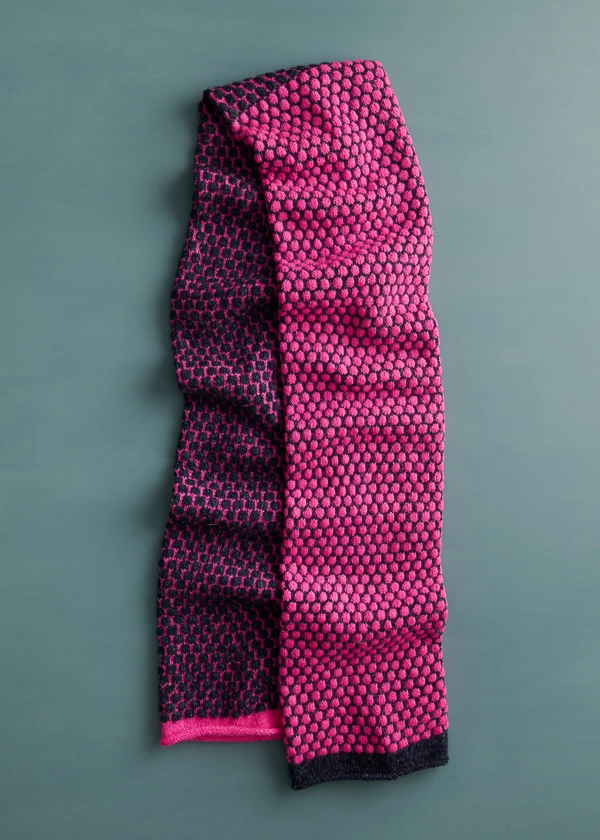
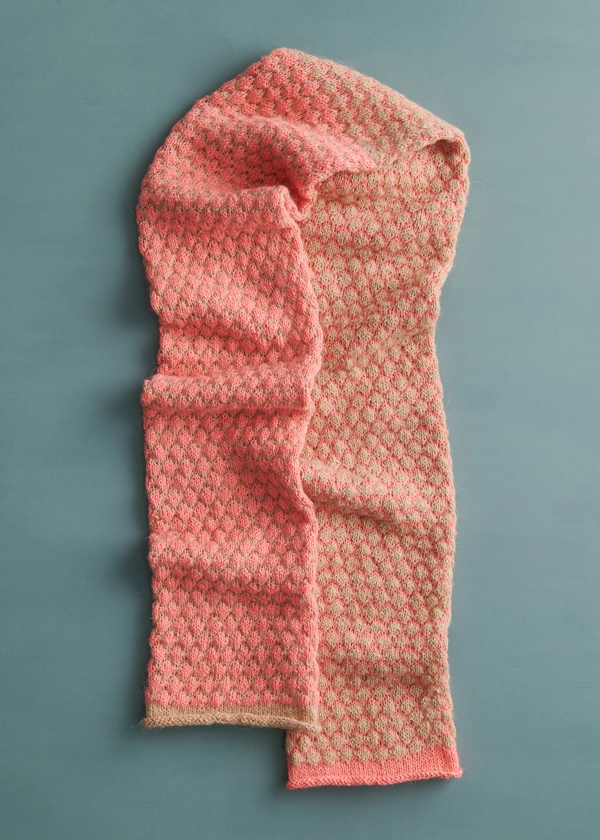
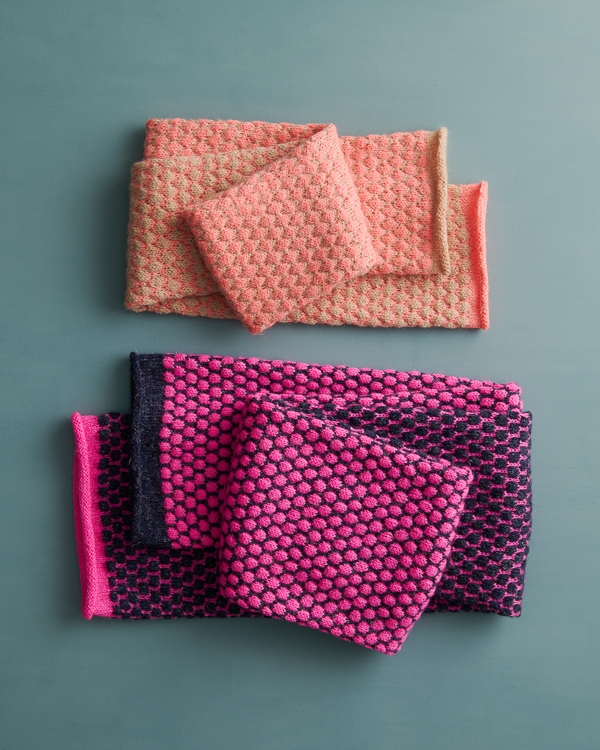
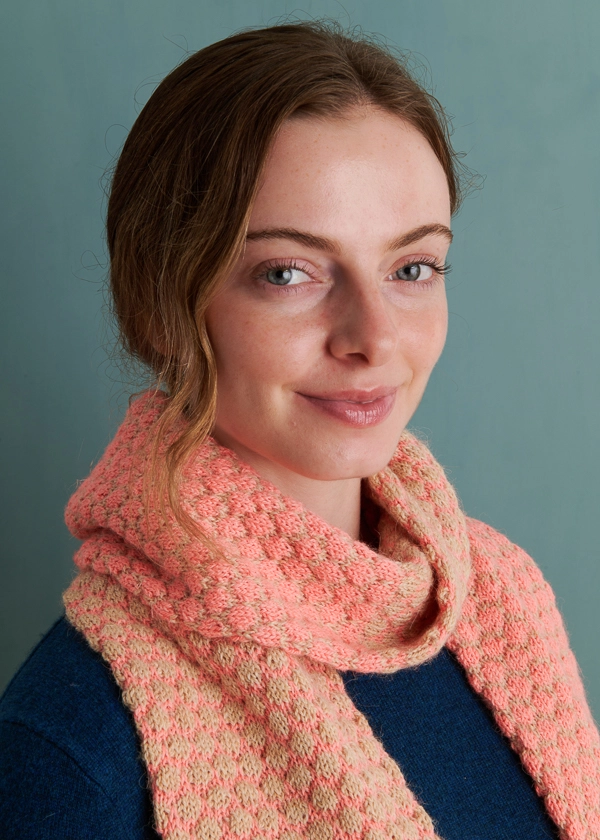
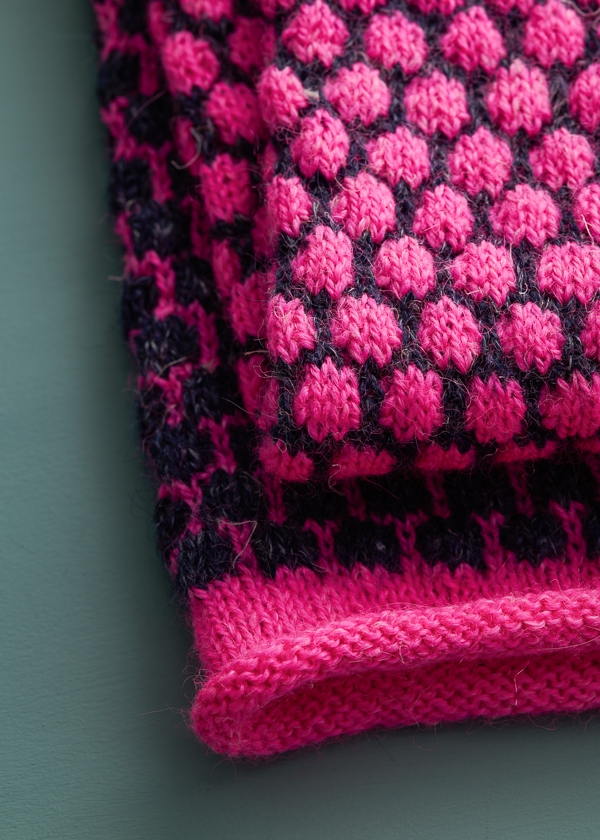
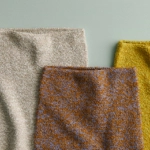
Go high contrast, like the Pink Pop and Dark Denim of our large scarf, or choose gentle shifts in color, like the Honey Pink and Peachy Pink of our smaller one. Either way you’ll love the beauty and fun of this no-fuss colorwork scarf!
Designed by Purl Soho designer, Hiromi Glover. Click here to see even more of Hiromi’s work!
Share your progress and connect with the community by tagging your pics with #PurlSoho, #PurlSohoBusyHands, #PurlSohoPennyTileScarf, and #PurlSohoLinenQuill. We can’t wait to see what you make!
Materials

- Purl Soho’s Linen Quill, 50% fine highland wool, 35% alpaca, and 15% linen. Each skein is approximately 439 yards/ 100 grams.
- Color A: 1 (2) skein(s); approximately 435 (840) total yards required. We used Honey Pink for one sample and Pink Pop for the other.
- Color B: 1 (2) skein(s); approximately 435 (840) total yards required. We used Peachy Pink with Honey Pink, and Dark Denim with Pink Pop.
- US 3 (3.25 mm), 12- or 16-inch circular needles, depending on size you are making (or US 3 long circulars for Magic Loop)
- A stitch marker
GAUGE
28 stitches and 46 rounds = 4 inches in stitch pattern
SIZES
Small (Large)
Finished Dimensions, Unrolled: 11½ inches in circumference x 58 inches long (16 inches in circumference x 70 inches long)
SAMPLES: The Honey Pink + Peachy Pink sample is the Small size, and the Pink Pop + Dark Denim sample is the Large size.
NOTES
STITCH MULTIPLE
This pattern is worked over a multiple of 8 stitches.
CARRYING UP YARN
Be sure to carry non-working yarns up the inside of the tube when you switch colors. For a few tips, visit our Stripes in the Round Tutorial!
KNIT 4 BELOW (K4B)
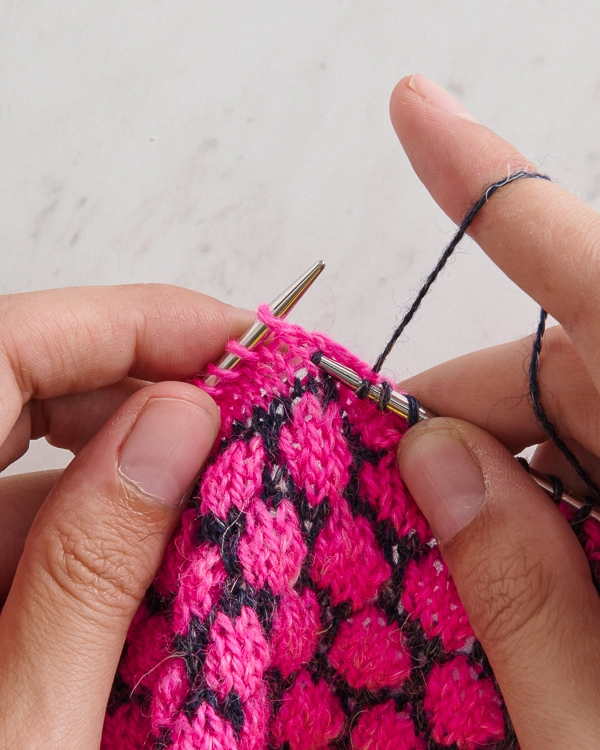
Insert right needle tip into the stitch 4 rows below the next stitch (you’ll know it’s the right one if it’s the same color as your working yarn), and knit it…
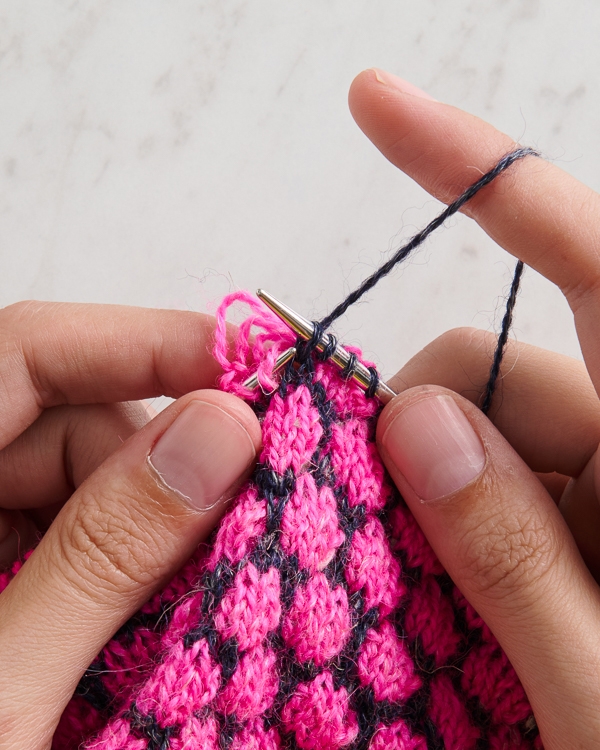
…then, use the left needle tip to carefully unravel the 4 stitches from the rows in between.
For more information on this technique please visit our Working into the Stitch Below Tutorial, but remember to knit the stitch 4 rows below not 1!
PATTERN
ROLLED EDGE
With Color A and using a basic Long Tail Cast On, cast on 80 (112) stitches.
Place marker and join for working in the round, being careful not to twist the stitches.
Knit every round until piece measures approximately 1 (1½) inches from cast-on edge, unrolled.
FIRST HALF
Round 1: With Color A, knit to end of round.
Rounds 2–5: With Color B and carrying Color A up the inside (see Notes), knit 4 rounds even.
Round 6: With Color A, k1, *k4b (see Notes), k3, repeat from * to last 3 stitches, k4b, k2.
Round 7: With Color A, knit to end of round.
Rounds 8–11: Repeat Rounds 2–5.
Round 12: With Color A, *k3, k4b, repeat from * to end of round.
Repeat Rounds 1–12 twenty-six (31) more times or until piece measures approximately 29 (35) inches from cast-on edge, unrolled.
SECOND HALF
Using Color B for Color A, and Color A for Color B, work as for First Half until piece measures approximately 57 (68½) inches from cast-on edge, unrolled.
Cut Color A.
ROLLED EDGE
Continuing with Color B, knit every round until piece measures approximately 58 (70) inches from cast-on edge, unrolled.
FINISHING
Bind off knitwise.
Weave in all ends and gently wet block.


Beautiful pattern. I am a bit confused on the unravelling of the 4 stitches in between after knitting the one stitch 4 rows below. Can you provide more detail or video/photos of that and how they look afterwards? Thank you.
Hi Joyce,
Thanks for reaching out! At the moment, we only have the photos that are included in the NOTES section of the pattern, but I’m eager to help clarify this stitch any way I can. After you complete the stitch, it will look like one very stretched contrast color stitch on the right side. On the wrong side, it will look like reverse stockinette stitch (purl bumps) in the main color, with small floats going over the stretched contrast color stitch.
Are there any other aspects of this stitch that’s especially confusing? Let me know, and then I’ll hopefully be able to give a more helpful answer!
All the best,
Lili
Please, exactly which stitch is unraveled. Is it the one above where needle is inserted to kb
Hi Olga,
Thanks for reaching out! Yes, the stitch that’s unraveled is the column of Color A stitches directly above the stitch in which you work the k4b!
All the best,
Lili
Hi. I was very confused also but I believe this means. First K4B and then let that original stitch fall off the left needle. (Like in the video tutorial provided) then you will see how the “ladder” reveals itself between the K4B and where you will do the next knit 3. That “ladder” simply needs to be gently unravelled. It’s secured by the K4B you just did. Hope that helps. The image provided is not helpful at all.
What does the ‘wrong side’ look like, please?
Hi Karren,
Thanks for reaching out. This scarf is knit in the round so the wrong side won’t show and will always be on the inside of the project! As for how the wrong side will look, it’ll comprise of reverse stockinette stripes in the main and contrast colors. There will also be small floats of the main color traveling across the one stitch that you knit 4 rows below. Hope this helps!
All the best,
Lili
I want to knit this scarf! What do you mean, when you say, Rounds 2-5: ” carrying Color A up the inside (see Notes), knit 4 rounds even.
Hi Jenn,
Thanks for writing in! “Carrying up” the yarn means that you want to keep Color A accessible at the beginning of each round so that you can begin knitting with it again once the pattern calls for that. This is an alternative to cutting the yarn and rejoining it, and you can learn more about how to do it in our Stripes in the Round video tutorial! I hope this helps get you started, and please let me know if you have any other questions.
All the best,
Lili
I love the look of the “tile” would it work on a blanket?
Would the cross yarn in the back look awkward?
Hi Maria,
Thanks for reaching out, and yes, this stitch pattern can absolutely be used for a blanket! The first thing I want to mention is that it may be beneficial to choose a thicker yarn for a blanket. It’ll take forever to knit with Linen Quill, since it’s a fingering weight yarn, and also because the pattern is in the round, meaning that you’re knitting double the stitches per round as you would if it were flat. I’d be happy to give you some alternate yarn recommendations if you’d like–just let me know!
Once you’ve settled on a yarn, then all you’ll need to do is adjust the cast-on number so that the blanket is as wide as you want it to be. To figure out your cast-on number, you will want to first knit a gauge swatch in pattern (if this is daunting, we have a wonderful tutorial called All About Gauge). Once you know how many stitches you are getting per inch, you can multiply that number by the width that you would like and cast on the nearest multiple of 8 stitches. Then you can follow the pattern as written!
And you don’t have to worry at all about the wrong side of the knit fabric. Since the pattern is knit in the round, the wrong side will be hidden on the inside and not visible at all!
All the best,
Lili
Would it change the yarn requirements if you didn’t reverse the colors halfway through?
Hi Vicki,
Thanks for reaching out! While there isn’t an easy way to figure out exactly how much yardage you would need for that, I think the following is a good estimate for the number of skeins of Linen Quill you would need:
Color A (main color): 2 (4) skeins
Color B (contrast color): 1 (1) skein
Hope this helps!
All the best,
Lili
I was reading over the pattern instructions. I understand the K4B but the part I don’t understand is “then, use the left needle tip to carefully unravel the 4 stitches from the rows in between. ” And how far down are they unraveled. What happens to those 4 stitches? Are they picked up in the next round?
Is there a tutorial for this scarf?
Hi Margo,
Thanks for reaching out, and I’m happy to explain some more! Once you’ve knit the stitch that’s 4 rounds below, you can simply drop the next main color stitch off of the left needle tip. The fibers may cling to each other, so we recommend then using the left needle to separate each loop, so they all lay horizontally across the back of the work–just like floats in stranded colorwork! Since you’ve already secured the stitch that’s 4 rounds below by knit it, the dropped stitches will stop at that point and won’t be able to unravel any further.
I hope this helps clarify things, and please let me know if you have any other questions!
All the best,
Lili
This looks terrific and I can’t help but wonder whether I could use the same technique for a baby blanket — combining this stitch with something like the stabilizing stitch in the Double Knit Blanket, on a wider scale. Thoughts? Would a bulkier yarn work? (I’m scared of taking on a blanket in fingering weight yarn LOL)
Hi Jane,
You can absolutely use this technique for a blanket, and I would definitely recommend using a bulkier yarn so that it doesn’t take forever! I’m afraid that double knitting will end up being pretty difficult in this stitch pattern though, but I think it would be fine without the stabilizing stitches. If you seam together the two layers at the cast-on and then do the same for the two layers at the bind-off, the blanket should remain pretty stable when in use!
All the best,
Lili
Does this yarn ship from across the water thereby getting charged twice for a shipping charge? Yarn and pattern are beautiful
Hi Loretha,
Thanks for writing in! All of our orders ship from Santa Ana, California. For more information on the shipping methods we offer, I’d recommend taking a look at our Shipping page. Please let me know if any other questions come up!
All the best,
Lili
Thank you for the scarf pattern! I normally avoid any patterns that call for knitting “any rows below” — sounds weird. A bit scary. And I am intimidated by releasing rows as I’m knitting. But maybe it’s time to overcome that fear of “knitting below” …
Hi Lisa,
We’re so glad to hear that this pattern has caught your eye! If you end up giving it a try, we’re here to help if you run into any trouble or if any questions come up along the way!
All the best,
Lili
Can this be made as a flat piece, for example, as a blanket or a cushion? I’m not really a scarf wearer but love the pattern
Hi Andrea,
Thanks for writing in! This pattern works best knit in the round, since it’s mainly stockinette and would curl up if knit flat. But you could make a lovely double-sided blanket by following the pattern as written, just with additional stitches for the width! You could also easily make a cushion in the round by seaming the cast-on edge and the bind-off edge to close up the knit fabric. Hope this helps give you some ideas!
All the best,
Lili
I’ve only read through the instructions but really like this technique. Love this method of creating floats after the fact. Can’t wait to try this. Thanks.
i’am so confused … knitting in the und but the piece looks like a reg flat worked scarf … how did that happen
Hi Peggy,
Thanks for reaching out! The scarf is indeed a tube, but when it’s displayed on a flat surface or worn around the neck, it naturally collapses into two layers of flat fabric. A good way to illustrate this is with any article of clothing! For example, a pair of pants is basically two connected tubes (just like how the scarf is a tube), but you can still lay the pants flat if you want to fold them up to put in your closet! I hope this example helps you visualize how the construction of this scarf works.
All the best,
Lili
Hi There-
I was just trying to knit this and you could see the floats in the back when I K4B. Is there a way that I can do this, so you won’t be able to see it? I let the floats go before and then knit the 4th stitch below. Is that okay to do?
Hi Jenn,
Thanks for writing in! I’m afraid that the floats on the wrong side of the work are an unavoidable part of this stitch pattern. But the good news is that they will still be completely invisible! Since this scarf is knit as a tube in the round, all the floats will be on the inside of the scarf so you won’t be able to see them at all on the outside.
All the best,
Lili
What I meant was that the fabric is very loose, and doesn’t seem as taught as the one that you knit. It ends up looking sloppy when I am doing it. Specifically- I can see through the floats on the right side of the fabric. would it make sense for me to drop the four stitches and then knit the 4th stitch, or knit the 4th stitch and then drop the 4 stitches? Does that make sense?
Hi Jenn,
It is very normal for the unravelled stitches to be looser than the other stitches! As you knit though, the extra yarn should settle into the adjacent stitches, and the floats should tighten up.
Hmmmmm it’s odd that you’re able to see through to the back of the knit fabric though! Would you be able to send a photo of your work to customerservice@purlsoho.com? That way, we can better visualize what’s going on.
All the best,
Lili
It seems in the photo, once zoomed in, that this pattern, isn’t knit the way it says in the instructions. You can plainly see that the contrasting color has four stitches not one large 4 row slip.
Why would this be? screen shot of knitted scarf attached./Users/Owner/Desktop/penny tile scarf.png
Hi Kimberly,
Thanks for reaching out about this. It’s concerning to hear that our photos don’t look like they match the pattern! I’m afraid that I can’t see the screen shot you attached though, so would you mind emailing it to us instead? You can send us an email at customerservice@purlsoho.com.
All the best,
Lili
Hello
Like another commenter, I would like to make this without reversing the colours halfway. You suggest 4 skeins of A and 1 of B but I don’t understand how that can be right – as surely there are more stitches of B overall (since it is the bubble colour)? Is this definitely your guess? Thank you!
Hi Natalie,
Thanks for writing in! Since the bubble color reverses half way through in our original design, both Color A and Color B are used for the bubbles at different times. To knit the scarf without reversing the colors, you will need 4 skeins of whatever color you want to use for the bubbles and 1 skein of the other color!
All the best,
Lili
Read questions and also had difficulty figuring out the K4b stitch but found multiple YouTube Videos demonstrating the stitch. I used the one created by Studio Knit. I hope this helps others who like me need to see how to create the stitch.
I would love to knit this scarf for my niece who is 7yrs old but I think even the size small would be too big. Do you have any advice on how to change the pattern to work for a child? Thank you!
Hi Kelly,
Thank you for writing in! This sounds like such a lovely gift for your niece! I would recommend knitting fewer repeats of the FIRST HALF rounds instruction, stopping when you get to half the size of your desired length. Just make a note of how many times you repeated 1-12 so that you can do the same on the second half of your scarf! I hope this helps but please let me know if you have any other questions!
Happy knitting,
Gavriella