Mary Jane Slippers

When I was seven I relished any chance I could get to wear my black patent leather Mary Jane’s. No event was too insignificant! Now I like to shuffle around my apartment in these knit slippers reminiscent of the classic style.
Some historical perspective: Mary Jane was sister to Buster Brown, star of the early 20th-century comic, Buster Brown. The Brown Shoe Company licensed the names and characters of the strip and made Mary Jane Shoes what they are today. Cute and sassy!
Enjoy! -Whitney
Designed by Purl Soho designer, Whitney Van Nes.
Share your progress and connect with the community by tagging your pics with #PurlSoho, #PurlSohoBusyHands, and #PurlSohoMaryJaneSlippers. We can’t wait to see what you make!
Materials
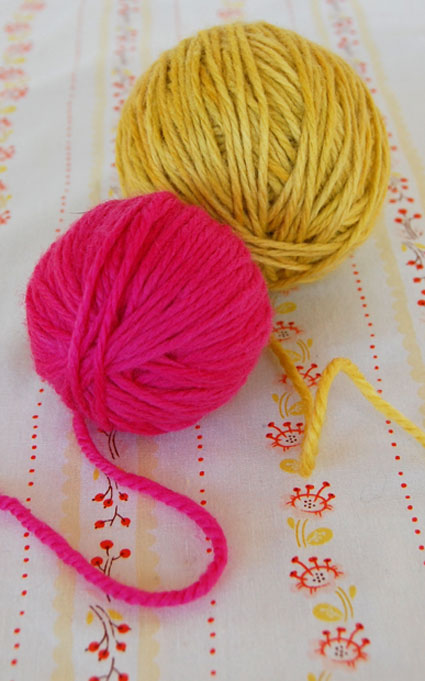
- 1 skein each in two contrasting colors of Lorna’s Laces Superwash Shepherd Worsted yarn. I used Firefly for the main color and Pink Blossom for the contrast color.
- US 6 (4 mm), 16-inch circular needles
- US 5 (3.75 mm) double-pointed needles
- 3 stitch markers
- Tapestry needle

I kept these slippers pretty simple, but they’d also be really cute modified for a button or decorated with a knit flower. I hope you have as much fun knitting these as I did designing them!
Gauge
20 stitches = 4 inches in garter stitch
Size
Fits medium size woman’s foot (shoe size 7-9)
Pattern
Make the Sole
Note: If you slip the first stitch of every row, it will be a little bit easier to pick up stitches later.
Cast on 8 stitches. We used a basic Long Tail Cast On.
Row 1: Knit
Increase Row: Slip 1, kfb, knit to last 2 stitches, kfb, knit 1 (10 st).
Knit 2 rows.
Repeat the last 3 rows 2 more times (14 stitches)
Knit until piece measures 2 inches from cast on edge (or, if you prefer to count rows: Knit 11 rows).
Knit an Increase Row (16 stitches).
Knit until piece measures one more inch (11 rows).
Repeat the last 12 rows 3 more times (piece will measure 6-inches and there will be 22 stitches).
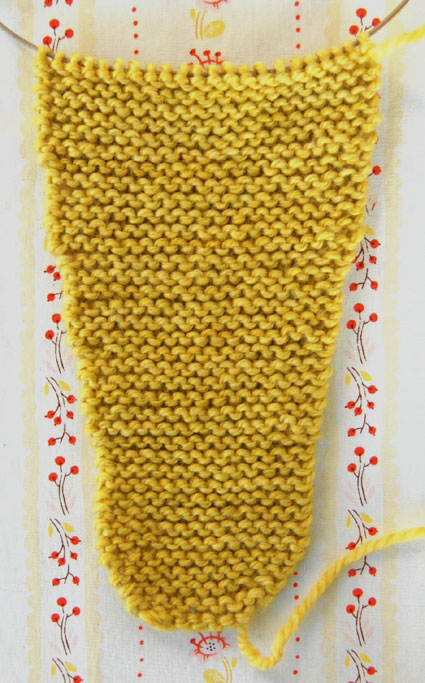
At this point the sole should look something like this:
Knit 3 rows.
Decrease Row: Slip 1, k2tog, k to last 3 stitches, ssk, knit 1 (20 stitches).
Knit 1 row.
Repeat the last 2 rows 8 more times (4 stitches).
Bind off.

Make the Upper
Starting at the center of the heel (with either side facing you), pick up 42 stitches to the center of the toe (pick up 1 stitch for every stitch around the heel and toe, and 3 stitches for every 4 up the sides).
Pick up 42 stitches down the other side to the center back of the heel and place a marker (pm). (84 stitches on needle). Work the following rows in the round.
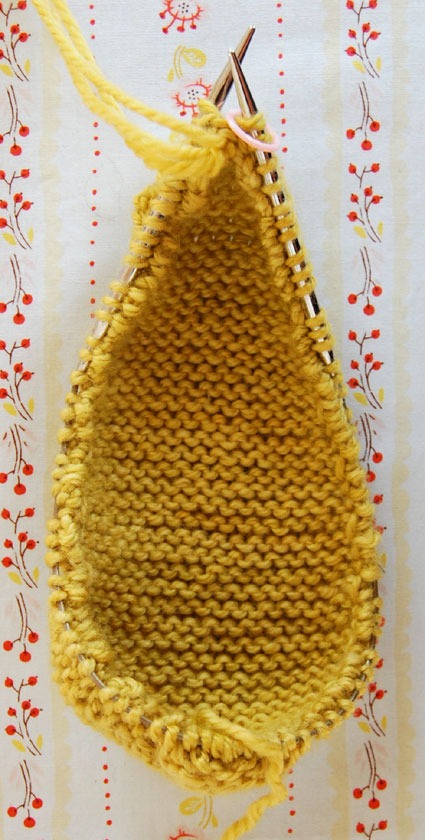
Purl 1 round. (The first couple of rounds are a little tight and awkward, but it gets easier.)
Knit 1 round.
Purl 1 round.
Repeat the last 2 rounds.
Next round: Knit 32, pm (use a different color than the end-of-the-round marker), k2tog, k 16, ssk, pm (use the same color as the marker just placed), knit 32.
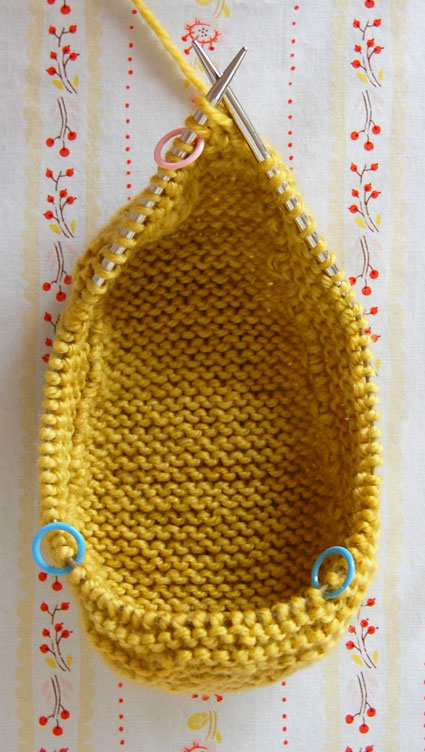
Purl 1 round.
Next round: Knit to marker, k2tog, knit to 2 stitches before marker, ssk, knit to end of round.
Repeat last 2 rounds until there are 6 stitches between the 2 same color markers (5 times) (70 stitches total remaining).
Bind off loosely.
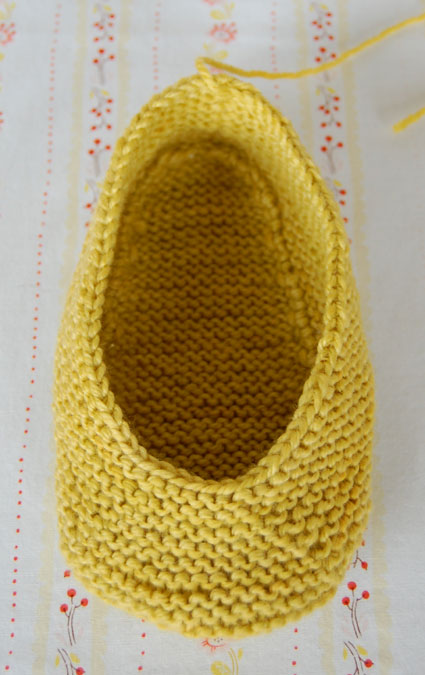
Attach the I-Cord
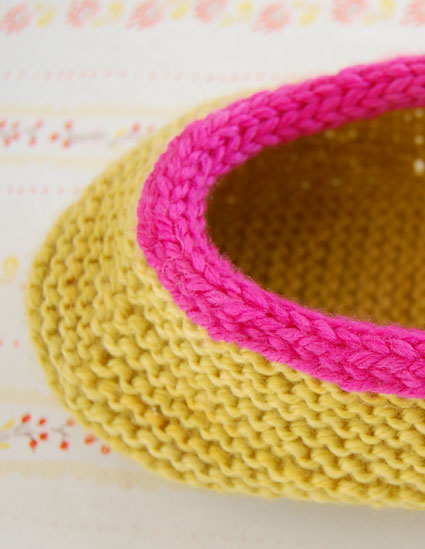
With the contrast yarn, use the provisional cast-on technique (see our provisional cast-on tutorial) to cast 4 stitches onto one US size 5 double pointed needle.
Starting at the center of the heel, knit an attached I-cord around the edge of the slipper. Pick up 1 st for every bound off stitch. For instructions on knitting an attached I-cord, see our tutorial. Finish the two live ends of the Attached I-cord by refering to our Kitchener Stitch Tutorial.
Knit the Strap
Try the slipper on to see where you would like to have the strap. I placed mine 3 inches from the center of the heel.
With a US size 5 double pointed needle, pick up 5 stitches inside the slipper, on the left side, right below the attached I-cord.
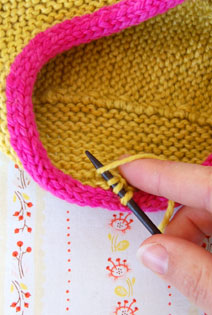
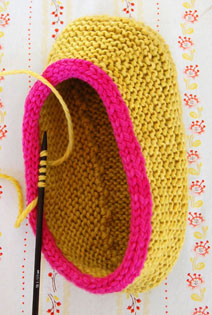
Slipping the first stitch of every row, knit in garter stitch until there are 16 1/2 ridges (ie for 33 rows) or until it is the length that fits your foot, bearing in mind that garter stitch really stretches.
The last row you knit should leave the yarn at the heel end of the slipper. Cut an 8 inch tail and thread it through a tapestry needle.
Straight across from where the strap began, thread the yarn up through a purl bump.
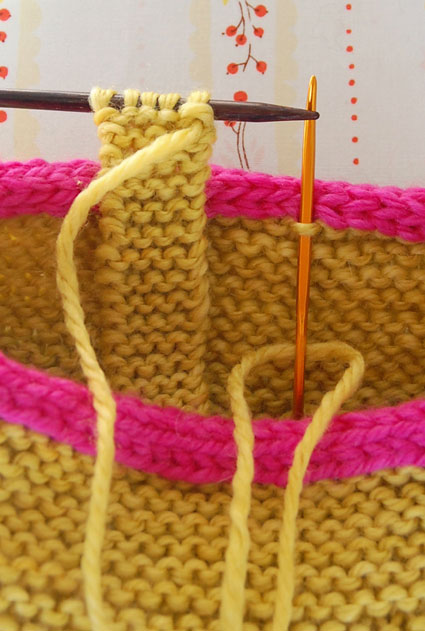
Then thread the yarn through the first stitch of the knitting needle as if to purl and remove the stitch from the needle.
Repeat these 2 steps until no stitches remain.
Weave in all the ends. And make another!


Cute, Cute, Cute… As soon as I get this half to project dun… I am going to start making several pair….
What a great colour choice! Very good tutorial, love the pictures!
They’re super cute. I love the color combo.
They look lovely- can’t wait to try them, I have knitted some before from another pattern but these look a much better fit- thanks for sharing!
hi,
the slippers look awesome. i m a left handed knitter ..do i have to reverse the pattern ? and how do i do it?
Oh my goodness. I love these. Love the color combo too!
I love this pattern! I especially love how easy you’ve made it for even the newest of knitters to follow. Those giant photos are clearer than I can see my own knitting … without a magnifier, that is. This pattern is destined to be used by a small local group to knit slippers for a women’s shelter, as well as for ourselves, of course. However, after much tinkering (cut, paste, re-position, and finally putting it into Word in a two column, 10 row table) I did get it pared down from the 15 pages my printer wanted to print it on to a mere 10. The photos are still full size; I only had to downsize the font on the text that goes with the first part of the Making of the Sole in order to keep it all on one page. This way, I will save paper, and have fewer pages to lug across town to the meetings. I haven’t yet looked at any of your other patterns, but I’m willing to bet they all could be made to eat less paper when printed out. Would it be asking too much of you, with your much higher computer skills, to aim to save paper and your reader’s time by making the printable version more compact for us?
Thank you very much.
http://knitting.meetup.com/1069/calendar/9398566/
Would you be interested in making a pair of these for a one year old? How much would you charge? Thanks
do you have an easy adjustment for a larger size – to fit a women’s 10-11 & also for girls sizes? i have long feet & these would make fun gifts for my neices!
hi i just wanted to know is this pattern for the mary jane slippers for beginner, intermediate, or advanced knitters. because i am a beginner and i want to knit those slippers. and my second question was how do you adjust this pattern to fit a womans feet a size 4,5, or 6.
Hi Passion,
This pattern would probably qualify as an intermediate pattern because of the shaping, the attached i-cord and also the use of kitchener stitch in finishing. You can adjust the pattern size by adjusting the length of the sole of the slipper, and then pick up less stitches around the sole when you make the foot. If you’re a beginner, it may be best for you to knit at least one slipper as written so that you can get the idea of the pattern before you jump in to customizing it.
Hope this helps!
Just wondering if anyone has made these minus the strap??
To Peggy Pennie: I have knitted these a few times and once I chose to go strapless on these. I just knitted an extra row or two (after picking up stitches). It works just fine without the strap this way. : )
Would anyone be able to post the finished measurements for these slippers? I just started them, and I'm afraid they are turning out too big.
Thanks.
HI Sue,
The length of the sole should measure about 8 1/2 inches when you finish it. Also, double check your gauge; that will really let you know if you're on the right track!
Thanks for your question and good luck!
Whitney
Can these be made to a real shoe…
Hi Aisha,
Do you mean you'd like to add a rubber sole to the bottom of these? I suppose if you have a source for soles and they have holes along the edges, there's no reason you couldn't sew them on. I'm not sure how long the shoes would last, but it sounds like a fun experiment!
Thanks for asking and good luck!
Whitney
I would love to make these mary jane slippers for my greatgranddaughters (ages 1 and 3) Please post instructions for that or how i should go about changing the size. Thanking you in advance.
Lorraine.
Hi Lorraine,
Unfortunately, we don't have the resources to customize patterns, especially ones that are complicated to alter (like this one!). Aside from rewriting the pattern yourself, you could try following it as it's written but use a much thinner yarn. You may get close to the size you want!
Thank you so much for your question and good luck!
Whitney
Hello, all went well first, I knitted the sole with DPN needles, picked up my 84 stitches to a 60cm circular needle and then it all became impossible when I started my 1st round: am I dong something wrong? the stitches are not sliding and I found it impossible to Purl my 1st round ( I have never used circular needles before.)…is the circular needle the wrong type or wrong size ?
Hi Claudie,
I'm not surprised you're having trouble! A 60cm (24 inch) circular needle is too long for the number of stitches you have on the needle. I used a 16-inch circular needle because that is short enough to allow the stitches to reach around in a circle.
I hope this helps. It sounds like you're off to a good start! Please let us know if you hit any more snags!
Whitney
Hi,
I love the look of these slippers and would definitely like to make them! I'm not very familiar with f picking up stitches, though, do you have a recommended tutorial for that? Also, is there a specific casting on technique you need for doing so?
Thanks for all your great patterns!
Hi Kiki,
We almost always use a Long Tail Cast On, which will serve you just fine for this pattern. Here is our tutorial: https://www.purlsoho.com/create/knitting-tutorials-cast-ons/2006/9/29/long-tail-cast-on.html
And for picking up stitches, we don't have our own tutorial (yet!), but Knitty has a good one! http://www.knitty.com/ISSUEwinter04/FEATwin04TT.html
Thanks for your questions and good luck with your Mary Janes!
Whitney
Hi I am more of an experienced knitter but don’t know my exact level, anyways I have just started training a new knitter and she is a complete beginner she only knows how to cast on, knit, purl, and bind off so far with a few variations like seed stitch and ribbing, using basic swatches. Do you think I can do this with her as a first pattern? She is my neighbor so I have easy access to supervise the entire pattern. I can also work this pattern myself first if I need to.
Hi Sarah!
My only hesitation with this pattern for a novice is the use of “picking up stitches” and using an “attached i-cord.” If you feel comfortable instructing both, I think this would be a great “advanced beginner” project. Be sure to check out our tutorials for the techniques used!
Happy Knitting!
Thomas
very cute
Hi–
I’m trying your pattern, but I really need help in understanding the picking up. I don’t understand the meaning of pick up 3 stitches for every 4 up sides. I’m not that new anymore to knitting, but this is the first time I’m doing slippers or socks kind of thing…and the first time I’ll be learning about picking up. Please advise. Thank you.
Hi Cici,
Thank you for the comment! This is a technique used in a lot of sock patterns which entails going along the edge of the knitting and making stitches to then continue knitting in another direction. Here’s a nice youtube video that demonstrates how to do the technique; https://www.youtube.com/watch?v=oUPhLYkC0Fw
I hope this helps clarify and feel free to write back if you have anymore questions!
Happy Knitting!
Jake
i have one sock (one anything really. One sleeve, one side,) syndrome. Can you make these two at a time on one circular needle?
Hello Toni!
You could absolutely create both of the bases of the slippers at the same time. Because you’re picking up stitches and then knitting in shorter rounds, you wouldn’t be able to knit the two bodies at the same time. These are so cute though–think of it as making two little hats! Best of luck! -Alyson
Beautiful Slippers ,can I have in spanish?thank you very much
Hi, Blen!
Thank you so much for writing in! Unfortunately, we don’t have Spanish translations for our patterns.
Sorry and thank you again for your question!
Best,
Kumeko
Hello,
I’m at the pick up stitch stage and for some reason I can only pick up 80 stitches when following the instructions of 3 out of 4 round the edges. What is the best way to go from here? Is it best to pick up extra stitches so I have 84?
Thanks,
Kathryn
Hi Kathryn,
Thanks for writing us! I think that you should probably go back and pick up one more stitch in each “quadrant” of the sole, getting you to 84 total. It is sort of important because the gauge is not very forgiving and four stitches is about an inch! It will all be worth it in the end. Best of luck and let me know if you have any other questions!
-Adam
I love the look of these, but I am having trouble with the I Cord. I just don’t think I have it in me to try it. What if I knit it, like so it’s all knits for 4 stitches, then attach to the slipper as if I was sewing it, and then I could attach it with a tapestry needle/yarn needle.
I just don’t think I am good enough, even having read over both I Cord tutorials you have, to get it right. I had trouble with the slipper itself and I won’t be doing a contrasting color, but just a 4 stitch cord and attempting to hand sew/weave it in with some more of the yard I am using.
That should work right? I will let you know how well it goes, because I just can’t get my head around how you get the casted on stitches onto the slipper and then how you’d knit it into it. Love this pattern so far, but mine was longer and I never did do 11 rows for one inch, it was more like 8 rows, probably has to do with the yarn weight I used.
Here it is as it is right now, not quite ready for the I Cord, but I was taking a break to get ready to move onward and read it over repeatedly before breaking down to ask for help on how to alternatively get a close result. Thanks for the awesome pattern! I have certainly learned a lot so far!
http://i289.photobucket.com/albums/ll214/ThePamster/slipper1_zps4p1ktdow.jpg
Hi Pamela,
Thanks for writing in! In my opinion I would switch to a smaller size needle and do about five rounds of ribbing around the top edge. If you try to make a trim and sew it on, you’ll probably end up with gapping and you’ll feel the seam. Alternatively, you can pick up all the stitches around the top edge, knit a few rounds of stockinette and then bind off loosely. This will give you a similar look to the i-cord. Best of luck and feel free to write back with questions!
-Adam
I’m casting on as I text!…I’m using the colours purple and gold!…trying to use up my leftover wool stash….here I go…knitting has commenced…
Iam having a hard time following along one step says knit one. More inch and it is 12 rows that does not make. Sence 2 once is not 22 rows can you please help me I so want to make th
Hi Nicole,
Thanks for writing in! On the sole you will be knitting an increase row and then knitting 11 more rows which should increase the length by one inch. Then you will be repeating the increase row and the next 11 straight rows 3 more times for a total of 6 inches for the whole length. If you are getting a measurement of more than 1 inch for each set of 11 rows, I would suggest checking that you are getting correct stitch gauge (5 stitches per inch) and if you are, you can eliminate or add 2 rows in the 11 row section to shorten or lengthen the measurement to get 1 inch.
I hope that this helps!
Cassy
Has anyone actually made these, is this written correct?
Hi Jenn,
Thanks for writing in! Many pairs of these lovely slippers have been knit over the years! Any issues with the pattern that we have found thus far have been included in the pattern above so you should be good to go! As always, feel free to reach out with any questions!
Best,
Cassy
The step to attach the I-Cord. Cast 4 stitches and how long do I make the I-Cord before attaching. This part of the I-Cord making and attaching is confusing to me. Please help.
Thank you
Hi Jacqueline,
Thanks for writing in! Rather than knitting the i-cord separately, you will be attaching as you go, following the instructions in our Attached I-Cord tutorial.
I hope that helps, and happy knitting!
Julianna
Hi,
Regarding ‘slipping the first stitch’ on those MaryJanes …. is that a slip as if to Purl or Slip as if to Knit?
Love these!!
Suezi B
Hi Susan,
Thanks for reaching out! You can slip all the slipped stitches knitwise with the yarn in back!
Warmly,
Gianna