Kitchener Stitch
Kitchener Stitch is a technique for invisibly grafting live stitches together. It is essentially a set of sewing steps that you work with a length of yarn and a tapestry needle. In the end, you have a row of knit stitches that seamlessly graft together two sets of live stockinette stitches… Pretty amazing! (Note that sometimes Kitchener Stitch is used over other simple stitch patterns, but the steps for those stitches are in a different order.) Common places to use Kitchener Stitch are at the toe of top-down socks and at the shoulders and underarms of garments.
The instructions for Kitchener Stitch may seem a bit intimidating, but really, it’s super simple. The only real challenge is keeping track of where you are in the steps. A good tip: Say each step out loud as you do it, and soon, you’ll be in the rhythm!
Stitch along with our video or skip down to our step-by-step photo tutorial and you’ll be Kitchener-ing in no time!
Kitchener Stitch: Step-By-Step
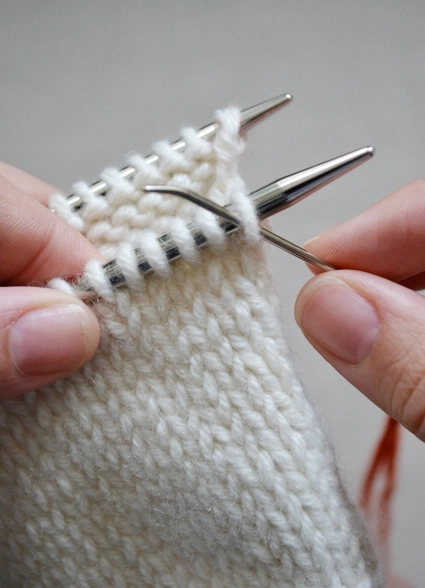
Step 1: Thread a tapestry needle with the same yarn you used to work your project. Hold the needles with the live stitches parallel in your left hand. Insert the tapestry needle through the first stitch on the front needle as if to PURL. Pull the yarn through, leaving a tail that you will weave in later. Leave the stitch on the front needle.
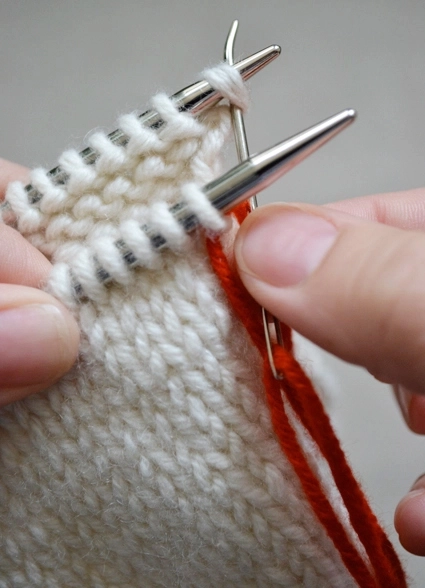
Step 2: Insert the tapestry needle through the first stitch on the back needle as if to KNIT, pull the yarn through, leaving the stitch on the back needle.
Step 3: Insert the tapestry needle through the first stitch on the front needle as if to KNIT, pull the yarn through, removing the stitch from the front needle.
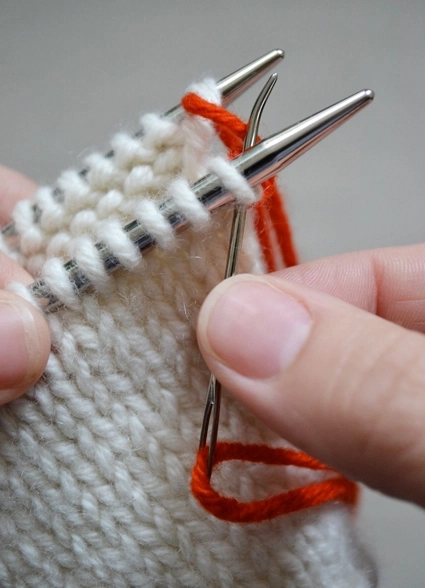
Step 4: Insert the tapestry needle through the first stitch on the front needle as if to PURL, pull the yarn through, leaving the stitch on the front needle.
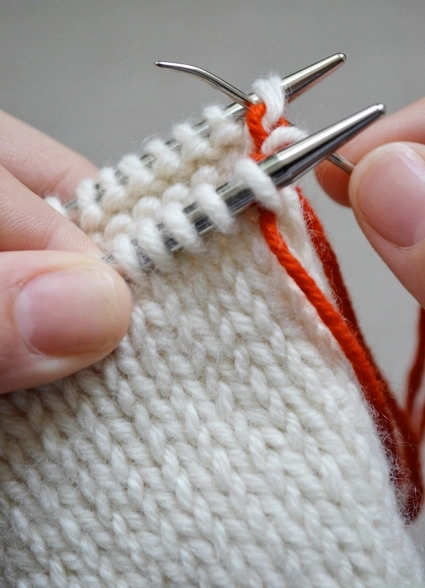
Step 5: Insert the tapestry needle through the first stitch on the back needle as if to PURL, pull the yarn through, removing the stitch on the back needle.
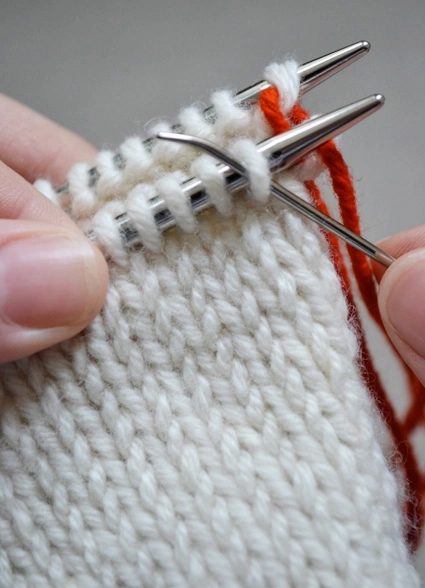
Step 6: Insert the tapestry needle through the first stitch on the back needle as if to KNIT, pull the yarn through, leaving the stitch on the back needle.

Repeat Step 3 – Step 6 until all stitches have been worked. Every few stitches, adjust the tension of your work, making sure not to pull too tightly. Remember, you are making an extra row of knitting rather than sewing together a seam.


Thank you so much for this tutorial, the last times I tried this stitch and followed a different tutorial I kept giving up half way through out of frustration!
best instructions
Hi do you slip the stitches off one needle to the other to begin. I understand the stitch process but not the starting .
Thank you.
Hi Cheryl,
Thanks for reaching out! If your stitches are all currently on one needle, you can move half of them to another needle by slipping them purlwise; or, if you are using a circular needle, you can fold the circular needle in half so the needle tips are parallel to each other.
I hope that helps!
Julianna
these are the best instructions for this stitch I have seen! And I have been knitting a looooong time.
ME TOO!! I will find myself coming back to the instructions whenever I’ve lost them in between projects. Thank you so much, Julianna.
Thank you so much for this tutorial. It’s not the first time I’ve used it. It works better for me written out as steps – the video is a bonus, too!
When using the Kitchener stitch, can this be used when putting together pieces that are finished on all sides, for example , I am making a cable stitch blanket and doing it in columns…. now I need to attach each column. Do I use the edge stitches by putting them on a needle or would that not work as a flawless seam?
Hi Linda,
Thanks for reaching out! In this situation, it sounds like using Kitchener Stitch would add some unnecessary steps and not result in a “seamless” seam. Kitchener stitch works best in a situation where you have two sets of live stitches on your needles, but since you are joining the sides of two panels, you will have to first pick up stitches and then kitchener them together. Picking up stitches always creates a ridge on the wrong side of your work, and kitchener stitch creates a purl ridge on the wrong side, so your seam will be visible on the wrong side. Instead, I would recommend using Mattress Stitch or our tutorial for Seaming Garter Stitch to assemble your panels – when worked carefully, both methods should look almost seamless!
Best,
Julianna
Could you show us how to attach finished pieces to ensure a flat seamless end product?
Hi Linda,
Thanks for reaching out! I think you may be interested in our Mattress Stitch, Seaming Garter Stitch, and Seaming Stockinette Horizontally tutorials – these methods for seaming knits are quite tidy and nearly invisible from the right side of the work!
Happy knitting!
Julianna
Thank you for the tutorial. Does this work for 1×1 rib? I have tried, but it doesn’t look like ribbing
Best regards Anette
Hello Anette,
Thanks for reaching out! You are correct it is a different process for a ribbed stitch. Unfortunately we don’t currently have a 1×1 rib kitchener tutorial, but I’m sure there are plenty of examples on YouTube! Good luck on the search!
Best,
Marilla
Thanks so much for this video! I finished the underarms of a children’s sweater using it, and found it to be very easy to follow.
I always enjoy your tutorials and this is no exception. My problem came from my not realizing the difference between grafting stockinette and a 1/1 rib. I had to look up another video on YouTube to find one. The technique worked, so I am happy with the outcome. You all provide clear instructions with no distractions. I always choose to look to Purl SoHo first!
Thank you for your brilliant video on how to do kitchener stitch.
Best wishes,
Eileen
A very clear explanation and demonstration of kitchener stitch. Now I am not afraid to try it. Thank you do much.
Great tutorial! One question – Why are you saying to use a separate piece of yarn when Kitchenering? I understand YOU choosing to, to make it easier to see on the video, but why us? That’s one more end to weave in, in an already sensitive area of the sock. Just wondering…
Hi Macy,
Thanks for reaching out! As you mentioned, we’re using a different color yarn to demonstrate the steps in the tutorial; when you’re working on your project, we recommend using the same yarn that you used for your project (you can find this noted in Step 1 of the written tutorial instructions found just under the video). Often, patterns will tell you to leave a longer tail that you can use for the Kitchener Stitch, so you don’t have to introduce a new strand of yarn, but this does somewhat depend on the project!
I hope this helps!
Warmly,
Kelsey
Great tutorial. I about to finish the Lovely Leaf Lace Scarf using this technique I am giving the wrap to a deaf friend who is from NY and has always been a great supporter of the knitting community even though she isn’t a knitter.
Hi Carissa,
Thanks for reaching out and for your kind words! I am so glad to hear that you enjoyed our tutorial, and I love to hear that our beautiful Lovely Leaf Lace Scarf will be a gift for a dear friend! We would love to see your finished work, so please feel free to send a photo to our email customerservice@purlsoho.com or tag us on Instagram using @purlsohobusyhands or the hashtag #purlsohobusyhands
Happy knitting!
Gianna
Thank you for your instructions. Will the infamous dog ears appear on socks?
Hi! I’m not sure how to set up your double knitting blanket at the end to start binding off with kitchener stitch-Can you help?
Thanks!
Hi Alice,
Thanks for reaching out. The first thing you’ll need to do before beginning the kitchener stitch is to get half of your stitches onto your spare set of circular needles! To do this, slip each stitch purlwise onto either the other end of your working needles or onto the spare needles. If the stitch is attached to the side of the fabric facing you (the knit side), then slip it onto your working needles. But if it’s attached to the side of the fabric further away from you (the purl side), then slip it onto your spare needles. Once you’ve done this across the entire width of the blanket, your blanket should separate into two halves, and you’ll be ready to begin grafting the sides together using the kitchener stitch! I hope this helps!
All the best,
Lili
As always, thanks for the great tutorials. I have my stitches (28) on two needles (14 each) but, when I put the stitches from the “shorter” of the three needles (7 on each; 14 from the “longer” set of stitches) my yarn end is in the middle of the second set of stitches. It’s like a puzzle! Is there a way to get the yarn end at the end of the line of stitches or do I just “weave” it over? Or add another piece of yarn? Befuddled and I haven’t even started the kitchener! :/ Thanks .
Hi Beverly,
Thanks for writing in. Can you let me know what pattern you’re working from? Generally, the instructions will be written so that your working yarn ends up in the correct position to begin the kitchener stitch. It seems to me like your stitches were in the perfect position when you had them on two needles, divided in half. That’s normally what I’d expect before working the kitchener stitch, so it strikes me as odd that you then have them on three needles. I’ll keep an eye out for your reply!
All the best,
Lili
Lili, I apologize for the delay in getting back to you; couldn’t get your site to cooperate. (I think I was asking your comment section to do too much importing.) Thank you for your response and for your insightful comments.
The pattern I am using is:
https://www.ravelry.com/patterns/library/cascade-christmas-stocking
I’m going to try to import a photo so you can seen where I am now.
Thank you for your continued support! Beverly
Hi Beverly,
It might be best to move this conversation over to email, so you can easily send me photos of your work! Just send them along to customerservice@purlsoho.com, and I’ll take a look.
All the best,
Lili
Thank so much for the instructions – I could actually understand them. Thank you
I don’t understand how this technique is applied to join the ends of an icord, as required for the Gentle Cardigan. Can you please explain how this is done?
Hi Sadie,
Thanks for reaching out! To do Kitchener stitch to join 2 i-cords, first make sure you have the ends you want to graft together on separate needles. Then, hold these parallel to each other, with at least one working strand of yarn coming out from the right end of one of the i-cord ends. You’ll only have a small number of stitches on each needle, so it may look a little funny, but you can actually follow the instructions in our tutorial as written! Since you have so few stitches, it will also go very quickly!
All the best,
Lili
I’ve never done the Kitchener stitch, but your directions are great! I’m a bit nervous but will give it a go; however, I do have one question: My stitch number is odd 45 stitches – so do I do the 44 just like your video and then what do I do with the last one? The directions say “after grafting 44, pick up the last stitch, pull tight and knot”? I’m not sure what that means . . .
Also do you recommend using the working yarn or a separate piece of the same yarn?
thank you!
Hi Alison,
Thanks for reaching out! It sounds like the pattern you’re working from is indicating to thread your working yarn through that final stitch and tie a knot with it. It would help to have a bit more context though! Would you be able to send us the pattern you’re working from, so we can take a closer look? Feel free to send an email to customerservice@purlsoho.com, and we can go from there!
All the best,
Lili
Do you also have a tutorial for Kitchener in the round, for example, joining two ends of a tube cowl? For that, there are no setup stitches. I wonder if anyone is confused because I see some designers linking to this page, when they really don’t need the setup stitches for their particular design.
Hello,
Thanks for writing in! I’m afraid that we haven’t made a tutorial for Kitchener in the round ourselves, but I know that some other knitters have done so. I’d recommend searching “Kitchener stitch in the round” in your favorite search engine, and lots of videos will come up, if you want to see this in action!
All the best,
Lili
Hi, this is such a great tutorial! I’m using it to graft the underarms of a sweater but there are holes on either side of where I’ve used Kitchener on the “live” stitches. How can I close those up without losing elasticity and keeping it relatively invisible? Thank you!
Hi ZOE,
Thanks so much, glad to hear it was so helpful! The holes you’re seeing are super normal, and fortunately there’s an easy way to close them up. You can take the yarn ends that are present at the underarm and use them to work duplicate stitch on the wrong side of the fabric over the holes. This will cinch them up really well and be invisible from the right side of the fabric!
All the best,
Lili