Mattress Stitch
The Mattress Stitch is a finishing technique for vertical seaming. It creates an invisible join between pieces worked in stockinette stitch or ribbing, perfect for so many things, such as sewing the front and back of a sweater together. For demonstration purposes, we have used a different yarn in a contrasting color, but typically you would use the same yarn as your knit pieces.
First, align the two pieces you wish to seam. Bring your threaded tapestry needle from the back of your work to the front at the location where you wish your seam to start. (I began with the knit piece to the right and brought my needle to the front just above my cast on edge.)
For Mattress Stitch you sew two knit pieces together by grabbing a strand of yarn from each edge, alternating back and forth, working vertically along the edges. The strand of yarn you grab is a horizontal bar that runs between the knit stitches (or “V”s). If you gently tug on the right and left edge of your knit piece, you can see these horizontal bars (or “ladder”) between the Vs. Picking up a bar from each side draws the edges together, making it appear as though it is one knit piece.
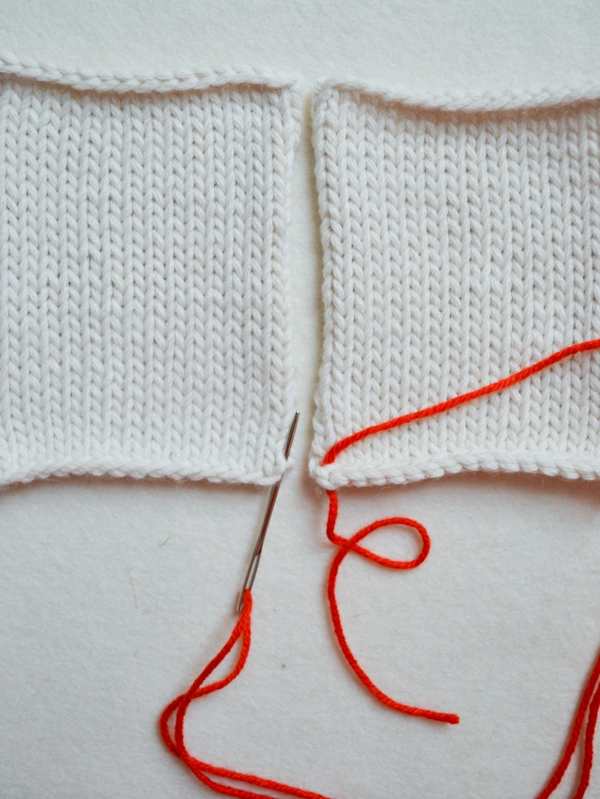
Next, draw the needle under the bar between the two most outer Vs of the second knit piece, right across your entry of the first edge. Beware of the outermost column of knit stitches; it tends to curl to the back. The farther in from the edge that you work, the bulkier the seam will be.

Take the tapestry needle back to the first piece and pick up the bar just above your initial entry point.
Now, take the needle back to the second piece and pick up the bar above the last one your picked up on this side.
NOTE: Depending on the gauge or density of the fabrics, sometimes it is just as effective to pick up every other bar, rather than ever bar. It is a personal choice.
Continue working vertically along the two edges, drawing the tapestry needle under each bar of each piece.
Above you can see the many red stitches connecting the two columns of Vs. The goal is to bring those Vs together.

Just as with knitting, the more even you can keep your tension, the better. An even tension will prevent pulling and puckering along the seam.

To close the seam, gently pull the length of yarn from either the top or the bottom. If you are working a long seam, it is best to sew a few inches, then pull to close, again sew a few inches and pull, continuing in this fashion to the end of the seam, being careful to maintain a consistent tension throughout.

It’s like magic.

If you turn your work over so the wrong side is facing, you’ll see the seam.


Excellent! Perfect timing; I am just about to close up a poncho with mattress stitch! Great tutorial!
Thank you soooo much! Now i got the courage to finish a work from last year! I was afraid to do it badly… Great video!
great video : much easier to understand with oral and visual directions and you can keep going back !
Good video. Cleared up many questions I had. Not afraid to try this any longer. Thank you.
Wow, what an excellent tutorial. So clearly explained. I’m going to go finish the seams on the pillow I just finished knitting now with the mattress stitch. Thanks!
Thank you I M delighted to have just chanced on your site! I have been looking for clear instructions to join some knitted strips for a throw! Does it matter if one uses a single colour to join multi coloured strips as the stitching appears to be concealed?
Great Video. I think I now have nerve to finish my sweater!!
Hello Carol!
We’re so glad this was helpful! Best of luck finishing up your sweater! -Alyson
I love your tutorials but whenever I open one, a window pops up on the left side of my screen asking me to “Save to favorites”. This window will not go away and has no button to close it. It completely blocks me from looking at the tutorial. Do you know why this is happening? Thanks!!
Hi, Katherine!
Thank you so much for writing in! I am very sorry for the delay in responding to your comment! I believe that we have fixed this glitch. If you are still having trouble, please let us know! Again, thank you so much for taking the time to comment!
Best wishes,
Kumeko
I’m having the same problem with the pop up screen. It does go away when I’m at the top and looking a the video but pops up when I scroll down to look at the photos and text.
Hi, Kim!
Thank you so much for writing in! We are looking into this glitch and hope to have it fixed soon! We are terribly sorry for the inconvience!
Best,
Kumeko
This persistent window issue is still happening. Not sure why. Using Safari 9.0.2 but it also happens in Firefox 43.0.4. Haven’t tried other browsers but suspecting it’s the page. Be happy to email you a screenshot, if you need it.
Hello, CiticSugar!
I totally see what you’re talking about. It’s happening on my computure, too. I’ve let our website folks know that this is still occuring. We should have it taken care soon! Thank you for writing in!
Best,
Kumeko
This was very helpful.
Hi, I was wondering if this stitch would be appropriate for a flat knitted sleeve? The current shape of my sleeve looks like a V.
I’ve used 1k 1p for ribbing and stockinette stitch for the rest. But I’m unsure as to which stitch would work best. My pattern didn’t recommend any stitches.
Hi Ringo,
Thank you for contacting us! Mattress stitch is more of a sewing technique than a stitch and it is used to seam up flat knitting. In this case, where your sleeve it knit flat, mattress stitch is perfect and will do the job. Best of luck!
-Adam
Thank you so much! 😀
Hi,
This is very useful and amazing magic how the stitching yarn vanishes! But I need to seam stockinette and reverse stockinette – ie the front and back of the sweater will show the right side (knit) and the side pieces will show the wrong side (purl). I’m supposed to leave a one stitch seam allowance to ‘express’ the seams as a design feature. (The pattern is ‘Redford’) I’ve tried, but it doesn’t look any good, it looks a bit like the last picture in this tutorial, but I think it’s supposed to look more like a chain. Any tips or photos?
Thanks a lot, Katherine
Hi Katherine,
Thank you for the question! If your outside seam on your Redford sweater looks like the “inner” seam on our tutorial, then you are spot on correct! The Redford uses exposed seams as a design detail. Leaving 1″ for seam allowance seems like a lot though. From the sample in the picture, it looks like they are just doing the mattress stitch on the reverse side of the garment on the selvedge stitches. Let me know if you have any other questions!
Best,
Adam
THANK YOU
If I am seaming something that is slightly too big, instead of picking up the stitches on the edges, can I start picking up about half an inch or so in? I have a hat that I knit flat but will be way too big when seamed so I’m looking for a way to possibly take it in a bit!
Hi Candice,
Thanks for writing in! You absolutely can use the mattress stitch to take in extra fabric. I have used this to take in excess fabric on a sweater before. Just be sure that you are able to wear the hat comfortably with the additional fabric on the inside.
Best,
Cassy
Wonderful! If only I could cut off the extra! 🙂
Hi there;
Thank you for the tutorial! Before I start, is it best to block or lightly press the edges of an “up and over” knit sweater before starting the mattress stitch joining front to back? (I’m making your Over-the-top Top).
Hi Gill,
Thank you for the question and the wonderful compliment! It will certainly make seaming much easier if you block your piece before sewing up the sides. Also, I think that blocking before seaming makes the seam look better. Go for it!
All the best,
Adam
Hello there!
Thanks for the excellent tutorial!
I still have a doubt though: do I “lose” a stitch in the seam? I’m looking to seam a sweater, and I’d like the 2×2 ribbing on the sleeves and hem to look continuous…
Hi Cristina,
Thanks for writing in! Typically with seaming, you will lose a stitch from each side that you are seaming together. Frequently, a pattern will account for this. If you are seaming 2 2×2 rib sections together and the edges are both knit or both purl, you will lose 1 stitch from each edge to the seam creating a 2 stitch section of either knit or purl thus preserving the ribbing!
I hope that this helps!
Cassy
Yes!
That’s why the pattern gave me a (multiple of 4)+2 number of stitches for the ribbing! I’m used to working ribbing in the round, so it initially didn’t make sense!!
Thank you for your help!!
Hi! Thank you for the excellent tutorial. However, I have a question. I am getting ready to seam Julie Hoover’s Goode, pullover sweater, made with your Cattail Silk. I’m guessing that when seaming I would follow the advice from the tutorial to pick up every other ladder, as it is a lightweight yarn? My question is why is this recommended?
Thanks!
Hi Sonja,
It really is a matter of preference to pick up all the bars or just every other.Depending on the gauge or density of the fabrics, you will want to pick up every other bar.
I hope this helps,
Melissa
Thank you for this! I am working on an afghan made of 12×12″ squares and used horizontal seaming to create four columns, which I now need to seam together. Are there any major disadvantages to having one continuous vertical seam between each column (i.e., instead of starting and stopping a vertical seam a few times within the column, if that makes any sense?) I’m mainly concerned with the strength of the seam. My columns are 60″ long.
Hi Mee,
Thanks for writing in! You certainly can do a continuous, long seem. The one thing that I would be careful about would be the creeping of the seem as you work. To prevent this, I would use locking stitch markers or Cocoknits fantastic claw clips to hold your pieces together along to whole length and this will help keep you on track!
I hope that this helps!
Cassy
I am using mattress stitch to seam a garment (drift vest) knitted with 2 strands of yarn. Is it OK would you say, to just use 1 strand for seaming to achieve a neater finish? Or is this likely somehow to ‘unbalance’ the garment.
Many thanks for your advice
Hi Anne,
Great question! I almost always use just one strand to seam when putting together a garment knit with two strands held together, because it significantly cuts down on bulk in the seams! As long as you are careful not to pull too tightly when working mattress stitch, it should work out wonderfully!
Best,
Julianna
Can / should mattress stitch be used to join knitting of ‘stepped’ shoulder seams?
Hi Maureen,
Great question! I would recommend using a variation of mattress stitch, which we show in our Seaming Stockinette Stitch Horizontally tutorial, to join any cast off edges together, such as stepped or flat shoulder seams. The steps do make things a bit trickier, but I usually find that by making sure my stitches bridge across the steps, instead of ending at the edge of one step and beginning on the next, the seam usually turns out nice and tidy!
I hope that helps!
Julianna
Would you ever use mattress stitch to seam shoulders in a sweater or just the sides?
Hi Kim,
Great question! Mattress stitch is the best way to seam any side by side edges of knitted pieces. Theoretically, if a sweater was knit side to side, you might use this method to sew the shoulder seams! However, if your sweater is knit from the bottom up (which is much more common!) you will use a variation of mattress stitch which you can see in our Seaming Stockinette Stitch Horizontally tutorial.
I hope that helps!
Julianna
is there a technique for seaming stockinette when the pieces line up perpendicular?
Hi Molly,
Thanks for reaching out! We don’t have a tutorial for that, but if you search “Perpendicular invisible seaming” on youtube there are some excellent tutorials available! And you can find all of our Finishing tutorials here!
I hope this helps, happy knitting!
Gianna
thank you for your response! i had no idea how to find this information because i did not know what it was called or what to search for. thanks for the link. your tutorials, photos, and verbal explanations have really helped me to have the confidence to learn many new techniques. the way you explain it really simplifies the different approaches for seaming and now it doesnt look like a dauhnting task anymore 🙂
I am seaming a sweater knit with seed stitch. Would mattress stitch still be best? Will the seam just be harder to hide because of the knits and purls coming together next to each other?
Hi Alicia,
Thanks for reaching out. You’re right that the seam will be a little bit more noticeable because of this, but I still think that mattress stitch is the best way to do it! The knits and purls will likely end up next to each other regardless of the seaming technique you decide to use. I hope this helps!
All the best,
Lili
Hi there! I am seaming a cable sweater done in reverse stockinette as the background stitch. Do you recommend the mattress stitch for seaming this sweater? I don’t quite know how to do it so that the seam is underneath on the stockinette side. Or is there a better stitch for this application?
Hi Kristin,
Thanks for reaching out. I think you can make mattress stitch work for reverse stockinette! You can try changing where you insert the needle, like this: Holding the reverse stockinette panels right-side-up (purl bumps visible), draw your needle through the furthest purl bump on one panel, and then through the matching purl bump on the other panel. Keep doing this up the entire side, and the seam should end up on the wrong side!
All the best,
Lili
Hi, great instructions, both pictures and text.
The Top I knit was done in garter stitch, however it says to sew the side and sleeve seams using the Mattress stitch. How would this work?
There are no further instructions.
Thanks
Hi Joanne,
Thank you for writing in! I think that our Seaming Garter Stitch tutorial would be wonderful for the pattern you are working on. If this doesn’t help, I would recommend reaching out to the designer to see if they have a suggestion on how they seamed their pattern design. Please let us know if you have any other questions!
Happy knitting,
Gavriella
What should I do with the end of my seaming yarn to hold the seam? Do I knot it??? Or just weave it in using duplicate stitch like any other yarn end? How do I ensure the vertical seam will be strong? (For context, I’m working the vertical side seams on the Sundance Pullover, and I’m especially concerned about the top of the seam, which is at the underarm).
Hi Nicole,
Thanks for writing in! The best way to deal with this yarn end is to weave it in like you would your other ends. Mattress stitch creates a very strong seam itself, so it’ll hold up just fine!
All the best,
Lili