
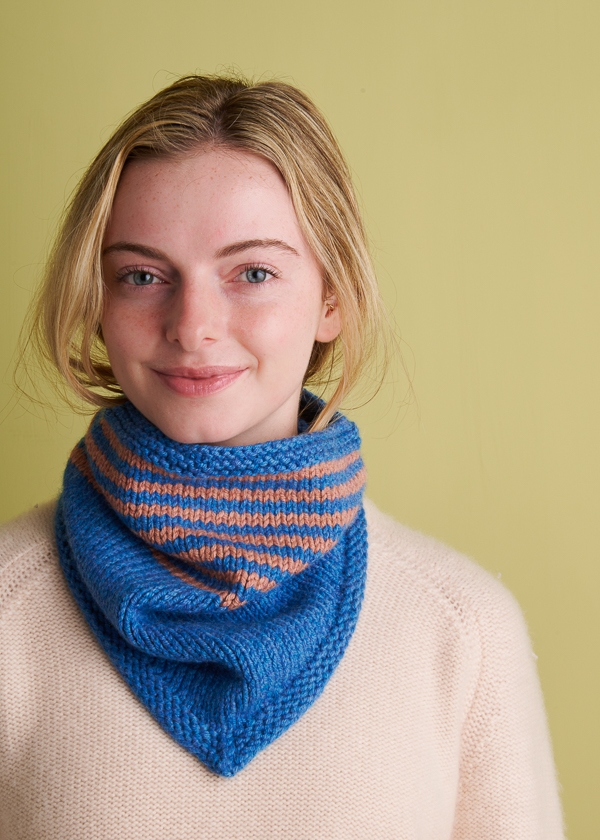
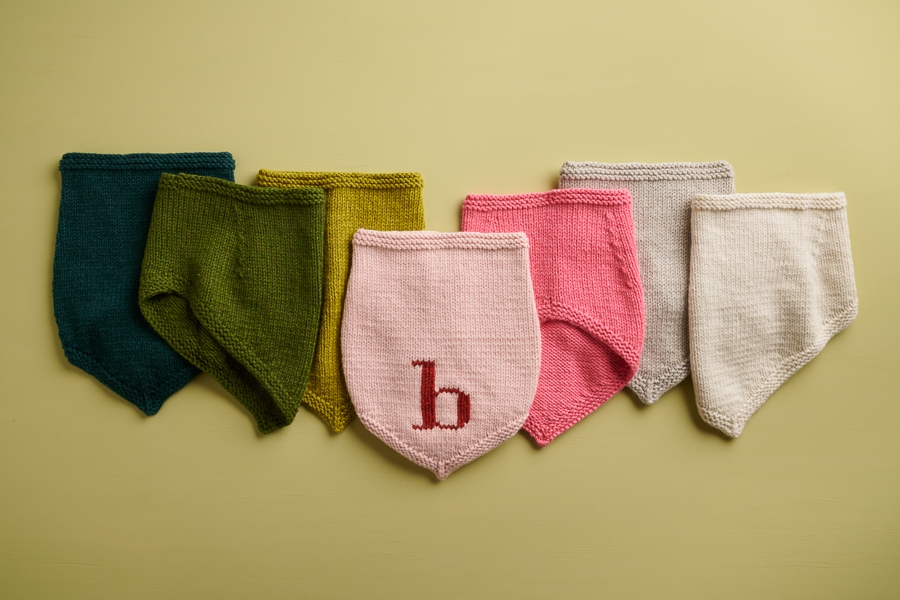
Bandana Cowl In New Styles + Colors
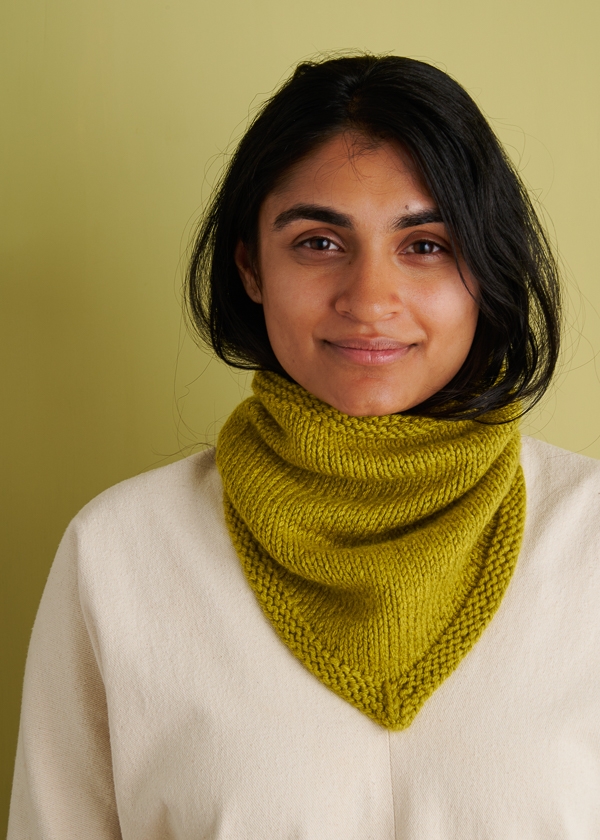
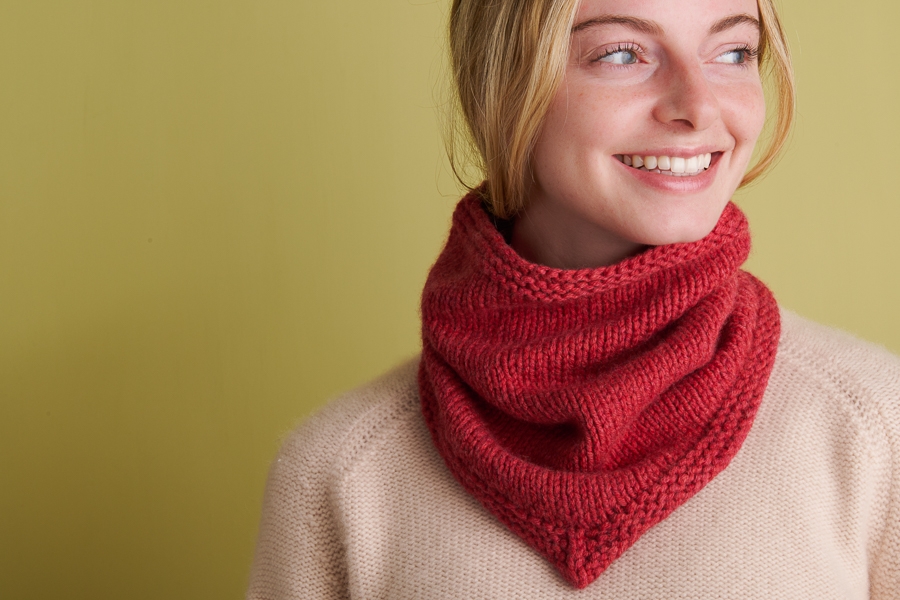
Our Bandana Cowl is a true one-skein-wonder. Soft and stylish, cute and cozy… It’s been a customer favorite for over ten years!

A clever little knit, you work it in the round with short rows for shaping. If you’ve never knit short rows, now is the perfect time to try them because we have tutorials that walk you through every step. Find out if you’re a wrap-and-turn kinda knitter or more of German-short-rows type… We explain both techniques!

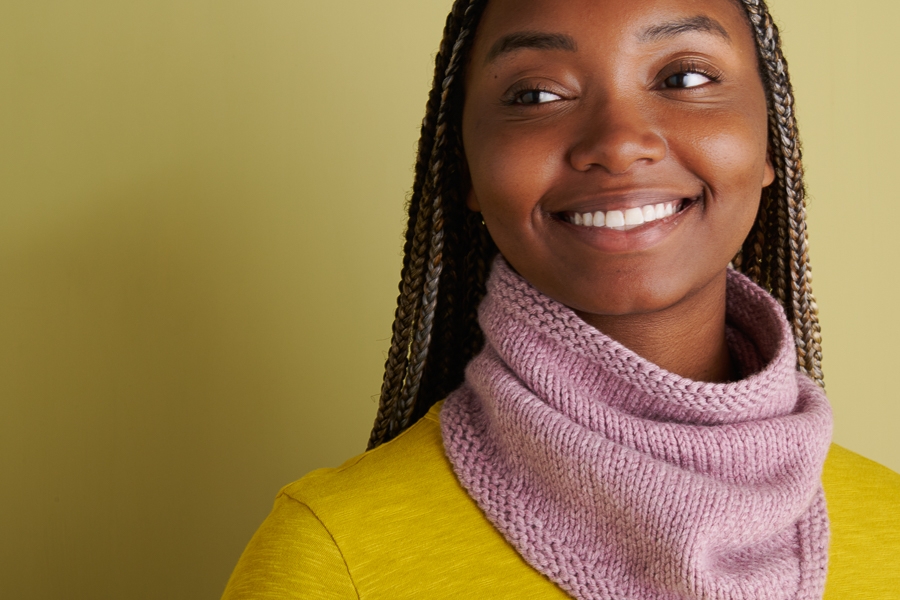
In our 100% extra fine merino Plenty, the Bandana Cowl is a quick knit that makes a fantastic gift (for a friend, loved one, or for yourself)! Soft and squishy, cozy and cushy, Plenty is as un-scratchy as wool gets! We found the softest merino on the market, making sure it’d be wonderful to knit and wear.

With its distinctive high twist, Plenty is not so prone to pilling and has a lively bounce to its step. We love its plump and lofty sense of generosity and its overall good feeling… It’s just amazing to knit with!

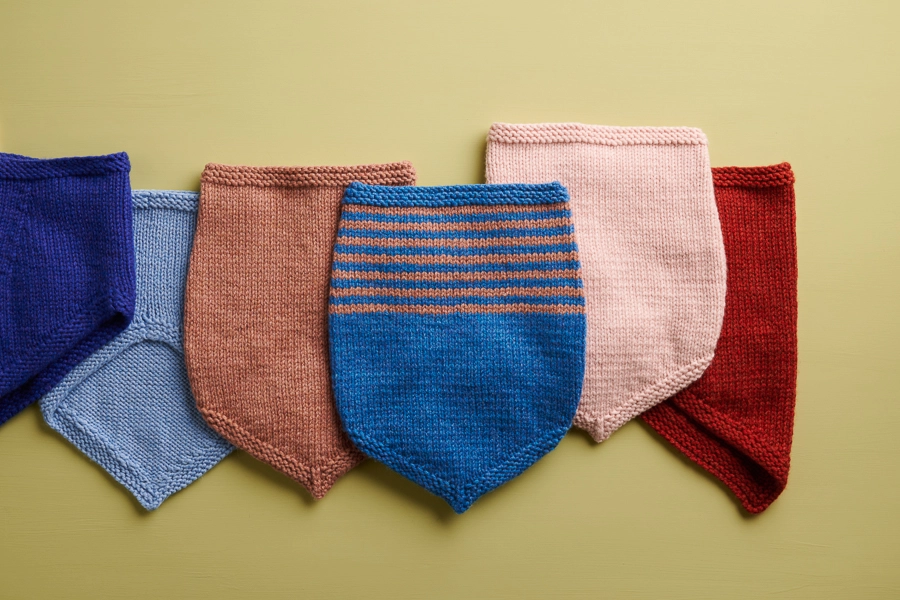
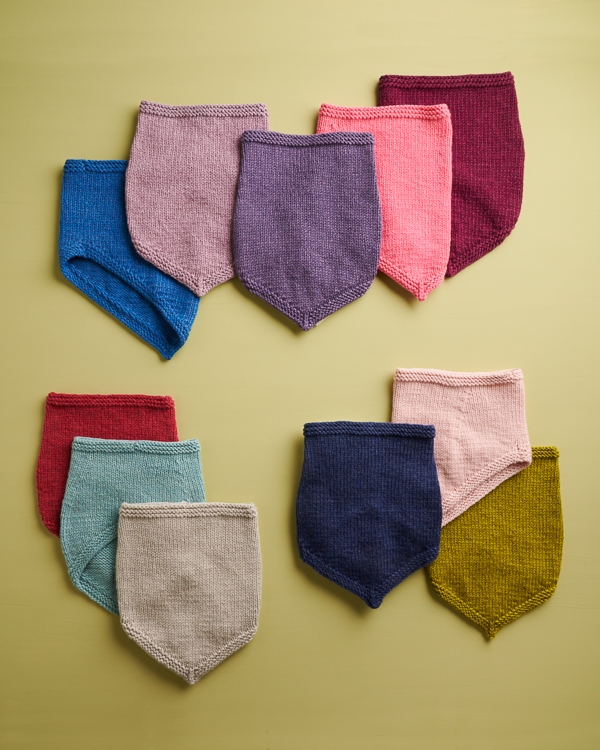
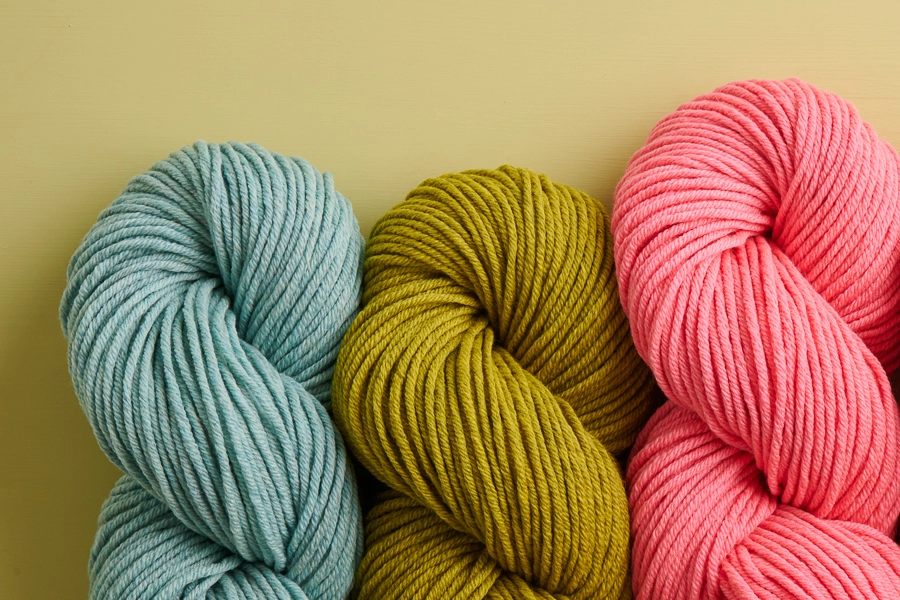
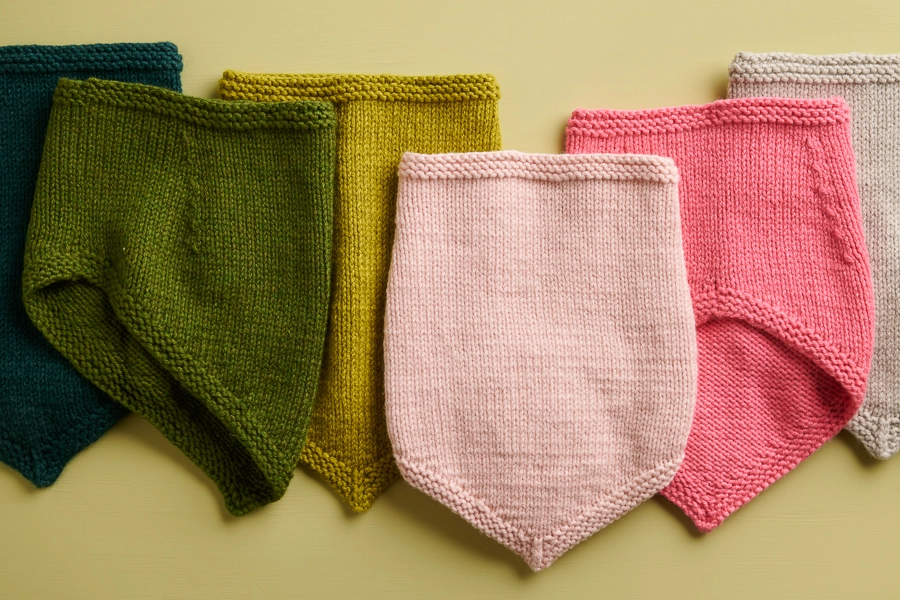
To celebrate our five new colors of Plenty, we’ve knit up a band of Bandana Cowls that covers the full range of Plenty’s new twenty-three-color palette. You can spot our new Mint Blue, Golden Green, and Plumeria Pink in the photo below (from left to right). Gorgeous!

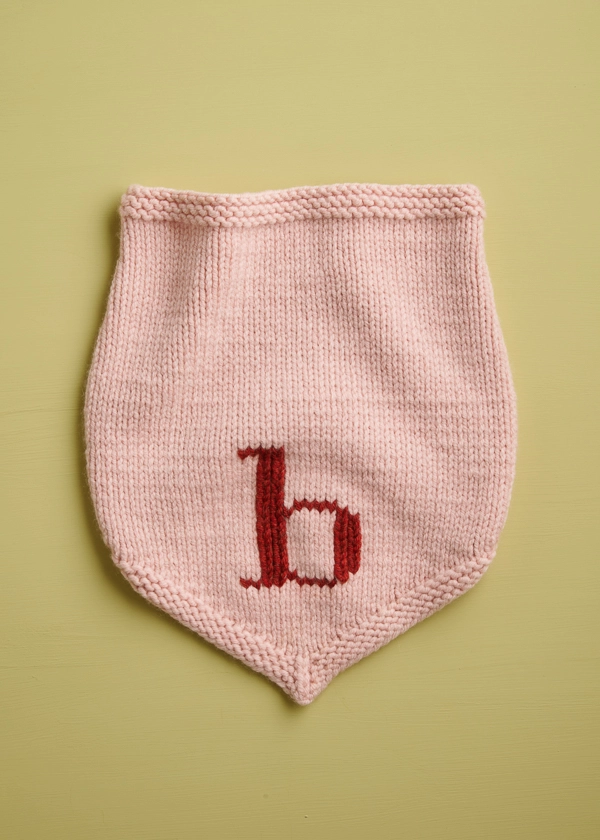
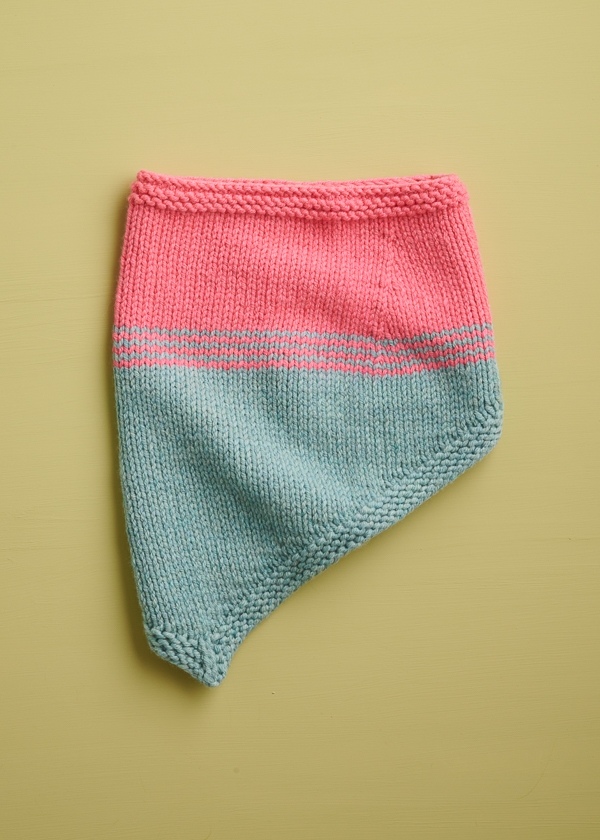
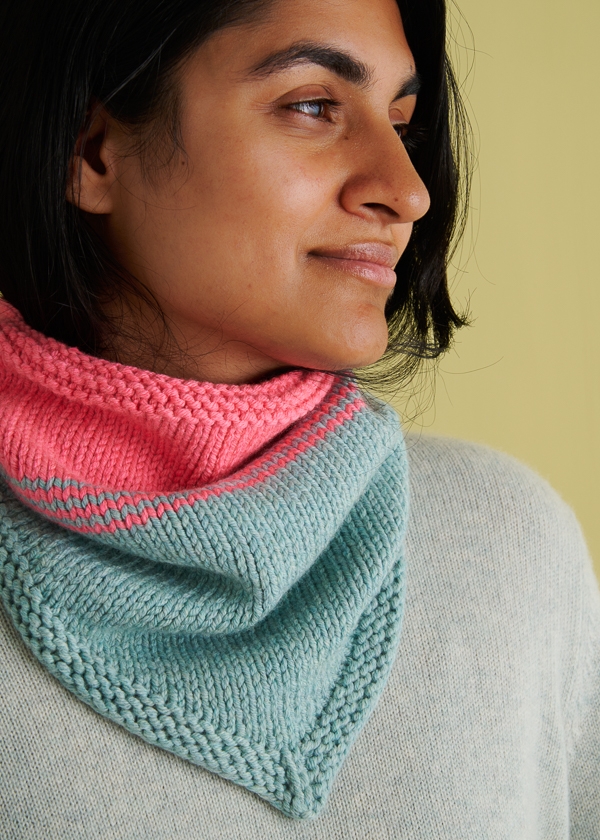
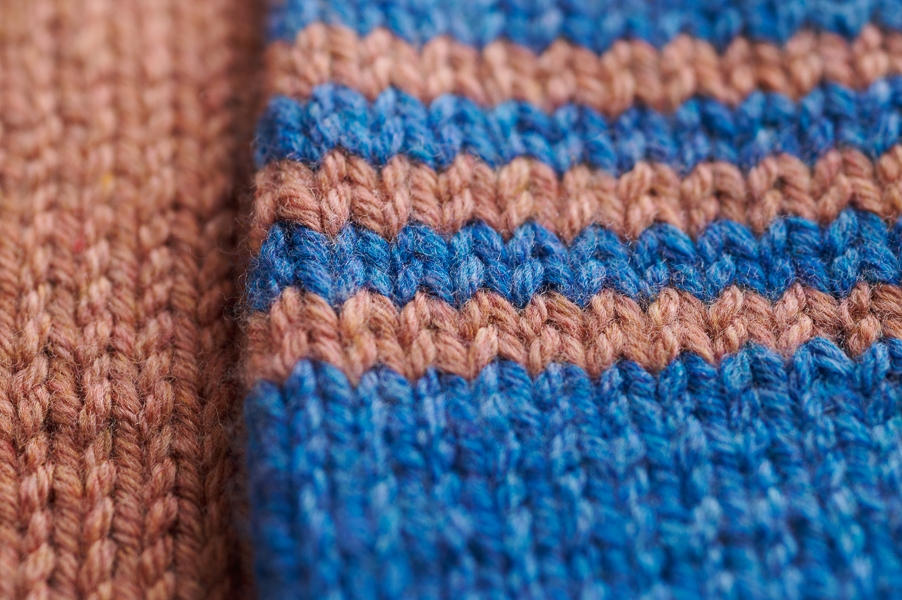
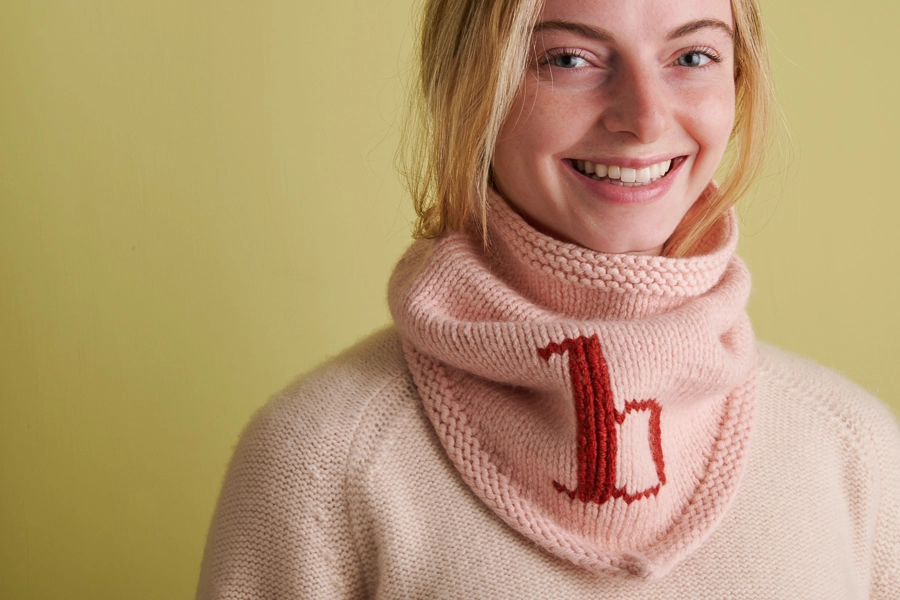
So many beautiful colors, we decided to whip up four new colorplay versions: Breton Stripes, Transitional Stripes, Colorblock, and even a duplicate stitch Monogram, so you can bring your A game to this knit! (Or your B game!)

So, pick your pattern, pick your colors, and cast on to find out why the Bandana Cowl is still one of our most popular knits!
Share your progress and connect with the community by tagging your pics with #PurlSoho, #PurlSohoBusyHands, #PurlSohoBandanaCowl and #PurlSohoPlenty. We can’t wait to see what you make!
Materials
One-Color Version
- Main Color (MC): 1 skein of Purl Soho’s Plenty, 100% extra fine merino wool. Each skein is 139 yards/ 100 grams; approximately 139 yards required. We used Mint Blue and Lilac Quartz. (NOTE: Some of the colors are no longer available.)
Two-Color Version
- Main Color (MC): 1 skein of Plenty
- Contrast Color (CC): 1 skein of Plenty
For Colorblock Version, approximately 70 yards required of each MC and CC. We used Golden Green and Gray Pearl.
For Breton Stripe Version, approximately 115 yards required of MC and 35 yards of CC. We used Sapphire Blue and Pottery Pink.
For Transitional Stripe Version, approximately 80 yards required of MC and 65 yards of CC. We used Mint Blue and Plumeria Pink.
For Monogram Version, approximately 139 yards required of MC and a few yards of CC. We used Peony Pink and Red Pine.
You’ll also need…
- US 10 (6.0 mm), 16-inch circular needles (Note: Always use the needles that you need to get the correct gauge. In this case, some of our sample makers found a US 10 worked better for them than what Plenty’s label recommends, which is a US 9 for 4 stitches to the inch. If you know you’re a bit of a tight knitter, US 10 needles are more likely to work for you, and if you’re on the loose side, you may prefer US 9s!)
- Stitch markers, including one unique
GAUGE
16 stitches and 24 rounds = 4 inches in stockinette stitch
NOTE: We used almost a full skein to make this cowl. To avoid running short, please re-use your swatch yarn, double check your gauge, and be conservative with tails!
SIZE
Finished Neck Opening: 17¼ inches circumference, comfortably stretching an additional 5 inches
Finished Height from Point: 13½ inches
NOTE
We explain how to make this cowl with two different methods of short rows: Wrap + Turn or German. Most people would say German Short Rows are simpler, but lots of people feel more comfortable with Wrap + Turn ones. For our samples, we used Wrap + Turn Short Rows, but pick whichever method you prefer!
SPECIAL INSTRUCTIONS
S2KP (SLIP, SLIP, KNIT, PASS)
NOTE Watch this decrease in action with our Slip Slip Knit Pass Tutorial.
Slip 2 stitches together knitwise, knit 1, pass 2 slipped stitches over knit stitch. [2 stitches decreased]
SHORT ROW SHAPING
WRAP + TURN (WRP-T)
NOTE For our step-by-step video tutorial of how to work this technique, including how to work wrapped stitches with their wraps, please visit our Short Rows: Wrap + Turn Tutorial.
On the right side: Keeping yarn in back, slip next stitch purlwise from left needle to right needle. Bring yarn to front. Return slipped stitch to left needle. Bring yarn to back. Turn work so wrong side is facing you.
On the wrong side: Keeping yarn in front, slip next stitch purlwise from left needle to right needle. Bring yarn to back. Return slipped stitch to left needle. Bring yarn to front. Turn work so right side is facing you.
GERMAN SHORT ROWS
NOTE: For more help with this technique, please visit our German Short Rows Tutorial.
Make Double Stitch
On the right side: Turn work so wrong side is facing you. Slip 1 to right needle with yarn in front, pull working yarn tightly over needle so it tugs up both legs of slipped stitch to look like two stitches, i.e. a “double stitch.” Bring yarn around back of needle, then forward, passing between needles so yarn is in front.
On the wrong side: Turn work so right side is facing you. Slip 1 to right needle with yarn in front, pull working yarn tightly over needle so it tugs up both legs of slipped stitch to look like two stitches, i.e. a “double stitch.” Bring yarn over needle and leave it so yarn is in back.
Work Double Stitch As Single Stitch
On the right side: When you reach the double stitch, work it as a single stitch by knitting both legs of double stitch together.
On the wrong side: When you reach the double stitch, work it as a single stitch by purling both legs of double stitch together.
CARRYING UP THE YARN
For the Breton Stripe and Transitional Stripe Versions, rather than cutting the yarn every couple of rows, carry the non-working yarn up the inside of the cowl. For tips on carrying the yarn, visit our Stripes In The Round Tutorial!
PATTERN
BEGIN
With Main Color (MC), cast on 89 stitches. We used a basic Long Tail Cast On.
Place a unique marker and join for working in the round, being careful not to twist the stitches.
Round 1: Purl to end of round.
Round 2: K43, s2kp (see Special Instructions, above), knit to end of round. [87 stitches remain]
Round 3: P42, s2kp, purl to end of round. [85 stitches remain]
Round 4: K41, s2kp, knit to end of round. [83 stitches remain]
Round 5: P40, s2kp, purl to end of round. [81 stitches remain]
WORK BANDANA POINT
NOTE In this section you will be working back and forth in short rows, turning the work partway through each row. For extra help, see Special Instructions and pick the short row method you prefer. For German Short Row instructions, go on to next section.
IF USING WRAP + TURN SHORT ROWS
Short Row 1 (right side): K42, wrp-t (see Special Instructions).
Short Row 2 (wrong side): P3, wrp-t.
Short Row 3: Knit to wrapped stitch, knit wrapped stitch with its wrap, k1, wrp-t.
Short Row 4: Purl to wrapped stitch, purl wrapped stitch with its wrap, p1, wrp-t.
Repeat Short Rows 3 and 4 eighteen more times. (Don’t worry if you lose count; you’ll know you’re done when you wrap and turn the stitches right next to the marker!)
Next Round (partial round): Knit to end of round, knitting wrapped stitch with its wrap.
Go on to Decrease To Top section, below.
IF USING GERMAN SHORT ROWS
Short Row 1 (right side): K43, make double stitch (see Special Instructions).
Short Row 2 (wrong side): P4, make double stitch.
Short Row 3: Knit to double stitch, knit double stitch as single stitch (see Special Instructions), k2, make double stitch.
Short Row 4: Purl to double stitch, purl double stitch as single stitch, p2, make double stitch.
Repeat Short Rows 3 and 4 eighteen more times. (Don’t worry if you lose count; you’ll know you’re done when you make a double stitch right next to the marker!)
Next Round (partial round): Knit to the end of the round, knitting last double stitch as a single stitch.
Go on to Decrease To Top section, right below.
DECREASE TO TOP
ONE-COLOR VERSION
Working in the round again, knit 2 rounds even, knitting remaining wrapped stitch with its wrap (or working double stitch as a single stitch, if using German Short Rows).
Set-Up Round: K18, place marker, k45, place marker, knit to end of round.
Decrease Round: Knit to 2 stitches before first marker, knit 2 together, slip marker (sm), knit to next marker, sm, slip slip knit, knit to end of round. [2 stitches decreased]
Continuing in stockinette stitch (knitting each round), repeat Decrease Round every 4th round 5 more times, then knit 3 rounds even. [69 stitches remain]
WORK GARTER STITCH EDGE
Round 1: Purl to end of round.
Round 2: Knit to end of round.
Repeat Rounds 1 and 2 one more time.
Bind off very loosely, purlwise.
COLORBLOCK VERSION
Cut MC, and with Contrast Color (CC), follow Decrease To Top instructions for One-Color Version, above.
BRETON STRIPE VERSION
NOTE: Be sure to carry non-working yarn up inside of cowl. See Special Instructions for more info.
Do not cut MC (you will pick it back up shortly).
Working in the round again, with Contrast Color (CC), knit 2 rounds even, knitting remaining wrapped stitch with its wrap (or working double stitch as a single stitch, if using German Short Rows).
Set-Up Round: With MC, k18, pm, k45, pm, knit to end of round.
Round 1 (Decrease Round): With MC, knit to 2 stitches before first marker, knit 2 together, slip marker (sm), knit to next marker, sm, slip slip knit, knit to end of round. [2 stitches decreased]
Rounds 2 and 3: With CC, knit to end of round.
Round 4: With MC, knit to end of round.
Repeat Rounds 1-4 five more times. [69 stitches remain]
Cut CC.
With MC, follow Work Garter Stitch Edge instructions for One-Color Version, above.
TRANSITIONAL STRIPE VERSION
NOTE: Be sure to carry non-working yarn up inside of cowl. See Special Instructions for more info.
Do not cut MC (you will pick it back up shortly). Working in the round again…
Round 1: With Contrast Color (CC), knit to end of round, knitting remaining wrapped stitch with its wrap (or working double stitch as a single stitch, if using German Short Rows).
Round 2: With MC, knit to end of round.
Set-Up Round: With CC, k18, pm, k45, pm, knit to end of round.
Decrease Round: With MC, knit to 2 stitches before first marker, knit 2 together, slip marker (sm), knit to next marker, sm, slip slip knit, knit to end of round. [2 stitches decreased]
Next Round: With CC, knit to end of round.
Next Round: With MC, knit to end of round.
Cut MC.
Continuing with CC…
Next Round: Knit to end of round.
Next Round: Repeat Decrease Round.
Continuing in stockinette stitch (knitting each round), repeat Decrease Round every 4th round 4 more times, then knit 3 rounds even. [69 stitches remain]
Follow Work Garter Stitch Edge instructions for One-Color Version, above.
MONOGRAM VERSION
NOTE: For duplicate stitch pointers, please be sure to visit our Duplicate Stitch Tutorial.
Follow Decrease To Top instructions for One-Color Version, above.
With a length of Contrast Color yarn threaded onto a tapestry needle, follow our Monogram Chart to create a duplicate-stitch monogram. We centered ours in the bandana’s point.
FINISHING: ALL VERSIONS
Weave in ends and gently wet block.

If you would like a free PDF copy of our Bandana Cowl pattern, please enter your email into the field below, and we’ll send it right over. It is the same as the pattern above, in an easier-to-read, super-inspiring format. Use either version to cast on for this clever little one-skein-wonder!
Bandana Cowl
FOR FREEBy providing your email, you agree to receive marketing communications from us and consent to our use of your email address in accordance with our Privacy Policy and our Terms of Service.


Like the bandana pattern, but I need a machine washable yarn, what would you recommend for this pattern
Hi Carol!
Thank you for writing in! For a machine washable yarn for this cowl, we suggest Tulip Cotton! This is a machine washable, 100% organically grown cotton yarn that has a similar gauge to Plenty, however we always suggest making a gauge swatch first to be sure your project will come out as intended.
I hope this helps!
All the best,
Margaret
I absolutely love this bandana cowl pattern. I made this last year when I first started knitting and was able to complete it! The instructions are easy to follow, and it results in a gorgeous finished product that is practical and stylish.
Hi Emma!
Thank you so much for your comment. We are so happy to hear you enjoyed making this cowl, and we hope you continue to enjoy wearing your hard work!
Happy knitting,
Margaret
After I do the GSW do I continue to the end of the row as the tutorial states, or do I immediately switch to the directions for the next row? I tried continuing on until the end of the row, but ended up with a very odd shaped cowl! Thank you.
Hi Laurie,
Thanks for reaching out. Once you complete one German short row, you will already be facing the opposite side of your work, ready to begin the next short row (which is going in the other direction). The first step of each double stitch is to turn your work, so you will never be continuing on in the same direction until you complete all the short row repeats and are back to knitting in the round!
All the best,
Lili
Hi Lili,
I realize I am turning and going in the opposite direction. So, once I turn my work and complete my double stitch, ready to go back in the other direction, am I then following the written pattern instruction for the next row? Or do I knit or purl back to the BOR marker and then begin following the written pattern instruction for the next row?
Thank you..
Hi Laurie,
Yes! Once you turn your work and complete the double stitch, just follow the instructions for the next row, exactly as written. These instructions will have you turn your work and create another double stitch before you reach the end of the round.
All the best,
Lili
I love this– especially the new multicolor options! I was hoping to find a kid-sized version… any advice? Or could I put in a request for a kid size for this pattern?
Hi Nicole,
Thanks for writing in! You can definitely make this pattern a bit smaller to fit a child. To figure out your cast-on number, you can multiply the number of stitches per inch (4) by the circumference that you would like and cast on the nearest 4 + 1. Then you can follow the pattern as written! You may also want to reduce the height of the cowl, so to do that, just knit fewer rounds in the DECREASE TO TOP section. Hope this helps!
All the best,
Lili
I’m new to this short rows and not getting it. Doing the wrap & turn, row 1, I knit 42 then wrap & turn. Do I purl back to the beginning marker or go to row 2.
Hi Jul,
Thanks for writing in. After you work the wrap + turn on Short Row 1, you are exactly in the position to begin Short Row 2! You will actually not knit back to the end-of-round marker until you’ve completed all the short rows. Hope this helps clarify things!
All the best,
Lili
Loved the look, but too small for my 22-inch head. Can you share how to modify the pattern for a larger head?
Hi Sarah,
Thanks for reaching out. This cowl will definitely still fit over your head! Knit stitches are very, very stretchy, so even though the circumference of the top of the tube is only 17 1/4 inches, it will stretch a ton as you bring the cowl over your head, and then it will sit comfortably around your neck!
All the best,
Lili
Unfortunately , it does not fit. I made this a couple years ago. Most wool knit stitches won’t stretch 5 inches. But I love the design.
Hi Sarah,
Oh no, I’m sorry to hear that it doesn’t fit! It sounds like this may be the result of a too-tight bind-off, preventing the stitches from stretching to their full potential. That’s a common issue, and one way to solve it is binding off with a needle a size or two larger!
I’d recommend giving that a try, but if it still doesn’t work then there are certainly ways of modifying the pattern for a better fit. The easiest way would be to not work the decreases! That way, the circumference at the top will be as wide as the circumference at the bottom of the cowl.
All the best,
Lili
Hello….I need some help
I am making my first bandana cowl…I’ve made it thru the German short rows and have begun the Decrease to Top. I have knitted 2 complete rows and am ready for the “set-up”. I have knitted 18, placed a marker, knitted 45, placed a marker and here lies my question. Should there be 18 stitches remaining (so that it’s even?). (I have 20 stitches remaining). Not sure how to proceed
Hi Ruth,
Thanks for reaching out. Yes, you should end up with 18 stitches remaining after you place the second marker! Since you have 2 additional stitches, I would recommend moving each marker 1 stitch forward. That way, you’ll even it out at 19 stitches, 45 stitches, and then 19 more stitches. Hope this helps!
All the best,
Lili
Love this pattern and it is fun to knit! Which of your available cashmere yarns would you recommend for the bandana cowl? The intended recipient is very sensitive to wool fibers.
Hi Susanna,
Thanks for writing in! I would recommend using Jade Sapphire 8-Ply Cashmere for this pattern. However, I wanted to let you know that Plenty is merino wool, so it’s likely the same softness (or even softer!) than cashmere. So if your friend is fine with wearing cashmere, then Plenty will also work!
Like cashmere fibers, merino fibers are so fine that they bend to the touch, rather than sticking up and scratching. Most people who are sensitive to normal wool do not have the same reaction to merino wool. Plenty, in particular, has a micron count of 17.5 (the width of one hair, in microns), which is on par with most cashmere yarns!
I hope this background information is useful!
All the best,
Lili
Very useful information, Lili. I will pass along to my friend, it may open up a whole new world for her. : )
Hi! I have finished the GSW. The pattern then says to knit 2 rows even, does that mean just knit two rows before going on to the set up row for decreases? It also says to knit the one double stitch that is left. I don’t have any more double stitches. I am at the BOR but my working yarn is on the left needle with the right side facing me. How do I go on to knit and join in the round? I hope you can understand my explanation! Thank you.
Theresa
Hi Theresa,
Thank you for reaching out. It sounds like you still need to knit the Next Round (partial round), which is the final round of the short row section before moving onto the first 2 rounds of DECREASE TO TOP! Once you complete Next Round (partial round), you will have created another double stitch (to be knit as a single stitch on the first round of DECREASE TO TOP), and your yarn will be in the correct position at the end to continue knitting in the round. I hope this helps clarify things!
All the best,
Lili
Right now I’m at the center back, right side facing, with the working yarn on my left. The first stitch will be the stitch I just worked on the previous row. If that is correct, where do I do another double stitch? The only thing that makes sense is that it will be the last stitch of the row, is that considered the partial row? Thanks!
Hi Theresa,
The first stitch is the stitch that you’ll create the double stitch with! This stitch is the final stitch of the final repeat of Short Row 4, which is a “make double stitch.” Next Round (partial round) is considered a partial round because the first stitch (which is the double stitch) is actually considered part of Short Row 4, and not Next Round. So on Next Round, you are working every stitch but this one (the double stitch)!
All the best,
Lili
Thank you Lili!
I think I’m where I should be now. I still don’t know how I got confused. I created a list of 18 “3s and 4s” to cross off as I did each row, so I don’t know how I was short a row. I’m very grate for your help!
Theresa
You’re very welcome, Theresa! Glad you’re back on track now.
All the best,
Lili
Hi,
I just finished the German short row part an joined again in the round – but now there’s kind of a gap or hole, where the round closes again (right in the back of the bandana). Is this normal?
Thanks!!
Corinna
Hi Corinna,
That’s a great question, and the simple answer is that a gap forming at that point is perfectly normal! It’s occurring because you have two double stitches right next to each other, one on either side of the end-of-round marker, and because of this placement, the tension of each stitch naturally gets a bit skewed.
Fortunately, though, there’s a great way to fix this tension imbalance, but the first step, surprisingly, is to ignore the hole! Once you’ve knit both double stitches normally and knit a few more rounds of plain stockinette, you can return to the gap and gently tug on one of the loose legs until the extra yarn is distributed throughout the adjacent stitches. That should tighten up the gap considerably and help it blend in with the rest of the stitches.
Hope this helps!
All the best,
Lili
Hi Lili, thanks a lot for the quick and kind reply!
happy again 🙂
Corinna
I’m loving the look of the bandana cowl and would like to give it a try but am a bit overwhelmed by all the lovely color options. I realize this is more of a personal choice question but am hoping you can give me some input. I’d like to do a Breton stripe in a bluish-greenish combination. Two possibilities I’ve come up with are sapphire blue main and laurel leaf green stripes or fresh pickle green main with forget-me-not blue stripes. Any comments or other suggestions? Thank you very much!
Hi Kate,
Thanks for writing in! Choosing the perfect colors can be one of the most difficult parts of the knitting process, and I would be happy to recommend some blue/green combos for you to consider. I’ve actually just finished up my own cowl using Night Blue + Golden Green, and it turned out amazing! Those two colors worked so well together because of the high contrast in value. The darkness of Night Blue really allowed the Golden Green to pop!
So if you also want to go for high contrast, then Night Blue + Golden Green would be a great combo, as well as Laurel Leaf + Forget-Me-Not Blue. For a medium-level contrast, then both of the combinations you suggested would work, although I often find that medium-level contrasts aren’t great for showing off either color, since they can seem a bit muddled. Finally, you could go for a very low contrast, like Night Blue + Laurel Leaf. You wouldn’t be able to tell the difference between colors very well, but that could be a cool effect!
I hope this helps give you some more options for your cowl!
All the best,
Lili
Hi Lili,
Thanks so much for quick reply, suggestions, and explanation! The laurel leaf/forget-me-not blue combination really caught my eye, so that’s what I’m going with.
Looking forward to the lovely yarn and my next project!
Kate
Hi Kate,
We’re so glad that Lili was able to help you! Thank you again for reaching out and have a wonderful rest of your day.
All the best,
The CS Team
Hi-
I’m doing German short rows and am confused. Should I end up with double stitches on either sides of the stitch/round marker?
Thank you!
Hi again and apologies for not putting all of this in one comment box.
So my last short row, the WS is facing me, I’m purling to the double stitch, then P2. Then I turn my work so the RS is facing me and I knit a partial round to the end of the round.
(What is meant by “partial round”? Am I knitting ten stitches, a dozen, or 30 until the end of the round?)
Should the last stitch of this partial round be a double stitch?
I’m doing the Transitional Stripes version.
Will the remaining double stitch be the last stitch of end of the round using the Contrast Color or the first stitch at the beginning of the CC round?
Hi Tracey,
It sounds like you’re doing everything correctly so far! Yes, you should have a double stitch on either side of the end-of-round marker as you begin the Partial Round. This round is “partial” because you will be working every stitch except the first one! That’s because the first stitch on this round is the double stitch that you created after the final purling short row, as you mentioned doing in your comment.
The final stitch of the Partial Round is also a double stitch, and you will knit this with your MC. Then, you will switch to your CC and begin Round 1. The first stitch of Round 1 is the double stitch you created on the final purling short row, and you’ll knit this one with the CC. Hope this helps clarify things!
All the best,
Lili
Hi Lili,
Thank you so much for the clarification!
Best,
Tracey
Hi! I loved knitting this pattern in Plenty yarn. I have some worsted yarn in my stash that would look great as a Bandana Cowl. Do you know of any modifications to this pattern that would make it suitable for worsted weight yarn? Thanks.
Hi Jennifer,
Plenty is a worsted weight yarn itself, so I’m sure you could use another worsted weight yarn to make the Bandana Cowl without any modifications! You’ll just need to make a gauge swatch to ensure that you’re able to get the same gauge measurements with the other yarn. You may need to size up or down your needles in order to get the correct gauge!
All the best,
Lili
Thank you very much!
Hello! I finished my first (of 5!) cowls using Plenty. I was a tad under gauge when I finished knitting, but after wet finishing it grew huge. I had to squish it while drying/blocking to get it back to the specified size. Is that normal? Should I finish/block another way? I am a fairly new knitter!!
Hi Karen,
Thanks for reaching out, although I’m sorry to hear that your cowl didn’t turn out exactly as expected! Plenty does have a tendency to grow once blocked, so the best way to make sure that anything you knit with it comes to the correct dimensions when finished is to block your gauge swatch. If you block your gauge swatch and take your measurements after blocking, you’ll get an accurate measurement for the gauge (and therefore, size) of the cowl after blocking as well! I hope this advice is useful for future projects!
All the best,
Lili
Hello! I’ve finished two Bandana Cowls now and am having fun with this great pattern. However, on both of them, I notice that the cute little center line (in the tip) shown on your samples is on the wrong side of my cowls.
This is how I’ve started mine:
– cast on with long tail cast on
– purl first row after casting on
– K43, s2kp, K to end of round
– P42, s2kp, P to end of round
– K41, s2kp, K to end of round
– P40s2kp, purl to end of round
German Short Rows begin:
– K43, make double stitch: BUT somehow on both of mine, I’ve had to turn my work here in order to do a K row; in other words, if I did it this way, the wrong side would be facing me.
Not sure this will be clear to you, sorry! But somehow both times, I’ve ended up with the neat little line on the wrong side of the tip.
Thanks so much for your advice.
Hi Jenny,
Thanks for writing in, although I’m sorry to hear that the decrease “seam” has ended up on the wrong side of your cowls! Would you be able to send a photo of that to customerservice@purlsoho.com? We’ll keep an eye out for that, and then we’ll be able to take a closer look into the issue!
All the best,
Lili
Hello again;
On a different topic, I am wondering how to adapt the pattern for children. I noticed your remark above, but I don’t have a lot of advice adjusting patterns. So, I thought it might help me to know what is the range of head sizes this pattern accommodates? Then perhaps I could adjust the formula downward for smaller sizes based on head measurements?
Many thanks!
Also, I’m using a worsted weight wool with size 8 needles to get my gauge.
Hi Jenny,
This pattern can fit any head circumference up to about 24 inches! Since you’re hoping to make a children’s version of it, I’d recommend casting on fewer stitches, so that the cowl has a more snug fit over a smaller head and neck. That definitely depends on the exact fit you’re going for–since children grow so rapidly, there are definitely multiple measurements that could work for a “child size” cowl! I’d recommend measuring the recipient’s head circumference and then using that as your initial circumference with which to calculate your cast-on number. Hope this helps!
All the best,
Lili
Thank you, Lili! One thing I’ve found a bit mind boggling about changing the size is figuring out exactly where to put the s2kp’s. If I cast on 77 stitches, could you tell me what to do on Rounds 2-5? Things come together after that, but I seem to get stuck with that. Thanks so much!
You’re very welcome, Jenny! Here’s what you’ll need to do for a cast-on of 77 stitches:
Round 2: K37, s2kp, knit to end of round. [2 stitches decreased]
Round 3: P36, s2kp, purl to end of round. [2 stitches decreased]
Round 4: K35, s2kp, knit to end of round. [2 stitches decreased]
Round 5: P34, s2kp, purl to end of round. [2 stitches decreased, (69) stitches remain]
All the best,
Lili
I am devastated! This is because your instructions regarding the bandana KAL cowl is ridiculously impossible to follow along! I am utterly devastated! Where (just to begin) is a description of right side/wrong side when knitting in the round?
Hi Ilona,
Thank you for reaching out directly about this, and I’m so sorry to hear that you’ve found our Bandana Cowl pattern to be difficult to follow! Knitting should be a fun and relaxing experience, not a frustrating one, so we’re happy to help out with whatever’s causing the difficulties. Would you be able to let us know what aspects of our instructions in the pattern are impossible to follow? We can help troubleshoot from there, and we’ll also review the pattern itself to make sure that it’s written as clearly as possible.
To start though, I can absolutely answer you question about right and wrong sides when knitting in the round! When you’re knitting in the round, every round will be a right-side round. This is because you’re knitting in circles, and the right side (the outside) of your work will always be facing you. Since there will never be a time (when working in the round) that the wrong side will be facing you, knitting patterns generally do not specify this.
I hope this helps clarify things, and I also wanted to let you know about all the avenues in which we offer pattern support, in case you run into any difficulties in the future! You’re always welcome to send us an email at customerservice@purlsoho.com, but you can also sign up for a free 1-On-1 Project Help session, where a team member would be happy to chat or demonstrate techniques in real time for you over video!
I’ll keep an eye out for your reply, and then I’ll be able to attend to any specific questions, comments, or suggestions you have for the Bandana Cowl! Again, thank you for sharing your thoughts. We really appreciate your feedback and take it very much to heart!
All the best,
Lili
I simply LOVE LOVE LOVE this pattern! I’ve made several so far, and have learned that the German short row technique is the technique for me. Very easy to knit with the correct results. Thank you again for a fantastic pattern!
I absolutely love this pattern and yarn! Plenty is so squishy and soft and the pattern makes it nice and thick. It also keeps your interest, especially since I’m a big fan of German Short Rows. Thank you again!
Hi Cheryl,
Thanks so much! It makes us so happy to hear that you’re a fan of Plenty and had fun making this cowl! We really appreciate you taking the time to leave such a nice comment and hope you have a great rest of your day!
All the best,
Cat
I was doing great until row 5, K42. wrap and turn… OK then what?
purl to marker?
Or go to row 6?
I did go directly to row 6 after the wrap and turn..
I’m having difficulty envisioning the final comment… my wrap and turn stitches will end up at the marker. Seeking clarification. Thank you
Joanne
Hi Joanne,
Thanks for writing in! It sounds like you just finished “Short Row 1 (right side): K42, wrp-t” in the “WORK BANDANA POINT” section. After you work Short Row 1, you would move onto “Short Row 2 (wrong side): P3, wrp-t.” After that, you would just repeat short rows 3 and 4 until your wrp-t stitches are back at the beginning of round marker. This happens because the amount of stitches you knit in each short row will gradually increase starting from the center as you continue to knit past the previously wrapped stitches and make new wrp-t’s. Eventually, you’ll reach the end of round marker when your short rows reach their widest. I hope this helps! Please let us know if you have any other questions!
All the best,
Cat
Also where in the pattern instructions does it indicate a garter stitch edge?
Hi Joanne!
The garter stitch edge instructions are right after the end of the “ONE-COLOR VERSION” and are: “Round 1: Purl to end of round. Round 2: Knit to end of round. Repeat Rounds 1 and 2 one more time. Bind off very loosely, purlwise.” Hope this helps!
All the best,
Cat
I am at the last line of the Work Bandana Point and that last line confuses me. Repeating short rows 3 and 4, and using markers for each wrp-t, eventually they meet at this last line. Is this correct? Becuase this is what I have: two wrp-t next to each other. Do I knit thee last row wrapping the two stitches with their wraps – essenetially knit a whole row, and not a partial row?
Hi Karen,
Thanks for reaching out! In this section of the pattern, you’ll actually only have one stitch marker on your needles–the end-of-round marker. This marker remains stable throughout the entire section, and you’ll know you’ve finished all the short rows once you have a wrapped stitch on either side of this marker. So it sounds like you’ve reached this point!
If you’re up to Next Round (partial round), this is technically still a partial round. That’s because you don’t work the very first stitch, since it was the stitch you wrapped and turned on during the previous short row. On Next Round (partial round), you’ll knit to the final stitch and then knit it with its wrap. Then, on the next round (which is a full round!) you knit the first stitch with its wrap, and then complete the round knitting each stitch normally.
I hope this helps clarify things!
All the best,
Lili
I’ve loved working on this cowl and it turned out beautifully. The only problem is that, in spite of my best efforts to bind off loosely, it’s still too tight to fit over my head. I think I might know the answer to this question, but is there anything I can do to salvage it, or do I need to just chalk this one up to the learning process as I’ve already cut the end and woven it in? Thanks for your feedback!
Hi Andrea,
Thank you for reaching out. For bind-off edges that are a bit tight, we recommend going up one or even two needle sizes to help those stitches be a bit looser! For your cowl, we’d suggest finding the end of your yarn if possible and going backwards a bit so you can re-work the bind-off. If you need any assistance with that process, please feel free to email us at customerservice@purlsoho.com and we’re happy to help further there!
Separately, you can try blocking your cowl first and shaping the opening where the bind-off is so that it’s a bit bigger to see if that might help too.
Please feel free to reach out if you have any other questions!
All the best,
Cat
Hi, I love this pattern and would love to jump in right away. I’ve got Malabrigo yarn, both Mecha and Rios weight. My circular needles are 32″ #8s. Would that work for either weight yarn, or do I really need to us the shorter loop? Thanks!
Hi Elyse,
Thanks for reaching out! Since Rios is a worsted weight yarn, like Plenty, it would be the best choice for this pattern. You will likely need larger and shorter needles though. Since this pattern has a finished circumference (at the smallest point) of 17.25 inches, you will need to use 16-inch circulars. And as for needle size, we used size US 10 needles, but I would recommend knitting up a gauge swatch with the yarn you have! You may need to size up or down your needles in order to achieve the correct gauge. Hope this helps!
All the best,
Lili
Hello! I love this pattern so much and my question may be a little odd! I love the pointed bandana look but I was wondering if it’s possibly to make the pointed end more of a rounded look for a softer look at the front? Like a gradual edge rather than the shaper point look? I hope that makes sense! Thank you x
Hi Gina,
Thanks for reaching out. You can absolutely modify this pattern to make a rounded front to the cowl! The easiest way would be to cast on 81 stitches and just not work the decrease stitches in the BEGIN section. Instead, just work in garter stitch in the round until it’s time for the WORK BANDANA POINT section! You can also alter how many stitches you knit in the short rows in this section to make the front more rounded, but I think it will be considerably less pointy after just not doing the decreases at the beginning. Hope this helps!
All the best,
Lili
Where can I find instructions to knit a monogram on the Bandana Scarf?
Hi Marianne,
Thanks for reaching out! You can find instructions for that under the MONOGRAM VERSION section in the pattern. There, you’ll find links to our duplicate stitch tutorial and monogram chart. Hope this helps!
All the best,
Lili
I am knitting the Bandana Cowl using the German Short Rows. I completed Row 1,2,3,4 and am now repeating Rows 3 and 4. The pattern says “you’ll know when you are done when you make a double stitch next to the marker”. Is the marker the one I placed when I joined to work in the round? This is more than 18 rows.
Hi Anne,
Thank you for writing in! That is correct, you will be working around the initial beginning of round marker here. For the short row repeats, the instructions indicate to work rows 3 AND 4 eighteen more times meaning 36 rows total. I hope this helps but please let me know if you need further clarification or assistance in the pattern!
Happy knitting,
Gavriella
Has anyone who’s made this wear it like an actual bandana? If so how does it work for you? Does it stay on your head? Please let me know because I like the way it looks but I don’t want to wear it as a cowl
Hi Jackie,
Thanks for writing in! While bandanas can be worn either on the head or around the neck, this pattern was designed to be worn around the neck only. For some other bandana patterns that are more versatile, I’d recommend checking out the Springtime Bandana and the Knit + Fold Bandana. Hope this helps!
All the best,
Lili