Short Rows: Wrap + Turn
Short Rows tend to strike fear into the hearts of first-timers, but, like all knitting techniques, once you try short rows, you’ll see they’re not so hard after all!
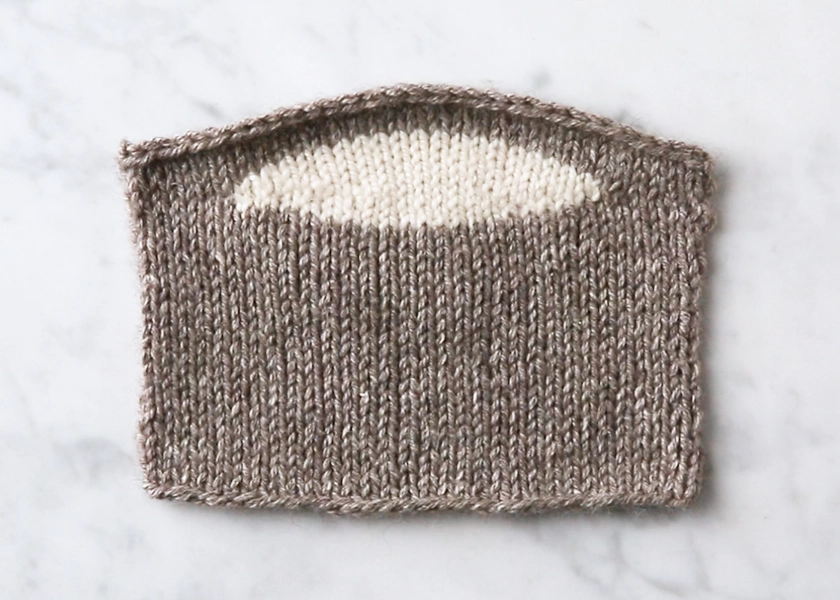
Short Rows are used to create triangles or wedges within your knitting. They shape everything from bust darts to ear flaps. Basically, a Short Row is just that: a row that you don’t knit to the end of the needle. There are lots of ways to turn your work partway through a row, but our favorite is called a Wrap + Turn (wrp-t). This simple method prevents holes along the Short Rows and works well with many different stitch patterns.
Note that there are a few stitch patterns, including Garter Stitch, that don’t require any sort of special technique when it’s time to work back the other way. For these stitch patterns, you just turn the piece and work back the other way. Easy!
Video Tutorial
TIME STAMPS
(Just click the “Chapters” icon in the lower right corner of the video to skip to any of these topics!)
00:00 – Intro
00:23 – Wrap + Turn on the Knit Side
01:40 – Wrap + Turn on the Purl Side
02:34 – Picking Up the Wrapped Stitch on the Knit Side
03:30 – Picking Up the Wrapped Stitch on the Purl Side
04:33 – Bonus Clip: Picking Up a Purl Wrap on the Knit Side
Step-By-Step Tutorial
Here’s the same information as our video, but this time shown with still photos and text…
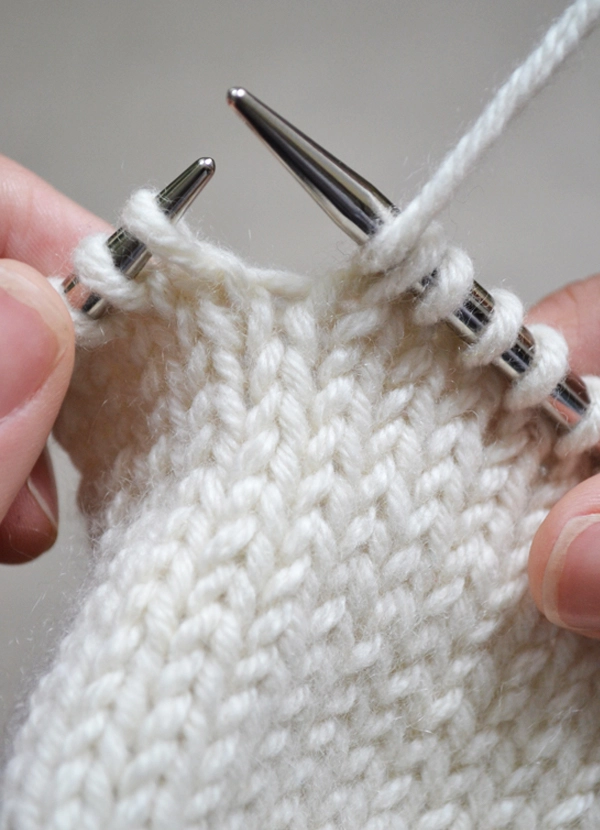
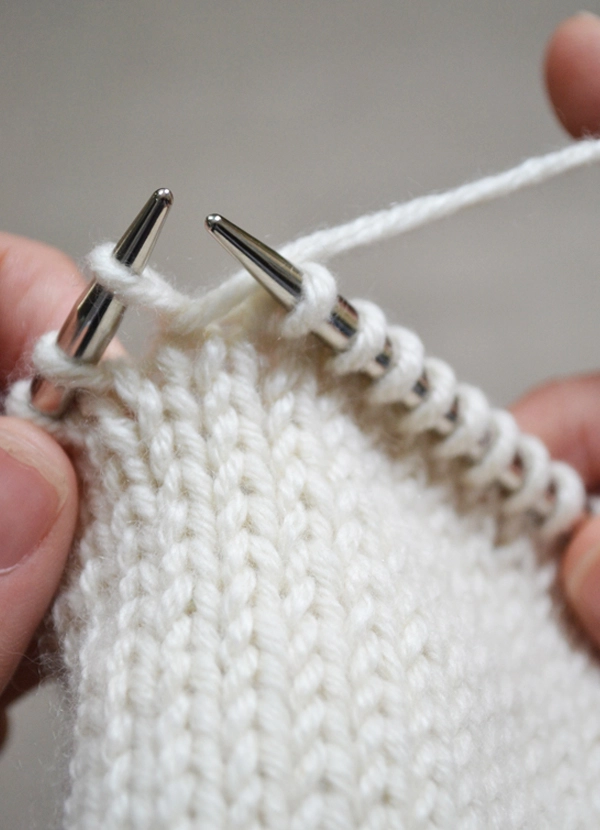
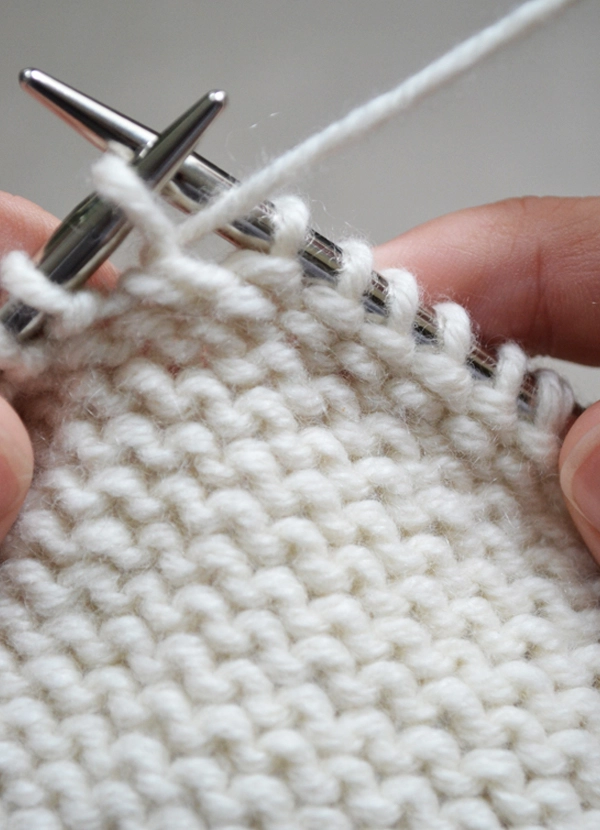
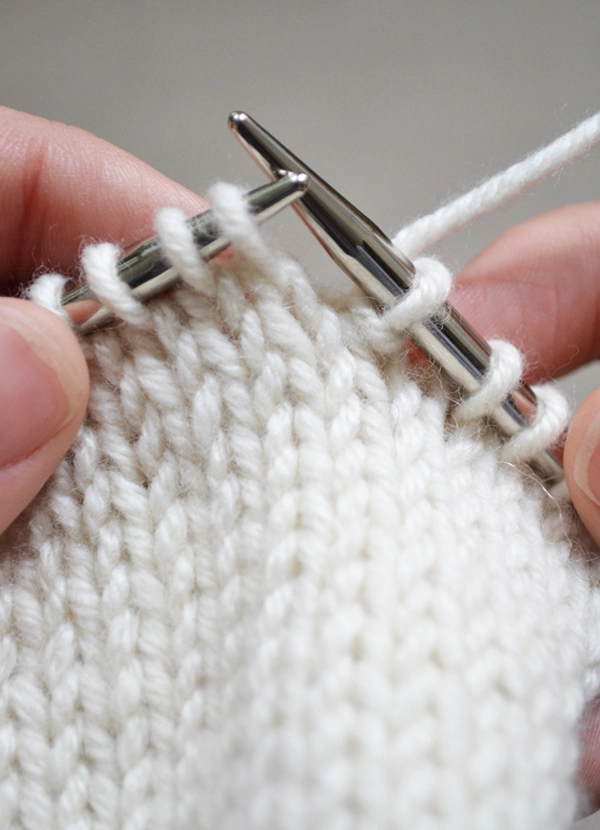
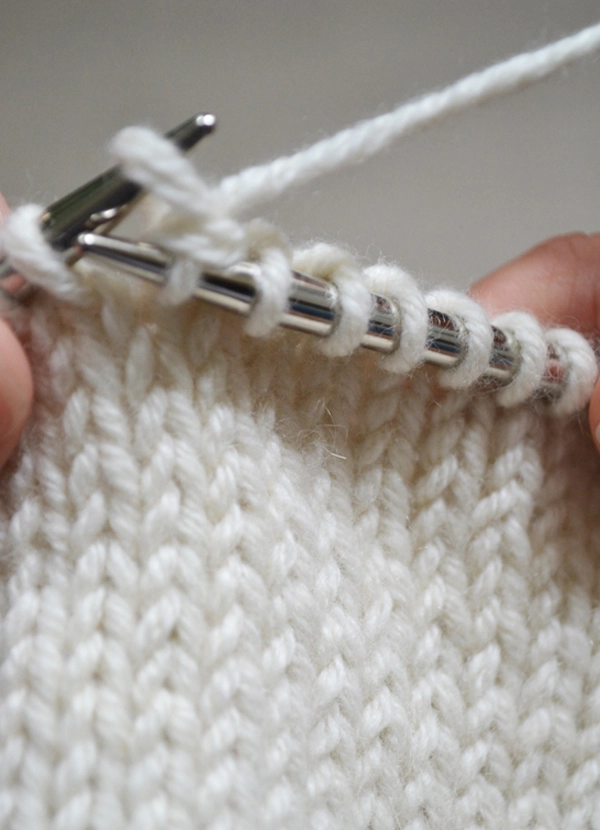
Wrap + Turn On The Knit Side
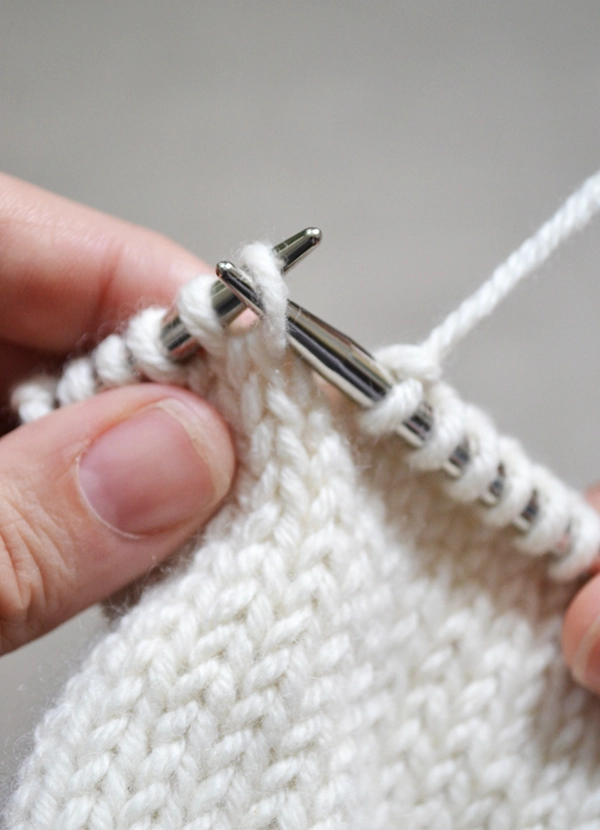
Keeping the yarn in back, slip the next stitch purlwise from the left needle to the right needle.
Bring the yarn forward as if to purl.
Slip the stitch from the right needle back to the left needle.
Bring the yarn to the back of the work as if to knit.
Turn the work so the purl side is facing you, ready to purl.
Wrap + Turn On The Purl Side
Keeping the yarn in front, slip the next stitch purlwise from the left needle to the right needle.
Bring the yarn back as if to knit.

Slip the stitch from the right needle back to the left needle.
Bring the yarn to the front of the work as if to purl.
Turn the work so the knit side is facing you, ready to knit.
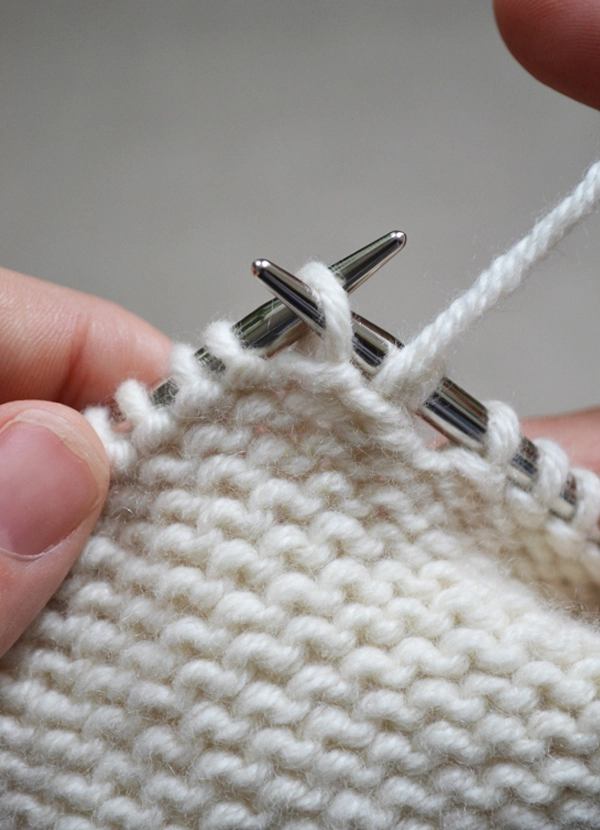
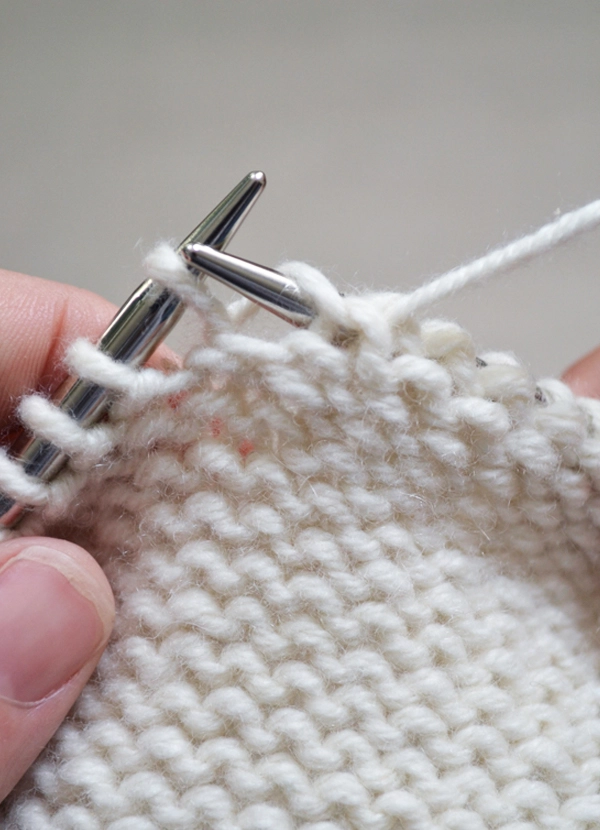
Once you’ve completed your Short Rows, you’ll notice gaps in the knitting where you wrapped the stitches. To rectify this, you work across the entire row, closing the gaps by “picking up the wrapped stitches”.
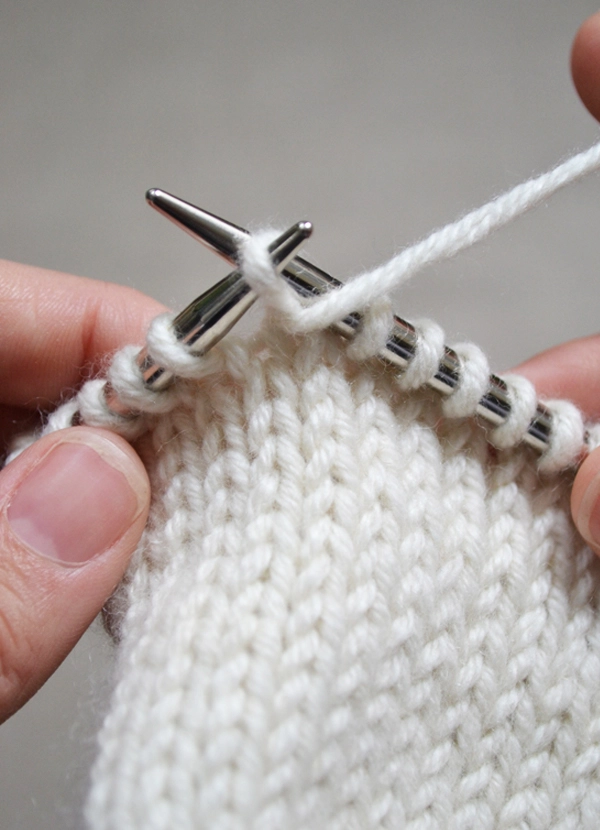
Picking up the Wrapped Stitch on the Knit Side
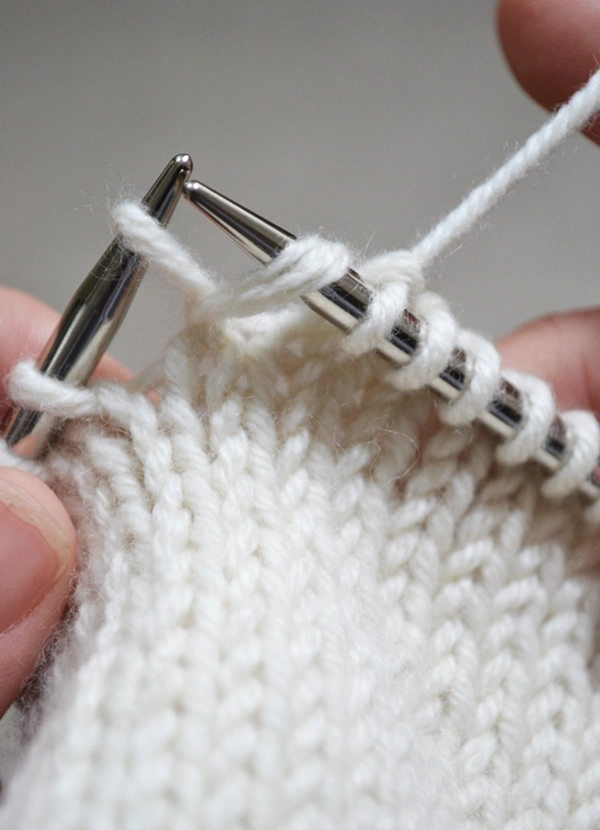
Pick up the wrap with the right needle from front to back.
Then insert the right needle into the stitch that is wrapped.
Knit the wrap and the stitch together.
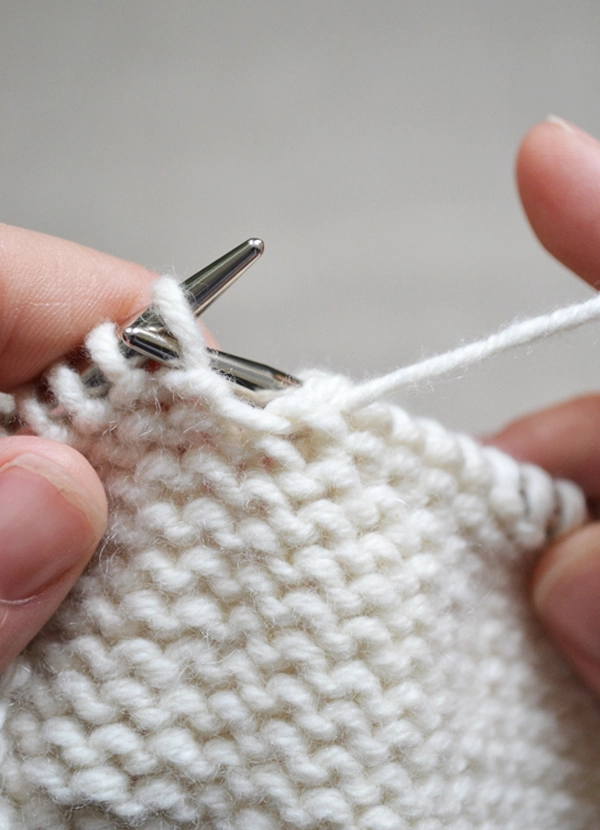
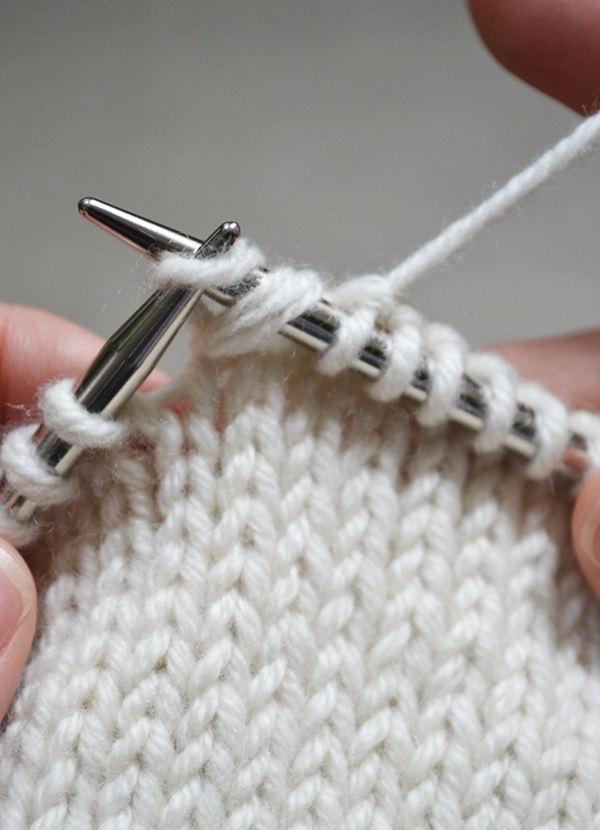
Picking up the Wrapped Stitch on the Purl Side
Pick up the wrap with the right needle from back to front
.
Place the wrap onto the left needle, over and behind the stitch it was wrapping.
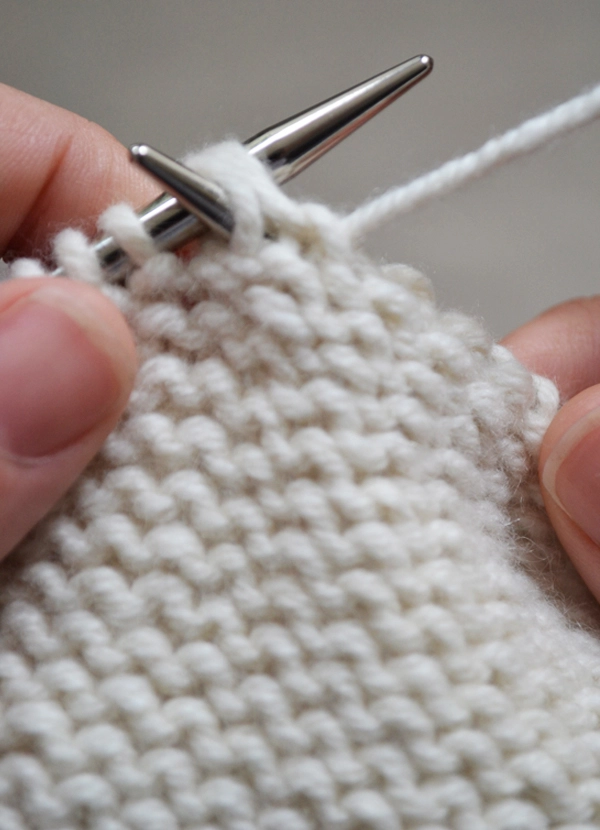
Purl together the wrap and the stitch that is wrapped.
That’s Short Rows! Not so scary!
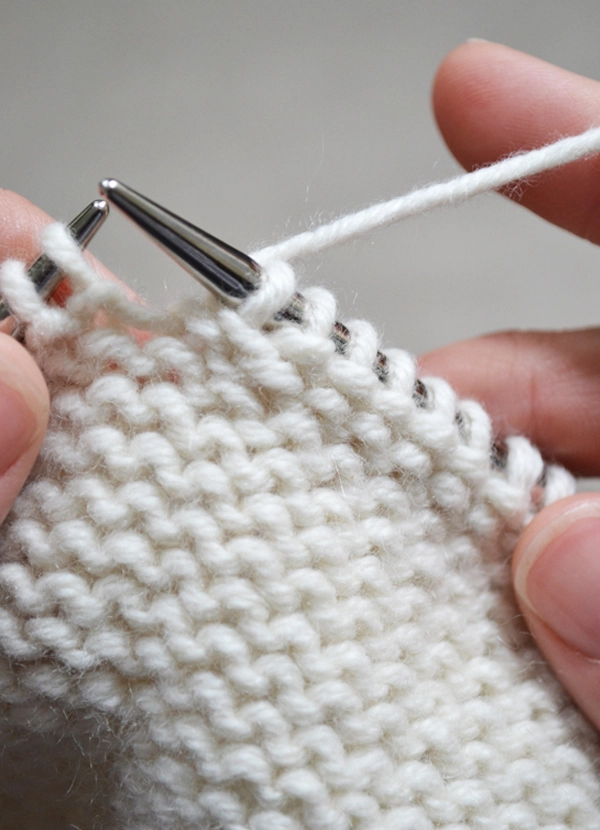
Bonus: How To Pick Up A Purl Wrap On The Knit Side
NOTE: See this particular situation in action at minute 4:33 of the video tutorial , above.
When working in the round, you may encounter a stitch that was wrapped on the purl (or wrong) side and needs to be picked up on the knit (or right) side. Here’s how to pick up a purl wrap on the knit side…
Work up to the wrapped stitch.
Use the tip of the right needle to pick up the wrap, inserting the needle from front to back. Place the wrap onto the left needle. Note: If necessary, nudge the wrap so it is after the next stitch on the needle.
Next, slip the first sitch knitwise, then slip the wrap purlwise. Insert the tip of the left needle into the front legs of those two slipped stitches. Wrap your working yarn around the right needle to knit the two together.
The wrap will fall to the wrong side of your fabric… Nice!
NOTE: For the swatches in this tutorial we used Jade Sapphire’s Zageo 6-Ply Cashmere in Ivory and Purl Soho’s Understory in the color Willow Bark in our video (we no longer offer Understory, but take a look at our other light worsted/dk weight yarns)!


I am knitting a sweater and have come to thr shaping of the neck. Could you please help me with these rows..What do I do?
Row 1: Continuing in established pattern K3 sts, W&T
Row 2: Keeping pattern P36, W&T
Row 3: Keeping pattern, K to wrap, pick up wrap and K with st., W&T
Row 4: Keeping pattern, P to wrap, pick up wrap and P with st, W&T
Every time you do a W&T do you always knit or purl to the end of the row every time?
Hi Linda,
Thanks for reaching out. Since these are all short rows, you will not be knitting or purling to the end of each row! Instead, you will be turning your work and continuing in the opposite direction as you begin the subsequent row. Hope this helps clarify things!
All the best,
Lili
Greetings,
I have questions about the short row shaping/wrap and turn instructions in the Bandana Cowl pattern. First, it says “on the right side”, then goes through the procedure. Then it says “on the wrong side”, and details the procedure for the wrong side. Are you giving examples for 2 different scenarios, and we pick the one that matches whether we’re working on the right or wrong side and then proceed after that? Or are we supposed to do both of these procedures (right side and wrong side) back to back to complete the wrap and turn. I ask this because I’ve tried this over and over and still get stuck at Row 7, because when I do it, following the wrap and turn instructions slowly, word for word – the last part is to bring yarn to front, and turn the work so right side is facing me. After I do that, the yarn is in back. But the next thing is to purl, so I would move the yard in front as usual for purling, which kind of messes with my head because the yard being in back seemed to be what created the wrap.
Forgive me, I’m a newish knitter and still learning. Someone at my dear local yarn shop said this was an easy pattern but I keep getting stuck here. There’s something I’m missing.
Appreciate your advice. The pattern is so cute and I can’t wait to conquer the tricky part!
Cheers,
Dee Vogel
Santa Cruz, CA
Hi Dee,
Thanks for reaching out! Your first interpretation is correct. When you are on a right side row and have reached the point in the pattern that says “wrp-t,” then you will follow only the “on the right side” directions. Then, you can begin the following row, which will be a wrong side row. Once you reach the “wrp-t” on that row, you will follow only the “on the wrong side” directions instead!
At the point you’re getting stuck, you may be working the incorrect version. All odd-numbered rows are right side rows, in this pattern, so you should be working the “on the right side” version, which actually ends with “Turn work so wrong side is facing you.” Once the wrong side is facing you, your yarn will be in front, ready to purl across the next row!
I hope this helps, and please let me know if you have any other questions!
All the best,
Lili
Could you please load this pattern onto YouTube, I cannot understand the short rows maintaining garter stitch, is one flap knitted one at a time?
Hi Sharon,
Thanks for reaching out. It looks like you’ve left a comment on a tutorial of ours, rather than a pattern page. Can you let me know what pattern you’re wondering about? I’d be happy to answer any questions you have about this pattern!
All the best,
Lili
I am having a very hard time with the videos. Would it be possible to turn the videos into WORDS?
Hi MJ,
If you scroll down on this page, you’ll be able to find our photo tutorial about this technique! In that version of the tutorial, we describe each step in words with an accompanying photo.
All the best,
Lili
I am knitting the half and half wrap.
I plan on doing German short rows.
Is there one knit stitch in between each wrap stitch or is it wrap every stitch on the wrong side.
Hope you understand.
Hi Diane,
Thanks for reaching out! In this pattern, each live stitch will be a double stitch (or wrapped, if you’re using wrap + turn short rows). There are no plain stitches between the double/wrapped stitches. Hope this helps!
All the best,
Lili
Hello,
I am knitting Notched-Hem Tank Top and I’ve started the “Shape Back and Body” section. I’m knitting in the round, but I thought I placed the short rows 1-3 correctly,. However, no where in the next Decrease round 1 directions does it say to pick up the wrapped stitch. There are k2tog and ssk but they don’t line up with my wrapped stitches. Am I doing something wrong or should I keep going the the Next Round?
Hi Chris,
Thanks for reaching out! The start rows shape the back, while the decreases shape the body at the sides, so they should not line up. While it’s not noted in the pattern, you should be knitting (or purling) each wrapped stitch with its wrap when you come to it. Hope this helps!
All the best,
Lili
No need to publish this comment
How do I tell if I picked up the wrapped stitches??
I would suggest, since you refer knitters to the tutorial on short rows, so you must expect some beginners, that you put the instruction to “pick up” the wrapped stitch into the decrease row instructions. I thought the ssk and k2tog were the pick-ups! I’m at a loss — I guess I’ll just progress and mark the wraps next time and try my best. I don’t think I can tink the decrease and short rows to go back and start the section over
Hi Chris,
Once you’ve worked a wrapped stitch with its wrap, it should blend in completely with the surrounding stitches, so it’ll be hard to tell that it was there originally! We agree that the pattern should indicate that you should be picking up the wrapped stitches, so we’ll go ahead and edit the pattern to include that instruction. Thanks for bringing that to our attention!
All the best,
Lili
I am knitting Joji Locatelli’s Spector sweater and she lists a link to this page to explain the short rows for back shaping. However, she very explicitly states in her instructions that there is no need to pick up wrapped stitches. Do you have any idea why this is the case?
Hi Esther,
Thanks for reaching out. I’m not familiar with that pattern, but are the short rows worked in a section of garter stitch? If so, then the reason you don’t need to pick up the wraps is because they blend in with the purl bumps of garter stitch!
All the best,
Lili
Hi, there!!
Thank you so much for a great tutorial! I’m still having trouble with one of my current projects that involves doing wrap & turns and short rows on double pointed needles (it advises against using circular needles and doing the magic loop method). I’m using the Frog & Cast pattern for a knit frog and toad!
I’m currently in the chin-shaping section, which directs me (for Short Row 1) to: k10, place 21 previous stitches on waste yarn, removing all markers, k12, wrp-t.
I’m experiencing two problems here:
1) I’m not sure if I should be knitting these short rows across all three needles with the stitches dispersed, or whether I should place them all on the same needle to begin the wrap and turns.
2) I also am not sure what to do when I reach the end of a needle and there aren’t any stitches left to slip or knit from. I hope this isn’t as confusing for you as it is for me, but I apologize if I’m not making much sense! And please let me know if I can clarify an aspect of the pattern for you!
The wrap and turn techniques, as well as picking up wraps, I seem to have down, which is why I can’t figure out where I’m going wrong. Essentially, I would so appreciate any advice for handling short rows on DPNs because the only advice I can find applies to knitting flat or with circular needles. Thanks so much!!
Hi Sabine,
Thanks for reaching out, and I can definitely help answer your questions! Basically, the answer to both of them is: Treat your DPNs as if they were a continuous circular needle. In order to easily knit from DPNs, you can’t have too many stitches on any one needle (they should be as evenly dispersed as possible at all times), so you shouldn’t need to reorganize the stitches at all for this section. And if you reach the end of a needle and still have more stitches to knit, you can go onto the next needle! This is the same whether you are knitting short rows or normal rounds. Overall, DPNs are just a type of tool you can choose to use for circular knitting, and that will not affect the technique of short rows at all!
All the best,
Lili
I’m getting the half-and-half. It says to wrap and turn on the right side. I have that down but not as usual on the wrong side because it’s all garter stitch. Am I using allThe stitches on the needle or just the three at the end always? I’m really confused.
Hi Patti,
Thanks for reaching out! When working in garter stitch, all you need to follow are the instructions for short rows on the right side (of stockinette), with one small modification. I would recommend following the instructions included in the NOTES section of the Half + Half Triangles Wrap, and using the video tutorial just as a reference for the specific motions. Here’s what the note in the pattern says:
Keeping yarn in back, slip next stitch purlwise from left needle to right needle. Bring yarn to front. Return slipped stitch to left needle. Turn work so wrong side is facing you.
The slight difference between the instructions for the right side in the video and these instructions is that you don’t bring the working yarn back to the back before turning your work! This change makes sure that your working yarn is in the correct position to begin knitting on the next row of garter stitch.
In answer to your other question, you will not be wrapping and turning on the same stitch each time. Instead, you’ll actually be wrapping and turning on the stitch directly before it (for Triangle 1) or after it (for Triangle 2)! This ensures that each short row is either shorter (for Triangle 1) or longer (for Triangle 2) than the previous one, which creates the triangular shape of each section.
I hope this helps clarify things, and please let me know if you have any other questions!
All the best,
Lili
I am trying to knit the foxglove vest . The instruction on this vest is doing MY HEAD IN.
I don’t understanding your instruction beyond Row 3 although I have been knitting complicated Aran pattern with cable for more that 40 years.
I understand Row 1 ,Row 2 and Row 3 perfectly well. I struck on Row 4 for the last 4 days.
On Row 4, It says slip 2 times knitwise knit to wrapped stitch, wrapped stitch with its wrap, * k3 (3,4,4,5)*, wrp-t.
So if I follow the instruction on Wrp-t (wrap and turn): up to where it say, “Bring the yarn to the back. Turn the work so the wrong side is facing you.” Can you please me how do I continue to do knit 4 (the bit I insert with * above) when I suppose to turn because once I turn it is a purl row? This bit of the instruction is very poor and unclear!
Hi Rita,
I’m so sorry to hear that Row 4 has been giving you such trouble, and I’m happy to help clarify! It sounds like you might be interpreting the instructions “work wrapped stitch with its wrap” as “wrp-t,” when they are actually different things. Working a wrapped stitch with its wrap is a way to resolve the wrapped stitch you created on a previous short row, which is different from working a wrp-t itself. We demonstrate how to work a wrapped stitch with its wrap around the 2:35 minute mark in our short row tutorial! Once you’ve worked this wrapped stitch with its wrap, you can then knit 4 stitches and work the wrp-t to complete the short row.
I hope this helps clear things up, but please let me know if any other questions come up as you knit!
All the best,
Lili
I am currently trying the baby garter stitch ear flap hat with peaked top. I know garter stitch is knit right and wrong sides, but this pattern calls for circular needles and knitting each row…however, with circular needles, I get a stockinette stitch finish. Shouldn’t I be knitting every other round in a purl stitch to get the garter stitch finish? And how does that affect the w&t stitches? Have a great grandchild due in January and would like the hat done to go with a matching blanket. Thanks for your help!
Hi Bonnie,
Thanks for reaching out! This pattern actually does begin with some stockinette. The first 3 rounds are all knit, which creates a small stockinette border that will curl up when the hat is finished. Then, you’ll work the short rows knitting each row, which begins the garter stitch! After the short rows are complete, you will alternate knit and purl rounds to continue working in garter stitch. Hope this helps clarify things!
All the best,
Lili
Hi,
I am knitting the Garter Ear flap Hat with wrap and turn rows for the ear flap…they look like a little cup when finished and don’t lie flat..have I done something wrong?
Hi Henrietta,
Don’t worry, you’re not doing anything wrong! Short row shaping tends to warp the knit fabric a little bit, since it causes the nearby full rows of knitting to be stretched over a further distance. It can be easily corrected during blocking though!
All the best,
Lili
I am knitting the garter ear flap hat and I understand the right side wrap-t , but I do not understand what to do on wrong side K2, wrp-t. Do I just turn and purl back?
Hi Pat,
Thanks for writing in! Since this pattern is worked in garter stitch, you won’t actually need to purl the stitches while working your short rows but instead you will just knit them. You also will not need to pick up those wrapped stitches as they will disappear into the fabric as a result of the ridges created by the garter stitch. I hope this helps but please let me know if you need any further assistance!
Happy knitting,
Gavriella
Thanks for your help , it did help. Now I have finished the left ear . Do I knit around the front of hat to 7 stitches before right ear marker?
Hi Pat,
Yes! To begin the Right Ear Flap of the Garter Ear Flap Hat, you will knit to 7 (8, 9, 10, 11, 12) stitches before Right Ear Flap marker and then work a wrp-t.
All the best,
Lili
Hi, I’m working on baby sweater. I’m shaping the back and shoulders but I don’t understand the instructions.
[purl to the next marker, sm] 3 times, working the wrapped stitch with its wrap as it comes to it.
Hi Nora,
Happy to help clarify these instructions! The phrase “[purl to the next marker, sm] 3 times” means that you just purl every stitch and slip each stitch marker as you pass it. I don’t know the full context of this pattern, but it sounds as though you only need to do this 3 times because there are 3 stitch markers. It also sounds like there are a few wrapped stitches on this row or round, so you just need to purl the wraps together with the wrapped stitches whenever you reach one. Our video tutorial demonstrates how to do this, but please let me know if you have any other questions!
All the best,
Lili
Hi. Can wrap and turns be done in ribbing. I am working on a bottom-up raglan sweater and would like to use short rows in the 1×1 ribbing to make the back ribbing wider.
Hi Deborah,
Thank you for writing in! You can definitely use wrap and turns in ribbing. Just be sure to knit in pattern (knit the knits and purl the purls) as you create your short rows and you should be good to go.
Happy knitting,
Gavriella