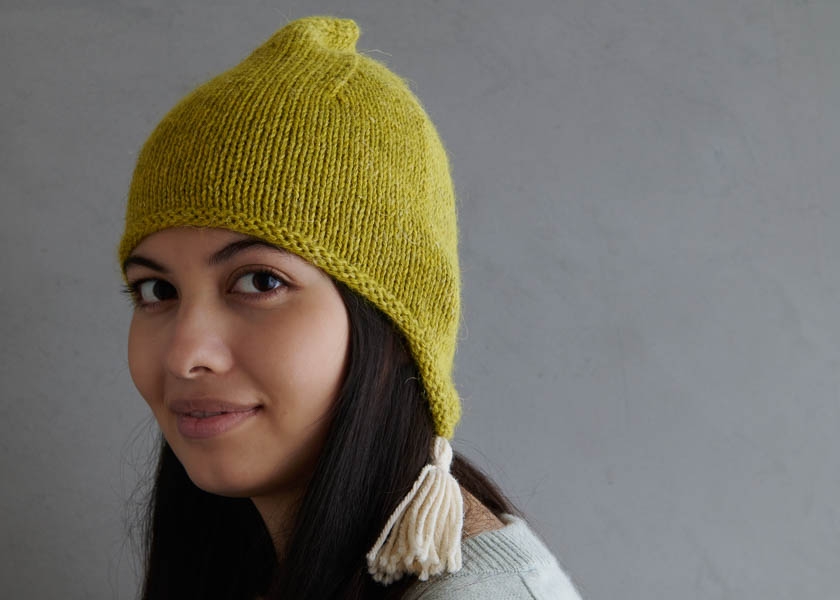
Ear Cozy Hat
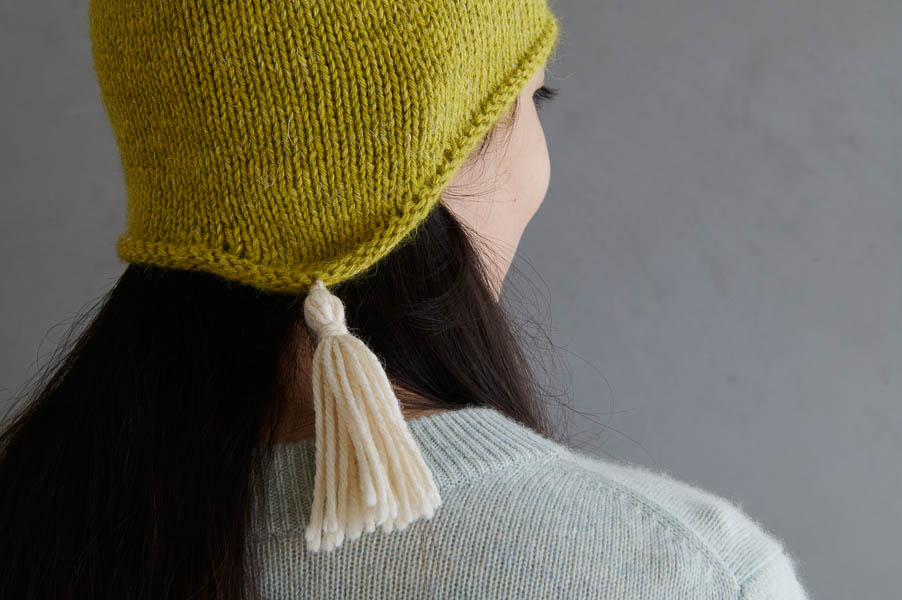
If teapots get cozies, then certainly our ears should, too. Our Ear Cozy Hat protects precious ears from howling winds, while keeping your whole head (and nape!) toasty warm and looking darn cute besides!
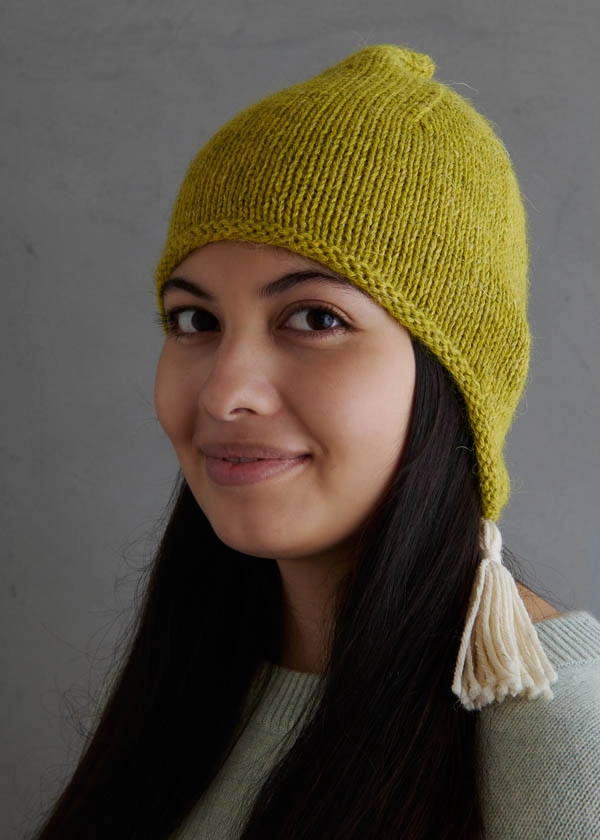
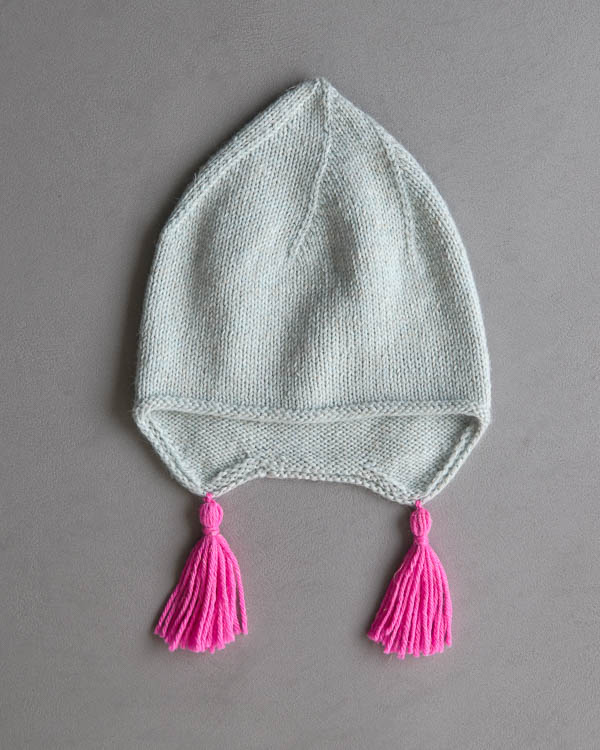
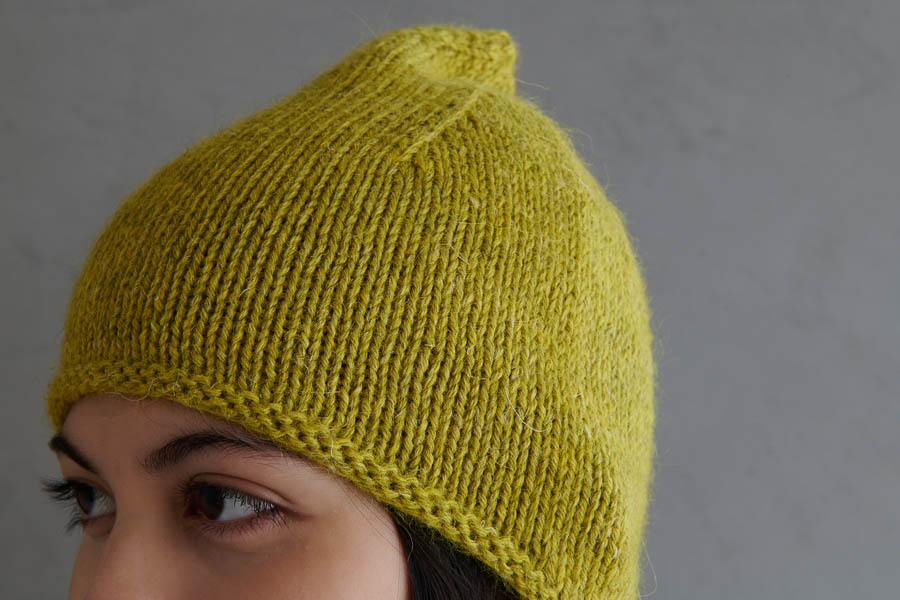
This super fun knit employs short rows to shape a hat that follows the head’s anatomy, beginning with ear flaps, then working the back section so it covers the exact part of the neck that your collar doesn’t. Simple knit 2 togethers form the crown, which departs from your head’s shape and peaks in a gentle and very charming little point.
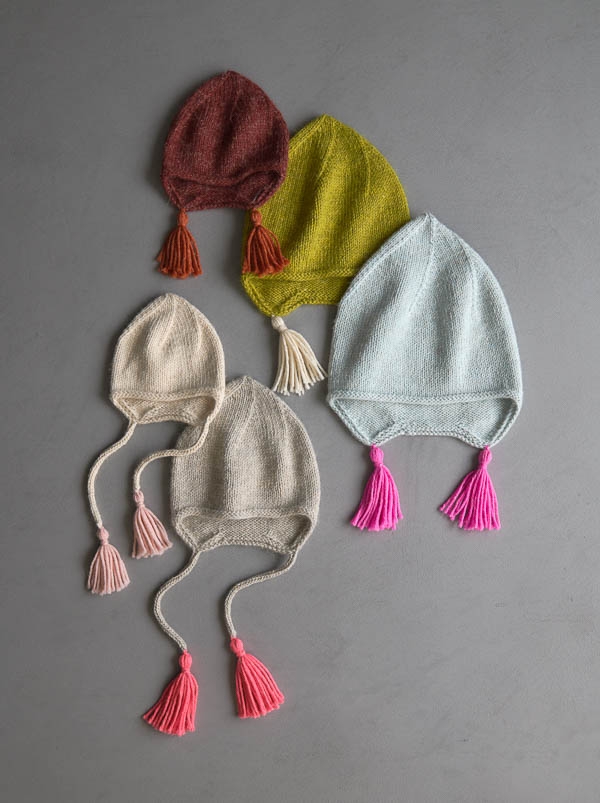
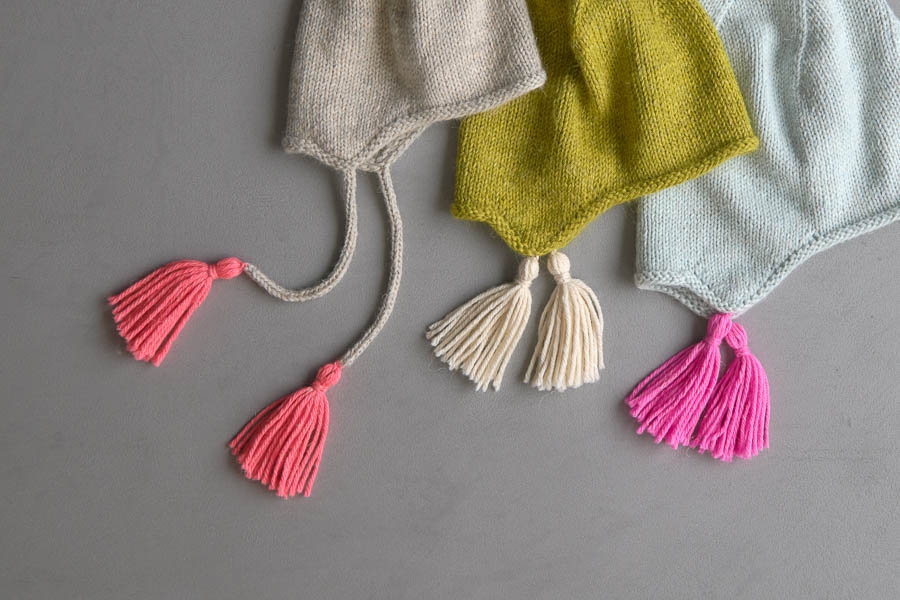
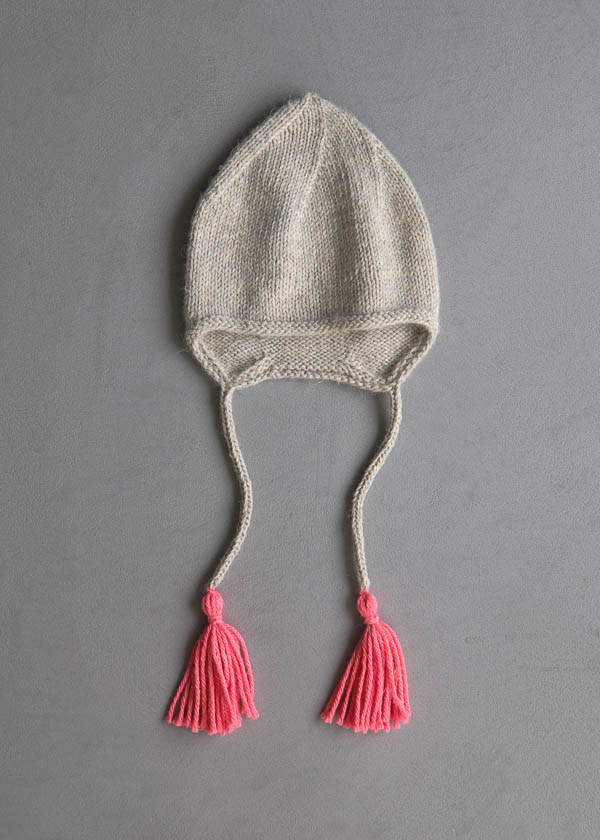
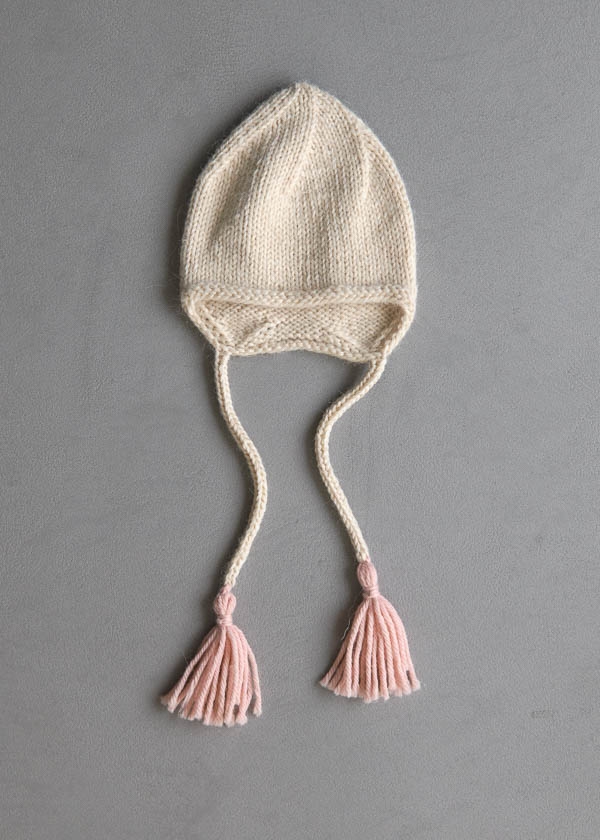
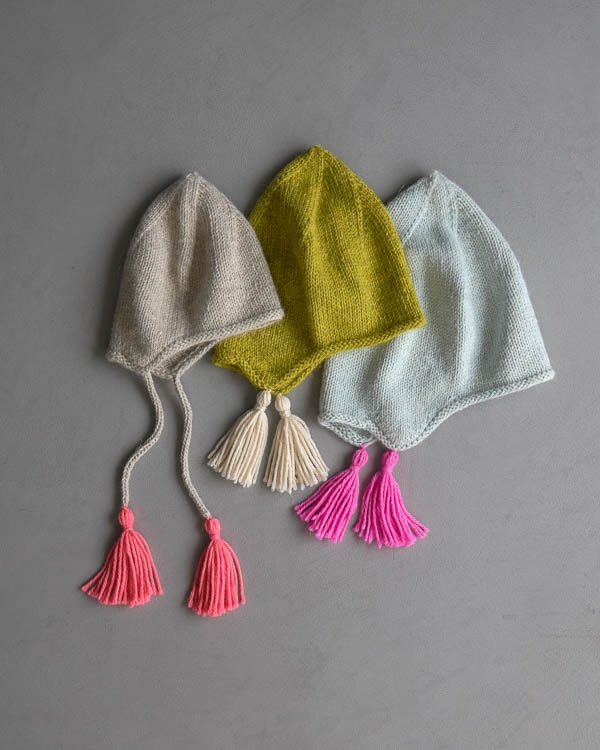
And because “cozy” is not just a feeling but a look, too, we added tassels to our ear flaps, sometimes directly to their cast-on edges and sometimes to the tips of some sweet and dangly I-cords.
Such attention to the details calls for a yarn that understands the brief. We chose our Linen Quill Worsted because its plump and lofty spin maintains heat, while its rustic beauty cuts the cute-factor with something a little more serious, like a slice of lemon in your chamomile tea.
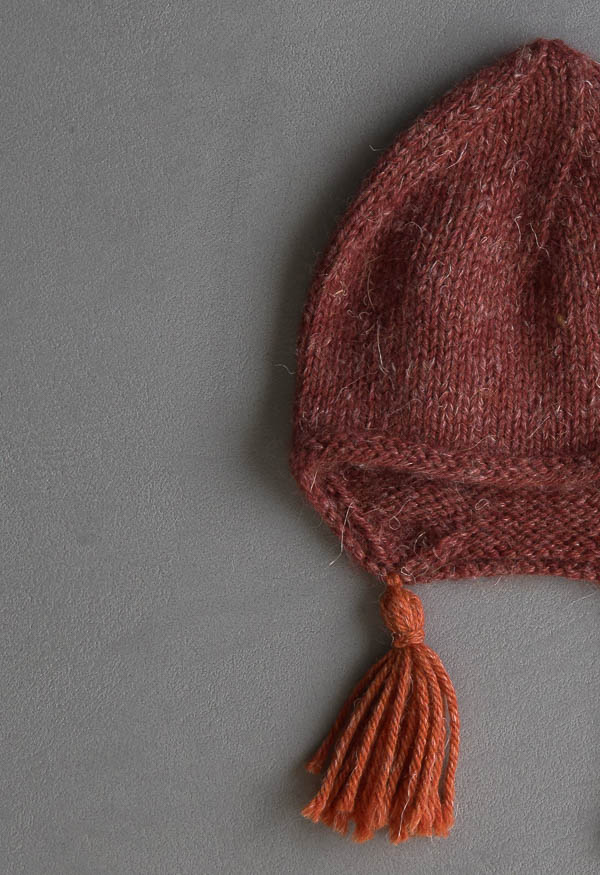
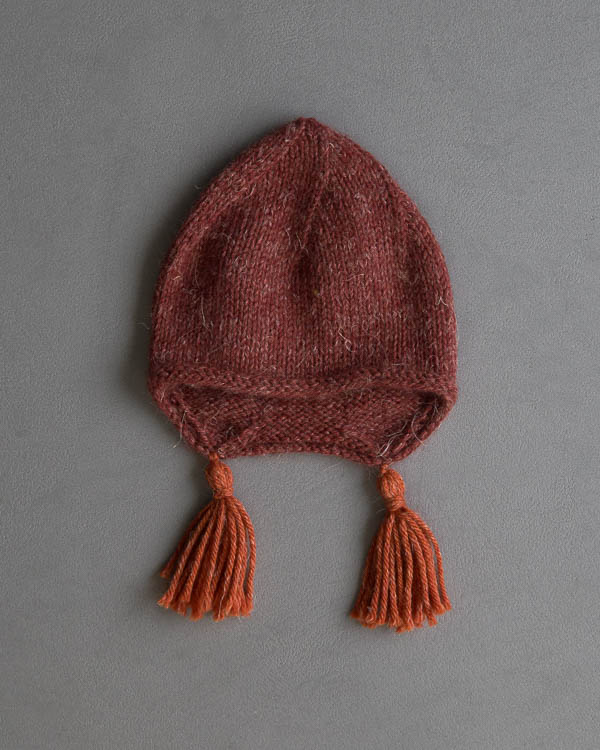
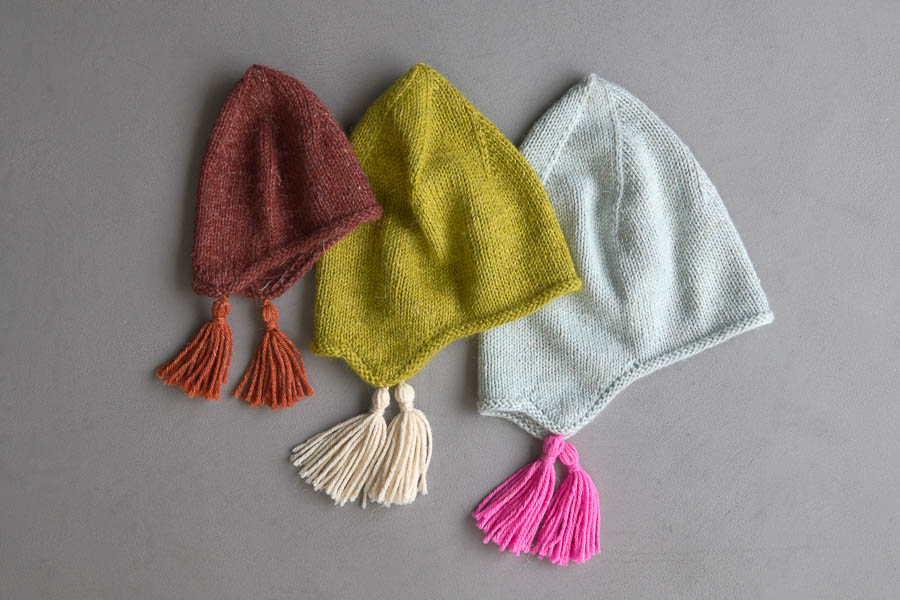
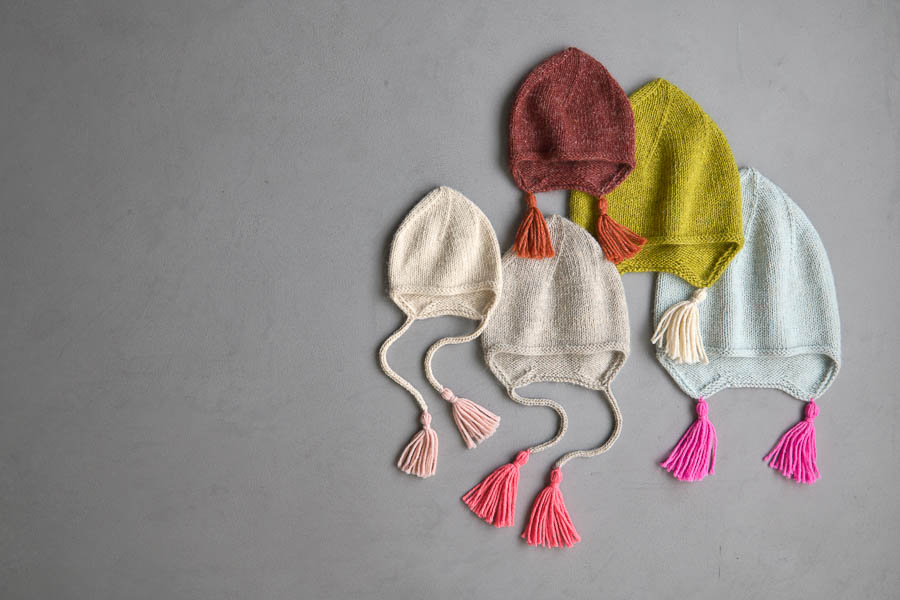
Linen Quill Worsted also inspired us with its six stunning new colors. We used four of them here: Chestnut Red (above), Reed Gray (below, left), Golden Green (below, middle) and Birds Egg Blue (below, right). Plus Baked Earth and Blue Quartz, the Linen Quill Worsted palette is now 27 gorgeous colors strong! Pick your favorites and get cozy!
Designed by Purl Soho designer, Jake Canton. Click here to see even more of Jake’s designs!
Share your progress and connect with the community by tagging your pics with #PurlSoho, #PurlSohoBusyHands, #PurlSohoEarCozyHat and #PurlSohoLinenQuillWorsted. We can’t wait to see what you make!
Materials

- Main Color (Body + I-Cords): 1 skein of Purl Soho’s Linen Quill Worsted, 50% fine highland wool, 35% alpaca, and 15% linen. Each skein is 164 yards/100 grams; approximately 60 (80, 100, 130, 160) yards required. (NOTE: We no longer offer Linen Quill Worsted, but choose from one of our other worsted weight yarns.)
- Contrast Color (Tassels): 1 skein of Linen Quill Worsted; approximately 6 yards required.
- US 7 (4.5 mm), 16-inch circular needles
- A set of US 7 double pointed needles
- Stitch markers, including one unique
- Optional: Purl Soho’s Pom Pom Maker Set, Extra Large + Jumbo for making tassels
For our hats, we used…
- Baby Size
- Main Color: Pale Oats
- Contrast Color: Peony Pink
- Toddler Size
- Main Color: Chestnut Red
- Contrast Color: Kiln Red
- Kid Size
- Main Color: Reed Gray
- Contrast Color: Bright Flamingo
- Adult Small
- Main Color: Golden Green
- Contrast Color: Pale Oats
- Adult Large
- Main Color: Bird’s Egg Blue
- Contrast Color: Pink Pop
Gauge
19 stitches and 28 rounds = 4 inches in stockinette stitch
Sizes
Baby (Toddler, Kid, Adult Small, Adult Large)
Finished Circumference: Approximately 12¾ (14¾, 16¾, 19, 21) inches, comfortably stretching 1–2 inches
Finished Height at Center Back: 6 (7¼, 8½, 9¾, 11¼) inches
Notes
CONSTRUCTION
You will knit this hat in the round from the bottom edge to the crown. The Earflaps are shaped with Short Rows.
SPECIAL INSTRUCTIONS
SHORT ROW SHAPING: Wrap and Turn (wrp-t)
On the right side: Keeping yarn in back, slip next stitch purlwise from left needle to right needle. Bring yarn to front. Return slipped stitch to left needle. Bring yarn to back. Turn work so wrong side is facing you.
On the wrong side: Keeping yarn in front, slip next stitch purlwise from left needle to right needle. Bring yarn to back. Return slipped stitch to left needle. Bring yarn to front. Turn work so right side is facing you.
For a step-by-step video and photo tutorial of how to work this technique, please visit our Short Rows: Wrap + Turn Tutorial tutorial.
PATTERN
BEGIN AT CUFF
With Main Color, cast on 60 (70, 80, 90, 100) stitches. We used a basic Long Tail Cast On.
Place unique marker and join for working in the round, being careful not to twist the stitches.
Rounds 1 + 2: Purl to end of round.
Round 3: Knit to end of round.
WORK EARFLAPS
NOTE: You will shape Earflaps using Short Rows (see Special Instructions). You will work the left Ear Flap first, then the Right Ear Flap, and finish with short rows across the back of the head. Slip Beginning of Round Marker when you come to it during the short rows.
Short Row 1 (right side): K9 (10, 12, 13, 14), wrp-t.
Short Row 2 (wrong side): P3, wrp-t.
Short Row 3: Knit to wrapped stitch, knit wrapped stitch with its wrap, wrp-t.
Short Row 4: Purl to wrapped stitch, purl wrapped stitch with its wrap, wrp-t.
BABY + TODDLER SIZE ONLY
Short Rows 5–7: Repeat Short Rows 3 and 4 one (1, –, –, –) more time, then repeat Short Row 3 one more time.
Short Row 8 (wrong side): Purl to wrapped stitch, purl wrapped stitch with its wrap, p12 (14, –, –, –), wrp-t.
Short Row 9 (right side): K3 (3, –, –, –), wrp-t.
Short Row 10: Purl to wrapped stitch, purl wrapped stitch with its wrap, wrp-t.
Short Row 11: Knit to wrapped stitch, knit wrapped stitch with its wrap, wrp-t.
Short Rows 12-14: Repeat Short Rows 10 and 11 one (1, –, –, –) more time, then repeat Short Row 10 one more time.
Short Row 15: [Knit to wrapped stitch, knit wrapped stitch with its wrap] 2 times, wrp-t.
Short Row 16: Purl to wrapped stitch, purl wrapped stitch with its wrap, wrp-t
Short Row 17: Knit to wrapped stitch, knit wrapped stitch with its wrap, wrp-t.
Repeat Short Rows 16 and 17 one (1, –, –, –) more time, then repeat Short Row 16 one more time.
KID SIZE ONLY
Short Rows 5–9: Repeat Short Rows 3 and 4 two more times, then repeat Short Row 3 one more time.
Short Row 10 (wrong side): Purl to wrapped stitch, purl wrapped stitch with its wrap, p17, wrp-t.
Short Row 11 (right side): K3, wrp-t.
Short Row 12: Purl to wrapped stitch, purl wrapped stitch with its wrap, wrp-t.
Short Row 13: Knit to wrapped stitch, knit wrapped stitch with its wrap, wrp-t.
Short Rows 14–18: Repeat Short Rows 12 and 13 two more times, then repeat Short Row 12 one more time.
Short Row 19: [Knit to wrapped stitch, knit wrapped stitch with its wrap] 2 times, wrp-t.
Short Row 20: Purl to wrapped stitch, purl wrapped stitch with its wrap, wrp-t
Short Row 21: Knit to wrapped stitch, knit wrapped stitch with its wrap, wrp-t.
Repeat Short Rows 20 and 21 two more times, then repeat Short Row 20 one more time.
ADULT SMALL + ADULT LARGE SIZES ONLY
Short Rows 5–11: Repeat Short Rows 3 and 4 – (–, –, 3, 3) more times, then repeat Short Row 3 one more time.
Short Row 12 (wrong side): Purl to wrapped stitch, purl wrapped stitch with its wrap, p – (–, –, 18, 20), wrp-t.
Short Row 13 (right side): K– (–, –, 3, 3), wrp-t.
Short Row 14: Purl to wrapped stitch, purl wrapped stitch with its wrap, wrp-t.
Short Row 15: Knit to wrapped stitch, knit wrapped stitch with its wrap, wrp-t.
Short Rows 16–22: Repeat Short Rows 14 and 15 – (–, –, 3, 3) more times, then repeat Short Row 14 one more time.
Short Row 23: [Knit to wrapped stitch, knit wrapped stitch with its wrap] 2 times, wrp-t.
Short Row 24: Purl to wrapped stitch, purl wrapped stitch with its wrap, wrp-t
Short Row 25: Knit to wrapped stitch, knit wrapped stitch with its wrap, wrp-t.
Repeat Short Rows 24 and 25 – (–, –, 3, 3) more times, then repeat Short Row 24 one more time.
ALL SIZES
Next Row (partial row): Knit to end of row.
BODY
Knit every round, knitting remaining wrapped stitches with their wraps, until piece measures 4 (4¾, 5¼, 6, 7) inches from cast-on edge at center back (i.e. the end of round).
CROWN
Set-Up Round: *K12 (14, 16, 18, 20), pm, repeat from * to end of round.
Round 1: *Knit to 2 stitches before next marker, knit 2 together (k2tog), slip marker, repeat from * to end of round. [5 stitches decreased]
Round 2: Knit to end of round.
Repeat Rounds 1 and 2 nine (11, 13, 15, 17) more times, changing to double pointed needles when necessary. [10 stitches remain]
Next Round: *K2tog, repeat from * to end of round. [5 stitches remain]
Cut yarn and thread tail onto a tapestry needle. Thread tail through remaining stitches, pull taut and bring tail to inside of hat.
Weave in ends and gently wet block.
FINISHING
OPTIONAL I-CORD
With right side facing you and using Main Color and a double pointed needle, pick up and knit 3 stitches from the lowest point of an Ear Flap’s cast-on edge. Knit an I-cord for 6 (6, 7, 7, 8) inches. On the final row (slip 1, k2tog, pass slipped stitch over) to bind off.
Repeat for other Ear Flap.
TASSELS
MAKE TASSELS
Using the Contrast Color and following our Tassel Tutorial, make a 3 (3, 4, 4, 4)-inch long tassel.
For Baby- and Toddler-sized tassels, use the legs of our Extra Large Pom Pom Maker (or a piece of cardboard that measures 3½ inches along one side) and wrap the yarn 10 times.
For Kid-, Adult Small- and Adult Large-sized tassels, use the legs of our Jumbo Pom Pom Maker (or a piece of cardboard that measures 4¼ inches along one side) and wrap the yarn 14 times.
ATTACH TASSELS
With the right side facing you, use the tassels’ tails to attach a tassel to the lowest point of each Ear Flap’s cast-on edge or to the end of the I-cord.
Weave in the remaining ends.


Love this pattern! Can I substitute German Short Rows for the wrap n turns?
Hi Phyllis,
Thanks for writing in, and thank you for your kind words! While German short rows would work in this pattern, you would have to do a lot of reworking of the stitch counts in the short row sections, since the wrap of wrap + turn short rows falls in a different place than the double stitch of German short rows. If you feel up for this, I say go for it!
All the best,
Lili
Hi! I did German short rows and it worked out OK.
Cheers!
Cynthia
Hi! Doing a mock up of the kid hat and wondering if measuring from cast-on edge is from the ears or from the body of the hat. Awaiting your reply!
Cheers from Philly,
Cynthis
PS Measure from Center Back?
Hi Cynthia,
Thanks for reaching out and sorry for the confusion! You will measure from the cast on at center back i.e. where the end of the round marker is, we have updated the pattern to clear this up!
Happy knitting!
Gianna
Thank you! Hat is adorable.
Cynthia
So any reason why you specify dp needles vs a 16” circular?
Hi Ann Marie,
Thanks for writing in! For this pattern, if you are making the Baby or Toddler size you will only need the dpns, if you are making any of the other sizes you will need both the 16″ circular needles and the dpns! For those sizes, you will cast on to the 16″ circular needles and then switch to the dpns when you come to the CROWN section of the pattern.
I hope this clears things up!
Gianna
Hello! Could you substitute nine-inch short circulars for the dpns for finishing the crown?
Hi Julia,
Thanks for writing in. While you could use 9 inch circulars for the first portion of the crown of the hat, once you get down to the final few stitches, you would still need to switch to DPNs. For reference, the final two rounds of the crown only have 10 and then 5 stitches in them, which can only be worked on DPNs (or magic loop, if you have very long circulars!). I hope this helps clarify things!
All the best,
Lili
For the kid size: Short Row 19: [Knit to wrapped stitch, knit wrapped stitch with its wrap] 2 times, wrp-t.
I’ve read this many times and am a little confused. Does this mean follow the bracket instructions twice? And if so, you need a wrp-t at the end of each knit row?
Of course, I figured it out right after posting! 😛
Hi Kim,
Thanks for reaching out!
Exactly, for “Short Row 19: [Knit to wrapped stitch, knit wrapped stitch with its wrap] 2 times, wrp-t,” you would do the bracketed instructions twice and then just wrp-t once after you’ve finished that! So yes, there’s a wrp-t at the end of each row in the Short Rows Section. When you finish that and get to the Body Section of the hat, you would just knit in the round, knitting each wrapped stitch with its wrap!
I hope this was helpful! Have a great day!
All the best,
Cat
I am also confused about this. If I do this, won’t it take me around the entire circumference of the hat? since I’m not turning or purling…??? Also, I’ve followed the instructions to to a” T” up until Short Row 19 and the Left earflap looks significantly larger/deeper than the right. Please help!
Hi Vanessa,
Thanks for reaching out! That is correct, you will [Knit to wrapped stitch, knit wrapped stitch with its wrap] 2 times (meaning repeat what’s in brackets 2 times), working with wrapped stitches, then you will wrp-t (turning the work).
As for the difference in the ear flaps, please feel free to send our customer service team at customerservice@purlsoho.com the information above along with a clear photo of your work and they can troubleshoot what may be happening from there!
I hope this helps!
Gianna
After completing short row section, the next step is the Body. As I start to knit the Body, the back of the hat is already longer than the front, by virtue of the short row section.
Is the length of the Body measured from cast on edge at the front of the hat or cast on edge of the back of the hat?
Thank you.
EDIT: I should have mentioned that I believe the measurement should be made at the back of the hat because that is where the round begins and ends. I just want to make certain I am correct in my interpretation of the pattern.
Hi Donna,
Thanks for reaching out! Yes, you are correct! You will measure from the cast on at center back i.e. where the end of the round marker is, we have now updated the pattern to reflect this!
Happy knitting!
Gianna
Hi! When you are measuring from the cast on edge for the body do you use the front or the back since the back is longer? I’m making the kid version and I need the body to be 5 1/4” from the cast on edge.
Thanks for your help!
Hi Patty,
Thanks for reaching out and sorry for any confusion! You will measure from the cast on at center back i.e. where the end of the round marker is, we have now updated the pattern with this information!
Warmly,
Gianna
I am knitting this cute and adorable hat and I have a question. What do you mean by these instructions:
BODY
Knit every round, knitting remaining wrapped stitches with their wraps, until piece measures 4 (4¾, 5¼, 6, 7) inches from cast-on edge to end of round.
Do I measure at the front of the hat or the back of the hat? Because at the back it is substantially longer from the cast on edge to the current round because of the short row shaping.
Hi Teresa,
Thanks for writing in! You will measure from the cast on at center back i.e. where the end of the round marker is. We have now corrected the pattern to reflect this change!
All the best,
Gianna
Thank you!!! I love this pattern and you.❤️
Hi, I think I may have chosen a project beyond my experience. I am attempting to make the adult small size. Can you tell me if I am to do the entire hat on same 16″ circular needle and then switch to dpn on crown?
Hi Gail,
Thanks for reaching out. Yes, you can absolutely knit the entire body of the hat on the 16″ circular needles and only switch to DPNs for the crown!
All the best,
Lili
Also, I have not found a tutorial on short rows and wrap and turn using a circular needle. Is it possible to wrap and turn with a circular needle?
Thanks so much.
Hi Gail,
Thanks for writing in about this as well! Wrap + turn short rows are actually done in the same exact way on straight or circular needles. But instead of turning your work to the back or front, you can think of it as turning your work to the inside or outside! I see from your other comment that you found a good tutorial already, but hopefully my answer can provide help to others with the same question!
All the best,
Lili
Oh gosh so sorry. Right after I posted this I actually found a tutorial showing wrap and turns with a circular needle.
I have started this project twice now and I always wind up with one ear flap about twice the size of the other. Any advice for where I may be going wrong?
Hi Courtney,
Thanks for reaching out! Please send the information above and a clear photo of your work to our customer service team at customerservice@purlsoho.com and they can help troubleshoot further from there!
Warmly,
Gianna
After completing the left ear flap where do you begin the right? How many stitches should be on the needle after completing the left ear flap?
Thank you,
Linda
Hi Linda,
Thanks for writing in. The WORK EAR FLAPS section is a combination of the shaping for both ear flaps as well as the back of the hat! If you’re making the adult sizes of the hat, then you’ll start working the right ear flap on Short Row 12, and then you’ll start working the shaping for the back of the hat at Short Row 23. As long as you follow the stitch counts for whichever size you’re knitting, you’ll end up in the correct spot to start the right ear flap!
In answer to your second question, because you’re working in short rows, you will actually have the same number of stitches on your needles at all times. I hope this explanation helps!
All the best,
Lili
Hello! Thanks for sharing this project, but i don’t understand what to do here: Adult small size: “Short Row 23: [Knit to wrapped stitch, knit wrapped stitch with its wrap] 2 times, wrp-t.” I’m working on a circular needle and at this point i have 5 stitches at the both sides of the marker before both ear flaps… Does it mean i have to go across to the left hear flap as well? Thank you very, very much!
Hi Sandra,
Thanks for reaching out. At Short Row 23, you’ll be starting to work the short row shaping for the back of the hat! So yes, you will be working across both of the ear flaps as well as the back. Hope this helps clarify things!
All the best,
Lili
Hello,
I am still unclear about the instructions listed above: Adult small size: “Short Row 23: [Knit to wrapped stitch, knit wrapped stitch with its wrap] 2 times, wrp-t.” Does this indicate that I am just going along the knit row and I will incorporate two different wraps with in a knit stitch. So instead of turning at the wrp-t, I continue on until I hit another, work that wrapped stitch, the wrp-t again?
Thank you for further clarification!
Hi Kristen,
You have exactly the right idea! Since this short row travels all the way across the back of the hat, you’ll need to pick up the left-over wraps from both the right and the left ear flaps. Hope this helps clarify things! You’re already on the right track.
All the best,
Lili
I have an extra skein of linen quill so thought I’d make this hat for myself. I’m not sure which size to make. Measuring just above my ears, my head is about 21″ around. Do I make the 19″ one? I’m a pretty small person so it seems illogical for me to make the biggest one. Thanks.
Hi Rona,
Thanks for reaching out! Since this hat will comfortably stretch 1–2 inches the Adult Small should be a perfect fit for you! My head also measures about 21″ in circumference and when I knit our hat patterns for myself, I always make the Adult Small size!
I hope this helps, happy knitting!
Gianna
Is there a video for setting up the crown and switching to the DPN’s?
Hi Trish,
Thanks for writing in. I’m sorry to say that we don’t have a tutorial on that at the moment! We’ll keep that in mind as an idea for the future though, and in the meantime, I wanted to suggest our Double Pointed Needles tutorial as a useful resource, in case that helps at all!
All the best,
Lili
I feel like the dumbest “knitter” since I’m pretty sure this is so straight forward!
But on the first working the ear flap, I did k9 wpt then p3 wpt. Now it says knit to wrapped stitch.
This is my first time doing wrap and turn so I can’t quite “see” the wrap yet.
Do I knit 3 stitches?
And then do I park back 3 to the other wrap stitch?
Thanks!
Hi Kimberly,
Thanks for reaching out. There’s no such thing as a dumb knitting question, and I’d be happy to help you out with this section of the pattern!
We actually have a tutorial for learning how to knit your wraps with their stitches at the bottom of our Short Row tutorial! The wraps should look like a horizontal float that’s wrapped around the stitch, and you can knit this with its stitch by inserting the tip of your needle under the wrap, as well as through the stitch itself, then knit them together into one stitch.
In the pattern, for row 3 of the earflaps, you will be knitting 3 stitches back across the short row, and on the 4th stitch, you knit the wrap with its stitch.
I hope this helps, and please let me know if you have any other questions!
All the best,
Carly
Hi, I am just finished round 3 but I am not understanding where round 4 is? I am a bit confused about the short rows. I understand how to do them, it’s just the instructions I am not understanding. I am making the adult large.
So after round 3 i go straight to short row 1,2,3,4 but what does short rows 5-11 mean? Does it mean after round 3 I do short row 1,2,3,4, then do short rows 3, 4 three times? I am confused how it relates to short rows 5-11.
Hi Hannah,
Thanks for reaching out! I’d be happy to help explain the short rows in this pattern. For Short Rows 5 – 11, you will be repeating Short Rows 3 and 4 three more times, and then Short Row 3 once more. Written out fully, that would look like this:
Short Row 1 (right side): K9 (10, 12, 13, 14), wrp-t.
Short Row 2 (wrong side): P3, wrp-t.
Short Row 3: Knit to wrapped stitch, knit wrapped stitch with its wrap, wrp-t.
Short Row 4: Purl to wrapped stitch, purl wrapped stitch with its wrap, wrp-t.
Short Row 5: Repeat Short Row 3
Short Row 6: Repeat Short Row 4
Short Row 7: Repeat Short Row 3
Short Row 8: Repeat Short Row 4
Short Row 9: Repeat Short Row 3
Short Row 10: Repeat Short Row 4
Short Row 11: Repeat Short Row 3
Then you can move onto the subsequent short rows! I hope this helps clarify things.
All the best,
Lili
I was also completely confused about this but your explanation was so clear. Thanks, Lili!!
I love this hat but I cannot wear wool or other animal fibers. Which other of your yarns would you recommend for this pattern?
Hi Bethany!
Thank you for writing in. In place of Linen Quill Worsted for this hat, I suggest using Tulip Cotton for a non-animal fiber hat! Tulip Cotton is spun from 100% organically grown Turkish cotton, and is also a worsted weight yarn like Linen Quill Worsted, making it easy to achieve gauge for this project. You can find Tulip Cotton right here!
All the best,
Margaret
I enjoyed knitting this hat (with malabrigo worsted), but found that the ear flaps were at the back of my head when finished. Followed the pattern exactly. I made the adult large size. I measured my head first, 22 inches. Also, the finished hat is way more pointy than the pictures on the model appear… like an extreme point. This really bothers me. Is there a way to fix this? Should I rip it out and remake it as adult small or kid?
Hi Alison,
Thanks for reaching out, although I’m sorry that your hat didn’t turn out exactly as expected! You’re right, the bottom points of the ear flaps actually end up closer to the back of your head than directly over your ears in this design. It’s a bit hard to tell in the photos of the model though, since their hair is obscuring things.
But you can absolutely change this placement if you choose to knit this pattern again! To do so, just knit more stitches on Short Row 1 to set up the location of the left ear flap, and then mirror this distance on Short Row 12, when you set up the location of the right ear flap.
In answer to your question about the point at the top of the hat, there’s also a simple way to adjust this so it’s less pointy! When you’re working the decrease rounds in the CROWN, instead of repeating Row 2 in between each Row 1, you can repeat only Round 1. This will make the slope of the crown more pronounced!
All the best,
Lili
Thank you for these awesome tips!! I appreciate it!
Hello – Do you have a washer friendly yarn that can be sub. for this pattern? I will be making the adult small and adult large. Thank you!
Hi Katrina,
Thanks for your comment! I’d suggest For Better or Worsted (https://www.purlsoho.com/for-better-or-worsted.html), which is machine washable. And since you’re substituting yarns, I’d also recommend doing a gauge swatch to make sure you’re matching the gauge in the pattern. Let us know if we can help with anything else!
All the best,
Cat
Hi There – Do you think the worsted twist would work well with this?
Thanks!
Hi Claire,
Thanks for writing in! Worsted Twist would be perfect for this pattern, since it’s the same weight as Linen Quill Worsted.
As always though, we recommend knitting a gauge swatch before casting on your project, especially when you are substituting yarns. You may need to size up or down your needles in order to get the correct gauge! If you would like to learn more about this, we have a handy tutorial called All About Gauge.
All the best,
Lili
Thank you!
Hello, I have a yarn substitute question, would your Cashmere Merino Bloom work well for this hat, assuming I get the gauge correct?
Thanks!
Hi Annette,
Thanks for reaching out! I think that you could make Cashmere Merino Bloom work for this pattern, but the knit fabric may be on the looser side, since Cashmere Merino Bloom is thinner than the yarn we used in the design. You may need to go up a needle size to get the gauge as well!
All the best,
Lili
I want to make this hat as luxurious and soft as possible. Which Purl Soho brand would fit the bill?
Hi Jessica,
I would recommend using either Cashmere Merino Bloom or Knitting Yarn for this hat! Both of these yarns contain merino wool, which is the softest type of wool, and Cashmere Merino Bloom also contains cashmere which is similarly soft! These yarns are both DK weight, so I’d take extra care to make sure your gauge is accurate. You should definitely be able to match the gauge (especially after blocking), but you may need to go up a needle size!
All the best,
Lili
Oh dear, I tried to knit this but I’ve sort of created two little cuplets at the bottom, more like a little bra for a doll!
I think I’m nearly there, but not quite.
I’m going to try again on a smaller swatch and practice the wrp-t again.
Hi Charlie,
We saw both your comment and email and replied to your email! Have you received that yet in your inbox (or spam folder)?
All the best,
Lili