
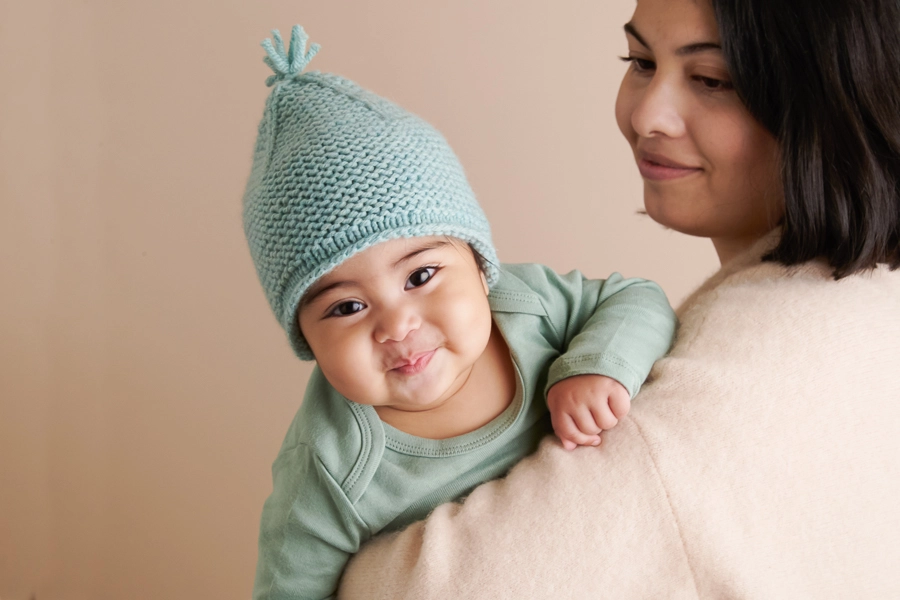

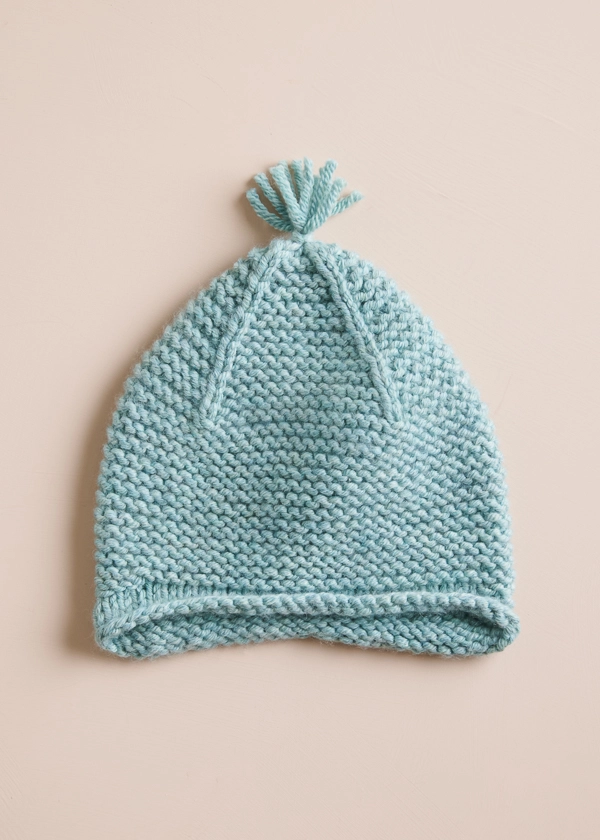


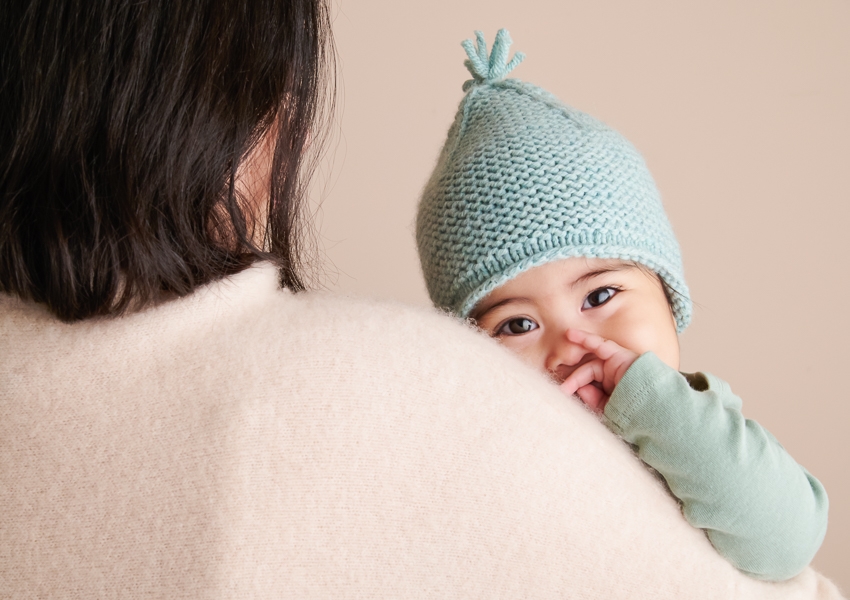
Garter Ear Flap Hat in Plenty
So often, when it comes to winter hats, our poor ears get left out in the cold. In toasty, soft Plenty, our Garter Ear Flap Hat makes sure those little listeners get the love they deserve!

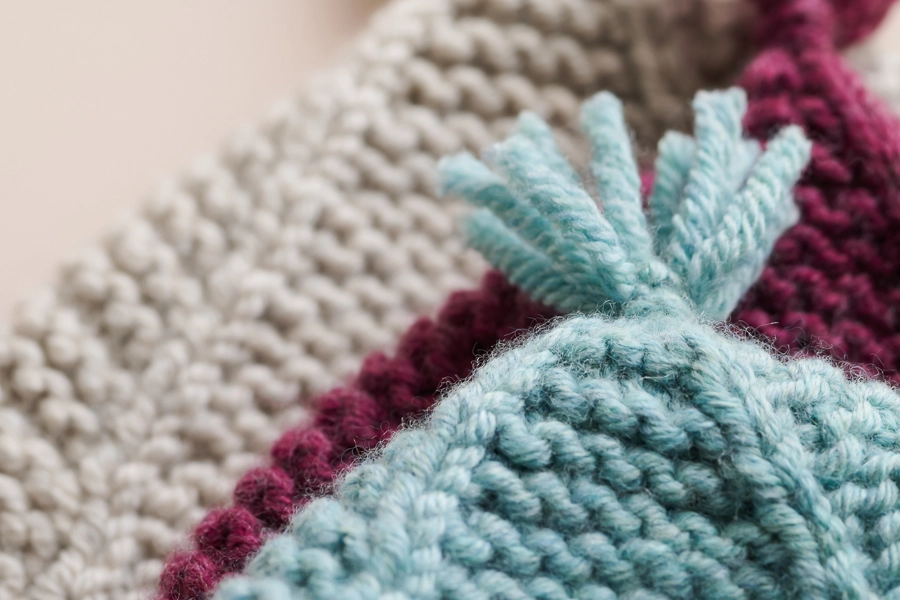
After you cast on and join in the round, you work some simple short rows to shape the ear flaps. Since it’s garter stitch, you can skip the step of picking up the wraps and get right to the fun of decreasing to a gentle peak.

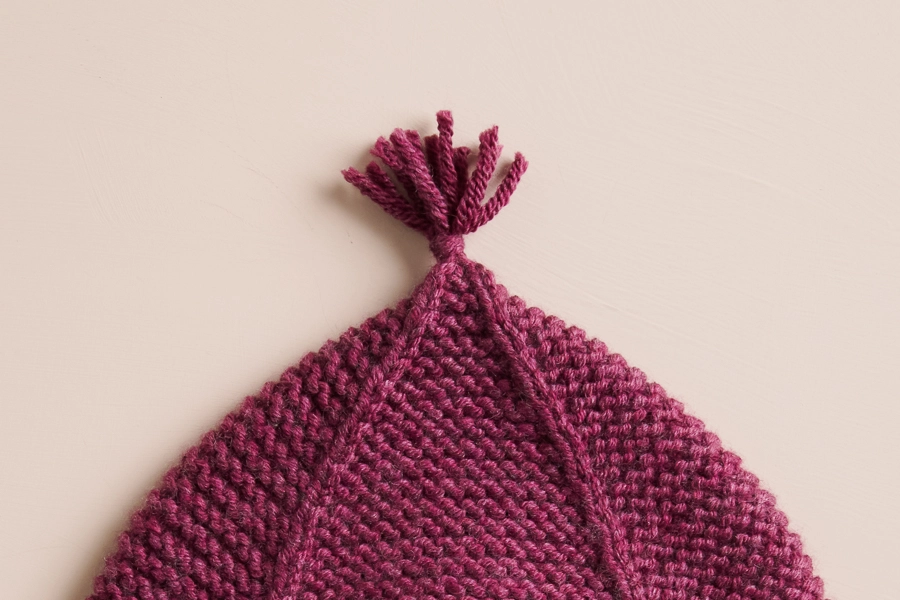
At the summit, top it all off with a winsome little tassel!

The plush depth of garter stitch always adds a little warmth to a fabric, but in our soft and springy Plenty, your ears will be downright toasty!

This 100% extra fine merino is as un-scratchy as wool gets, and it has a tidy, high twist that wards off pills… extra important for a hat that’s going to get as much use as this one!

With over twenty colors of Plenty to choose from, surely there’s one to make you grin from ear to ear!

Originally designed by Purl Soho designer, Laura Ferguson.
Share your progress and connect with the community by tagging your pics with #PurlSoho, #PurlSohoBusyHands, #PurlSohoGarterEarFlapHat, and #PurlSohoPlenty. We can’t wait to see what you make!
Materials
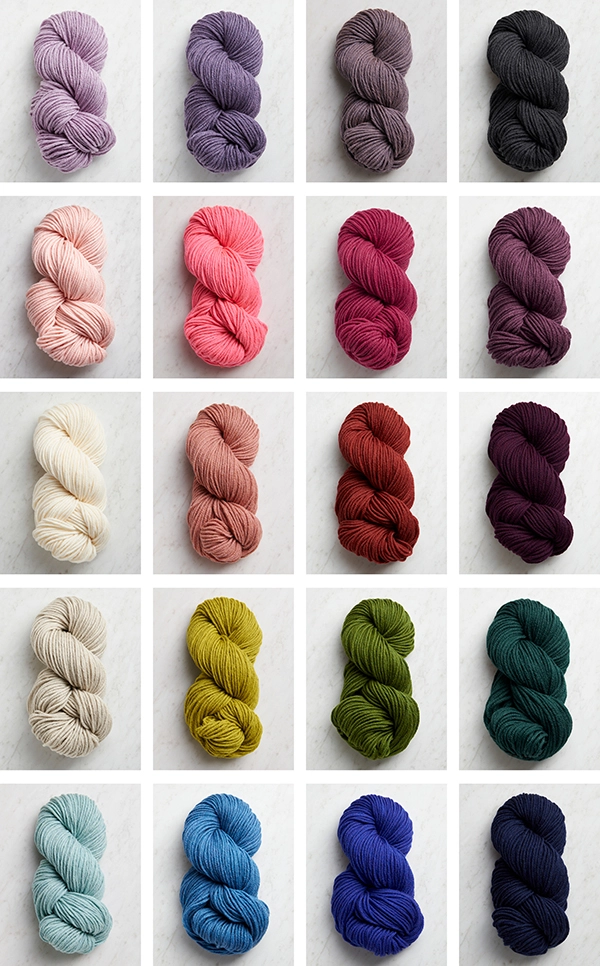
- 1 (1, 1, 2, 2, 3) skein(s) of Purl Soho’s Plenty, 100% extra fine merino. Each skein is 139 yards/ 100 grams; approximately 80 (100, 135, 165, 215, 260) total yards required. We used Mint Blue, Reed Gray, and Fresh Fig.
- US 8 (5 mm), 12-inch (for Baby size) or 16-inch circular needles
- US 7 (4.5 mm), 12-inch (for Baby size) or 16-inch circular needles
- A set of US 7 double pointed needles
- Removable stitch markers, including one unique
GAUGE
17 stitches and 32 rows/rounds = 4 inches in garter stitch with smaller needles
SIZES
Baby (Toddler, Kid, Adult Small, Adult Medium, Adult Large)
- Finished Circumference: 14 (16, 17¾, 19¾, 21¾, 23½) inches, comfortably stretching 1–2 inches
- Finished Height: 7¼ (8, 9, 10, 11½, 12¾) inches, from bottom of ear flap to top of hat (not including tassel)
SAMPLES: The Mint Blue hat is the Baby size; the Reed Gray hat is the Kid size; and the Fresh Fig hat is the Adult Medium size.
NOTES
CONSTRUCTION
You will start this Hat at the bottom rolled edge, working a few rounds of stockinette stitch, which, in the round, means knitting every stitch. Next, you will work the Ear Flaps in garter stitch, first the Left one, then the Right (pay close attention to the stitch marker instructions here!). You will work in short rows to shape each one, turning the work partway through each round. Because you’re not working in the round for these sections, you will work garter stitch by knitting every stitch. Next, you will work the Body of the Hat, again, in the round, and now, because you’re working in the round, to continue in garter stitch, you’ll alternate knitting 1 round with purling 1 round. Finally, you will work some decreases on your knit rounds in order to shape the Crown. A little Tassel finished things off!
SPECIAL INSTRUCTIONS
SHORT ROWS: WRP-T (WRAP AND TURN)
NOTE: For our complete Short Rows tutorial, please click here. Because this pattern is in garter stitch, you’ll only follow the “Wrap And Turn On The Knit Side” section of the tutorial. For the same reason, you won’t need to later pick up the wraps. Simply ignore them when you come to them and work the wrapped stitch normally.
On both sides: Keeping the yarn in back, slip the next stitch purlwise from the left needle to the right needle. Bring the yarn forward as if to purl. Return the stitch from the right needle back to the left needle. Turn the work.
S2KP (SLIP SLIP KNIT PASS)
NOTE: For more help with this decrease, check out our Slip Slip Knit Pass tutorial.
Slip two stitches together knitwise, knit 1, pass slipped stitches over knit stitch and off needle. [2 stitches decreased]
PATTERN
UPDATE November 2023: A previous version of this pattern used multiple stitch markers to work the short rows for the ear flaps, but some customers found this more complicated than necessary. We heard you and have made a few improvements to the Ear Flap instructions for clarity. If you would like to use the previous version, please click here and scroll down to find the original pattern.
BEGIN
With larger needles, cast on 60 (68, 76, 84, 92, 100) stitches. We used a basic Long Tail Cast On.
Place unique marker and join for working in the round, being careful not to twist the stitches.
Knit 2 rounds even.
Change to smaller needles.
Next Round: K3 (4, 4, 4, 5, 6), place marker (pm) for Left Ear Flap, k54 (60, 68, 76, 82, 88) for Front, pm for Right Ear Flap, k3 (4, 4, 4, 5, 6).
SHAPE LEFT EAR FLAP
NOTE: For this portion of the pattern, you will be working in Short Rows, back and forth, turning the work part way through each round, rather than continuing to the end of the needle. See Special Instructions for more help with Wrap + Turns.
Short Row 1 (right side): Knit to first (Left Ear Flap) marker, slip marker (sm), k9 (10, 11, 13, 14, 15), wrp-t.
Short Row 2 (wrong side): K2, wrp-t.
Short Row 3: Knit to wrapped stitch, knit wrapped stitch (no need to knit wrap, see Special Instructions), wrp-t.
Repeat Short Row 3 eleven (13, 15, 17, 19, 21) more times, until you have wrapped the stitch next to the Left Ear Flap marker, ending with a wrong-side row. [7 (8, 9, 10, 11, 12) garter ridges total]
SHAPE RIGHT EAR FLAP
NOTE: For this portion of the pattern, you will again be working in Short Rows.
Short Row 1 (right side): Knit to 7 (8, 9, 10, 11, 12) stitches before Right Ear Flap marker, wrp-t.
Short Row 2 (wrong side): K2, wrp-t.
Short Row 3: Knit to wrapped stitch, knit wrapped stitch (again, no need to knit the wrap), wrp-t.
Repeat Short Row 3 ten (12, 14, 16, 18, 20) more times, until you have wrapped the stitch next to the Right Ear Flap marker, ending with a right-side row.
Repeat Short Row 3 one more time. [7 (8, 9, 10, 11, 12) garter ridges total]
Partial Row (right side): Knit to end of round.
WORK BODY OF HAT
Now working in the round…
Round 1: Purl to end of round, removing all stitch markers except end-of-round marker.
Round 2: Knit to end of round.
Repeat Rounds 1 and 2 until piece measures 4 (4¼, 4¾, 5¼, 6¼, 7) inches from the rolled edge at the center of an Ear Flap, or until approximately 3¼ (3¾, 4¼, 4¾, 5¼, 5¾) inches shy of desired finished height, ending with Round 2.
CROWN
NOTE: Switch to double pointed needles when necessary.
Set-Up Round: P7 (8, 9, 10, 11, 12), k1, place removable stitch marker on previous stitch, [p14 (16, 18, 20, 22, 24), k1, place removable marker on previous stitch] 3 times, purl to end of round.
Round 1 (Decrease Round): [Knit to one stitch before next marked stitch, remove marker, s2kp (see Special Instructions), place removable stitch marker on resulting stitch] 4 times, knit to end of round. [8 stitches decreased]
Round 2: [Purl to marked stitch, k1] 4 times, purl to end of round.
Round 3: Knit to end of round.
Round 4: Repeat Round 2.
Repeat Rounds 1–4 five (6, 7, 8, 9, 10) more times. [12 stitches remain]
Next Round: Repeat Round 1. [4 stitches remain]
Next Round: Knit to end of round.
FINISHING
Cut yarn leaving a 24-inch tail, thread onto tapestry needle, and pull through remaining stitches. Make a Tiny Attached Tassel by following the instructions found here.
Weave in the ends and gently wet block.


Wondering if you could set up your patterns to print more efficiently? This one is 17 pages! Surely the knitting instructions and a photo could fit on two. ..we all need to be conscious of precious resources.
Hi Janet,
Thanks for reaching out. Here’s how to print a more printer-friendly (and environmentally-friendly!) version of this pattern:
If you’re on your computer, you’ll find a “print” icon in the right column just below the “Save To Favorites” button. If you’re on a mobile version of the site, you will find the “print” icon below the pattern and above the comments.
Click on this button, and a window will pop up where you can delete whichever parts of the pattern you don’t want to print. When you hover over any image or a text block, it will be highlighted in yellow and a “trash” icon will appear. Just click on this icon to delete anything that’s not necessary to the pattern! For example, you may decide to shorten the pattern by omitting certain images or the list of materials. Then, just click on the “Print” button in the upper left-hand corner of the pop-up window!
All the best,
Lili
Thank you for this printing information! And the pattern 🙂
My grandchildren will have warm hats this winter!
Hi – Do you have any washer friendly yarn that can be sub. for this pattern? Thank you!
Hi Katrina,
Thanks for writing in! I’d suggest Campo (https://www.purlsoho.com/campo.html), which is machine wash cold and on a gentle cycle and lay flat to dry, as well as For Better or Worsted (https://www.purlsoho.com/for-better-or-worsted.html) which is machine washable. With any yarn substitutions, we also recommend doing a gauge swatch to make sure your gauge is consistent with the pattern. Here’s our guide on swatching if you’d like more information (https://www.purlsoho.com/create/2020/08/20/all-about-gauge/)!
Hope this helps!
All the best,
Cat
I love the ear flaps! How many yards are required for each of the hat sizes that require 2 skeins of yarn? Would 3 skeins of Plenty be sufficient to knit up 2 adult hats, one in adult medium and one in adult large?
Hi Nan,
Thanks for writing in! We’re so happy to hear that you’re a fan of this pattern! The sizes that require 2 skeins each, Adult Small and Adult Medium, each require 165 and 215 yards respectively. The Adult Large size requires 260 yards so I’m afraid 2 skeins of Plenty would not be enough to knit both the medium and large hats since each skein is 139 yards. You would need 4 skeins to knit the Adult Medium and Adult Large. I hope this helps! Let us know if there’s anything else we can assist with.
All the best,
Cat
Could you knit this without the earflaps by just skipping the specific directions for them? Would you have to adjust the number of stitches?
Hi Mary,
Thanks for writing in! Yes, you can certainly omit the ear flaps by skipping the short rows. You would not have to adjust the number of cast on stitches and can go straight to the “Work Body of Hat” section after knitting 2 rounds even and changing to smaller needles in the “Begin” section. I hope this helps!
All the best,
Cat
Hi Lili,
Hands down, this is the cutest hat ever for babies and even adults! Would you have the pattern in crochet? I know your company has emphasis on knitting, but crocheting is also a nice craft. The products that Purl Soho advertises are always excellent.
Susan Stoltz
Hi Susan,
Thanks for writing in and sharing your idea for a crochet version of this pattern! I’m afraid that we don’t have one yet, but I love that idea and will absolutely pass it along to our design team. This is a beloved pattern, and I’m sure many others will be happy to see a crochet version as well!
All the best,
Lili
I don’t understand the pattern. After the first wrap and turn you’re on the purl side, with yarn in front. Then it says to knit to six stitches to next marker, so for baby size that’s only 3 stitches and then you wrap and turn again? I’m confused with what marker you’re referring to. I have a red and Orange marker after the beginning of the round marker. Am I missing something?
Hi Teresa,
Thanks for reaching out. It sounds like you’re interpreting the pattern correctly! Your second short row should indeed only be 3 stitches, since that short length creates the rounded shape of the ear flaps. The “next marker” in Short Row 2 refers to the marker that’s placed 3 stitches after your end-of-round marker. Hope this helps clarify things!
All the best,
Lili
Thank you for this clarification. I have a question though, the pattern for baby size Short Row 2 says: knit to seven stitches before next marker. Was this pattern updated recently?
Hi Mónica,
I believe that may have been a typo in the comment! This pattern hasn’t been updated recently, so everything should be correct. If not though, please don’t hesitate to reach out to us to let us know!
All the best,
Lili
Hi: I am confused about the directions. Early in the description of the wrap stitch we learn that this hat is knitted in garter stitch – knit every row. Later in the body of the hat we change to round 1 – PURL to the end and Round 2 is KNIT to the end. Repeat until the body of the hat is the desired height. is this not stockinette stitch and won’t this alter the look of the hat? When I see the photo of the hat it appears to be all garter stitch.
Please advise. Thanks much.
Hi Rebecca,
Thanks for reaching out. While garter stitch worked flat is indeed knitting on every row, when garter stitch is worked in the round, you’ll need to alternate knit and purl rows! If you knit every row in the round, it will end up being stockinette stitch, like in this hat, for example. I hope this helps clarify things!
All the best,
Lili
When transitioning from the first ear flap to the “for all sizes” section, the first step says to knit to 6 stitches before next marker. What is the reference for “next”? Am I counting from the beginning or from the end of the ear flap?
Hi Hannah,
Thanks for reaching out. When beginning the ALL SIZES section of the short rows, you will be referencing the same stitch marker that you’ve been referencing throughout the SHAPE LEFT EAR FLAP section! This is the very first marker you’ll come across once you turn your work during the previous row’s wrp-t. Hope this helps clarify things!
All the best,
Lili
Hello,
I am knitting the ear flap and I have a question about the wrap and turn. There are no indication to “pick up the wrap”. Is it normal? Do I simply leave the wrap around the stitch and continue?
Thanks for all you wonderful patterns!
Diane
Hi Diane,
Thanks so much for writing in! We’re so happy to hear that you’re enjoying the pattern! Yes, exactly, there is no need to pick up the wrap for this pattern. Because this hat is knit in garter stitch, you can ignore the wraps when you come to them and work the wrapped stitch normally. To do the short rows for this pattern, on both sides you would work them this way: Keeping the yarn in back, slip the next stitch purlwise from the left needle to the right needle. Bring the yarn forward as if to purl. Return the stitch from the right needle back to the left needle. Turn the work.
Hope this helps!
All the best,
Cat
I’m loving this Plenty, but I’m stuck after the first ear flap. It looks great, I’ve finished the short row directions,but I don’t understand how you get from the left ear flap to the right! Do I finish the short row directions and then knit my way over to the marker for the right ear flap? I don’t see how to get fro the first ear flap to the second…thanks.
Hi Sarah,
Thanks for reaching out! In the pattern, you’ll move from the Left to the Right Ear Flap on Short Row 1 of the SHAPE RIGHT EAR FLAP section. On this row, the pattern instructs for you to knit to 7 (8, 9, 10, 11, 12) stitches before fourth marker, which automatically brings you in position to continue shaping the Right Ear Flap! Hope this helps clarify things!
All the best,
Lili
I would like to make this hat for a newborn but baby skin is sensitive and I worry about merino wool. Your thoughts? And can you recommend another yarn to use with this pattern?
Hi Elizabeth,
Thanks for reaching out! Merino wool doesn’t itch at all because the fibers are so fine that they bend to the touch, rather than sticking up and scratching. Most people who are sensitive to normal wool do not have the same reaction to merino wool, and it’s a great yarn for babies! Plenty, in particular, has a micron count of 17.5, which is exceptionally low, meaning that the fibers are a whole lot finer than almost any other wool yarn.
If you’d like to use a non-wool yarn though, I’d recommend Tulip Cotton. Hope this helps!
All the best,
Lili
I have made 2 of these darling hats now, and find the directions extremely confusing, as, apparently do many others. So I have a couple of suggestions for edits that would have helped me.
When it says : “Next Two Short Rows: Knit to x stitches before next marker, wrp-t.
Next Two Short Rows: Knit to x stitches before next marker, wrp-t.”
It would be very helpful if it said “knit to x stitches before marker, wrap-t and knit back to the beginning of that row (2 rows knitted).” I felt left hanging after the “wrap-t” . I know it should be obvious, but it was not.
I think I have this next suggestion right. If I do not, then my directions should be reversed!
When done with the short rows on the left side, the directions say :
“Short Row 1 (right side): Knit to X stitches before fourth marker, wrp-t. ” It would be very helpful to mention that one is knitting across the back to get to the next ear flap, and that the beginning row marker is the the second of the four.
I got it right the first time, but apparently missed a wrap and turn on the second hat and headed around the front, which of course messed up the garter pattern. I doubt that I am the only one who had been challenged by these two things, and it would be so simple with a few more directions.
It really is an easy pattern, once you get past the confusion, and it is an absolutely darling hat!
Hi Wendy,
Thanks for reaching out, although I’m sorry to hear that this pattern has given you so much trouble! We really appreciate your detailed suggestions though, and I will absolutely pass them along to our design team for consideration.
Going forward, I also wanted to let you know about all the avenues in which we offer pattern support if you ever hit a stopping point in the future, or just want clarification! If you have any questions about any of our patterns, you can send us an email or even sign up for a free 1-On-1 Project Help session, where a team member would be happy to chat or demonstrate techniques in real time for you over video!
Again, thank you for sharing your thoughts on this pattern. We really appreciate your feedback and take it very much to heart!
All the best,
Lili
Lili, please clarify Wendy Shore’s
December 21, 2022 comment, where she states that one is knitting across the BACK side of the hat to get to the 4th marker. My understanding is that the knitter is knitting across the FRONT of the hat to get to that fourth marker!
Also, for the BEGIN section of the pattern, please please please update instructions with NUMBERED MARKERS, as we all have 5 markers…..one which the pattern calls a ‘unique marker.’
Hello,
Thanks for writing in, and I’d be happy to clarify! You’re correct, to get from left ear flap to the right ear flap, you’ll be knitting across the front of the hat.
And I can absolutely see how the wording of the short rows can be unclear, but I want to explain why we chose to notate the markers like that. Because you will be working flat for each ear flap, the order of the numbered stitch markers would change depending which side of the knit fabric is facing you. That might get pretty confusing, since the stitch marker numbers would be in reverse order every time you’re on a wrong side short row!
I hope this helps shed some more light on this pattern, and please don’t hesitate to reach out if you have any other questions.
All the best,
Lili
When I out a removable marker on “the previous stitch” is that the stitch before the k1 stitch which would be the last of the purl stitches in the set up row or is it the knit stitch?
Hi Marianne,
Thanks for reaching out. The “previous stitch” mentioned in the Set-Up Round of the CROWN section is the stitch that you just knit! It will be the very first stitch on your right-hand needle.
If you’re wondering about the instructions in Round 1 (Decrease Round) to place the removable marker on the “resulting stitch,” then that stitch is s2kp you just worked. This will also be the very first stitch on your right-hand needle!
Hope this helps clarify things!
All the best,
Lili
I love this little hat. I have made it twice now. I picked the pattern because I wanted to nail down the skill of short rows. I learned to knit at age 4, so reading and following a pattern has come along later, and I enjoy adding new skills to my knitting basket.
The local school is benefiting from my practice sessions. Do you have an area where we can share pics of our latest triumphs.
On the needles today: Fiddle head and the big comfiest blanket. A gift for the guy I like to share snuggles with.
Yikes! I’ve had to frog this little hat 3 times now! I’m not a beginner and have done short rows before, but the directions feel very incomplete to me. Once I’ve wrapped and turned, then what? Like the video, I tried knitting the rest of row, but since I’m knitting in the round, I end up back at the beginning pretty quickly. And then what? I can start to see the little ear flaps growing but now there’s a pretty big gap where normally the ends of the rows would be joined together to keep the hat in the round. I recast this time onto a short cable so I can knit fully in the round and not magic loop like I usually do, thinking that would help, but it still doesn’t make sense to me.
I would like clarification on precisely which marker to keep knitting to after the wrp-t . You had us place 4 markers. When the directions say “next marker,” is that after you’ve knit all the way around once in order to keep the hat connected in the round? But then how will the other Why just drop us off into the ether after the wrp-t? Sorry for being dense on this, but I can see from the comments in Ravelry that I’m not the only one who feels the directions are confusing. I was hoping this would be a short little project that I could whip up in a few hours. I’m feeling sad! Thanks for any clarification…
I made my first of these hats way back in 2014, in preparation for my first baby! Since then , he has specifically requested three more, in larger and larger sizes. I just gave him his most recent one for his eighth birthday, on the very day you published this update!
We love this pattern!
Julia here. The one who was sad about having to frog the project 3 times. I found the old posting for this pattern and read those all those comments and found some really helpful tips that got me through it! Sorry for whining and thanks for all the wonderful patterns you gift us. And for your amazing yarns. And for holding space for us while we knit! I appreciate you!
Hi Julia,
Thanks for writing in, and I’m so glad to hear that you’ve found helpful tips in some of our previous comments! I do want to answer you questions here though, because I’m sure it will helpful for another knitter to see if they find themselves looking through the comment section as well.
After you work any wrap + turn, you will be in the exact position to begin the next short row! A wrap + turn always marks the end of one short row, and the beginning of the next. The gaps you’re seeing are completely normal, since the tension of the wrap tugs the wrapped stitch in one direction. But they will disappear once you knit the wrapped stitches eventually!
In answer to your question about markers, we use “next marker” to refer to whatever the next marker is that you encounter while knitting a row or round. The trick to interpreting an instruction like this is to interpret it completely literally! You can essentially forget about any other markers on your needles except for the next one in your path.
I also want to provide a link to our Short Rows: Wrap + Turn tutorial, since it may be helpful for many people to see this technique in action! You can find the tutorial right here. I hope that my explanations are useful to you and anyone else reading this comment in the future!
All the best,
Lili
I have never completed a Wrap and Turn, so I appreciate that a video is provided for us. However, after many starts-and-stops, I realized that my consternation is because the pattern instructions and the video have different end-points; in the video tutorial, the last step is for the yarn to be pulled to the back, whereas the written pattern instructions omit this step. For us newbies, it sure would be helpful if the instructions ended with a statement that in this pattern, the yarn is left facing the knitter before the turn.
Hello,
Thanks for reaching out, and I’m glad that our tutorial has been helpful in general! The reason for the difference is that our tutorial uses stockinette stitch as an example, while the Garter Ear Flap Hat is garter stitch. Because you’ll be knitting on each next short row (rather than purling, like the tutorial shows), you don’t need to bring your working yarn to the back of the work before turning. We do include specific instructions for this on the pattern page–they’re right after the NOTE that links to the tutorial. I’d recommend referring to those for exactly what steps to take to work wrap + turn short rows in garter stitch!
All the best,
Lili
Hi! This hat is absolutely adorable but I am struggling with the set up and decrease round.
I’m doing the second size – where it says
P8, k1 – then place rsm on previous stitch.
Is the rsm placed on the p stitch just before the k1 st? Or 2 sts before the k1 st I’m not sure where sm placement is.
Thank you in advance for clarification
Hi Kim,
Thanks for reaching out! You’ll place the removable stitch marker on the stitch you just knit, which is the k1. Hope this helps clarify things!
All the best,
Lili
How many stitches should I cast on if I were to use Campo for this hat for a baby size. I am knitting the 4 corners blanket as a baby gift and wanted to use one of the colors for the baby and two siblings. But the yarn difference has me confused as to how to modify this pattern for campo. Any help would be appreciated. Thanks!
Hi Kim,
Thanks for reaching out. You can likely work the pattern exactly as written with Campo, since it has a similar gauge to Plenty! I’d recommend knitting a gauge swatch to determine which needles would be best to use. Once you’ve achieved the gauge of the pattern, you can cast on the original number of stitches!
If this is daunting, I’d recommend checking out a tutorial called All About Gauge, which covers some incredibly helpful information. I even learned some interesting, new tidbits myself while looking over it, and you may, too! You can find it right here.
All the best,
Lili
Thanks!
Garter Ear Flap hat is THE BEST EVER for babies. The parents of gift recipients absolutely rave about it. Many, many thanks for the free pattern.
Will the pattern ever be available for various yarn weights (Dk and fingering)? I would gladly purchase it.
Hi Clayton,
Thanks for writing in, and we’re so happy you love this hat! While we don’t have any plans in the works to redo this hat for different weight yarns, I’ll certainly let our design team know of your interest. Thanks again for sharing your idea!
All the best,
Lili
Hi. I’ve frogged once because I did the second ear flap and they were too close together, not symmetrical. I’m confused when you say 4th marker. Is that the last one before end of row or are you counting the BOR marker as #1? Thanks so much for the help.
Hi Diane,
Thanks for writing in! The 4th marker is the last one before the BOR marker. Hope this helps clarify things!
All the best,
Lili
When I started working the decreases, I found that my first marker eventually moved to where my round begins. After my second time of doing the decrease rounds(1-4), my first marker no longer has any stitches before it. The stitch before it is at the end of the previous round. Make sense? So is my progression correct? Should I be working back into the previous round at this point?
thanks, Lisa
Hi Lisa,
Thanks for reaching out. It sounds like you placed your 4 additional stitch markers in slightly incorrect spots on the Set-Up Round! The number of stitches between the end-of-round marker and the first marker should eventually decrease as you’re seeing, but not after only two repeats of the Decrease Rounds. Can you let me know what size you’re making? That would help me determine the correct spots for the 4 additional markers!
All the best,
Lili
thanks for your response….I’m making the smallest sizw and cast on 60. There is an equal number of stitches between my markers now and that is 9 stitches, counting the marked stitch for a total of 54 stiches after 3 rounds of decreases(first decrease plus 2 rounds of the 5 more decreases). Sounds like I need to rip back and redo my marker placements?
Hi Lisa,
Thanks for letting me know! It may be best to rip back and redo the stitch markers. For reference, here’s how they should be spaced on the Set-Up Round, in order from the end-of-round marker:
1. End-of-round marker (in between stitches)
2. 7 purl stitches
3. Stitch marker in 1 knit stitch
4. 14 purl stitches
5. Stitch marker in 1 knit stitch
6. 14 purl stitches
7. Stitch marker in 1 knit stitch
8. 14 purl stitches
9. Stitch marker in 1 knit stitch
10. 7 purl stitches
Let me know if this helps you orient the markers this time around!
All the best,
Lili
Thanks for this clarification! I was also mixed up by how the decreases were spaced and needed to frog.
I would like to knit this hat using your Sunflower yarn. Can you recommend the pattern adjustment and number of skeins for baby size?
Hi Nina,
Since Sunshower Cotton is slightly thinner than Plenty, it’s likely that you’ll naturally end up knitting at a smaller gauge! The best way to make adjustments to a pattern when this is the case is to choose a different size that will come out to your intended size at the smaller gauge. Here’s how to figure out which size to make:
First, make a gauge swatch in pattern with your intended yarn and needles. Once you know how many stitches you’re getting per inch, multiply that number by the head circumference measurement for your original size (14 inches, for the Baby size). Then, compare the resulting number to the stitch counts around the head of each size (60 (68, 76, 84, 92, 100) stitches). The size that comes closest is the one you should make!
And you will most likely only need 1 skein of Sunshower Cotton for the Baby size!
All the best,
Lili
Hello,
I am knitting my 3rd hat but this time I have got it wrong somehow.. the decreases are showing up on the wrong side.. I am unable to figure out where I went wrong.
Please help me. I am knitting adult small size using a thin yarn to achieve a toddler size.
Hi Sushma,
Thanks for reaching out, although I’m sorry to hear that your project isn’t turning out as expected! Would you be able to send a photo of your work to customerservice@purlsoho.com? That way, we can visualize exactly what’s going on and provide advice from there.
All the best,
Lili
I made this hat as a baby gift and got rav reviews! Is there a way to get a PDF download of this Garter Ear Flap hat?
Hi Cynthia,
Thanks for reaching out! Here’s how you can download a PDF version of this pattern: If you’re on your computer, you’ll find a “print” icon in the right column just below the “Save To Favorites” button. If you’re on a mobile version of the site, you will find the “print” icon below the pattern and above the comments.
Click on this button, and a window will pop up where you can delete whichever parts of the pattern you don’t want to print. When you hover over any image or a text block, it will be highlighted in yellow and a “trash” icon will appear. Just click on this icon to delete anything that’s not necessary to the pattern! For example, you may decide to shorten the pattern by omitting certain images or the list of materials. Then, click on the “PDF” button in the upper left-hand corner of the pop-up window. Once your PDF has finished downloading, just click the “Download PDF” button, and it will be saved to your computer! (You can also click the “Print” button if you’d like to print the pattern.)
All the best,
Lili
Hello, I’m working the crown decreases for the baby size of this pattern and am confused by the instructions. If a decrease row decreases by 8 stitches and you repeat the four rounds 5 times, wouldn’t you end up with 20 stitches rather than 12 since you cast on 60 stitches? Please advise, thank you!
Hi Hannah,
Thanks for reaching out! Actually, you’ll be repeating the Decrease Row a total of 6 times for the Baby size: the first time, and then 5 more times after that. This brings the stitch count down to 12 by the end!
All the best,
Lili
I was worried, reading the comments, that this pattern was going to be confusing, but it truly isn’t. I’m not the most experienced knitter, but the instructions are clear and spot on – you just need to follow them to the letter and resist overthinking! The linked videos for the wrap-and-turn, S2KP and tassel are very clear – and the resulting hat (I made the baby size) is quite gorgeous. Thank you, Purl Soho!
Hi, this hat is adorable, I’m keen to get started making one. What ply or weight is this yarn? I will have to substitute with something else, and want to me sure I get the right yarn for the project. Thank you.
Hi M’leigh,
It truly is such an adorable hat! We designed this hat for a heavy worsted/aran weight yarn, and the gauge of the pattern is 4.25 stitches per inch. Hope this info helps you find a substitute yarn!
All the best,
Lili
Absolutely brilliant pattern and hat! Knitted up quickly over an afternoon. Took a few reads to get my head around the short row shaping. The written instructions in the special instructions bit helped me the most.
Added a little Pom Pom on and it suits it perfectly.