Slip Slip Knit Pass (s2kp)
S2kp is short for “slip 2, k1, pass slipped stitches over” and is also referred to as a Centered Double Decrease. You work an s2kp over three stitches, decrease two, and end up with one. The beauty of this technique is that the finished stitch slants neither left nor right, but rather lies perfectly centered. An s2kp also finishes as a slightly raised stitch, which can be very pretty! Here’s how you do it…
Slip 2 stitches together knitwise, knit 1, pass slipped stitches over knit stitch and off right needle. [2 stitches decreased]
We turn to this fantastic double decrease time and time again. Here are a few free patterns that put the s2kp to good use!
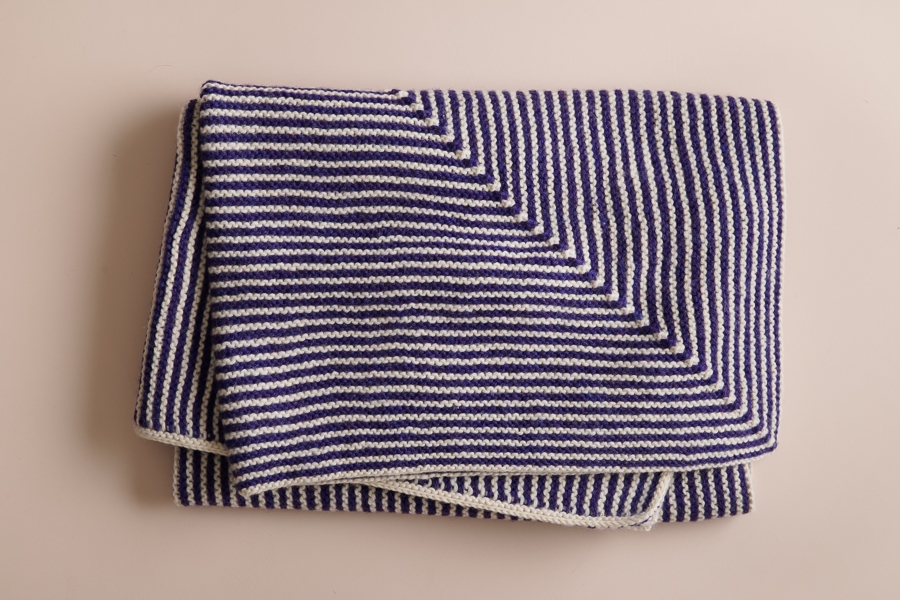
Little Mitered Stripes Blanket
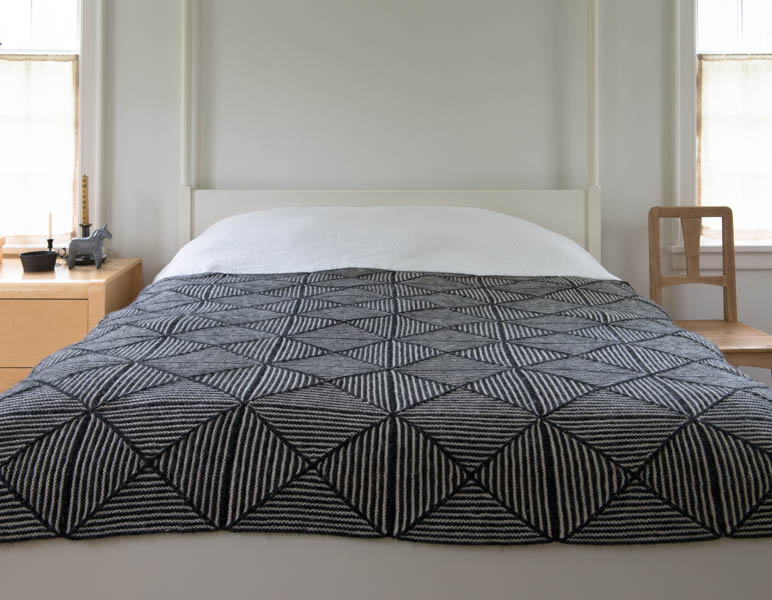
Optic Blanket


Spellbinding!
Thanks so much for this clear, concise instruction.
I love the purl soho site. Your patterns are my go to ones. Thank you for the updates.
That was exceptionally clear, concise, and helpful! Thank you!
My pattern, Bandana Cowl, calls for the S2kPO on the purl side. It is clear from your tutorial how to do that on the knit side, but I do not understand how to do S2kPO when you are on the purl row. IE: Round 2 – Purl 42, S2kPO, purl to end of the round.
Hello Blanche,
Thank you for reaching out! In the Bandana Cowl pattern you are knitting in the round so even though you are switching between knit rows and purl rows to create a garter stitch you will be doing your S2kPO on the outsideot right side of your cowl. This means that it will be knit so S2kPO or slip 2, knit, pass over.
I hope this clears things up for you and let us know if you have any further questions!
Happy knitting!
-Marilla
Thanks!! the video is so clearly well explained! I love you page and the amount of beautiful and lovely patterns you share for free!! Hope to be able to visit your real shop once there in USA.
hugs from Argentina!
This is great, thanks. When doing a variation on this, the “yfwd, skpo,” after moving the yarn to front and slipping the stitch, do you have to move the yarn to the back again before doing the knit stitch, or do you leave it in front for the knit stitch? To me the YO is one of the most confusing things about knitting, because I am so literal when reading instructions! Thank you.
Hello Kate,
Thank you for reaching out! Unless otherwise noted, your working yarn must be to the back for you to be able to knit a stitch. This means that you will put your yarn to the back to do your knit stitch.
I hope this helps and happy knitting!
-Marilla
What is the difference between S2KP and CDD?
Hi Donna,
Great question! A S2KP is a type of CDD, or Centered Double Decrease. There are several other variations, but any decrease that gets rid of two stitches at once and does not lean to either the right or left, like the S2KP, can be called a Centered Double Decrease. Knitting abbreviations are not perfectly standardized and different patterns may refer to this decrease as either a S2KP or CDD, or they may intend for you to use a different decrease but use the CDD abbreviation, so I would suggest checking the stitch glossary for new patterns if you are in doubt. For Purl Soho patterns, we will always mean to use the decrease above when you see the abbreviation S2KP.\
I hope that clears things up!
Julianna
Re Bandana Cowl and the issue of S2KPO on the purl side, is the yarn in front or back of needle JUST BEFORE you slip 2. (Do you move the yarn to the back for knit position before or after slipping the 2 stitches).
Thank you and thank you for providing these wonderful patterns and yarns!
Jean
Hi Jean,
Great question! You should move your yarn to the back of the work before slipping the stitches for the S2KPO.
Happy knitting!
Julianna
Can’t thank you enough – this video was clear simple and direct. Love the video thanks again
This is a great technique to make pointed triangles in the middle of the work!
How would one find where to start this decrease in a pattern if we wanted to add it to our work? Divide stitches in half and subtract 1? It would be great to know! Thanks, Pat!
Hi Patricia,
Thanks for reaching out! I am glad you enjoy this tutorial and technique! It would depend on the project you are working on to decide how to include it, for some ideas you can see how we used this technique in our Optic Blanket and Tiny Stripes Hat!
Warmly,
Gianna
Thank you for this useful tutorial. As a beginner, it is very easy to follow and I learned a lot.
I love the look of this decrease and I would like to do a mirrored increase with a similar look, meaning a nice raised central column of 1 stitch with the newly added stitches seemingly leaving from under it on each side. The CDI with kbf is too flat. I also tried M1L, k1, M1R which is better but this is giving a very weak raise and there’s the small holes.
Any help is appreciated, thanks!
Hi Lyn,
Thanks for writing in! I am so glad to hear that you enjoyed this tutorial! for a raised increase I suggest trying out the Lifted Increases (RLI + LLI), this may give you a bit more or a column than the M1L M1R increase!
I hope this helps, happy knitting!
Gianna