Sashiko
Sashiko embroidery is one of my favorite crafts. It’s easy to master and the process is very meditative and relaxing. Although the patterns can look difficult, they are just a matter of breaking down the whole into linear parts. –Mari
The Materials
There are four key materials to sashiko – needle, thread, thimble and fabric. As you’ll see, no embroidery hoop is necessary, which makes sashiko a very portable craft.
Needles

- left – traditional sashiko needle
- middle – modern sashiko needle
- right – 1mm embroidery needle
Traditional sashiko needles are very long (about 2 inches) with a small eye. The width of the needle is uniform all the way to the top. Modern sashiko needles have a larger eye so the needle can be more easily threaded. In the photo, I included the largest embroidery needle in my collection, a 1mm width needle to show the difference between the needles. As you’ll see below, a long needle is necessary to the sashiko embroidery technique.
Thread

- left – sashiko thread
- middle – embroidery floss
- right – Pearl Cotton Embroidery Thread
Sashiko thread is more twisted than embroidery floss and not made to be separated into strands. Sashiko thread doesn’t have a sheen as embroidery floss or the Valdani embroidery thread have. Either thread could be used a substitute for sashiko thread but the look will be slightly different.
Thimble
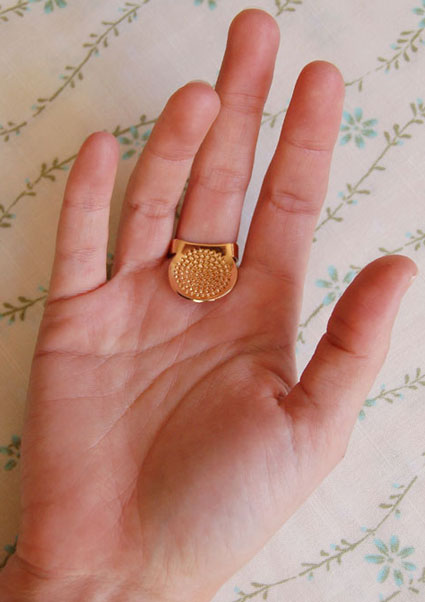
This is a traditional sashiko thimble that is used to push the needle through the cloth. We have a similar thimble made of leather which you can find here.
Fabric
The ideal fabric for sashiko embroidery is one that is not too tightly woven, such as Robert Kaufman’s Essex fabric, which is a linen/cotton blend. Because sashiko thread is so thick, a fabric that is too tightly woven will show puckering or the holes quite easily.
The Technique
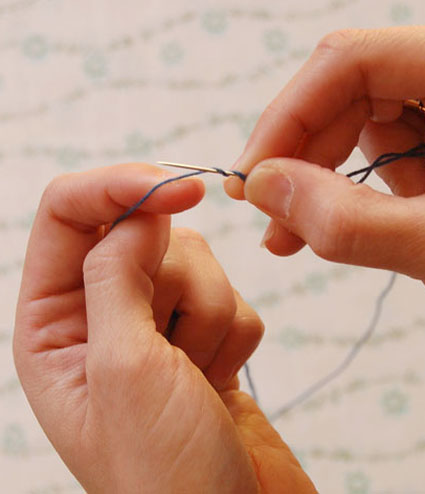
To begin your project, cut a piece a thread that will be long enough to go from one end of the section you are working on to the other end. Create a quilter’s knot by wrapping the thread around the needle twice and pulling it through.
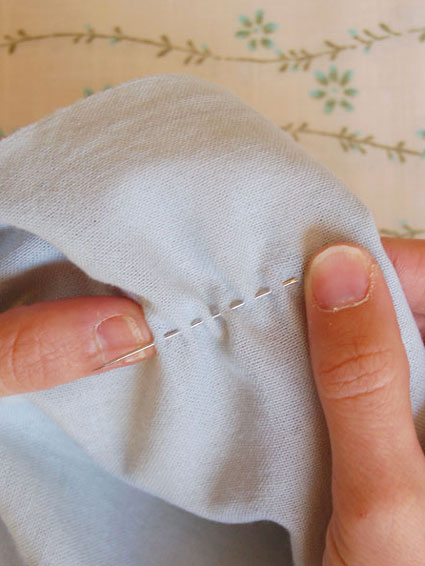
Next, take your fabric and insert the needle through the fabric without pulling the thread through. The proportion of the sashiko stitch is about 3:2, with the longer stitch on the right side of the fabric. Continue running the needle through the fabric without pulling the thread through until you have multiple stitches on the needle.
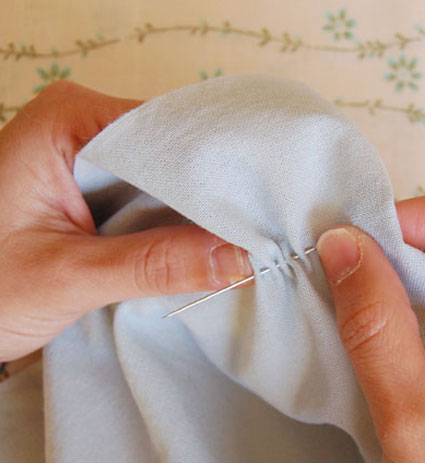
After you have several stitches on the needle, whatever number you are comfortable with, push the needle through the fabric and pull the thread all the way through. Use the sashiko thimble to push the needle through the fabric.

Pull the fabric taut to ensure there is no puckering. Continue until you have reached the end of the row and tie another quilter’s knot, leaving some slack at the end to compensate for any puckering.

If you are doing a pattern with any change in direction or angles, leave a little loop at each point on the wrong side of the fabric, again for puckering.
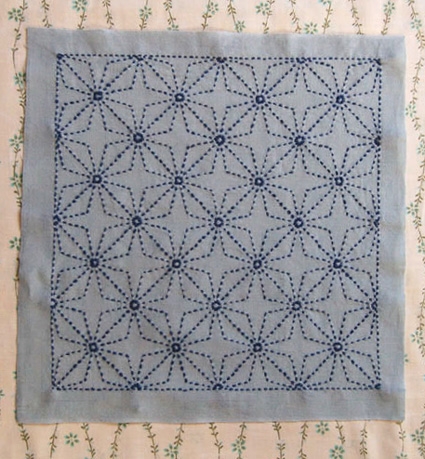
“Water Surface” Kit
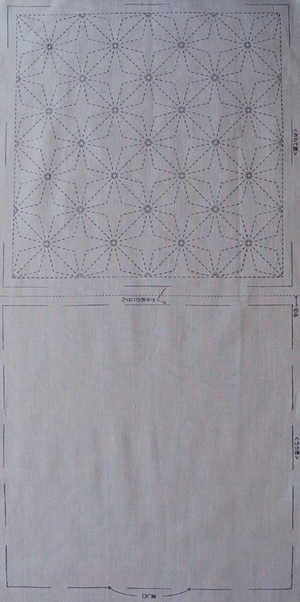
The sashiko patterns we have all have easy to follow instructions which have the stitches printed on the fabric in washable ink. I chose the traditional sashiko kit “water surface” to show how to do a pattern from beginning to end. I paired the kit with the Cobalt Blue Sashiko Thread (#10). The fabric has a second side that could be used to cover up the wrong side of the embroidery in a pillow or handkerchief.

Before beginning the embroidery, decide how to do the pattern. Typically, the horizontal and vertical lines are done first (except for the outside lines). Next, the diagonal lines are stitched. Finally the remaining shapes are embroidered. Since this pattern does not have any horizontal or vertical lines, start with the diagonal lines, from one end to the other.
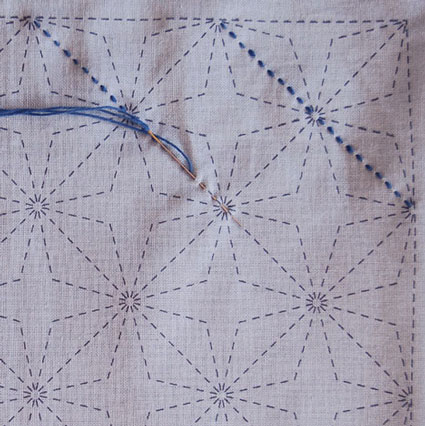
When the first line is finished, start with the next line, but start in the opposite direction to avoid any puckering or skewing of the fabric. Make sure you have enough thread on the needle to get from one end of the pattern to the other, to avoid having any knots in the middle of the fabric.

After completing all of the diagonal lines, the figures remaining create a diamond pattern. To do this part of the pattern, start at the top, then follow the arrows around the pattern back to the top.

This is how the diamond pattern looks when completed. Work your way from one side of the fabric to the other, just as you did the diagonal lines. Finally, embroider the outside lines. The ink of the pattern will come out easily in a cold water hand wash with a little agitation. Your sashiko sample is complete!


I have bought all the tools needed and I’m sitting here trying to thread the longest needle (which has a very small eye)! Is there a trick to getting these thicker sashiko threads thru small eyes?!
Thank you! Michelle
Hi Michelle,
Thanks for reaching out! I would suggest trying a needle threader – our Clover Double Needle Threader is designed to be used with both large and small eye needles, so it should do the trick!
Best of luck and happy stitching!
Julianna
Try using a thin (strong) thread looped thru the eye then put the thicker thread thru the loop and pull the thicker thread back thru the eye – the thin thread works like the old fashioned wired needle threaders.
Thank you so much for your clear instructions. I have already completed my first piece but appreciate the information on directions. I also love the idea of starting lines from different directions to avoid puckering! Would not have thought of that myself!
Wendy
So I recently finished one of these kits and I was slightly confused on how to turn it into a kitchen towel/cloth. I cut on the dotted line after completing the stitching (thru one side) and sewed the two pieces together right sides in and then turning the piece right side out. Is this the best method or did I miss something in the instructions? They were in Japanese but the photos seemed pretty self explanatory.
Hi and thanks for writing in! You actually have quite a few options for how to finish or use your finished sashiko sampler. For a tea towel, you could simply hem the edges of the embroidered square, but using the extra fabric as a backing is a great idea! You can also use the blank piece of fabric to create a pillow, or sew several samplers together into a quilt top.
Best,
Julianna
Je trouve ces broderies magnifiques et je pense en faire très prochainement. Il ne me reste plus qu’à me procurer les outils indispensables à leurs réalisations.
Hello!
I’m new to Sashiko and am really interested in starting it. I was wondering…when you finish your first row, do you continue using the same thread that’s on the needle? Or do you knot off the first thread and the start with a new thread? Likewise, when you’re working on the smaller details, is there a sequence to it or do you keep on just going to wherever the next stitch is closest?
Sorry for all the newbie questions but I want to make sure I do it correctly. It would be really helpful if you can explain what happens on the backside of the piece. I suppose there will be many little knots here and there?
Thanks so much!
Hi Winnie,
Great questions! There is no need to end each row with a knot. I just keep going until I run out of thread and then make a knot on the back. For Sashiko there is generally a preferred sequence for each design that is generally noted either by instructions or by a series of arrows on the pattern. This is generally designed to use as little thread as possible and make the floats on the back side as short as possible. On the backside of the work, the pattern will almost be the opposite and will differ for each pattern. For the very basic design that we used for our Reversible Sashiko Placemats, you can see both the front and back as they are both visible and lovely in this design with the knots buried on the sides.
I hope that this helps!
Cassy
thank you só much for the clear explanation with photo’s.Now I dare to try the wonderful sashiko technique.
Nel.
I love sashiko, I know it looks simple however is difficult for me to master, having most of my time devoted to knitting and crochet, I do have a kit so is up to me to practise, practise, practise. Also I have Sashiko CDS for my embroidery machine. Guess technology makes one a bit lazy. Thank you for the wonderful tutorial. I live Midwest of Western Australia, Australia. Sincerely
Hi,
I’d like to purchase the kit, but don’t see it on the website. Where can I find it?
Thank you!
Hi Lori,
Thanks for reaching out! You can view all of our sashiko samplers by clicking right here!
Best,
Julianna
Hi there do you press Sashiko embroidery when the piece is finished? Regards Sonia
Hi Sonia,
Thanks for writing in! Although you can gently press your finished sashiko, it usually isn’t necessary. When you wash your sampler to remove the printed lines and then lay it flat to dry, it should turn out nice and flat and tidy!
Happy stitching!
Julianna
Can I use Sashiko embroidery on a hand knitted wool garment?
Hi Sheila,
Great question! Although I don’t think it would technically be called sashiko anymore and the stitching technique would be a little different, you can certainly use a straight stitch or running stitch to embellish a knitted item! We don’t have any tutorials for embroidering on knitted fabric, but if you search for “running stitch embroidery knitting” you should find several videos demonstrating how to do it!
Best,
Julianna
Hello I have been working with this stitch for a little while. I am a big fan of thread embroidery most all styles. I have learned to have the back look like the front. I would like to see how the back of the sashiko panel looks when finished. I really like working this stitch. Thank you Velvet
Can you work sashiko on aida.I am doing an embroidery course and have been told to do sashiko on a tea towel with a Aida insert, they don’t give any instructions leaving you to research this method. If you can use Aida what would be the best number of threads to do it over.
Hi Pauline,
Thanks for reaching out! That is a great question, I haven’t heard of anyone using an Aida insert for Sashiko in particular but I would assume that you would treat it the same way you would if you were working with more traditional embroidery. When using Sashiko thread I personally do not like to strip it like I would with embroidery floss. I find it works and looks much better using the full amount of threads!
I hope this helps and please let us know how it goes!
Warmly,
Gianna
The traditional and best way to stitch is to press the end of the needle into the plate of the thimble and push the needle through the fabric onto the needle in an up and down motion. It delivers a beautiful result. See Youtube sash.co for the best tutorials.
Hi Suzan,
Thanks for writing in! That is a great tip thank you for sharing, it is much appreciated!
Warmly,
Gianna
I have just completed the ‘water surface’ design – it is tricky at first but you soon get into the rhythm of it. I think I’m going to frame it and order another – it will look great on the wall in square white frame. So simple yet stylish. Thank you for your inspiring shop and website!
Hi Carrie,
I’m so glad to hear you’re pleased with your final product! It sounds like it will make a beautiful piece to hang!
Thanks for you lovely message, and happy crafting!
Kelsey
I am working on a pre printed sashiko design. I am finding that the design markings disappear from handling the fabric as I work. How can I retrace the piece as it did not come with a template? Thank you.
Hi Ilene,
Thanks for reaching out! Please send this information as well as a clear photo of the fabric to our customer service team at customerservice@purlsoho.com and they can troubleshoot further from there!
Warmly,
Gianna
I LKVE IN CANADA WHERE CAN I INQUIRE TO FIND KITS TO BUY SASHIKO. I LIKE GEOMETRIC DESIGNS ESPECIALLY WITH. SOME ART HISTORY TO CHAT ABOUT. WHEN ENGAGED IN THEDISCUSSION OF SASHIKO. THANK YOU. VERY INTERESTING AND CLEVER.
Hi Aria,
Thanks for reaching out. We sell sashiko supplies on our website, and we ship to Canada! You can find our offerings at this link. If you’re interested in projects as well, we have a few designs here. Hope this helps!
All the best,
Lili
How do you make sure the edges of the patches don’t fray? Do you hem them before using them?
Hi Sabina,
Thanks for reaching out! The sashiko stitches will keep the fabric from unraveling, even if the edges fray a bit. If you want to avoid fraying altogether when you sew your patches onto another piece of fabric, I’d recommend attaching them using the turned edge applique technique, which is a great way to secure edges and attach the patch all in one step! We have a tutorial on this technique here, in case this technique is unfamiliar to you. (We use fusible interfacing as a tool to make it easier, but this is totally optional!)
I hope this helps!
All the best,
Lili