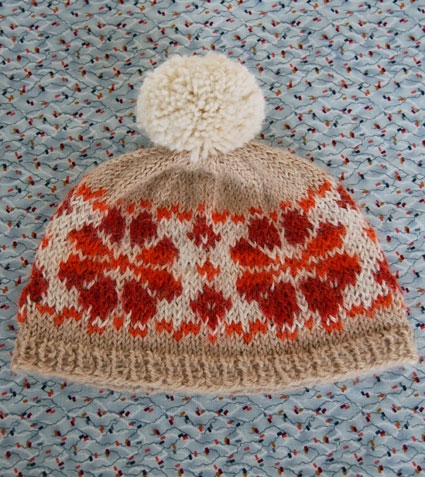
Giacomo’s Baby Hat

My great friend Giovanna, never one for mincing words, flat out asked me to make a hat for her one year old, Giacomo. And she requested a pom pom. If you knew Giacomo, you’d have a hard time refusing too!
This project is a great opportunity to practice your Fair Isle skills. It’s small enough to rip out, redo, and make a few. Also, baby’s are so uncritical.
To design this hat I used the help of a great book called Traditional Fair Isle Knitting by Sheila McGregor. Besides ancient images of rugged Scottish fishermen covered head to toe in expertly knit Fair Isle gear, the book includes pages and pages of black and white traditional stitch patterns. I chose one, came up with a little border and a color scheme and here you go! Enjoy! -Whitney
Designed by Purl Soho designer, Whitney Van Nes.
Share your progress and connect with the community by tagging your pics with #PurlSoho, #PurlSohoBusyHands, and #PurlSohoGiacomosBabyHat. We can’t wait to see what you make!
Materials
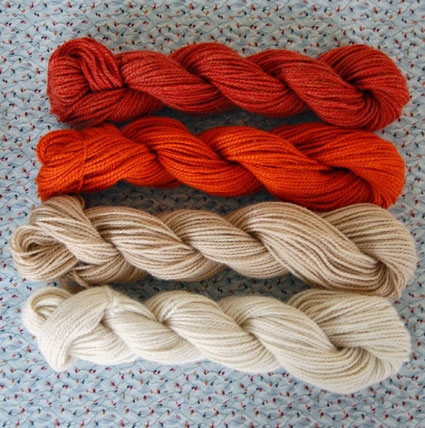
- 4 skeins of Blue Sky Alpacas Sportweight Alpaca (enough yarn to make many baby hats). I used (from the top):
- Salsa #806 (from the “Melange” colors)
- Tangerine #521
- Natural Light Tan #004
- Natural #500
- US 4 (3.5 mm), 16-inch circular needles
- US 5 (3.75 mm), 16-inch circular needle
- A set of US 5 double pointed needles
- A stitch marker
- A tapestry needle
- Pom Pom Maker (If you need help making a pom pom, see our Pom Pom Tutorial)
(The fabric in the background is from Windham’s Williamsburg Collection, Blue Confetti Ditsy)
GAUGE
24 stitches = 4 inches in stockinette stitch, with larger needles
SIZE
14.5-inches circumference (to fit a baby approximately 3 – 9 months old)
Pattern
With US size 4 needle and the main color, cast on 88 stitches. We used a basic Long Tail Cast On.
Place a marker and join for working in the round, being careful to not twist the stitches.
Round 1: *K1, P1, repeat from * to end of round.
Repeat last round until piece measures 3/4 of an inch from the cast on edge.
Switch to US size 5 needle.
Knit 3 rounds.
Knitting the Fair Isle Section
For the next 19 rounds follow this chart:

Some tips:
Read each line from right to left, starting at the bottom right corner. Repeat the line until the end of the round (4 times), and then move up the chart to the next round.
Be sure to keep the strands across the back of the work loose. I find the best way to do this is to shove the stitches on the right needle far over to the right so that the new color has to stretch to reach the left needle. This creates perfect slack, preventing buckling and tightness.

One other thing to keep in mind is that when there are 7 or 8 stitches of 1 color, tack the other color’s strand after 3 or 4 stitches. Also, I cut the MC, but carried the other colors up the inside.
Here’s what the fair isle section looks like when it’s finished:

Knitting the Crown
With the MC, knit 3 rounds.
Next round: *K6, K2tog, repeat from * to end of round.
Knit 1 round.
Next round: *K5, K2tog, repeat from * to end of round.
Knit 1 round.
Next round: *K4, K2tog, repeat from * to end of round.
Knit 1 round.
Next round: *K3, K2tog, repeat from * to end of round.
Changing to double pointed needles, knit 1 round.
Next round: *K2, K2tog, repeat from * to end of round.
knit 1 round.
Next round: *K1, K2tog, repeat from * to end of round.
Next round: *K2tog, repeat from * to end of round. (12 stitches left)
Cut the yarn. Sew the tail through the remaining stitches, pull tight to close the top of the hat, and bring the tail to the inside of the hat.

Weave in the ends and block the hat.
Finishing
For really satisfying pom poms, I like to use a Pom Pom Maker. In this case, I chose the second largest size and the white yarn. Please check out my Pom Pom Tutorial if you need help figuring out how your pom pom maker works.
After tying off the pom pom, cut the tail and bring it through the center of the top of the hat. Turn the hat inside out and tightly tie the pom pom tail and the hat tail in a square knot. Weave in the ends.


Hello!
Gorgeous hat .. I’d like to make one for a man .. how do I adjust to determine how much yarn I need? .. Also, if it’s going to be worn skiing, is there a particular wool that is best?
Thanks a lot! Haley
I’d love to know if you have this pattern in adult sizes?
Thank you.
Hello Vicky,
Unfortunately we don’t have this pattern sized up for adults at the moment! If you would like to try making a larger size, make sure to add 22 stitches at a time so that you don’t throw off the color work! Keep in mind that every 6 stitches equals one inch according to the gauge of the pattern.
Best of luck! -Alyson
Hello! Whats the name of the book you're talking about in the intro?
Hi Frederique,
Weird! I don't know what happened to the photo that used to be in this story. So much has changed since 2008!
The book is called Traditional Fair Isle Knitting by Sheila McGregor and it's available at Purl Soho right here: https://www.purlsoho.com/purl/products/item/3067-Dover-Publications-Traditional-Fair-Isle-Knitting
And thanks for pointing out the omission. I've changed the intro to include the book info!
Whitney
Hi! Great design, but I wondered what is the best way to make bigger versions, I want to make it for a 5 yr old and an 8 yr old . Any help would be great!
Thanks
Kim x
Hi Kim,
The fair isle pattern works on a multiple of 22 stitches, so the next biggest size you could make would cast on 110. At a gauge of 6 stitches to the inch,110 stitches would end up being 18 1/3 inches in circumference, maybe a little big for a 4 or 5 year old who usually wears more like a 16-inch hat.
So, maybe try the original pattern in a larger gauge (divide the cast on [88] by the number of stitches per inch to determine what circumference you'll get); or try the 110 stitches at smaller gauge.
By the way, if you end up using 110 stitches, be sure to start the crown decreases with *k8, k2tog instead of *K6, k2tog.
Please let us know if you need more guidance and we'd be happy to give it! Thanks for your question!
Whitney
I just discovered this amazing website. Everything is so easy to understand unlike many other patterns. I love the diagrams for the fair isle patterns. I am going to make this hat for a baby that will actually be born in a couple days! Sofia might not wear it for a few months but thats ok! I am going to give it to her for christmas. It is such a beautiful hat and I am considering buying the book. Thank you so much!!