Pom Pom Tutorial
On a hat, hanging from a garland, or in a bowl on the table, pom poms are nothing but fun!

Here we show you all our tricks for making a perfectly dense and fluffy one-color pom pom, using our Pom Pom Maker Set. For tips on making fancier designs, like polka dots, color blocks, and sprinkles, pick up our Pom Pom Pattern… Or, get the Maker Set, Pattern, and six skeins of Pocket Posy all together in our Pom Pom Kit (Note: no longer available)!
Materials
- A U-shaped pom pom maker. We used Purl Soho’s Pom Pom Maker Set.
- Some yarn. Amount depends on weight of yarn and size of pom pom. (NOTE: The pom poms shown here were made with Purl Soho’s Posy, which is no longer available. To see our full range of beautiful yarns, click here!)
- Embroidery floss, for securing the pom pom (or some of the yarn you used to make your pom pom, if it’s strong)
- Very sharp scissors
Note
This tutorial explains how to make pom poms using Purl Soho’s Pom Pom Maker Set, but these instructions apply to all U-shaped pom pom makers (even ones you cut out of cardboard!) and almost any yarn.
Determine the Size
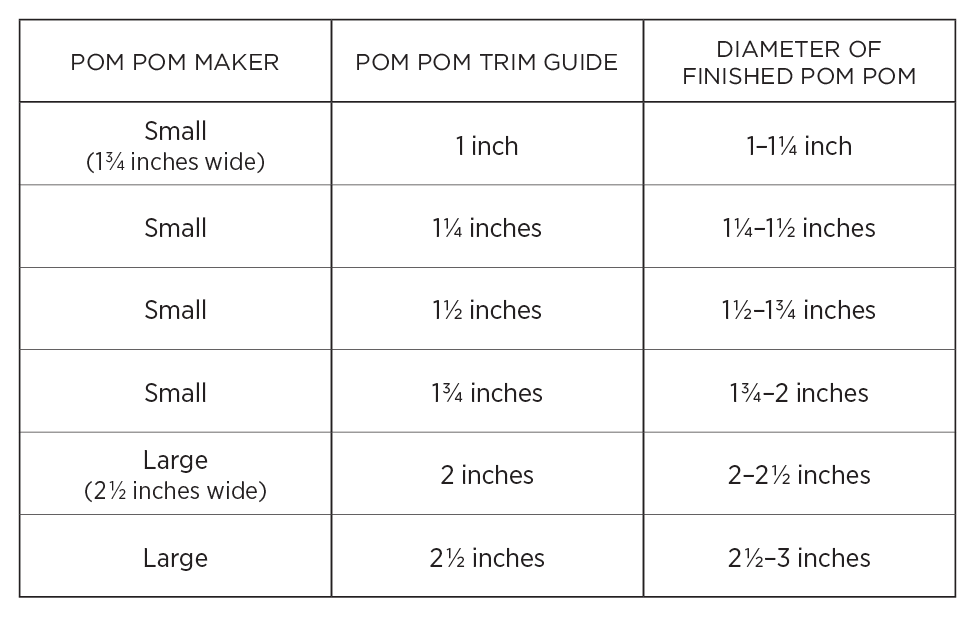
Your pom pom’s size depends on the size pom pom maker and trim guide you use. The maker determines the initial size of the pom pom and the trim guide determines the size of the finished pom pom.
Our Small + Large Pom Pom Maker Set includes two pom pom makers and six trim guides.
Here’s what size pom poms to expect from these tools…
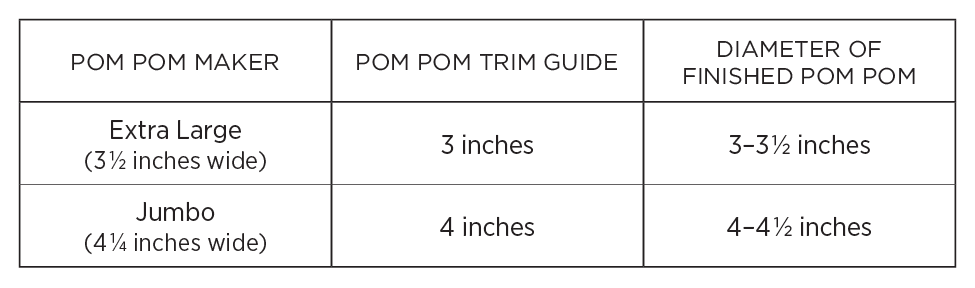
Our Extra Large + Jumbo Pom Pom Maker Set includes two pom pom makers and two trim guides.
Here’s what size pom poms to expect from these tools…
Wrap
NOTE: Before you begin, if your yarn is in a skein, be sure to wind it into a ball. For tips on how, please visit our tutorial.
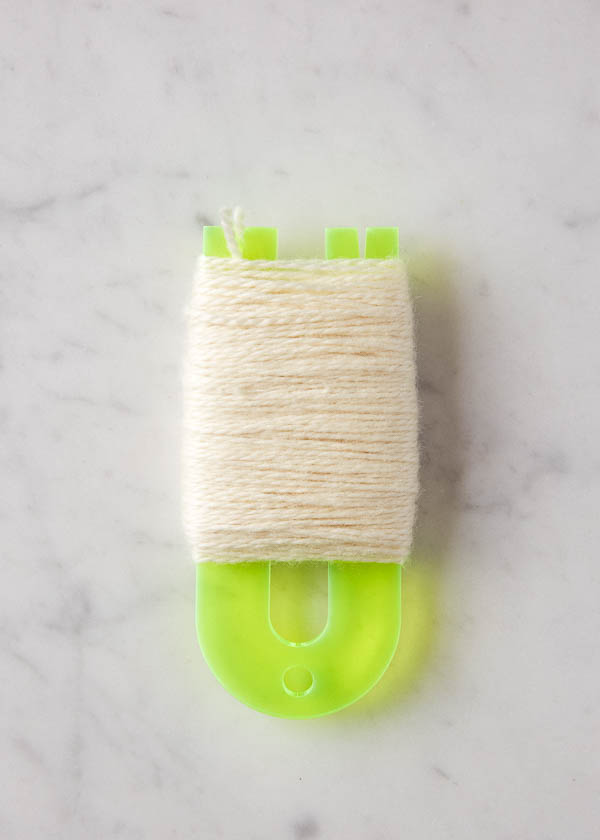
To start, tuck one end of yarn into the notch on either arm of the pom pom maker. (Our makers have notches, but if yours doesn’t, just use your finger to pin the end against the maker as you begin.)
Now wind the yarn around the pom pom maker’s arms. The number of revolutions you make depends on the size pom pom you want, i.e. on the trim guide you intend to use. For nice, dense pom poms, refer to the following chart for the number of revolutions we recommend making.
NOTE: You can use two ends of yarn at the same time so that you only need to wrap half the number of revolutions. If you’re working with a ball of yarn whose other end is buried, just roll that ball into two!
For Purl Soho’s Pom Pom Maker Set, these are our recommendations…
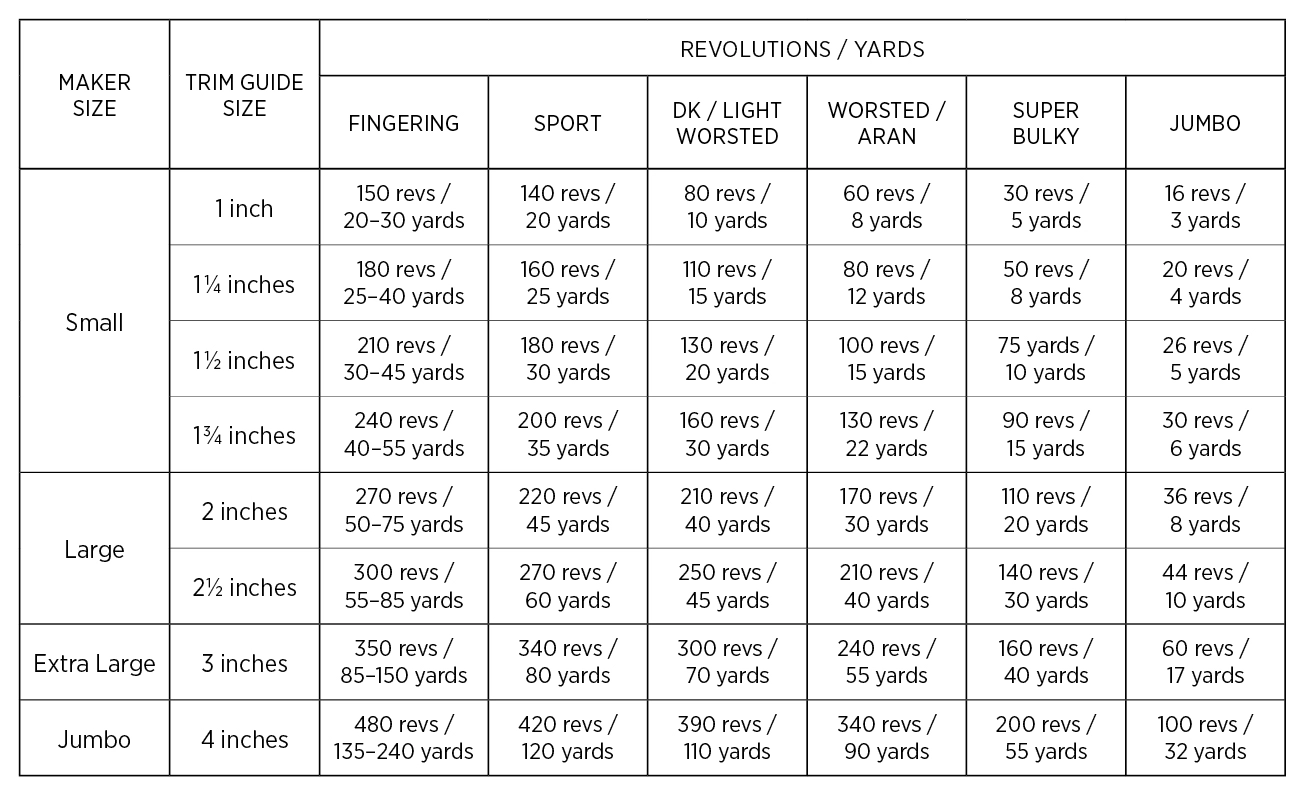
NOTE: For fingering weight yarn, adjust the number of revolutions for the yarn you’re using: more revolutions for thinner yarn and fewer for thicker yarn.
Once you’ve wrapped the yarn, tuck it into either notch and cut the yarn.
Secure
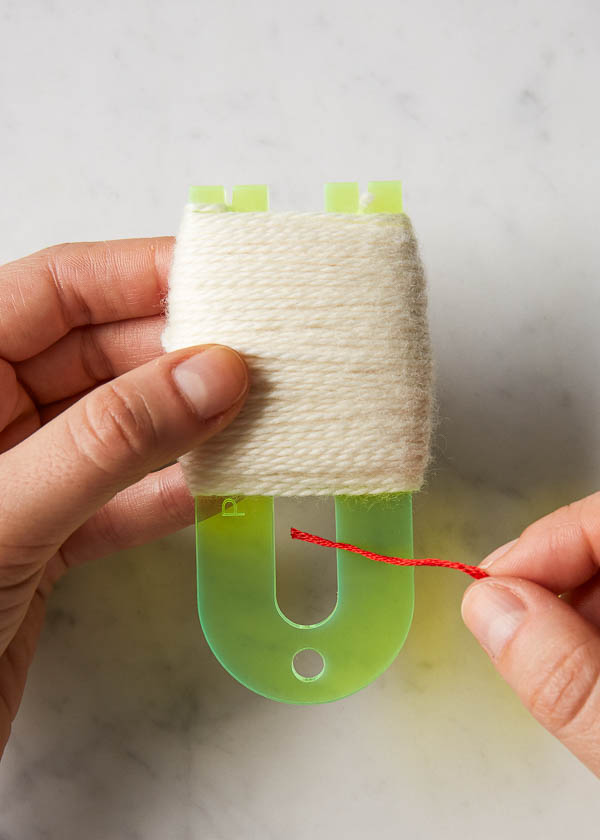
Cut an 18-inch length of embroidery floss (we’re using red here for clarity, but we used ecru for our actual pom pom), and thread one end through the space under the wraps of yarn. Pull the floss a bit more than halfway through.
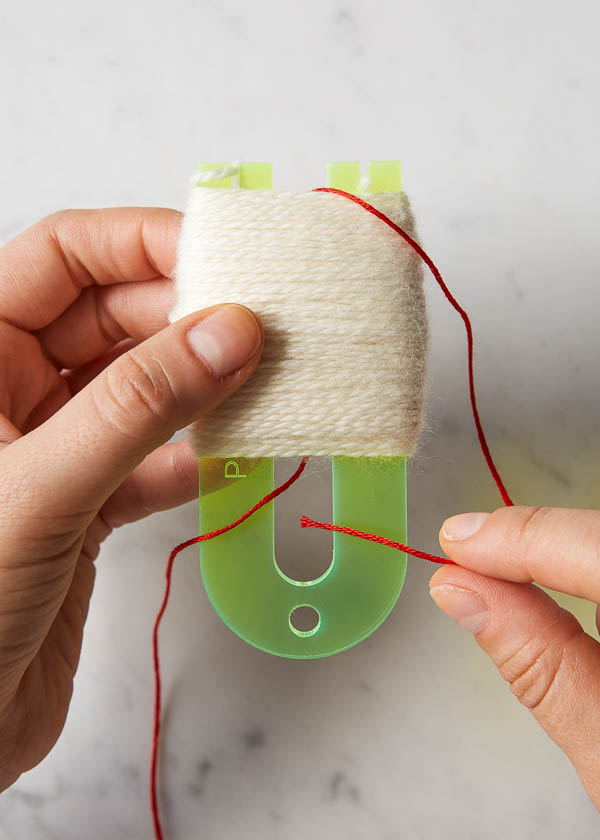
Bring that same end of the floss up and over the center of the wrapped yarn, and thread it back through the same space once more. Bring that end up and over the wrapped yarn again.

Bring the two ends of floss together, making sure the floss is centered on and perpendicular to the wraps. Now tie a surgeon’s knot by making a half granny (like the first step of tying your shoes), but wrapping the end through the loop twice. Pull the knot to the surface of the yarn, but don’t pull tight just yet.
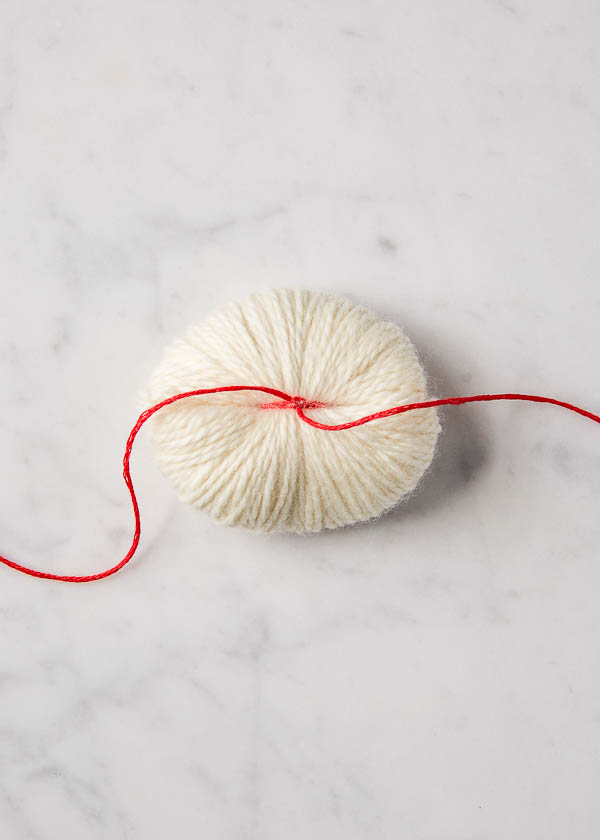
Carefully slide the yarn from the pom pom maker and now pull the knot as tight as possible without breaking the floss. Use a spare finger to anchor the surgeon’s knot and tie a half granny knot.
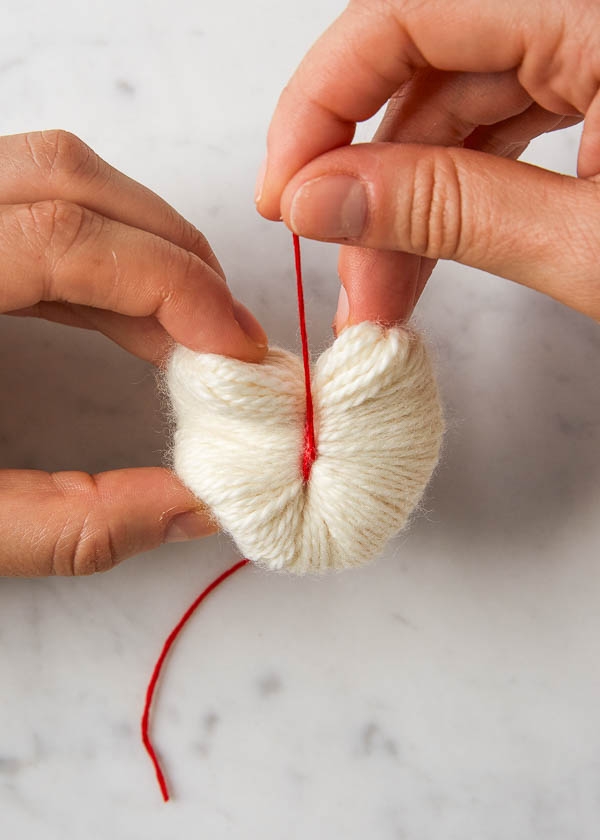
Bring the ends of the floss to the back side of the pom pom, making sure to pass the floss through the middle of the loops without catching any. Tie another very tight surgeon’s knot, and secure it with a half granny. The center of the pom pom should feel very firm. If it doesn’t, repeat these steps to tie another set of knots.
Now trim the embroidery floss, either close to the knot if you plan to use your pom pom like a bead (on garlands, for example), or leaving some length if you plan to tie your pom pom to something, such as a gift or zipper. In that case, be sure to not cut the embroidery floss when you’re trimming your pom pom, which is next!
Trim
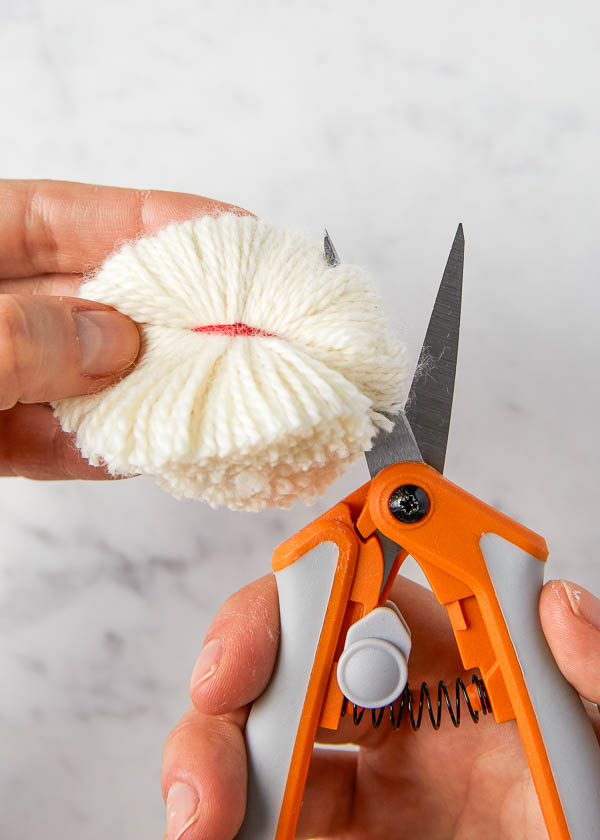
Now trim through the center of all the yarn loops. Be sure to also cut through the little loops that may be buried closer to the center of the pom pom.

Holding the pom pom flat, center the trim guide on the pom pom. Gripping the guide firmly in place, trim along its perimeter, making the cuts straight down, perpendicular to the guide. Place the trim guide on the center of the back side of the pom pom and trim around once more.
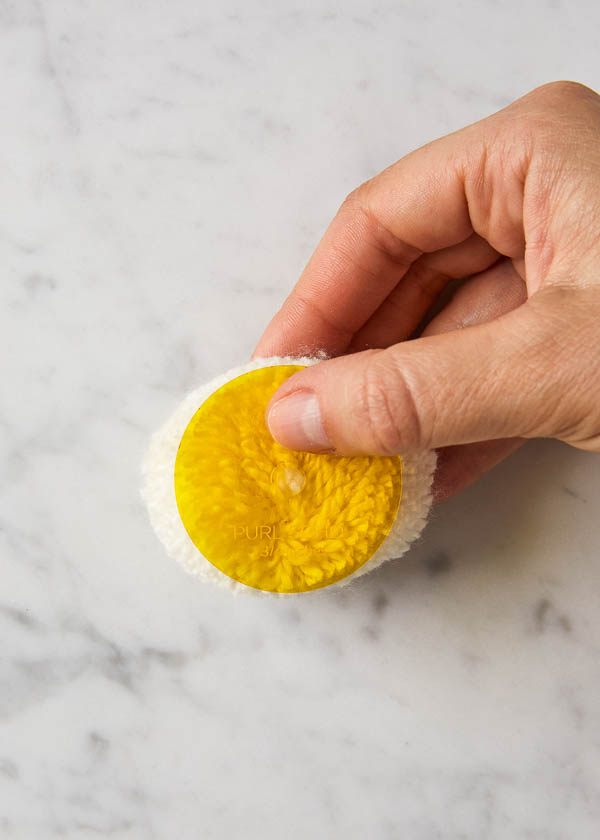
Now fluff up the pom pom. It should be a bit of an oblong at this point. Holding the pom pom so the long side of the oblong is facing you, place the trim guide on the center of the pom pom and press it flat. Trim around the guide as before, both on the front and back sides.
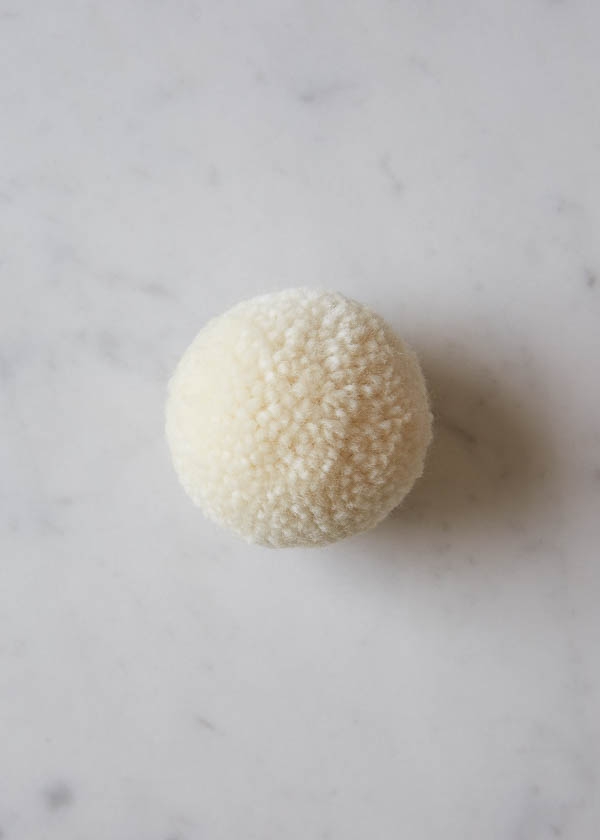
Fluff up the pom pom again and give it a final once over, trimming off any little yarns that are still sticking out and cleaning up uneven patches. That’s it, one beautiful pom pom!


I cannot print the text because there is other text on top of it. You do not have a function that allows me to delete it. check it out and let me know so I can download it.
Hi Bea,
Thank for reaching out! If you’re on a desktop version of the site, you will find a “print” icon in the right column just below the date and tags. If you’re on a mobile version of the site, you will find a “print” icon below the pattern and above the comments.
Follow the easy on-screen instructions to delete whichever parts of the pattern you don’t want to print or save. For example, you may decide to shorten the pattern by omitting certain images or the list of materials. To remove images, click the drop down next to the image icon and change from 100% to 0%.
I hope that helps!
Julianna
The pom-poms are so fit and luxurious.
Can you please do a video tutorial on how to make Pom poms please.
Hello Effie,
Thank you for reaching out and for your great suggestion! I will certainly pass it along.
Happy knitting,
Marilla
Thank you for your freely available patterns and tutorials. Very much appreciated!
Can you please make a video
Hi Sophie,
Thanks for writing in! Unfortunately we don’t have the resources at the moment to do a video tutorial of this. We will however keep your request in mind for the future!
Best,
Julianna
Hi! Thank you for sharing this pattern. My pom poms have gone from floppy to full and fun! I am interested in string a bunch together to make a garland – how would I connect each of the pom poms to a long knit i-chord? Thanks so much!
Best,
Colleen
Hi Colleen,
Thanks for writing in – it’s wonderful to hear that our tutorial was so helpful! We usually create our garlands by threading pom poms onto a thin twine or rope using a yarn needle, but an i-cord would probably be too thick to thread through the center of a pom pom. Instead, I would recommend leaving the tails of the embroidery floss or yarn that you use to secure the center of the pom pom long, and using those to tie the pom poms to the i-cord.
Warmly,
Julianna
Thank you for your help! Happy knitting!
I purchased your Pom Pom maker kit and I love it. I’m attempting to make snowmen ornaments and can’t figure out how to string the poms together to make the body. I’thought I could run the tail of the embroidery floss through the center but can’t figure out how to knot/end it so that it doesn’t pull back through. Any thoughts or suggestions.
Thanks
Hi Amy,
Thanks for reaching out! I am so glad to hear that you love the Pom Pom maker and kit! That sounds like such a cute idea! I would recommend running a tail of embroidery floss through the center like you originally tried but securing it with a knot around the embroidery floss used to tie around the yarn to make the Pom Pom!
I hope this helps and please let us know how this turns out!
All the best,
Gianna
I have just made an adorable Pom Pom! However, I must have done something wrong because I’m not sure how to attach to top of hat! Is there supposed to be long tails somewhere? Is there a video tutorial somewhere I have missed? Thanks always for your help, Linda
Hi Linda,
Thank you for writing in! You can add an additional length of yarn around the pom pom if you have already cut your tails! For next time, the red strings in this tutorial are the strands you should NOT trim as they can be used to tie onto the top of your project. I hope this helps but please let me know if you have any other questions!
Happy making,
Gavriella
I purchased your extra large/jumbo pom pom maker. I am using your Worsted Twist. Your pattern suggests 240 revolutions for the Worsted Twist and a 3 inch pom pom. But that creates such a thick center that no embroidery floss will hold the strands tightly enough. Any suggestions?
Hi Janet,
Thanks for reaching out! I totally understand what you are saying! It takes a bit of finagling but it is possible to use the embroidery floss to secure the center, I recommend using a longer piece so that you can pull it and wrap it around several time to insure that it is tight enough to keep the pom pom together! If you are still having problems I would recommend a few less wraps around to see if that helps with the bulk.
I hope this helps!
Gianna
When adding a pom pom to a hat (a first for me), do you recommend attaching it in a way that allows it to be removed for future cleaning of the hat? I’m concerned about the ends beginning to look frayed. I’m making a hat in fingering, 100% wool.
Thanks for your help (and I do wish I had thought earlier and already had your pom pom maker on hand!).
Hi Patrice,
Thanks for reaching out! Typically when we attach a Pom Pom to a hat we secure it so that it is permanently attached, but I think it could be very cool if you could attach it to the top so that it is removable! I think that would be a great way to prolong the life of the pom pom since it is possible for some fibers to fray or felt a bit. Another way to keep your Pom Pom neat is to lightly trip the edges if it starts to look a bit shaggy!
Please let us know how this turns out!
Warmly,
Gianna
Thanks for your suggestions. What I have now done on two hats (specifically the Scrap Yarn pattern from Ravelry, and the Up and About Striped Beanie from Churchmouse) is to tie the pom pom with a double strand of my yarn then thread the ends through the small hole at the top of the hat. On the inside I used a large-ish plastic button with 2 holes; I threaded the ends of my tie through the button, snug up the pom pom to the hat; then tie one surgeon’s loop and finish with a tied bow, so it will be easy to untie. So far, the pom pom stays on the hat nicely, and I haven’t had to launder either hat, so I don’t have a complete story.
Hi Patrice,
Thanks for reaching out and sharing your tips! That sounds like a great idea to keep the pom pom sturdy but at the same time easy to remove!
Warmly,
Gianna
I bought the small pom pom kit and have followed the instructions exactly but my pom poms look nothing like the tutorial. They are limp and scraggly – no where near as full and puffy as the photos. I don’t know what I’m doing wrong??
Hi MG,
Thanks for reaching out! If you would like, you can send a photo of your pom pom to our customer service team at customerservice@purlsoho.com and they can troubleshoot further what may be the problem!
I hope this helps!
Gianna
Do you sell the scissors that are shown? I would love to get them. None of scissors are sharp enough. Thanks,
Hi Barbara,
We do carry the scissors from the tutorial, but unfortunately they’re out of stock right now! In the future, you can find them right here. Also, I’d recommend entering your email address to get notified when they return!
All the best,
Lili
Thank you so much!💕