
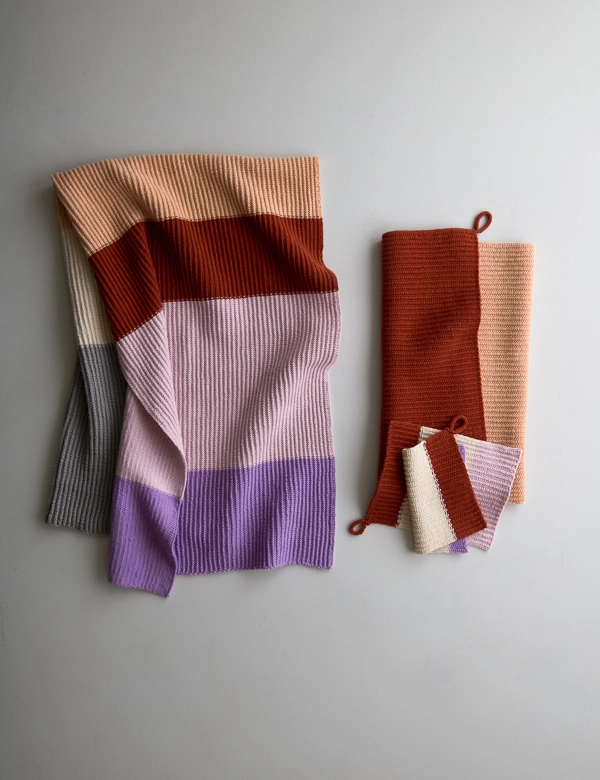
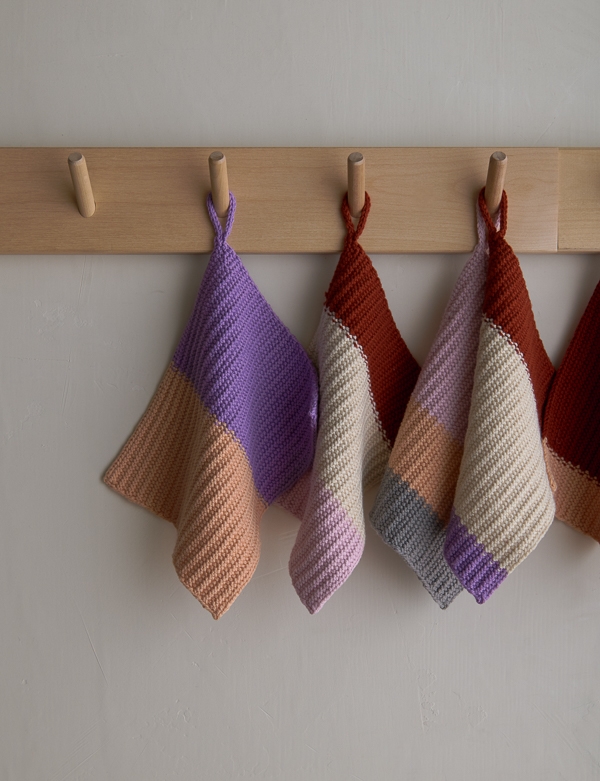
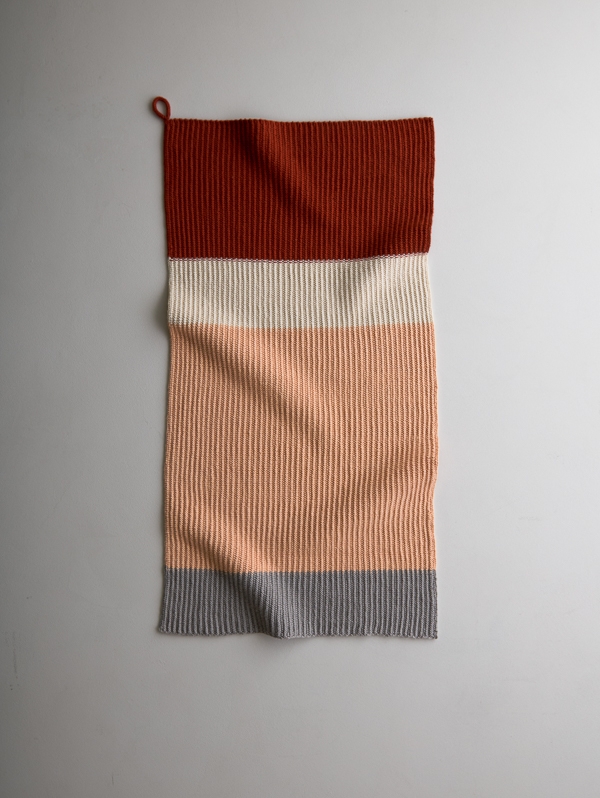
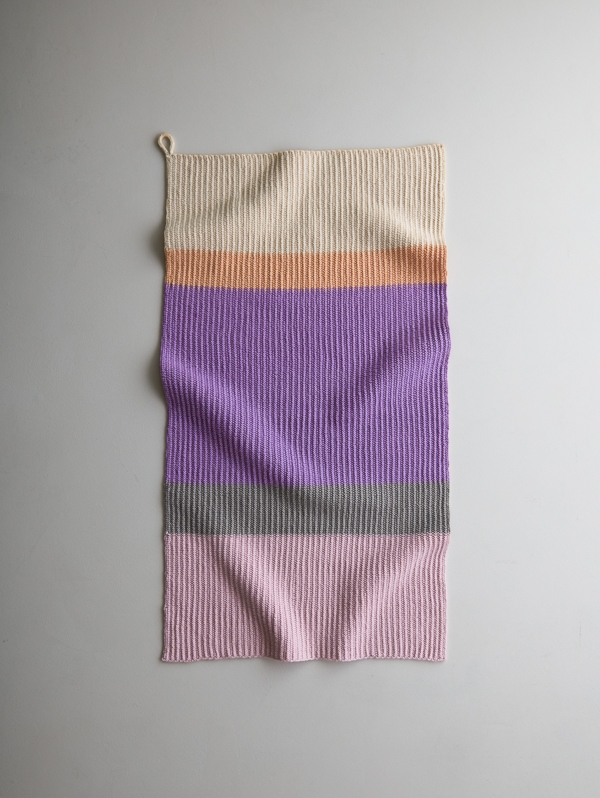
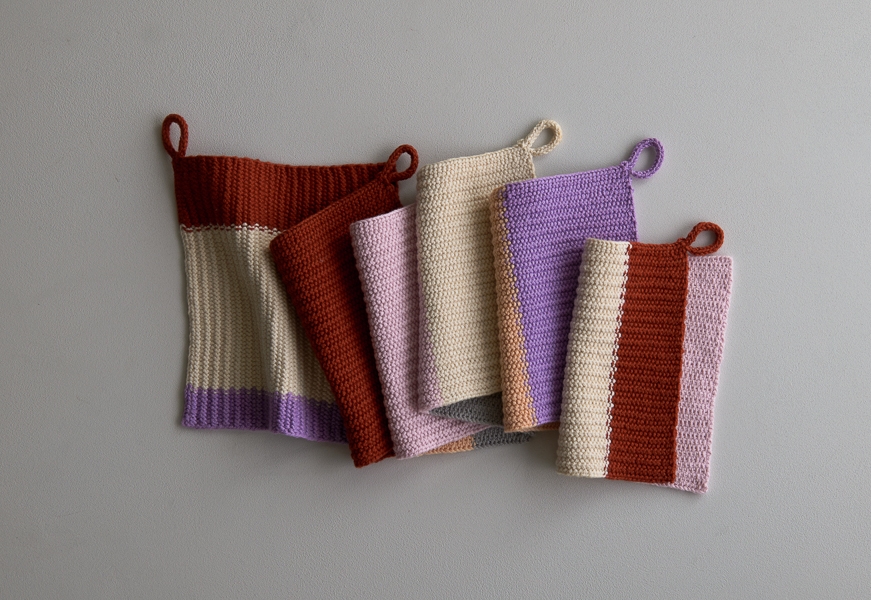
Stripes + Blocks Towel Set
Having become so intimate with our homes over the past year, we all know by now the immense pleasure of a perfectly weighted mug or a well-cushioned slipper. Our senses are alive to the things we see and feel every day, and the importance of our objects is tangible.

For us, this answers the question, “Why would I bother to hand knit my towels and washcloths?” In fact, once you’ve come to know the jolt of gratification that comes with each use, the answer may more succinctly be, “Why wouldn’t you?”
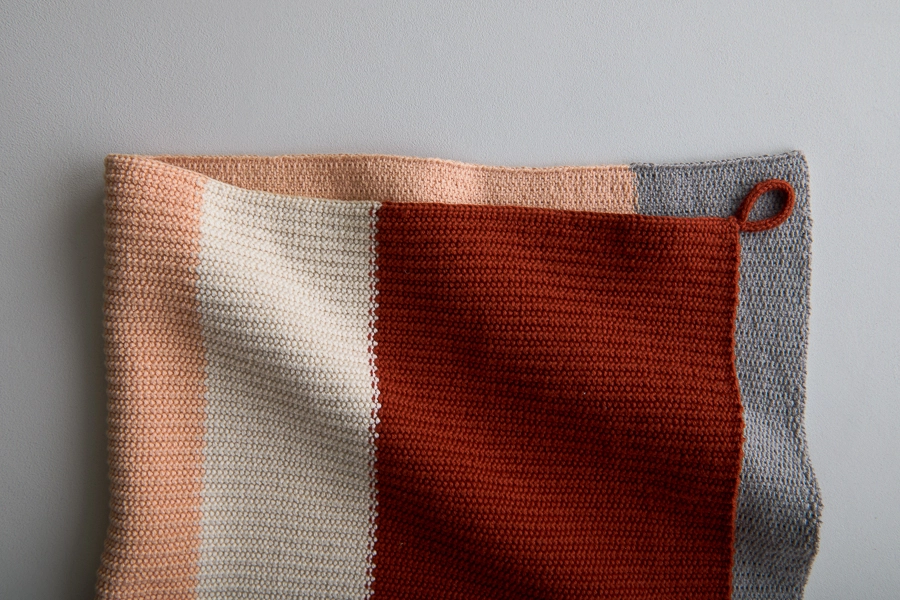
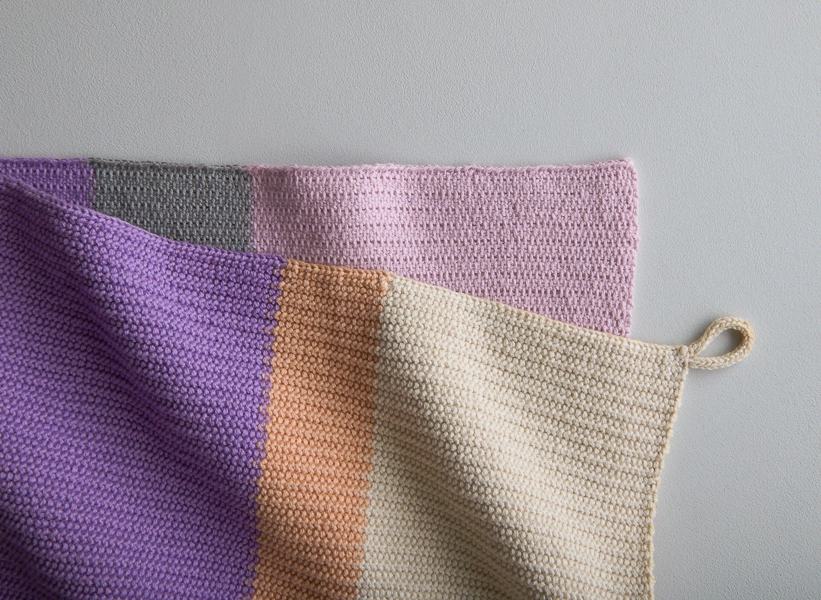
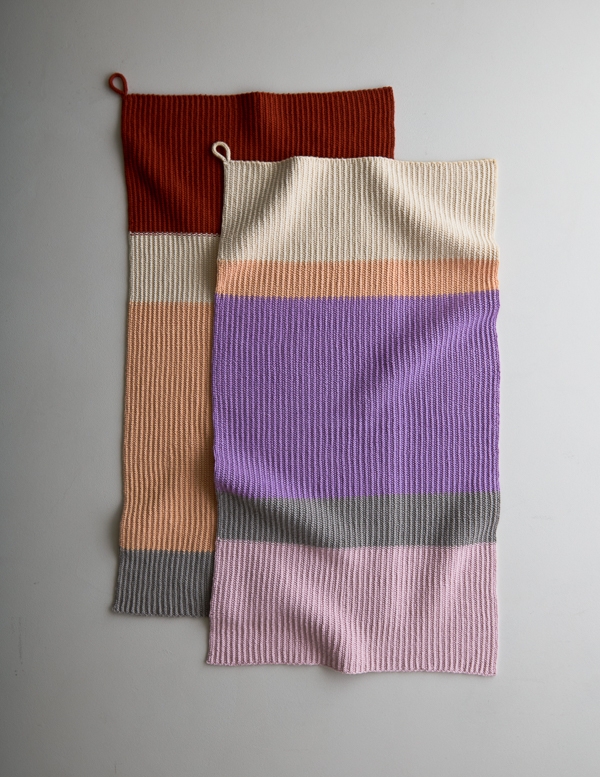
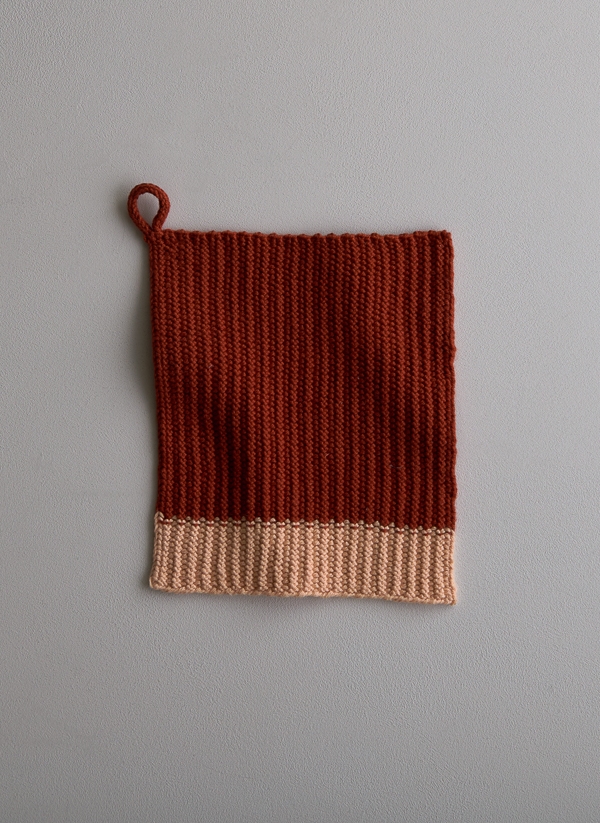
Our Stripes + Blocks Towel Set is guaranteed to provide that jolt with its distinctive texture, lovely colors, and soft cotton-y feeling. The texture is thanks to a simple two-row slip stitch pattern that creates a beautiful ripple, as well as a nicely dense and squishy fabric.
And the colors and touch are due to our brand new Buttercup Cotton! Like our Cotton Pure, it is 100% organically grown non-mercerized cotton, but Buttercup Cotton is a lighter fingering weight, perfect for heirloom baby gear, summertime sweaters, and fine towels and washcloths like these.
As gentle as a tiny wildflower in a breeze and as sweet as a sunny carpet of blossoms, Buttercup Cotton is machine wash- and dry-able, wonderfully soft, and comes in 18 fresh-picked colors, from juicy Summer Melon to delicate Bluebird Egg.
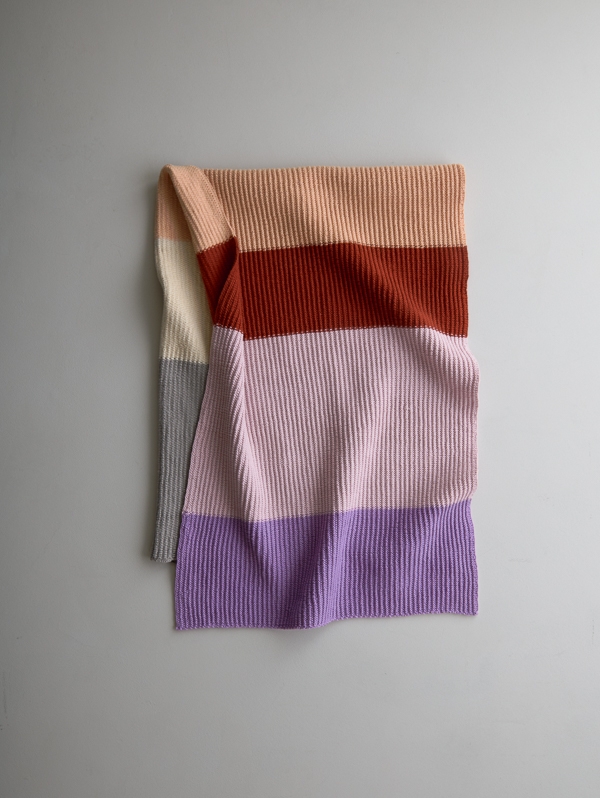
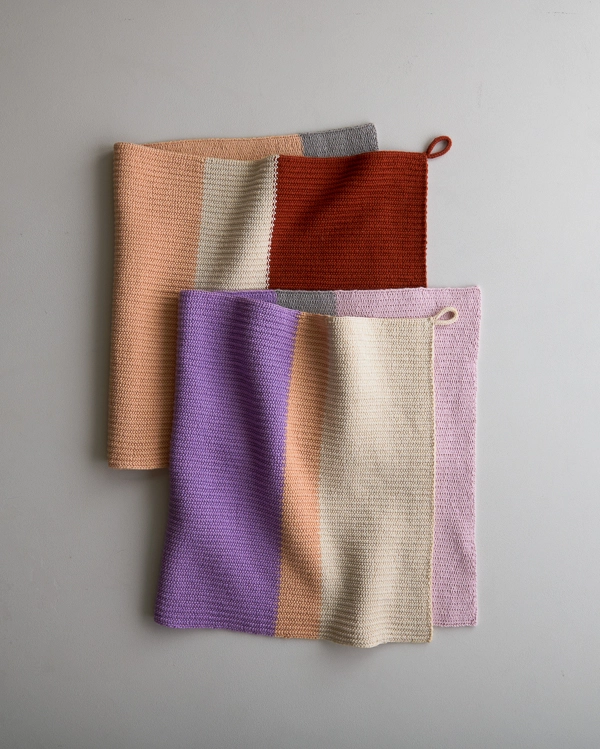
To work up your own set, pick up our Stripes + Blocks Towel Set Bundle, in either this shell-y Starfish or in a watery blue Lake palette. Two bundles makes this entire set of a bath towel, two hand towels, and six washcloths, or make fewer pieces with just one bundle. However you do it, your homelife will thank you!
Designed by Purl Soho designer, Jake Canton. Click here to see even more of Jake’s designs!
Share your progress + connect with the community by tagging your pics with #PurlSoho, #PurlSohoBusyHands, #PurlSohoStripesAndBlocksTowelSet, and #PurlSohoButtercupCotton. We can’t wait to see what you make!
Materials

To make a full set of 1 Bath Towel, 2 Hand Towels, and 6 Washcloths, you’ll need…
- Two Stripes + Blocks Towel Set Bundles (no longer available). Each includes…
- 6 skeins in six colors of Purl Soho’s Buttercup Cotton, 100% organically grown cotton. Each skein is 364 yards. (NOTE: We no longer offer Buttercup Cotton, but choose from one of our other fingering weight yarns.)
NOTE: Just one bundle makes 1 Bath Towel and 4 Washcloths, or 2 Hand Towels and 4 Washcloths.
You will also need…
- US 4 (3.5 mm), straight or 24-inch circular needles
- If using straight needles: Two US 4 double pointed needles for I-Cord
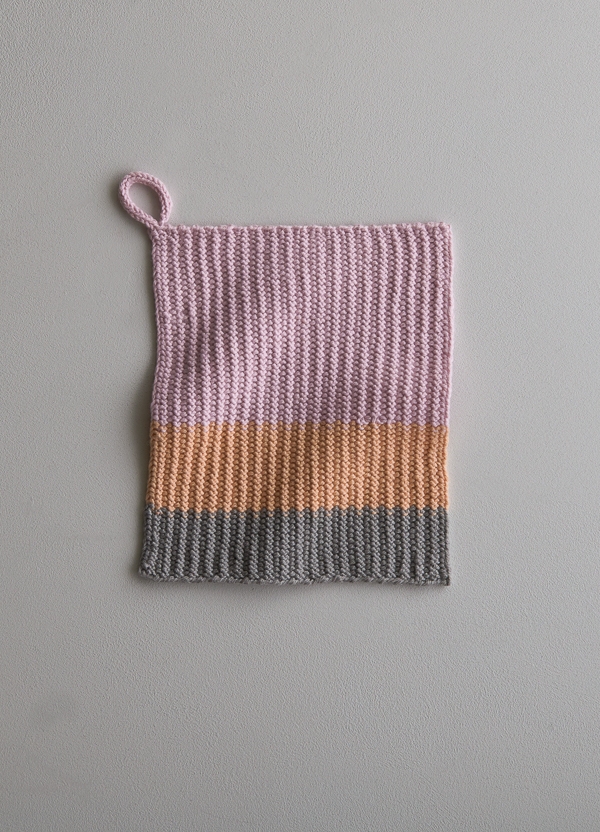
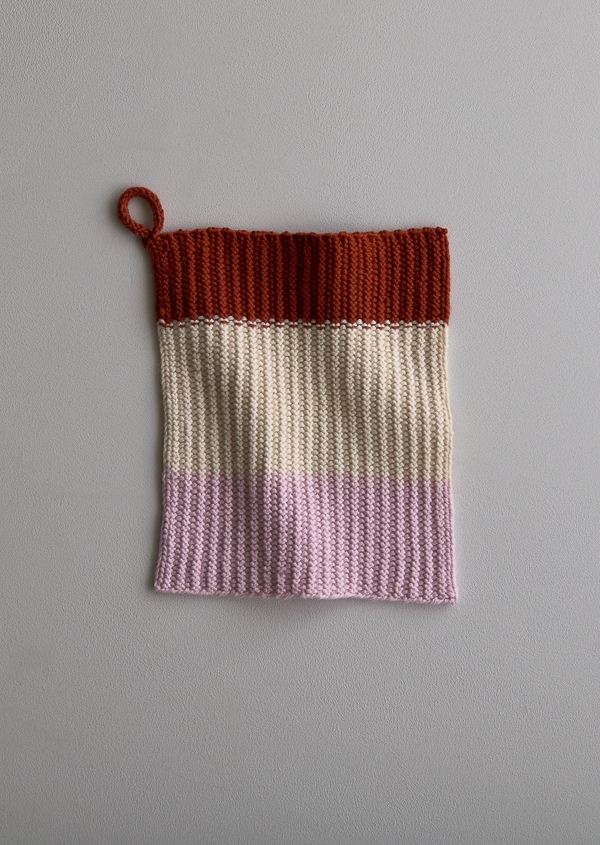
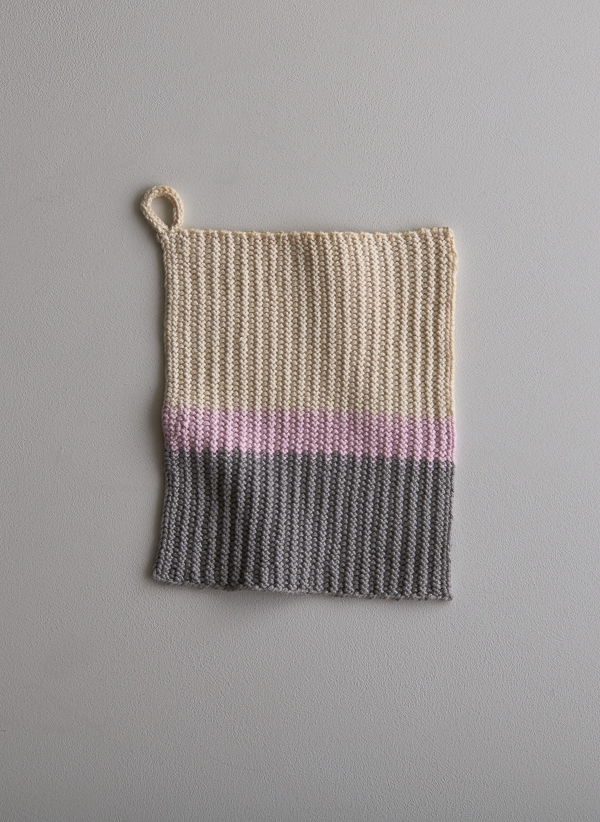
Choose from 2 pretty palettes…
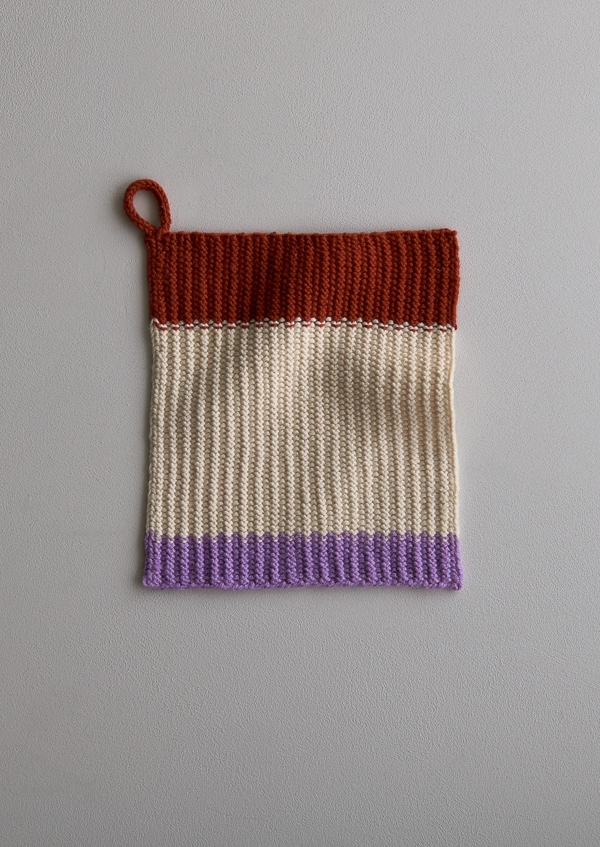
STARFISH
(photo above)
- Color A: Gray Cloud
- Color B: Heirloom White
- Color C: Summer Melon
- Color D: Cedar Wood
- Color E: Vintage Pink
- Color F: Purple Aster
LAKE
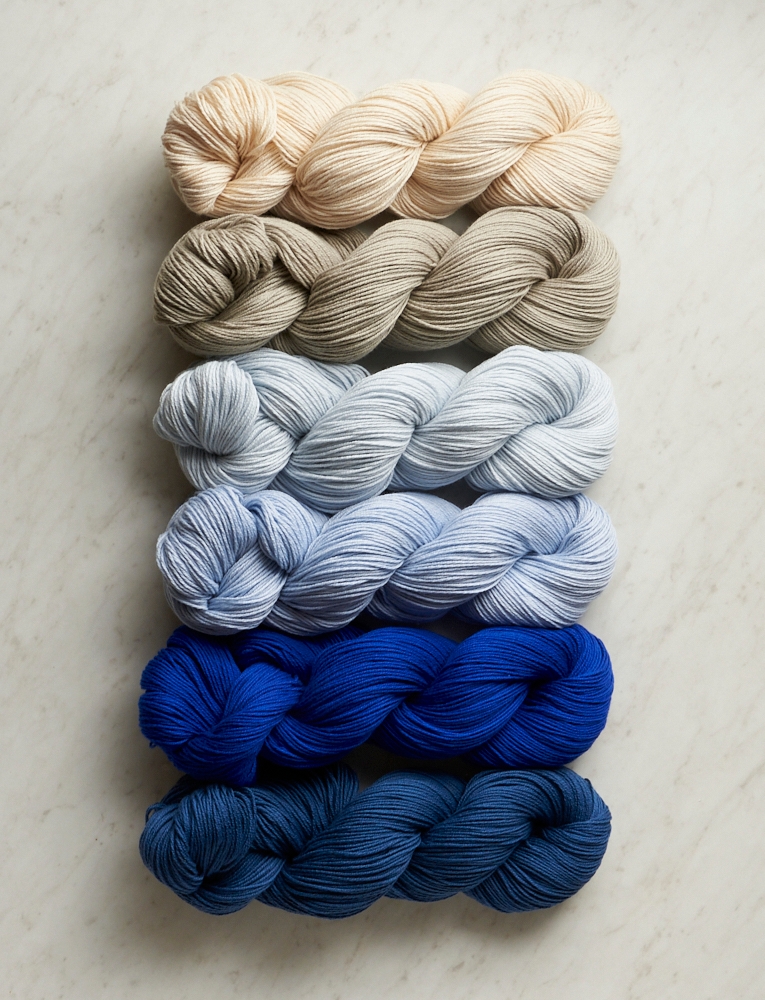
- Color A: Heirloom White
- Color B: Woodland Gray
- Color C: Morning Sky
- Color D: Pale Denim
- Color E: Blue Jay
- Color F: Evening Blue
Here’s how much yardage you’ll require for each component of the set…
ONE BATH TOWEL
- Color A: Approximately 364 yards required
- Color B: Approximately 255 yards required
- Color C: Approximately 291 yards required
- Color D: Approximately 182 yards required
- Color E: Approximately 364 yards required
- Color F: Approximately 255 yards required
TWO HAND TOWELS
- Color A: Approximately 225 yards required
- Color B: Approximately 288 yards required
- Color C: Approximately 350 yards required
- Color D: Approximately 230 yards required
- Color E: Approximately 193 yards required
- Color F: Approximately 291 yards required
SIX WASHCLOTHS
- Color A: Approximately 52 yards required
- Color B: Approximately 140 yards required
- Color C: Approximately 88 yards required
- Color D: Approximately 128 yards required
- Color E: Approximately 96 yards required
- Color F: Approximately 64 yards required
Gauge
32 stitches and 64 rows = 4 inches in stitch pattern
28 inches and 40 rows = 4 inches in stockinette
Sizes
Finished Dimensions
- Bath Towel: 26 inches wide x 49 inches long
- Hand Towel: 20 inches wide x 30 inches long
- Washcloth: 8 x 8 inches
Notes
Stitch Multiple
This pattern works over a multiple of 3 stitches.
Stitch Pattern
Row 1 (wrong side): Slip 1 knitwise with yarn in front (wyif), *slip 1 purlwise wyif, k2, repeat from * to last 2 stitches, slip 1 purlwise wyif, k1.
Row 2 (right side): Slip 1 knitwise wyif, *p1, slip 2 purlwise with yarn in back, repeat from * to last 2 stitches, p1, k1.
Bind Off In Stitch Pattern
K2, pass first stitch over, *slip 1 with yarn in front, pass first stitch over, k1, pass first stitch over, k1, pass first stitch over, repeat from * to last stitch, k1, pass first stitch over.
Cut yarn and pull tail through last stitch.
Pattern
Bath Towel
With Color A, cast on 207 stitches. We used a basic Long Tail Cast On.
Repeat Rows 1 and 2 of Stitch Pattern (see Notes) for 10 inches, ending with Row 2.
Cut Color A.
Join Color B and repeat Rows 1 and 2 of Stitch Pattern for 7 inches, ending with Row 2.
Cut Color B.
Join Color C and repeat Rows 1 and 2 of Stitch Pattern for 9 inches, ending with Row 2.
Cut Color C.
Join Color D and repeat Rows 1 and 2 of Stitch Pattern for 5 inches, ending with Row 2.
Cut Color D.
Join Color E and repeat Rows 1 and 2 of Stitch Pattern for 11 inches, ending with Row 2.
Cut Color E.
Join Color F and repeat Rows 1 and 2 of Stitch Pattern for 7 inches, ending with Row 1.
With the right side facing you, bind off in Stitch Pattern (see Notes).
Weave in ends and wet block.
Hand Towel
Layout 1
With Color A, cast on 159 stitches. We used a basic Long Tail Cast On.
Repeat Rows 1 and 2 of Stitch Pattern (see Notes) for 4½ inches, ending with Row 2.
Cut Color A.
Join Color C and repeat Rows 1 and 2 of Stitch Pattern for 12 inches, ending with Row 2.
Cut Color C.
Join Color B and repeat Rows 1 and 2 of Stitch Pattern for 4½ inches, ending with Row 2.
Cut Color B.
Join Color D and repeat Rows 1 and 2 of Stitch Pattern for 8½ inches, ending with Row 1.
With the right side facing you, bind off in Stitch Pattern (see Notes) to last 2 stitches, k2, leaving 3 stitches on right needle.
Go on to Make I-cord in Finishing section, below.
Layout 2
With Color E, cast on 159 stitches. We used a basic Long Tail Cast On.
Repeat Rows 1 and 2 of Stitch Pattern (see Notes) for 7½ inches, ending with Row 2.
Cut Color E.
Join Color A and repeat Rows 1 and 2 of Stitch Pattern for 3 inches, ending with Row 2.
Cut Color A.
Join Color F and repeat Rows 1 and 2 of Stitch Pattern for 11½ inches, ending with Row 2.
Cut Color F.
Join Color C and repeat Rows 1 and 2 of Stitch Pattern for 2 inches, ending with Row 2.
Cut Color C.
Join Color B and repeat Rows 1 and 2 of Stitch Pattern for 6 inches, ending with Row 1.
With the right side facing you, bind off in Stitch Pattern (see Notes) to last 2 stitches, k2, leaving 3 stitches on right needle.
Go on to Make I-cord in Finishing section, below.
Washcloth
Layout 1
With Color F, cast on 63 stitches. We used a basic Long Tail Cast On.
Repeat Rows 1 and 2 of Stitch Pattern (see Notes) for 1 inch, ending with Row 2.
Cut Color F.
Join Color B and repeat Rows 1 and 2 of Stitch Pattern for 5 inches, ending with Row 2.
Cut Color B.
Join Color D and repeat Rows 1 and 2 of Stitch Pattern for 2 inches, ending with Row 1.
With the right side facing you, bind off in Stitch Pattern (see Notes) to last 2 stitches, k2, leaving 3 stitches on right needle.
Go on to Make I-cord in Finishing section, below.
Layout 2
With Color A, cast on 63 stitches. We used a basic Long Tail Cast On.
Repeat Rows 1 and 2 of Stitch Pattern (see Notes) for 1½ inch, ending with Row 2.
Cut Color A.
Join Color C and repeat Rows 1 and 2 of Stitch Pattern for 2 inches, ending with Row 2.
Cut Color C.
Join Color E and repeat Rows 1 and 2 of Stitch Pattern for 4½ inches, ending with Row 1.
With the right side facing you, bind off in Stitch Pattern (see Notes) to last 2 stitches, k2, leaving 3 stitches on right needle.
Go on to Make I-cord in Finishing section, below.
Layout 3
With Color E, cast on 63 stitches. We used a basic Long Tail Cast On.
Repeat Rows 1 and 2 of Stitch Pattern (see Notes) for 2½ inch, ending with Row 2.
Cut Color A.
Join Color B and repeat Rows 1 and 2 of Stitch Pattern for 3½ inches, ending with Row 2.
Cut Color B.
Join Color D and repeat Rows 1 and 2 of Stitch Pattern for 2 inches, ending with Row 1.
With the right side facing you, bind off in Stitch Pattern (see Notes) to last 2 stitches, k2, leaving 3 stitches on right needle.
Go on to Make I-cord in Finishing section, below.
Layout 4
With Color C, cast on 63 stitches. We used a basic Long Tail Cast On.
Repeat Rows 1 and 2 of Stitch Pattern (see Notes) for 1½ inch, ending with Row 2.
Cut Color C.
Join Color D and repeat Rows 1 and 2 of Stitch Pattern for 6½ inches, ending with Row 1.
With the right side facing you, bind off in Stitch Pattern (see Notes) to last 2 stitches, k2, leaving 3 stitches on right needle.
Go on to Make I-cord in Finishing section, below.
Layout 5
With Color A, cast on 63 stitches. We used a basic Long Tail Cast On.
Repeat Rows 1 and 2 of Stitch Pattern (see Notes) for 3 inches, ending with Row 2.
Cut Color A.
Join Color E and repeat Rows 1 and 2 of Stitch Pattern for 1 inch, ending with Row 2.
Cut Color E.
Join Color B and repeat Rows 1 and 2 of Stitch Pattern for 4 inches, ending with Row 1.
With the right side facing you, bind off in Stitch Pattern (see Notes) to last 2 stitches, k2, leaving 3 stitches on right needle.
Go on to Make I-cord in Finishing section, below.
Layout 6
With Color C, cast on 63 stitches. We used a basic Long Tail Cast On.
Repeat Rows 1 and 2 of Stitch Pattern (see Notes) for 4 inches, ending with Row 2.
Cut Color C.
Join Color F and repeat Rows 1 and 2 of Stitch Pattern for 4 inches, ending with Row 1.
With the right side facing you, bind off in stitch pattern (see Notes) to last 2 stitches, k2, leaving 3 stitches on right needle.
Go on to Make I-cord in Finishing section, below.
Finishing
Make I-Cord
With the remaining 3 stitches, work an I-Cord for 3 inches, working the last row as follows…
Last Row: K1, k2tog, pass first stitch over second stitch and off the right needle. Cut yarn, leaving an 8-inch tail and pull through remaining stitch.
Thread the tail onto a tapestry needle. Make a loop with the I-cord and weave the tail into the fabric of the washcloth at the base of the I-cord, then weave it through the looped I-cord, and back into the fabric of the washcloth. Weave in the remaining ends and wet block.


I have now been trying to get this stitch pattern right but I must have done something wrong each time. What I get on one side is a kind of “float” and on the other side what looks like seed stitches … please clarify this for me!
Hi Anna,
Thanks for reaching out! This is a very unique stitch, one side (the wrong side) should be smooth and resemble a linen stitch, while the other side (the right side, that is visible in the photos) will be very textured with a type of purl bumps! To achieve the right consistency you will need to knit pretty tight, and make sure you are slipping the stitches the correct direction as stated in the NOTES section of the pattern under STITCH PATTERN!
I hope this helps and please let me know if you have any more questions!
Warmly,
Gianna
So fun! Love the cute colors. Cannot wait to play around with these.
Question tho, since you are slipping first stitch, when you change colors how is best way to do that? I might not slip first stitch of that row, just knit with new color. Suggestions?
Thanx kindly
Hi Shar,
Thanks for reaching out! When bringing in the next color you will only want to bring it in on the technical “right side” of the pattern (this is the purly bumpy side), and you will want to slip the first stitch to keep the stitch pattern consistent. To do this you will simply slip the first stitch knitwise wyif as normal and then you will start with the new color with the p1 and then continuing on in stitch pattern!
I hope this helps, happy knitting!
Gianna
Can you use straight needles for these patterns?
Hi Jo,
Thanks for writing in! You could definitely use straight needle for the washcloth and hand towel sizes, but if you are interested in knitting the bath towel size straight needles would be a bit too short to accommodate all of the stitches so you would need a circular needle for that!
Warmly,
Gianna
If using Cotton Pure for this pattern would you use the same US4 needles or increase?
Hi Jonathan,
Thanks for writing in! We used a US 4 for Buttercup Cotton which is a fingering weight yarn, but if you plan on using Cotton Pure (which is a sport weight) you would definitely need to go up in needle size. I would suggest starting out by working a gauge swatch in the stitch pattern on a US 6 needle!
Warmly,
Gianna
How much will these towels shrink when dried in the dryer? Also, will they stay soft if I dry them on a rack, rather than in the dryer?
Hi Nancy,
That’s a great question! Since this yarn is made from a plant-based fiber (cotton) you shouldn’t experience a problem with shrinking that’s more common with a wool base. Just to be safe, we recommend a tumble dry low setting if you’re using a machine. You can certainly dry it on a rack if you prefer though and this will be an even gentler method on the finished fabric!
I hope that helps! Please let us know if you have any other questions.
All the best,
Zha Zha
Can I ask you to check the yardage needed for each color per bath towel against the length of each color in the pattern? They seem to be off. For example color A needs 364yds for 10″ and color E just needs 87yd for 11″. Color A is 36yards/inch of knitted length and Color E is 8yds per inch of knitted length. This does not make sense to me given the width is constant at 26″ . Based on the photo of the finished towel, the inches knit in the pattern seem to match so I am assuming the yardage needed is not correct.
Hi Katy,
Thanks for writing in! Thank you for bringing this to our attention. Yes, that is a typo in the pattern, both colors A and E should use approximately a full skein (364 yards) of Buttercup Cotton!
I hope this clears things up, happy knitting!
Gianna
I’m interested in knitting the Lake color set but I would like to see samples of it. Do you have any that I’m missing finding or, if not, are you able to post or email me them?
Hi Amanda,
Thanks for reaching out! We don’t have any examples of the Lake color palette knit up, but thank you for expressing your interest! I will be sure to pass this along to the rest of the team!
Warmly,
Gianna
Hi, I’m having trouble with this pattern. It may be because the yarn is finer than I’m used to working with, but after I do a 2,3,4 rows, I end up with more stitches than I started with and I can’t ‘see’ the pattern to see where I went wrong or how to fix it. Any advice?
And is there another stitch pattern I could use for this project with this yarn that would be easier?
Thanks,
Cheryl
Hi Cheryl,
Thanks for reaching out! I totally understand what you mean, this stitch can be a bit tricky, especially when using fine yarn. My best guess for why you may be ending up with more stitches is when you are working the slipped stitches, you may be crossing the yarn over the needle as you would for a Yarn Over, incidentally adding another stitch. Going forward I would be extra careful when you are slipping stitches to make sure the yarn is not crossing over the needle.
However, if you would like to try a more simple stitch I would suggest using out a simple seed stitch or garter stitch, both have a nice texture that would be great for towels with this yarn! Just be sure to work a gauge swatch to help determine your cast on amount since these stitches have a different gauge from the linen stitch we sued here!
I hope this helps and please let me know if you have any more questions!
Gianna
I don’t understand how to integrate the new color when you are starting with the slip stitches. I don’t understand how to anchor it on those first few stitches.
Hi Gail,
Thanks for writing in! When joining in a new color, you don’t need to worry about that first slipped stitch. Once you begin knitting with the new color on the second stitch, it will become anchored to that one, as well as the rest of the stitches in that row! Hope this helps.
All the best,
Lili
Could you please clarify the “Binding Off in Stitch Pattern” for me? I don’t understand what it means to pass the second stitch over, pass the first stitch over. Which stitches are you referring to?
Hi Lexi,
Thanks for reaching out. I’m so sorry for the confusion that this line caused! It should actually say “pass first stitch over” for everything, meaning that you’ll bring the stitch that’s furthest to the right on your right-hand needle over the adjacent one and then off the needle, just as you would in a normal bind-off. We’re going to update the page to reflect this change as soon as possible–thanks again for bringing it to our attention!
All the best,
Lili
I’ve not worked with a yarn this fine and I’m still finding it hard to work with. Could I knit this project with a double strand of this yarn? Or is there another pattern on your site that would work with a double strand of Buttercup Cotton?
Thanks!
Hi Cheryl,
Thanks for writing in. You can absolutely knit this project with a double strand of Buttercup Cotton! All you’d need to do is adjust the cast-on number to accommodate the larger gauge. To figure out your cast-on number, you will want to first knit a gauge swatch in pattern. Once you know how many stitches you are getting per inch, you can multiply that number by the width of the pattern and cast on the nearest multiple of 3. Hope this helps!
All the best,
Lili
Hello,
Is there a better cast on than the long tail cast-on? The cast-off side looks great, but the cast-on edge is looking very off pattern…
Thank you.
Hi Christian,
Thanks for reaching out. The long tail cast-on should actually blend in very well with this stitch pattern! There’s a chance that you worked the bind-off row on the incorrect side of the pattern though, and are now viewing the cast-on edge from the opposite side (which would definitely make it look off pattern). The bind off should occur directly after a Row 1, and not after a full repeat of the stitch pattern. Hope this helps!
All the best,
Lili
Is it possible to get three hand towels out of one bundle? I don’t washcloths or bath towel.
Thanks.
Hi Hillary,
Thanks for reaching out! You could certainly get three hand towels out of one bundle, you may need to switch the colors up from what we use in the two layouts since some require more yardage than others.
Warmly,
Gianna
Before I begin (got the yarn today!), I’d like to know if this pattern stitch resists “growing”. I have knitted many a lovely washcloth only to have it turn into a scarf! I am always looking for a stitch or stitch combo that doesn’t grow or at least minimizes this effect.
Hi Mimi,
Thanks for reaching out. We haven’t experienced much “growing” with this yarn and stitch pattern! But the very best way to make sure that your project turns out to be the correct dimensions is to knit a gauge swatch. Once you make the swatch, make sure to block it, or wash it exactly as you plan to wash the finished project. Then take your gauge measurements only after that. This way, you’ll get an accurate idea of how much the finished project will grow (if at all), and you can choose your needle size accordingly. Hope this helps!
All the best,
Lili
Hi! Is there any way to get slip one knitwise with yarn in front in video…I am having trouble knowing if I am doing this right at the beginning of the row! Thanks!
Hi Jennifer,
Thanks for reaching out! We don’t currently have a video tutorial for this technique but I am happy to explain it in more detail! To start the row, you will want to orient so that the yarn is in front of the work, from there you will insert your working needle into the first stitch (put it in as if you were going to be knitting the stitch) but instead of knitting the stitch, you will simply slip it over to the working needle. If you are on row 1 of the stitch pattern, after this you will then want to slip 1 purlwise wyif, to do that you will keep the yarn in front and now insert your needle into the stitch as if to knit, and slip it to the working needle. If you are on row 2 you will p1 as normal after slipping the stitch knitwise wyif.
I hope this helps clear things up, and please let me know if you have any more questions!
Gianna
To slip one purlwise shouldn’t I be going into the stitch as if to purl? I am thinking I need to let go of the idea of perfect edges here and embrace the idea that hand knits aren’t perfect?
Hi Jennifer!
Thank you for your comment, and I love your perspective on handknits! To slip one purlwise, all you need to do is insert your right needle into the stitch as if to purl, and slip that stitch off your left needle. Sometimes you will slip this stitch with the yarn held in front of the work, and sometimes you will slip a stitch purlwise with the yarn held in the back of the work, so that is something to keep in mind when you come to a slip stitch!
I hope this helps!
All the best,
Margaret
In your reply to Shar’s question, you say to start a new color on the right side and describe this as Row 2. However in the pattern instructions it says to repeat rows 1 and 2, ending with row 2 and then starting the new color on row 1. Can you please clarify this discrepancy? Thanks,
Fran
Hi Fran,
Thanks for writing in! You’re right, the new colors are added in on Row 1, which is a wrong side row. Hope this helps clarify things!
All the best,
Lili
Hello,
Went to order a bundle today only to discover that apparently this yarn is being discontinued. I absolutely love the color palette of the samples shown. Can you recommend a similar substitute that includes this color palette?
Renée
Hi Renée,
Thanks for reaching out with your question. I’m so sorry to say that we have discontinued Buttercup Cotton! While we loved yarn, not everybody else felt the same way, so we’ve had to make the sad decision to stop producing it. We hope you can understand!
We do have other yarns that would be perfect substitutes for Buttercup Cotton, however, we don’t carry the same color palette in these yarns. We’re so sorry about that! If your interested, I would recommend checking out Picnic Cotton and Santolina. These are both fingering weight yarns, and they can be machine washed and dried, making them perfect for towels!
You can also alter the pattern itself to be used with Cotton Pure! This is the same fiber content as Buttercup Cotton, but it’s a slightly heavier sport weight. To alter the pattern, you will first need to calculate your gauge by knitting a swatch. Once you know how many stitches per inch you are getting, you can multiply that by the desired width of your towel in inches. This pattern is worked over a multiple of 3 stitches, so rounding to the nearest multiple of 3 will be perfect for your cast-on number!
I hope this helps, and please let me know if you have any questions!
All the best,
Carly
Carly, thank you for your very prompt response to my inquiry. Sorry to hear that Buttercup hasn’t worked out as I feel some of the simple, yet elegant patterns PS created for its use are masterpieces! However, your suggested yarn substitutes and corresponding pattern modifications are extremely helpful. Thank you, I appreciate your recommendations!
Cheers,
Renée
You’re very welcome, Renée! I’m so glad my recommendations were helpful!
Happy knitting!
Carly
Hello! I got 4 kits a while back (quite ambitiously) and am finally getting started with trying a washcloth first to get to know the pattern. I have tried several times now but I am not seeing my interpretation matching what I see in the photos — would it be at all possible to see a video of someone doing each of the two rows a couple of times? Would so appreciate a visual learning option. Thank you so.
Hi Lukas,
I’m sorry to hear that you’re having trouble with this pattern! I’m afraid that we don’t have the time and resources to create a video for this project, but we’d be happy to help in other ways. Would you be able to send a photo of your work so far to customerservice@purlsoho.com? That way, we can better visualize what’s going on in your project and pinpoint the issue.
All the best,
Lili