


Knit Drawstring Bag + Backpack
Whether a little two-gallon sack makes you think book, gym shorts, and an apple, or maybe work-in-progress, our Knit Drawstring Bag + Backpack serve your purpose!
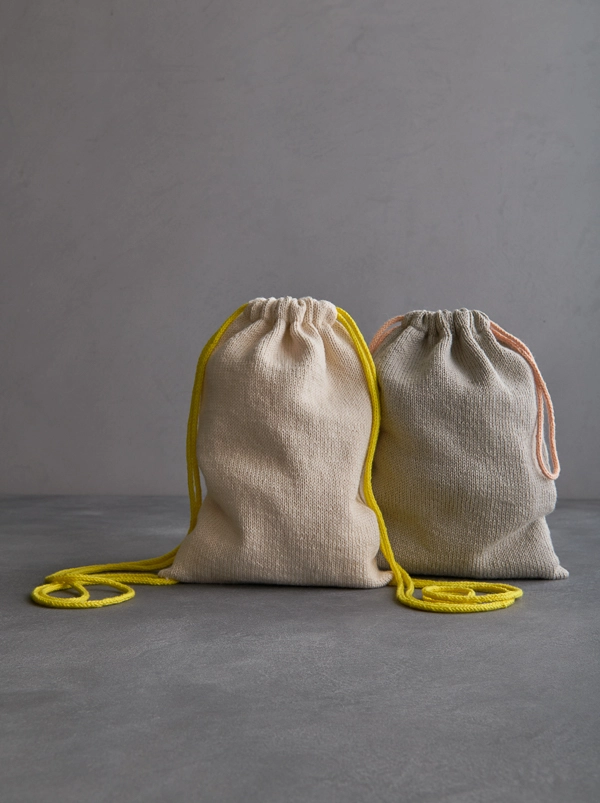
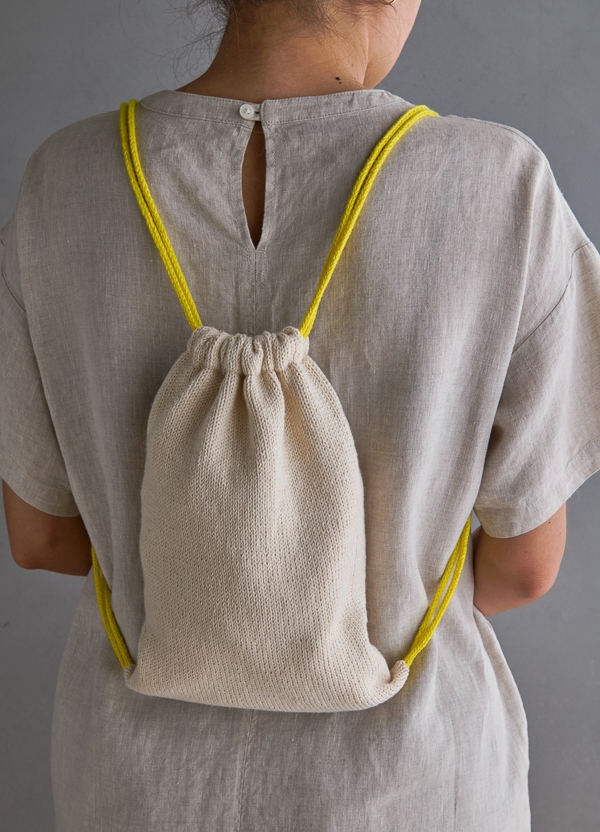
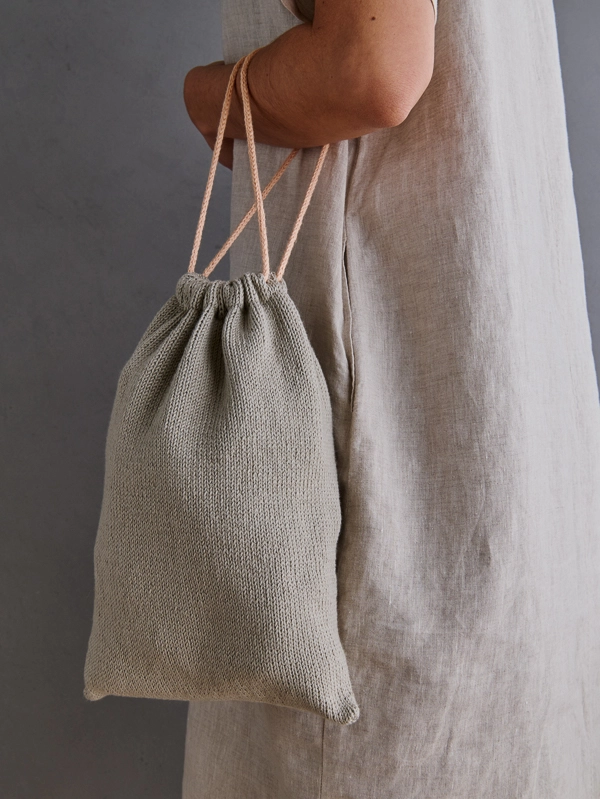
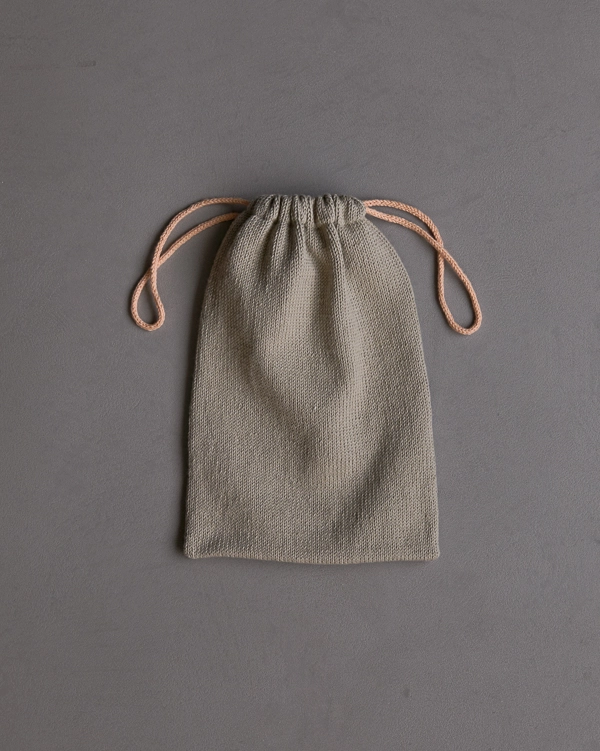
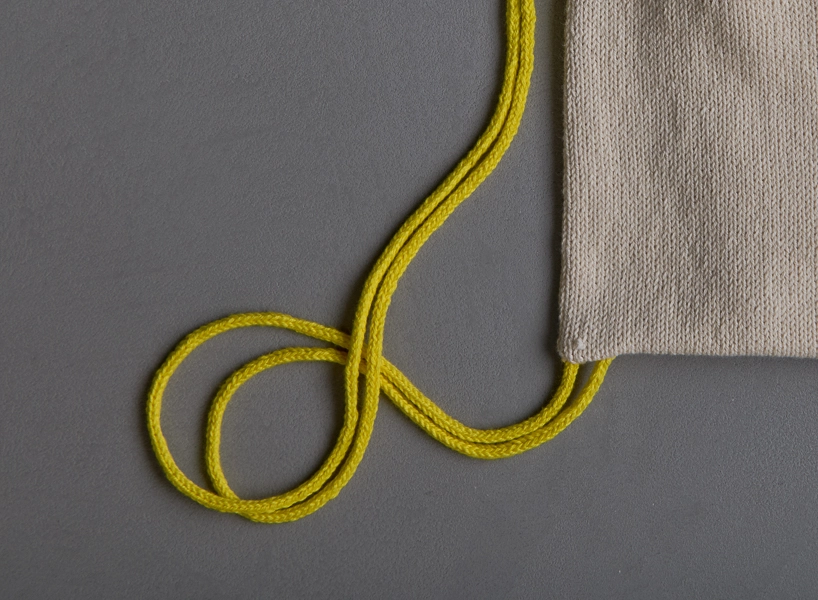
We love these little dumplings! Simple tubes with a drawstring channel at one end and a three-needle-bind-off seam at the other, the bag and the backpack only diverge in their use of I-cords. The bags are a simple drawstring, while the backpacks serve as both a drawstring and straps. Clever!
For durability, machine-wash-ability, and total cuteness, we used our brand new Buttercup Cotton. A 100% organically grown, non-mercerized cotton, its fingering weight keeps these sacks light and lends a very nice polish.
Buttercup Cotton comes in 18 lovely colors with many opportunities for striking bag-cord combos. Best news for last? You’ll need just one skein of each for either the bag or backpack and will even have enough left over to make another in reverse colors!
Designed by Purl Soho designer, Jake Canton. Click here to see even more of Jake’s designs!
Share your progress + connect with the community by tagging your pics with #PurlSoho, #PurlSohoBusyHands, #PurlSohoKnitDrawstringBagAndBackpack, and #PurlSohoButtercupCotton. We can’t wait to see what you make!
Materials

- Main Color (MC): 1 skein of Purl Soho’s Buttercup Cotton, 100% organically grown cotton. Each skein is 364 yards; approximately 272 yards required for either the bag or backpack. (NOTE: We no longer offer Buttercup Cotton, but choose from one of our other fingering weight yarns.)
- Contrast Color: 1 skein of Buttercup Cotton. Approximately 16 yards required for the bag or 62 yards for the backpack.
- US 1.5 (2.75 mm) 16-inch circular needles
- Spare 16-inch circular needles, US 1.5 (2.75 mm) or smaller
- A set of US 1.5 (2.75 mm) double pointed needles
- A stitch marker
- Stitch holders or scrap yarn
- A few yards of fingering weight scrap yarn
- A size B–E (2.5–3.5 mm) crochet hook (for Provisional Cast On)
We made our samples in the following colors…
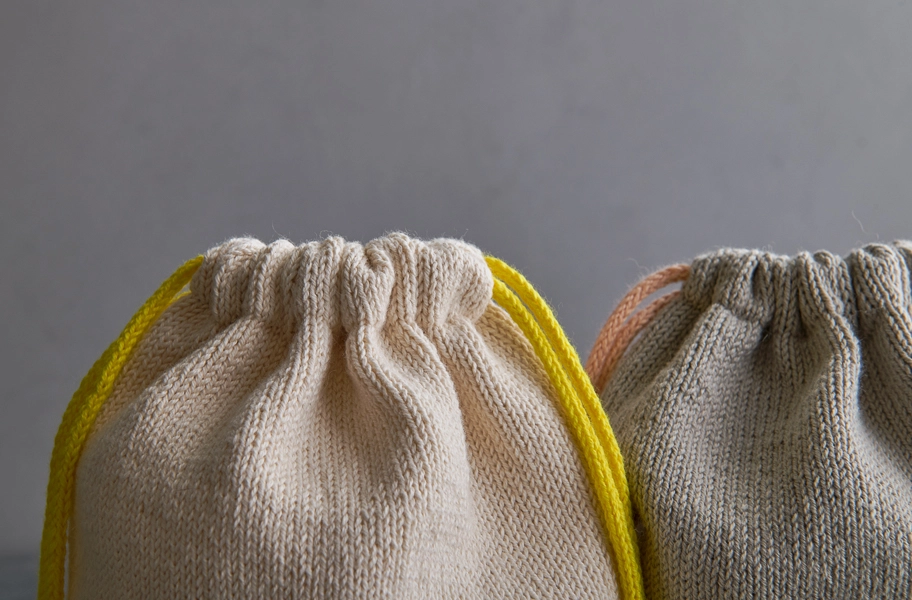
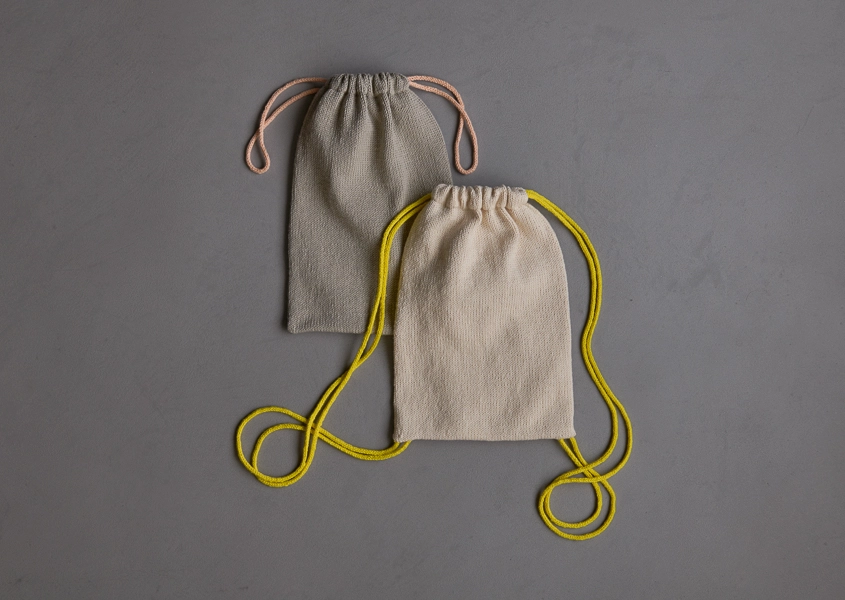
BAG SAMPLE: Main Color is Woodland Gray; Contrast Color is Summer Melon
BACKPACK SAMPLE: Main Color is Heirloom White; Contrast Color is Jonquil Yellow
Gauge
28 stitches and 40 rounds = 4 inches in stockinette stitch
Size
Finished Circumference: 18 inches
Finished Height: 12 inches
Length of Straps (Backpack Only): 31½ inches
Notes
Construction
You begin both the bag and backpack by making I-cords for the drawstrings. You then knit the body of the sack from top down and in the round, incorporating a hem that encases the I-cords and finishing with slightly different instructions for the bag or backpack.
Provisional Cast-On
For assistance, including how to put live stitches back onto needles, please visit our Provisional Cast-On: A Two-Step Method Tutorial.
Pattern
Make I-Cords
With Contrast Color (CC) and using a Provisional Cast On (see Notes), cast 3 stitches onto double pointed needle.
Knit an I-cord 19 inches long for the bag or 63 inches long for the backpack. Place three I-cord stitches on a stitch holder or scrap yarn. Cut yarn.
Make a second I-cord identical to the first and set both aside.
Begin Body
With Main Color (MC) and using a Provisional Cast On, cast 126 stitches onto circular needles.
Place marker and join for working in the round, being careful not to twist the stitches.
Work in stockinette stitch, knitting every round, until piece measures 1¼ inches from cast-on edge.
Next Round: [Knit 2 together, yarn over, k59, yo, slip slip knit] twice.
Continue knitting in stockinette until piece measures 1¾ inches from cast-on edge.
Create Hem
NOTE: For assistance with working this technique, visit our Knit Hem Tutorial.
With the right side facing you, slip Provisional Cast On onto spare circular needles (see Notes). [126 stitches on each set of circular needles]
Fold the cast-on edge inside the bag, wrong sides of fabric together and so the two circular needles are parallel to each other, working needles in front and spare needles behind.
Identify the two sets of eyelets created by the yarn overs: one set at the end of the round and the other set halfway through the round.
Beginning with the set of eyelets at the end of round, use a crochet hook to draw one end of an I-cord towards you, from the wrong side of the fabric to the right side, through the right-hand eyelet. Then draw the other end of the I-cord towards you through the left eyelet so that both ends are dangling out the side facing you.
Now, from the wrong side, pull the I-cord that is in between the two eyelets and sandwich it between the two layers of fabric along the entire circumference of the hem.
Do the same with the second I-cord through the opposite set of eyelets, laying this cord on top of the first along the entire circumference of the hem.
Next Round: Using the right needle of the working needles, *knit next stitch from front needle together with next stitch from back needle, repeat from * to end of round. [126 stitches on working needle]
Continue Body
Continue knitting in stockinette stitch, knitting every round, until piece measures 12 inches from the Hem’s folded edge.
For Bag, go on to Finishing section below.
Backpack Only: Connect I-Cords To Body
Place the 3 stitches at each end of each I-cord (either from stitch holder or from provisional cast on) onto separate double pointed needles. [4 double pointed needles, each with three I-cord stitches]
Next Round: *Identify the I-cord that emerges from the hem eyelet directly below the next stitch on the left circular needle. Hold that I-cord’s double pointed needle in front of the left working needle, [knit together one I-cord stitch from the double pointed needle and one Body stitch from the left needle] 3 times**, k57, repeat from * to **, k4, repeat from * to **, k49, repeat from * to **, k4.
Bag + Backpack: Finishing
Turn piece inside out so the right sides are facing each other. Holding the two ends of the working needles parallel to each other and sliding half the stitches to each end of the needles, use a spare needle to work a 3-Needle Bind-Off, closing the bottom of the Body.
Turn piece inside out again.
Bag Only: Finish I-Cords
Remove the scrap yarn from one I-cord’s provisional cast on and place stitches onto a double pointed needle. Place on-hold stitches at the other end of the same I-cord onto a second double pointed needle. Hold the two double pointed needles parallel and use the Kitchener Stitch to graft the two ends of the I-cord together.
Repeat with other I-cord.
Bag + Backpack: Last Thing
Weave in ends and block, if desired!


Simple and just so exquisitely beautiful!
Hi!
These are so cute. Could these be made with your cotton pure yarn? I have a bunch of it and would love to use it to make these. However I’m not sure whether I would need to adjust the gauge or number of stitches or anything else?
Thanks so much!
Val
Hi Val,
Thanks for writing in! This is a pretty basic pattern so I think you could certainly use Cotton Pure with a few adjustments! Since Cotton Pure is a bit heavier (Sport Weight) you will need to adjust the gauge, and cast on amount. I recommend starting off by working a gauge swatch with an appropriate sized needle and you can calculate your cast on from there!
I hope this helps and please let me know if you have any more questions!
Warmly,
Gianna
Will you also be putting this cotton out on a cone? I can foresee myself weaving lots of lightweight shawls with this!
Hi Collette,
Thanks for writing in with such a great idea! We haven’t made plans for this yet, but I’ll certainly bring it up internally so the team is aware it’s something people are interested in. Please don’t hesitate to let me know if you have any other questions and thank you again for sharing your thoughts with us. They definitely don’t just go into some dusty suggestion box!
All the best,
Zha Zha
Hi! I think there is an omission error in this pattern? In the Main Body section, the pattern does not say to make two pieces, yet in the Create Hem section, there seems to be a reference to having two to lay next to each other.
Can anyone clarify if I am simply missing something?
Hi Judie,
Thanks for writing in! The pattern is correct as written, the body of the bag is knit in the round (as a tube) in one piece!
I hope this clears things up!
Gianna
You do a provisional cast on, so there are two sets of live stitches. When you get to the stopping point in the create hem section, you fold the piece in half so the two sets of stitches are parallel.
Hi Ramona and Judie,
Thank you, Ramona, for clarifying and you’re absolutely right! Judie, to even further break it down, the two sets of stitches the pattern refers to are the working stitches and the live stitches from the provisional cast on. Knitting these two sets of stitches together creates a channel for the drawstring, and once you’ve done that, you’ll just work a tube in the round and seam the bottom of the bag together with a 3-Needle Bind Off. If some of these terms are unfamiliar to you, we have tutorials along the way and are also always happy to help! Please let us know if you have any other questions and thank you for this one!
Best,
Whitney
Hello,
I usually do not like to knit with cotton, however, there is something about this particular cotton that is making me think I would like to knit a couple of simple tee pullovers–the colors are beautiful. Is there a particular Purl Soho pattern (s) that you would suggest that would be an excellent choice for using Buttercup ?
Thanks you,
Carolyn
Hi Carolyn,
Thanks for writing in! Buttercup Cotton is a great yarn, and is very nice to work with! I think it would be an excellent option for a tee, I would suggest our Lovely Lightweight Tee or our Contour Tee! I do recommend working a gauge swatch prior to beginning to insure you are consistent with the pattern!
I hope this helps and please let me know if you have any other questions!
Gianna
Hello, PurlSoho geniuses! I understand why you’d want a provisional cast-on for the body, since we want to be sure to create a strong hem. But goodness, I’m a little daunted by the idea of trying the 2-step provisional cast-on method for 126 stitches. Would it be at ALL possible to use another really good cast on, like Twisted German, as long as you could pick up all 126 stitches when you’re making the hem?
If you tell me it has to be provisional cast-on, I’ll try my very best! 🙂
Thanks so much for this inspired and charming design!
Sue
Hi Sue,
Thanks for reaching out! I think you could certainly use a different cast-on method for this pattern! I think the Twisted German method would be a great option.
If you do, please let us know how this turns out! Happy knitting!
Gianna
Hi,
In the begin body section where it says slip slip knit, do I knit the two slips together or is it really slipping 2 stitches and then knitting the 3rd?
Hi Erin,
Thanks for reaching out! A slip slip knit (or ssk) is a very common single decrease (like a k2tog) except it is characterized by its left-leaning slant (compared to the right-leaning k2tog)! To see exactly how to work this decrease please view our Slip Slip Knit (ssk) tutorial!
I hope this clears things up, happy knitting!
Gianna
Hello,
I’m making the backpack version for an eight-year old. She wants to learn to knit, so I got her one of your kits for her birthday. I’m trying to decide the length for the I-cords. I’m sure 63 inches is too long, but I don’t know how long to make it.
Suggestions will be much appreciated.
Hi Jane,
Thanks for reaching out! I would suggest measuring from the tip of her shoulder to waist or mid-back to determine how long the straps should be!
Happy knitting!
Gianna
Just finished mine and though I despised the provisional cast on, I enjoyed the rest so much that I want to do another. Has anyone added a lightweight lining so that what is put in the backpack doesn’t poke through or snag the knitting? I’m thinking about trying to do that …
Loved the cotton!
Hi Marilyn,
Thanks for reaching out! I am so glad to hear that you have finished your backpack and enjoyed the yarn! I haven’t heard of anyone lining the backpacks yet, but I think that it is a great idea and will certainly work!
If you try this out please let us know how it goes, happy knitting!
Gianna
I love this pattern, but I am still confused about how to attach the
I-cords for the drawstrings. I get that you sew them into the seam as you make it, but don’t quite get exactly how to do it. What keeps them from pulling out when you tighten the drawstring? Could someone please explain a bit more? I’m to this point in the pattern and can’t go any further until I figure this out. Thanks!
Hi Lesley,
Thanks for reaching out! I am happy to help, I just need a bit more information to assist you further! Which version are you making? The backpack or the bag? They have slightly different instructions, so I want to make sure I advise you correctly.
Looking forward to your response!
Gianna
For the drawstring bag do I do the provisional cast on with the Main Color but not cut the yarn when finished (and as shown in the tutorial), but just join for working in the round?
Hi Ann,
Thanks for reaching out. The only yarn you’ll need to cut is the waste yarn that you use to make the crochet chain! Then, pick up 126 stitches with the main color and join in the round to begin working in stockinette stitch. Hope this helps clarify things!
All the best,
Lili
Good morning!
Would you please suggest a slightly darker color pairing for the backpack/bag? I adore the pattern and plan to make it for my tween but I don’t think that such a light color would work well for her. Thank you!
Hi Megan,
Thank you for writing in! Some darker Buttercup Cotton pairings for this pattern that might work well for you are: Evening Blue (MC) with Morning Sky (CC), Carbon Black (MC) with your favorite color (CC), Purple Aster (MC) with Gray Cloud (CC), Cedar Wood (MC) with Woodland Gray (CC), and Grass Green (MC) with Gray Cloud (CC). Additionally, we have Color Cards for Buttercup Cotton that let you see the colors in person without committing to a full skein. You can’t go wrong with any colors you choose!
Hope this helps you narrow down your search!
Best,
Margaret
Does this pattern allow to make the back pack larger?
Hi Suzanne,
Thanks for reaching out! Since this backpack has an extremely simple construction and is knit as a sack from top-down and in the round, you can easily adjust your cast on amount to make the backpack wider, and knit till you reach your desired length. Just be sure to check your gauge prior to beginning, this will ensure you ar consistent with the pattern and help you calculate how many stitches to cast on!
I hope this helps, happy knitting!
Gianna
Since Buttercup Cotton is mostly sold out. Do you think Santolina or Picnic Cotton could work well for this? Thanks!
Hi Maritza,
Thanks for writing in! I think Buttercup Cotton and Santolina would work great with this pattern. With any yarn substitutions, we always recommend doing a gauge swatch to make sure your gauge is consistent with the pattern. Here’s our guide on swatching if you’d like more information on that (https://www.purlsoho.com/create/2020/08/20/all-about-gauge/)!
I hope this helps! Have a great rest of your day!
All the best,
Cat
Confused on when you insert the icord for the bag
Hi Karla,
Thanks for reaching out! You will incorporate the i-cord during the CREATE HEM section. You’ll draw the i-cords through the yarn over eyelets and lay them around the entire circumference of the hem. Then, you’ll work Next Round, which closes up the hem, encasing the i-cords inside. Hope this helps clarify things!
All the best,
Lili
Hello, I think there is a typo in your materials list… All sources I can find say that a US 1.5 needle size is 2.5 mm, but here it says 2.75. Of course I know the size I actually need depends on my yarn and knitting tension, but I just wanted to double check which is the correct suggested needle size – US1.5 (2.5mm) or US2 (2.75mm)? Thank you!
Hi HK,
Thanks for your question! You will need a 2.75mm needle for this project!
Please let us know if you have any other questions.
Happy knitting,
Gavriella
Thanks for your response! You should probably edit the materials list to reflect this… it should say US 2 instead of US 1.5 to eliminate confusion.
Hi HK,
Gavriella is off work today, so I’m stepping in! The metric sizes we indicate in our patterns might differ from what you’re used to since different needle companies sometimes assign the millimeter measurements to different US sizes. These inconsistencies, while frustrating, are very common when comparing needles, so when in doubt, rely on metric sizes…they’re standardized! And as long as you find needles with which you can achieve the correct gauge, those will work for the pattern!
All the best,
Lili