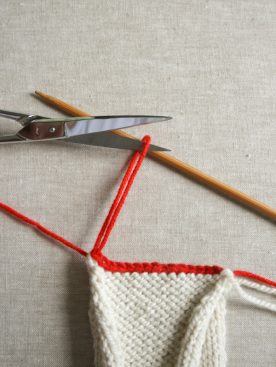
3-Needle Bind Off
The 3-Needle Bind Off is a great finishing technique for joining two pieces of knitting that are still on the needles. It is also a great time saver because you bind off and seam all at once!
First we’ll show you the standard method, scroll down to find a modified version!
3-Needle Bind Off
Note that a 3-Needle Bind Off and the Kitchener Stitch are somewhat interchangeable. The advantage of a 3-Needle Bind Off is that it’s easier to do and that, because it creates an actual seam, it offers some structural integrity. The Kitchener Stitch is a bit trickier to work, but it creates a smooth and seamless finish. Same but different!
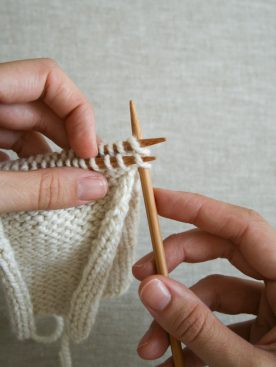

To end up with the seam on the wrong side of your knitting, arrange the two pieces with their the wrong sides facing out. Hold the needles parallel and slip a third (working) needle into the first stitch on each of the two needles.
Wrap yarn around working needle as if to knit, and knit the two stitches together. Allow the first stitch from each of the parallel needles to fall from the needles.

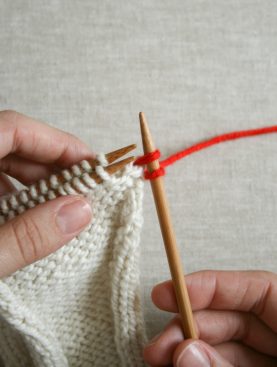
*Knit together the new first stitch on both parallel needles in the same way as above.
There will be two stitches on the working needle.
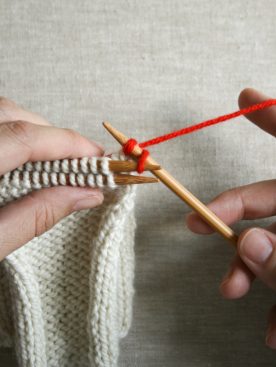
Using one of the two parallel needles, pass the first stitch on the working needle over the second stitch and off the needle, as you normally would when binding off.
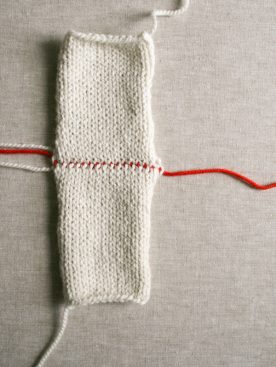
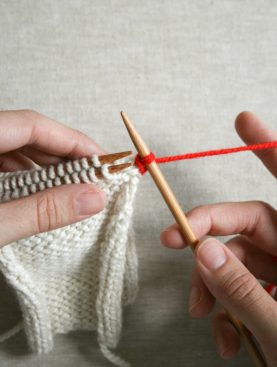
Repeat from * until only one stitch remains on the working needle.
Break yarn and pull the tail through the last stitch to fasten off.
Modified 3-Needle Bind Off
This modification involves just a few extra moves and creates a less bulky seam that lies flatter against the knit fabric. So pretty and smooth, it can be used as a design detail on the right side of your fabric!
Holding needles parallel, insert a spare needle knitwise into first stitch of front needle. Wrap yarn as you would for a knit stitch, but do not pull stitch through.
Next, insert spare needle purlwise into first stitch on back needle, wrap yarn as would for a purl stitch, pull that stitch through, but do not let it off the needle.
Bring yarn between back and spare needles to back of work and pull stitch through front needle.
Let first stitches fall off front and back needles.
*Repeat, then pass first stitch over second. Repeat from * until one stitch remains.


Wow! So much knitting, so little time…..and as a fairly new knitter, some of the terms are terrifying! This 3-needle bind-off is SO easy….after you’ve shown it to me!
Thanks so much for a great tutorial!
Love your knitting technique. The tutorial was very easy to follow. Thank you so much.
I’m trying to follow this tutorial, which seems so great, but the website has a left margin popup that blocks a lot of it and won’t go away. What a drag! On a better note–I’d love to see a tutorial for a stretchy bind off.
Hello Alexis!
We’re so sorry you’ve had issues with the site’s formatting! If you click PRINT you will be able to download a PDF version of the pattern that should be much easier to view without any distractions.
As for a super stretchy bind off, take a look at this tutorial from Knitty.com: http://knitty.com/ISSUEfall09/FEATjssbo.php Its wonderful!
Happy knitting! -Alyson
Thanks..study well.
How can I graft 2 ribbed pieces together? The Kitchener stitch is perfect for stocking St. but not for ribbing
Hi, Lyn!
Thank you so much for writing in! It is possible to use the Kitchener stitch for ribbing, but it is a bit tricky. To do it you will need to separate the knit stitches on to one needle and the purls on to another. You’ll do this with both sets of live stitches (you’ll have 4 needles). Next, arrange your needles so that the purl stitches are at the back. Ignore the purl needles and graft the knit stitches the way you would for stocking stitch. When you have competed the knit stitches you’ll flip everything over and graft the purl stitches. These will now look like knit stitches because you flipped everything over. Be sure to be careful with your tension because this method of grafting isn’t elastic like the ribbing itself.
You could also try Matress stitch. We’ve got a tutorial here: https://www.purlsoho.com/create/2013/11/11/mattress-stitch/.
If you have further questions please let us know!
Best,
Kumeko
Can I use your method of grafting knit and purl stitches together using the four needles if my pattern has cables?
Hi Chris,
Thanks for writing in. You can certainly use the 3-needle bind off if the pattern has cables. However, you will want to make sure that you are not cabling too close to the seam as that will pull on it. I hope this helps!
Good luck,
Adam
I think there is a mistake in the next to last photo. The tail of the yarn should be cut and pulled through the loop. The photo shows the loop itself being cut. This will make everything unstable.
Hi Lily,
This will actually work just fine. The yarn that is already pulled through will be cut and the rest can be pulled out of the knitting. Thanks!
-Adam
This was a great video and easy to understand and follow. Thank you
As Diane Falk says, “This 3-needle bind-off is SO easy….after you’ve shown it to me!” I totally agree…it is so much easier for me to learn a new stitch or technique by watching a well-made video, which this one surely is. Thanks for the instructions!
Can’t wait to make this cowl!
Thanks,
Jennie
I’m trying to picture doing this on circular needles — for example, if I were to join the ends of a long knitted tube. How would this work in that instance?
Hi Kelly,
Good question. You’ll want to divide your stitches in half so you’ll have your working yarn coming from your end of round and the circular needle cord coming out at the midpoint of the round. It helps to switch to either a longer cord so there is a pronounced loop at the midpoint, two straight needles or two long double points. Best of luck!
-Adam
Thank you for a great tutorial. You have saved me from embarrassing myself in front of my knitting friends.
Hi Jude,
Thank you so much for your kind words! They made our day!
Best,
Cassy
Wow! Your demonstration of 3-needle bind-off was amazingly clear! I had been procrastinating on a project because that’s the last step and it sounded kind of scary… now I can finish the project! Thank you!
Thank you. This was was so clear and helpful!
Great tutorials for 3 needle bind off (or cast off as we say in the UK). Love this method of joining pieces, reduces the sewing up, which I hate, and provides such a neat finish. Thank you Purl Soho!
How would you do the Modified 3-Needle Bind Off with 1×1 ribbing?
Hello Lulu,
Thank you for reaching out!
Unfortunately, there isn’t a modification for a three needle bind of for ribbing. You could always try doing it on a rib stitch, though it will not maintain the stretch of the rib.
It is possible to use the Kitchener stitch for ribbing, but it is a bit tricky. To do it you will need to separate the knit stitches on to one needle and the purls on to another. You’ll do this with both sets of live stitches (you’ll have 4 needles). Next, arrange your needles so that the purl stitches are at the back. Ignore the purl needles and graft the knit stitches the way you would for stocking stitch. When you have competed the knit stitches you’ll flip everything over and graft the purl stitches. These will now look like knit stitches because you flipped everything over. Be sure to be careful with your tension because this method of grafting isn’t elastic like the ribbing itself.
You could also try Mattress stitch. We’ve got a tutorial here:
I hope this helps and let us know how it goes!
Happy knitting,
Marilla
Great tutorial! My pattern calls for a standard 3 needle bind off, done with right sides together. If I do the modified one, should I do it with wrong sides together? Not sure what the other side of the work would look like if I did it with right sides together. What would you recommend for the best look on the outside of the sweater shoulder seam? Thank you in advance!
Gina
Hello Gina,
tHank you for your kind words! Yes, If you are doing a modified version and would like there to be purl bumps (or if your pattern calls for this) you would work the bind off with the wrong sides on the outside.
I hope this makes sense and let us know if you have any further questions!
Happy knitting,
Marilla
I just stumbled onto your modified three-needle bind-off – wow! I have been doing something similar (or trying to!) with a crochet hook, but it was so awkward. This technique is just what I need to finish the shoulder seam of a jumper (sweater) I have been working on. If I zip through the sleeves I shoukd be able to wear it to our annual Australian sheep show on the weekend. Exciting!
I am trying to do the 3-needle modified bind-off for the Ridgeline Wrap Cardigan but I knit Continental style and I can’t seem to make it work. Is there something different I should be doing to make this work for Continental knitters?
Hi Judy,
Thanks for reaching out! You are correct that this is a bit tricky to do when knitting continental – however, it is possible! In the first step, when the video says to insert your needle knitwise into the stitch on the front needle and wrap your yarn as if to knit, it helps to think of this as bringing your yarn in front of the right hand needle instead of wrapping it. It also feels a bit awkward to bring your yarn to the back at the end of the final stitch, but I think with a bit of practice it should start making sense!
I hope that clears things up!
Julianna
Thank you so much Juliana! This is exactly the help I needed with figuring out the modified bind off for myself. I couldn’t figure our how I kept getting an extra loop in there!? All better and looking forward to a finished double layer cowl tonight
I’m also having trouble figuring out the modified 3-needle bind off as I knit Continental. Is there any way you could post a video using the Continental method?
Hi Wendy,
Thanks for writing in. Unfortunately we don’t have the resources at the moment to do a video tutorial of this. We will keep your request in mind though for the future!
Best,
Julianna
How would one accomplish 3-needle bindoff, if the two needles had not exactly the same number of stitches on each?
Hi Mickey,
Thanks for reaching out! If possible I would suggest working one more row on the set of stitches that has more and evenly decrease across this row so that the two sets of stitches are the same before beginning the three needle bind off. It is possible to decrease while working the three needle bind off, but it can be tricky to keep track of, so it’s much easier to adjust the stitch count before starting the bind off.
I hope that helps!
Julianna
I just picked up a sweater I started 27 years ago and never finished!! It was my first multiple color project. That’s not why I stopped. I guess I just lost interest and had little time.
It’s a Jacobsdal pattern with angora yarn and raglan sleeves (I think they’re coming back). : )
I just discovered your website and of all the knitting sites I’ve visited for a variety of tips, I think yours is the best! I learned the modified 3-needle-bind-off from your site and it’s perfect for the shoulders and sleeves of my sweater. It looks so cool, and you made it so easy to learn.
Thank you very much for creating your website! I might try your optic blanket this summer in preparation for fall/winter.
Hello Jan,
Thank you for sharing all of this- so cool! Let us know how the sweater goes and happy knitting!
-Marilla
Thank you for the detailed video!
Would this work on seaming the back and front (shoulder) of a cardigan that’s done with linen stitch? I‘ve also been considering binding off, then slip stitch with a crochet hook. What method would you recommend ?
Thank you!
Hi Sol,
Thanks for reaching out! Since Linen Stitch usually contracts significantly width wise, it’s hard to say if a 3-Needle Bind Off would work – it is possible that the join would turn out wavy, since the row of knitting created while working the 3-Needle Bind Off would have a larger gauge than the linen stitch. I would suggest trying it, and if it doesn’t work, try binding off and using a traditional seam instead, since it will make it easier to pull the seam tighter if necessary to match the width of the linen stitch.
I hope that helps!
Julianna
Hi. A short question. I’m making the ribbed cardigan and the instructions say to use the modified 3 needle bindoff. I’m used to doing a 3 needle with the right sides together but your video shows it with the wrong sides together. Which way should I do it for that pattern
Hi Rona,
Thanks for reaching out! It depends whether or not you want the bind off to be exposed. Usually the modified 3-Needle Bind Off is meant to be exposed, since it lays flat and looks quite attractive, so we demonstrated it with the wrong sides together, but a traditional 3-Needle Bind off is often worked with the right sides together so that the raised seam is on the inside of the garment. In the case of our Ridgeline Wrap Cardigan, you should work the modified 3 Needle Bind Off with the wrong sides together so it creates a decorative detail on the shoulder of the sweater.
I hope that clears things up!
Julianna
Thank you for the great tutorial! Will the three needle bind off add an extra row of knitting as the kitchener stitch does or in the case of the three needle bind off will it disappear with the seam? I am trying to figure out how many shoulder rows to knit and whether the bind off counts as a row or not. Your advice would be greatly appreciate 🙂
Thank you in advance!
Hi Pastille,
Thanks for writing in! While working a 3-needle bind off does create another row of knitting, that row goes into the seam and does not add height to the sweater. If you are substituting a 3-needle bind off for a regular seam, you do not need to subtract a row of knitting from the shoulder and can simply use it in place of the regular bind off.
I hope that helps!
Julianna
Great, thank you so much !
Can I do 3 needle bind off as follows with circular needles: place one shoulder on one side of circular..place second shoulder on other needle; needles parallel, then use 3rd needle to proceed?
Thanks!
Hi Linda,
Thanks for reaching out! Yes, using a circular needle to hold both sets of stitches is a great way to arrange everything for a 3-needle bind off!
Best,
Julianna
Omg the modified 3 needle bind off is wonderful!!
No harder than the regular 3 needle bind off, it comes out so much smaller and smoother. Thank you
I am a seasoned knitter. But I am also a foreigner and do not read American directions when it comes to knitting. Would you please just give me the length of the hat before you start decreasing, and then the full length of the hat. I would be very appreciative
Ia
Hello la,
Thanks for reaching out! It looks like you commented on the 3-needle Bind Off tutorial page. Which hat are you interested in knitting?
I hope I can help!
Best,
Marilla
Interesting bind-off. I have just finished knitting the PurlSoho Criss Cross top. Lovely pattern, by the way. I am blocking the sweater at the moment, mainly to flatten out the cast-on row.
So, I will have to wait until the hem is flat and dry prior to using the three-needle cast of for the back neck. This is in ribbing. I would imagine that the cast-offs should be in in ribbing???? Thanks in advance for your input.
Hi Jean,
Thanks for reaching out. We recommend using the Modified 3-Needle Bind-Off for this pattern! (This is demonstrated in the second video on this page.) While we demonstrate the technique using stockinette stitch, it can also be used for ribbing with no changes to the instructions. I hope this helps clarify things!
All the best,
Lili
I just want to say that this method TOTALLY ROCKS!! I’ve been knitting for years, and never had done it before. So glad I checked out the video. Thanks for putting such well done and helpful videos! Love Purl Soho!!!!
What does the backside of the modified three needle bind off look like?
Hi Opi,
Thanks for reaching out! If you’re working in stockinette stitch, like in the tutorial, the wrong side will look like purl bumps. The row where the seam takes place is almost imperceptible from the wrong side!
All the best,
Lili
Hi Lily,
Can you use the 3-needle bind off to knit the sides of a sweater together?
Thank you, your youtube is great!
Hi Yvon,
It’ll depend how the sweater is constructed, but it’s definitely possible! This technique works when you have two edges of fabric with live stitches on them. So if the sides of your sweater are live, then yes, absolutely! But if they’re just regular edges, then a different seaming technique would be more useful.
All the best,
Lili
Thanks for your reply!! I guess I’ll use another method.
Happy holidays!
Yvon
OMG! Thank you for this tutorial. Just the words “3-Needle Bind-Off” scared the socks off of me. (I made the Keyhole Scarf using Merino Bloom) The instructions and photos were just the ticket. Well done, Purl Soho!
Hi Nancie,
We are thrilled to hear that you found this tutorial helpful. It’s always fun to learn a new technique! Please let us know if you have any questions along the way and we would be happy to help!
Warmly,
Gavriella