


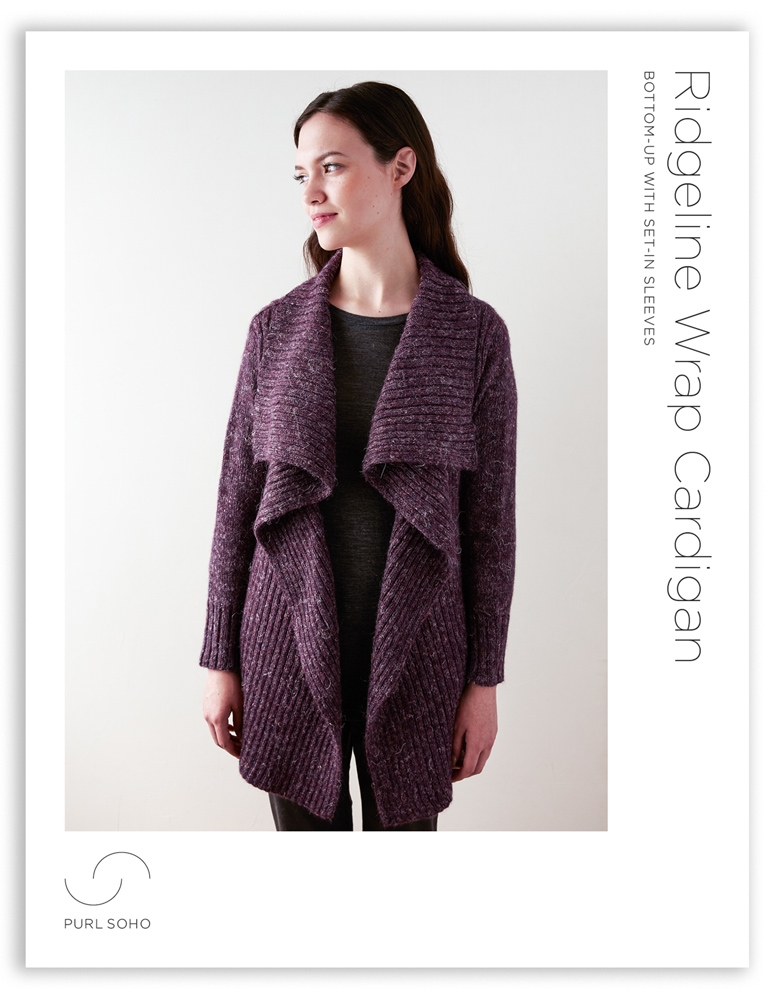
Ridgeline Wrap Cardigan
Our Ridgeline Wrap Cardigan taps into the drama of nature itself: the ebbs and flows, the bends and curves, the skyline of the Alps, the peak of Mount Fuji, the ups and downs of the Rocky Mountains.
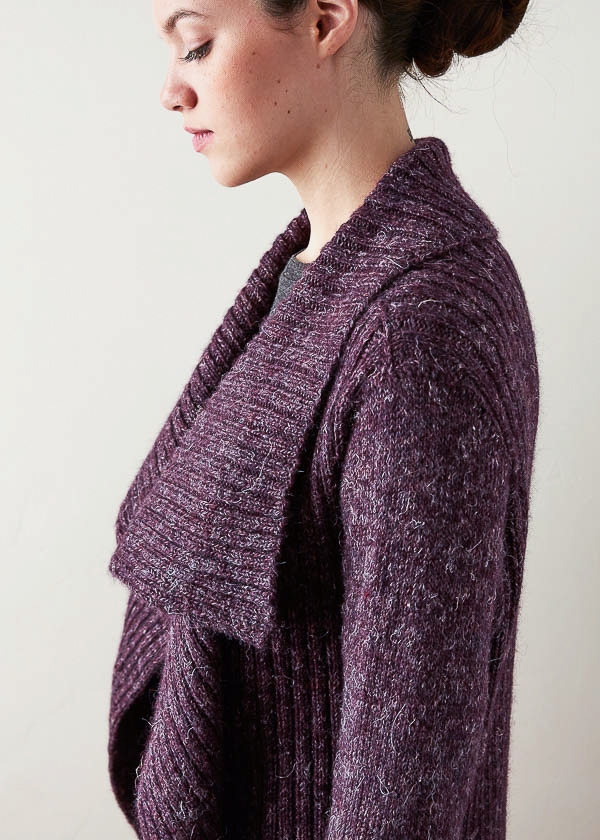
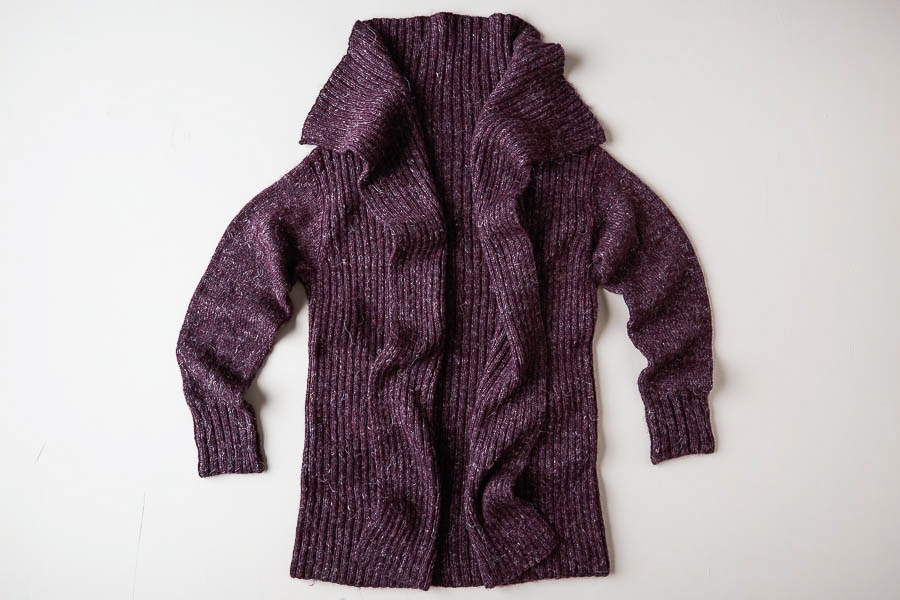
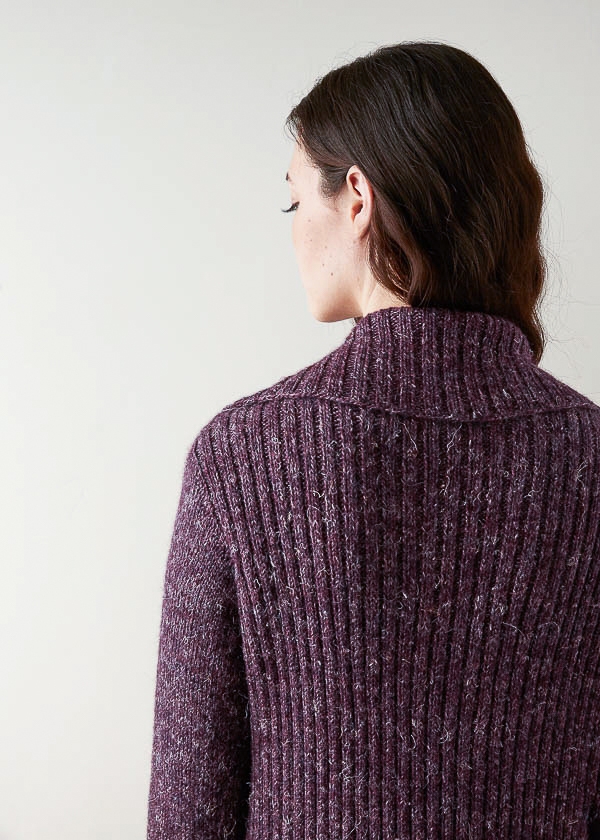
Great for beginners on a quest for their first dramatic achievement and also for more experienced knitters who are always up for beauty, this pattern is perfectly straightforward. Its body is knit bottom up in 2×2 rib, and the set-in sleeves are picked up and knit in the round with short-row shoulder shaping. The sweeping shawl collar grows right out of the body, and stockinette sleeves envelop the wearer’s arms without constricting them.
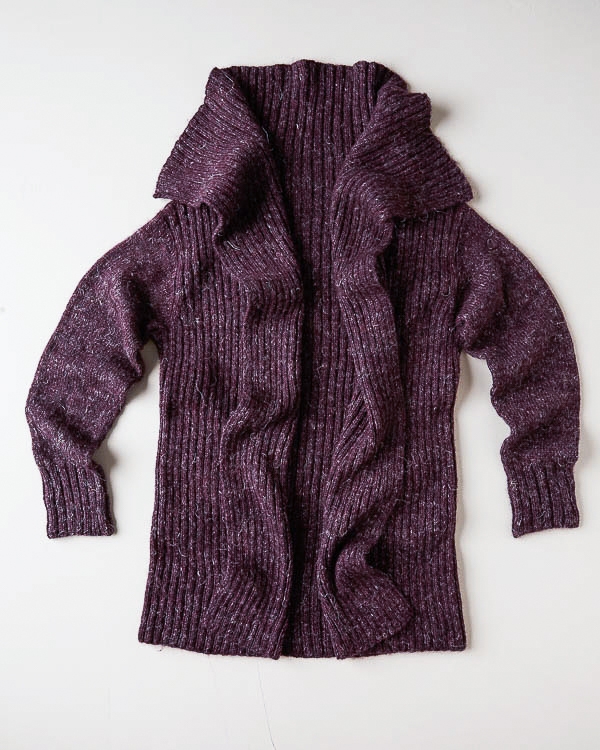
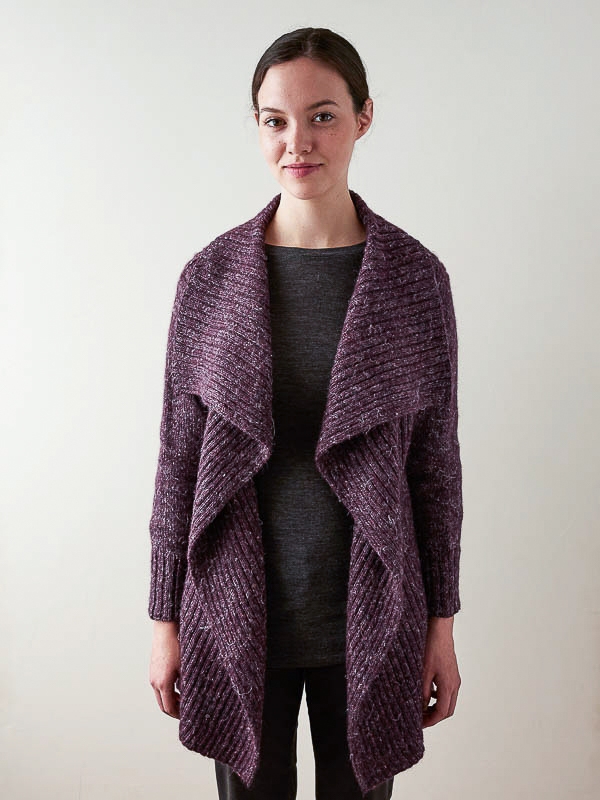
The perfect layering piece, wear your Ridgeline Wrap Cardigan under coats or on top of finer knits as a generous overcoat. Wear the waterfall front open to swish and sway in an early-fall breeze or belted and buckled to add structure to your look.
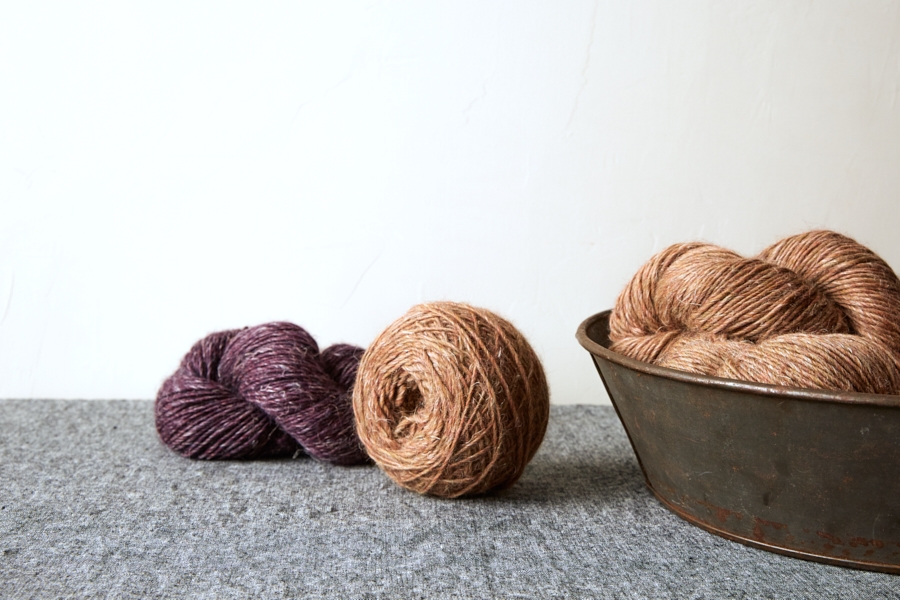
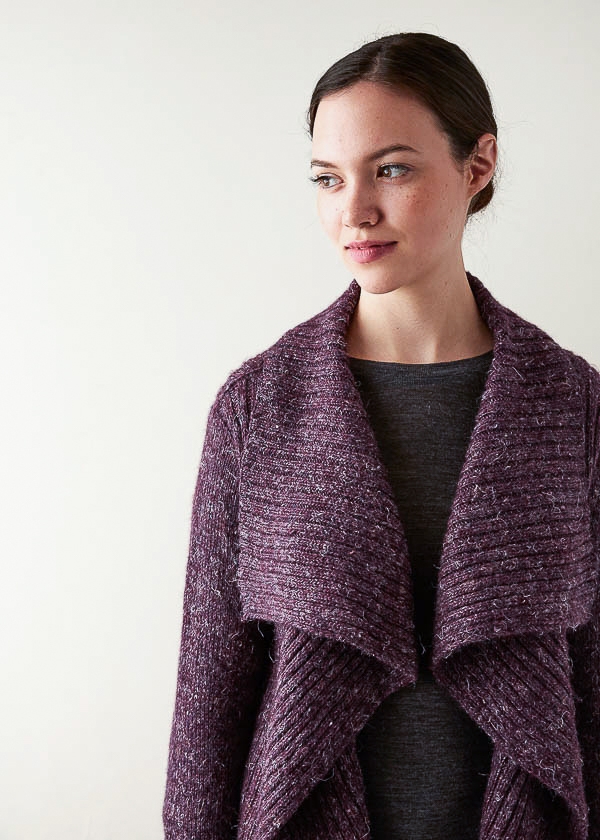
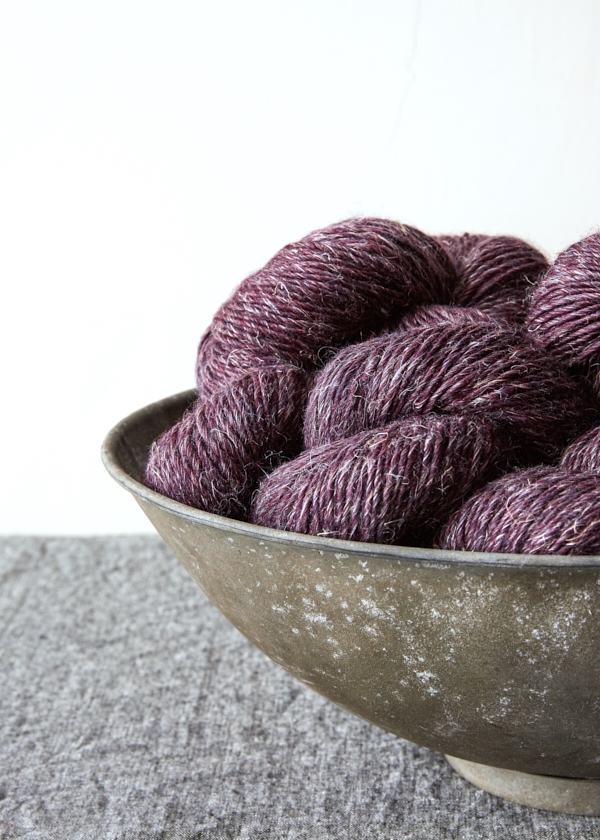
And what better yarn to create such a natural beauty than our Flax Down? A combination of baby alpaca, extra fine merino, and linen, our Flax Down collection just welcomed nine beautiful new colors, including the Dark Iris color we used here. Full of life and richness, it still reads as an everyday neutral that somehow goes with most everything!
Even if your next mountain adventure isn’t on the horizon, wearing your own hand-knit Ridgeline Wrap Cardigan will transport you there, like you’re on top of the world!
Designed by Purl Soho designer, Adam Aronowitz.
Share your progress and connect with the community by tagging your pics with #PurlSoho, #PurlSohoBusyHands, #PurlSohoRidgelineWrapCardigan, and #PurlSohoFlaxDown. We can’t wait to see what you make!
MATERIALS
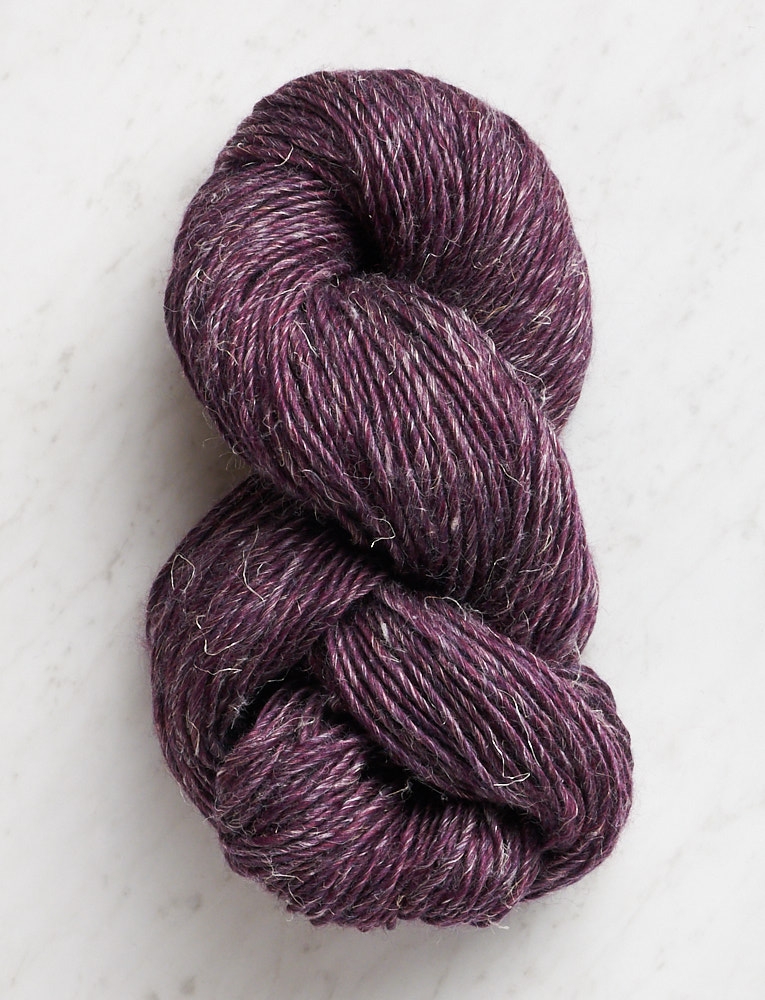
- 10 (10, 11, 12) (13, 14, 15, 16) skeins of Purl Soho’s Flax Down, 43% baby alpaca, 42% extra fine merino, and 15% linen. Each skein is 219 yards/ 100 grams; approximately 1995 (2145, 2360, 2560) (2830, 2990, 3200, 3380) yards required. We used the color Dark Iris (and also Fresh Nutmeg, shown in the banner photos at the top of this page). (NOTE: We no longer offer Flax Down, but choose from one of our other light worsted/dk weight yarns.)
- US 6 (4 mm), 40-inch circular needles
- A set of US 6 double pointed needles
- Stitch markers
- Stitch holders or scrap yarn
- A Ridgeline Wrap Cardigan Pattern
GAUGE
32 stitches and 32 rows = 4 inches in 2×2 rib
23 stitches and 34 rows = 4 inches in stockinette stitch
SIZES
NOTE For help picking a size, please check out our Understanding Ease + Selecting Size Tutorial!
34½ (38½, 42½, 46½) (50½, 54½, 58½, 62½) inches, closed
To fit actual chest circumference of 30–33 (34–37, 38–41, 42–45) (46–49, 50–53, 54–57, 58–61) inches, with approximately 2–5 inches of ease
- Finished Chest Circumference: 34½ (38½, 42½, 46½) (50½, 54½, 58½, 62½) inches, closed
- Finished Length From Shoulder To Back Bottom Edge: 27 (27½, 29¼, 29¾) (31½, 32, 32½, 33) inches
- Finished Sleeve Length: 18 inches
SAMPLE: The sweater pictured here is size 34½ with 3 inches of ease.
PATTERN
The Ridgeline Wrap Cardigan is available for purchase as a PDF download.


Gorgeous!
Could this pattern be modified without sleeves to make a vest? It’s just the style I’ve been wanting.
Thank you!
Hi Lisa,
Thanks for writing in and for the kind words! The cardigan would be super easy to modify into a vest, because the entire body is knitted first and the sleeves are picked up from the armhole openings and knitted last. All you would have to do is skip the sleeves!
Best of luck, and please let us know how your Ridgeline Wrap Vest turns out!
Julianna
Thank you so much! I’ll keep you posted …
Beautiful! Purl Soho continues to blow me away with their beautiful designs and modern aesthetic! Thank you for this!
This is a gorgeous sweater. I’d love to make it with 100% cashmere.
Would it drape the same and what yarn do you recommend?
Hi Lin,
Thanks for writing in! Pure cashmere has fantastic drape so I think it’s an awesome choice for this cardigan! Although you should always knit a gauge swatch, especially when substituting yarns, Zageo 6-Ply Cashmere should knit up at the same gauge as Flax Down. You will need 15 (15, 16, 18, 19, 20) skeins which is a quantity we do not usually keep in stock, so please feel free to give us a call at (800)587-PURL so we can place a special order for you!
Happy knitting!
Julianna
Beautiful pattern & yarn…but way too expensive! I would need 14 skeins @ $22.50 per skein. The sweater would come out to $315.00 without purchasing the pattern or taxes & shipping. Keep up the good work; but please be realistic.
Hi Karen,
Thanks so much for the kind words! We hear you! We totally understand that sometimes our yarn suggestions are more of an inspiration than a reality for many people. We are always happy to recommend less expensive (but still beautiful!) alternatives. In this case, we suggest that you try Good Wool – you would only need 6 (6, 7, 7, 8, 8) skeins, and at $9.80 per skein, it would make a more economical yet equally lovely cardigan.
Thank you so much for asking. We’re sure that lots of other readers will thank you, too!
Best,
Julianna
Thank you so much for your reply, Julianna, your suggestion is within my price budget & Good Wool looks like a beautiful yarn. Thanks again!
I appreciated Karen’s question and your suggestion of Good Wool as an alternative fiber. Can make another suggestion that might offer a wider range of colors?
Hi Kathy,
Thanks for writing in! Although it’s hard to beat Good Wool for an economical alternative, Brooklyn Tweed Arbor should also knit up at the correct gauge and comes in a wide range of beautiful colors.
I hope that helps!
Julianna
I would love to make this cardigan also and wondering how many skeins of Brooklyn Tweed Arbor do I need to buy please?
Can’t wait to buy the pattern.
Quyen
Hi Quyen,
Great question! This lovely sweater uses 1995 (2145, 2360, 2560, 2830, 2990) yards of yarn. For Arbor, this would be 14 (15, 17, 18, 20, 21) skeins.
Best,
Cassy
Hello! I always love all of your patterns and information! I’ve only ever made blankets and scarves and just from teaching myself and using Youtube and books, but am loving this cardigan! How difficult would this be if I wanted to attempt to make it with my current skill level? Am really thinking about it but don’t want to spend the money if it’s going to end up being beyond my abilities. Thank so much for all of your wonderful designs and helpful posts!
Hi Dori,
Thanks so much for the kind words and for reaching out! I would rate this an advanced beginner to intermediate pattern – although the entire body of the sweater is very straightforward knitting and purling, the shoulders and sleeve caps are shaped with short rows, and you will have to pick up the stitches for the sleeves. However, we do have video tutorials for both of these techniques! You can review our short row tutorial here, and our picking up stitches tutorial here. I think this is an excellent project if you are looking to expand your skills, and we are always here to help if you run into any questions!
Best of luck and happy knitting!
Julianna
Thank you so much! I think I may give it a go! I look forward to the challenge and ending up with a beautiful cardigan in the end! I’ll definitely ask if I have any questions once I get going.
LOVE. IT. I am a huge fan of Manos Maxima – do you think it would be a good substitute? Thanks for another gorgeous design . . . .
Hi Chermia,
Thanks so much for the kind words! Maxima is a bit heavier weight than Flax Down – although I think you could achieve the correct gauge by adjusting your needle size, you may find that it makes a denser fabric with less drape than Flax Down. However, if you are looking for a cozy, somewhat structured sweater, it could work fantastically! I would definitely suggest knitting a gauge swatch to see if you are happy with the fabric.
Best of luck and happy knitting!
Julianna
do you use 2 strands of yarn held together in the Ridgeline wrap cardigan
Hi Jane,
Thanks for reaching out! We used a single strand of Flax Down on US 6 needles for this cardigan.
Best,
Julianna
Beautiful. This just moved to the top of my knitting list.
Hi, I was wondering what size the model is wearing in the photo?
Thanks a bunch!
Hi Charlotte,
Thanks for writing in! The sweater pictured here is size 34½ modeled with 3 inches of ease.
Happy knitting!
Julianna
Hi
Can this pattern be modified to have a more rolled look rather than the large draping
Even though beautiful it’s not quite the same as the project I want to make for my daughter and I can’t find a pattern
I’m also using a 10ply Aran cashmere merino blend
Could I adapt this pattern to suit style & wool
Thanks
Janis
Hello Janis,
Thank you for reaching out- your yarn sounds beautiful! I suspect that you could shorten the color and then pick up and knit around the border to create a rolled edge. Depending on how close your gauge is to our 23 stitches and 34 rows to 4 inches in stockinette stitch will determine how much altering you would have to take on. I would knit up a little gauge swatch with your yarn to see how far off you are and go from there!
I hope this gives you some guidance and let us know if you have any further questions!
-Marilla
I LOVE this pattern. I have 1530 yards of Blue Moon DK 100% merino in my stash. Do you think this yarn would drape properly and would it be enough for sz 38.5? Thanks so much.
Hello Suzanne,
Thank you for reaching out! Size 38.5″ takes approximately 2,243 yards so, though your yarn would work beautifully for this project, unfortunately you will not have enough for this size.
I hope this helps and happy knitting!
-Marilla
Hi! I have a question about blocking, when you block the sample of 2×2 ribbing do you stretch it out when you pin it to dry? Or do you simply pin it in the corners and leave it? I’m a little new to knitting swatches so I don’t want to do it wrong. Thanks so much!
Hello Charlotte,
Thank you for reaching out. This is a great question! You do not need to stretch it out, but simply pin each corner. Ribbing is always a little tricky to measure because of its stretch, but ultimately your goal is to get your swatch as close to how your sweater will knit up as possible.
I hope this helps and happy knitting!
-Marilla
This is a gorgeous cardigan. The thing is I am too petite even for its smallest size. Any suggestion?
Hello Revni,
Thank you for reaching out! This cardigan is designed to have and over sized look to it so if you are up for altering the pattern a bit I think you could make it work. You could decrease the number of stitches in the back to bring the arms closer together in the back and take away some stitches in the front color to balance everything out. In addition adjusting the length of the sweater should be pretty straightforward.
I hope this helps and happy knitting!
-Marilla
When making a guage swatch for this sweater, do I wet the swatch ad shape it, or just measure it the way it comes off the needles?
Hi Wanda,
Thanks for reaching out! It is always a good idea to wash and block your swatch the same way you intend to wash and block your sweater, since you will be washing your sweater eventually and if your gauge changes after blocking, your entire sweater may not fit after blocking.
Best of luck and happy knitting!
Julianna
I really like this pattern but was wondering if it can be made up in a lighter yarn. I live in Miami and would prefer cotton or linen. My preference might be linen.
Hello Susan,
Thank you for reaching out! I would suggest trying out either our Cotton Pure or Habu’s Bamboo. Both of these yarns will knit up at a smaller gauge than what the pattern calls for so you could go down in needle size and knit one size larger. This is not an exact science so you would have to be ok with the size not coming out perfectly.
I would also check out Joelle’s favorite Vest which could be knit up in our Field Linen or the Folded Square Cardigan which is made with Habu’s Bamboo
I hope this helps and happy knitting!
-Marilla
I have done several gauge swatches and keep coming up between using the recommended size 6 needles or sizing down to a 4. My swatches are coming out between. In general I am a loose knitter. Can you help me decide what size needle to use? I tried on the sweater this weekend in the store, and the small size was a good fit. Would I do better to end up a bit bigger or smaller?
Hello Wendy,
Thank you for reaching out! I would recommend using a size 5 needle in your case so that you can get as close to gauge as possible. When working on something this large that needs to fit your body it is always better to be as close to gauge as possible, as I’m sure you know. Generally I would say if you are choosing between your sweater coming out larger or smaller it is better to go larger especially with something that is designed to fit oversized. However it is important to remember that however much your gauge is off by per inch, your sweater will be off by that amount per inch.
I hope this makes sense and happy knitting!
-Marilla
Marilla: thank you so much for your prompt and helpful reply. I love Purl Soho! I took my gauge swatches into a local yarn shop that I love when we are in NJ, and contrary to what I told you, they agree that they are within a stitch of #4 needles, and as I am a loose knitter, we agreed that I should progress with the 4. I am eager to begin this beautiful project, and thank you again for your input. My daughter and I were in your shop this past weekend, and both bought this project. Can’t wait to begin!
I’m really excited for this pattern and it is the first sweater I’ve ever attempted! I was wondering if you could give some guidance about how to measure in order to determine the right size? I am relatively petite but have a large bust, and typically wear a small in an oversized sweater like this one. I’ve measured my chest circumference under my armpits (37 in) and also where my bra strap goes (33 in). I’m not sure if I should take the bust measurement into account, because I suspect that will make for a fit that is too large in the shoulders. I am leaning towards the 38 1/2 size but wanted to be sure before starting. Thank you!!
Hi Rebecca,
Great question! For a some people who have a larger discrepancy between the under bust, or bra band, measurement and full bust, using the full bust measurement to determine sweater sizing can lead to a sweater that is too big everywhere else. If you find that is the case, you can use a different measurement, called the high bust, to determine your size instead. To do so, wrap the measuring tape around your chest at the top of your armpits, and then take the measurement with your arms down – it sounds like this is where you measured and got 33 inches. Using that measurement, I would recommend knitting the 34 1/2 size. Fortunately, since this sweater is meant to be oversized and doesn’t close in the front, I think either size could work so you don’t have to worry about the sweater not fitting, whichever size you choose to knit!
I hope that helps!
Julianna
Thank you! Yes, using the “high bust” measurement you described I measured 37 in – so the 38 1/2 size should be the right one I think? Thanks so much for your reply
Hi Rebecca,
Yes, I would knit the 38 1/2 size if your high bust is 37 inches! In the future, if you try to use this method to choose a size for more fitted sweaters, you may find that you have to make additional adjustments, but it works quite well without alteration for boxy or open front cardigans.
Happy knitting!
Julianna
Hello! I love this look of this cardigan and this will be my first cardigan!!! I am so excited but need some help with the pattern. Is there a video or tutorial that you can send me for this pattern, especially on the Division Row? Like I mentioned this is my first big project and not sure on how to ‘join new ball of yarn and bind off next 10 stitches’. I’m stuck please help!
Thank you so much! And cannot wait to finish my very first cardigan!!
Hi Judy,
Thanks for reaching out! Unfortunately we do not have a video tutorial for this step, but hopefully I can walk you through it! At this point in the row, you will simply start knitting and casting off with the tail from a new ball of yarn, leaving the old ball of yarn attached to the Right Front stitches to use later. Once you finish the row, the new ball will be attached to the Left Front, which you will work in the next set of instructions, and the old ball of yarn will still be attached to the Right Front, which you will return to after you have finished the Left Front.
I hope that clears things up!
Julianna
Can this pattern be adjusted to make it smaller as in more narrower? Smallest size was still way too large. Thanks!
Hi Dawn,
Thanks for reaching out! Unfortunately we do not have a smaller size available for this pattern, but I will pass your suggestion along to the design team. If you are up for a bit of experimenting and math, you could possibly subtract stitches from the back and fronts in multiples of 4 so that the ribbing works out, but keep in mind that narrowing the front will result in a narrower collar, and either adjustment will affect the short rows in the shoulders.
Best of luck and happy knitting!
Julianna
Hi Julianna,
So I am knitting the sweater using the Flax Down and am loving both the yarn and the pattern very much. I’ve come to the “Shape Left Shoulder” section and my questions is about the short row shaping, which occurs only on the wrong side. I’ve only done German short rows before so I apologize if this is a stupid question. The directions (for WRP-T wrong side read “…bring yarn to front. Turn work so right side is facing you.” Do I now continue in pattern to the end of what is now the right side facing me? Again, sorry for being dense — I just can’t figure out how to proceed with this. And I always have a big fear of screwing up beyond repair! 🙂 Thank you very much for your time, Cynthia
Hi Cynthia,
Thanks for reaching out, and I apologize for the delay! After you work the wrap and turn, you will then move on to the next row in the pattern, Short Row 2, which reads “Work in established pattern to end of row.” So yes, you will simply be working a right side row all the way to the end before continuing with Short Row 3!
I hope that helps!
Julianna
Hello,
I am making this using a worsted weight superwash merino, and my gauge is completely off! I had to go down to a size 1 needle! I know the guage is 32 st. Per 4 inches, but with a size 6 this ends up huge! 8 sts per inch seems impossible. Please help!!
Hi Ainslie,
Thanks for writing in! Our Flax Down is a DK weight yarn, which is a bit thinner than worsted weight, but it does still seem odd that you would have to go down to such a small needle! Is it possible that you are knitting your gauge swatch in stockinette instead of ribbing? Our 32 stitches per four inches. gauge is for 2×2 ribbing, and the gauge for stockinette stitch should be 23 stitches per four inches.
Best,
Julianna
The pattern is gorgeous. The cheaper alternative, you have suggested is not as nice as flax Down. Can I use flax down for front and cheaper yarn for the rest?
Hi Vasanta,
Thanks for reaching out! Although this would be possible, it might be fairly tricky! I would suggest swatching in both yarns to make sure they both give the same gauge on the same size needle, and since the body of the cardigan is knit in one piece, you would have to switch yarns using intarsia at the side seam markers. It’s also hard to say how much of each yarn you would need since we can’t weigh just parts of the sweater. However, it’s quite an interesting idea – if you do tackle it, please let us know how it turns out!
Best,
Julianna
This is a beautiful sweater. I’ve been wanting to make something with your Cashmere Merino Bloom and it looks like that yarn is fairly similar to the flax down in terms of weight, length, etc. Do you think I could buy the same amount of the Bloom yarn and use that instead of the flax down? Thank you!
Hello Sara,
Thank you for your kind words! You are right that Flax Down and Cashmere Merino Bloom are very similar in weight. They also have approximately the same amount of yardage so you can get the same amount of skeins as well!
Happy knitting!
-Marilla
Hi!
I’m knitting the sleeves and they’re way longer than they should be, I don’t know where I went wrong! I knit up to the measurements the pattern says and then decreased. Should I knit a row short for the decreases to be exactly the measure given apart? This is the second time I’m knitting the sleeve, please help
Hi Noemi,
Thanks for reaching out! After completing the short rows for the sleeve cap, you should be right at the underarm and only knit two rows before beginning the sleeve decreases. Since the decreases are then worked a set distance apart, the sleeve should always turn out the same length – for instance, for the smallest size, you will work the decrease row every .75 inches twice, then every inch twelve times, which adds up to 13.5 inches, plus a bit extra for the decrease rows themselves. If you find that you need a shorter sleeve, I would suggest working the decreases closer together so that they are done by the time you reach your desired sleeve length.
I hope that clears things up!
Julianna
When shaping the shoulder of this lovely piece, you use short rows. I’m puzzled by the instructions: “…last 4 stitches, wrp-t…” and so it continues, for me, 5 more times. If you follow this, do you not create a SLIT? My logic says that one should go to the last 4, then last 5, then last 6, etc., in order to create a SLOPE for the shoulder? And, the short row video explains the method for stocking stitch only, not for a rib pattern? HELP, please. Thanks, K.
Hi Kirsten,
Thanks for writing in! If you read a bit further, after working the first wrap and turn four stitches from the end of the row, you will then work each subsequent wrap and turn four stitches before the previous wrap and turn, which will create a slope along the shoulder. Although the video only shows stockinette stitch, you will work wrap and turns in exactly the same fashion for ribbing. The only difference will be when you are knitting the wraps together with their stitches, you will just need to visually check whether it is a knit or purl stitch and then either knit or purl the wrap together with the stitch.
I hope that clears things up!
Julianna
Thank you, Julianna, for pointing out my misunderstanding, your clarification makes a lot of sense.
Kirsten
Juliana, I am confused about the short row instructions as well. I am on the left front. I followed the instructions in the pattern (slip stitch, bring yarn back, return slipped stitch to the other needle, bring yarn in front). Then it says turn work. It creates a gap that happens again the next time I do the wrp-t again (4 stiches before the first time). This doesn’t look right to me. Your instructions above mention “knitting the wraps together with their stitches”. Please explain. I don’t know what that means and I don’t see it in the pattern or special instructions. Thanks for your help. (So far the pattern has been a breeze!) Anita
Hi Anita,
Thanks for reaching out! Basically, this means that when you finish the short rows and work back across the stitches, you will be picking up the wrap and knitting it together with its paired stitch to close up the hole! You can see exactly how this works by watching our Short Rows: Wrap + Turn tutorial (this tutorial is also linked in the NOTES section of the pattern next to the Special Instructions!)
I hope this clears things up!
Gianna
This pattern is stunning! I read in the comments that it would be easy to modify for a sleeveless vest – how many yards would be needed? I have 5 skeins of Flax Down and looking for a perfect pattern for it. Thanks!
Hi Stefani,
Thanks for writing in! While we do not have yardage noted for the sleeves specifically, we suspect that they used between 3 and 5 skeins depending on the size made. With that in mind, I think that you would be quite short on yardage without further modifications. You can shorten the garment but as it is knit bottom up, you would need to decide how much to shorten it from the beginning. For 5 skeins of Flax Down, I might suggest our Foxglove Vest, which uses 3-4 skeins!
Happy knitting!
Cassy
Hi! I’m trying to get gauge and it’s so difficult with the ribbing. Should it be fully relaxed when measuring or stretched before measuring? Or maybe weighted? I’ve had issues with fit before so I’m trying hard to measure everything out and get it right this time! I tried the one on in the store and it for perfectly, I want to get the same fit! Have the store models been washed and blocked?Thanks for your help!
Hello Megan,
Thank you for reaching out with this great question! The project in the store was steam blocked. I know that ribbing can be really frustrating to get gauge with (from personal experience). I wouldn’t weigh it down or anything like that, you could lightly steam it, but you should be able to get an accurate measurement from you ribbed swatch without doing anything extra. You’ve got this!
Let us know if you have any other questions and happy knitting!
-Marilla
I’m at the point for joining the shoulders. I’ve watched the video for the modified three needle bind off which demonstrates the technique in stockinette stitch. Do I need to adapt it for the rib pattern or are the purl stitches just worked as if they were knit?
Hi Marianne,
Great question! For this pattern, you will be working the Modified Three Needle Bind Off in stockinette, as shown in the video, even though the cardigan is worked in ribbing.
I hope that clears things up!
Julianna
Hi! I am stuck at the Collar section. I can’t seem to work out what I need to do from here as I’ve read this section a few times. Pick-Up Row (right side): Working across Right front stitch, slip 1, rejoin yarn onwards, *k2, p2, repeat from * to last 2 stitches….
What do I do with the right front and left front on the stitch holders? Am I working with those and putting them back on my needle? So confused pls help. Thank you!
Hi Quyen,
I hope I can clarify this part of the pattern for you! Before working the collar, you should have joined your shoulder seams with a 3 needle bind off, leaving 83 (83, 83, 87, 87, 87) stitches on a holder for the Right Front, 66 (66, 66, 74, 74, 74) for the Back, and 83 (83, 83, 87, 87, 87) stitches for the Left Front. For this first row of the collar, you will be knitting across these collar stitches which have been on hold, beginning with the Right Front stitches. When you are done with this row, all of the held stitches from the Right Front, Back, and Left Front will be on the same needle so you can knit the collar.
I hope that helps!
Julianna
Thank you, Julianna. I think I got it:)
Hi Julianna,
I am up to the Shape Sleeve part where it says to Decrease Round.
K1, ssk, knit to last 3 stitches , k2tog. [2 stitches decreased].
What do I do with the last stitch on that round? Do I knit that?
Hi Quyen,
Thank you so much for pointing this out! The Decrease Round you mentioned should end with a k1 after the k2tog. We have made updates to the pattern PDF above and have published this error in our Errata page. Please don’t hesitate to reach out if you should have any other questions!
Happy knitting!
Gaby
I am loving this project SO much, thank you!! I am wondering if you can tell me where the approximate half way point is? I want to make this as long as possible, so wanted to know how many skeins I should leave for the arms, shoulders, top collar? Thank you!!
Hi Janna,
Thank you so much for the kind words and for writing in! Unfortunately, we don’t have information on how much yardage you will need for each section of this sweater; however, you will need 1995 (2145, 2360, 2560) (2830, 2990, 3200, 3380) yards to knit the cardigan as written. If you have any extra skeins or yardage, you can put all the extra into the body of the cardigan!
I hope that helps!
Julianna
Hi Julianna! I hope you are well! I had to take a break to move, but settled in and back at my sweater! It is amazing. All I have left is the sleeves, but I am stuck before even starting. 🙁
It says I should have 86 total stitches, but looks like I will have closer to 112 based on how many stitches I have to pick-up along the sleeve hole. Should I just eyeball and space them out? Any help on this part would be much appreciated.
Hi Janna,
Thanks for writing in! I am so glad to hear that you are settled and working on the sweater again and I am happy to help you with this! Thats alright if there are more stitches along the pick up edge since you finished the armhole shaping with more stitches than what you are picking up! Just evenly pick up the 86 stitches, evenly spacing them so you have 5 from the Underarm bind-off, 76 stitches evenly around Armhole edge (one stitch in from edge), and 5 stitches evenly along other side of Underarm bind-
off and distribute the stitches evenly across your double pointed needles.
I hope this helps and feel free to reach out with any more questions moving forward!
Gianna
How do you evenly space them out? Skip every 3rd or 4th stitch?
Thanks!
Hi Norma,
Thanks for writing in! Since the gauge in stockinette stitch is 23 stitches and 34 rows in 4 inches, you’ll need to pick up stitches at a ratio of 23:34, which is approximately 2:3. This means that for the most part, you can skip every 3rd stitch, but sometimes you will need to skip a stitch after the 4th stitch. Hope this helps!
All the best,
Lili
That did help! Thank you! I’m finishing up my first sleeve now!
Hi! I am about to start this project and am so excited about it! I just read the pattern and wondering if there is a cast on method you recommend? I typically use the long tail cast on.
Also, if I plan to do this as a vest, do I need double pointed needles? I think I can do the shoulder join with traditional needles, unless perhaps I’m misreading the pattern?
Thank you!
Hi Meaghan,
Thanks for reaching out! Long Tail Cast On is a great method to use for this Cardigan! You should also be able to work the Join Shoulder section (MODIFIED 3-NEEDLE BIND OFF) using 3 straight needles instead of double pointed needles!
I hope this helps and please let me know if you have any more questions!
Warmly,
Gianna
Thanks so much!
Hi! First time sweater knitter here. I’m white knuckling it 😂. The fabric looks and feels great IMO. I’ve just finished the right front and I’m ready to join yarn, on the wrong side, and p2,k2 (shape back armholes) but now I have a problem. If I am right about which side is the right side/wrong side, my first stitches would be k2,p2. I counted the stitches and I have the right count. I can’t figure out how best to proceed. I can’t imagine that I got off track with the left and right sides since the balls of yarn were marking those places and I never had trouble staying in pattern. Is there any downside to proceeding from here? The big difference I see between the right and wrong sides is the appearance of the decrease stitches around the right and left armholes. If it helps, the side I think is wrong side looks like 4 knit columns lining the armhole. The opposite side looks in pattern, two knits, 2 purls. I don’t see that in the sample photos showing the front of the armholes. If I can keep going, how to get started? Any modifications? Please help!
Hi Tricia,
Thanks for reaching out! The best way to identify the right from the wrong side is to look at the cast-on edge, the right side will have a smooth twisted edge while the wrong side will show hints of purl bumps along the cast on! Once you identify which is which, I would recommend placing a removable stitch marker on the right side of the fabric so that you can keep track! If you need additional help identifying the sides, feel free to send a few pictures to our customer service team at customerservice@purlsoho.com, just be sure to include the cast on edges in the photos!
I hope this helps!
Gianna
Thanks Gianna! I decided I’m making too much of the instruction to have wrong side facing me after going back and seeing how I was holding the work for other wrong side rows for the left and right sides. I’m now confident in the right side, thanks for the trick! I’m ready to plunge back in. Thanks again.
Hello. I have a question about the collar. Your photo shows the collar as making a sort of “S” shape (i.e., curved as it flows down the front sides) which is quite attractive. Did you achieve the curviness through blocking or just by placing it that way? I have turned the collar back at the neck and top of the sides but I am not getting that look.
Hi Anita,
Thanks for reaching out! The “s” shape is actually created just by placing it that way and the natural drape of the fabric when worn! To get this look we pulled the collar out to the sides so the edges are resting more along the tip of your shoulders, from there, you will get a great drape. It may not be the exact S shape shown here, so it is also possible to try to influence that by blocking the sweater!
I hope this helps!
Gianna
Hello,
I have a question about the collar. the pattern tells me to work k2, p2* to last 2 stitches then pick up and knit a stitch either side of the shoulder seam. Should this be pick up and purl to stay in pattern, or are there 6 knit stitches at this point? the rest of the pattern says k2, p2 as in pattern. Sorry, but I’ve tried both ways and I must be reading something wrong.
Hi Alice,
Thanks for reaching out! Yes, you will continue to work in the stitch pattern to join the shoulder seam! However, once you work the first row of the COLLAR section you will slightly break the stitch pattern by ending with a p3 instead of p2: Row 1 (wrong side) Slip 1, *p2, k2, repeat from * to last 3 stitches, p3.
I hope this helps, happy knitting!
Gianna
Hello! I am at the 3 needle bind off section where it says “wrong sides together” and now I’m wondering if it should say “right sides together”? I’m wondering if I can figure out how to undo the 3 needle bind off… help!
Hi Norma,
Thank you so much for writing in! For the 3 needle bind off section, you will be binding off the shoulder stitches with the wrong sides together. To rip back your 3 needle bind off, you can just remove your needle from the last stitch (or unloop that stitch if you bind it off already) and slowly unravel the last row! It might help to have a length of scrap yarn and a tapestry needle ready if you want to pick up the unraveled stitches onto the scrap yarn first!
I hope this helps, and please let us know if you have any other questions!
All the best,
Carly
Thank you, Carly! I was able to figure it out and saw what I did wrong.
You’re very welcome, Norma! I’m glad you were able to figure it out!
All the best,
Carly
Hi! I absolutely love this design, but I know the yarn weight would be too warm for the climate I live in… how could I adapt the pattern to suit a finer yarn, for example your linen quill which I absolutely adore!!!
Hi Beatriz,
Thanks for reaching out. In order to knit this design using a thinner yarn, I’d recommend simply choosing a larger size to follow! Here’s how to figure out which size to knit so that it will come to the right dimensions with a smaller gauge: First, knit a gauge swatch (in 2 x 2 ribbing) with the finer yarn. Once you know how many stitches per inch you’re getting, multiply that by your chest circumference plus the amount of ease you’d like the cardigan to have. Then, compare this number to the stitch count for the cast-on for the Back (138 (154, 170, 186) (202, 218, 234, 250)), multiplied by 2, and choose the size that comes closest!
For example, if my new gauge came to 40 stitches in 4 inches (10 stitches per inch), and my chest circumference is 34 inches, I would start by multiplying 10 by 37 (34 inches + 3 inches of ease). My resulting number is 370, and this comes closest to 186 times 2, since that’s 372. So I would make size 46 1/2 in that case!
I hope this helps, and if you’re unsure of the calculations, feel free to let me know 1) your new gauge, 2) your chest circumference, and 3) the amount of ease you prefer, and I can calculate this for you!
All the best,
Lili
I have a query, and forgive me if this has been asked and answered and I am exceedingly dense. I adore your patterns and have been so very happy with the ease of use with which they are presented. This part has me stumped. I’m at the short row section of the armhole shaping (which is new to me). Pattern states: [Short Row 1: Slip1, work in established pattern to last 4 stitches, wrp-t. Short Row 2: work in established pattern to end of row. Short Row 3: basically repeat Row 1]. My question is does this mean that you never actually make it to the original end of Row 2 ever again? Since wrp-t means you wrap and turn, when do you ever make it back to the end of Row 2 if you’re only ever doing the wrp-t on Rows 1 + 3? Do you ever make it back to the end of row 2? Is poor Row 2 left in limbo forever, never to be visited again? My short row experience is less than nothing, as you can tell. Any advice would be appreciated. Thanks so much!
Hi Shara,
Thanks for reaching out, and I’d be happy to help explain the short rows in the SHAPE LEFT SHOULDER SECTION! First, I wanted to explain the “big picture” of how these rows work to create a well-fitting shoulder. Basically, they function to make the inner part of the shoulder (closer to the neck) sit a bit higher than the outer part (closer to the arm), which matches the natural slope of your shoulder. Because you’re turning your work mid-way through a row when working the short rows, you’re effectively adding more fabric to the inner part of the shoulder, which raises it up to create this slope.
In answer to your specific questions then, the odd-numbered short rows take you part-way through the row, and then the even-numbered short rows take you all the way back to the side at which you began. Then, on Next Row, which occurs after a repeat of Row 2, you will work all the way across the row, knitting your wrapped stitches with their wraps. This is what takes you all the way to the opposite side finally!
I hope this helps clarify things, and I will answer your other questions when I reply to your other comments!
All the best,
Lili
Hi, Lili,
Your explanation makes sense to me now. But for this pattern I’m confused about _when_ all the wrapping occurs. The pattern states (after all the repeats and such): “New Row (wrong side): Slip, 1, working in established pattern to end of row, WORKING WRAPPED STITCHES WITH THEIR WRAPS WHEN YOU COME TO THEM.” So, am I correct in assuming the wrapped stitches just get worked in that ONE row? Is this how all wrp-t patterns work?
Again, I have limited experience with this and so appreciate you patience and expertise. You are the bomb diggety!
Thanks so much!! (And I’m frogging L side to fix the mistaken number of stitches between wraps)
Hi Shara,
Yes, you’re absolutely correct! All the wrapped stitches are knit with their wraps only on one row. But you’ll see patterns written either like this, or where the wrapped stitches are worked on each row. It all depends on what the pattern is! The point at which you work the wrapped stitches depends on the design of the pattern and what direction the slope is supposed to go.
All the best,
Lili
Hi, all!
Another short row question for you lovely people. Pattern states: Short Row 1: …”work in established pattern TO LAST 4 STITCHES, WRP-T. Then Short Row 3: work in established pattern to 4 STITCHES BEFORE PREVIOUS WRAP, WRP-T.” Does that mean the wrp-t happens on every 4th stitch or on every 5th stitch? In other words, are there 4 stitches _between_ wrapped stitches, or are you _wrapping_ every 4th stitch? Am I making sense? Sorry to pepper you with so many questions.
I have placed 4 stitches between wrapped stitches (so I’m wrapping every 5th stitch) but am concerned that this will alter the shape of the Left Front Collar and the sweater won’t fit correctly. I have no problem ripping back to the beginning of the wrp-t section. I just want the fit to be right as this is such a lovely pattern.
Thanks so much!
Shara
I’m making a size small, BTW. Also, was wondering how many total wrp-t repeats there are for that size. By my reckoning, I came up with 6. Is that correct? Again, many thanks!
You’re exactly correct! For the smallest size, you will work a total of 6 wrp-t’s.
All the best,
Lili
Hi Shara!
The instructions “4 stitches before previous wrap,” mean that you should knit until you have (on your left needle, going from left to right): wrapped stitch, 4 normal stitches. Then, you will work a wrp-t on this final normal stitch! This leaves you with exactly 3 stitches between each wrapped stitch, meaning that the wrapped stitch is on every 4th stitch. Since you have 4 stitches between each wrapped stitch, instead of 3, I would recommend going back and redoing this section to get the correct shaping!
All the best,
Lili
Hello,
I completed the sweater and unfortunately it is too large across the back. Can you advise a way too take the sweater in across the back. When my daughter-in-law wears the sweater it falls forward.
What do you recommend?
Kim
Hi Kim,
I’m sorry to hear that the cardigan you made for your daughter-in-law doesn’t fit her very well! One thing you could do to tighten up the back is to steek down the center back and then seam the two pieces back together. If you’re not yet familiar with the technique, steeking is essentially just cutting down a column of stitches! We unfortunately do not have a tutorial on the basics of steeking yet, but there are plenty elsewhere online.
Alternatively, if you don’t want to cut the garment at all (I get it!), you can seam the back smaller. I’d recommend picking two columns of knit stitches at equal distances away from the edges of the back, and working mattress stitch all the way up. This will result in a loop of fabric on the inside of the cardigan, but you can flatten that out a bit through blocking, and it shouldn’t be too noticeable when the cardigan is worn.
I hope this gives you some options to consider!
All the best,
Lili
Thank you so much for replying. I’ll check out both of these options.
I still have a lot to learn about the ease concept!
Kim
Has flax down been discontinued? What yarn would you recommend?
Hi Emily,
Thanks for writing in. I’m so sorry to say that we’ve indeed discontinued Flax Down! While we loved this yarn, not everybody else felt the same way, so we’ve had to make the sad decision to stop producing it. We hope you can understand! Flax Down was a DK weight yarn, so you’ll want to use another yarn of the same weight, in order to achieve the correct gauge for this pattern.
The best match would be Cashmere Merino Bloom, which is a very soft and fluffy yarn. Another great option would be Morning. Morning is a blend of cotton and yak, so it has a very different feel to it compared to Flax Down, but it’s a wonderful yarn too, and it’s machine washable! Finally, Knitting Yarn would also be a great substitute. This is one of our newest yarn additions, and it’s the perfect “all-around” yarn: simple, durable, and extremely versatile!
I hope that my recommendation are helpful, and please let me know if you have any other questions!
All the best,
Lili