Picking Up Stitches
There are several techniques out there for picking up stitches. To clear up any confusion on how we do it, we’ve made four videos showing our favorite methods: picking up stitches along a horizontal edge, along a vertical stockinette edge, along a vertical garter stitch edge, and also, purlwise.
Picking up stitches is as easy as knitting and purling. Once you get acquainted with the edge of your fabric, just pick up your needles and yarn and you’re ready to go!
Along a Horizontal Edge
This video shows you how to pick up stitches knitwise along a cast-on edge. The same technique will also work along a bind-off edge.
Insert your needle, from front to back, into the center of the stitch closest to the cast-on (or bind-off) edge; wrap the working yarn around the needle counter-clockwise as if to knit; use the tip of the needle to pull that yarn through to the front of the fabric. One stitch picked up!
Along a Vertical Edge: Stockinette Stitch
This video shows you how to pick up stitches knitwise along the vertical edge of a stockinette stitch swatch.
Insert your needle, from front to back, between the last and second-to-last columns of stitches; wrap the working yarn around the needle counter-clockwise as if to knit; use the tip of the needle to pull that yarn through to the front of the fabric.
TIP: When picking up stitches along a vertical edge, the new stitches will run perpendicular to the existing stitches. And since the stitch and row gauges are typically unequal, you will not pick up a stitch for each row along the vertical edge of the fabric. Often you’ll pick up 2 stitches for every 3 rows or 3 stitches for every 4 rows. Which depends on the gauge of the fabric .
Along a Vertical Edge: Garter Stitch, Between Ridges
This video shows you how to pick up stitches knitwise along the vertical edge of a garter stitch swatch.
Insert your needle, from front to back, between the ridges of garter, between the last and second-to-last columns of stitches; wrap the working yarn around the needle counter-clockwise as if to knit; use the tip of the needle to pull that yarn through to the front of the fabric.
TIP: Due to the ratio of stitches per inch and rows per inch, when picking up along a garter edge, you’ll typically only need to pick up one stitch for each ridge (1 ridge = 2 rows).
Along a Vertical Edge: Garter Stitch, Into The Ridge
Another way to pick up stitches along the vertical edge of garter stitch is by picking up into the garter ridge itself. We love to use this technique in blanket projects to get a really tidy edge between different colors.
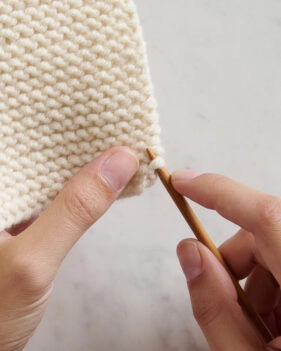
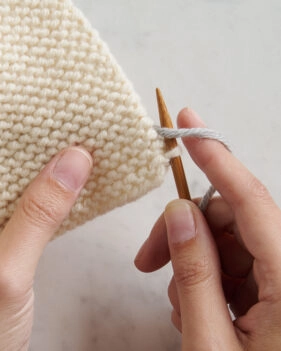
Locate the outermost purl bump (the one shaped like a little frown) along the edge of the garter ridge and insert your needle, from bottom to top, into that bump. Wrap the working yarn around the needle counter-clockwise as if to knit…
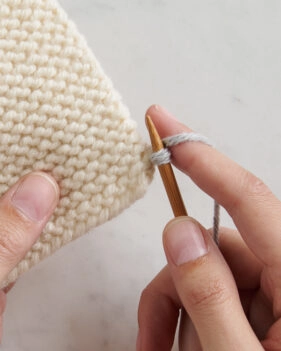

… and use the tip of the needle to pull that yarn through to the front of the fabric. Repeat these steps until you have picked up the desired number of stitches.
TIP: Due to the ratio of stitches per inch and rows per inch, when picking up along a garter edge, you’ll typically pick up one stitch in every ridge (1 ridge = 2 rows). This means picking up every purl bump!
Purlwise
This video shows you how to pick up stitches purlwise along a cast-on edge. While picking up purlwise isn’t as common, it does occasionally come in handy! The steps are very similar to picking up knitwise.
Insert your needle, from back to front, into the center of the stitch closest to the cast-on (or bind-off) edge; wrap the working yarn around the needle counter-clockwise as if to purl; use the tip of the needle to pull that yarn through to the back of the fabric.
Practice
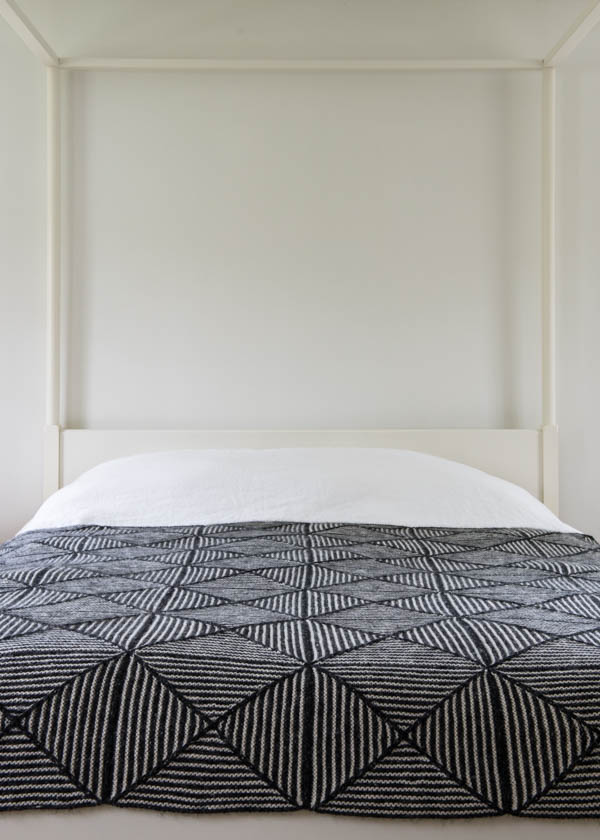
Our Optic Blanket is a great project for practicing picking up stitches. Each block is attached to its neighbors by picked up stitches. Easy, clever, and best of all, no sewing!


Pefect instructions for picking up stitches in a variety of situations, Thank you
I’m a bit perplexed. I’m ready to pick up stitches on the left selvage, have turned my right side 90 degrees with working yarn near the first selvage stitch on the upper right ….do I slip my existing 26 stitches down the cord and use my needle with working yarn to begin picking up 36 stitches (every other stitch since there are 73 on that selvage)???
Hi Karen!
Thank you for your question! When it comes time to pick up stitches along a selvedge, you can insert your right needle into the stitch you would like to pick up, and create a new, live stitch by knitting into that loop with your right needle. I suggest referencing your pattern for some more information about how many stitches to pick up, but with most patterns, any stitches you have picked up previously (even if they are around a corner edge) can be slipped down your needle as you continue to pick up more stitches!
We would love to help you with some more personalized help as well, so please feel free to reach out to us at customerservice@purlsoho.com so we can get a better understanding of your project!
All the best,
Margaret
These videos aren’t loading on my computer, are they still available?
Hi Tonya,
Thank you for writing in! I would try using a different browser. Maybe the videos aren’t compatible with the one you are currently using? I just checked the video and it works for me. I am using Google Chrome. Hope this helps!
Good luck!
-Adam
Videos are not showing up for me, either. I tried Google Chrome and Safari, both on a desktop. 🙁
Hi Julie,
We apologize for this! At the moment our website is going through some technical difficulties and we are working our fastest to resolve all the issues. Please check back later and hopefully everything will be back to normal!
Best,
Adam
Would you please let me know how to knit the ending and beginning first stitches so the edge is neat and When I pick up the stitches the are neat. Thank you.
Hi Asha,
Thanks for reaching out! You will knit the first and last stitch just as you would with all of the other stitches, you want to make sure you work every stitch the same to keep things consistent and clean!
I hope this helps, happy knitting!
Gianna
Hi, I’m picking up stitches all the way around a stockinette stitch baby blanket made of fluffy, worsted weight cotton. I have made this blanket before and found the seam too noticeable once those nearl 100 stitches were picked up on each side, plus the top and bottom. Your video on how to pick up on the vertical edge talks about how to make the seaming less noticeable but does not touch that subject for picking up on the cast on or cast off edges. Any suggestions? This is such a sweet blanket, all stockinette stitch with a lovely rice stitch border added on in a contrasting color. Unfortunately this added border makes the blanket noticeably right or wrong sided. Thanks for any help!
Hi Denise,
Thank you for writing in! Picking up along an edge is a lot easier to hide than a cast on. If you wanted, you could try to pick up a stitch in the cast on or bind off by inserting your needle into only the top leg of the stitch instead of both stitches. This would decrease the bulk, but might create some gapping depending on what kind of yarn you are using. I hope this helps!
-Adam
Hi Denise,
I’m doing this very thing to avoid obvious right/wrong sidedness on a child’s blanket. First, I undid the bound off edge to make those stitches live again. Second, and a bit more fiddly, I picked out the cast on row, again to have live stitches. Now the border is coming along just right. If you’re uncertain about picking out the cast on row, I recall recently seeing that subject for an online video. I’m sure that would help.
Best to you,
Marsha
Is it ok to use a slip stich edge when I’m going to be picking up stitches, as for an armhole edge? My edges tend to be messy, but if I use the slip stitch edging, they come out nicely.
Hi Susan,
Thanks for the question! I tend to not prefer a slipped stitch for an armhole edge where I will be picking up stitches. The slipped stitches tend to pull a little more and create gaps or holes along the armhole edge. Additionally, when picking up stitches for a sleeve, any slight imperfections along the edge (if the stitches are not slipped) tends to be hidden.
I hope that this helps and happy knitting!
Cassy
I am completing the Classic Knit Jacket in the Lanecardate and have reworked the sleeves twice only to still have large holes where I picked up the stitches. I have watched the tutorials for picking up stitches and still have gaping holes. What else would you suggest I do to remedy this? Thank you!
Hi Nancy,
Thanks for the question! You have a couple of options. First you could try picking up with a smaller needle. Your second choice is that you pick up the stitches, knit one round and then pull the yarn tail from your first picked up stitch every so gently as to tighten up the picked up stitches on the round below. Let me know how all of this goes!
-Adam
ok, I made a gorgeous cashmere sweater, but ended up wanting the sleeves to be a little longer than the pattern called for, and did indeed have a little bit of yarn left over. But, alas, I’d already bound off the sleeve edges. I tried to undo my cast off so that I could just continue on, but the fuzziness of the yarn combined with an unusually thorough job weaving everything in has left me unable to do so. any ideas? I knit the sleeve extensions, and left the top edges live with the hopes of figuring something out, but i’m stumped. should I just try to ‘kitchner’ the bound-off edges of the finished sweater onto the live stiches of the new extensions? will it look hideous and lumpy, or could it be just crazy enough to work? (the bind off is VERY elastic)
Hi Rachel,
Thanks for writing in! In cases such as yours, I would normally recommend picking out the cast off and then kitchenering the stitches together. If you pick up and kitchener the bound off edge, you will get a bit of a lumpy result. You could run a needle through the stitches right above your bind off making sure to go through the right leg of each stitch and then snip the bound off edge off carefully with sharp scissors being sure to not cut any stitches further up. You can then kitchener the newly live stitches with your live extension stitches.
If this seems a little scary, you might want to try it on a swatch first. I would also give another try to picking out the cast off.
I hope that this helps!
Cassy
Thank you! You answered my questions. Video was very good.
LOVE, LOVE, LOVE your instructional posts! The videos and narratives with photos are clear, easily followed, and produce consistent results. Thank you for thinking these through so well. and please keep producing them. As a first generation knitter, I have no in-person resource to turn to, but you all fill the bill:)
I have a question…I was wondering if there is a better way to pick up stitches along a neckline where live stitches on both the front and back remain on a holder? So when working the front and back of a vest it had me leave the center 20 on the front and 24 on the back on a holder. Then it wanted me to pick up 72 on the neck edge and knit the k2p2 ribbed neck. I added 14 the new stitches on the right picked up the 20 off the holder and realized I had to cut the yarn I was using to pickup the stitches or otherwise carry it across to pick up the next 14 stitches. Not knowing any other way I cut the yarn leaving a long tail and did the same on the other side picked up the last 24 live and began my 2 by 2 rib. Is there another way?
Hi Mimi,
Thanks for writing in. The best method when picking up stitches around a neckline where there are live stitches is to string your live stitches on to a needle of the same size. This way, as you pick up the last stitch before the live stitches, you can use your working yarn to knit across the live stitches. Hope this helps!
-Adam
How do you pick up the cast on edge of a garter stitch?
Hi Francine,
Thanks for the question. If you used the long tail cast on method, it’s quite easy to see. The bottom edge will have little “v” shapes. You’ll insert your needle into both bars of the cast on and pull your working yarn through, creating a new stitch. I hope this helps. If not, please feel free to write back!
-Adam
I am working on your Knit Four Points baby blanket. In following your instructions is seems like I will have a problem as all my k2 tog are on the same side? Does not look like it will make a triangle. Since there are so many stitches I do not wan to have to take so many stitches out if I am correct. Please let me know as I need to finish this baby blanket. Only about 1 & 1/2 inches done so far. Thank you for your help!
Hello Marsha Ann,
Thank you for writing in. You are on the right track! The decreases are only on one side. As long as you have the correct gauge this will create a triangle.
Let me know if you have any further questions and good luck on your project!
-Marilla
I am working on your Knit Four Points baby blanket. In following your instructions is seems like I will have a problem as all my k2 tog are on the same side? Does not look like it will make a triangle. Since there are so many stitches I do not wan to have to take so many stitches out if I am correct. Please let me know as I need to finish this baby blanket. Only about 1 & 1/2 inches done so far.
Hi Marsha,
Thanks for writing in! It sounds like you are doing everything correctly! All of your k2togs should be on the same side. This will create create a triangle as you cast on all the stitches for the bottom and have one straight side and one decreases side. I find the referencing the diagram is helpful for this as it shows you the cast on edge and the direction of decrease.
I hope that this helps!
Cassy
Very good and easy to see what I needed to know, it all makes sense, thank you.
Hello Jay,
Happy to hear it!
-Marilla
My pattern asks me to pick up 44 stitches along a cast on edge that only has 32. Its for ribbing. Please explain how to do this. Thankyou very much.
Hey Sally!
I think the best thing to do here is to pick up some stitches from in between cast on stitches. There is a little bar between each stitch and that is where you will need to insert the needle to pick up.
I hope this helps!
Carly
thankyou yes I will try
This is so helpful. Unfortunately, I accidentally picked up my stitches on the wrong side. Do you have any suggestions or a tutorial on how to undo picked up stitches? I thought I could just unwind the yarn, but then I lost the first stitch! I’d love any suggestions you might have, as know I’m completely stuck. Thank you!
Hi Beth,
Thanks for writing in! We do not have a tutorial for undoing a pick up! Generally, you will simply remove your needle and pull the yarn out. If you are concerned about the last stitch, I would suggest putting a removable stitch marker or a spare needle through the final stitch tp prevent it from being pulled out!
I hope that this helps!
Cassy
Hi. Do you have a video for picking the stitch at the end of every other row for the 4th panel of the 4 points blanket? I have it looking ok, but feel a little uncomfortable — like I didn’t figure it out properly. Thanks, Marlene
PS – for others planning this – I made a mistake by decreasing once on the wrong side of the triangle. I worried and worried, but the yarn was black and that is hard for me. I decided it was not worth ripping out a lot, and, surprisingly, you cannot tell.
Hi Marlene,
Thanks for writing in! We do have the video below for picking up stitches “Along a Vertical Edge: Garter Stitch” that works for the 4 points blanket. While helping someone in the shop yesterday with this pattern, I suggested using locking stitch markers to pre-mark that stitches that you will pick up. We placed a stitch marker at the half way point, and the half way points between the two halves and then markers between those that add up to the correct number of stitches. This way, when you come to one of these markers, you can pick up the stitch with confidence, remove the marker and carry on. I am a big fan of using notions and tools to make things easier on myself.
I hope that this helps!
Cassy
I don’t see this video
Hi Lea,
Thanks for reaching out! The video is the third one in the post above, titled “Along a Vertical Edge: Garter Stitch.”
Best,
Julianna
I’m knitting the Drift Vest and am to the point where I’m doing the armhole edgings. My problem is when I’m attaching the icord the armhole becomes too small. Any suggestions?
Hi Gail,
Thanks for writing in! I can certainly help! If the armhole is becoming too small, you can increase your pick up rate. Instead of the stated picking up 3 stitches for every 4 rows, you can pick up 4 for every 5 rows and this will give you a more open arm hole!
I hope that this helps!
Cassy
Hi I am making and loving your 4 corner baby blanket. I’m working on the 4th quarter and not understanding how to knit it onto the 1st quarter. The part about knitting to the end slip the last stitch onto the right needle, then picking up a stitch from the left needle, then passing the slipped stitch over. Do you have a video tutorial for it? Mine just looks so messy and wrong. Thanks in advance.
Hi Christine,
Thanks for reaching out! We do not have a video for this at present but I will certainly pass along your request! This portion can be a bit tricky to get the hang of. For me, practicing it several times helped me get the hang of it and create a neat and tidy join!
Best,
Cassy
I’m working on a sweater knit in stockinette. It has a garter stitch front band that will be picked up along the vertical edge. Is the pick up ratio much different than picking up for 1×1 or 2×2 ribbing? Thanks.
Hi Brenda,
Thanks for writing in! If you are working from a pattern that has you pick up a specific number of stitches for the front bands I would follow their instructions, distributing the stitches as evenly as possible. If you are working without a pattern, usually you will pick up 3 stitches for every 4 rows of stockinette when working a garter, stockinette, or seed stitch edging.
I hope that helps!
Julianna
Thanks. That was a real help. I do have a pattern, but have made some changes.
Awesome video, I have been knitting for years and never liked picking up stitches because it was such a pain, thank you I will be using your method from now on
Hi I have to pick up stitches on a baby cardigan but at each end it’s the button band and buttonhole band how will it come out the same pattern if I have to knit 5 rows thanks
Hello Amanda,
Thank you for reaching out! I’m not sure I completely understand your question, are you creating a collar with your picked up stitches? What is the pattern that you are trying to continue with your picked up stitches? I hope I can help!
-Marilla
Can you explain how to pick up stitches in your baby sock pattern…”Inserting the needle under both legs of each picked up stitch”
Hi Abby,
Thanks for reaching out! When working our Baby Socks, or almost any other sock pattern, after you have completed the heel flap and heel turn, you will have a tidy row of slipped stitches on each side edge of the heel flap. When picking up stitches along the side of the heel flap, you will insert your needle under both legs of these slipped stitches while following the instructions in our “Along A Vertical Edge: Stockinette Stitch” instructions above.
I hope that clears things up!
Julianna
I knitted an 8″ by 7″ piece with cable stitching patterns. It’s going to be too small, as I just found out that the big baby’s head circumference is 15″….Rather than pulling it all out, I’d like to pick up and knit from the side, BUT how to do it and still keep the pattern?
Hi Lea,
Thanks for writing in! Unfortunately since cables can’t be worked sideways, I’m afraid you won’t be able to have the pattern look the same if you pick up stitches from the side of the piece. I would instead recommend knitting another separate cable panel and sewing it to the piece you already finished.
I hope that helps!
Julianna
Thank you so much! I’ve been struggling with a baby blanket and these tutorials are exactly what I needed! And I’m so grateful that you have written instructions as well as videos because sometimes I do better with words than pictures. LOL! Thanks again!
Hi everyone at PS.
I’m a bit confused when a pattern tells me to “pick up and knit” does that mean to pick up all the stitches I need and on the next round knit? Or pick them up and knit as I go? Help!
Thanks for any help you can offer me.
Rachel
Hello Rachel,
This is a great question! When your pattern says to pick up and knit, you will pick up all your stitches and then knit them.
Happy knitting!
-Marilla
Is there a way to pick up stitches around the neckline in an elastic pick up method ? Buttom up knitting. I made a sweater I use To pick up stitches round the neck and my head cannot go through.
Hi Suzanne,
I am happy to help! Are you able to get the sweater over your head before picking up the stitches? Bind offs can be places where tightness enters the knitting. For the pick up methods above, as you are creating more knitted fabric on top of other knit fabric, so long as your tension is not too tight, the pick up should be pretty elastic. In both cases, if you are finding things to be a bit on the tight side, you can bind off or pick up using a needle one size up to loosen things up a bit.
I hope that this helps!
Cassy
regarding the first video (picking up along a horizontal edge) is there any reason you would not want to pick up the stitch under the two legs of the bind off or cast on edge itself?
The reason I am asking is that I think I want to add a ruffle to the bottom of a bound off sweater. Seems to me it might be nicer in this case to pick up the bound off edge? Thanks
Hello Paula,
Thank you for reaching out! Picking up the first stitch is going to give you a seamless transition, on your right side, while picking up along the actual cast on will give you an inconsistent transition. That being said there is no reason why you can’t experiment!
Happy knitting!
-Marilla
Thank you Marilla! I just may try both and see!
I always hated picking up stitches and avoided projects requiring that task. This has helped me immensely and made me wonder why I ever thought this was so difficult! Thanks so much.
Alas, the video of picking up stitches from a garter stitch edge does not show the reverse side. Does that method leave a ridge on the reverse? Would the join on the Four-Points Blanket, for example, be reversible? Thanks.
Hi Sherrill,
Thanks for reaching out! Picking up stitches always results in a small ridge and slightly different appearance on the wrong side. If you look at the first picture in our Knit Four Points Baby Blanket story, where the blanket is folded in quarters with the corners slightly folded up, you can catch a glimpse of the wrong side of the picked up edge on the bottom layer of the blanket. Although it does look a bit different from the right side, we find it is fairly unobtrusive in the finished blanket!
Happy knitting!
Julianna
On the mitre corner blanket, the instructions say to pick up only one leg of the edge- the link to the tutorials doesn’t show this and I was having trouble with the photo. Any help would be appreciated.
Hi Winnie,
Thanks for reaching out! Unfortunately we don’t have a tutorial for this exact technique, but hopefully I can help explain it! If you look at the stitches directly below each garter ridge, you will be able to see the individual V-shaped or teardrop-shaped stitches – you may have to stretch the garter ridges away from each other to see this clearly. When picking up each edge stitch, you will insert your needle directly into the middle of the V closest to the edge of the square, so that only one leg of the V, or stitch, is to the right of the needle. Since you are holding your yarn doubled, there will be two strands of yarn, but just one leg of the actual stitch. You can then wrap your yarn as if to knit and pull up the new stitch.
I hope that clears things up!
Julianna
Hi! I finished the Paint Pail Pullover, but now I’ve got to pick up stitches along the neckline. The horizontal stitches are simple to pick up, but the angled, decrease/increase stitches always look so sloppy when I pick up around a neckline. Help! How do I neatly pick up the stitches that sit on the curve around a rounded neckline?
Hi Megyn,
Thanks for reaching out! Picking up stitches on a curved edge can be tricky indeed, and unfortunately most of the time it just takes a bit of practice and trial and error to find the best places to pick up. In general, though you want to avoid picking up stitches in any spaces or holes that are already large, such as the transition area between each set of cast off stitches, as the picked up stitch will only make the hole larger. The majority of the front neckline shaping for this sweater is worked with decreases, so you should be able to use the method we show in our Picking Up Stitches Along A Vertical Edge video, making sure to pick up stitches one full stitch away from the edge of the neckline.
I hope that helps!
Julianna
Good Morning! Thank you very much, I loved the explanations! Excellent!
Hi, I need your help please. I am busy with a jersey where I need to pick up stitches on the purl edge. The piece knitted it 107row and I need to pick up 94 st. Please advise how to do this
Hi Anthea,
Thank you for reaching out! Sometimes patterns do require you to pick up a smaller amount of stitches along a longer edge, as seems to be the case here. The stitches may need to be picked up evenly across the edge or concentrated to one side, so without seeing your pattern it’s hard to know which one you might be dealing with. If your stitches need to be spaced evenly, I recommend the following:
Pick up Row: *Pick up 1 stitch in each of the next 8 rows, skip 1 row, repeat from * 10 more times, pick up 1 stitch in each of the last 8 rows.
This will space out your 94 picked up stitches fairly evenly across the 107 rows.
I hope this is helpful!
Gaby
I am making a garter stitch entrelac blanket, using the pattern for the jacket by Debbie Bliss in a pattern book using Noro (silk garden) yarns, now out of publication. I started it a couple of years ago, then it went into storage while we did a house renovation. I am now trying to pick up where I left off, and for some weird reason, now having difficulty with the side triangles, which are worked in the purl row. I have gone over the instruction several times, but I am stumped as to how I make the side triangle, and can’t find any tutorials that can help me out. Most tutorials for the side triangles are for the knit stitch side, not the purl stitch side. I know I should be able to work this out, as I have already knitted nearly 2 feet of this blanket previously two years ago!!! Feeling very weirdly dumb. Do you have any pointers?
Kind regards,
Shaaryn, Brisbane, Australia
Hi Shaaryn,
Thanks for writing in! Coincidentally, I have this exact book in my collection, so I’m happy to help out with the side triangles! Is there a particular step or row that is tripping you up? Although the side triangles are worked entirely in purl, the order of the stitches and the arrangement of the increases and decreases is exactly the same as any other entrelac side triangle, so you might still be able to follow along with any videos or tutorials you find, keeping in mind that you will always be purling, no matter whether the demonstrator is knitting or purling.
Best,
Julianna
I am finishing a baby sweater and the instructions say to create a button band by picking up and knitting, then do three rows of rib. On the first band I picked up and then knitted a row but this put me on the wrong side to bind off. Do you think pick up and knit refers to the yarn around the needle when picking up and not actually knitting? Thank you
Hi Hilary,
Thanks for reaching out! Let me see if I can help clarify things for you.
It sounds like your pattern is asking you to pick up and knit (meaning pick up the stitches so that they’re live on your right-hand needle and ready to be worked in the following row), then work three rows and bind off on the fourth. If you’re picking up your stitches with the right side of the fabric facing you, then you’ll be binding off that fourth row on the right side of the fabric as well.
I hope this helps clear things up, but please let me know if you have any other questions!
Happy Knitting!
Kelsey
Thank you so much for the helpful video. I’m picking up on a vertical edge for a button hole band. Do I start picking up from the top of the sweater or the bottom, does it matter?
Hi Laura!
Thank you for your question. It doesn’t really matter where you start picking up stitches, however your pattern might have this specified so I would be sure to check to see if it suggests starting from the top or the bottom. One thing to keep in mind is where your working yarn and tail are, which will impact where you are weaving in an end, and where you are knitting from for the following rows!
I hope this helps!
All the best,
Margaret
I have 18 heel rows pattern says pick up and knit 9 sets along inter edge why only nine
Hi Flo,
Thanks for reaching out. It’s likely that in the pattern you’re working from, you only need to pick up one stitch for every two rows! So if you pick up a stitch on only, say, the odd-numbered rows, you’ll be picking up a stitch on Rows 1, 3, 5, 7, 9, 11, 13, 15, and 17, which totals to 9 picked-up stitches. Hope this helps clarify things!
All the best,
Lili
Just completed a scarf I started with a long – tail cast on of 32 stitches. I decided to decrease the end of the scarf to accommodate 1 pom-pom. Now, I can pick up the broad end of my scarf and stitch out a decrease so the piece is symmetrical. The ridge is a nice design element that I plan to use for my next project.
I’m super psyched and grateful for your great library of instructions 🙂
Hi,
I am making the loop scarf with the fiddlehead yarn and I am confused on the loop. I’ve knit my 10″ and now do I knit the two ends together? or am I just adding on 13 stitches to the cast on edge?
Hi Gale,
Thanks for your comment! You are picking up stitches on the cast-on edge so you would not be knitting the two ends together. You can ignore the live stitches on your needles at this point! Then, once you’ve picked up the 13 stitches along the cast-on edge, you will have 26 total stitches on your needles and will just be knitting these stitches in the round for the remainder of the scarf. I hope this helps!
Kindly,
Cat