


Two-Tone Pom Pom Hat + Scarf
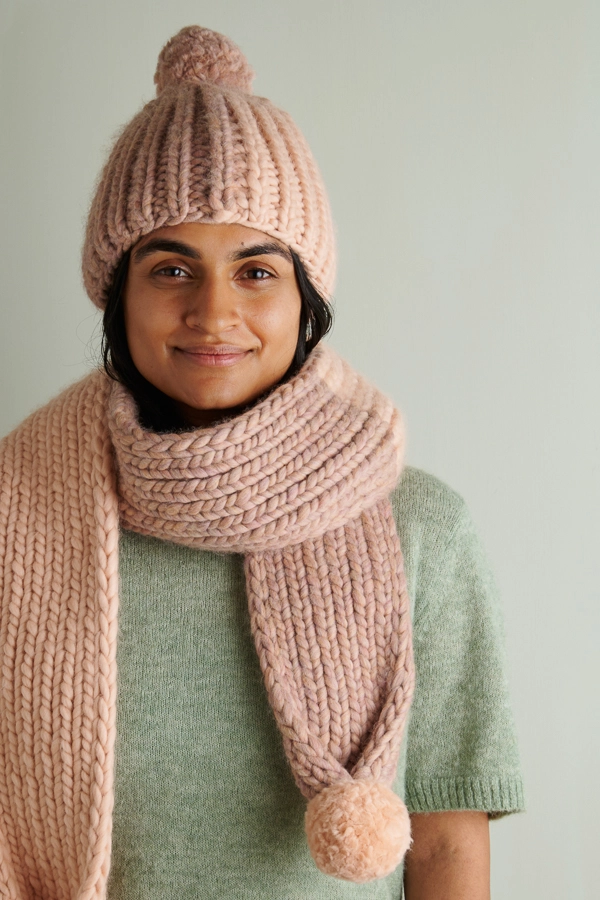
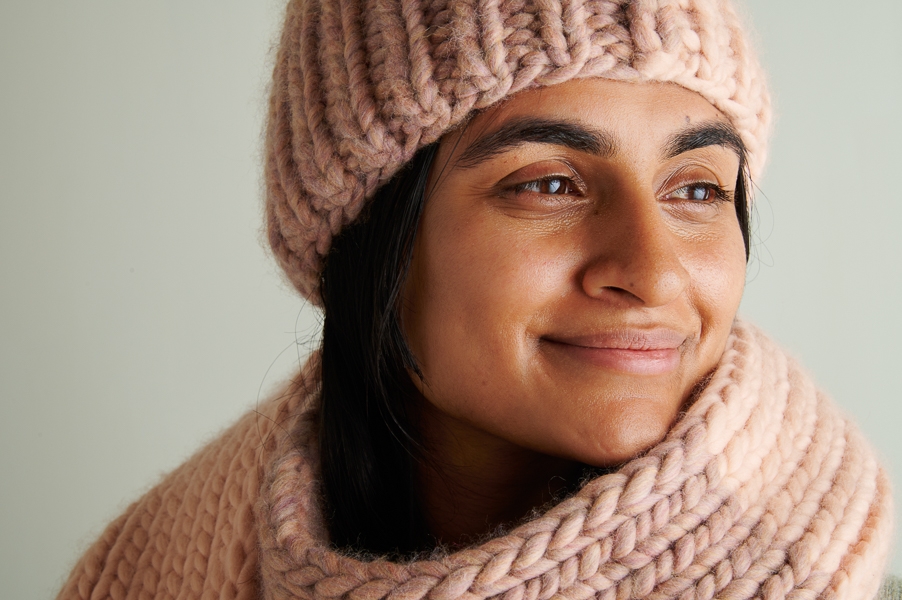
Flip a coin, heads or tails… How about both! No need to pick one color when Tayler Harris’s new Two-Tone Pom Pom Hat + Scarf lets you have two.
For the hat, Tayler walks us through a technique for intarsia “in the round” that newer knitters can master but that many experienced knitters may not yet have encountered. We love a fresh approach!
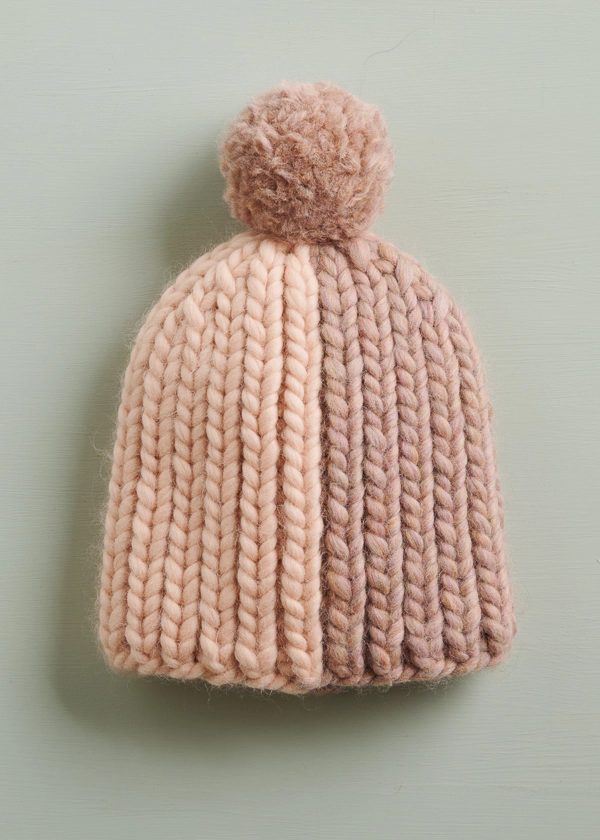
The basic gist is to work the hat in rows, which you connect into the round each time you reach the end. Simple, right? Our approachable instructions and your clear head are a recipe for success!
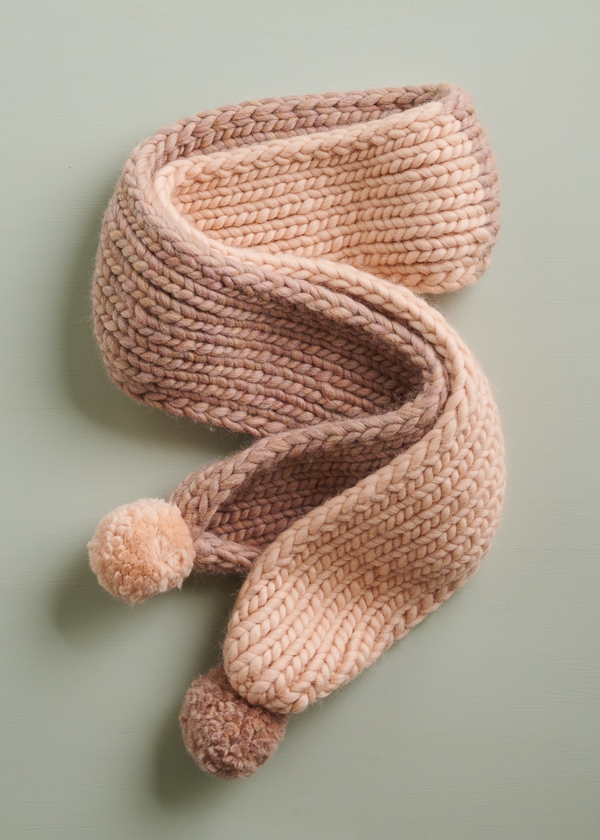
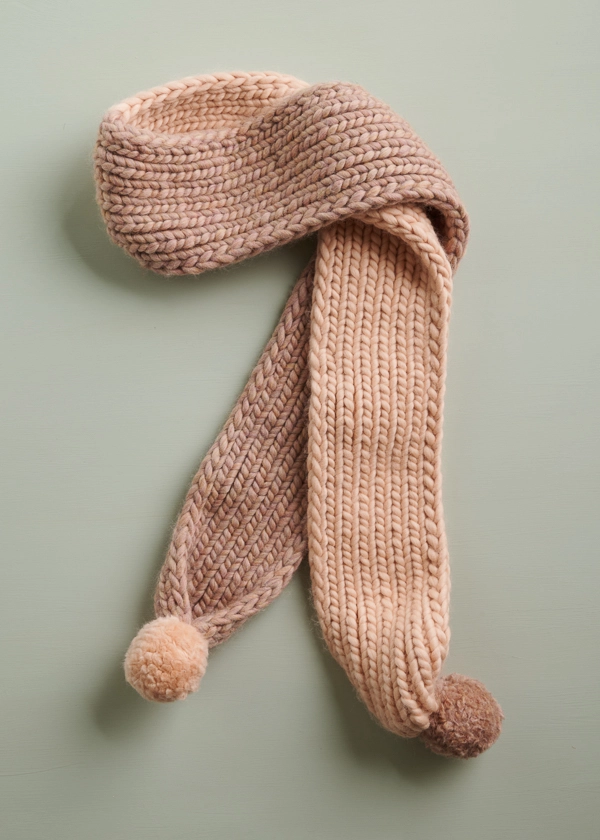
And this adorable scarf? For this one, you use a provisional cast-on so you can come back and cinch the end shut, and the rest is just 1×1 rib with a color-swap in the middle. Fluffy, fuzzy pom poms add some serious fun.
A great yarn for a knitting adventure, our generous jumbo-weight Gentle Giant makes it easy to see what you’re doing and also helps you reach the finish line quickly. This incredibly soft, single ply 100% merino also feels amazing as you zip along.
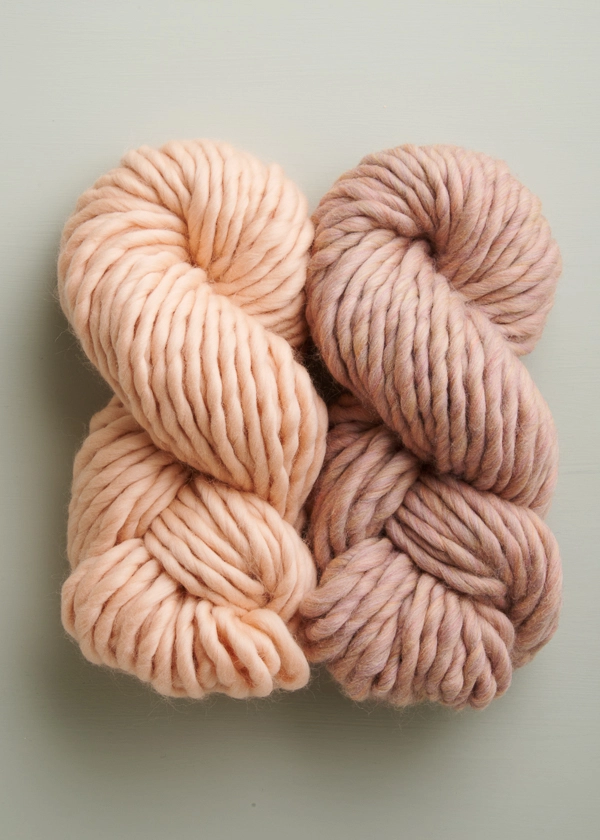
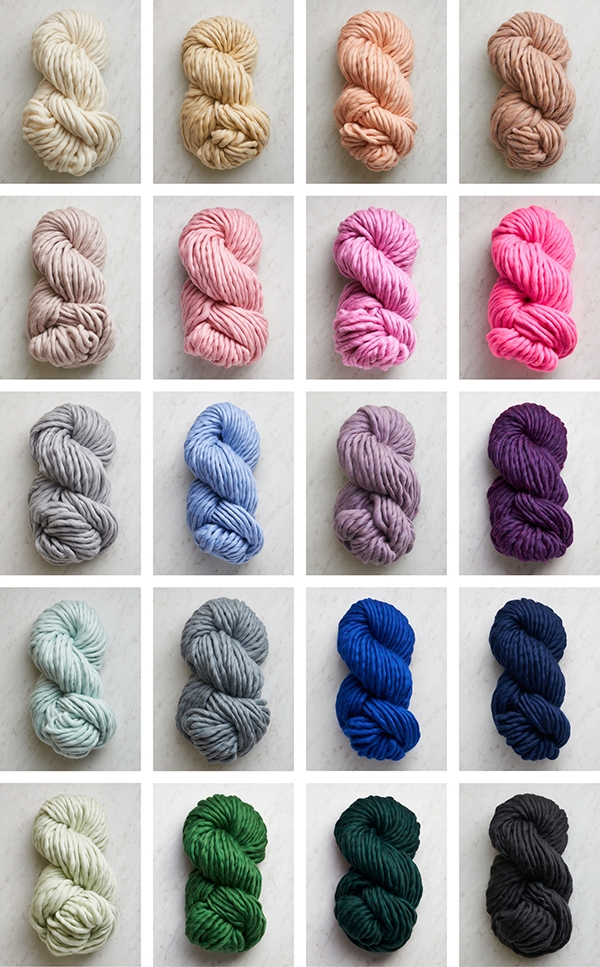
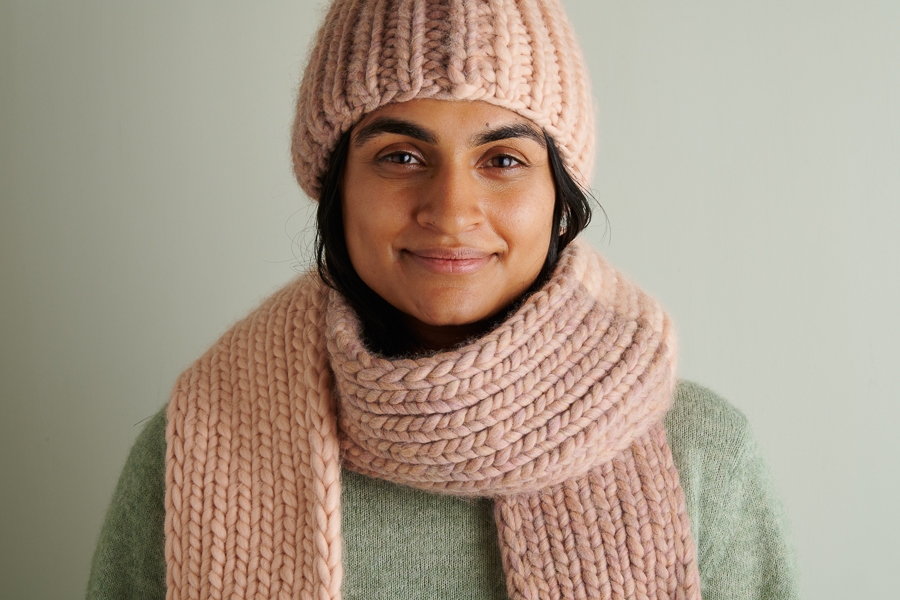
Looking for a gentle glow, we knit our Two-Tone Pom Pom Hat + Scarf in Calico Pink and Cowrie Pink, but there are over twenty lovely colors of Gentle Giant to choose from… If it’s a coin flip between your favorites, pick both and cast on!
Designed for Purl Soho by Tayler Harris. Based in Utah, Tayler finds inspiration for her designs from the unique landscapes of her home state. From the beautiful mountains and canyons to the national parks and natural landscapes, she loves to incorporate the colors, textures, and shapes of her favorite places.
Share your progress and connect with the community by tagging your pics with #PurlSoho, #PurlSohoBusyHands, #PurlSohoTwoTonePomPomHatAndScarf, and #PurlSohoGentleGiant. We can’t wait to see what you make!
Materials
HAT
- Purl Soho’s Gentle Giant, 100% merino wool. Each skein is approximately 48 yards/ 125 grams.
- Color A: 1 (1, 2) skein(s); approximately 40 (48, 60) total yards required. We used Calico Pink.
- Color B: 1 skein; approximately 25 (35, 45) total yards required. We used Cowrie Pink.
- US 15 (10 mm), 16-inch circular needles
- A set of US 15 double pointed needles
- Jumbo stitch markers, including one unique
- A cable stitch holder
- Purl Soho’s Pom Pom Maker Set, Extra Large + Jumbo
SCARF
- Purl Soho’s Gentle Giant, 100% merino wool. Each skein is approximately 48 yards/ 125 grams.
- Color A: 3 skeins; approximately 115 total yards required. We used Calico Pink.
- Color B: 3 skeins; approximately 115 total yards required. We used Cowrie Pink.
- US 15 (10 mm), 16-inch circular needles
- A few yards of scrap yarn and a crochet hook to match
- Purl Soho’s Pom Pom Maker Set, Extra Large + Jumbo
NOTE: If you’re making both the Hat and Scarf, you’ll need 4 skeins of Color A and 3 (4, 4) skeins of Color B.
GAUGE
11 stitches and 13 rows/rounds = 4 inches in 1×1 rib, unstretched and steam blocked
SIZES
HAT
Kid (Adult Small/Medium, Adult Large/Extra Large)
To fit actual head circumference of 16–19 (19–22, 22–25) inches
- Finished Circumference (unstretched): 13 (16, 19) inches, comfortably stretching 3–6 inches
- Finished Height: 7 (8¼, 9½) inches
SCARF
Finished Dimensions: 6¼ inches wide x 72 inches long
HAT PATTERN
NOTES
YARN OVERS
At beginning of wrong-side rounds: Bring yarn to front of work, then over right needle to back of work, ready to knit the next stitch.
At beginning of a right-side rounds: Bring yarn over right needle to front of work, then between needles to back, ready to knit the next stitch.
SLIP STITCHES
Slip stitches purlwise unless directed otherwise.
RIBBED DOUBLE DECREASES
RDD-L (Ribbed Double Decrease, Left Leaning)
Slip 1 purlwise to right needle, slip 1 purlwise to cable stitch holder and hold in back, slip 1 purlwise to right needle, return stitch from cable stitch holder to left needle, return both slipped stitches from right to left needle, slip slip knit, purl 2 together. [2 stitches decreased]
RDD-R (Ribbed Double Decrease, Right Leaning)
Slip 1 purlwise to right needle, slip 1 purlwise to cable stitch holder and hold in back, slip 1 purlwise to right needle, return stitch from cable stitch holder to left needle, return both slipped stitches from right to left needle, knit 2 together, slip slip purl. [2 stitches decreased]
CAST ON
With Color A, use a basic Long-Tail Cast On to cast 19 (23, 27) stitches onto circular needles. With Color B, make a slipknot about 24 inches from the end of the yarn, and without turning work, place knot on right needle. Pass last Color A stitch over slipknot and off needle, slip Color B stitch to left needle, place marker, slip Color B stitch back to right needle. [19 (23, 27) total stitches: 18 (22, 26) Color A stitches; 1 Color B stitch]
Continuing with Color B, cast on another 18 (22, 26) stitches. [37 (45, 53) total stitches: 18 (22, 26) Color A stitches; 19 (23, 27) Color B stitches]
Arrange needles for working in the round, being careful not to twist the stitches.
Slip first Color A stitch to right needle. Pass last Color B stitch over Color A stitch and off needle, slip Color A stitch to left needle, place unique marker for end of round. [36 (44, 52) total stitches: 18 (22, 26) Color A stitches; 18 (22, 26) Color B stitches]
Use a removable stitch marker or piece of scrap yarn to mark the right side of the work, which is the one facing you. After a few rounds, move it up so it is clearly visible on the right side.
BODY
NOTE: To work intarsia for this pattern, you work right- and wrong-side rows, joining them together at each end of round. It’s kind of quasi in-the-round, quasi flat, an interesting knitting adventure!
Round 1 (wrong side): Turn work so wrong side is facing you and remove marker. With Color B, yarn over (see Notes), replace marker on right needle, *k1, p1, repeat from * to next marker, slip marker (sm). At front of work (wrong side), cross Color B over Color A, then bring Color A to back of work, and with Color A, *k1, p1, repeat from * to last 3 stitches, k1, purl last stitch together with yarn over.
Round 2 (right side): Turn work so right side is facing you and remove marker. With Color A, yarn over (see Notes), replace marker on right needle, *k1, p1, repeat from * to next marker, sm. Bring Color A to back of work (wrong side), cross Color A over Color B, then with Color B, *k1, p1, repeat from * to last 3 stitches, k1, purl last stitch together with yarn over.
Repeat Rounds 1 and 2 until piece measures approximately 5¾ (6½, 7) inches from cast-on edge, ending with Round 2.
CROWN
NOTE: Change to double pointed needles when necessary.
Set-Up Round (wrong side): Turn work so wrong side is facing you and remove marker. With Color B, yarn over, replace marker on right needle, [k1, p1] 4 (5, 6) times, k1, place marker, p1, [k1, p1] 4 (5, 6) times, sm. At front of work (wrong side), cross Color B over Color A, then bring Color A to back of work, and with Color A, [k1, p1] 4 (5, 6) times, k1, place marker, p1, [k1, p1] 3 (4, 5) times, k1, purl last stitch together with yarn over.
Round 1 (Decrease Round, right side): Turn work so right side is facing you and remove marker. With Color A, yarn over, replace marker on right needle, *k1, p1, repeat from * to 5 stitches before next marker, RDD-L (see Notes), k1, sm, p1, RDD-R (see Notes), *k1, p1, repeat from * to next marker, sm. Bring Color A to back of work (wrong side), cross Color A over Color B, then with Color B, *k1, p1, repeat from * to 5 stitches before next marker, RDD-L, k1, sm, p1, RDD-R, *k1, p1, repeat from * to last 3 stitches, k1, purl last stitch together with yarn over. [8 stitches decreased]
Round 2 (wrong side): Turn work so wrong side is facing you and remove marker. With Color B, yarn over, replace marker on right needle, *k1, p1, repeat from * to 1 stitch before next marker, k1, sm, p1, *k1, p1, repeat from * to next marker, sm. At front of work (wrong side), cross Color B over Color A, then bring Color A to back of work, and with Color A, *k1, p1, repeat from * to 1 stitch before next marker, k1, sm, p1, *k1, p1, repeat from * to last 3 stitches, k1, purl last stitch together with yarn over.
Repeat Rounds 1 and 2 zero (1, 2) more time(s), then repeat Round 1 one more time, removing stitch markers. [20 stitches remain]
Cut yarns.
Thread Color B tail onto a tapestry needle and draw twice through remaining stitches, pulling taut to secure. Bring tail to inside of hat to weave in.
Weave in all ends and gently steam block.
POM POM
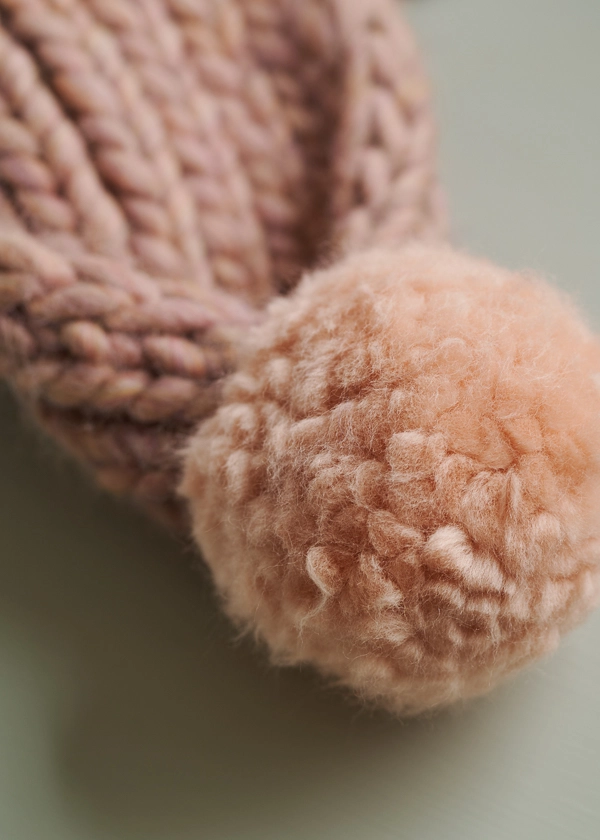
If you’re using Purl Soho’s Pom Pom Maker Set, use the Extra-Large Pom Pom Maker with the 3-inch Trim Guide. With Color A, follow our Pom Pom Tutorial to make a 3-inch pom pom.
ATTATCH POM POM
Attach the pom pom by threading each tail separately through the top of the hat. Tie the tails into a knot, then thread the tails up through the pom pom itself, and trim them flush with the pom pom. Done!
SCARF PATTERN
NOTE: For help with the Provisional Cast On, please visit https://www.purlsoho.com/create/provisional-cast-on-video/.
With crochet hook and scrap yarn, use a Provisional Cast On (see Notes) to cast on 17 stitches.
Join Color A, leaving a 12-inch tail to be used later.
Row 1 (right side): K2, p1, *k1, p1, repeat from * to last 2 stitches, k2.
Row 2 (wrong side): Slip 2 purlwise with yarn in front (wyif), k1, *p1, k1, repeat from * to last 2 stitches, slip 2 purlwise wyif.
Repeat Rows 1 and 2 until piece measures approximately 36 inches from cast-on edge, ending with Row 2.
Cut Color A.
Join Color B.
Repeat Rows 1 and 2 until piece measures approximately 72 inches from cast-on edge, ending with Row 2.
Cut Color B, leaving a 12-inch tail.
GATHER ENDS
With right side facing you, thread Color B tail onto a tapestry needle and draw tail through each stitch from right to left. Bring tail across front of work and draw through each stitch once more from right to left. Slip stitches off needles, pull tight, and secure tail.
Carefully remove scrap yarn from Provisional Cast On, slipping the 17 stitches onto needles as you go. Thread Color A tail onto a tapestry needle and with right side facing you, draw tail through each stitch from left to right, then bring tail across front of work and draw tail through each stitch once more. Slip stitches off needles, pull tight, and secure tail.
Weave in all ends and gently steam block.
POM POM
If you’re using Purl Soho’s Pom Pom Maker Set, use the Extra Large Pom Pom Maker with the 3-inch Trim Guide. Follow our Pom Pom Tutorial to make two 3-inch pom poms, one in each color.
ATTATCH POM POMS
Attach the Color A pom pom to the Color B end of the scarf and the Color B pom pom to the Color A end by threading each pom pom tail through the gathered point of the scarf. Tie tails into a knot, then thread tails up through pom pom itself, and trim them flush with pom pom.


I really want to make the hat! Maybe I can’t understand the pattern… I just want to make it in one color. How should I read the pattern when I only use the one color then?
Hi Lisa,
Thanks for reaching out. You can absolutely make the hat in just one color! This hat is essentially just 1 x 1 ribbing, but the instructions for the intarsia make it a lot more complicated.
But it should be very simple in one color! Just work in 1 x 1 ribbing until the body is long enough, and then work the crown decreases at the same points they occur in the written pattern (one decrease worked on each side of each stitch marker, 2 stitch markers placed on opposite sides of the hat).
I hope this helps make your vision for this hat come to life!
All the best,
Lili
Hi Lili. Thanks so much! Now I get it 😀 I must have confused myself too much reading the pattern.
I purchased the yarn to make hat and scarf for my granddaughter. I don’t understand this at all. So frustrating. I’ve started it over 10 times. Looking up intarsia knitting doesn’t match this pattern. I don’t understand the yarn over.
Hi Wendy,
Thank you for reaching out directly, although I’m so sorry to hear that you haven’t had great experience with this pattern so far! Knitting should be a fun and relaxing experience, not a frustrating one, and I absolutely understand how disappointing it is when this isn’t the case.
The way that we use the intarsia technique in this pattern is different from how it’s traditionally done. Intarsia is generally worked flat, not in the round, so the tutorials you’re finding online are likely for doing intarsia flat. Because this pattern is worked in the round instead, we provide different instructions for how to do intarsia in the round!
Can you let me know what in particular you’re finding confusing about the yarn overs? I can absolutely explain this technique in more depth, and I also wanted to let you know that there are instructions in the pattern NOTES section for how to wok these stitches on either the wrong-side rounds or the right-side rounds. I’ll copy those below, for quick reference:
YARN OVERS
At beginning of wrong-side rounds: Bring yarn to front of work, then over right needle to back of work, ready to knit the next stitch.
At beginning of a right-side rounds: Bring yarn over right needle to front of work, then between needles to back, ready to knit the next stitch.
Going forward, I also wanted to let you know about all the avenues in which we offer pattern support! If you have any questions about any of our patterns, you can send us an email (at customerservice@purlsoho.com) or even sign up for a free 1-On-1 Project Help session, where a team member would be happy to chat or demonstrate techniques in real time for you over video!
I’ll keep an eye out for your reply, and then I’ll be able to answer any specific questions you have about the yarn overs, or any other aspect of the pattern!
All the best,
Lili
I gave up on the instructions for the intarsia and I’m just doing a wrap at the end of the rows, where there’s no working yarn, across to the other color. Seems sturdy enough to me, now I just have to figure out the decreases!
I also decided to abandon this… I just couldn’t follow the pattern and started over several times. No prob, I’m making the Homestretch cap with this yarn! Knitting should not be frustrating and I was looking for a quick fun cap for gifts! I might try again when I see my friend who is an advanced knitter and maybe she can explain it!
Hi Dana,
I’m so sorry that this pattern has become so frustrating! Knitting should be a fun and relaxing experience, not a frustrating one, and I absolutely understand how disappointing it is when this isn’t the case. Would you be able to let us know what aspects of our instructions in the pattern are difficult to follow? We can help troubleshoot from there, and we’ll also review the pattern itself to make sure that it’s written as clearly as possible.
Going forward, I also wanted to let you know about all the avenues in which we offer pattern support! If you have any feedback about any of our patterns, you can send us an email or even sign up for a free 1-On-1 Project Help session, where a team member would be happy to chat or demonstrate techniques in real time for you over video!
In the meantime, I’m glad to hear that you found another option for your yarn!
All the best,
Lili
I am also not understanding. I think the problem may be the stitch count? I followed the instructions but ended up with 23 stitches for both colors (hat). I’m gonna try making sure I have 22, even when it says CO 23. I want something a little more challenging, so I really want to figure this out!
Nevermind! 3rd restart and I figured it out. I think where others might be getting confused is near the yarn overs, it’s 3 sts before the marker not the last 3 sts of current color. So we are purling 2 different colors together. And when we cross over the colors on the other color change, we’re crossing over the working yarn, not the sts
Glad to hear that you’ve figured out your question already! I ended up replying anyway in case anyone else had the same question.
All the best,
Lili
Hi Shawnee,
Thanks for reaching out! The reason the pattern begins with a cast-on of 23 stitches, even though you’ll eventually have only 22 stitches of each color, is because you pass the 23rd stitch over the first stitch of the next color and off the needle. This is necessary to lock the colors together at the cast-on edge, and it decreases the stitch count for each color to 22!
I hope this helps clarify things!
All the best,
Lili
Hi there! Starting the body on this lovely hat and confused by this bit of instruction. I’m at the end of R1 wrong side:
K1 P1 from * to last 3 stitches, k1, purl last stitch together with yarn over.
The last 3 stitches are a purl knit purl. This direction seems to indicate knitting over a purl stitch and then either an increase or purling two stitches together? That cannot be that I’m reading this correctly.
Hi Susan,
Happy to help explain! It sounds like you’re not counting the yarn over as one of the last three stitches. You’ll need to knit one more stitch to reach the last three stitches, which should be a knit stitch, a purl stitch, and the yarn over. Then, you knit the knit stitch and purl the purl stitch and yarn over stitch together!
All the best,
Lili