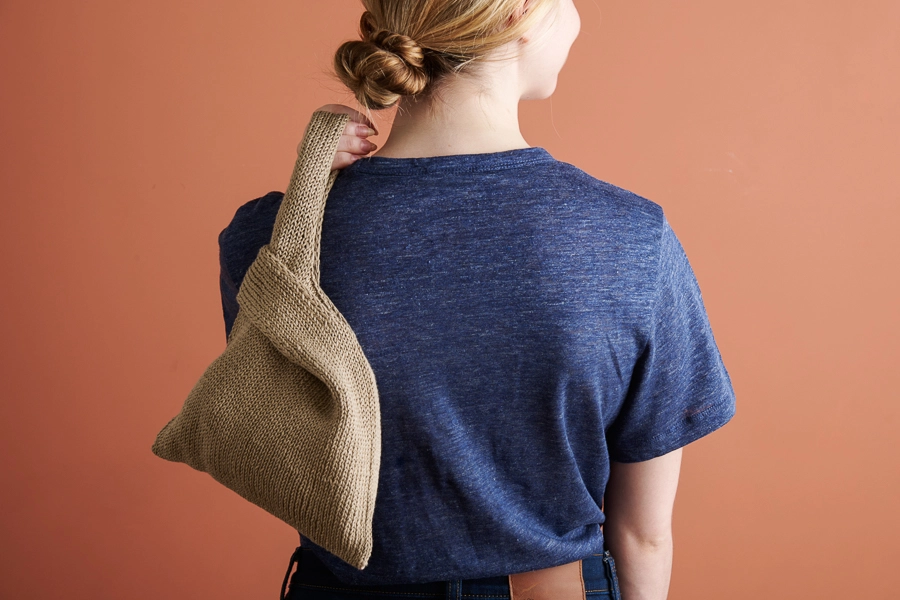


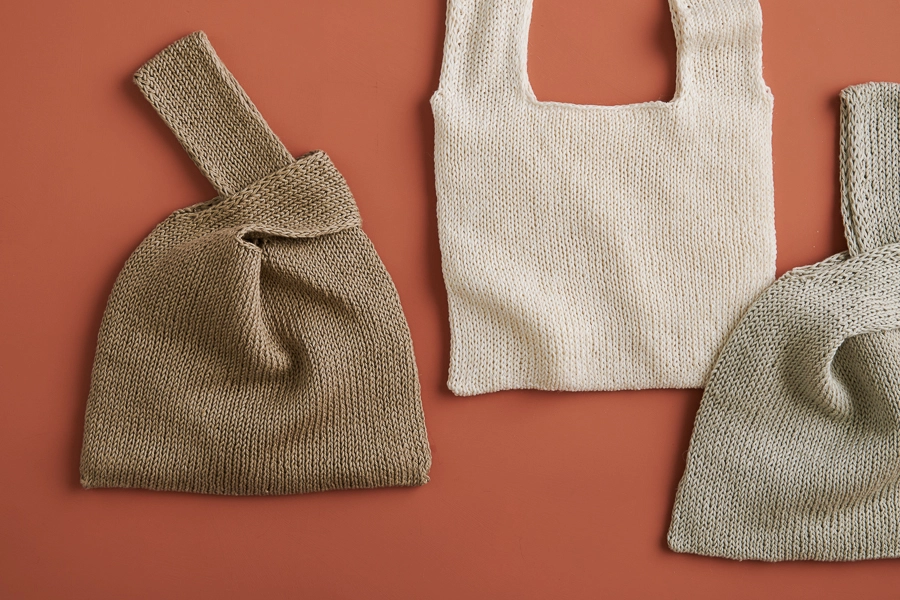
Dumpling Bag
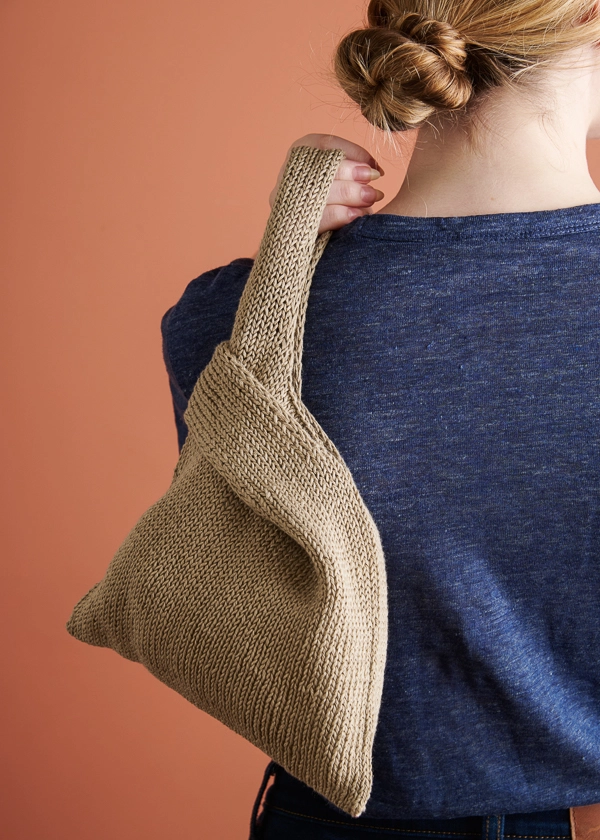
Perfectly plump with folds and dimples galore, our fun new Dumpling Bag, designed by Jeannie Lee, is a bite-size knit that’s an elegant twist on the simple knot bag.

Jeannie designed this bag as a bottom-up knit, starting with a provisional cast on. You knit the body in the round, then work the straps off live stitches. You graft the ends of the straps to the body with Kitchener Stitch and finish by closing the bottom with our old friend, Kitchener, again.
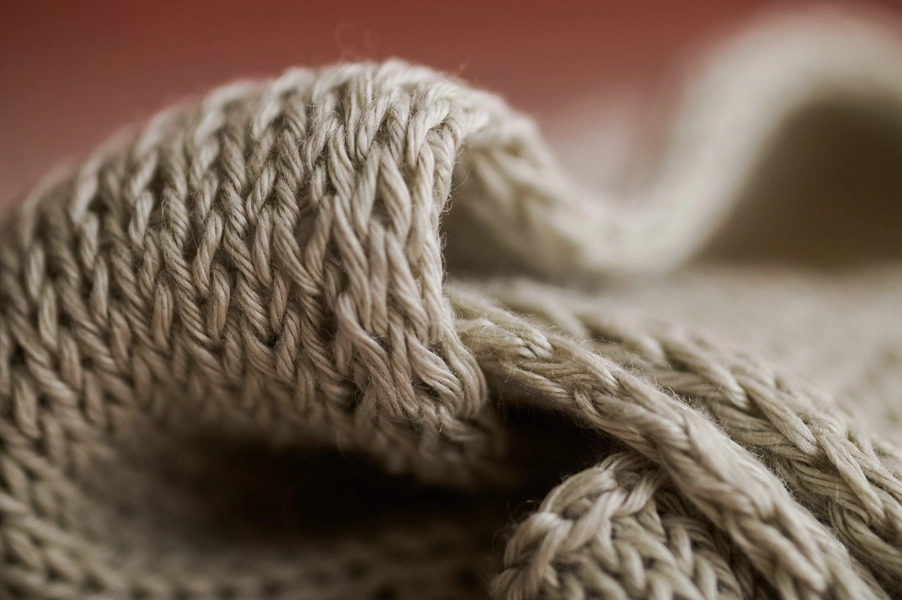
And you need? One skein of our beautiful Blackbird Linen! A light worsted weight, this 6-ply 100% French linen is a super hard-working yarn. It makes a strong and sturdy bag with a lovely drape and subtle shine.
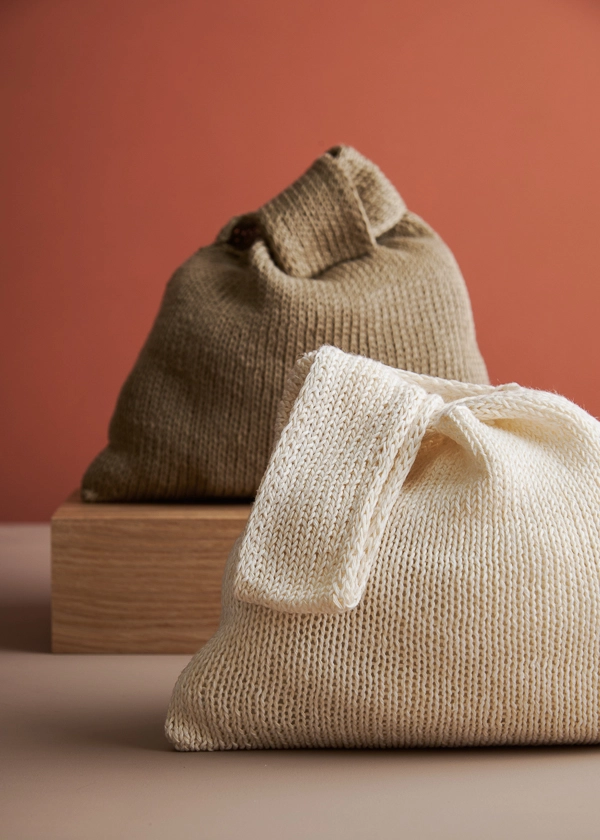
Rustic and elegant at the same time, Blackbird Linen comes in seventeen gorgeous colors, including these dumpling neutrals!

Designed for Purl Soho by Jeannie Lee. Based in California, Jeannie designs, knits, crochets, and, most of all, shares her joy of crafting with others! Her garments, accessories, and housewares bring simple pleasures to life with innovation and whimsy!
Share your progress and connect with the community by tagging your pics with #PurlSoho, #PurlSohoBusyHands, #PurlSohoDumplingBag, and #PurlSohoBlackbirdLinen. We can’t wait to see what you make!
Materials

- 1 skein of Purl Soho’s Blackbird Linen, 100% linen. Each skein is 175 yards/ 100 grams; approximately 165 yards required. We used the colors Queen Anne’s Lace, Silver Thistle, and Natural Flax.
- US 5 (3.75mm), 16-inch circular needles
- Scrap yarn and crochet hook for Provisional Cast-On
- Stitch markers, including one unique
- Stitch holders or scrap yarn
GAUGE
20 stitches and 27 rounds = 4 inches in stockinette stitch
SIZE
- Finished Circumference: 20 inches
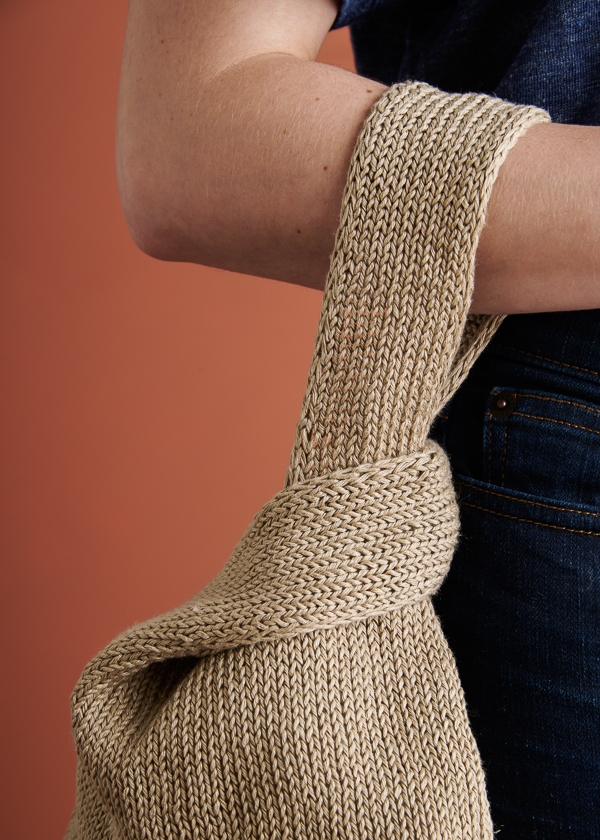
- Drop Length of Long Handle: 6 inches
- Drop Length of Short Handle: 4 inches
NOTES
CONSTRUCTION
You will start this bag with a Provisional Cast On, then work the Body in the round, from bottom up. You’ll then work the Straps separately, attaching them to the Body using Kitchener Stitch. You will finish by grafting the bottom closed, again, using Kitchener Stitch.
PROVISIONAL CAST ON
For assistance, including how to join in the round, remove the cast on, and put live stitches back onto needles, please visit our Provisional Cast-On: One-Step Method tutorial, or watch our video above!
PATTERN
BODY
With scrap yarn, use a Provisional Cast-On (see Notes), to cast on 100 stitches.
With main yarn and leaving a 2-yard tail . . .
Set-Up Row: Knit to end of cast-on stitches.
Place a unique stitch marker for end of round and join for working in the round, being careful not to twist the stitches.
Round 1: Knit to end of round.
Repeat Round 1 until piece measures 7¾ inches from cast-on edge.
Do not cut yarn.
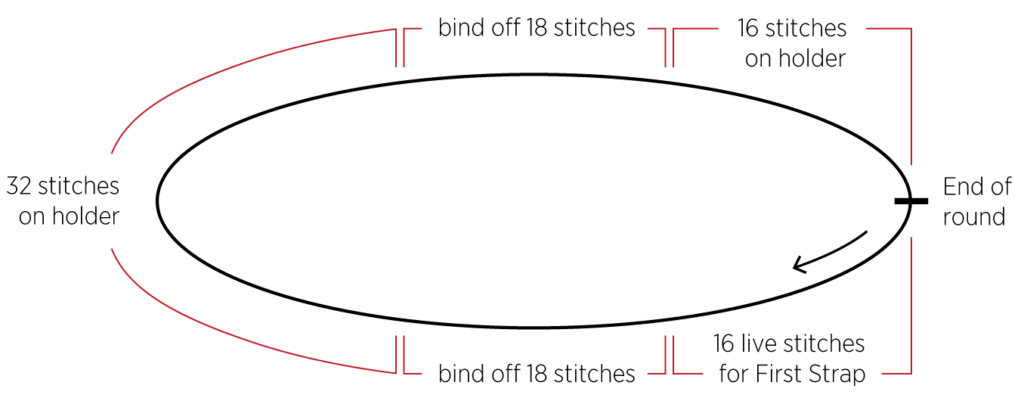
STRAPS
Set-Up Round: K16, bind off 18 stitches, k31, place previous 32 stitches onto stitch holder or scrap yarn, bind off 18 stitches, k15, place previous 16 stitches onto stitch holder or scrap yarn and remove end-of-round marker. [16 stitches remain for First Strap]
Work First Strap
NOTE: In this section you will work the Strap flat, turning the work at the end of each row.
Row 1 (right side): K1, slip 1 with yarn in front (wyif), k12, slip 1 wyif, k1.
Row 2 (wrong side): Slip 1 wyif, knit 1, slip 1 wyif, p10, slip 1 wyif, k1, slip 1 wyif.
Repeat Rows 1 and 2 thirty-nine more times or until Strap measures approximately 12 inches, ending with Row 2.
Cut yarn, leaving a 15-inch tail.
With right side facing you, slip 16 on-hold stitches onto other end of needles.
Holding needles parallel with tips pointing to right and working stitches on front needle, use 15-inch tail and Kitchener Stitch to graft Strap and Body stitches together.
Work Second Strap
Orient bag so First Strap is on the right and 32 on-hold stitches are on the left. Slip first 16 on-hold stitches onto needles. [16 stitches remain on hold]
With right side facing you, join yarn and work Rows 1 and 2 twenty-seven times or until Strap measures approximately 8 inches, ending with Row 2.
Cut yarn, leaving a 15-inch tail.
Slip remaining 16 on-hold stitches onto other end of needles.
Holding needles parallel with tips pointing to right and working stitches on front needle, use 15-inch tail and Kitchener Stitch to graft Strap and Body stitches together as for First Strap.
SEAM BOTTOM
Carefully unravel Provisional Cast-On and slip live stitches onto circular needles, 50 stitches per needle.
Now choose to seam the bottom with either Kitchener Stitch or a 3-Needle Bind-Off . . .
Kitchener Stitch
Graft bottom of bag closed using 2-yard tail and Kitchener Stitch.
3-Needle Bind-Off
Turn bag inside out so wrong sides are facing out, and with a spare needle, bind off all stitches using a 3-Needle Bind Off.
FINISHING
Weave in ends, wet block, and lay flat to dry.


Can I use a different cast on?
Hi Carolyn!
Thank you for your question! The Provisional Cast On used in this pattern allows live stitches to be temporarily on hold so that after the bag is knit, you can come back to these on hold stitches to graft them together for the bottom seam of the bag. You could use another method of casting on, however we found this method to be the best for coming back at the end to sew the seam together with Kitchener Stitch.
I hope this helps!
All the best,
Margaret
I purchased the yarn, does the pattern come with the order?
Hi Diana!
Thank you for your question. The pattern for the Dumpling Bag is free and can be found if you scroll up on this page! If you would like to print the pattern, there is an icon with the option to print on the middle of right hand side of the page near the top as well.
I hope this helps, and happy knitting!
All the best,
Margaret
Just FYI, you must be using the “desktop site” instead of the mobile view to see the print icon. I hope that helps some people.
Thank you for pointing that out, Elizabeth! On mobile view, the Print icon will be located next to the Comment section button, but below the pattern itself.
All the best,
Margaret
Margaret
thank you for the clarification. I am just starting so this really helps
Regina
Couldn’t you use “Judy’s Magic Cast On” to begin…the bottom would already be set to go, eliminating the step of joining the bottom?
Hi Vicky,
Thanks for reaching out! You can absolutely use that cast-on method for this project to eliminate the need for Kitchener stitch once your bag is complete!
I hope this helps! Please let us know if you have any questions.
All the best,
Carly
Hi Vicky!
I used Judy’s magic cast on and it looks great! Wouldn’t do it any other way 😉
Melissa
Hi Melissa, did you just cast on 100 stitches on your needles and add the one increase at each end to build up the sides? Just watched the Very Pink video for Judy’s magic cast on. Thanks for tips! I think I’d like to make this bag maybe even make it a bit bigger.
I think 40 on each side then add one to each side 5 times till you have 50 stitches on both sides then knit all 100 in a round after that
Can I use a yarn with 90% Silk and 10%Viscose for this dumpling bag? 50g=105 yards. Thank you.
Hi Hope,
Thank you for your question! I recommend doing a gauge swatch with the silk and viscose yarn you have to see if you can reach gauge with it first! (We have a handy tutorial called All About Gauge if you are interested in learning more about how to make and use a gauge swatch.) If you can meet gauge, then I think this yarn would make for a beautiful bag, as linen and silk are both lovely lightweight yarns!
Happy swatching!
All the best,
Margaret
Thank you so much!
Hi!!
Has Jeannie adapted this as a crocheted pattern? I’ve made this purse in leather and would love to crochet one. I don’t knit enough to understand the instructions!!
Best,
Kelly
Hi Kelly,
Thanks for reaching out! We don’t currently have a crochet version of the Dumpling Bag pattern, but we appreciate your interest in a design for a project like that and will be sure to let our design team know!
In the meantime, you might be interested in checking out our Market Bag pattern! This adorable bag is crocheted using 2 skeins of our Field Linen.
I hope this helps!
All the best,
Carly
This is so cute! Do you think I could make the long handle longer to go over my shoulder and tuck under my arm?
Hi Diane!
Thank you so much! You could absolutely make the long strap longer to go over your shoulder, though you will likely need more than one skein of Blackbird Linen to do this, as the pattern uses a majority of the one skein with the straps as written.
Happy knitting!
Margaret
Is this a difficult project to make?
Hi Stephanie,
Thank you for writing in! If you are comfortable working in the round, putting stitches on hold, and grafting stitches together with Kitchener stich, then this is a very easy and quick pattern to knit. We encourage you to give it a try, and if you are in need of some help along the way, please feel free to reach out to us at customerservice@purlsoho.com or schedule a free 1-on-1 zoom with us!
All the best,
Margaret
Hello Margaret,
I know how to do everything you’ve listed. However, I cannot understand the written instructions; it’s like a legal document where you know all the words but you cannot work out the meaning when all these words are put together 😂. Is there a video/ visual instruction?
Thanks.
Not to worry! We have a full list of terms and their meanings here, in case this helps you decipher the pattern any further. We encourage you to give this bag a try, and we are also happy to offer free 1-on-1 project help via zoom if you find yourself stuck along the way!
All the best,
Margaret
Doesn’t this bag stretch and sag with use?
Hi Ken!
Thank you for your question! Blackbird Linen doesn’t have a lot of stretch to it so I wouldn’t be too concerned about stretching, however if you want to reshape it after some wear, we recommend following our blocking tutorial.
I hope this helps answer your question!
All the best,
Margaret
I knit up an indigo blue bag then lined it with a patchwork of Japanese dyed linen. It stabilized the bag, gave me the chance to add a practical small pocket, and is fully reversible for another look.
Hi! I’m about to make this bag for my mother and wanted to line it. Is there a way you recommend that worked well with the bag? Thanks!
Hello!!
I have some Field Linen yarn on hand, can I make this with them instead? Field Linen has more stitches per inch, does that mean I would need to add numbers of cast ons to reach the desired dimension?
Thanks.
Hi J,
You could certainly use your Field Linen to make the Dumpling Bag! You are correct; if you want your bag to have the same dimensions that are listed in the pattern schematics, then you will need to add some additional stitches to offset the weight difference between the Blackbird Linen the pattern was designed for and the thinner Field Linen. The best way to determine how many additional stitches you’ll want to cast on would be to make a gauge swatch with the Field Linen to determine how many stitches you’re getting per every 4 inches, then use that number to determine how many stitches you’ll need to reach 20″. If you’ve never made a gauge swatch before, then our tutorial All About Gauge is a great resource that you can check out for loads of helpful information! As a rough estimate, I’d say you’d probably need to cast on an additional 20 stitches using Field Linen to get the 20″ finished cicumference for your Dumpling Bag. You will also need to adjust the number of stitches you work for the straps (again as a rough estimate, you’ll likely want closer to 20 stitches per strap instead of the 16 currently listed), so that’s something else to keep in mind as you plan your project! Please feel free to reach out to us at customerservice@purlsoho.com if you have any additional questions!
Warmly,
Kelsey
To make this wider, do we just add stitches; no specific count; i.e., additional stitches in odd or even numbers?
Hello!
Thank you for your question! If you wanted to make this bag wider, you could cast on an even number of additional stitches. This may require more yarn to complete the bag, so I would recommend having an extra skein of Blackbird Linen on deck if you end up needing more yarn!
All the best,
Margaret
I had a problem with Rows 1 and 2 of knitting the strap. Why would you slip one wyif on the knit row? On the purl row it is good to slip one wyif, buy why would you then knit one? I am doing this:
Row 1 I k1, sl 1 wyib….. On the wrong side sl 1 wyif, purl 1, sl 1 wyif and it looks just like the picture of your finished bag. Is there something I am not reading correctly?
Hi Linda!
Thank you for your question! The slip 1 with yarn in front at the beginning of the rows for the strap is designed to help create a raised edge for the borders of the strap to prevent curling. Slipping the second stitch in the row with the yarn in front raises the stitch behind it on the other side of the fabric, so that the three stitches on either edge of the strap have a more defined stockinette stitch to keep the straps laying flat. We are glad to hear the way you have knit the strap worked well for you, as we encourage knitters to knit what feels best for them!
I hope this helps clarify things, and happy knitting!
All the best,
Margaret
I had the same question as Linda. If you slip wyif on the right side, the carried yarn is on the right side of the strap. The photos don’t appear to have the carried yarn showing on the right side m. Not sure if I’m being clear. It just seems like it should be with yarn in back for the right side and in front when working the wrong side. Sorry I’m being dense.
Another question on the strap. When you turn the work to the wrong side is the wrong side now the front? Or is the right side always the front? When you slip one with yarn in front as the first stitch, why does it matter whether the yarn is in the front or back? Either way you were just slipping the first stitch and then knitting one. Thanks!
Hi Rachel,
Thanks so much for your question! When you’re making the straps and knitting flat, the Right Side will always be the front of the strap! And for rows that begin with “Slip 1 wyif, knit 1,” it does matter if the yarn is in the front for that first slipped stitch as you’ll need to move it over the front of the slipped stitch after you slip that and between the 2 needles to the back so that it’s in the correct position for the next knit stitch. This actually creates a little bit of double knitting at the edges for a really nice selvedge. I hope this helps, and please let us know if you have any other questions!
All the best,
Cat
This is puzzling to me too. Can you clarify what you mean by “move it over the front of the slipped stitch”? The yarn is clearly not carried straight across in front of the slipped stitch and then moved to the back for the following knit stitches. I’m mystified. 🤷♂️ Thanks.
Hi Sherrill,
Thanks for writing in, and I’d be happy to help clarify this part of the pattern! It may help to break down the “slip 1 with yarn in front (wyif)” instruction into smaller steps:
1. The first stitch on this row is a normal knit stitch, so you will end up with your yarn in back of your work, like you do when knitting normally.
2. But then, you need to get your yarn in front of your work so that you can slip the following stitch with the yarn in front, so you will move the working yarn in between the needles to the front of the your work.
3. Next, you will slip the first stitch on your left needle over to your right needle, all while holding the yarn in front of your work still.
4. The following stitch after the slipped stitch is a knit stitch again, but at this point, your yarn is still in front of your work, so it’s impossible to do the knit stitch correctly. So before you work that stitch, you will need to move the working yarn back between the needles to the back of your work.
5. Now, your working yarn is back in the back of the work, and you’ll be able to knit the following knit stitches!
I hope this helps clear things up!
All the best,
Lili
Hi, would it be possible to make this lovely bag in your Home Life yarn or would it not be sturdy enough? I like the structure of this yarn so much. I also would like to know of some mixed (black/white or so) yarn for the bag.
Once again a real Purl Soho design I adore!
Thanks!
Hi Elsje!
Thank you for your question! While you certainly could make this bag out of Home Life, it might be a little difficult to use this yarn for the kitchener stitch portions, so I suggest knitting the first few rounds of the body of the bag in a different, smoother yarn (your favorite light worsted yarn will do!). That way, when it comes time to sew the bottom of the bag together with kitchener stitch, it will be a smoother process. For the kitchener stitch in the straps, you could use Home Life for sewing these together, or use the same yarn that you used at the base of this bag for a unique effect!
For a black and white helix yarn to use for this bag, I can recommend Cashmere Merino Bloom in Charcoal Onyx Helix (which we expect to have back in stock by the end of this month!)
I hope this helps!
All the best,
Margaret
Hi Margaret,
Thank you for the quick reaction, I can do a lot with that!
As for the black and white, I was also thinking of the Linen Quill Worsted in Kettle Black, the bag would then perhaps become somewhat larger. But the yarn looks lovely.
You are welcome! Linen Quill Worsted in Kettle Black would be another great option for a black and white version of this bag, however it is a much thicker yarn, so this will create a larger bag if you follow the pattern as written. I suggest knitting a gauge swatch if you choose this yarn, and then counting how many stitches per inch you are getting to help calculate the cast on amount for the same dimensions as the pattern in Blackbird Linen. If you would like to learn more about how to calculate and measure gauge, we have a handy tutorial called All About Gauge!
All the best,
Margaret
Hello is Linen Quill going to be too stretch for keeping the bag shape
Hi Brenda!
Thank you for your post! Linen Quill would be too thin of a yarn to use with this pattern as written, so we would definitely suggest using Blackbird Linen for a sturdier bag, since Linen Quill is a lightweight fingering weight yarn. The bag would still be beautiful in Linen Quill if you were to adjust the pattern for a different gauge, however Blackbird Linen is the best option for a bag that will maintain its shape over time.
I hope this helps!
All the best,
Margaret
This is my first time using a provisional cast on and I had a hard time wrapping my head around how you then join in the round using new yarn (any projects I’ve done previously you join with the working yarn). The only way I could figure to do it was to do the join by knitting two together, so I cast on 101 stitches so I could k2tog and still have 100 stitches. What is the intended technique here?
Hi Angela,
Thanks for reaching out. Although the pattern reads “join in the round” earlier, you won’t actually be able to literally join the knit fabric until you’re on your second round! Using the one-step provisional cast-on, you’ll end up with 100 stitches on your needles in scrap yarn. When you join your main yarn for Round 1, you will simply knit across these stitches. Then, on Round 2, you will be able to join the fabric and start knitting in the round. I hope this helps clarify things!
All the best,
Lili
Thanks for that. I did do that at first but then figured that was wrong. If I joined the way I described will I have any problems?
You are very welcome! As long as you have 100 stitches by the time you get to the handles, you will be all set to work the set-up round and straps as written in the pattern. If for some reason you have a few extra stitches, I would add those in to the two sets of 18 stitches bound off on either edge for the top boundary of the bag between the straps.
I hope this helps, and happy knitting!
All the best,
Margaret
Nevermind. I’m just following the instructions and it looks fine. I’m knitting in black, so hard to see, but I get what it’s doing for the strap edges. Should have known to just trust the pattern. 😊
Hi Susan!
Thank you for your posts! I am happy to hear your strap is turning out as expected now. The slipped stitch with yarn in front at the beginning and end of the strap stitches will be pushed back like purl stitches are in a 1×1 ribbing, thus creating a more defined stockinette edge for the strap. It sounds like you are on the right track with this now, though, but please don’t hesitate to reach out if you have any other questions come up as you knit!
All the best,
Margaret
Greetings! I would like to make a smaller version for my granddaughters. Do you have any suggestions for how to modify the pattern? Thanks!
Hi Carol,
Thanks for reaching out with your question! We haven’t made a smaller version of the Dumpling Bag yet, but I think the simplest way to adjust the size of the bag is to knit it in a different gauge than the pattern calls for!
I recommend using Field Linen as a substitute for Blackbird Linen in this case. The best needles for this yarn will be between sizes US 2-4, so feel free to experiment with a few swatches before casting on your project to be sure you like the density of the fabric on those needles!
Once you decide on a needle size that works for your yarn, you can follow the pattern exactly as written until you get to the straps, which you might want to knit a little shorter in proportion to the bag.
I hope this helps, and please let me know if you have any other questions!
All the best,
Carly
I am working on a swatch (in the round) and while it looks like I am will get gauge with a US 5 needle, I feel like my knitting looks looser than the photos. It’s not like “lace” or open, but I can see through it if I hold it up to my face. Does this sound right or would you suggest I go down a needle size? Has anyone else experienced this? I bought several skeins of Blackbird Linen to make bags for Christmas gifts.
Hi Kim,
Thanks for your question! I recommend blocking your swatch before taking the gauge measurement. If you’re currently getting the correct gauge before blocking, you might want to size down your needles again since your swatch will likely grow a bit once it’s been soaked. Here’s our tutorial All About Gauge that you might find helpful for this!
Because of the nature of linen, it’s definitely normal to see some tiny holes through the fabric, but they shouldn’t be big enough to see through! This does sound like your gauge might be slightly looser than the pattern calls for in this case.
I hope this helps! Please let me know if you have any other questions.
All the best,
Carly
Same here. My Blackbird Linen in Gal. Teal is VERY stiff. I have to pull every stitch with some power behind it and even then there is a big gap. The yarn does not want to bend. I’m now using size 4 needle. The size 5 had gaping space on each stitch. I don’t understand what the problem could be. Anyone?
Hi Cheryl,
I’m so sorry to hear that you’re having a difficult time knitting with Blackbird Linen! Linen is naturally a very strong fiber, so it tends to feel tough on the hands while knitting. It also has no “fluff,” like yarns made from animal fibers do, so it is normal to see a bit of a gap between stitches.
If you’re finding it unpleasant to knit with, then I wanted to suggest a tip for knitting with linen that you may want to try on a future project! Before you wind the yarn, you can undo the skein into a large loop and soak the yarn in water for a few hours. After it dries, it should be much softer and more pliable!
I hope this helps, and please let me know if you have any other questions or concerns.
All the best,
Lili
Hi! Thanks for you wonderful pattern. I can’t understand how the straps are made. Do you knit them in seperete needle and yarn?
Hi Nikol!
Thank you so much! We’re so glad to hear you’re enjoying this pattern. This bag is knit from the bottom up, so the straps are formed by putting stitches on hold on either side of the bag, and knitting one strap at a time from those stitches before grafting the other end of each strap with the remaining on-hold stitches using Kitchener Stitch. This creates a seamless flow of stitches from the bag body through to the straps!
I hope this is helpful!
All the best,
Margaret
I have a skein of Burnish, would that work or would the bamboo have too much stretch?
Hi Ela!
Thank you for your question. Since Burnish is a fingering weight yarn, it would be too thin of a yarn to use for this pattern, as we recommend using a DK weight yarn for this gauge. If you are interested, you can browse our Burnish patterns here for your skein of Burnish, or our collection of DK weight yarns for your Dumpling Bag!
I hope this helps!
All the best,
Margaret
quick question… are slipped stitches slipped purlwise?
thanks
Hi Katherine!
Thank you for your question! Yes, all slipped stitches in this pattern are slipped purlwise.
I hope this helps clarify things, and happy knitting!
All the best,
Margaret
thanks! also just want to say the edge detail on the straps is brilliant!
I’m having trouble maintaining tension with Blackbird Linen. Any tips?
Thanks,
Liz
Hi Liz,
Thanks for reaching out. Linen is definitely a tricky fiber to work with, since it’s so inelastic! If you’re having trouble maintaining the tension to achieve the correct gauge, I’d recommend trying different needles. You may need to size up or down your needles in order to do this, or even changing the needle material might help!
All the best,
Lili
Hi Lili,
Smaller needles and slower pace both helped.
Thank you,
Liz
On strap one, I’ve knit 12 rows. My gauge is 5 rows per inch. For 12 inches, I’ll need to knit 60 rows. I’m not a very loose knitter. This seems very off from the pattern which states about 39 rows. I’m worried about running out of yarn.
Hi Laura,
Thanks for reaching out. I’d be happy to help explain how the math works out for the straps! The gauge for this pattern is 27 rows in 4 inches, which equates to 6.75 rows per inch. The pattern states to “Repeat Rows 1 and 2 thirty-nine more times,” so that’s actually a total of 80 rows of knitting (including the first time you knit Rows 1 and 2). Since your gauge is a bit loose (5 rows per inch vs 6.75 rows per inch), you may not even need to knit all 80 rows though, before you reach 12 inches. Hope this helps clear things up!
All the best,
Lili
I love this bag, and although I’ve knitting for years, i’m finding it hard to understand the instructions. Wish there would be a video showing the main parts. Like when you do the partial cast on, you then cut the yarn and star how?
Really want to do this ❤️
Hi Ana,
Thank you for your post, though we’re so sorry to hear you’re having a hard time with the instructions! We happen to have a video showing how to do a provisional cast on right here, which hopefully helps make casting on for your bag easier. Please don’t hesitate to reach out if you have any other questions along the way!
All the best,
Margaret
I did the provisional cast on, but when I started my main yarn in, the provisional cast on started falling off. How do you join in the round with a prov. cast on? Do you join with the prov. yarn or main yarn? I can’t find any videos that show this exact technique.
Hi Melissa,
Thanks for reaching out, although I’m sorry to hear that your provisional cast-on is falling off! Did you use the one-step method or the two-step method? Regardless of which one you used though, I’d recommend making sure that you’ve chained enough extra stitches on the ends, so that the scrap yarn stays put and doesn’t unravel!
To join in the round when using a provisional cast-on, this depends on which method you used! If you used the one-step method, then you will knit across the provisionally-cast-on stitches with your main yarn for one row, then you will begin working in the round from the end of that row. So your scrap yarn will not be “joined” at all, but your main yarn will!
If you used the two-step method, however, you will already have all your main yarn stitches on your needles after picking them up from the scrap yarn chain. So after you’ve completed picking up all the necessary stitches, you can continue by knitting those in the round!
I hope this helps clarify things!
All the best,
Lili
I am following the pattern for the straps closely and I have checked my work making sure I am slipping with yarn in front at the appropriate stitches and the edges of my strap are still curling. Do you think blocking will get rid of the curl so straps will lay flat?
Hi JJ,
Thanks for reaching out. Blocking will absolutely remove the curling with this yarn and pattern! Linen blocks out very well, so if you wet block the bag and pin it in shape to dry, it will retain that shape once it’s done drying. Hope this helps!
All the best,
Lili
Could you use double stockinette stitch instead of the provisional cast on and Kitchener stitch seam?
Hi Melissa,
Thanks for reaching out. You could certainly begin this bag with some double knitting, but I think it may be more trouble than it’s worth! If you want a method to avoid the provisional cast-on and Kitchener stitch, then I’d recommend using Judy’s Magic Cast-On.
All the best,
Lili
Hi. Will any DK weight linen yarn work for this pattern? Thank you!
Hi Alexis,
Yes, any DK weight linen yarn would be a great choice for this pattern! As always though, we recommend knitting a gauge swatch before casting on your project, especially when you are substituting yarns. You may need to size up or down your needles in order to get the correct gauge! If you would like to learn more about this, we have a handy tutorial called All About Gauge, which you can find right here.
All the best,
Lili
Thank you for the response! Does it need to be 100% linen?
Nope! While we personally like the texture that linen creates for this bag, you can use any fiber for the project!
All the best,
Lili
If I use Judy’s magic cast on, I use the linen yarn not scrap hat, is that correct?
Thanks
Hi Melissa,
Thanks for writing in! Yes, you do not need to use any scrap yarn for Judy’s Magic Cast-On. That technique allows you to begin directly with the yarn you’ll be using for the project. Hope this helps clarify things!
All the best,
Lili
Would pure cotton be fine for this cute bag?
Hi Julie,
Yes, Cotton Pure would be a great choice! It’s a bit thinner than Blackbird Linen though, so you may need to use larger needles to meet the gauge. Or, you could knit a slightly smaller bag!
All the best,
Lili
Will I be able to access the video of today’s KAL for the Dumpling Bag on the Purl Soho website? I am kind of an advanced beginner and still really need visual to completely understand.
Thank you,
Leigh Anne
Hi Leigh Anne,
Thanks for reaching out! We’ll be uploading the recording to our YouTube channel as soon as we finish editing the video. I recommend subscribing here if you haven’t already so you can receive a notification once the latest meeting goes up.
I hope this helps, and please let me know if you have any other questions!
All the best,
Lili
Hello! I was watching the video for adding the straps and your piece is so flat! Mine is very curly!! Have you semi blocked it to get it to lie flat? Or is there a tip to keep it flat as you are knitting? Thank you so much.
Hi Linda,
Thanks for writing in! In the Zoom + Knit video, Margaret had fully blocked her finished bag in Bottle Green, and she had gently steam blocked her other partially-completed bag in Natural Flax. You could also use clips, like these, to secure the bottom edge of the bag together as you knit. That will help keep the bottom edges from curling upwards!
All the best,
Lili
What an adorable pattern! I’m planning to knit this with some stashed Linen Quill held double — or perhaps Linen Quill with Sweetgrass instead. These look like potato chip knitting and would be great as gift bags for something special!
Me again. Please disregard my earlier question. I’ve just watched the KAL video and now understand what to do. Thanks very much. Onward!
I am at the point of finishing the bottom of the bag but I’m tempted to knit a couple of rows to use up my left-over yarn before doing the Kitchener stitch to close the bag. Looks like it should be possible to knit “down” (in the opposite direction). Is it?
What’s the best way to weave in the linen ends – duplicate stitch on the back? Diagonally?
Great fun to make this little bag. Thanks for the pattern and for your help.
Hi Sherrill,
Yes, it’s definitely possible to knit in the opposite direction, starting from the provisionally cast-on stitches! And for weaving in ends, I believe I used duplicate stitch on the back for my own bag, and that worked great, but diagonally will also be very secure (and slightly less bulky)!
All the best,
Lili
Hi PS, assuming that all the slipped stitches are slipped purlwise in the pattern strap section? I didn’t find that specifically called out. Thanks!
Hi Ann,
Thanks for writing in! Yes, all the stitches are slipped purlwise in this pattern. When not specifically noted in a pattern, it’s generally safe to assume purlwise!
All the best,
Lili
Darn it, as a self-taught knitter, I always assumed you would slip knit-wise when knitting and purl-wise when purling. That’s what I did. The strap looks decent, but I’m wondering if I should rip it out and start the strap over.
Hi Carol,
No worries, that seems to be a common misconception! Slipping stitches knitwise actually twists them, so it’s really only used if the pattern requires that twisted-stitch appearance. If you’re happy with the way your strap looks, then there’s no reason to redo it, but you’re welcome to redo it if you’re not quite happy!
All the best,
Lili
Hi! I’ve removed my provisional cast-on stitches and have my live stitches divided and ready to go. Currently, my 2-yard tail is on the front needle with the needles pointing right. Is this correct or do I need to shift that stitch onto the back needle and adjust my stitch marker?
Hi Emily,
Thanks for reaching out! You can still begin the Kitchener stitch with the working yarn coming from a stitch on the front needle. Hope this helps!
All the best,
Lili
Hi..I have got the Dumpling Bagbody and first strao done but I am confused as to hoe to get my Holding stitches onto the needle so I can Kitchener Stitch ..Donit understand how to do thid ..I watched the tutorials several times but they do not show this step,,maybe I am being dense but don’t want to attempt this and have it twisted or something after I Kitchener stitch it…Please send me pics or video or fruther instructions
Love the bag
Cheers
Donna
Hi Donna,
We’re sorry to hear this section is giving you trouble and would be happy to help! I recommend sliding the stitches you have on hold onto a double pointed needle if available. This will ensure it does not get twisted as you do the kitchener stitch.
From there, you’ll align the stitches so the ones from the strap you just completed are on the bottom or (front set of needles) with the right side facing you. The stitches that were previously on hold should be on a separate pair of needles (or the back set) so the two right sides are right on top of each other.
If a visual would be more helpful, I recommend booking a free 1-On-1 Project Help session through this link. You can also email us directly at customerservice@purlsoho.com so we can send you some pictures!
All the best,
Zha Zha
Hi!
I have reached the “set up” section and have knit 16, bound off 18, and knit 32 stitches. Now I’m ready to put those 32 stitches on scrap yarn. BUT…I accidentally bound off only 17 stitches so I need to get that 18th stitch bound off and am wondering how I can accomplish that.
Thanks much,
Laurie
Hi Laurie,
No worries, there’s definitely a way to backtrack and bind off that additional stitch! I’d recommend unknitting each stitch by inserting your left needle into the stitch below, removing it from the right needle, and pulling the working yarn out of the stitch. You can repeat this process for each stitch on the right needle until you’ve reached your bind-off. Then, bind off the 18th stitch and knit forward from there!
All the best,
Lili
Hi,
I am now ready to knit the straps and have already divided the work and did the cast off for the stitches not included for the straps. The problem is that now the edges where i’ve bound off are curling. Is that normal and will it go away after blocking or do you use a special bind off technique? Thanks!
Hi Susan,
Thank you for writing in! Yes, you are correct, the curl from the stockinette stitch is completely normal. I would suggest pinning your straps down while blocking to help them dry flat and this should drastically reduce the curling!
Happy knitting,
Gavriella
I’m at the set-up round. Instructions say K16, BO18, K31, place previous 32 stitches onto holder. And next is again placing 1 more stitch on the holder than has been knit. Would I be placing 1 bound off stitch on the holder?
Hi Sally,
Thank you for writing in! For this section, you will count the last stitch left on your needle as one of the 32 stitches to be put on the holder. So after your bind off, there should be 1 stitch remaining on your needle, you will then knit the next 31 stitches leaving with 32 consecutive stitches ready to be put on hold. I hope this helps but please let me know if you have any other questions!
Happy knitting,
Gavriella