


Sideways Garter Vest
From now until spring, if you happened to stumble into Purl Soho’s backroom during a Purl Bee meeting, you’d most likely find us all cloaked in various Bee projects, fending off the draft from our backroom’s elegant but quite drafty fenestration.

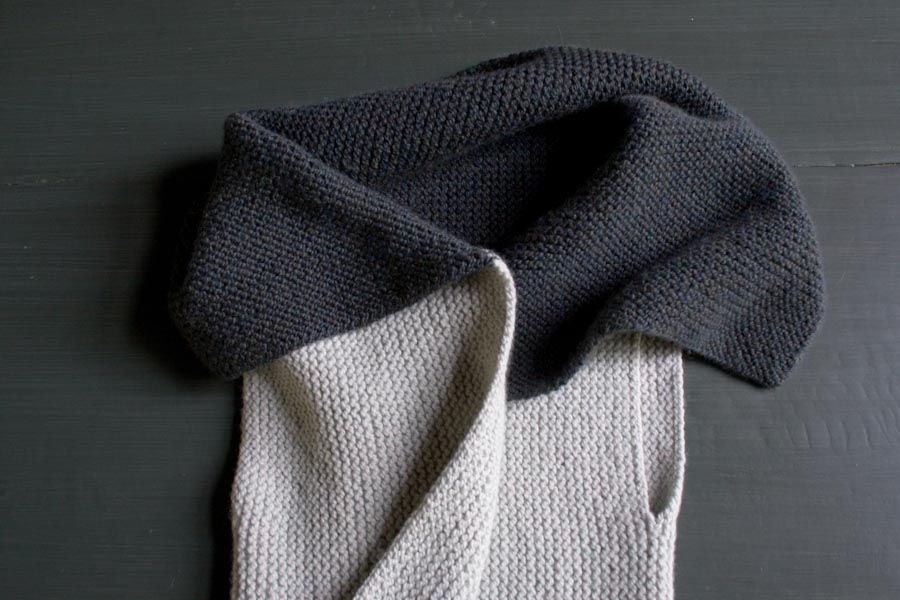
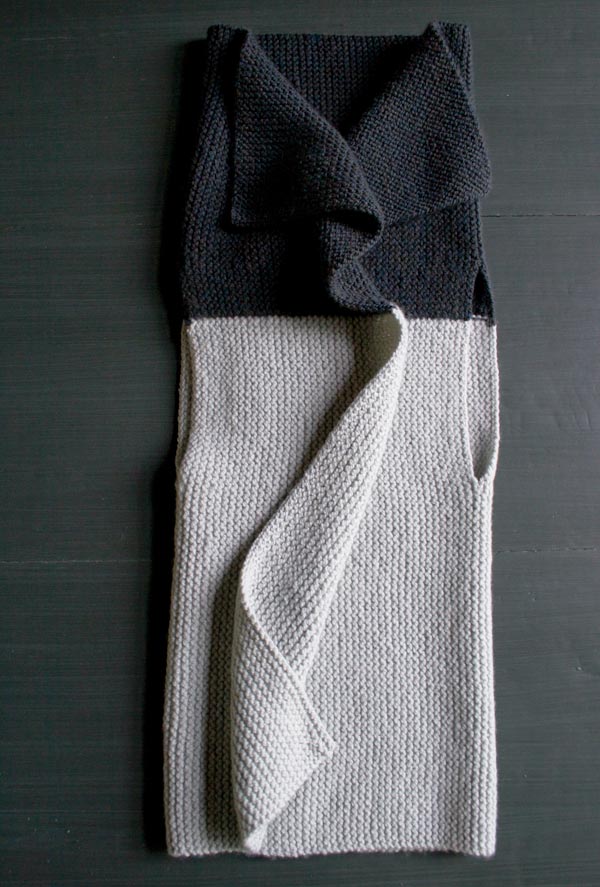
My co-workers usually rush for the sweaters and shawls, but I always beeline to a Super Easy Blanket. I adore its comfort, how its garter stitch is so sumptuous and cushy and how its ridges embrace me. Then one day I thought, Why not just pop some holes in that blanket and let the fabric speak for itself? And the Sideways Garter Vest was born.
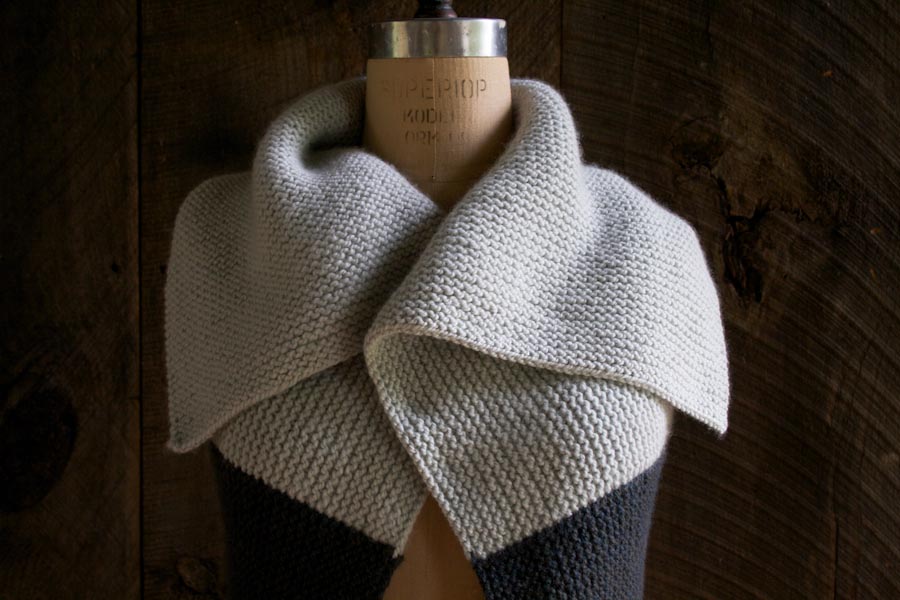
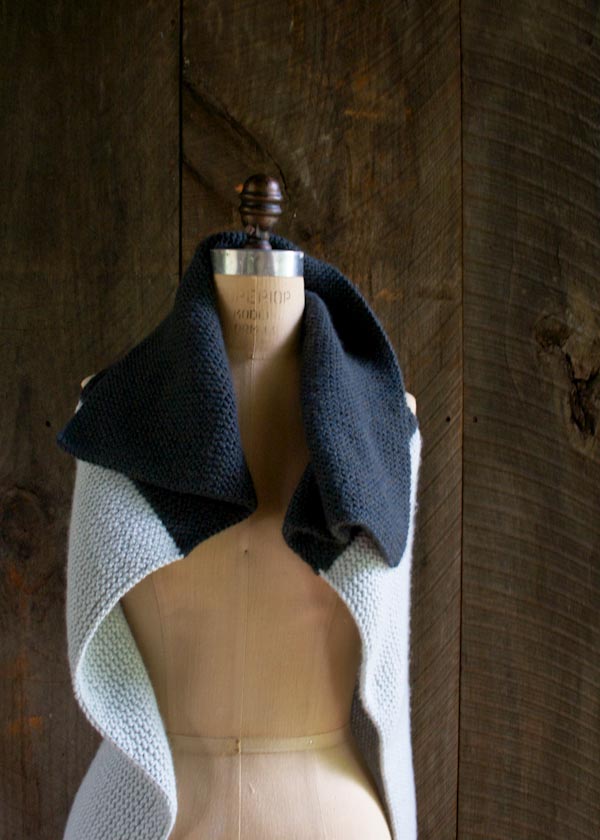
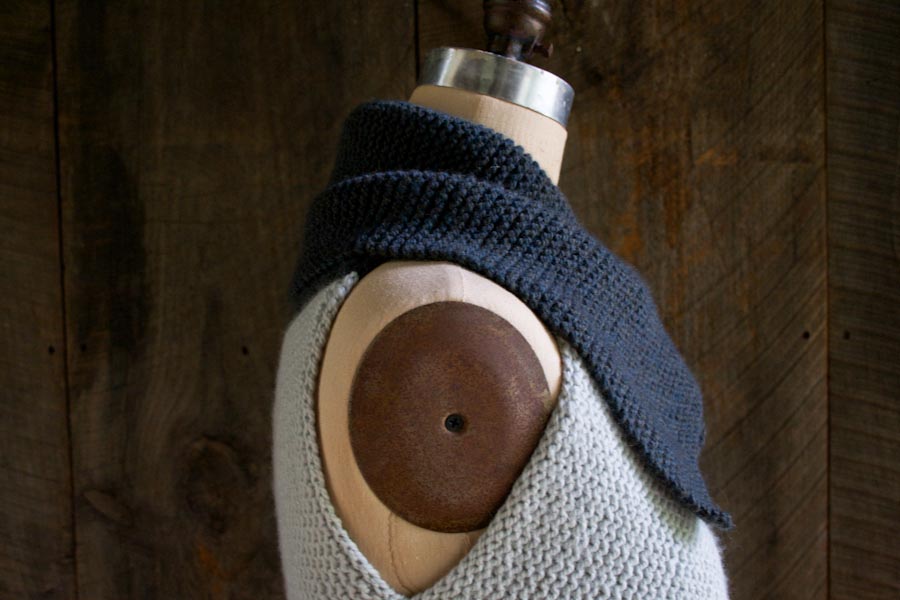
A rectangle of garter stitch with two well-placed slits for armholes, nothing could be simpler to make… or wear. “Sideways” because I knit it that way, the Sideways Garter Vest is designed for effortless versatility. Wear it longer in the torso and shorter at the collar, or for those especially windy meetings, flip it upside down for a more generous collar and cropped body. The Sideways Garter Vest, knit in a combination of Purl Soho’s Worsted Twist and Worsted Twist Heather, is definitely my new go-to for Purl Bee meetings and beyond! –Laura
PS: For extra security and warmth, pin the collar shut with one of Fog Linen’s gorgeous Brass Cloth Pins!
Designed by Purl Soho designer, Laura Ferguson.
Share your progress and connect with the community by tagging your pics with #PurlSoho, #PurlSohoBusyHands, #PurlSohoSidewaysGarterVest, and #PurlSohoWorstedTwist. We can’t wait to see what you make!
Materials
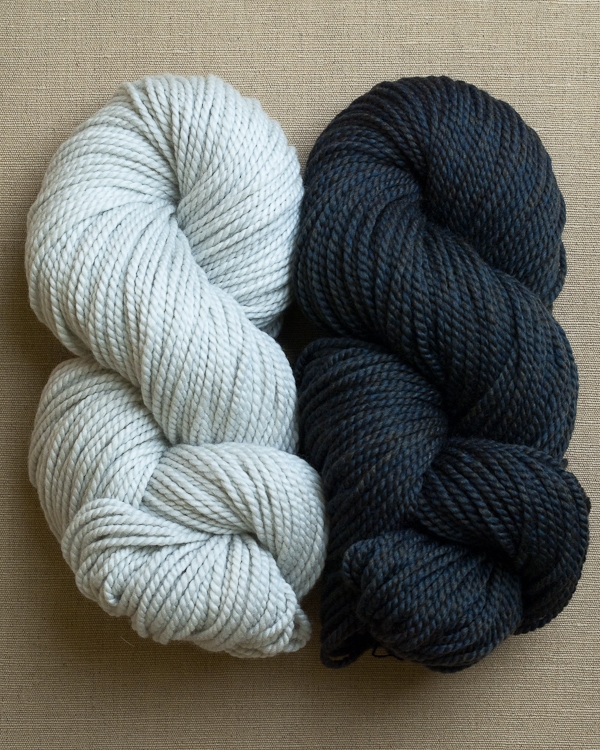
- Yarn A: 3 (4, 4) skeins of Purl Soho’s Worsted Twist, 100% merino. Each skein is 164 yards/ 100 grams; approximately 492-656 yards required. I used the color Artemisia Green. (NOTE: We no longer offer Worsted Twist, but choose from one of our other worsted/aran weight yarns.)
- Yarn B: 2 (3, 3) skeins of Worsted Twist, 100% merino; approximately 328-492 yards required. I used the color Stillwater Blue.
- A US 8 (5 mm), 32-inch circular needle
- A spare US 8, circular or straight needle
- A few yards of scrap yarn
Gauge
16 stitches and 32 rows = 4 inches in garter stitch
Sizes
To fit shoulder widths measuring 14-15 (16-16½, 17-17½) inches
- Finished Dimensions: 30 (35, 37½) inches across x 30 inches from top to bottom (including fold-over collar)
- Finished Height of Armhole: 8 inches
- Finished Width across Shoulders: 12 (14, 15) inches
- Finished Width of Fronts: 9 (10½, 11¼) inches
FIT: The length measurements are the same for all three sizes, and you have a choice of how to wear the vest: either 12 inches from hem to underarm with a 10 inch collar; or upside down with 10 inches from hem to underarm and a 12-inch collar.
Notes
This piece is knit ‘sideways’ from one vertical edge to the other, rather than from top to bottom or bottom to top.
The colorwork is done with a technique called Intarsia in Garter Stitch. Each row will involve two balls of yarn, which is much easier than it may sound! To work intarsia in garter stitch on the right side…
Cross Yarn A over Yarn B and knit the next stitch with Yarn B.
To work intarsia in garter stitch on the wrong side…
Bring Yarn B to the front purl position, and cross Yarn B over Yarn A.
Bring Yarn A to the back knit position and knit the next stitch with Yarn A.
Pattern
Begin with Front Left
With Yarn B, cast 48 stitches onto the longer needle. We used a basic Long Tail Cast On. Put Yarn B to the side; do not cut it.
With Yarn A, cast 72 stitches onto that same circular needle. [120 total stitches]
NOTE: When you switch colors in the following rows, be sure to use the intarsia techniques described in the Notes, above.
Row 1 (right side): With Yarn A, knit 72 stitches; with Yarn B, knit to end of row.
Row 2: Slip one knitwise; with Yarn B, knit 47 stitches; with Yarn A, knit to end of row.
Row 3: Slip one knitwise; with Yarn A, knit 71 stitches; with Yarn B, knit to end of row.
Repeat Rows 2 and 3 until piece measures 9 (10 ½, 11 ¼) inches from cast on edge, ending after working a right side row.
Cut Yarn A.
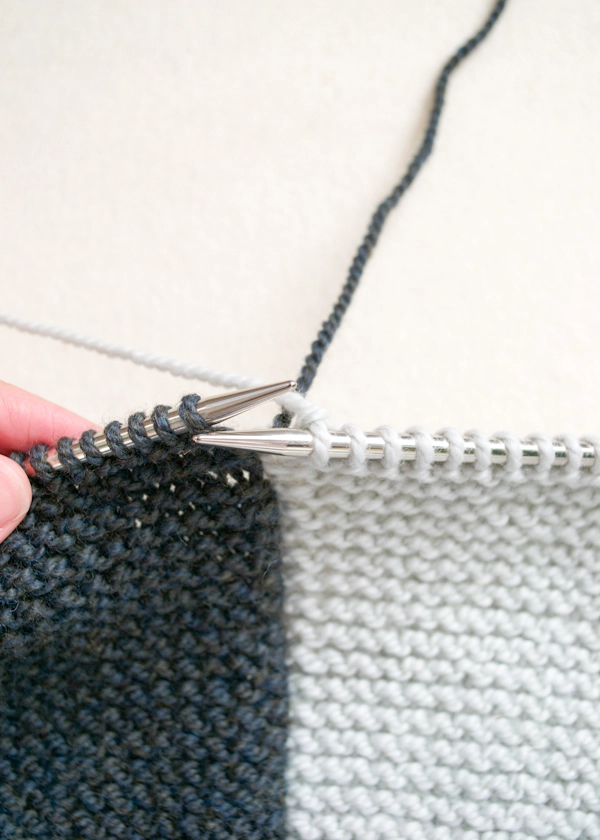
Make Left Armhole
Next Row (wrong side): Slip one knitwise; with Yarn B, knit 39 stitches, cut Yarn B; with scrap yarn, k32, cut scrap yarn; join Yarn A and knit to end of row.
Work Back Vest
Next Row (right side): Slip one knitwise; with Yarn A, knit 71; join yarn B and knit to end of row.
Repeat Rows 2 and 3 from FRONT LEFT section until piece measures 12 (14, 15) inches from scrap yarn, ending after working a right side row.
Cut Yarn A.
Make Right Armhole
Next Row (wrong side): Slip one knitwise; with Yarn B, knit 39 stitches, cut Yarn B; with scrap yarn, k32, cut scrap yarn; with Yarn A, knit to end of row.
Work Front Right
Next Row (right side): Slip one knitwise; with Yarn A, knit 71; join Yarn B and knit to end of row.
Repeat Rows 2 and 3 from FRONT LEFT until piece measures 9 (10 ½, 11 ¼) inches from scrap yarn for Right Armhole, ending after working a right side row.
Bind Off (wrong side): With Yarn B, loosely bind off 47 stitches knitwise (one Yarn B stitch will remain on the left needle), cut Yarn B; with Yarn A, bind off remaining stitches knitwise, cut Yarn A.
Armholes
Weave in Ends
Note: Work the following instructions for each Armhole.
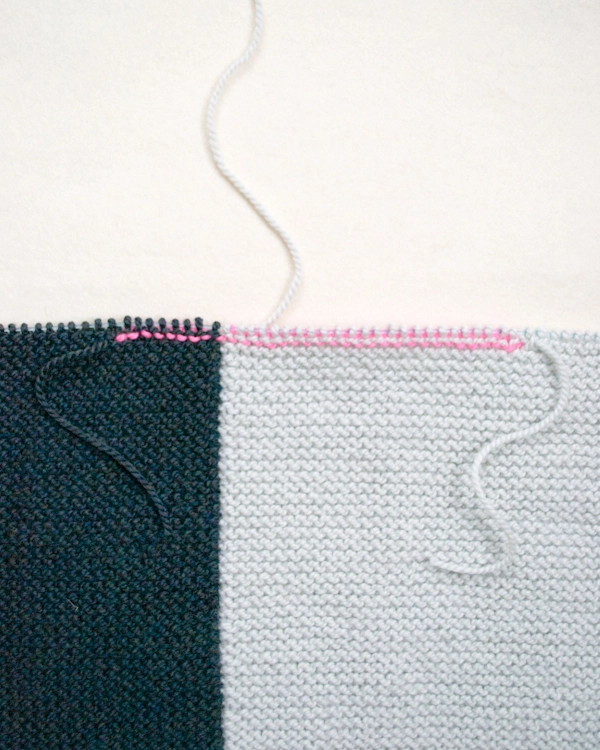
At each set of scrap yarn stitches, where the colors transition, there is one Yarn A end and one Yarn B. To weave in these ends, first orient the garment with the wrong side facing you and in same direction as it was knit (with the cast on edge nearest you).
To weave in the Yarn A tail…
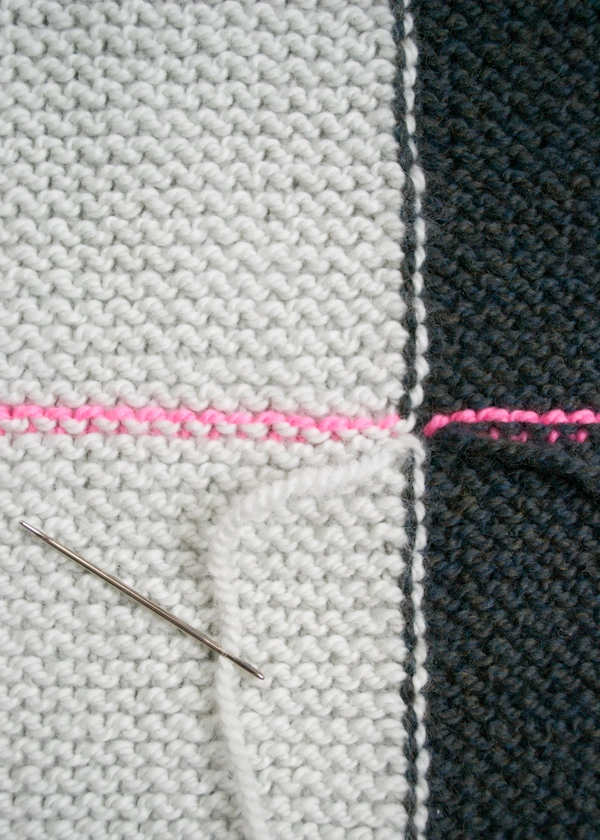
Thread the tail onto a tapestry needle. Gently tug the threaded tapestry needle to close any gap in the fabric.
Then insert the needle (in a downward motion) through the purl bump of the stitch just below the scrap yarn and just to the left of the color transition, as well as through the next purl stitch below. From there, weave in the tail to secure it.
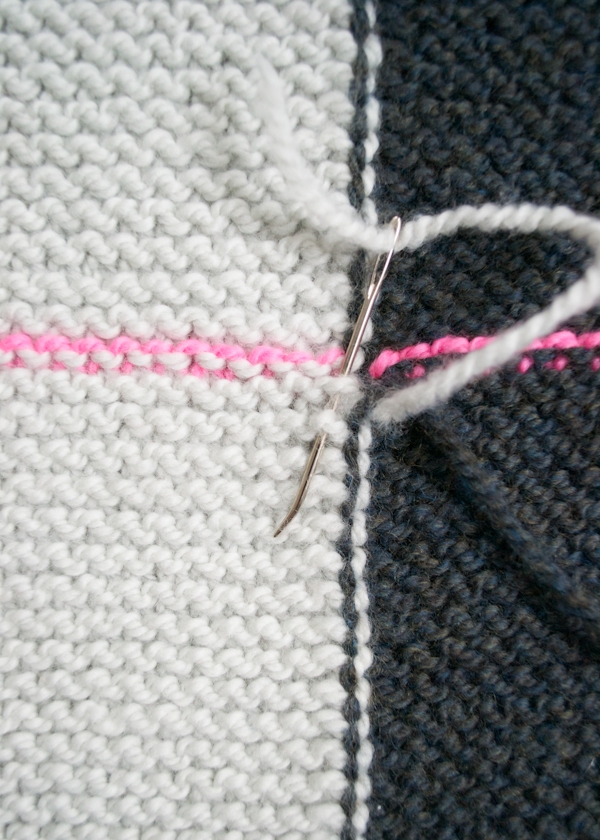
To weave in the Yarn B tail…
Thread the tail onto a tapestry needle. Gently tug the threaded tapestry needle to close any gap in the fabric. Then insert the needle (in an upward motion) under the nearest vertical strand of Yarn A.
Now insert the needle (in a leftward motion) under the vertical strand of Yarn A one row up. From there, weave in the tail to secure it.
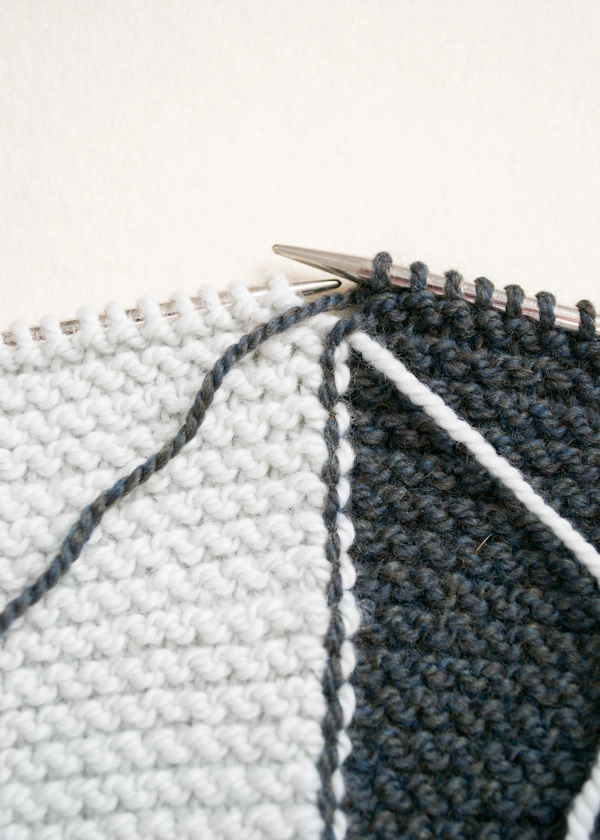
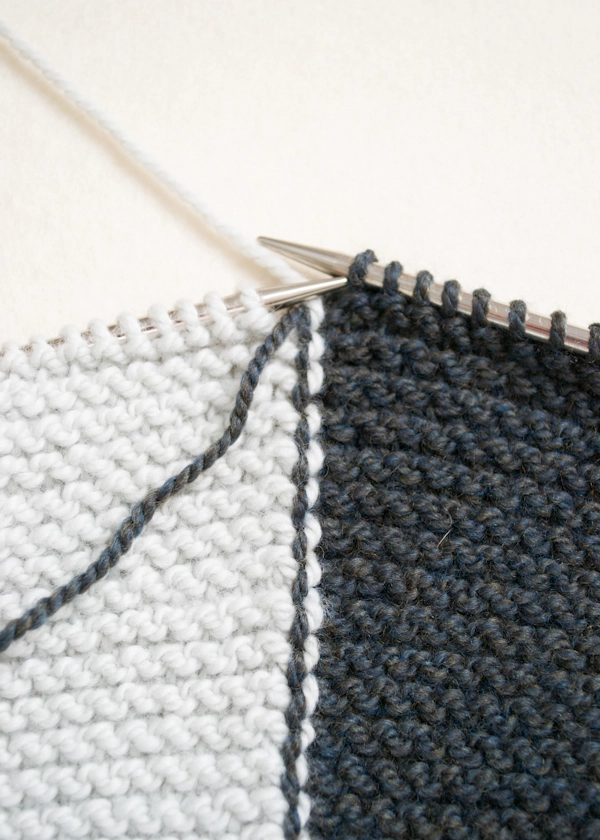
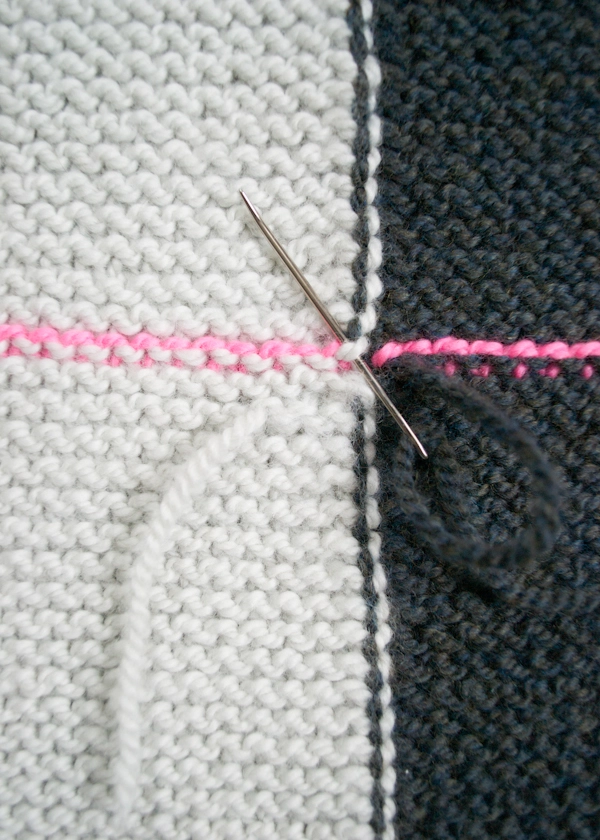
Pick Up + Bind Off
Note: Work the following instructions for each Armhole.
With the right side facing you, slip the 32 stitches just below the scrap yarn onto the shorter circular needle; continuing with the same end of the needle, slip the 32 stitches just above the scrap yarn onto the needle. [64 total stitches]

Use the tip of a tapestry needle to pull out the scrap yarn.
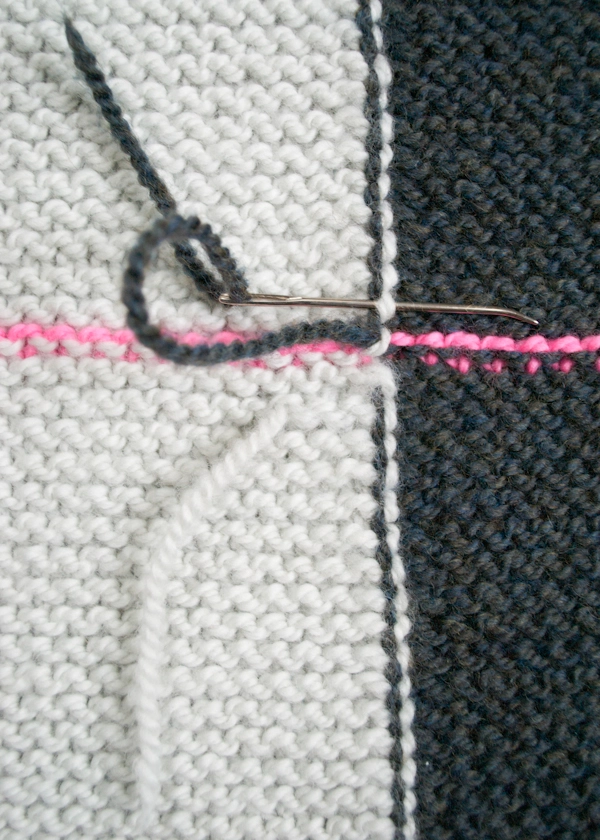
Bind off (right side): Join Yarn A and bind off 24 stitches purlwise (one Yarn A stitch will remain the right needle), cut Yarn A; join Yarn B and bind off 16 stitches purlwise (one Yarn B stitch will remain on the right needle), cut Yarn B; join Yarn A and bind off remaining stitches purlwise.
Use the ends at the top and bottom of the armhole to close up any gaps.
Weave + Block
Weave in the remaining ends and block as desired.


I am approaching the arm holes and after reading all the comments and answers I would prefer to Bind off at the arm hole.
So I should knit 39 stitches with yarn B (which is the top color) then BO 32 stitches ( 9 of these will be yarn B and the other 23 will be yarn A) then finish knitting the remainder of my 71 stitches in yarn A (my math is 48 stitches) (bottom color).
now I slip 1 and start knitting I think it will be 71minus 23 stitches (48 if calculating right)
then I have to cast on 23 stitches (to get me back to my 71 with color A) and cast on 9 more with color B – then finish knitting this row with my color B to the top! This is my first garment and really hoping to make it through this part! Thanks for any corrections or tips.
Hi Sonya,
Good job on the kitting math! I think you’ll be fine. The most important part is that you knit 39 and bind off 32. When you turn your work you’ll have no choice but to cast on 32 stitches where you previously bound off. Best of luck!
-Adam
Hello Purl,
Your Garter Vest is great. I wear mine often. Even in winter over a little pullover. But I’d like to add a good closure. I already tried to add some snap fasteners (bouton pression in french), but it’s not the perfect closure, as the knit stretches and falls down the closure. I also tried a pin, but the knit falls around it too. I’m looking for a better idea, do you have any ideas ?
Thank you !
My knit is there on Ravelry :
http://www.ravelry.com/projects/emmaluna/sideways-garter-vest
Hi Emmaluna,
Thanks for writing in and for your kind words! The best closures that we have seen have been either shawl pins or giant saftey pins like these: https://www.purlsoho.com/tools/notions/brass-safety-pins.html
They do pull a bit at the fabric but this can be mitigated by closing the vest less tightly!
I hope that this helps!
Cassy
This is the cutes pattern. Is there a way to enlarge to fit a size 3X? Hopeful yes. Your patterns are amazing.
Thanks so much
Hi Marcia,
Thanks for your interest in this pattern! This pattern is very easy to modify and I think you can do it! First you’ll want to get gauge because you’ll increase your cast on from there. I’d measure from your nose to where you want the vest to end and multiply your stitches per inch by this measurement. Yarn B is 40% of your cast on and yarn A is 60%. From here on out you’ll measure to your body where you want the first armhole to sit. Make sure you count how many rows in you are so you can repeat that for the second armhole. You’ll probably have to make the armhole bigger so I suggest taking away more stitches from Yarn B. From there on out you’ll keep trying on the vest for the cross back measurement and repeat for the second armhole. I hope you’ll tackle this one!
-Adam
Hi. I have made this vest and love it. Thinking about adding sleeves and I was wondering which technique you think would be best? Thanks so much for any help and thanks for the great pattern.
Patti
Hi Patti,
Thanks for the question. I suggest picking up the stitches along the slits and knitting down in the round. If you want to maintain garter stitch in the round, you’ll knit a round and then purl a round. Best of luck and let me know if you have any other questions.
-Adam
I really want to make this but in all one colour but I don’t know how to adapt the pattern. Maybe l’all wait until I’m a bit stronger at knitting! Lovely pattern!
Hi Kelly,
Thanks for writing in. It’s really quite easy to make this all in one color. All you do is cast on in one color and you don’t follow the instructions for intarsia. Hope you’ll do it!
-Adam
Hi
I too want to make it in one color. Hopefully I can work my way thru it.
I’m not a new knitter, but usually make easy projects
Hi, I loved you garter vest and it has the stitch I am looking for. Could you let me know did you knitted it? The recipe for it please, I am about to start a new project and I would love to use this stitch.
Thank you very much.
Cristina
Hi Cristina,
Thank you for writing in! The pattern for this lovely vest can be found above! It is knit in garter (knitting every stitch on both sides) and uses an intarsia technique to allow for the two colors!
I hope that this helps!
Cassy
I was wondering about how this garment along with the vest using the new undyed alpaca yarn would look on an individual with a larger bust measurement. I was also wondering if either of these patterns are too difficult for a knitter of 7-8 yrs., with no experience knitting the multiple patterns/stitch combos? Thank you in advance for any advice you can give me!
Hi Pam,
Thanks for the questions. This pattern is totally doable for a knitter of 7-8 years. Intarsia is easier than you think and we have a tutorial for it. The Shepherdess Alpaca is a heavier weight than the Worsted Twist, so you might have to do a gauge swatch to modify the pattern for yourself. Also, I’ve seen this garment on people of all sizes and it looks great. It is a very simple vest and is a nice addition to any outfit.
All the best,
Adam
Hi Pam,
Thanks for writing in! I have seen this vest on women of every body type and it looks great on just about everybody! There are a lot of completed projects for this vest on Ravelry that I think could give you a good idea of how it looks on a variety of body types. As the Drift Vest is brand new, I have only seen the sample on people. Given its boxy construction and simple by pleasing shape, I think that it will work well on a large variety of body shapes! Both vests are easy to achieve especially if you have been knitting for 7-8 years!
Best,
Cassy
I am struggling with the knitwise instruction… there are several knitwise tutorials on YouTube. I am assuming it’s to add a better border/edge to the top and bottom but cannot figure it out.
Thank you,
Cara
Hi Cara,
Thanks for writing in. Slipping one knitwise simply refers to slipping as if to knit instead of how you’d normally do it, which is as if to purl. When you slip one knitwise you get a very clean edge.
All the best,
Adam
Hi Purl,
Can you recommend another type of yarn for this pattern besides worsted yarn?
Hi Lena,
Thanks for writing in! This pattern is written for worsted weight yarn and you can substitute any worsted weight that you would like! I think that Cascade 220 or Blue Sky Worsted Hand Dyes would both work beautifully. If you would like to use a different weight yarn, you will need to quite a bit or reworking of the pattern.
I hope that this helps!
Cassy
I am a beginner knitter. I am hinting with #8, 32″ circular needles. With Yarn B, cast 48 stitches onto the longer needle. Put Yarn B to the side; do not cut it.
What is the longer needle? The needles are both the same size with the nylon string in-between. Confused .
Thanks, Theresa
Hi Theresa,
Thank you for the question! The longer needle just refers to the main needle you’ll be using for the whole project. It does not refer to the actual needles on either side of the cord. Because there are two needles specified in the pattern materials we pointed out that you’ll want to cast on with the longer needle (US8, 32″). Hope this clears things up!
-Adam
im loving the simplicity and elegance of your vest. i am considering using combination pallett of sea salt and rose granite. as i cant see them side by side, do you feel these colors compliment eachother? thanks, leslie
Hi Leslie,
Thanks for writing in! I took a look at the colors together and think that they will make a lovely vest. The color combination is a bit more subtle than the one shown but it is quite lovely!
Best,
Cassy
I don’t get how you show dimensions for three sizes, but only one size/set of instructions when you actually cast on and knit. I want to make it in large. It looks like such a great vest!
Hello Wendy,
Thank you for writing in! I’m happy to hear you like this vest. This piece is knit ‘sideways’ from one vertical edge to the other and the length measurements are the same for all three sizes. This means the cast on will be the same for all three sizes. Once you get to “Repeat Rows 2 and 3 until piece measures 9 (10 ½, 11 ¼) inches from cast on edge, ending after working a right side row” in the pattern it will give you instructions for each size in parentheses.
I hope this helps!
Warmly,
Marilla
Hi any chance of sideways vest being translated into crochet? Love your patterns and site.
Hi Cat,
Thanks for writing in! We do not have a crochet version of this vest at present but I will certainly pass on your request. You may be able to create the pattern on your own by doing some gauge swatches in double or single crochet and seeing which fabric you like and how many stitches you are getting per inch. You would then use the measurements of this vest to determine how many to chain on and work the vest based on the measurements that we provide!
Best,
Cassy
comment on the May 22 2017 comment. I am rather busty and the 37 measurement just won’t make it. I would need to increase 10 inches. I can most probably do the measurements and do the math, but please remember us size large busty ladies. I am excited to see this pattern and am more excited to knit it. THANKS!!
Hello,
Thank you so much for your comment! We will definitely pass this suggestion on to the team!
Best,
Carly
How do you know which side is the wrong or right side? How do I knit waste yarn into the row. I need more help. Thanks!
Hi Sylvia,
Garter stitch is identical on both sides. To determine the right and wrong side, hold up the piece and note where the cast-on tail is located.
If the cast-on tail is at the lower right, you are looking at the right side of the knitting. “Right is right” is a handy memory tool for me.
To knit the waste yarn, you are going to knit the waste yarn, as if it is a new ball of yarn to your project
I hope this helps,
Melissa
My friend and I are knitting the garter vest. We are on Manitoulin Island,
Ontario, Canada. We love your patterns and your site…thx
Hi there! I’m looking at potentially starting out on this pattern but I am still figuring out yarn. I have (2) skeins of Anzula For Better or Worsted in my stash that I would love to use. I do not have a complimenting yarn so I was thinking of Worsted Twist for the other yarn choice. Are those two yarns a good pairing size wise? I see they have similar needle sizes but your expertise would be appreciated. Thanks!
Hi Katie,
Thanks for writing in! Worsted Twist and For Better or Worsted would work well together as they knit at the same gauge. The hand of each is a little different, the Anzula is a bit shinier and more tightly plied. But I think that in this case, that would be lovely!
Best,
Cassy
Hi!
Love your store and will be visiting again shortly to start a new project. But before that I have to finish the one I’m currently on. This is my first piece of clothing. I just finished and am left with the arm holes. I’ve looked so closely at th pictures and even scrolled through the comments and have viewed the other projects suggested with the yarn as a place holder and am still having trouble. Afraid to do it bc I don’t want to ruin the vest (so proud of how it came out!!). Any suggestions? Thanks so much!
Hi Kristin,
Thanks for reaching out! Do you have a specific question about finishing the arm holes? I am happy to try to help with any question that you might have!
Best,
Cassy
I am a beginner and would love to attempt this in one color to simplify things for me, but am having trouble understanding the directions without intarsia in mind. Could you please tell me how to adapt the directions for a single color? Thank you!!
Hello Molly,
Thank you for reaching out! The main thing to keep in mind is that you are now working with one color rather than 2, so every time the pattern says color A or color B it will all be color A. For example when casting on you will just cast on 120 stitches and move on to row 1. I hope this helps and if there is a particular part of the pattern that is tripping you up, let me know and I can try and help!
Happy knitting!
-Marilla
Thank you so much!
I love this design and can’t wait to start.
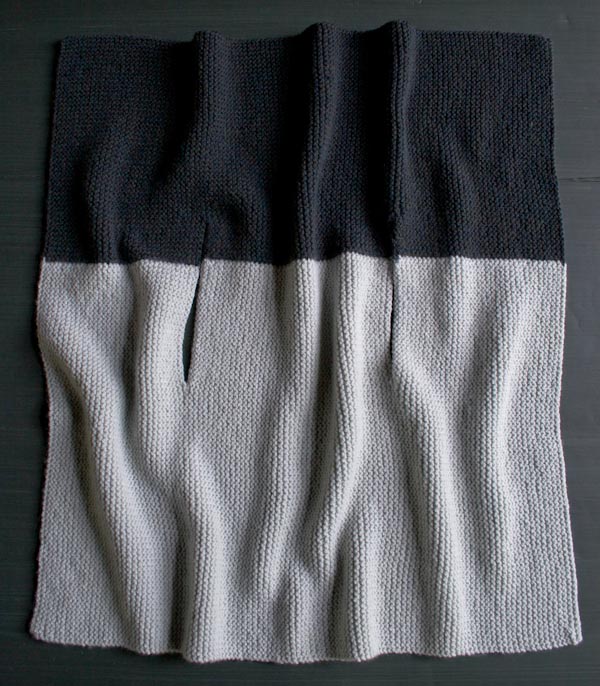
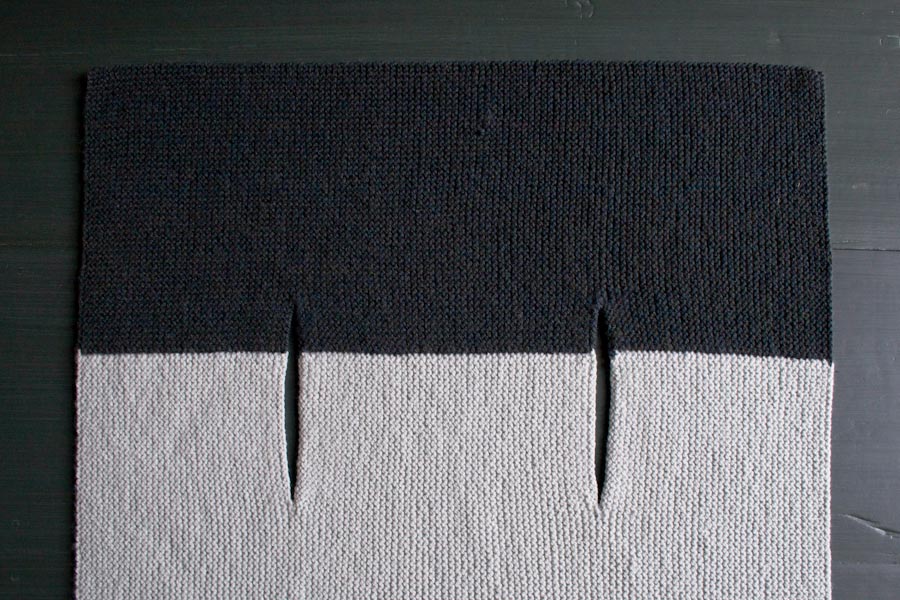
If opened out and laid flat, does it form a T shape?
It’s hard to tell from the photos.
I love it! Thanks xx
Hi Sheila,
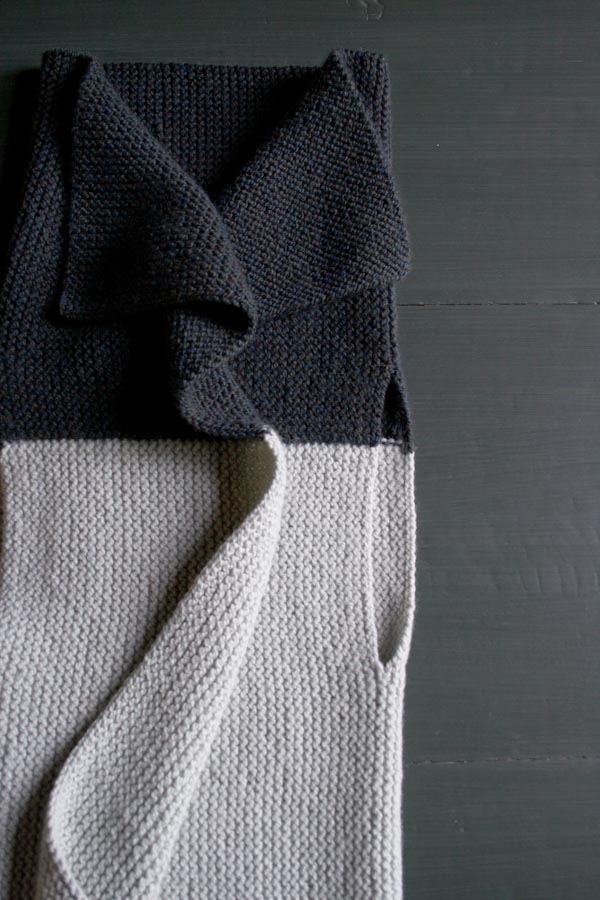
Thanks for the kind words! When laid flat, the vest is a large rectangle with two slits for the arms. We do actually have one picture of the vest laid flat, which you can find by scrolling to the bottom of the pattern. The picture comes just after the “Weave + Block” section, right above the comments.
I hope that helps, and happy knitting!
Julianna
I am making this best using different yarn. Would like to know how long are the arm slits and how many inches from the top should they be started.
Hi Elzbieta,
Thanks for writing in! If you look at the sizes available for the pattern, I believe you will find all the information you need! The arm holes are approximately eight inches long, and placed ten inches from one top or bottom edge and twelve inches from the other.
I hope that helps!
Julianna
I cannot get my head around the armholes.’
I am using one colour, so i cast on 120 sts, knit to length then the next row is it
sl1,k39, cast off 32, k48 then
sl1, k48, cast on 32, k39
Hello Caroline,
Thank you for reaching out! For the arm holes, all you are doing is knitting those 32 stitches onto scrap yarn When you have completed the body of the vest you will take the scrap yarn out create the opening for the arm hole. For example your row will look like this, sl1,k39, knit 32 using scrap yarn, k48.
I hope this helps and let me know if I can clarify any of this for you!
Happy knitting,
Marilla
I just love this vest and am dying to making it.
How can I modify the pattern by using only one color?
As well as, can it be possibly made bigger? If so, how can I do the size increase?
Thank you so much.
Concetta
Hi Concetta,
Thank you for the kind words! Knitting in one color will make this vest even easier and is a very simple modification – all you have to do is cast the total number of stitches (which is 120 for the pattern as written) with one color, and ignore all the directions in the pattern to change from Yarn A to Yarn B or vice versa! You will also not have to cut your yarn before or after starting the armholes.
Increasing the size of the vest is only a little bit trickier, but I think you will be able to do it! First you will want be sure to check your gauge, then measure from your nose to where you want the vest to end and multiply your stitches per inch by this measurement and make this number the cast on. Next, measure from the center of your chest to where you want the first armhole to sit, and knit the Left Front to this length before beginning the Left Armhole. You may have to make the armhole bigger – if so, you will need to knit a few more stitches with scrap yarn when marking the armhole placement.
Next, you will measure across your back from shoulder tip to shoulder tip and knit the Back Vest portion to one or two inches less than this due to the stretchy nature of Garter Stitch. Finally, match the Right Armhole size and placement to the left one, work the Right Front to the same length as the Left Front, and you are done!
Best of luck and let us know how it goes!
Julianna
I’m so confused as to how to make the armholes.
I’m a new knitter and this seems like an easy enough project to do but english isn’t my first language and the instructions for the armholes makes my head hurt. Is there any other way to make arm holes or at least a video that would guide me through it?
Thank you
Hi Luna,
Thanks for writing in! I think this is an excellent beginner project! Although we do not have a video on how to create the arm holes and the instructions may seem confusing when reading through them, I assure you that actually working them is not as difficult as it seems! If you wanted to try it before committing to the whole vest, you could always try the armhole step on a small practice swatch first. I would cast on 20 stitches, knit 10 rows, then on the next row, knit 5 stitches in your practice yarn and cut it, knit 10 stitches with a contrast color waste yarn, rejoin your main yarn and knit the last 5 stitches. Knit 10 more rows and cast off, and then you can follow the armhole instructions to practice picking up your stitches and removing the waste yarn!
I hope that helps! If you run into any problems while working the armhole we are always here to answer questions!
Best,
Julianna
I would like to know the length of the finished back ( of this vest) ,with the collar folded down.
As I like a vest that comes to mid thigh, knowing this would be very helpful!
Thanks!
Hi Carole,
Thanks for reaching out! It is hard to say how long the back will be precisely, since the shoulder and collar are unstructured so it depends how much you fold the collar over. You will get a better idea of the length of the vest by considering the side length from the underarm to hem, which is either 10″ or 12″ depending which side of the vest you wear on top. Either way, for a thigh length vest, I do think you will have to add some length, depending on your height!
I hope that helps!
Julianna
After reading the comments regarding closure difficulty, I’m wondering if I shouldn’t knit this a little larger to have greater overlap and I’m Full on the top (which is why i don’t usually wear vests of any sort, but i love this and want to give it a try)
. any thoughts?
Hi Susan,
Thanks for reaching out! If you want to wear the vest overlapped, you could certainly size up or add a few extra rows to the two fronts to make this less of a stretch. To do so, simply knit as many extra rows as you would like before the first armhole, and knit the same number of rows after the second armhole to make sure the two fronts match.
Happy knitting!
Julianna
Hello!
I am about to start this project. It is a elegant and simple. Beautiful!
My question is: which method you used to cast on the stitches? And to bind off?
Thank you!
Hello Gabriela,
Thank you for reaching out! For this project we used a long tail cast on and a basic bind off.
Happy knitting!
-Marilla
Hi, love this as do my little ones who are demanding their own. I was wondering the best formula to shrink this for kids sizes? And also the best way to raise the arm holes to get a smaller collar? Thank you.
Hello Chelsea,
Thank you for reaching out! This vest should be pretty easy to adjust. I would reccomend drawing a picture with your dimensions to help yourself visualize. You can place your armholes anywhere you want. To do this you will just need to adjust the amount of stitches you knit before you begin the armhole so in the pattern you “Slip one knitwise; with Yarn B, knit 39 stitches, cut Yarn B; with scrap yarn, k32, cut scrap yarn; join Yarn A and knit to end of row.” if you wanted to raise your armhole, say 2 inches, if you have a gauge of 4 stitches per inch you would knit “Slip one knitwise; with Yarn B, knit 38 stitches, cut Yarn B; with scrap yarn, k32, cut scrap yarn; join Yarn A and knit to end of row.”
I hope this makes sense and let us know if you have any further questions!
Happy knitting,
Marilla
Can this be knit is one color? I love the dual colors, however, I have enough yarn for to make it a solid vest.
Any thoughts?
Thanks,
Mary
Hello Mary,
Thank you for reaching out! Yes, you can certainly knit this up with one color. You will just not switch colors!
I hope this helps and happy knitting!
-Marilla
Hi,
I like the look of this Sideways Garter Vest but just wondered if it is possible to knit it on straight needles instead of a circular needle? I much prefer using straight. Would this cause problems?
Many Thanks.
Carol
Hi Carol,
Thank you for reaching out! If you have straight needles that are long enough to hold all of the stitches you can absolutely use straight needles.
I hope this helps and happy knitting!
-Marilla
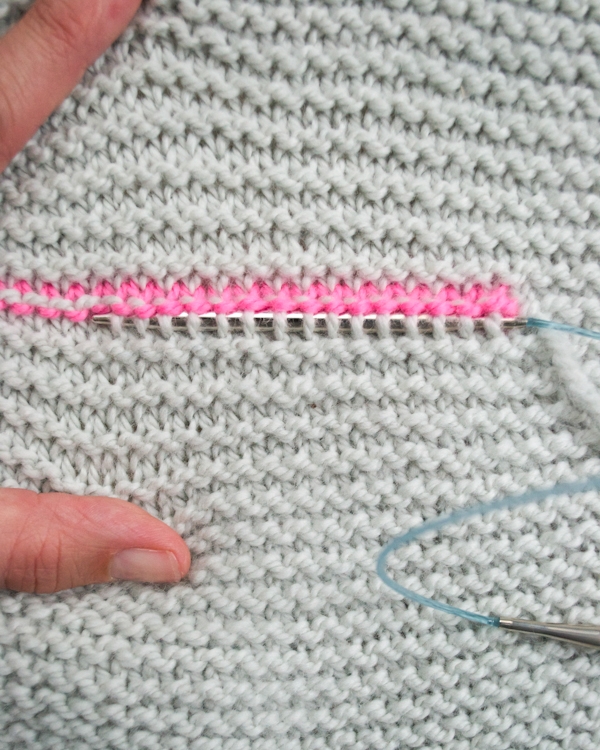
Hi. I’m about to pick up and bind off the armholes, and am not seeing exactly where to pick up the stitches. I know it’s above the purl bump, but that’s all I know. Thanks!
Hi Stephanie,
Thanks for reaching out! For this step, it’s very helpful to spread or pull the fabric apart so you can see in between the garter ridges, as we show in the first picture of the Pick Up + Bind Off section of the pattern. Between the purl ridges, immediately below and above the scrap yarn, you should see a row of stockinette stitches that look like V’s. You will be picking up one leg of each V.
I hope that clears things up!
Julianna
Could you add a photo of this step, please?
Hi Amy,
Thanks for reaching out! Unfortunately we don’t currently have the resources to photograph specific steps for this pattern but thank you for expressing your interest and I will be sure to pass this along to the rest of the team!
All the best,
Gianna
I am really wanting to make this cute vest! Can you suggest some alternate colorways as the one pictured is no longer in stock? Thanks
Hi Sheila,
Thanks for reaching out! We do still carry Stillwater Blue, so I would recommend pairing it with Reed Gray for a neutral look similar to our original vest. If you prefer something with just a bit more color, Reed Gray would also look just lovely with Gray Fig!
I hope that helps, and happy knitting!
Julianna
Hi
I’d like to buy yarn from you site for this project(new knitter!). In the beginning of the pattern where it indicates how much yarn to buy, it says for yarn A, the number of skeins, followed by (4,4) and for yarn B, (3,3). What does that mean?
Thanks,
Dina
Hi Dina,
Thanks for being in touch with this question! The numbers in the parenthesis refer to the number of skeins required for the three garment sizes available. For a 14-15 inch shoulder, you’ll need 3 skeins of Yarn A and 2 of Yarn B. For both the 16-16½ inch and 17-17½ inch shoulder sizes, you’ll want 4 skeins of Yarn A and 3 of Yarn B.
I hope that this helps!
Gaby
I had someone assist me with placing the first armhole. As I was ready to put the second armhole in I noticed a mistake. The first armhole doesn’t cross both colors of yarn. It was done completely in yarn A. I fear I need to rip everything out and do the first armhole correctly because it probably won’t look right. What is your opinion?
Hi Ginnie,
Thanks for reaching out! It’s hard to say without seeing your vest, but you might be alright! The armhole is not placed exactly in the center of the rectangle, but is 39 stitches away from one edge and 49 stitches away from the other. It’s possible that, if you started the armhole placement row on a right side row instead of a wrong side row, the armhole would end up entirely in Yarn A, but the fit of the vest wouldn’t be affected. If that’s the case, just make sure you start your next armhole placement row on the right side also so the two armholes end up closer to the same edge of the vest!
I hope that helps!
Julianna
I’ve been eyeing this pattern for myself for a while, but it also seems like a great gift for my sister for christmas. I have a few questions in thinking about it for her:
1. She would love the wide collar, so I don’t want to lose any of that for the sake of the length, but she wears a lot of leggings, so a longer torso would be good for her. How would I add length overall without sacrificing the generous collar?
2. When I measured my own shoulder width for comparison, I’m at the high end of your suggested range. She is bustier than I am, so should I scale up even larger? And if so, how?
3. Do you have any suggestions for how to estimate yarn yardage needed for these changes?
Many thanks!
Hi Caite,
Thanks for writing in! I am happy to help you figure this one out! 1, Since the vest is knit vertically you can easily cast on more stitches to the Yarn B section to add length and it wont’t disrupt the collar at all! 2, You may be alright with the largest size, and since the the vest doesn’t close all the way besides just at the top of the bust, the fit is a little more customizable! If you want to add a bit of size to be safe you can work a few extra rows to increase how many inches measure from the cast on edge on both front pieces and the back piece! 3, depending on how many inches you plan on adding to the bottom and to the width of the vest I would recommend an extra skein of each color to be safe!
I hope this helps and please feel free to reach out with any more questions you may have going forward!
Happy knitting!
Gianna
Please help with pick up and bind off. I cannot see in your pictures what consists of “the stitches just above the scrap yarn”. I’m afraid to pull out the wrong bits and ruin all this hard work!
Hi Amy,
Thanks for reaching out! You should be picking up the stitches that are directly knit onto to the scrap yarn and then removing the scrap yarn so that once that is taken out you will have all the stitches picked up on your needles! You can see exactly how we did this in the photos under the PICK UP + BIND OFF section!
I hope this clarifies thins, happy knitting!
Gianna
I’m knitting this for my little sister in black and gold. Thanks so much!
Hi Sole,
Thanks for reaching out! What a lovely gift, I bet your sister will absolutely love this vest!
Please let us know how it turns out!
Warmly,
Gianna
Beginner knitter here… I’m a little confused with this:
“ Row 2: Slip one knitwise; with Yarn B, knit 47 stitches…
Row 3: Slip one knitwise; with Yarn A, knit 71 stitches…
Repeat Rows 2 and 3 until…”
Does this mean that for each subsequent row, I need to still slip one knitwise? Or knit 47/71 stitches? I’m understanding that if I continue to slip stitches at the beginning of each row, that number will go down to 46/70. 45/69, 44/68, etc. If I stick with 47/71 stitches, I can’t be slipping a stitch. Am I missing something? Please help!
Thank you.
Hi Erin,
Thanks for reaching out! Slipping the first stitch does not change the amount of stitches you are working, and it also doesn’t cause the number to go down at all. So yes, you will be slipping the first stitch of each row! So for row 2 you will slip the first stitch, then knit 47 stitches, then for row 3 you will slip the first stitch and then knit 71 stitches! You will then repeat Rows 2 and 3 (slipping the first stitch knitwise of ever row) until the piece measures 9 (10 ½, 11 ¼) inches from cast on edge.
I hope this clarifies things!
Warmly,
Gianna
Thank you so much for your response!
P.S. She chose it and the colors. I’m knitting it in thin yarn, so it’ll probably take until February! LOL
Hi! I’m am having real trouble with picking up my armhole stitches despite the fabulous pictures you provided. Is there a video for this vest or maybe some tips? I hate to knit the whole thing and ruin it now. Thanks. 😬
Hi Nicki,
Thanks for reaching out! We don’t have a tutorial for this pattern besides the photos available in the post, but what part of the instructions seems to be the issue, I am happy to help explain in more detail!
Warmly,
Gianna
Hi,
I’m so looking forward to working on this project! 🙂 I’m a beginner.
The gauge should be measured using the garter stitch right since that’s the pattern we are using?
Should I be checking the gauge in both colors used for the project?
Hi Mamta,
Thanks for writing in! We’re so excited for you to cast-on this project! Yes, the gauge should be measured in garter stitch and you can just do that for one of the colors. I hope this helps! Let us know if you have any other questions!
All the best,
Cat