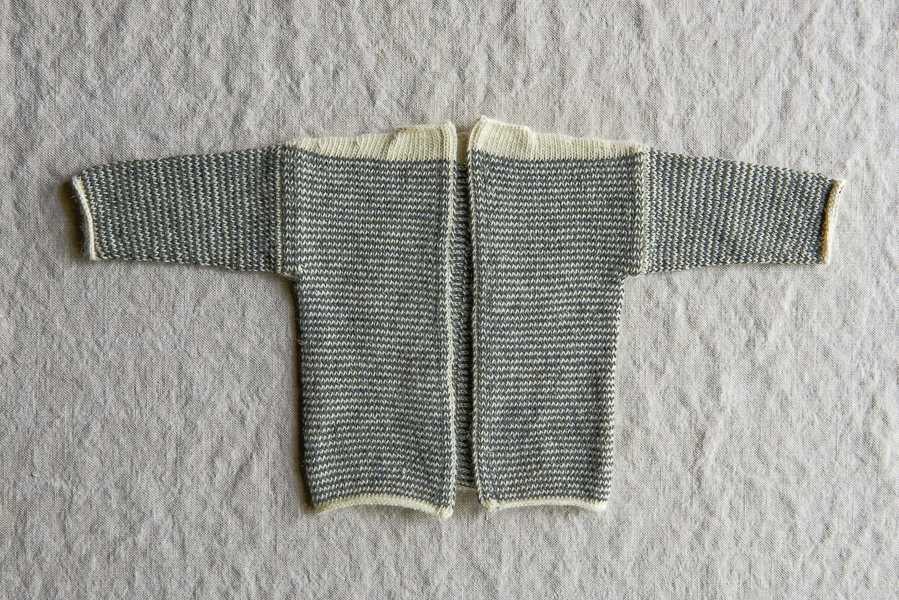

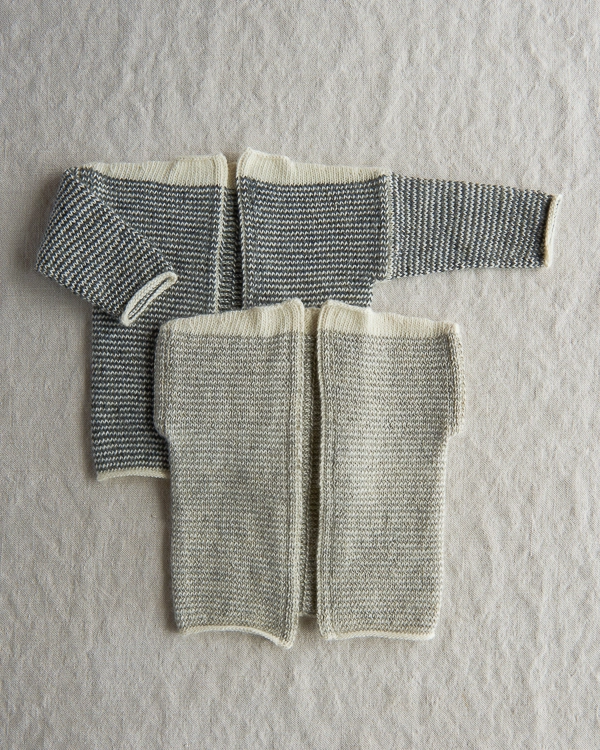
Tiny Stripes Cardigan + Vest
I’ve been a bit steek-crazed this season, first with our Learn-to-Love-Steeks Blanket and now with this Tiny Stripes Cardigan + Vest. Steeks may get the adrenaline pumping, but they’re not actually as hard or scary as you may think! One motto that has served me well in my knitting endeavors and that applies here: Test small.
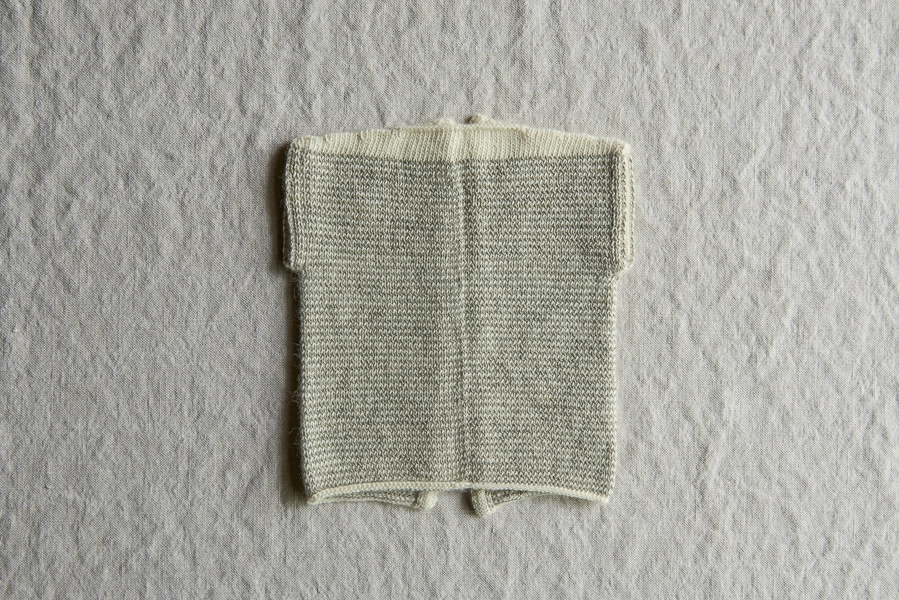
This way of knit life has landed me with a swatch-bin full of baby hats and sweaters. Most have been developed into larger scales, but this simple boxy construction and delicate striping beg for a tiny wearer.
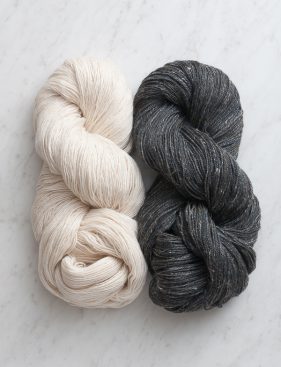
All four sizes of our Tiny Stripes Cardigan + Vest require just two skeins of yarn: one skein of our Line Weight merino and one skein of our Linen Quill, a merino-alpaca-linen blend. We’ve put together a few of our favorite combinations in our materials list below, but with 21 colors of Line Weight and 14 colors of Linen Quill, feel free to make your own color story. And one last motto to get on the right path: Measure twice, cut once! -Laura
P.S. In love with the stripes, but not up for steeks? Check out our Tiny Stripes Hat, available in all sizes and no cutting required!
Designed by Purl Soho designer, Laura Ferguson.
Share your progress and connect with the community by tagging your pics with #PurlSoho, #PurlSohoBusyHands, #PurlSohoTinyStripesCardiganAndVest, #PurlSohoLineWeight, and #PurlSohoLinenQuill. We can’t wait to see what you make!
Materials

- To knit your own Tiny Stripes Cardigan + Vest, you will need…
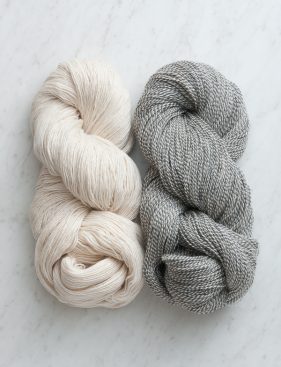
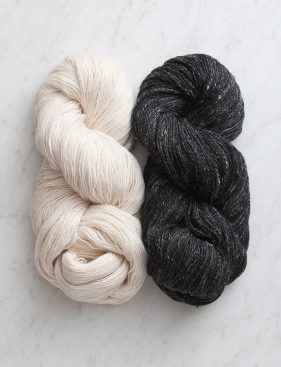
- Yarn A: 1 skein of Purl Soho’s Line Weight, 100% merino wool. Each skein is 494 yards/ 100 grams; approximately210 (240, 270, 295) yards required. We used the color Heirloom White.
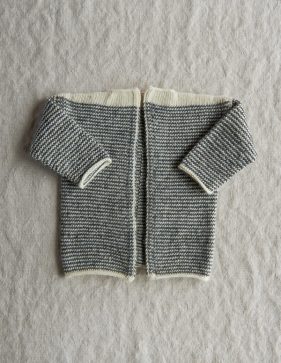
- Yarn B: 1 skein of Purl Soho’s Linen Quill, 50% fine highland wool, 35% alpaca, and 15% linen. Each skein is 439 yards/ 100 grams; approximately 165 (195, 220, 245) yards required. We used Stillwater Blue for the Long-Sleeve version and Stonewall Gray for the Vest version, both pictured above. Below are additional color options!
- US 3 (3.25mm), 16-inch circular needles
- Two US 1 (2.5mm), 16-inch circular needles
- A set of US 3 double pointed needles
- A set of US 1 double pointed needles
- 4 stitch markers, one unique
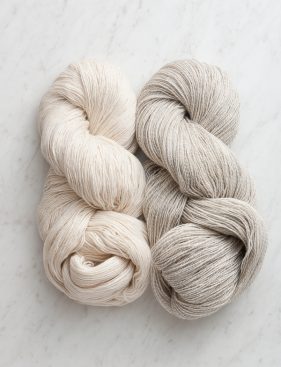
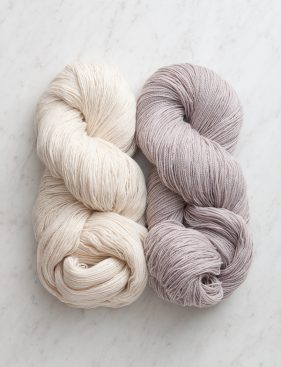
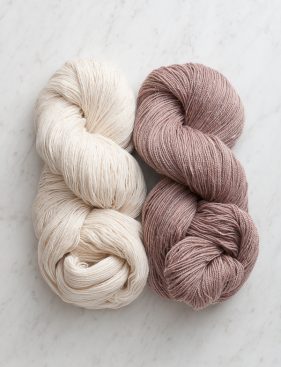
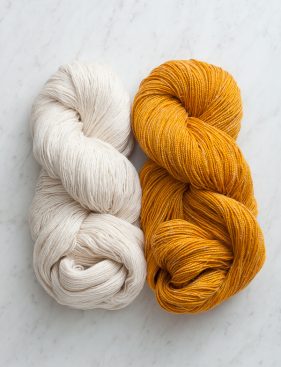
Top Row: Oatmeal Gray, Lavender Opal, Rose Granite
Bottom Row: Turmeric Yellow, Salt + Pepper, Kettle Black
Gauge
28 stitches and 40 rounds = 4 inches in stockinette stripe pattern on larger needles
NOTE: Take special care to also get the correct round gauge (40 rounds = 4 inches) so that your sweater will end up well proportioned!
Sizes
3-6 (9-12, 12-18, 18-24) months
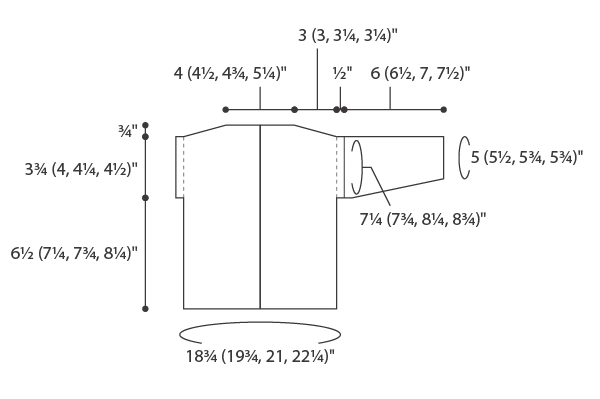
- Finished chest circumference: 18 ¾ (19 ¾, 21, 22 ¼) inches
- Finished length from shoulder to bottom edge: 10 ¾ (11 ¾, 12 ½, 13 ¼) inches
- Finished length of armhole: approximately 3 ½ (3 ¾, 4, 4 ¼) inches
- Finished length from cuff to underarm (Long-Sleeve version): 6 (6 ½, 7, 7 ½) inches
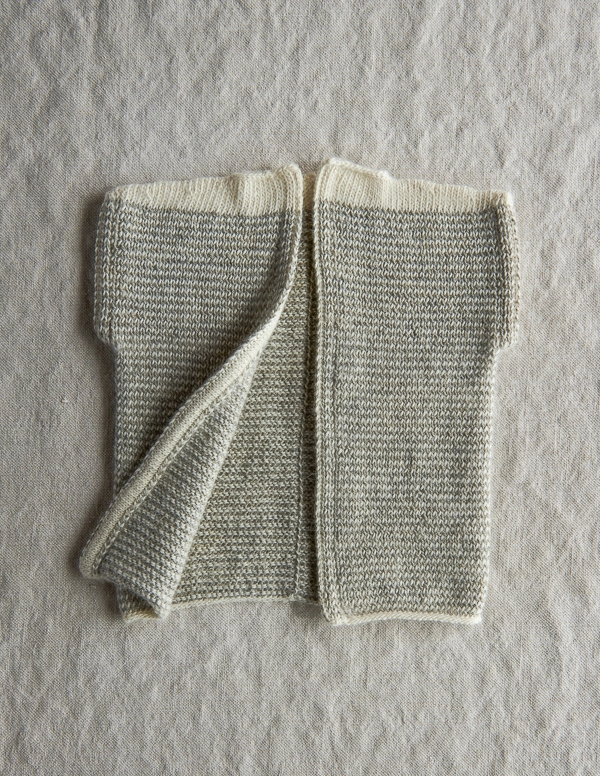
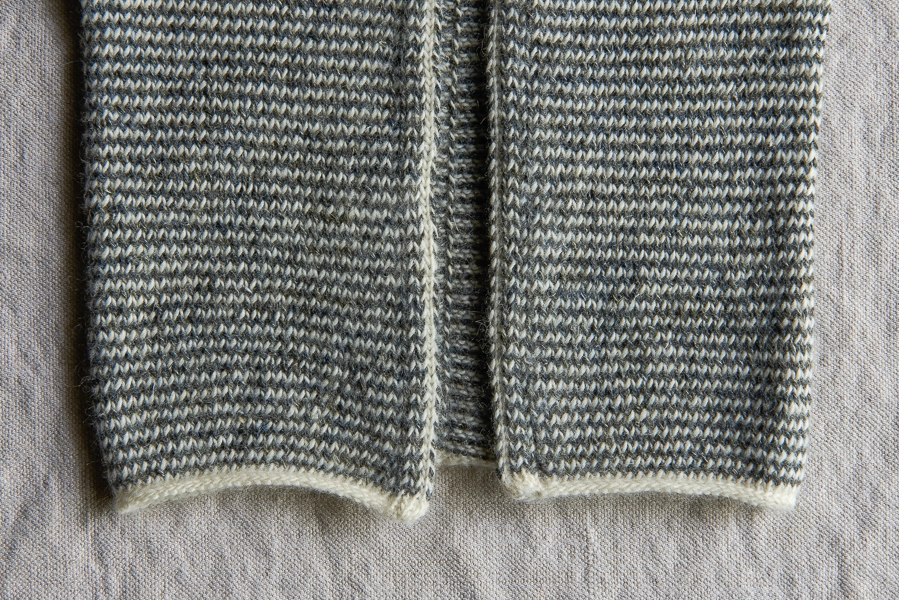
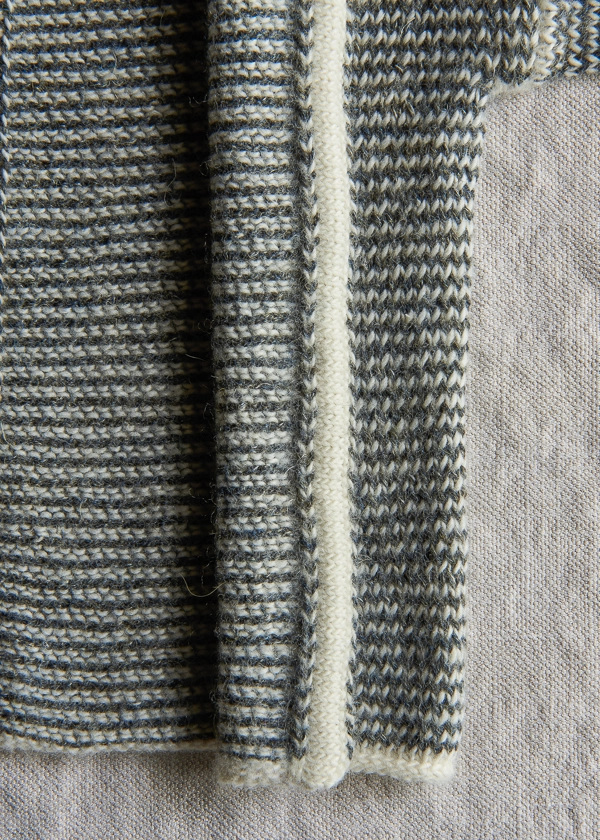
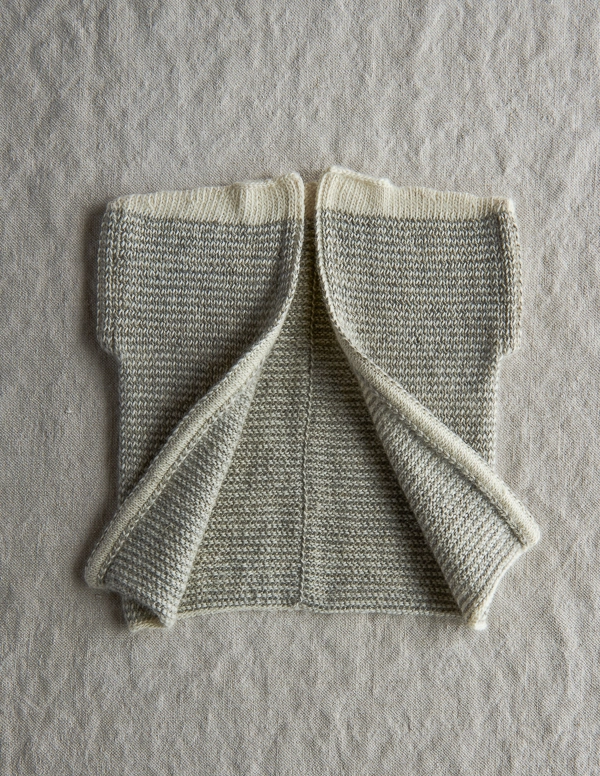
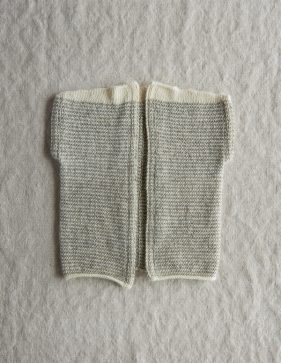
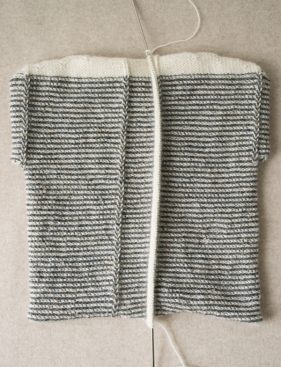
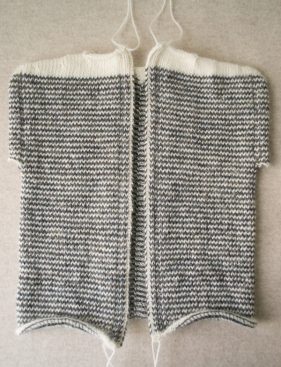
SAMPLES: Both the Long-Sleeve and Vest versions pictured here are size 3-6 months.
Notes
CONSTRUCTION: You knit this in the round, then cut up the front to create a cardigan.
VIDEO TUTORIAL: For a video tutorial on the entire steeking process, please visit our Steek with Knit Facing Tutorial.
STRIPES: For tips on carrying the yarn when working stripes in the round, check out our Stripes in the Round Tutorial.
Wrp-t (wrap and turn)
- On the right side: Keeping the yarn in back, slip the next stitch purlwise from the left needle to the right needle. Bring the yarn to the front. Return the slipped stitch to the left needle. Bring the yarn to the back. Turn the work so the wrong side is facing you.
- On the wrong side: Keeping the yarn in front, slip the next stitch purlwise from the left needle to the right needle. Bring the yarn to the back. Return the slipped stitch to the left needle. Bring the yarn to the front. Turn the work so the right side is facing you.
Pattern
Body
Begin at Bottom Edge
With Yarn A, cast 136 (144, 152, 160) stitches onto the larger circular needles. We used a basic Long Tail Cast On.
Place unique marker for end of round and join for working in the round, being careful to not twist the stitches.
Set-up Round: With Yarn A, k62 (66, 70, 74), place marker (pm), [p1, k10, p1] for front steek, knit to end of round.
Round 1: With Yarn A, knit to marker, slip marker (sm), p1, k10, p1, knit to end of round.
Round 2: With Yarn B, knit to marker, sm, p1, k10, p1, knit to end of round.
Repeat Rounds 1 and 2 until piece measures 6 ½ (7 ¼, 7 ¾, 8 ¼) inches from cast-on edge, ending with Round 2.
Shape for Armhole Steeks + Continue
Round 1: With Yarn A, k32 (34, 36, 38), pm, [p1, cast on 10 stitches using the backward loop method, p1] for left armhole steek, knit to next marker, sm, p1, k10, p1, k28 (30, 32, 34), pm, [p1, cast on 10 stitches, p1] for right armhole steek, knit to end of round. [156 (164, 172, 180) stitches]
Round 2: With Yarn B, [knit to next marker, sm, p1, k10, p1] 3 times, knit to end of round.
Round 3: With Yarn A, [knit to next marker, sm, p1, k10, p1] 3 times, knit to end of round.
Repeat Rounds 2 and 3 seventeen (18, 19, 20) times, then repeat Round 2 once more.
Cut Yarn B.
Next Round: With Yarn A, knit to next marker, sm, p1, bind off the next 10 stitches in pattern, knit to next marker, sm, p1, k10, p1, knit to next marker, sm, p1, bind off the next 10 stitches in pattern, knit to end of round. [136 (144, 152, 160) stitches]
Shoulders
Prepare to Shape Shoulders
Continuing in Yarn A only…
Round 1: Knit to next marker, sm, p1, pick up 3 stitches (one stitch in each of the first 3 bound-off stitches), skip next 4 bound-off stitches, pick up 3 stitches (one stitch in each of the last 3 bound-off stitches), p1, knit to next marker, sm, p1, k10, p1, knit to next marker, sm, p1, pick up 3 stitches (one stitch in each of the first 3 bound-off stitches), skip next 4 bound-off stitches, pick up 3 stitches (one stitch in each of the last 3 bound-off stitches), p1, knit to end of round. [148 (156, 164, 172) stitches]
Round 2: Knit to next marker, remove marker, p1, k1, k2tog, replace marker, ssk, k1, p1, knit to next marker, sm, p1, k10, p1, knit to next marker, remove marker, p1, k1, k2tog, replace marker, ssk, k1, p1, knit to end of round. [144 (152, 160, 168) stitches remain]
Shape Front Shouldes
NOTE: For this portion of the pattern, you will be working back and forth in short rows, turning the work partway through each row rather than continuing to the end of the row. For extra help, see both the Notes section and our Short Rows Tutorial.
Short Row 1 (right side): Knit to 3 stitches before next marker, p1, k2, sm, k2, p1, knit to next marker, sm, p1, k10, p1, knit to 7 stitches before next marker, wrp-t.
Short Row 2 (wrong side): Purl to 12 stitches before next marker, k1, p10, k1, sm, purl to 7 stitches before next marker, wrp-t.
Short Row 3: Knit to next marker, sm, p1, k10, p1, knit to 14 stitches before next marker, wrp-t.
Short Row 4: Purl to 12 stitches before next marker, k1, p10, k1, sm, purl to 14 stitches before next marker, wrp-t.
Short Row 5: Knit to next marker, sm, p1, k10, p1, knit to 21 stitches before next marker, wrp-t.
Short Row 6: Purl to 12 stitches before next marker, k1, p10, k1, sm, purl to 21 stitches before next marker, wrp-t.
Short Row 7: Knit to next marker, sm, p1, k10, p1, knit to 3 stitches before next marker working wrapped stitches with their wraps as you come to them, p1, k2, sm, k2, p1, knit to end of round.
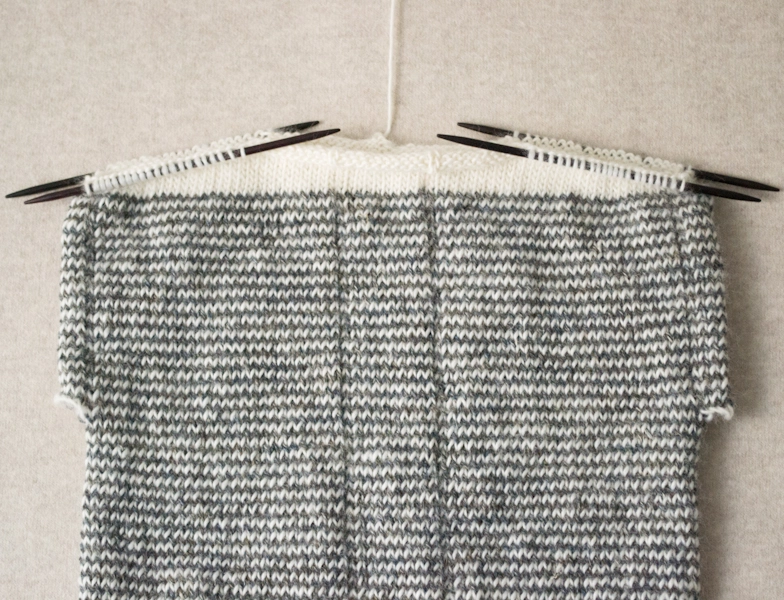
Shape Back Shoulders
NOTE: You will continue working in Short Rows for this portion of the pattern. While shaping the Back Shoulders, you will be working between the Left Shoulder marker and Right Shoulder marker, slipping the end-of-round marker at center back as you come to it.
Short Row 1 (right side): Knit to 7 stitches before next marker, wrp-t.
Short Row 2 (wrong side): Purl to end-of-round marker, sm, purl to 7 stitches before next marker, wrp-t.
Short Row 3: Knit to end-of-round marker, sm, knit to 14 stitches before next marker, wrp-t.
Short Row 4: Purl to end-of-round marker, sm, purl to 14 stitches before next marker, wrp-t.
Short Row 5: Knit to end-of-round marker, sm, knit to 21 stitches before next marker, wrp-t.
Short Row 6: Purl to end-of-round marker, sm, purl to 21 stitches before next marker, wrp-t.
Short Row 7: Knit to end of round.
Finish Shoulders
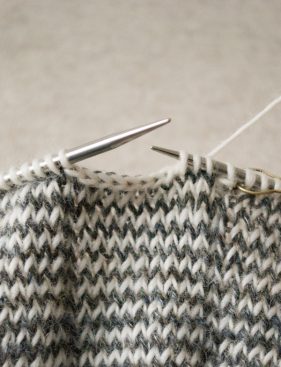
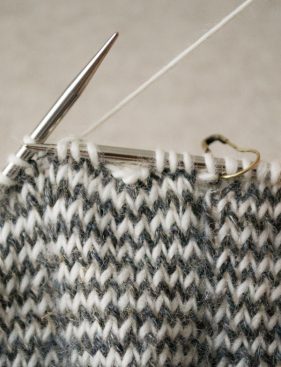
Round 1: Working the wrapped stitches with their wraps as you come to them, bind off 14 (16, 17, 18) stitches for left side of Back Neckline; knit to 1 stitch before next marker, slip 1 purlwise, place previous 21 (21, 22, 23) Back Left Shoulder stitches onto one of the larger double pointed needles; remove marker, slip 1 purlwise, k20 (20, 21, 22), place previous 21 (21, 22, 23) Front Left Shoulder stitches onto a second double pointed needle; bind off 32 (36, 38, 40) stitches for Front Neckline, removing marker as you come to it; knit to 1 stitch before next marker, slip 1 purlwise, place previous 21 (21, 22, 23) Front Right Shoulder stitches onto a third double pointed needle; slip 1 purlwise, k20 (20, 21, 22), slip previous 21 (21, 22, 23) Back Right Shoulder stitches onto a fourth double pointed needle; bind off remaining 14 (16, 17, 18) stitches for right side of Back Neckline. [84 (84, 88, 92) stitches: 21 (21, 22, 23) stitches for each of Back Left, Front Left, Front Right, and Back Right Shoulders]
You are now prepared to bind off or graft the Front and Back Shoulder stitches to one another. Turn your work inside out and use a 3-Needle Bind Off to bind the shoulders together, or leave your work right-side-out and use the Kitchener Stitch to graft the shoulders together.
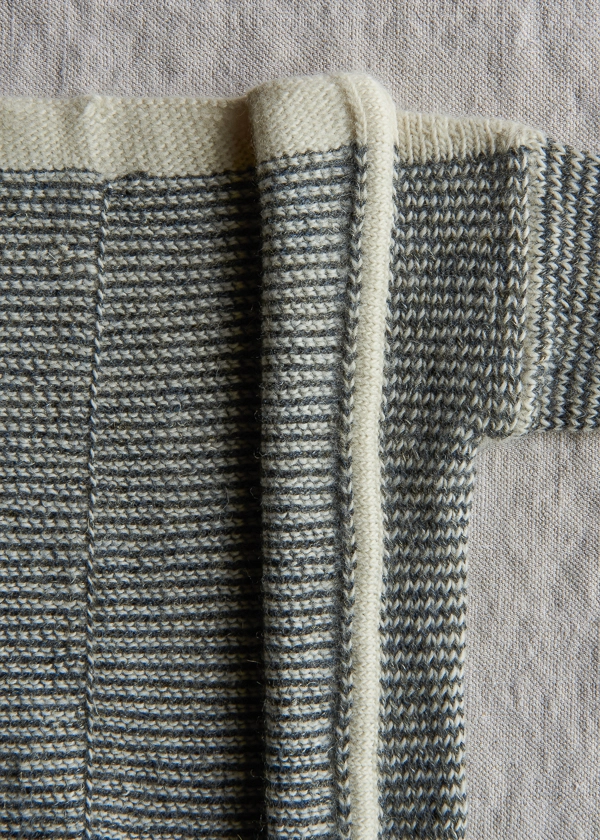
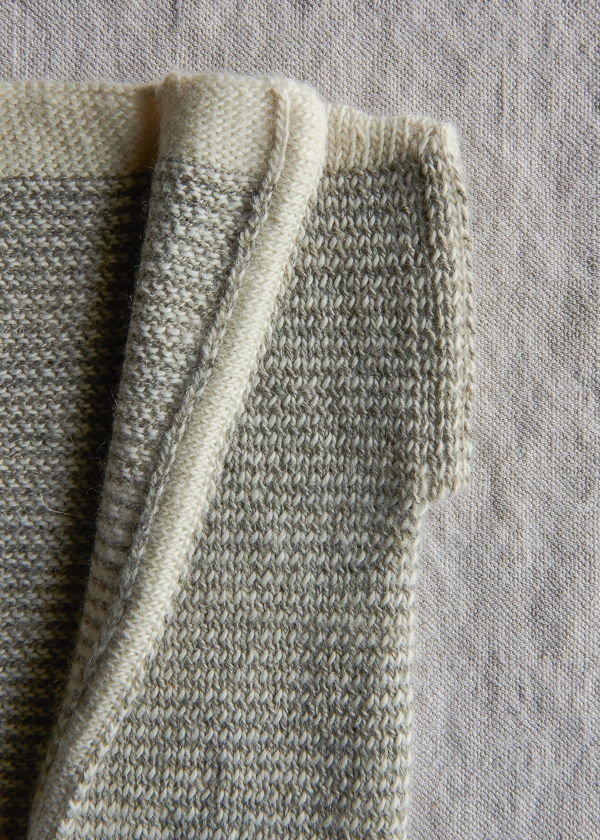
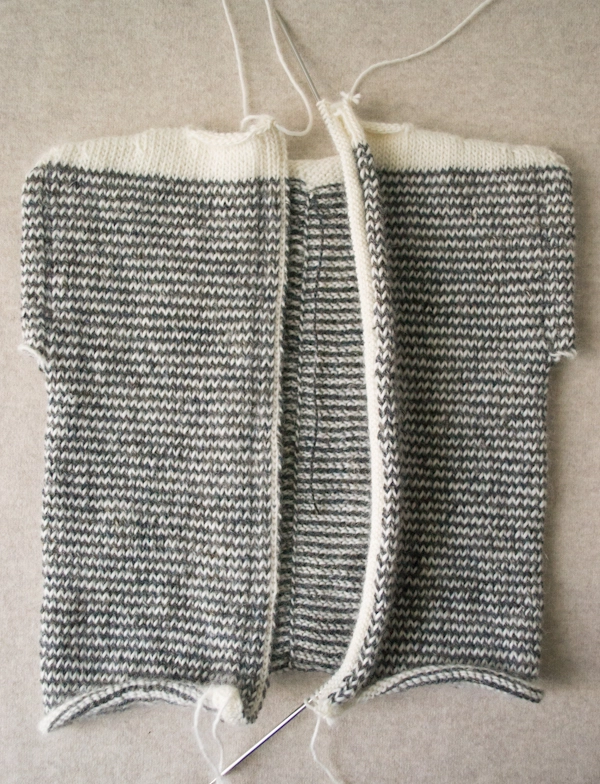
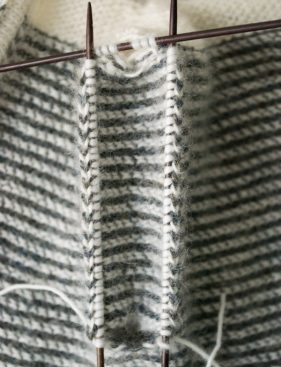
Front Steek
Turn the piece inside out. You will see two pronounced columns of knit stitches at the center Front.
Prepare First Facing
With one of the smaller circular needles and Yarn A, start at the bottom edge and work towards the Neckline, picking up under both legs of each stitch of the knit-stitch column on the right.
Working these picked up stitches…
Row 1: Knit.
Row 2: Purl.
Repeat Rows 1 and 2 one more time.
Cut yarn and leave the stitches on the needles.
Prepare Second Facing
With the second smaller circular needles and Yarn A, start at the neckline and work towards the bottom edge, picking up under both legs of each stitch of the knit-stitch column now on the right.
Working these picked up stitches…
Row 1: Knit.
Row 2: Purl.
Repeat Rows 1 and 2 one more time.
Cut yarn and leave the stitches on the needles.
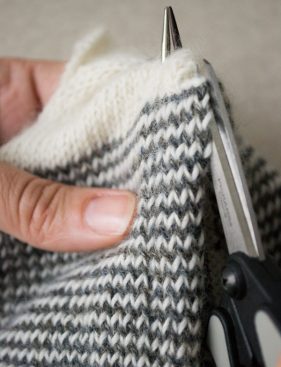
Cut Front
Turn the piece right side out.
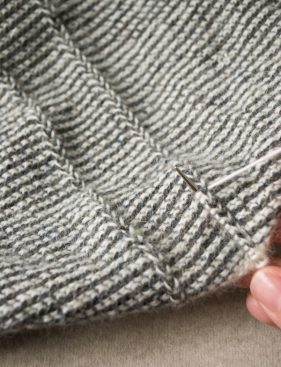
Note: If the yarn you used is very slippery, or if you are worried that the stitches will unravel after you cut them, secure each side of the steek with thread before cutting. Sew one or two lines of stitches down each side of the center of the steek (on stitches 5 and 6 of 10), either by hand with a needle and thread or with a sewing machine. This step was not necessary for the sample because the yarn is sticky enough that it would not unravel easily in the time it takes to secure the facings.
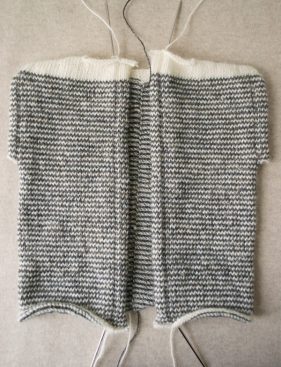
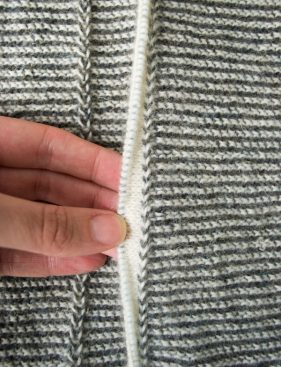
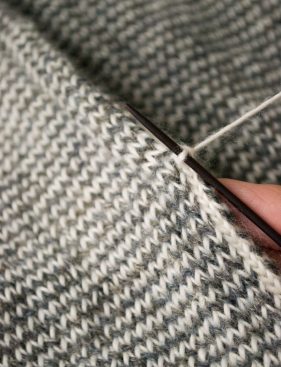
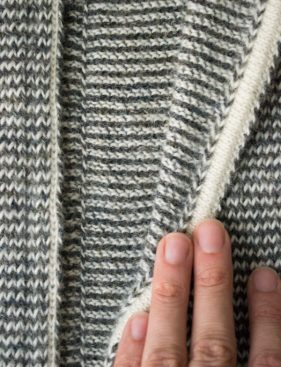
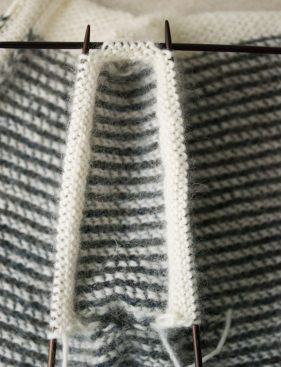
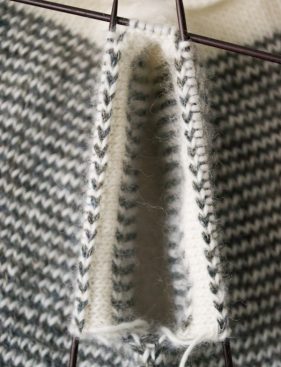
Between the two purl columns there is a column of 10 knit stitches. Beginning at the bottom edge and working towards the neckline, carefully cut up the exact middle of these 10 knit stitches for the entire length of the Front. As you cut the fabric, the two new edges are going to curl under. That’s okay, let them.
There are now 5 knit stitches at each newly-cut front edge.
Fold + Secure First Front Edge
Orient the piece so the bottom edge is closer to you.
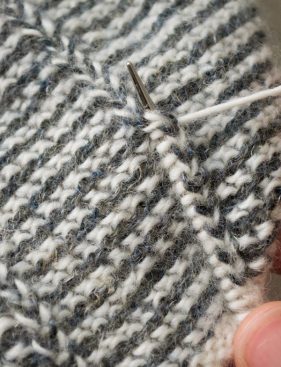
Identify the column of stitches in the middle of the left front edge, the third stitch of the five. In the following section you will work along this center column, picking up into each row and knitting the picked-up stitch together with a stitch from the corresponding Facing, working from the bottom edge towards the neckline and binding off as you go. Here’s how…
Beginning at the bottom edge, insert one of the smaller double pointed needles under both legs of the first stitch in the center column, then insert the double pointed needle into the first stitch on the circular needles, join Yarn A and knit these two together…
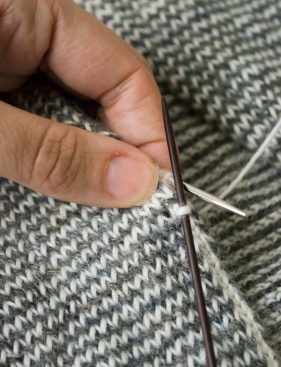
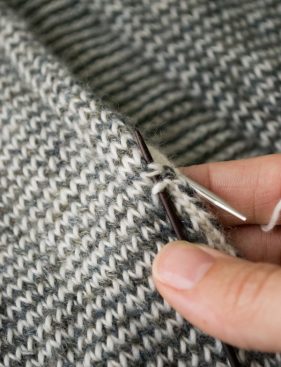

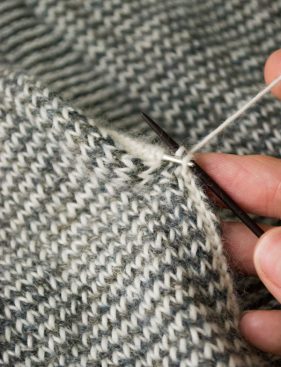
…*insert the double pointed needle under both legs of the next stitch in the center column and the next stitch on the circular needles, k2tog, pass second stitch on double pointed needle over stitch just worked to bind off 1 stitch, repeat from * to end of column/last stitch on circular needles.
You now have a precise fold with the raw edge sandwiched and secured between the facing and the striped fabric.
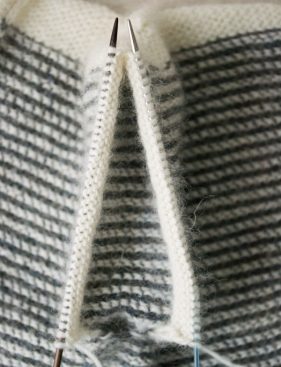
Fold + Secure Second Front Edge
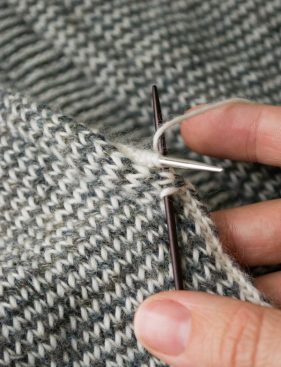
Orient the piece so the neckline is closer to you.
Once again, identify the center (third) column of stitches between the purl column and now-left-hand edge. You will work along this center column similarly to how you did in the previous section, but remember, you’re now looking at the fabric upside down, so you’ll insert the spare needle under both legs of an upside-down V rather than a right-side-up V.
Beginning at the neck edge, insert one of the smaller double pointed needles under both legs of the first stitch in the center column, then insert the double pointed needle into the first stitch on the circular needles, join Yarn A and knit these two together, *insert the double pointed needle under both legs of the next stitch in the center column and the next stitch on the circular needles, k2tog, pass second stitch on double pointed needle over stitch just worked to bind off 1 stitch, repeat from * to end of column/last stitch on circular needles.
Sleeves
NOTE: Work the following for each Armhole.
Prepare Armhole Facing
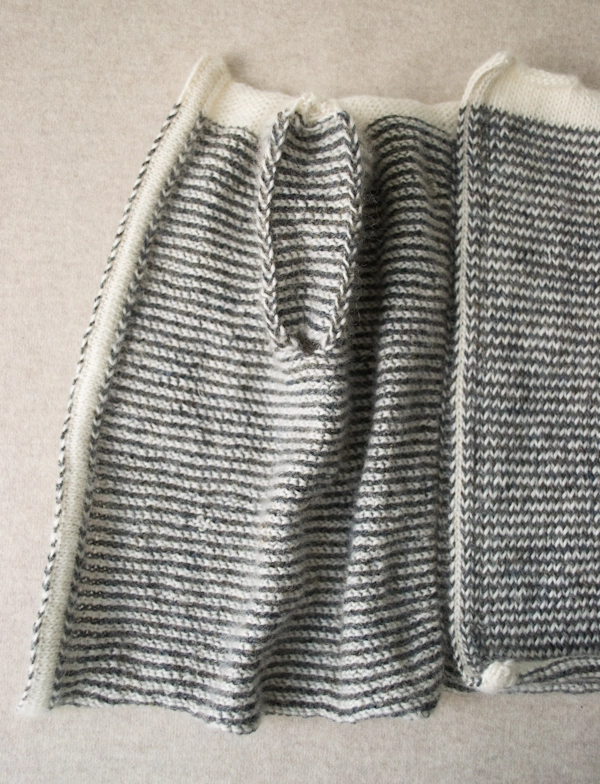
Open the cardigan, revealing the inside of one of the armholes. You will see two pronounced columns of knit stitches.

With one of the smaller double pointed needles and Yarn A, starting at the bottom of the right-hand column and working towards the shoulder, pick up through both legs of each knit stitch in the knit-stitch column, ending with the last Yarn B stitch. [36 (38, 40, 42) stitches on this needle]
With a second smaller double pointed needle, pick up a stitch into each of the 3 remaining Yarn A knit stitches in the right-hand column. Rotate the piece and working down the left-hand column, pick up a stitch into each of the first 3 Yarn A knit stitches. [6 stitches on this needle]
With a third smaller double pointed needle, pick up through both legs of each knit stitch in the remaining knit-stitch column. [78 (82, 86, 90) stitches total: 36 (38, 40, 42) stitches on first needle, 6 (6, 6, 6) stitches on second needle, 36 (38, 40, 42) stitches on third needle]
Do not join. Work 4 rows in stockinette stitch as follows:
Row 1: Knit.
Row 2: Purl.
Repeat Rows 1 and 2 one more time.
Cut yarn.
From the 6 stitches on the second double pointed needle, transfer the 3 stitches that are adjacent to the right needle onto the right needle and the 3 stitches that are adjacent to the left needle onto the left needle. [39 (41, 43, 45) stitches on each needle]
Transfer the stitches from one of the double pointed needles to one of the smaller 16-inch circular needles. This frees up a double pointed needle and makes it easier to turn the piece right side out.
Turn the piece right side out. (You may see the tips of the two needles peeking through the shoulder.)
Cut
NOTE: You may secure each side of the armhole steek with thread before cutting, same as for center front steek.

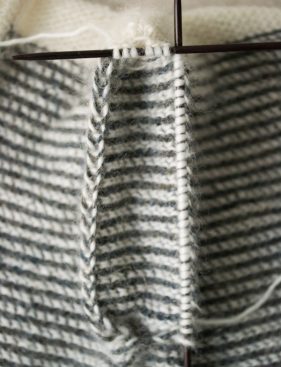
Once again it’s time to cut your fabric. Between the two purl columns there is a column of 10 knit stitches.
Beginning at the underarm edge and working towards the shoulder, carefully cut up the exact middle of these 10 knit stitches for the entire length of the fabric.
There are now 5 knit stitches at each newly-cut armhole edge.
Fold + Secure Armhole Edge
In this section, you will fold and secure the cut edges similarly to how you did for the Front Edges. You will begin at the underarm edge, work up the left-hand side (as you look at the garment) of the armhole, across the top of the shoulder, and down the right-hand side of the armhole. Here’s how…
NOTE: If you are making the Vest version, as you work the following instructions, bind off as you go, just as you did for the Front Edges. Then move on to the Finish section.
Beginning at the bottom of the left-side of the armhole (as you look at the garment) and working towards the shoulder, join Yarn A and *insert a smaller double pointed needle under both legs of next stitch in the center column (third stitch over from the purl column), insert the double pointed needle into the next stitch on the needle holding the facing stitches, knit these two together, repeat from * until 3 stitches remain on the needle holding the facing stitches.
With a second smaller double pointed needle, continue in the same fashion across the last three stitches on the current needle and the first three stitches on the next needle.
With a third smaller double pointed needle, continue in the same fashion down the other side of the armhole. [78 (82, 86, 90) stitches]
Work Sleeve, Long-Sleeve Version Only
Join + Begin
Place marker and join for working in the round.
With larger double pointed needles and Yarn A…
Decrease Round: [K0 (0, 2, 2), k2tog] 2 (1, 1, 3) time(s), [k1, k2tog] 24 (26, 26, 22) times, [k0 (0, 2, 2), k2tog] 1 (1, 1, 3) time(s). [51 (54, 58, 62) stitches remain]
Stripe Pattern
Round 1: With Yarn B, knit.
Round 2: With Yarn A, knit.
Continue
Repeat Stripe Pattern until piece measures approximately 1½ inches from joining round, ending with Round 1.
Decrease Round: With Yarn A, k1, k2tog, knit to last 2 stitches, ssk. [2 stitches decreased]
Work 5 rounds in Stripe Pattern.
Repeat the last 6 rounds 6 (6, 7, 9) more times, then repeat the Decrease Round once more. [35 (38, 40, 40) stitches remain]
Continue evenly in Stripe Pattern until sleeve measures 6 (6 ½, 7, 7 ½) inches from joining round, ending with a Round 1.
Cut Yarn B. With Yarn A, bind off knitwise.
Finish
Neckline
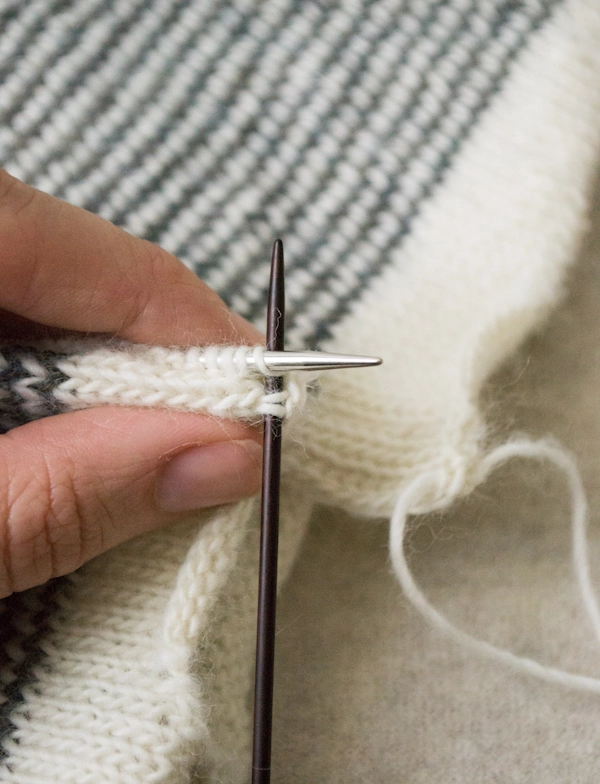
With Yarn A and two larger double pointed needles, and with right side facing you, beginning next to the finished Right Front edge, pick up 1 stitch in next stitch of neck edge, *pick up 1 stitch in next stitch of neck edge, pass second stitch on right needle over the stitch just picked up to bind off 1 stitch, repeat from * along neck edge of Right Front, Back, and Left Front, ending next to the finished Left Front edge. Cut yarn and pull through remaining stitch.
Bottom Edge
With Yarn A and two larger double pointed needles and with the right side facing you, beginning next to the finished Left Front edge, pick up 1 stitch in next stitch of bottom edge, *pick up 1 stitch in next stitch of bottom edge, pass second stitch on right needle over the stitch just picked up to bind off 1 stitch, repeat from * along bottom edge of Left Front, Back, and Right Front, ending next to the finished Right Front edge. Cut yarn and pull through remaining stitch.
Underarms
For both the Long-Sleeve and Vest versions: At each armhole, use Yarn A threaded onto a tapestry needle to sew the bottom left and bottom right edges together to close the hole at each underarm.
Weave + Block
Weave in the ends and block as desired.


Absolutely brilliant! I can hardly wait to try this method of finishing the steeked edges. Do you have any plans to release this pattern for steeking in adult sizing?
Hi Sandy,
Thanks for the wonderful compliment! Currently we don’t have anything in the works for an adult version of this vest, but that’s not to say that we won’t in the future! Stay tuned!
-Adam
I am in love with this pattern, Laura! I can’t wait to make it! I would also love one for myself! Is there any chance you will be adding an adult size in dk or worsted so the proportions are similar? The white on the shoulder and the edging are fantastic details! Great job! 🙂
Hi Julie,
What a lovely compliment! I’ll surely pass it on to Laura! At the moment we don’t have anything in the works for an adult version but we’ll keep your request in mind for the future. Thanks again!
-Adam
I am willing to give steeks a try on such a small garment. Trying steeks on an adult garment gives me shivers. It’s not like you can rip it out and try again.
Yes, I agree. But I love the design so much that I may end up wanting one in my size.
I have done lots of steels but love the pattern anyway
I would love to see this pattern in adult sizes.
Hi Marijke,
Thanks for writing in! We will certainly keep your request in mind for the future!
Best,
Cassy
I love your patterns
Your patterns are easy to follow
I’m willing to try steeks, too. Thank you for this pattern.
I love this but I crochet. Can this be translated to a crochet pattern? Thanks
Hi Cat,
Thanks for writing in! Unfortunately we don’t have a crochet version of this pattern and don’t have plans to make one currently. Sorry about that!
-Adam
I would love this in a bigger kid size! I have an 11 year old son that this would work great for!!
Hi Jessie,
Thank you so much for writing in and for your request! We will certainly keep it in mind for the future!
Best,
Cassy
Hi!
am trying to make one for my lil girl. But she is now already 30 months-old! Plus if I start now, will hardly complete it before Summer… so was wondering if you have this one for 36 or 48 months-old?? Your garment looks sooooo cute and irresistible!
Hi Celine,
Thanks for writing in and for your kind words! At present, the largest size that this pattern is available in is 18-24 months. We certainly appreciate the request and will keep it in mind for the future!
Best,
Cassy
This is a great idea! However this method of finishing the steeks is too bulky for a newborn or even a little one under a year. I got as far as finishing the vest and realized that it would not be appropriate so abandoned the project. To be fair I made it in a different yarn, that was a merino, cashmere, silk mix, which should have been soft and pliable, (and hurt to abandon). I will play with it again because I like the design so much, but the front facings and the armholes didn’t work in the garment or in several samples that I made in different yarns…
Hi Cher,
Thanks for writing us! Did you go down in needle size for the knit facing? It’s important that your facing fabric’s stitches per inch match your body fabric’s rows per inch. This could account for the bulkiness. A facing will always have a bit more bulk but that is also a part of the design of this vest/cardigan. Let us know if you have any other questions in the future!
-Adam
Any suggestions for a way to close this adorable sweater? Hook and eye or a button and loop perhaps? Looks so cute with nothing, but won’t it always be flapping open or coming off when baby moves?
Hi Dana,
Thanks for writing in! I think that both options that you suggested would work well for this sweater. I would probably lean more towards the loop and button option as you could choose a sweet button that matches the sweater. This option may look a little more like a design feature than the hook and eye.
Let us know how it turns out!
Cassy
This is such a beautiful cardigan. I am going to give this a try! What an ingenius way of knitting a cardigan. If you are keeping count, please know that I would also appreciate an adult size pattern. Please consider opening in the UK. You’re website is full of such inspirational makes, and stunning materials and yarn-thanks!
What a beautiful vest! Thank you so much for sharing.
I did a test-knit, as there’s a lot of new techniques for me to learn.
I’m not a super experienced knitter and I have a few questions – and I’m Danish, so please excuse any spelling errors. Hope you’re able to answer me 🙂
The jog
Is it possible to move the start to the side under one of the arms thus hiding the jog instead of having it in the middle of the back? That is, to begin the knitting under one of the arms. Or would that mess up the pattern somehow?
Tip to hide the jog/jogless jog: Inspired by the steek, I knitted the first stitch purl, i.e commencing each row with a purl stitch and then continuing with knit. This hid the jog quite neatly. It leaves a knit-line on the back, though.
Finish – Neckline
Which side is the right side? Is it the side on my right hand side, when the vest’s front opening is facing me or is it the vest’s right side?
Is it correct that the steek should not be bound off? There’s an opening now down through the steek – or maybe I missed a bind off earlier?
Finish – edge and bottom:
Would it be possible to post some pictures of the bind off? I don’t understand how to do this. Or is there a tutorial somewhere I could look at?
Hi Helene,
Thanks for writing in and for your questions! I hope that I can help!
Moving the jog underneath the armpit would require changing the pattern quite a bit. More easily, you can move the jog to the middle of the steek and thus hiding it when you cut the steek. I would move it to one or two stitches from the very middle of the steek do that you do not cut directly on it. We used it here as a design element as we liked the look of it but you can certainly place it nearer the steek to eliminate it.
With the neckline, the right side will be the right side of the garment when you are looking at it, nearest to your right hand!
For the bottom and edges, I do not have a tutorial for this technique. You will basically be picking up and then binding off stitches as you go. We do have a tutorial for picking up stitches that can be found here: https://www.purlsoho.com/create/picking-up-stitches/
I hope that this helps and please do not hesitate to reach out with any further questions!
Best,
Cassy
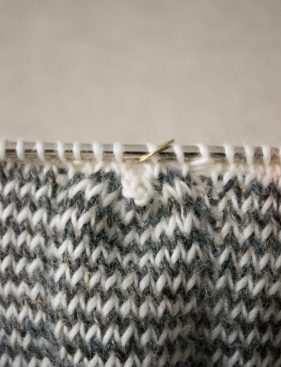
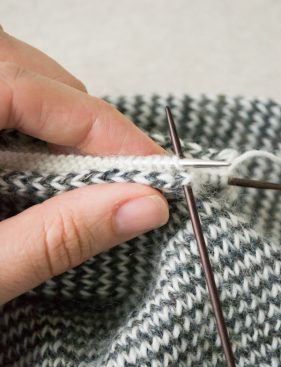
The steek stitches are indeed bound off. If you reference the pictures in the shoulder section, you can see that they are bound off and will be cut. This prevents the stitches from running.
Hi! Love this pattern but just want to clarify one step in the section on Shape for Armhole Steeks:
“Repeat Rounds 2 and 3 seventeen (18, 19, 20) times, ending with Round 2.””
So if we’re repeating rounds 2 & 3 – 17 times – does this mean we’re knitting 34 rows and then doing an additional row to end on round 2? Or are we only knitting to round 2 on the 17th iteration?
Thanks!
Hi Susan,
Thanks for writing in! I think that I can clear things up! I see how this can be a bit confusing. Given that the rows are so skinny here, you could easily do either but I would suggest knitting rounds 2 & 3 17 times but the 17th time you will just knit round 2.
I hope that this helps and happy knitting!
Cassy
Great – thank you!
I’m trying to figure out the set up and steek process for the arm holes and am a bit stuck. First, when picking up the 3 remaining stitches on the second DPN, are these the same stitches in yarn A as the rest of the column or are these the 3 stitches that are picked up after binding off the 10 stitches when creating this section earlier in the pattern? It’s hard to tell from the photos.
Second, how far up are we cutting the steek in the arm holes? Is it to the bind off row or further up? Again it’s hard to tell from the photos.
Thank you!
Hi Susan,
Thanks for writing in! I hope that I can help! The 3 stitches that you pick up on each side of the top of the sleeve will be the same stitches in yarn A as the rest of the column. When you pick up 3 on one side and 3 on the other, the small gap between these two sections is where you will be cutting to when cutting the steek. You want to be careful not to cut through the facing that you will be knitting here. I find that a removable stitch marker to delineate this. You can always cut fewer stitches at first and cut the final stitch or two if you are concerned!
I hope that this helps and happy steeking!
Cassy
I can’t decipher if this is bind off ends at the 10 knit stitches or at the purl stitch? Anyone know? It’s right before the “SHOULDERS” section.
“With Yarn A, knit to next marker, sm, p1, bind off the next 10 stitches in pattern, knit to next marker”
Hello Jeannie,
Thank you for reaching out! In this section you will bind off your 10 stitches and then continue knitting to your next marker. I hope this clears things up and please let us know if you have any further questions. Happy knitting!
-Marilla
Absolutely love this pattern and am excited to begin bit am a little vary, knowing my knitting skills. I have used quite a few of your patterns and know that they are clear and easy to follow when you take 1 step at a time. Thanks again for sharing.
In this case I have a v basic enquiry. Would using cleckheaton meri no bambino 4 play be ok? What size needles should I use? Should I check the gauge by knitting a flat pc or should I knit in the round for checking?.These questions are only to begin with. I may have more questions as I go along as I absolutely don’t want to go wrong any where. Love this so much. Thanks
Hello Rita,
Thank you for reaching out! This yarn should work beautifully, however it is always better to knit up a gauge swatch before jumping in to prevent any unpleasant surprises along the way. I would recommend knitting this swatch in the round. I hope this helps, and of course feel free to ask more questions as you continue with the pattern!
Happy knitting,
Marilla
Hi, I am wondering if there is a particular type of cast on that you would recommend for this pattern. Thank you 🙂
Hi Laura,
Thanks for writing in! We use and recommend a Long Tail Cast On for most of our projects, including this one, but you could also use a Cable Cast On if you prefer!
Best,
Julianna
Looking forward to making this as my first sweater project! Can the Linen Quill Be replaced with Anzula Squishy? Or another color of the line weight?
Thanks!
Hello Amy,
Thank you or reaching out! Yes! You can certainly substitute another fingering weight yarn for this project. I would, of course, knit a gauge swatch before jumping in.
Happy knitting!
-Marilla
I would love to knit this for my niece! but I’m just wondering how difficult this would be?
Hi Dani,
Thanks for writing in! This pattern does include some complex and advanced techniques; however, depending on your skill level, you may be up to the challenge! Much of the actual knitting is very simple and straightforward, and it’s always nice to learn new skills on a small scale project like this one. Also, our pattern includes plenty of pictures and video tutorials to demonstrate some of the trickier instructions, so I would recommend giving the pattern a read-through to see if you are ready to dive in!
Best of luck and happy knitting!
Julianna
I love this pattern but have run out of babies and toddlers to make it for. Any chance of an adult size version soon?
Hello Cheryl,
Thank you for reaching out! I’m so happy to hear you enjoyed this pattern, we do not currently have an adult version of this pattern. I will certainly pass along your suggestion!
Happy knitting,
Marilla
I would love to make an adult version, maybe with a heavier yarn. Any plans to add such a pattern?
Hi Linda,
Thanks for writing in! While we do not currently have plans to release an adult sized version of this vest, I will certainly pass your suggestion along to the design team!
Best,
Julianna
I work at a local hospital and a patient had brought in her knitting. She was wearing. “Sideways garter vest” . I have searched your website and cannot find that patter. Can you help, please.
Hi Beverly,
Thanks for reaching out! Here is a link to our Sideways Garter Vest – enjoy!
Best,
Julianna
I like the pattern and want to learn the thing with the steeks!
But I ave trouble downloading the pdf WITH the pictures… can you help? Thank you!
Hi Monika,
Thanks for reaching out! Is it possible that you are running an ad or pop-up blocker that is interfering with the images in the pdf dialogue? I would also suggest trying in a different browser if you can. If neither of those options solves the problem, please email us at customerservice@purlsoho.com so we can troubleshoot this for you!
Best,
Julianna
Hi there
This pattern is amazing & your website is the best knitting site I’ve discovered.
I would love to try this out & I’ve never cut up my knitting before.
I would like it with an open end zipper, do you think this pattern would work with a front zipper?
I would appreciate your expert advice 🙂
Cheers Faye
Hi Faye,
Great question! Although we didn’t use one, it’s quite common to sew a zipper into a steeked facing, and it would be a great closure for this vest! You might want to check out our Zippers in Knits tutorial for some extra tips and tricks!
Best of luck and happy knitting!
Julianna
Just out of curiosity, why does the pattern call for one skein of the Linen Quill and another of the Line Weight? I accidentally bought two skeins of the Linen Quill in contrasting colors and wanted to know how much it actually matters. Thanks!
Hi Marcela,
Thanks for writing in! We used two different yarns to add a bit of texture variety and interest, but there’s no reason you couldn’t use two colors of Linen Quill! Both yarns knit up to almost the same gauge, so your sweater size shouldn’t be affected at all.
Happy knitting!
Julianna
I just want to add my request for an adult sized pattern too. I love the simplicity of the look, it would be so easy to throw over anything I would wear. Love it!
hi!
i saw the video of the wrp+t but i still don’t understand, in the part of the SHAPE FRONT SHOULDES, first row, i knit more then of the of my row and then i’ll make the wrp+t and follow back my steps ? so i’m purling back on the same row ?
TNX
Hi Avishag,
Thanks for reaching out! It sounds like you’ve got it! When working a short row or wrap and turn, you will be stopping in the middle of a row and, after working the wrap and turn, purling back over the stitches you just knitted without completing the row.
Happy knitting!
Julianna
Thanks Julianna,
In row 1, I’m supposed to knit all the way and stop 7 stitches before the marker and then do the wrp-t? Or make just 7 stitches of wrp-t?
Short Row 1 (right side): Knit to 3 stitches before next marker, p1, k2, sm, k2, p1, knit to next marker, sm, p1, k10, p1, knit to 7 stitches before next marker, wrp-t.
Hello,
Thanks for reaching out! You will knit all the way and stop 7 stitches before the marker and then do the wrp-t.
Happy knitting!
-Marilla
Hi,
Thanks.
So how do I know when to stop to wrp-t? When is the end of my row?
Hi!
You will not knit to the end of your row until you get to row 7. When you are still working on row 1 and you get to your wrap and turn you do just that, you turn your work and begin row 2.
I hope this makes sense and let us know if you have any further questions!
Happy knitting,
Marilla
Hi there. I’m working on this project (my first ever sweater!) and am learning a lot of new techniques as I go, so very excited to complete this! I’m on the step for preparing the first facing for the front steeking and got a little confused. Where you say to pick up “under both legs of each stitch of the knit-stitch column on the right,” what does that mean? I’ve watched the video tutorial on picking up vertical stitches and I still can’t quite figure it out. Following the video, I believe I’m picking up a stitch between each row of yarn A and B… or are you supposed to pick up every other? Any additional pictures would be great! I’m nervous to cut any fabric without fully understanding what I’m doing. Thanks!
Hi Natasha,
Thanks for reaching out! This technique is a little different from picking up stitches normally, but our Steek with Knit Facing video will show you exactly how to pick up the stitches for this step! You should be picking up a stitch from every row of the knit column without skipping any.
I hope that helps and happy knitting!
Julianna
Hi,
Wow! Your website is second to non in the world of knitting. I’m completely in love with your children’s patterns, however, I’m devastated that they seem to only go up to 2 years. I have a 2 year old and a 7 year old, is there any way the patterns can be adapted?
Tania
Hi Tania,
Thank you so much for this lovely comment! Unfortunately we don’t currently have the resources to add larger sizes to our children’s patterns, but I will certainly pass your request along to the design team!
Best,
Julianna
Still hoping you will offer this pattern in adult sizes!
Hello!
Thank you for this beautiful and challenging pattern! I knit the body and facings a month ago…, and just last night finally got up the courage to cut the steeks and secure the front edges. Whew! It was stressful, and I didn’t execute it flawlessly, but it turned out well enough! Nonetheless, I’m going to delay the armholes for now, so I’m trying to work the finishing edging instead while baby naps. 🙂
ANYWAY, I seem to be struggling with the bottom finishing edge for some reason…. It’s a technique I’ve done before, but it’s feeling odd to start at the left front with right side facing me…. Do I want the finishing edge (picked up and bound off stitches) on the *bottom* (i.e. am I picking up the cast on stitches themselves), OR should I pick up in the first row of proper stitches so the finishing edge is visible on the right-facing side of the body? If the latter, this is what’s proving extremely confusing…. (Does that make sense? I’m having difficulty parsing how to ask my question — probably because I don’t truly understand myself why this is causing my brain to hurt!) Hmm….
I read the other comments and I saw you answer that there isn’t a tutorial for finishing edges: if nothing else, please consider this awkward question to be a request for such a tutorial whenever it’s possible to make one! 🙂
Many thanks,
Michael
Hi Michael,
I hope I can clear this up for you! You will be picking up stitches in the first row directly above the cast on edge so that the edging shows on the right side of the piece. It sounds like you might be having trouble getting the sweater oriented correctly to get started! Keep in mind that the left side of the sweater refers to the left side as if you were wearing it, so when you rotate the sweater so that the cast on edge is up and the two fronts are facing you, you will be starting on the corner of the sweater that is now on the left as you are looking at it. We don’t currently have the resources to create a tutorial for this edging, but I hope that clears things up, and I will certainly pass your request along to the design team!
Best,
Julianna
Hello
I posted a question earlier but have not heard from you.
I would like to knit this in inside out pattern. But how do I deal with steeking if I do this? Please help
Hi Annie,
Thanks for reaching out! It looks like your previous comment got shuffled into the spam folder for some reason, so I apologize for not getting back to you sooner! I think knitting this pattern inside out would work fine and I don’t think it should affect the ability to steek. You should be able to follow the same instructions for the steeking, you will just be working it on the opposite side of the fabric!
I hope this helps!
Gianna
Thank you so very much for your response. I am a beginner knitter so I don’t know a lot. I love this design and I going to knit it inside out with a purl stitch every ten stitches. I also want to do the Top down raglan style knit but then in the end could not figure it out in the end. Thank you for your beautiful designs. Can I post a picture when I am done
Hi Annie,
Thanks for writing in again! I am happy to help and please feel free to reach out with any more questions you may have going forward! If you are on Instagram please post your work and tag us @purlsohobusyhands and use the #purlsohobusyhands hashtag!
Looking forward to seeing how this turns out!
All the best,
Gianna
Hi,
Would you be able to provide a yardage for the different sizes? It was very helpful for the smarty pants pattern.
Thanks!
Hi Sinduja,
Thanks for reaching out! For this pattern, depending on the size we used approximately 210 (240, 270, 295) yards of Yarn A and 165 (195, 220, 245) yards of Yarn B for the Sweater!
Warmly,
Gianna