


Ribbed Raglan Pullover
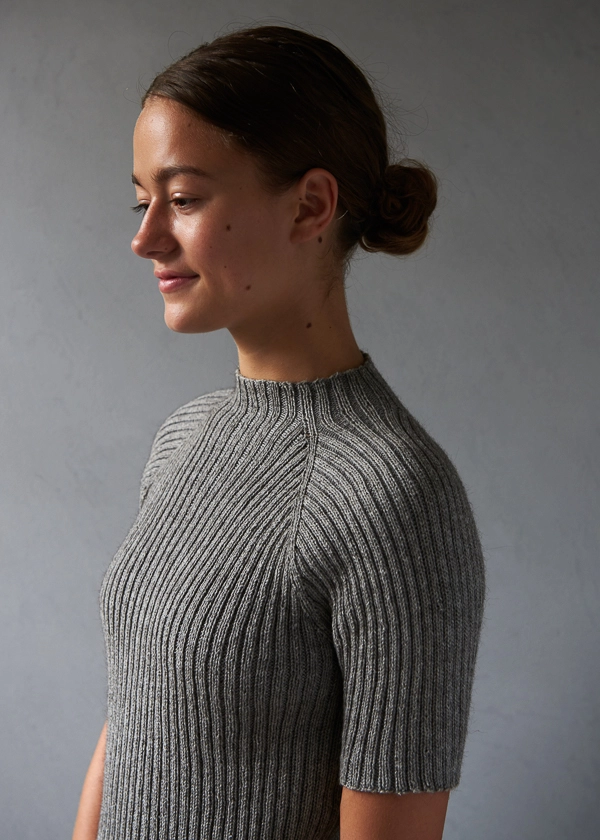
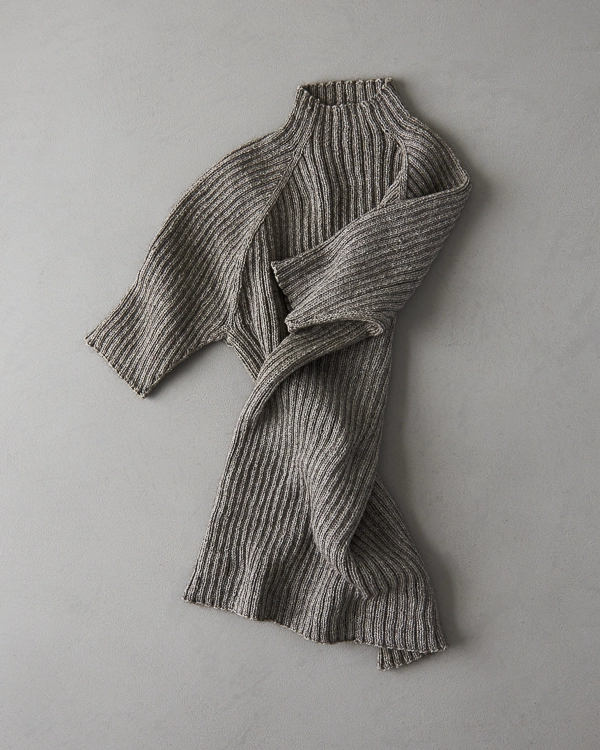
Knitting should never feel like a chore, and our Ribbed Raglan Pullover is designed to make sure it doesn’t! A simple-as-pie construction, you’ll start from the top and knit down in just-interesting-enough 2×2 rib… No edgings, no seaming, no shenanigans.

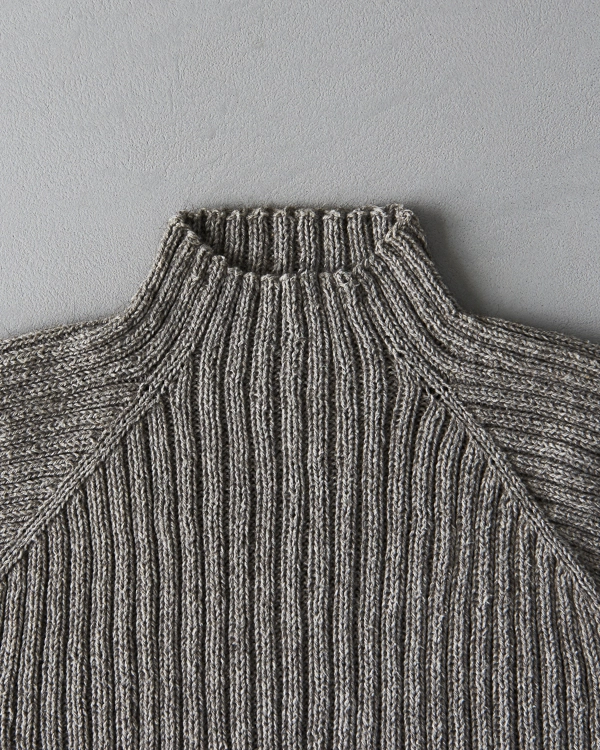
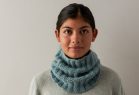
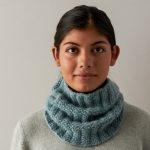
We love the easy details along the way: a flattering little half-funnel collar and graphic raglan increases, plus three sleeve length options: short, mid (shown here), and long.

Depending on which sleeve length you choose and where you live, the Ribbed Raglan Pullover is a perfectly four-season sweater in our Sweetgrass superfine alpaca and organic cotton blend. A real beauty in its natural, undyed state, it’s also lightweight, soft, and wonderful to hold in the hand… Perfect for good-time knitting!

Designed by Purl Soho designer, Adam Aronowitz.
Share your progress + connect with the community by tagging your pics with #PurlSoho, #PurlSohoBusyHands, #PurlSohoRibbedRaglanPullover, and #PurlSohoSweetgrass. We can’t wait to see what you make!
Materials
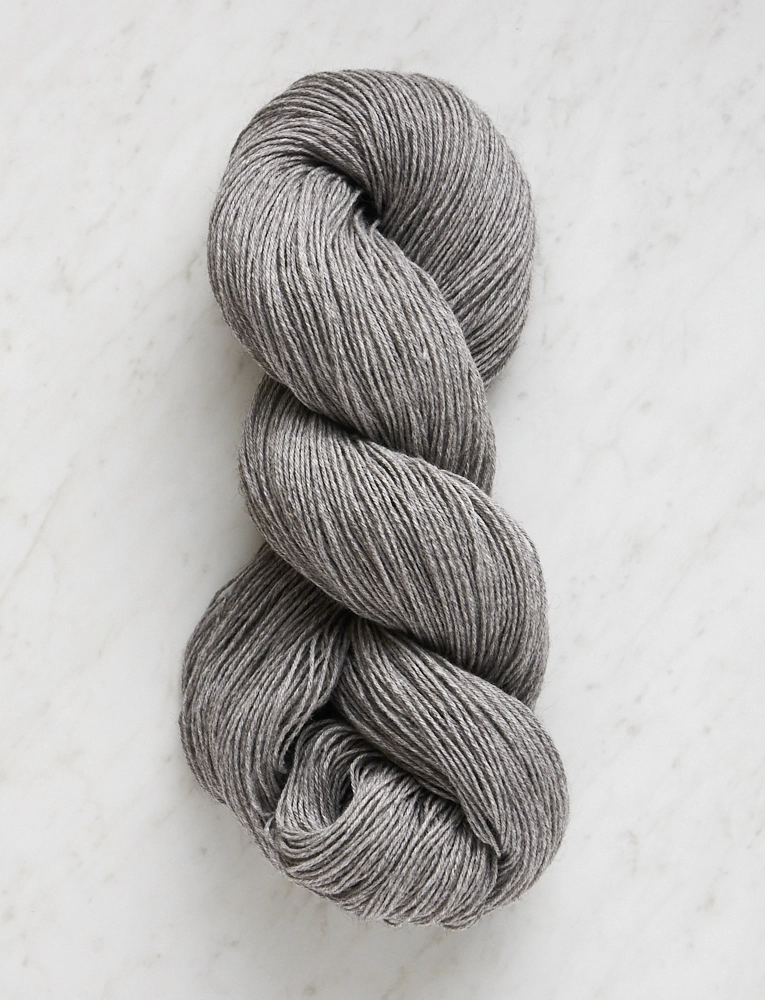
- Purl Soho’s Sweetgrass, 65% organic cotton and 35% superfine alpaca, undyed. Each skein is 437 yards/ 100 grams. We used the color Beech Bark.
- Short Sleeve Version: 3 (3, 4, 4) (5, 5, 6, 6) skeins; approximately 1030 (1195, 1430, 1625) (1910, 2085, 2355, 2595) yards required
- Mid Sleeve Version (shown here): 3 (3, 4, 5) (5, 6, 6, 7) skeins; approximately 1145 (1315, 1595, 1815) (2130, 2345, 2625, 2905) yards required
- Long Sleeve Version: 4 (4, 5, 5) (6, 7, 7, 8) skeins; approximately 1390 (1615, 1880, 2135) (2470, 2670, 2985, 3270) yards required
- A set of US 2 (3 mm) double pointed needles
- US 2, 16-inch circular needles
- US 2, 24-inch circular needles
- US 2, 40-inch circular needles
- Stitch markers, including one unique
- Stitch holders or scrap yarn
- A Ribbed Raglan Pullover Pattern
GAUGE
45 stitches and 37 rounds = 4 inches in 2×2 rib, unstretched
34 stitches and 37 rounds = 4 inches in 2×2 rib, gently stretched
SIZES
NOTE For help picking a size, please check out our Understanding Ease + Selecting Size Tutorial!
24¼ (28½, 32¾, 37) (41¼, 45½, 49¾, 54)
To fit actual chest circumference of 30–33 (34–38, 39–42, 43–46) (47–50, 51–55, 56–59, 60–63) inches, with approximately negative 6–9 inches of ease. Note that the fabric stretches a lot.
- Finished Chest Circumference: 24¼ (28½, 32¾, 37) (41¼, 45½, 49¾, 54) inches
- Finished Length from Center Back: 25 (25½, 26¾, 27½) (29, 29, 30¼, 30¾) inches
- Finished Sleeve Length from Underarm: Short Sleeve: ¾ inch; Mid-Sleeve: 5 (5, 5½, 5½) (5½, 6¼, 6¼, 6¼) inches; Long Sleeve: 16 (16, 16½, 16½) (16½, 17, 17, 17) inches
Sample: The sweater pictured here is size 28½, worn with negative 5 inches of ease.
PATTERN

The Ribbed Raglan Pullover Pattern is available for purchase as a PDF download only.


give m e symbol knitting
Hi and thanks for reaching out! Unfortunately we do not offer this pattern in chart form, but I will certainly pass your request along to the design team!
Best,
Julianna
Are there other yarns I could sub in. I like a brighter color than the suggested yarns.
Hi Laurie,
Thanks for reaching out! I would recommend substituting either Posy or Linen Quill for this sweater, both of which come in a pretty pallet that includes lots of bright colors.
I hope that helps, and happy knitting!
Julianna
I loooooove this top, especially the raglan sleeve which has always been my favorite because of the way it fits so nicely. Your yarns are fabulous!
Beautiful sweater! Any plans for a long-sleeve version?
Hi Fran,
Thanks so much for the kind words and for writing in! Although we only show the short sleeved version here, this pattern includes options for short, mid-length, and long sleeves, so you can knit the sleeves to any length you like!
Best,
Julianna
Hi,
Can you please start including sizes up to at least 60″ actual bust, including any positive ease recommendations? It would be great if you could also grade up some of your past most popular designs to include these sizes as well.
Hi yelley,
Thank you so much for your comment and for sharing your thoughts with us! We are happy to share that this lovely sweater fits up to a 63 inch chest! This sweater is worn with a fair bit of negative ease and thus the listed finished sizes of 24¼ (28½, 32¾, 37, 41¼, 45½, 49¾, 54) inches do look to be smaller than the sizes that they are intended to fit. For this pattern, these sizes are to fit actual chest circumference of 30–33 (34–38, 39–42, 43–46, 47–50, 51–55, 56–59, 60–63) inches, with approximately negative 6–9 inches of ease. With that in mind, if you chest circumference is 60 inches, you would knit the size 54 and have 6 inches of negative ease. Please know that we are sure to note ease both on the pattern and in the pattern description on Ravelry as well.
We are also in the process of working through our back catalog of older patterns to offer a greater size range, starting with our more recent and popular patterns. We are keenly aware of the importance of offering sizing for as many in our community as possible and are working to that end as we speak.
Thank you again for your message! We so appreciate the feedback and truly do take it heart!
Best,
Cassy
SPETT.LE SEV. CLIENTI, questo pullover mi piace tantissimo. Però l’ho visto in saldo. Ora non lo è più. come mai? poi un chiarimento, mi ricorda molto il modello pullover Peaks che ho acquistato l’hanno scorso. E’ cosi?
Grazie attendo chiarimento.
Hi Maria,
Thanks for writing in! Although we didn’t have a discount on this pattern when we introduced it, it is still available and you can purchase it by clicking here! The Peaks Pullover does also have quite a bit of 2×2 ribbing and a similar neckline, but is written for a different gauge of yarn and is knit from the bottom up, while the Ribbed Raglan Pullover is knit from the top down, so the construction is very different!
I hope that helps, and happy knitting!
Julianna
I am having a hard time with backward yarnover for next stitch is a purl. Can you suggest a tutorial?
Thanks
Diane
Hello Diane,
Thank you for reaching out! We do not have a tutorial for this technique, but I will certainly pass along the suggestion! In the meantime if you have any questions regarding this technique, just let us know!
Happy knitting!
-Marilla
I have had trouble with the byo before the pearl. I went to my local yarn shop for help. They did figure it out but I ended up doing a m1r and m1l instead. Now I am where the yoke increases are back to the the byo. Not sure what I am going to do but I do wish the pattern was written differently! I am an experienced knitter.
Hi Jo-Ann,
Thanks for reaching out! To work the backwards yarn over, instead of bringing the yarn forward between the needles, you will bring it forward over the top of the left hand needle. However, if you have already used M1R and M1L in previous parts of the sweater, I would continue to use those increases in the yoke so everything looks the same!
Best,
Julianna
hi Purl Bee team
this is a great pattern and I have had no problem with it so far, but I am using a different yarn and my stitch gauge is quite different. No problem, I’m just knitting a smaller size than my actual size and trying it on as I go. But since my row gauge is the same as in pattern, I’ll need to put in some extra rounds (app. 10-12) before separating for the sleeves. Now, should I put in those extra rounds before or after the ‘shape back and sleeves’ short row section? (I hope this makes sense). Best wishes from Astrid
Hi Astrid,
Thanks for reaching out! If you haven’t finished the yoke increases yet, I would suggest spreading them out by occasionally working a plain row between increase rows. If you are already finished with the increase rows, however, I would probably add the extra length before the short rows so that the short rows are still immediately before separating the sleeves.
Best,
Julianna
Thank you Julianna – I still have some of the yoke left so I can incorporate the extra round like you suggest – and wait with the short rows until just before the separation.
Thank you again for your answer 🙂
Beautiful pattern! A couple of questions: does the pattern contain short rows to raise the back neck? Also, does it contain waist shaping?
Hi Helen,
Great questions! This lovely sweater does use short rows at the neck but there is no waist shaping.
Best,
Cassy
Hi! Can I make this amazing sweater several sizes bigger and wear it oversized? Do you think it would look fine?
Thanks!
Hi Nat,
Great question! We haven’t tried knitting a boxy version of this pullover, but I don’t see why you couldn’t! Although it is knit in a different type of ribbing, the effect should be similar to our Twisted Rib Pullover, which is intended to fit with 4-6 inches of positive ease.
Best of luck, and please do let us know how it turns out!
Julianna
Hello, I don‘t unterstand the First increase Round (shape collar); ….., sm, k1, yarn over. Shouldn‘t it be k2? Otherwise I don’t get this raglan stripe of those 2 Knit stiches! What do I make wrong? Any idea? Thanks for your help, Marion
Hi Marion,
Thanks for reaching out! You will be interrupting the ribbing while you increase, but it is only temporary! Since the two stitches on either side of the marker are always knit, they will form the tidy column along the raglan increases that you can see in the pictures, and the stitches that you add will be worked into the ribbing on either side of those columns. It sounds like you are doing everything correctly!
Best,
Julianna
Success I’ll be wearing my sweater today! Even though I didn’t follow the pattern exactly as written (didn’t do the byo and reduced the length under the arm from 15” to 11”) it fits well. I could totally see a boxy or a bit oversized version of this sweater in my future! I love the sponginess of the 2×2 knit. Oh-made the neck higher too! Thanks Purlsoho!
Hi!
I purchased pdf pattern and Sweetgrass as it looks so good I want it exactly the same.
BUT
In pdf instructions there are no short rows in text, only at the side as required technique – and I see from the photo short rows are used.
Can you please help? Am I missing something?
Hi Katra,
Thanks for reaching out! I am happy to help! The short rows in this pattern are worked in the Yoke section of the pattern and appear on page 5!
I hope that this helps!
Cassy
Thank you Cassy, sorry I am not there yet, I just panicked because around the neck I have the same hight at the moment. Obviously the short rows come later down the back! I apologize 🙂 It’s on p.4!
Thanks!
Hi!
Thank you for this beautiful pullover pattern! It is my first sweater, and I have some difficulties with understanding of following part (I’m making the smalest size)
Short Row 3: [Work in pattern to next marker, sm] 3 times, work in pattern to wrapped stitch, work wrapped stitch with its wrap, work 19 stitches in pattern, wrp-t. Repeat Short Row 3 seven more times.
By the moment I reach short row 3, I have one wrapped stitch on the both sides, so I work wrapped stitch with its wrap (20 stitches after one of the markers) and then continue the same direction 19 more stitches before making the next wrp-t. is it correct?
if it was correct, and now I need to repeat it 7 more times. so the next row is the same, only on the wrong side instead of the right side. correct?
my main question – when I repeat short row 3 and it is the second time for the each side (right or wrong), I reach my wrapped stitch (which is now number 40 after marker – is it correct?). should I work this wrapped stitch with its wrap? and knit 19 stitches more the same direction and only then do wrp-t? so next time I will have 60 stitches, wrapped stitch worked and then 19 stitches before the next wrp-t? and so on?
I am completely confused at this point …
thank you!
Hi Anna,
Thanks for reaching out! It sounds like you’ve pretty much got it! The first time you work Short Row 3 will be on the right side, the second time on the wrong side, the third time on the right side, and so on, ending with a wrong side row, and each short row will be 19 stitches longer than the previous one. After knitting the wrap together with its stitch, you will continue working in the same direction for 19 more stitches, then work your next wrap and turn and start the next short row on the other side of the work. By the end of the short rows, yes, you will be working quite a few stitches after the last marker in each row! As long as you keep track of your rows, I think the short rows will make a lot more sense once you start knitting them!
Best of luck, and happy knitting!
Julianna
Thank you so much!
Hi Julianna, I’m also struggling with the wrap & turn section of the pattern. I think what is throwing me off is the markers. So I have 4 markers on the needle, one in between each sleeve between the front and back sections. Since I understand that this short row section is supposed to be only knitted on the back section, I’m getting confused when the instructions say to work in pattern through past 3 markers and then do the W&T. For me that puts the W&T on a sleeve section. What am I missing? Thanks for your help.
Hi Nancy,
Thanks for reaching out! It is correct for the first few wrap and turns to be in the sleeve stitches! The short rows will be adding length to the back and shoulders of the sweater so the front neck sits a little lower, so it sounds like you’re doing everything right!
Best,
Julianna
Hello from Australia,
Thank you for all your beautiful yarns, patterns and help that you provide.
I have a lot of sport weight yarn (2) (merino, alpaca, and silk using 3.25-3.75mm needles) in Australia it translates to 5ply.
I really like your Ribbed Raglan Pullover. My bust size is 38 inches.
Is there any way that a sport weight yarn can be used to achieve the same look?
If not, what could I use my yarn for ?
I wouldn’t mind knitting a plain and simple sweater if the above is impossible.
Many thanks.
Kindest Regards,
Wilma
Hi Wilma,
Thanks for reaching out! Our Sweetgrass is a fingering weight, or 3 ply, yarn, so your yarn is a bit thicker than ours, but you could always try knitting a gauge swatch. I can’t say if it would work for sure, but ribbing is quite stretchy and forgiving, so you may be able to achieve the same gauge as our pattern. We do have several sweater patterns that are written for sport weight yarns, including our Low-V Cardigan, Classic Crewneck Cardigan, Striped Spring Shirt, and Top-Down Turtleneck Cardigan – hopefully one of those is to your liking!
Best,
Julianna
Hello Purl Soho!
I purchased this pattern and Sweetgrass yarn at your store when I was in NY last fall. Your store is beautiful! I wished I lived closer! In trying to do my gauge swatch for this sweater, I’m wondering why the stitch count for the unstretched gauge in the pattern is not an even number that is a multiple of 4 (it is 45 stitches). Similarly, the second gauge is 34 stitches, which is not a multiple of 4. Am I missing something?
Thanks in advance for your response!
Lynne.
Hi Lynne,
Great question! It is not uncommon for the stitches per inch of a pattern to not align with the stitch pattern repeat. When knitting a gauge swatch, for the best results, you should cast on more than the amount you will be measuring so you can measure the center four inches of your swatch, several inches away from both the cast on and cast off edges and excluding the edge stitches. Everyone’s selvage or edge stitches tend to turn out a bit distorted, as do the stitches closest to the cast on and cast off, so you should try not to include them in your gauge measurement. I usually add 6 to 8 stitches to the gauge and then round to the nearest multiple that works well for the stitch pattern to determine how many stitches to cast on for a gauge swatch, and then knit the swatch in pattern for about 5 inches. You can then measure the center 4 inch square for the most accurate gauge measurement possible!
I hope that clears things up!
Julianna
Thank you so much for your response Julianna! It makes perfect sense now!
Hello, so should we cast on more than 45 stitches for the swatch gauge? Also, on the needle size it is listed as US 2 (3mm) but not all needle brands convert this way. Can you advise which needles were used to make this?
Hi Sonia,
Thanks for writing in! Yes, you should always cast on enough stitches to knit at least a 5 x 5-inch swatch.
The metric sizes we indicate in our patterns might differ from what you’re used to since different needle companies sometimes assign the millimeter measurements to different US sizes. These inconsistencies, while frustrating, are very common when comparing needles, so when in doubt, rely on metric sizes…they’re standardized!
We used US 2 (3mm) needles to knit the sample, but this may differ for you, since all knitters have slightly different natural tensions. As long as you find needles with which you can achieve the correct gauge, those will work for the pattern!
All the best,
Lili
Is it possible to convert the current neck into a turtleneck that could fold over?
I’m so sorry! I neglected to thank you in advance for your time and advice. I love this site; your materials, colors and patterns are inspiring.
Thank you,
Carole
Hi Carole
That’s a great question! We haven’t seen anyone try this yet, but since the pattern starts at the neck, I don’t see why it wouldn’t work! The ribbing would make it a close-fitted turtleneck, and it might take you a little trial and error to get it just right. I would recommend measuring the length of a turtleneck you own for comparison, trying it on as you go, and using a super stretchy cast on! Let us know if it works for you! So glad you are inspired by our patterns and materials, and I hope this helps!
Happy knitting
Jessica
Hi Jessica! Basically, I’m looking for a relatively easy pattern for a not too bulky basic turtleneck sweater (neck MUST fold down).
You mentioned a Stretchy Cast-on…any one In Particular? Also, if you have a different suggestion for a turtleneck sweater, I’m open to suggestions! (I am probably an intermediate knitter)
Thank you!!
Carole
A great stretchy cast on is the Long Tail Tubular and this would work great for this pattern. And another turtleneck option would be Up-and-Over Turtleneck which has you pick up the collar at the end, and customize the length. Hopefully one of these patterns will be on your needles soon!
Best
Jessica
Hi there – on the back + sleeves shaping, row 2, where I work in pattern to the next marker three times before wrapping and turning… is the end-of-row marker one of those three stitch markers? Or is it just the markers which have been in use for the shaping which are being counted? Thanks so much!
Hi Natalie,
Thanks for writing in! Yes, you will be counting the end of row marker when working this step! The first set of short rows will be in the sleeve stitches, so after working the first wrap and turn in the left sleeve, in Short Row 2 the three markers you knit past will be the left-back raglan marker, center-back marker, and right-back raglan marker, so the next wrap and turn ends up in the right sleeve.
I hope that clears things up!
Julianna
Thanks for your question Natalie. I was just about to pull my hair as I was reading down this trail and not seeing someone going through the same thought process. Then luckily I found out that the end of row marker counts in this instance.
Relieved in South Africa.
Me too in response to Jo! The other sections didn’t count the end-of-row marker (I think) so for consistency I didn’t count it in the wrap/turn and it was not making sense, since counting 3 markers put me at the front of the top and not in the sleeve. Thank you for this Q and A!
I am just getting started with the collar and using your recommended yarn from Purl Soho. Is this going to stretch enough to go over my head??? It looks so small, 104 stitches.
Hi Beth,
Thanks for reaching out! It should fit comfortably over your head if you are working over the correct number of stitches for your size! Did you work a gauge swatch before beginning?
Warmly,
Gianna
Yes thanks Gianna!
Hi Beth, I love this pattern, but am also finding it challenging, as I’ve never done an all-in-one pullover before, nor a top-down. Your comments about the short rows seem to make sense, but when it comes to separating the body and sleeves, how would I work wrapped stitch with its wrap and slip the marker twice? There are wrapped stitches only at each end of the short rows, as all the previous rows’ wraps have been knitted /purled with their wraps into normal stitches. Are the 116 stitches (2nd size) to go on a stitch holder exactly the 116 stitches of the left sleeve?
Hi Purlsoho
I am not sure if you received my last message. Following the short rows to increase the height of the back section, I am not sure how to proceed to separate the body and the sleeves. I am knitting the second size, so in 10 short rows I have 101 stitches each to the right and left of the end-of-round marker, just 15 stitches short of the markers on either side of the front section. The instruction is, from the end-of-round marker, to pass one stitch marker and then knit the wrap (stitch 101) with the stitch, which is OK, but twice? That would mean going around the front (passing two stitch markers) to get to the second stitch with a wrap. Is this what is meant? Please help!
Hi Jacqueline,
Thanks for reaching out! Basically, at this point, you should still have the 5 markers placed, Right Back Raglan, Right Front Raglan, Left Front Raglan, Left Back Raglan, and a unique marker for Center Back and end of round. So for this section of the pattern, it is more important to focus on the stitch markers rather than the wrapped stitches to ensure you are placing the correct stitches on hold. You should be starting at the beginning of the round, then work in pattern to next raglan marker, working wrapped stitch with its wrap, slip marker. You then repeat this to the next raglan marker (this should not be all the way around your work, just to the next marker.) Once you do that, you will then place the previous 116 stitches on hold. Then you repeat this whole section again, now working across the rest of the stitches, repeating the same process by working in pattern to next raglan marker, working wrapped stitch with its wrap, slip marker (2 times) and then again will place the 116 stitches on hold. So at the end of this, you should have 288 total stitches remain: 144 stitches each for the Front and Back Body and the 116 stitches on hold on either side for the sleves.
I hope this clears things up, happy knitting!
Gianna
Thanks, Gianna. Thank you for your reply. When you say ‘You should be starting at the beginning of the round, then work in pattern to next raglan marker, working wrapped stitch with its wrap, slip marker’ – I don’t have a wrapped stitch before the left back marker. The only wrapped stitch I have on the left of the garment is 15 stitches before the front left marker (i.e. the end of the 9th/beginning of the 10th short row) – unless I’ve misunderstood something and got it wrong?
Hi Jacqueline,
Sorry for the delayed response! The first set of short rows will be in the sleeve stitches, so after working the first wrap and turn in the left sleeve, in Short Row 2 the three markers you knit past will be the left-back raglan marker, center-back marker, and right-back raglan marker, so the other wrap and turn ends up in the right sleeve so you should only have two wrap and turns. So again, for this section of the pattern, it is more important to focus on the stitch markers rather than the wrapped stitches to ensure you are placing the correct stitches on hold and because there isn’t a wrapped stitch at every marker.
I hope this clears things up!
Gianna
Hi! I’m planning on knitting a male-version of this shirt for a man who requested a fitted, ribbed shirt. How would you recommend figuring out the best size to knit? Would it be different?
Hi JW,
Thanks for reaching out! I would suggest checking out our wonderful tutorial Understanding Ease + Selecting Your Size! This will give you a breakdown of how to select the perfect size.
I hope this helps, happy knitting!
Gianna
Hi there!
Almost done w the body and wondering if I shouldn’t use Italian bind off? Pattern says “bind off loosely in pattern”, but isn’t tubular or Italian more stretchy?
Hi Camilla,
Thanks for reaching out! We used a basic bind-off for this pattern, but you could certainly use a different method if you would like! If you do, please let us know how this turns out!
Warmly,
Gianna
Hi!
I am not a very advanced knitter but wanted to do this pattern so much that I decided to try it out and stumbled on the first step. It says “Using double pointed needles, cast on…” and never elaborates on which cast on to use. I can do a 2×2 tubular cast on in the round but is then the rest of the instructions doesn’t make sense to me, because it continues with “Round 1: [K1, p2, *…” but with 2×2 tubular cast on I will have to do 2 knits first. I am quite confused and would really appreciate your help so I can understand how to start. I’ve done your “Color Dipped Hat” pattern and had no issues following it.
Thanks!
Jenya
Hi Jenya,
Thanks for reaching out! I believe we used a long tail cast-on for this sweater (since it’s a great option for any sort of stitch pattern), but you can use whatever cast-on works best for you. If you want to make the 2 x 2 tubular cast-on work for this pattern, all you’ll need to do is knit the first knit stitch after joining in the round, and place your end-of-round marker there, instead of before that stitch. Then, you’ll be able to follow the pattern as written!
All the best,
Lili
Hi Lili,
Thank you so much for the quick reply!
After giving it some thought I reached the same conclusion as your advice, I need to simply move forward with one stitch and then follow the pattern 🙂 I will try the tubular cast on since it will look great on this model and it is also stretchier.
Best,
Jenya
You’re very welcome, Jenya! I think the tubular cast on would be perfect as well.
All the best,
Lili
Hi! Could I use Quartz with this pattern?
Hi Jessica,
Quartz would be a fantastic choice for this pattern! As always though, we recommend knitting a gauge swatch before casting on your project, especially when you are substituting yarns. You may need to size up or down your needles in order to get the correct gauge!
All the best,
Lili
I’m knitting size 28 1/2. I must be reading the pattern wrong in the collar. I’ve completed the Round 1 rib pattern [K1, p2, *k2, p2, repeat … ] for 1 1/4” from cast on edge. In Shape Collar when it says “work in pattern” does it mean always work in the Round 1 pattern K1, p2, *k2, p2, repeat… regardless of what stitch was in the previous round? In shaping the collar I’ve increased from 104 stitches to 120 before or after the markers as noted in the pattern. I’ve “worked in pattern” literally based matching the purl or knit stitch on the previous round. But at the markers that has resulted in knitting or purling more than 2 stitches in a row to match those increase stitches on the previous round, thereby interrupting the 2×2 ribbing e.g. I’ll get 5 purl or 5 knit stitches in a row. The rest of the 2×2 rib (not at the markers) is fine. Where am I going wrong?
Hi Lynn,
That’s a great question! ‘Work in pattern’ means you will knit all the knit stitches and purl all the purl stitches. The ribbing will not be exactly 2 x 2 ribbing after you begin to work the increase stitches, but as long as you’re knitting the knits and purling the purls, it will look as intended. I hope this helps but if you feel like you are still hitting a snag in your project, you can always send a photo to customerservice@purlsoho.com so we can better visualize what the issue might be.
All the best,
Gavriella
Thank you, I’ll send a photo to customer service.