Striped Spring Shirt
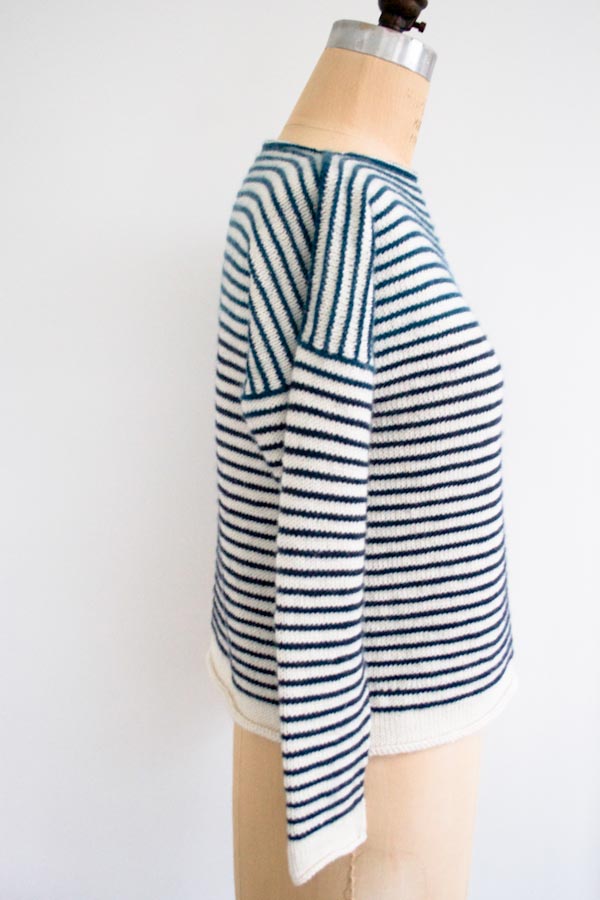
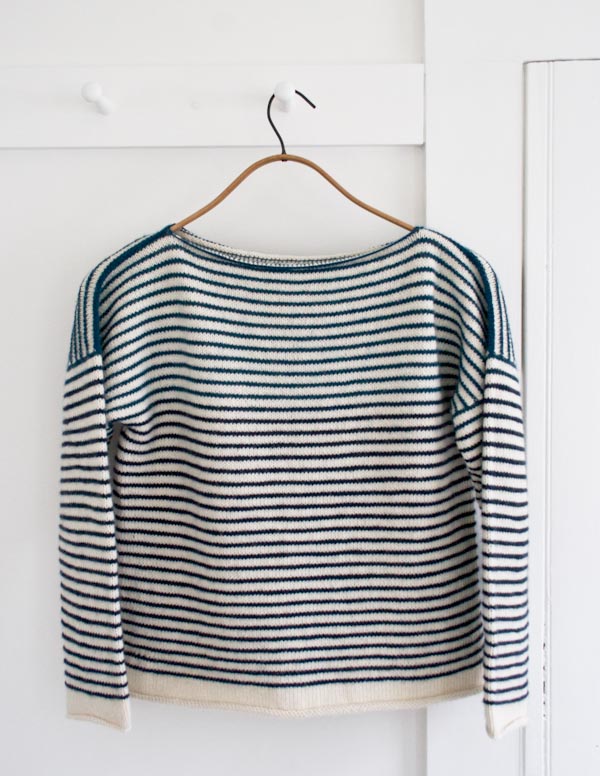
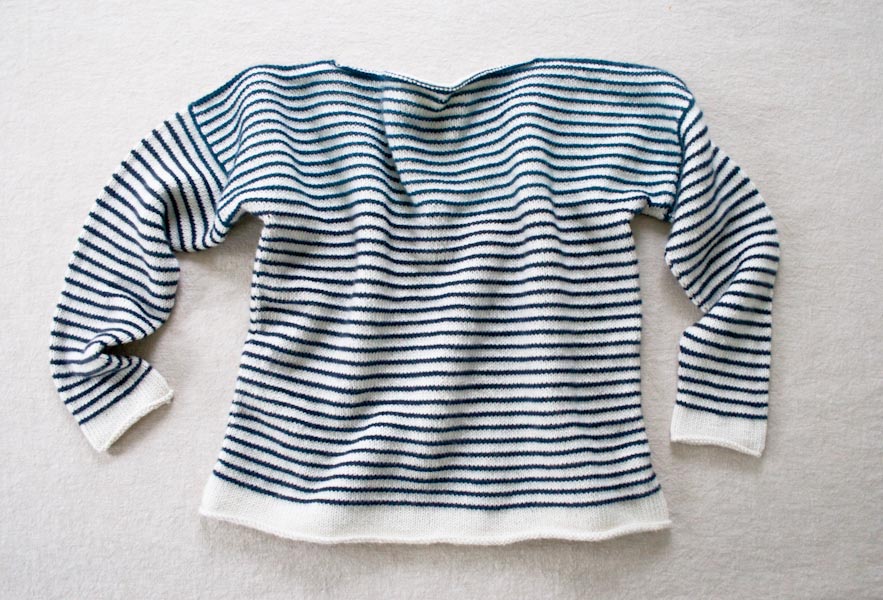
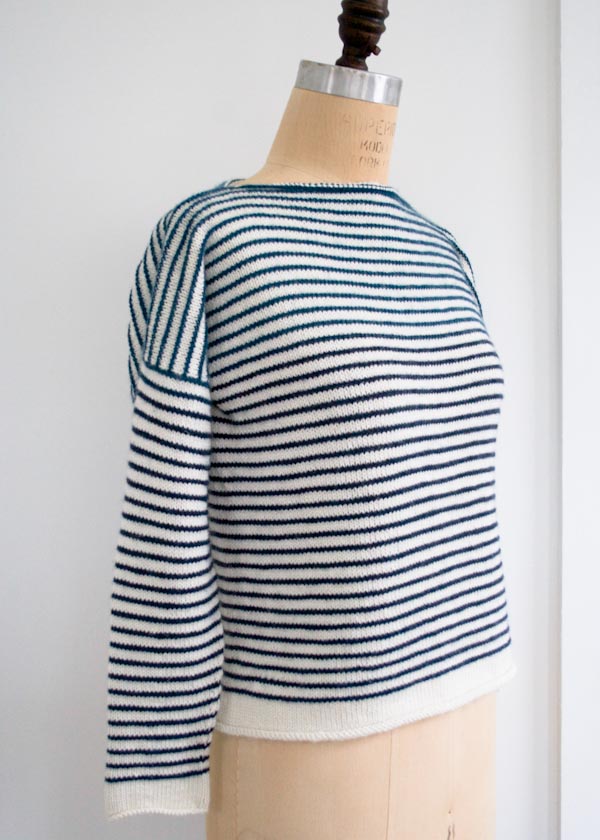
To ease you out of those cold, gray winter days and into the bright, dewy spring, we’ve redesigned our favorite summertime pullover in fresh spring yarns! In a slightly bigger gauge than the original, our Striped Spring Shirt is a classic, boat-neck, drop shoulder pullover, perfectly suited for clear spring days… and crisp summer nights.
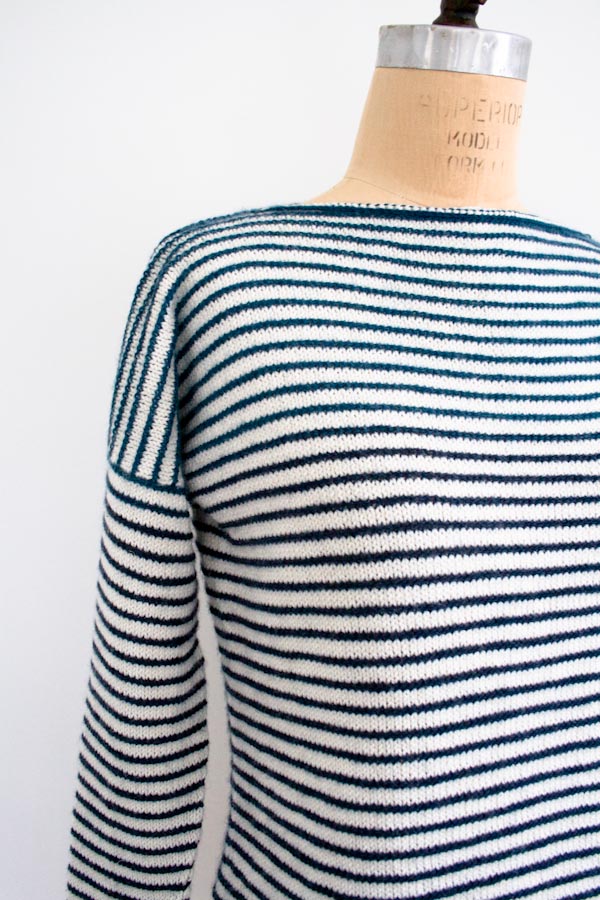
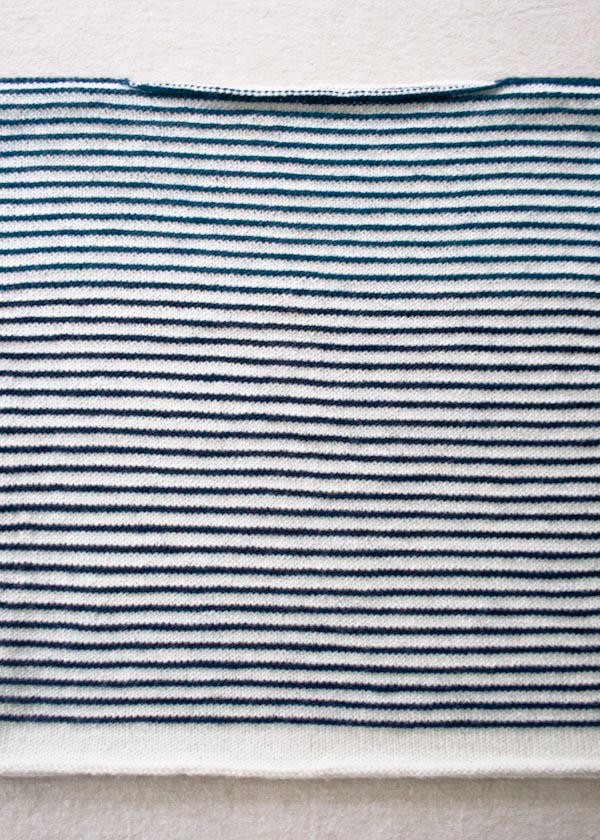
We knit up this season’s Striped Shirt In Purl Soho’s beautiful, creamy Mulberry Merino, and we punctuated it with thin garter ridge stripes of our Line Weight merino. In two shifting shades of deep blue, the effect is well-crafted subtlety, very pretty and hugely satisfying! -Laura
Designed by Purl Soho designer, Laura Ferguson.
Share your progress and connect with the community by tagging your pics with #PurlSoho, #PurlSohoBusyHands, #PurlSohoStrippedSpringShirt, and #PurlSohoLineWeight. We can’t wait to see what you make!
Materials
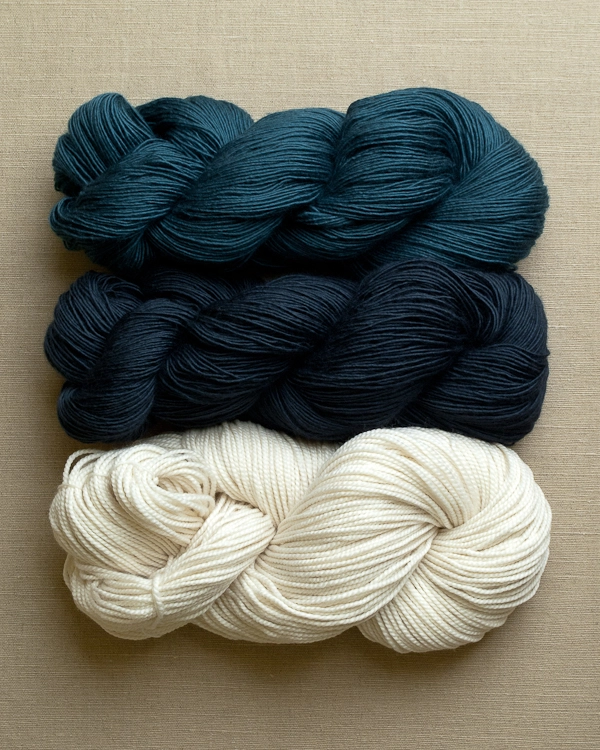
- Main Color (MC): 3 (4, 4, 5, 5) skeins of Purl Soho’s Mulberry Merino, 80% extra fine merino, 20% mulberry silk. Each skein is 247 yards/ 100 grams; approximately 730 (820, 910, 1010, 1105) yards required. We used the color Heirloom White. (NOTE: We no longer offer Mulberry Merino, but choose from one of our other sport weight yarns.)
- Contrast Color 1 (CC1): 1 skein of Purl Soho’s Line Weight, 100% merino. Each skein is 494 yards/ 100 grams; approximately 270 (295, 320, 350, 375) yards required. We used the color Timeless Navy.
- Contrast Color 2 (CC2): 1 skein of Line Weight; approximately 110 (130, 155, 175, 200) yards required. We used the color Peacock Blue.
- US 4 (3.5 mm), 32-inch circular needle
- Optional: US 4, 12- or 16-inch circular needle (for picking up and working upper sleeves)
- A set of US 4 double pointed needles
- 1 stitch marker
Additional Palette Ideas
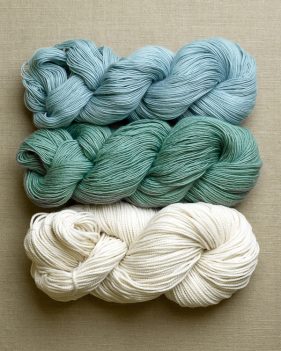
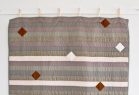
ON THE LEFT
- Main Color (MC): Purl Soho’s Mulberry Merino in the color Heirloom White (bottom)
- Contrast Color 1 (CC1): Purl Soho’s Line Weight in the color Lichen Green (middle)
- Contrast Color 2 (CC2): Purl Soho’s Line Weight in the color Desert Blue (top)
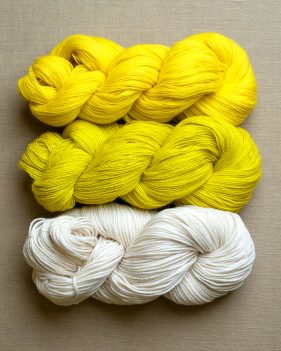
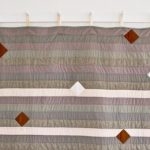
ON THE RIGHT
- Main Color (MC): Purl Soho’s Mulberry Merino in the color Heirloom White (bottom)
- Contrast Color 1 (CC1): Purl Soho’s Line Weight in the color Yellow Zest (middle)
- Contrast Color 2 (CC2): Purl Soho’s Line Weight in the color Yellow Yellow (top)
Gauge
NOTE: See Begin Striping section below for swatching in the round and/or see Continue Back Evenly for swatching flat.
24 stitches and 35 rows = 4 inches in striped stitch pattern, blocked
Sizes
NOTE For help picking a size, please check out our Understanding Ease + Selecting Size Tutorial!
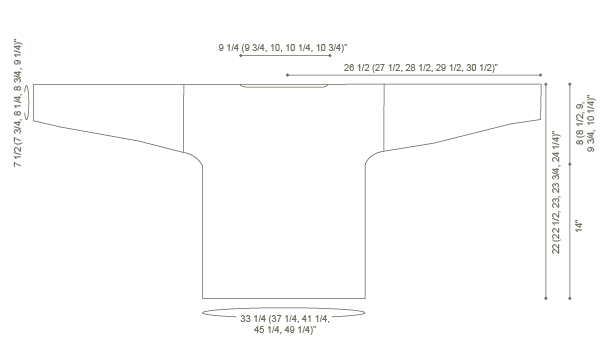
33¼ (37¼, 41¼, 45¼, 49¼)
- Finished Chest Circumference: 33¼ (37¼, 41¼, 45¼, 49¼) inches
- Finished Length from Shoulder to Bottom Edge: 22 (22½, 23, 23¾, 24¼) inches
- Finished Length from Underarm to Bottom Edge: 14 inches
- Finished Length from Center of Neck to Cuff: 26½ (27½, 28½, 29½, 30½) inches
EASE: This piece is designed with a 1 to 3-inch ease.
SAMPLE: Size 37¼ is pictured here.
Pattern
Body
Begin at Bottom Edge
With MC, cast 200 (224, 248, 272, 296) stitches onto the longer circular needle. We used a basic Long Tail Cast On. Place marker and join for working in the round, being careful to not twist the stitches.
Work in stockinette stitch, knitting each round, until piece measures 1½ inches from the unrolled cast-on edge.
Begin Striping
NOTE: For some extra tips visit our Working Stripes in the Round Tutorial.
Round 1: With CC1, knit.
Round 2: With CC1, purl.
Rounds 3, 4 and 5: With MC, knit.
Repeat Rounds 1-5 twenty-one more times or until piece measures approximately 14 inches from unrolled cast-on edge, ending with Round 5.
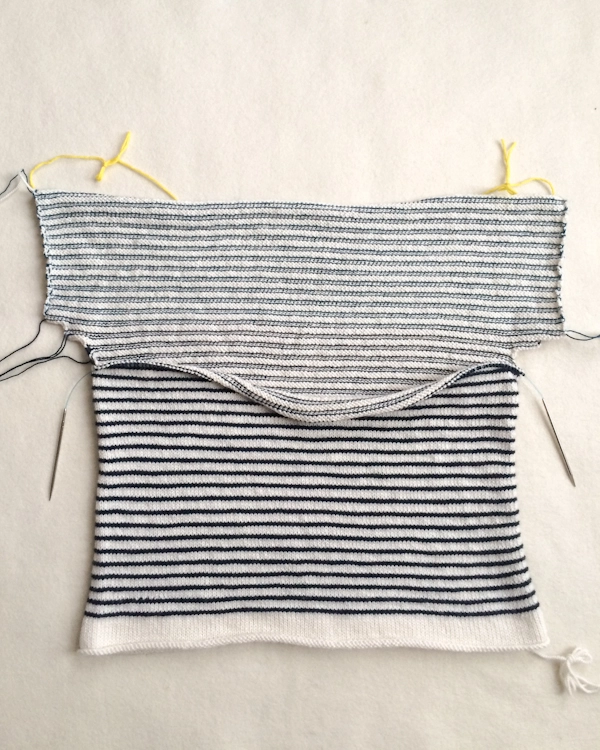
Divide Front and Back
Round 1: With CC1, knit 100 (112, 124, 136, 148) stitches, place these stitches on hold for Front, knit to end of round. [100 (112, 124, 136, 148) stitches remain for Back]
Back
NOTE: You will now be working back and forth in rows rather than in the round. Each row in this pattern ends with the instructions to either “turn” or “slide” the work:
“Turn” means to do what you would normally do when knitting rows with a circular needle. That is to say, put the needle in your left hand into your right and the needle in your right hand into your left, and flip the work around so the opposite side is facing you.
“Slide” means to keep the same side of the work facing you and to push all the stitches to the right end of the circular needle. Without turning the work, start the new row as you normally would.
Shape Back Sleeves
Row 1 (wrong side): With CC1, knit to end of Back stitches, slide.
Cut CC1.
Row 2 (wrong side): With MC, purl to end, turn.
Row 3 (right side): With MC, cable cast on 6 stitches, knit across these cast-on stitches and then knit to end, turn. [106 (118, 130, 142, 154) Back stitches]
Row 4 (wrong side) With MC, cable cast on 6 stitches, purl across these cast-on stitches and then purl to end, turn. [112 (124, 136, 148, 160) Back stitches]
Row 5 (right side): Join CC1, knit to end, turn.
Row 6 (wrong side): With CC1, knit to end, turn.
Cut CC1.
Row 7 (right side): With MC, knit to end, turn.
Row 8 (wrong side): With MC, cable cast on 6 stitches, purl across these cast-on stitches and then purl to end, turn. [118 (130, 142, 154, 166) Back stitches]
Row 9 (right side): With MC, cable cast on 6 stitches, knit across these cast-on stitches and then knit to end, slide. [124 (136, 148, 160, 172) Back stitches]
Row 10 (right side): Join CC1, knit to end, turn.
Cut CC1.
Continue Back Evenly
NOTE: For this section do not cut CC2 between stripes. Instead, loosely carry CC2 up the edge. This minimizes the number of ends you’ll have to weave in.
Join CC2 on wrong side…
Row 1 (wrong side): With CC2, knit to end, slide.
Row 2 (wrong side): With MC, purl to end, turn.
Row 3 (right side): With MC, knit to end, turn.
Row 4 (wrong side): With MC, purl to end, turn.
Row 5 (right side): With CC2, knit to end, turn.
Row 6 (wrong side): With CC2, knit to end, turn.
Row 7 (right side): With MC, knit to end, turn.
Row 8 (wrong side): With MC, purl to end, turn.
Row 9 (right side): With MC, knit to end, slide.
Row 10 (right side): With CC2, knit to end, turn.
Repeat Rows 1-10 five (five, six, six, seven) more times.
SIZES – (37 ¼, –, 45 ¼, –) INCHES ONLY
Repeat Rows 1-5 one more time.
ALL SIZES
Next Row (wrong side): With CC2, knit 34 (39, 44, 49, 54) stitches, place these stitches on hold for Back Left Shoulder, loosely bind off following 56 (58, 60, 62, 64) stitches for Neck, knit to end, place previous 34 (39, 44, 49, 54) stitches on hold for Back Right Shoulder.
Cut CC2 and MC.
Front
Shape Front Sleeves
Slip FRONT on-hold stitches onto longer circular needle. Join CC1 to wrong side and…
Work Rows 1-10 of the Shape Back Sleeves section, above. [124 (136, 148, 160, 172) Front stitches]
Continue Front Evenly
Work Rows 1-10 of the Continue Back Evenly section, above, six (six, seven, seven, eight) times.
SIZES – (37 ¼, –, 45 ¼, –) ONLY
Work Rows 1-5 in the Continue Back Evenly section, above, one more time.
ALL SIZES
Next Row (wrong side): With CC2, knit 34 (39, 44, 49, 54) stitches, place these stitches on hold for Front Right Shoulder, loosely bind off following 56 (58, 60, 62, 64) stitches for Neck, knit to end. [34 (39, 44, 49, 54) stitches remain on needle for Front Left Shoulder]
Cut MC.
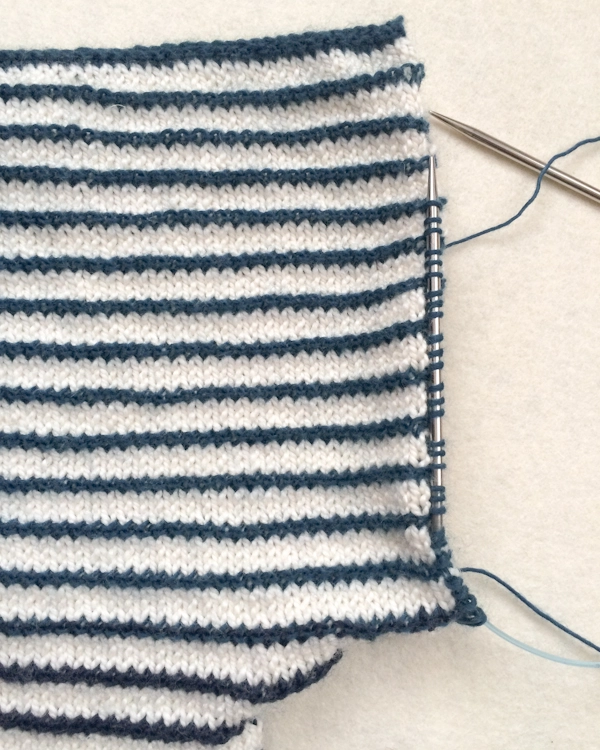
Shoulders
Left Shoulder
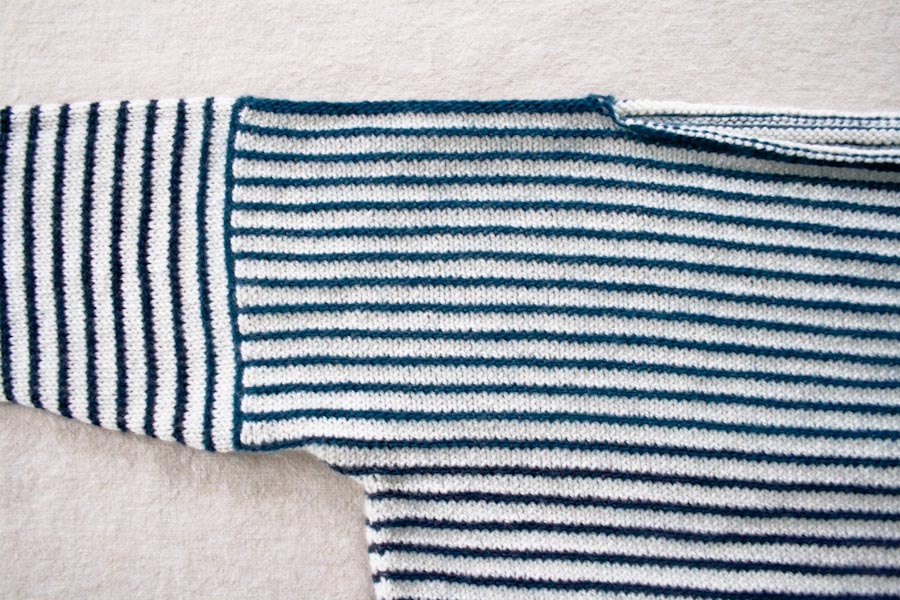
With the Front Left Shoulder stitches already on the longer circular needle, working from neck-side to shoulder-side, slip the Back Left Shoulder stitches onto the other end of the needle. The tips of the needle should exit the stitches at the shoulders’ edge. You will join the Front and Back Shoulders with wrong sides together in order to have a decorative seam on the outside.
Holding the needles parallel in your left hand, use either the shorter circular needle or a double pointed needle to work a 3-needle bind off. For extra help, please visit our 3-Needle Bind Off Tutorial.
Cut CC2.
Right Shoulder
Orient the Front Right Shoulder stitches and Back Right Shoulder stitches onto the longer circular needle as you did for the Left Shoulder stitches. With wrong sides together, join CC2 and use a 3-needle bind off to join the two sets of shoulder stitches.
Cut CC2.
Sleeves
Seam Underarm
NOTE: Before you seam the cable cast-on edges at the underarm, make your job easier by first weaving in the Contrast Color tails, just around this area.
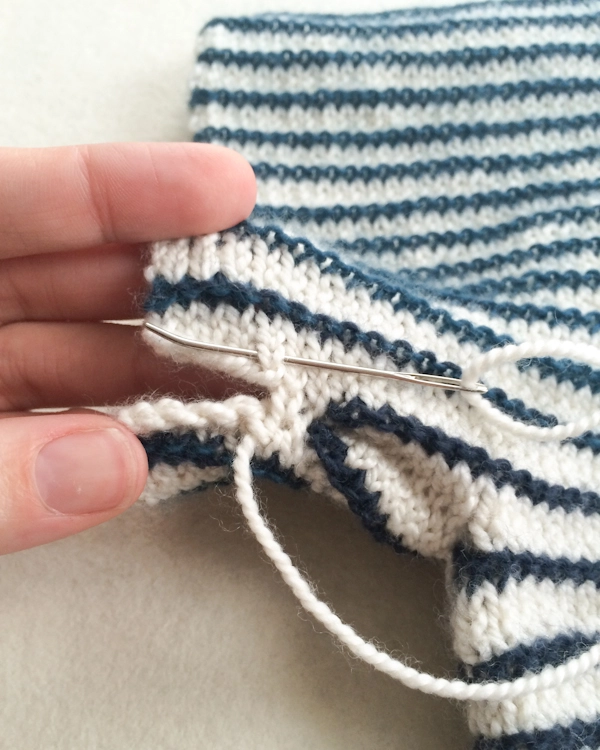
To seam the first underarm, hold the Front and Back cable cast-on edges parallel. Use a tapestry needle threaded with the MC yarn to sew together these edges, starting at the armpit and working outward. Sew under the knit stitch at the cast-on edge of one side and then under the knit stitch directly opposite. Continue back and forth until you reach the end.
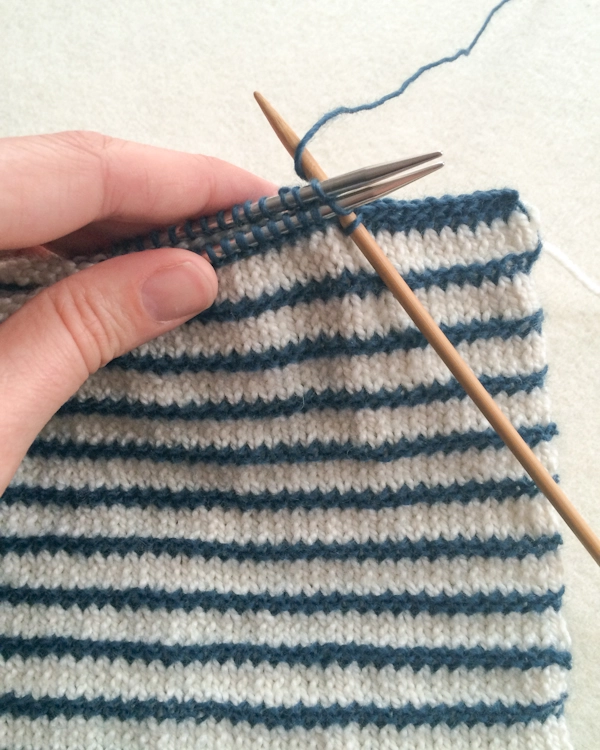
Pick Up for the Sleeve and Start Striping
With right side facing and starting to the left of the underarm seam, use the shorter circular or double pointed needles and CC2 to pick up a total of 77 (83, 89, 95, 101) stitches around the armhole. To do this, first pick up 2 stitches from the MC stitches to the left of the seam; then continue up the armhole, picking up 1 stitch for each MC row and 1 stitch at the 3-needle bind off ridge; then continue down the other side, picking up 1 stitch for each MC row; and lastly, pick up 2 stitches from the MC stitches just before the underarm seam. Place a stitch marker and join for working in the round. [77 (83, 89, 95, 101) stitches]
Round 1: With CC2, purl.
Rounds 2, 3 and 4: With MC, knit.
Round 5: With CC2, knit.
Cut CC2.
Transition Colors and Shape
NOTE: If you started the sleeves on circular needles, change to double pointed needles when necessary.
Joining CC1…
**Round 1: With CC1, purl.
Rounds 2, 3 and 4: With MC, knit.
Round 5: With CC1, knit.
Round 6: With CC1, purl.
Rounds 7 and 8: With MC, knit.
Round 9: With MC, k2tog, knit to last two stitches, ssk. [2 stitches decreased]
Round 10: With CC1, knit.
SIZES 33 ¼ (37 ¼, 41 ¼, 45 ¼, – ) ONLY
Repeat Rounds 6-10 one (2, 3, 5, – ) more times. [2 (4, 6, 10, – ) stitches decreased] ***
Repeat everything from ** to *** seven (5, 4, 2, – ) more times. [45 (47, 49, 59, – ) stitches]
SIZE – ( -, – , 45 ¼, – ) ONLY
Repeat Rounds 1-10 one more time. [ – ( -, -, 57, – ) stitches]
Repeat Rounds 6-10 two more times. [ – ( -, -, 53, – ) stitches]
SIZE – ( -, -, -, 49 ¼) ONLY
Repeat Rounds 6-10 twenty-two more times. [ – ( -, -, -, 55 ) stitches]
Continue Evenly
Round 1: With CC1, purl.
Rounds 2, 3 and 4: With MC, knit.
Round 5: With CC1, knit.
Repeat Rounds 1-5 one (one, zero, zero, one) more time(s).
Next Round: With CC1, purl
Cut CC1.
With MC, work in stockinette stitch, knitting each round, for 1 ½ inches.
Bind off loosely.
Repeat the entire Sleeves section for second sleeve.
Finish
Weave in ends and block as desired.


Hi there,
I’m loving knitting this up and the yarn is simply deelish but I have a question about the sleeve decreases.
So I’m to decrease on row 9 then go back to row 6 and decrease on the 9th row two times? Then I do the same thing 5 more times ( for size 37 1/4)? Am I reading this wrong or are the decreases staggered like this?
Help!
Hi Gazelle,
Glad you are loving this! To clear things up: after round 10 you will repeat rounds 6-10 two more times and then five more times. In total you will complete the decrease round eight times. The decreases are distributed evenly because you repeat the five round repeat in succession until you have done it eight times total. Let me know if you are still confused!
-Adam
Hi Adam,
If I only decrease 8 times total why does the next line in the instructions ask me to work from ** to *** . the ** is next to row 1 not row 6. This seems to indicate that after I do the two initial repeats I should go back to row one. I’m still confused. Is the ** next to the wrong row?
Hi Gazelle,
Sorry for the late reply! Yes, you will go back to round 1 and knit through to round 10 again AND repeat rounds 6-10 one more time. This is the whole repeat in between ** and ***. Hope this is clearer! All in all, you will decrease 32 stitches total.
Best,
Adam
Hi. I have two (probably rather basic) questions.
1. You mention the garment is designed with 1-3 inch ease. You also mention finished chest circumference. Does this mean I should add a measurement to my actual chest circumference or if I am 33.25 make the small and the built in ease is already added? (I hope I am clear.)
2. When I do a gauge swatch you mention to block it. I am wondering how much to “stretch” when I block. I have not had to block or do much swatches in my past and want to make sure I am doing this correctly.
Thank you for your time. I just got my yarn today in the mail and cannot wait to start!!
Hi Erin,
Thanks for writing in! And your question is not basic at all. Lots of people get tripped up with ease. If something is calling for 3″ of ease and your chest is a 33, you will want to make the garment with a finished chest measurement of 36″. Now, when blocking you shouldn’t stretch the fabric at all. I like to block my swatches how I plan to take care of the garment in the future. I hope all this helps you!
Best,
Adam
Hi – such a great pattern! I can’t wait to start and prepare for the spring! Would you be able to recommend an yarn option that is more affordable?
Thank you!
Hi C,
Thanks for the kind comment! You can knit the body in Cotton Pure or possibly Cascade 220 Superwash Sport. The stripes take any fingering weight yarn of your choosing, as long as you like the color.
Thank you!
Help!
I started knitting this beautiful sweater in a size small. About 6″ into the body, I decided I wanted to go for another color for the stripes. I started over and as I removed my work from the needles I noticed how wide it was. I took measurements and the total circumference (taken at the bottom edge) is 41 7/8 inches. I casted on 224 (size small). I recounted to make sure. I’m not sure why it ended up with such a wide body (41 7/8 inches instead of 37 ¼ inches). I also blocked that piece and ended up with the same width. The gauge is as it’s supposed to be: 6 stitches per inch. I did use an alternative to Purl Soho’s mulberry merino. The yarn I used is a sport weight alpaca and silk yarn by Blue sky fibers. What do you recommend? Should I knit this pattern in a XS instead of the S?
Thank you!
Marie-Claude
Hi Marie-Claude,
Thanks for the question. I don’t think you gauge came out to be six stitches per inch because a cast on of 224 should yield 37 1/4″ width (224/6 = 37.3). According to your measurements I think your gauge is around 5.5 stitches per inch. This seems like a small difference, but when applied to such a large cast on it can really change your dimensions. I’d go down a needle size or follow the smallest size in the pattern. With your gauge you should get a chest width of around 37″ if you follow the directions for the smallest size. I hope this helps!
-Adam
Thank you very much for your quick response.
I will try to use smaller needles. Thank you!
-Marie-Claude
Hi,
This sweater looks lovely. I’d like to knit it in similar colors as your photos, but the Line Weight colors don’t seem to be available. Do you think Koigu KPPPM + KPM would be okay as a substitute? If so, 1 skein of Koigu KPPPM + KPM seems to be significantly shorter than 1 skein of Line Weight, would 1 skein of each contrast color in Koigu KPPPM + KPM be enough for this sweater?
Hi Jisoo,
Thanks for writing in! While Koigu KPPPM amd KPM are a bit thicker than our Line Weight, I do think that you can use them here. For contrast color 1, you will need 2-3 skeins and for contrast color 2, you will need 1-2 skeins.
I hope that this helps!
Cassy
Thanks you.
Will Line Weight be available in the near future (for the colors above)? Also, might you have other alternatives worth suggesting other than the Koigu? I’m looking at 3010 & 1500 but am not quite sure they would be quite what I’m looking for.
Hi Jisoo,
Thanks for writing back! The Line Weight colors above are discontinued and will not be available again. As to an alternate yarn, Woolfolk Tynd could also work well here as would Tosh Merino Light!
I hope that this helps!
Cassy
Thank you again for the reply. One last question though, so for size 37 ¼, how much yardage will be needed for each of the contrast colors?
Hi Jisoo,
Thanks for writing back! For the size that you are making you will need roughly 330 yards of contrast color 1 and between 130-150 yards of contrast color 2.
Best,
Cassy
Thanks! I will be going with Woolfolk Tynd colors 11 & 14.
is that positive or negative ease?
Hi Caro,
Thanks for writing in! The ease listed here is positive ease. To select your size, measure you bust measurement and add 1-3 inches and choose the nearest size!
Best,
Cassy
Thanks for the quick reply!
I live in Australia but visited your store in New York last year and fell in love. I bought yarn in store and made a stunning scarf and fingerless mittens. Now I am knitting Julie Hoover’s Addison with yarn I ordered from you online. As always, I am already looking ahead to the next project and love the look of the Striped Spring Shirt. I am completely undecided about whether to do the spring or the summer version – both look beautiful! I wanted to do the spring in the blue colourway pictured but note that the blue yarns are no longer available. I read an earlier query from someone in Florida that wanted a lighter version and you recommended substituting the Habu cotton gima for the main yarn. Can I also use the cotton gima for the stripes? I am trying to get as close to the blues in your pictures as I can and the cotton gima blues look lovely? If not, what yarn do you recommend I use for the stripes if I use cotton gima for the main?
Hi Viki,
Thanks for writing in! I am so glad that your project is going well! We have done a summer version of this lovely sweater. It can be found here: https://www.purlsoho.com/create/2014/06/08/lauras-loop-striped-summer-shirt/
For the summer version we used Habu Silk Gima for the body and Habu’s Linen Wrapped Silk for the color rows. In both versions, the yarn used for the colored stripes is much finer than the main color. We also used the Silk Gima and not the Cotton Gima. You may be able to get gauge with the Cotton Gima but I would certainly recommend knitting a gauge swatch is substituting!
I hope that this helps and happy knitting!
Cassy
I keep reading the pattern, but I’m still confused. The photo appears to show TWO colors, but I know you have a CC2 in there. Is the front striped with one color & the back another? Does the shade of blue change when you get to the armholes?
Please straighten me out!
Hello Pam,
Thank you for reaching out! There are, in fact, three colors in this shirt. CC2 is used after separating for front and back of the body, so it is only used for the upper 3rd of the body and the rest is CC1. The deference in CC1 and CC2 is intentionally subtle.
I hope this clears thins up and let me know if you have any further questions!
Happy knitting!
-Marilla
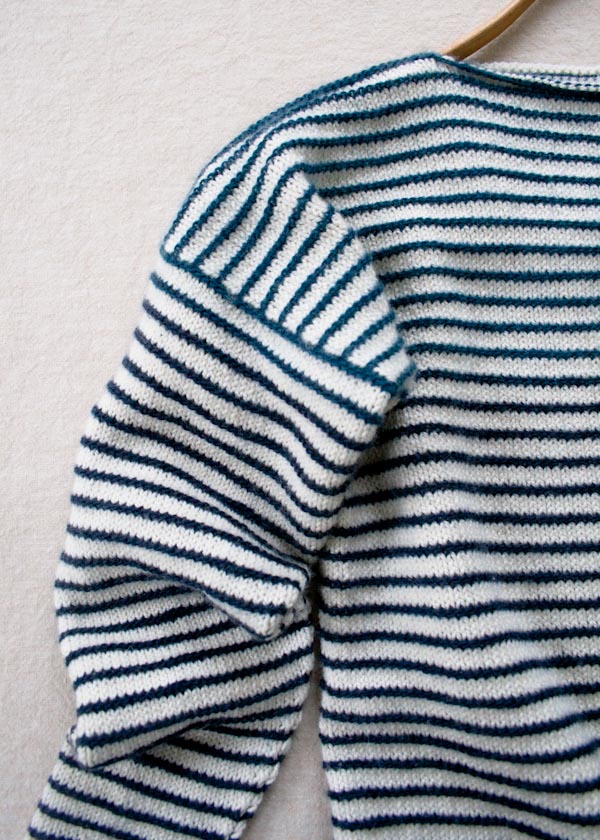
Thank you for the pattern, and for including the photos. The photos make the construction really clear, and I really appreciate that. I’m planning to knit this sweater in all one color, and am trying to condense the pattern accordingly. I need a little help doing that, please.
1. Are the directions for a one inch ease or a three inch ease? or does it not matter because we know the finished dimensions?
2. Are the sleeve decreases done every six rows? every 10 rows? something else entirely? Is there any reason not to do them a set number of times over a set number of rows until I get to the desired number of stitches?
3. Is there any reason not to cast on 12 stitches all at once to the front and back in order to create the drop shoulder? I see that you’ve done two sets of six, but I don’t see that it would make a huge difference.
By any chance, do you have a pattern for a drop-shoulder pullover in all one color, so that I don’t have to translate this pattern?
Thank you!
Hello Hope,
Thank you for reaching out! These are all great questions.
1. This shirt is designed to have 1 to 3 inches of ease. This means that you will want to make the size that is 1 – 3 inches larger than your actual chest size.
2. The sleeve shaping is done while working in the stripes and ridges as well as giving you a properly proportioned slope. This is why the decreases are spaced out every 10 rows as well as every 5 rows.
3. This is in reference to the “Shape Back Sleeves”? Because there are a several rows between each set of 6 cable cast on you are creating a slope which is important to the construction of the garment.
4. Yes! Our Camber Pullover is a lovely single toned dropped sleeve pullover.
I hope this helps and good luck!
Happy knitting,
Marilla
I love the white and blue stripes très français.
Your tutorial is very clear.
Merci
Yolande
Would love to make this sweater! Do you have a suggestion for a yarn I can supplement for the Mulberry Merino? Looks like it’s all sold out. Thanks!
Hi Kelsey,
Thanks for reaching out! I am sorry to say that the links to the yarn were out of date! We have updated them and you can certainly use the Mulberry Merino yarn which we do still produce!
Best,
Cassy
Thank you, that’s great news!
I would like to make this sweater but by any chance would you have directions to knit it up NOT in the round??
Hi Jo,
Great question! Although we don’t have instructions in the pattern for knitting this top flat, it can be done with a few modifications! You will need to cast on half the stitches for the front and half for the back, and work the stripe pattern as follows:
Row 1 (wrong side): With CC1, knit to end, slide.
Row 2 (wrong side): With MC, purl to end, turn.
Row 3 (right side): With MC, knit to end, turn.
Row 4 (wrong side): With MC, purl to end, turn.
Row 5 (right side): With CC1, knit to end, turn.
Row 6 (wrong side): With CC1, knit to end, turn.
Row 7 (right side): With MC, knit to end, turn.
Row 8 (wrong side): With MC, purl to end, turn.
Row 9 (right side): With MC, knit to end, slide.
Row 10 (right side): With CC1, knit to end, turn.
Repeat rows 1-10 until the front and back measure about 14 inches, ending with Row 10. Skip the row that divides the front and back, and you can then proceed to the Back instructions and work them as written.
I hope that helps!
Julianna
Thank you, Julianna, that is a great help!
Hello,
I would love to knit this sweater but I am six feet tall and need to add length. How much extra yarn would I need?
Thank you
Tammie Hamilton
Hello Tammie,
Thank you for reaching out! Depending on how much longer you would like to make this shirt you might need an extra skein of the main color, but you might be ok. Because of the stripes, dye lot is less important, so you could wait and see or buy an extra skein from the start.
I hope this helps and let us know if you have any further questions!
-Marilla
Hi there! LOVE that I found this beauty! I have two questions for you pros. 1. If I want to make it a little heavier weight is there a yarn you’d recommend? and 2. Do you have any steps for adding a small turtleneck/roll-neck/ mock-neck at the top?
Thanks!!
Hi Clare,
Thank you so much for writing in and for the kind words! Since changing the weight of the yarn can potentially change the gauge and therefore the finished size of the sweater, I would suggest picking something fairly similar to the original Mulberry Merino for the main color. Both Cashmere Merino Bloom and Good Wool are fairly close but slightly heavier and warmer yarns, so they will probably work well, but I would definitely recommend knitting a gauge swatch to make sure. To add a higher neck, for the last step of both the Front and Back instructions, rather than casting off the center Neck stitches, place them on a separate holder. Once you have completed the three-needle bind off for the shoulders, you can then place the front and back neck stitches on a 16 inch needle and knit the neck for as long as you would like.
I hope that helps!
Julianna
This is a great-looking sweater. I have three questions.
1. I’d like to make it in all one color. I’m usually pretty good at translating instructions and transposing patterns but I’m having a really hard time with this one. Should I just use the graphic as my guideline and ignore the pattern except for dimensions, increases and decreases? I’d welcome any suggestions you might have.
2. I’m planning to use a heavier yarn, either worsted or aran weight. Will the rolled stockinette look OK for the bottom of the sweater and cuffs or should I add a row of knit stitches to give them a little more stability?
3. How do I make sure that I get two inches of ease?
Thank you for the great patterns and elegant yarn! I’ve used your patterns to make something like 30 iterations of the Lovely Ribbed Hat and Classic Cuffed Hat combined for friends or their children over the past year. (I made one for myself as well but ended up giving it to an honorary niece. A replacement is on my needles now).
Hello Hope,
Thank you for writing, I’m so happy to hear of your hat successes!
1. To knit this pattern in one color I would recommend changing all of the CC1 and CC2 to MC. The “Shape Back Sleeves” section is the only part that gets slightly complicated because you have two wrong sides in a row. For this you will just cut your MC yarn, slide your work, and rejoin your yarn.
2. If you want to knit this sweater with a heavier yarn your gauge will change. This will be a bit of a risk because you will not know how it will turn out until you are fairly far into your project. The first step you will need to do is knit up a gauge swatch to find out how much bigger your gauge is going to be. You are correct that if your fabric is denser you will likely get some curling so adding an edging would be smart.
3. To get two inches of ease you will need your finished chest circumference to be two inches larger than your actual chest circumference. If your actual chest circumference is 35 then you would want to knit the size 37 1/4″.
I hope these answer your questions and let me know if I can clarify anything.
Happy knitting!
-Marilla
Hello!
Will you be updating these sizes to include larger ones? It’s beautiful!
Thank you!
Hi Heather,
Great question! We are currently going through our catalog of older patterns and updating them to reflect our current more inclusive size range, although I’m not sure when exactly we will be getting to this one. I’ll be sure to pass your request along to the design team!
Best,
Julianna
Great pattern! Just to confirm though.. I’m almost finished the front… I assume it should be the same length as the back? Thank you!
Hi Jo,
Thank you for writing in! Correct, you’ll be working the same amount of repeats as the Back and so the Back and Front should be the same length. Some knitters find that their gauge changes slightly as they knit, so not to worry if your front and back are not perfectly equal, blocking should take care of any small variances. I hope this helps!
Happy knitting!
Gaby
Hello,
Is there any way you can tell me the yardage used of the contrast colours? Thank you
Hi Gazelle,
Thanks for reaching out! Approximately 270 (295, 320, 350, 375) yards are required for CC1 and approximately 110 (130, 155, 175, 200) yards are required for CC2.
Happy knitting!
Gianna
Hi! I’m in love with this pattern, but I’m really confused about the sizing. I always take the smallest size of patterns, but I’m afraid this will be too large because of the ease. I’m measuring 32” chest size, would that mean that this sweater would be too big? I’ve no experience with adapting patterns, hence my hesitation. Thanks in advance for the help.
Hi Liesbeth,
Thanks for reaching out! If you have a 32″ bust I think the smallest size (33¼) should fit you very well! This size for a 32″ bust would only include about an 1¼” so it would fit you and not be too big! For more information to better understand ease I would recommend checking out our new excellent tutorial Understanding Ease + Selecting Your Size!
I hope this helps and please let me know if you have any more questions!
Warmly,
Gianna
love this pattern and would love to knit it for my granddaughter who is 9 years old,,,is there a youth version She wears size 8 clothing or medium at GAP
thanks
Hi Barbara,
Thanks for reaching out! Unfortunately we only have this pattern available in adult sizing, but thank you for expressing your interest and I will be sure to pass this along to the rest of the team!
Warmly,
Gianna
Hi! I decided that a slightly wider striped looked better in my yarn (4 stitches MC, 2 stitches CC). I’m almost done the first section but wondering what to about the upper body and sleeves. For the upper body, can I just slide/turn as needed? Thanks!
Hello!
Thank you for your question! With a larger stripe design for the upper body and sleeves, you can slide and turn as needed, following your existing larger stripe pattern. You may find that you need to turn more than slide with wider stripes, however everything should still work out just fine with larger stripes!
All the best,
Margaret