
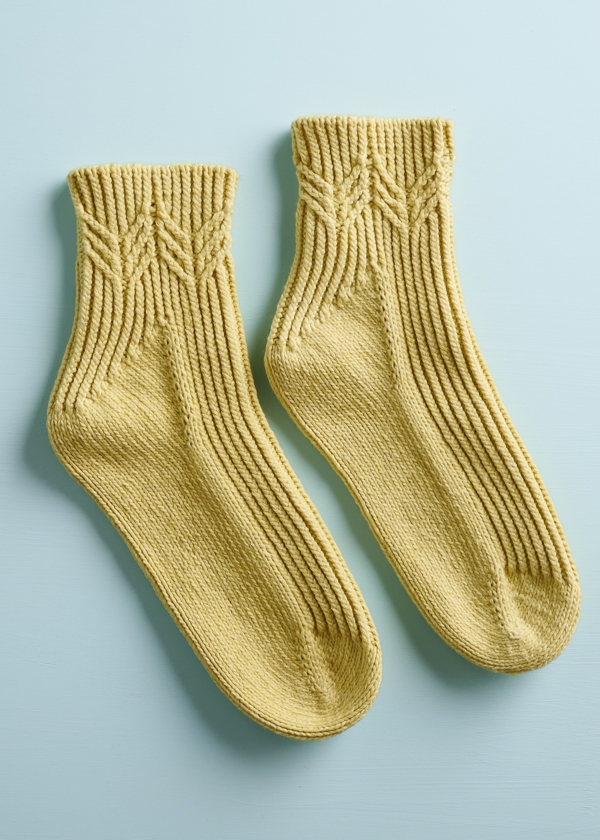
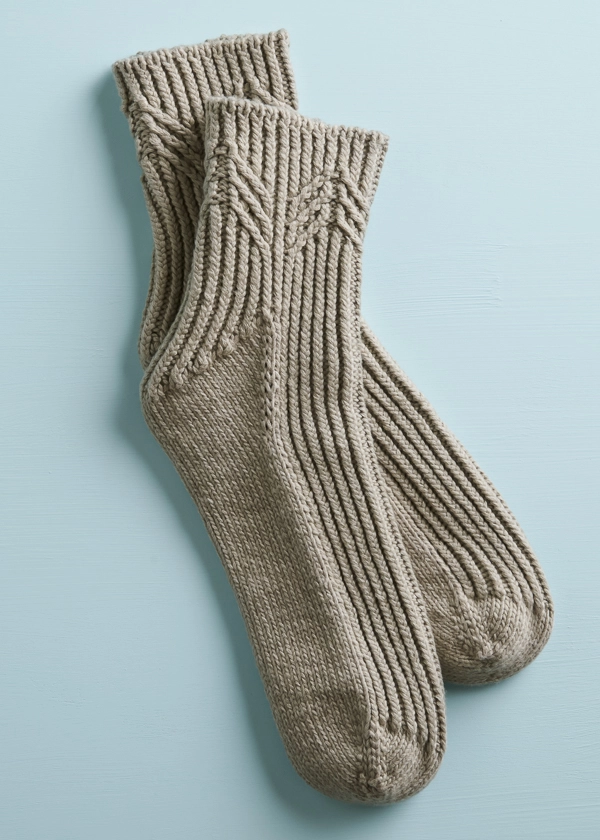
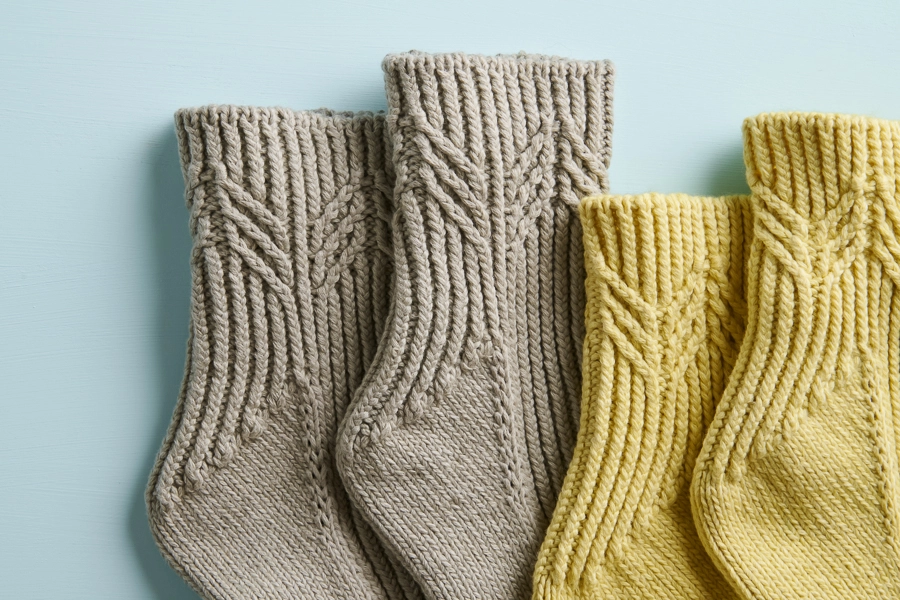

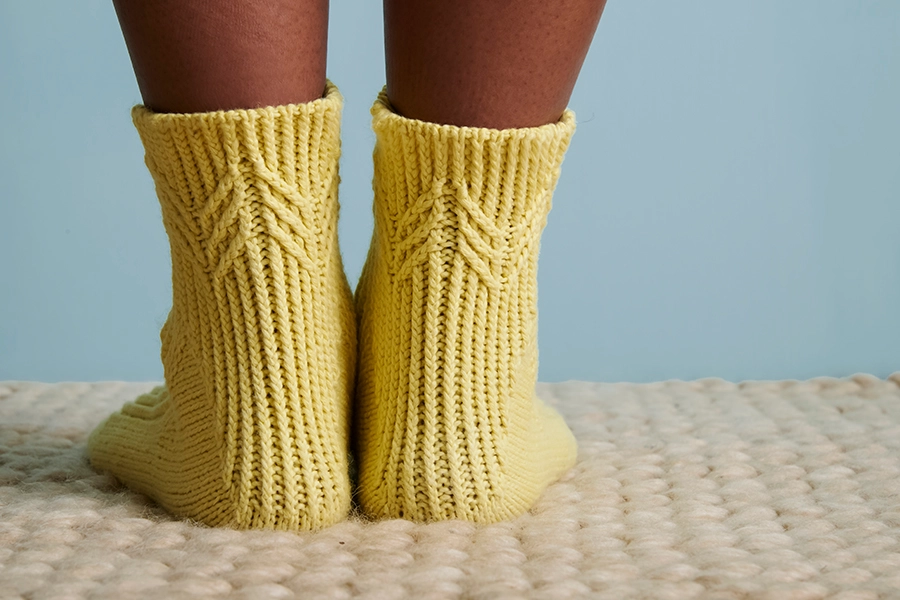
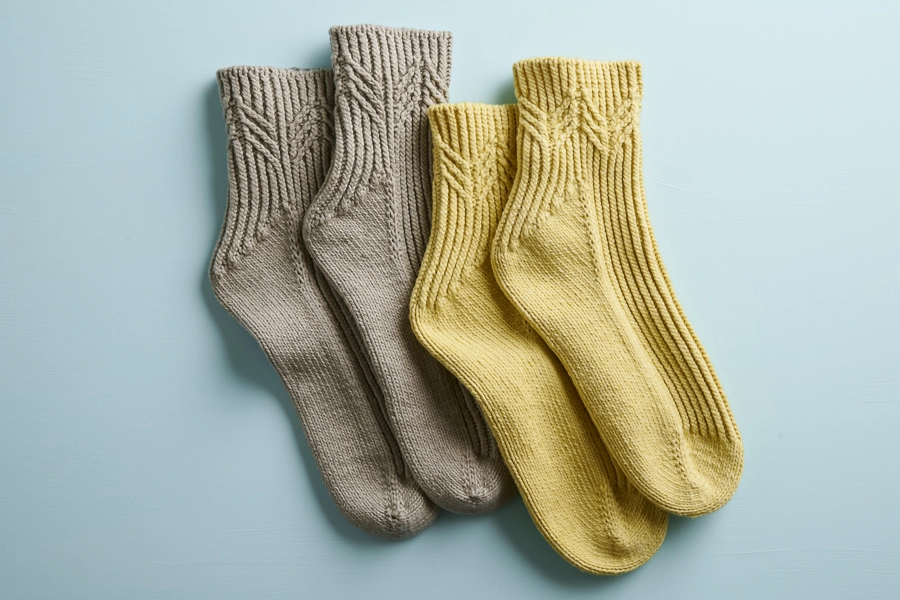
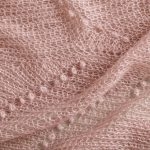
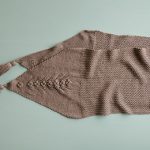
House Socks

You wake for the day, and there’s a chill to the air. This is the moment where handknit socks really shine. Our House Socks, designed by Fiona Alice, are a soft and cozy solution to the daily dilemma: it’s too cold to get out of bed!

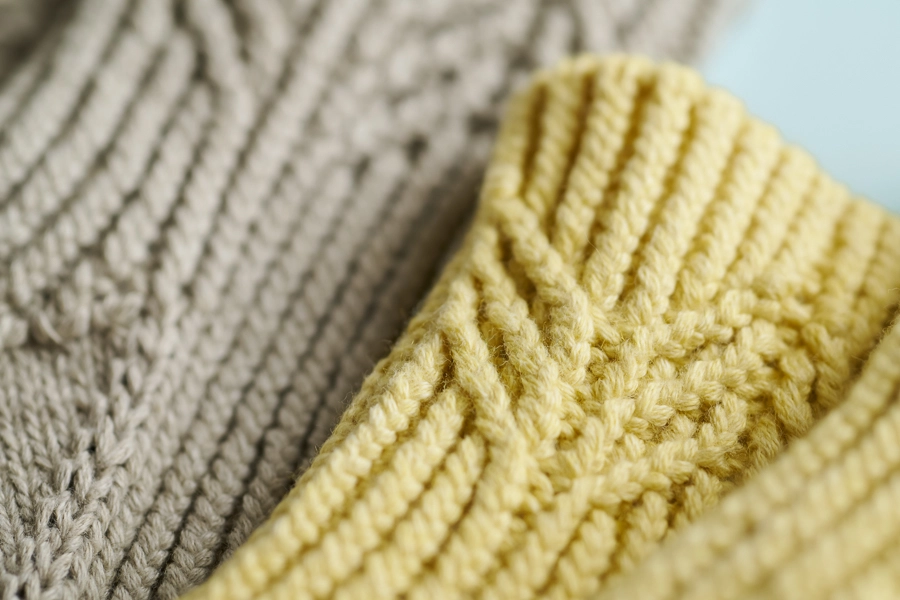
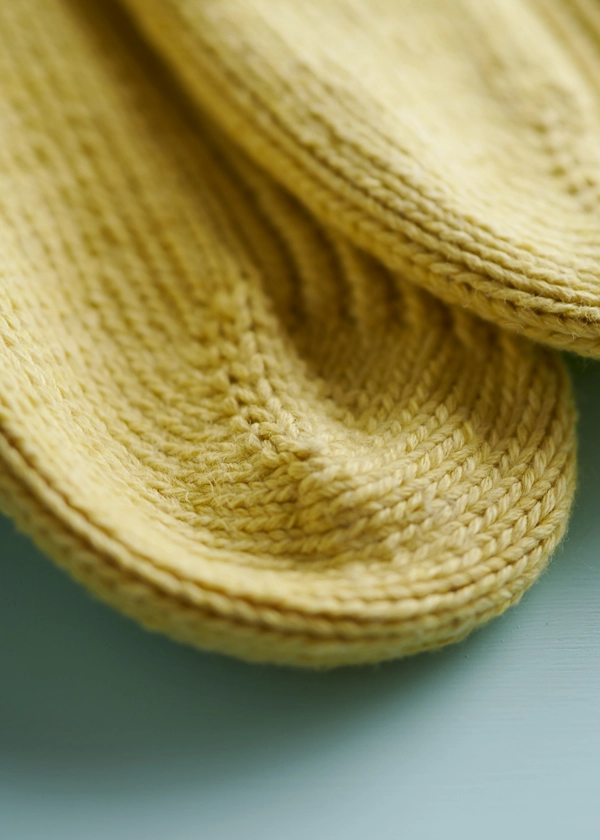
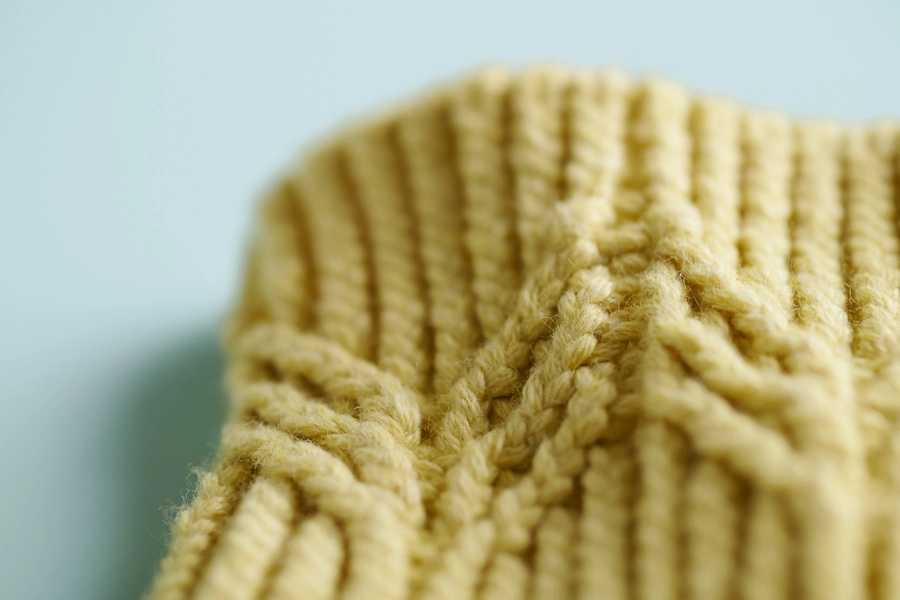
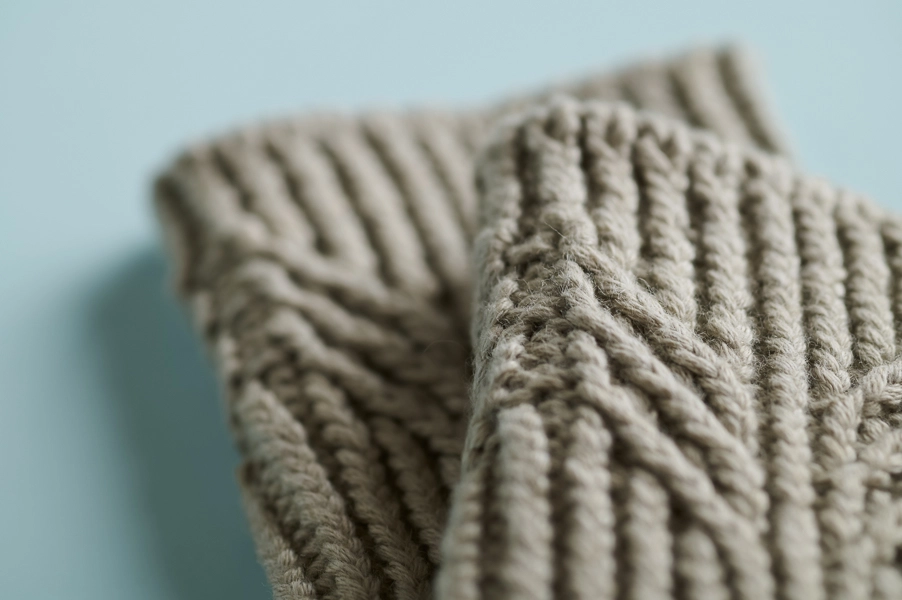
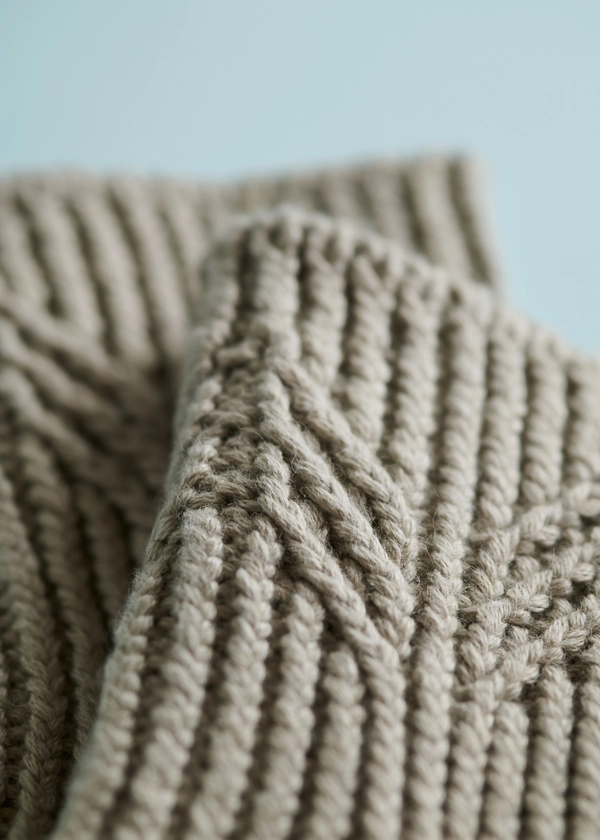
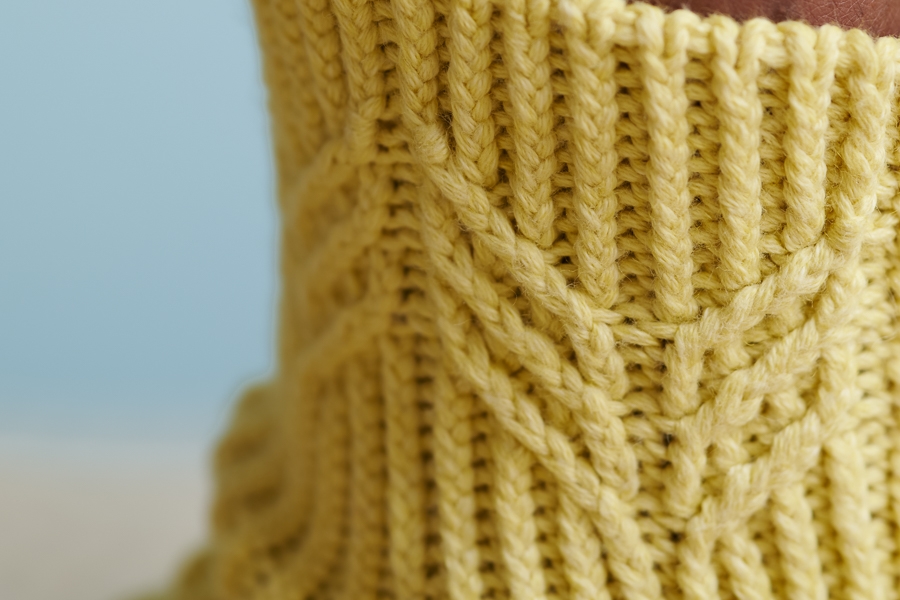
Fiona knit these socks from the toe up, with a twisted rib that makes them extra stretchy and squishy. She adds in simple cables and fun wrapped stitches, resulting in a wonderfully engaging knit!

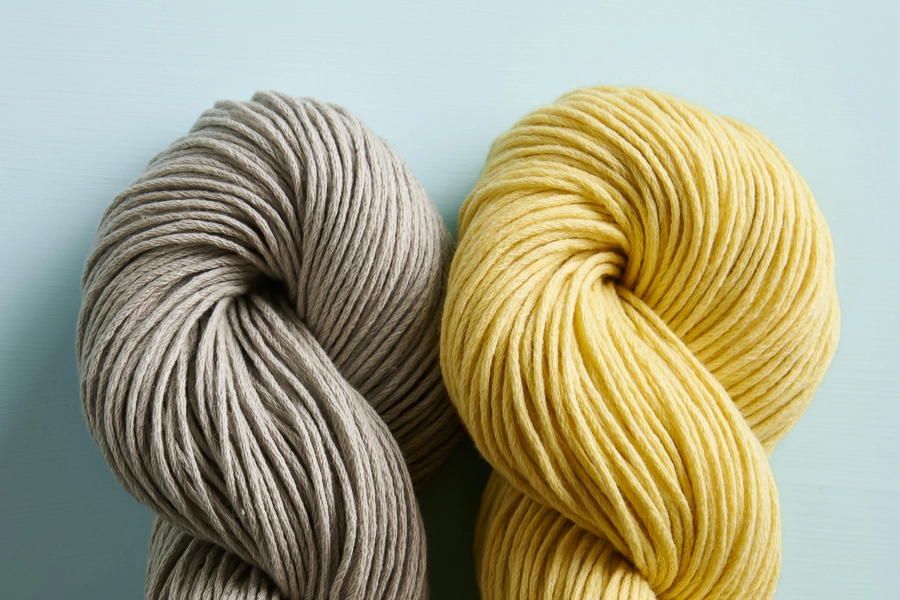
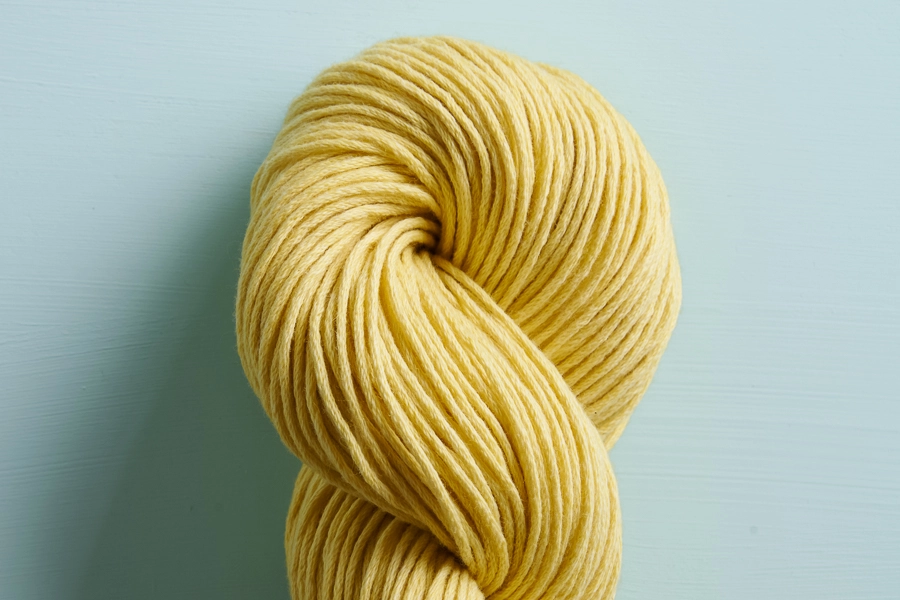
Our beautiful Morning is a special blend of 75% organically grown cotton and 25% yak. The cotton lends strength and extra moisture-wicking abilities, while the yak gives warmth and elasticity. Toss in the wonderful softness of both these fibers, and you have a super cozy pair of socks!
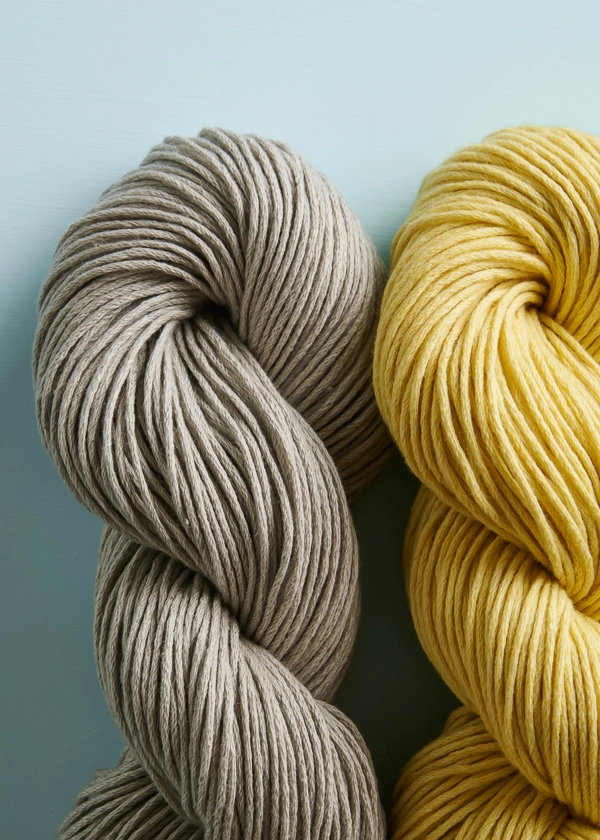
A light worsted (or DK) weight, this yarn makes for slightly thicker socks that don’t take an eternity to knit. Whip up a pair (or two!) in any of our up-with-the-sun colors, and solve your morning dilemma with Morning!
Designed for Purl Soho by Fiona Alice. Fiona is a knitwear designer, originally from Nova Scotia, Canada, who now calls Finland home. In between exploring Helsinki by bike and gardening at her local park, Fiona collaborates on her beautiful patterns with publishers, yarn companies, and independent dyers. More of her work can be found at www.fionaalice.com.

Share your progress and connect with the community by tagging your pics with #PurlSoho, #PurlSohoBusyHands, #PurlSohoHouseSocks, and #PurlSohoMorning. We can’t wait to see what you make!
Materials

- 2 skeins of Purl Soho’s Morning, 75% organically grown cotton and 25% yak. Each skein is 191 yards/ 100 grams; approximately 250 (270, 300) total yards required. We used Grassland Gray and Yellow Apple.
- US 1.5 (2.75 mm), 32-inch circular needles for Magic Loop OR a set of US 1.5 double pointed needles
- US 2 (3 mm), 32-inch circular needles for Magic Loop OR a set of US 2 double pointed needles
- A stitch marker
- A small crochet hook and scrap yarn (for Provisional Cast On)
- A cable stitch holder
- Optional: A spare circular or double pointed needle for Long-Tail Tubular Bind Off
GAUGE
34 stitches and 36 rounds = 4 inches in Twisted Rib (see Notes) on smaller needles
26 stitches and 36 rounds = 4 inches in stockinette stitch on smaller needles
SIZES
Adult Small (Medium, Large)
Finished Foot Circumference: 7¼ (8½, 9½) inches, comfortably stretching up to 2 inches
Finished Foot Length: Adjustable
Samples: The Grassland Gray pair is an Adult Small, and the Yellow Apple pair is an Adult Medium.
NOTES
CONSTRUCTION
You will knit these socks from the toe up and in the round.
DOUBLE POINTED NEEDLES OR MAGIC LOOP
This pattern includes instructions for both double pointed needles and the Magic Loop technique. Choose whichever method you prefer, and for more help, visit either our Double Pointed Needles Tutorial or our Magic Loop one. Want to work both socks at once with Magic Loop? We have a tutorial for that, too!
TWISTED RIB (For Gauge Swatch)
Note: We accidentally posted this gauge swatch instruction with ‘p1 tbl’ instead of ‘p1’. We’re so sorry for any trouble this has caused!
Worked over an even multiple of stitches, in the round.
Round 1: *K1 through the back loop (tbl), p1, repeat from * to end of row.
Repeat Round 1 for pattern.
SLIP STITCHES
Slip all slip stitches purlwise unless directed otherwise.
CROSS STITCHES
1/2 RTC (RIGHT TWISTED CROSS)
Slip next 2 stitches onto cable stitch holder and hold to back of work, k1 through back loop (tbl) from left needle, then [p1, k1 tbl] from cable stitch holder.
1/2 LTC (LEFT TWISTED CROSS)
Slip next stitch onto cable stitch holder and hold to front of work, [k1 tbl, p1] from left needle, then k1 tbl from cable stitch holder.
PATTERN
UPDATE November 28, 2022: If you’ve previously cast on for the Adult Large size, please note that we have since made corrections to errors in the Gusset and Heel of that size. For the full errata, please visit our Knitting Errata page.
TOE
CAST ON
DOUBLE POINTED NEEDLES (DPNs)
With scrap yarn, use a Provisional Cast On to cast 26 (30, 34) stitches onto smaller double pointed needles, dividing the stitches among 4 double pointed needles. [7 (8, 9) stitches on Needle A; 6 (7, 8) stitches on Needle B; 7 (8, 9) stitches on Needle C; 6 (7, 8) stitches on Needle D]
Place unique marker and get ready to join for working in the round, being careful not to twist the stitches.
MAGIC LOOP
With scrap yarn, use a Provisional Cast On to cast 7 (8, 9) stitches onto smaller circular needles, place marker (pm), cast on 13 (15, 17) stitches, pm, cast on 6 (7, 8) stitches, divide stitches in half onto ends of needles. [26 (30, 34) stitches total stitches: 13 (15, 17) stitches on each needle]
NOTE: The front needle holds Needle A and B stitches, separated by a stitch marker, and the back needle holds Needle C and D stitches, separated by a stitch marker. [Front Needle: 7 (8, 9) Needle A stitches and 6 (7, 8) Needle B stitches; Back Needle: 7 (8, 9) Needle C stitches and 6 (7, 8) Needle D stitches]
Get ready to join for working in the round, being careful not to twist the stitches.
INCREASE: DPNS + MAGIC LOOP
Join main yarn, leaving a 10-inch tail, and with smaller needles…
Round 1: Knit to end of round.
Increase Round: For Needle A, k1, make 1 right (m1R), knit to end of needle; for Needle B, knit to last stitch, make 1 left (m1L), k1; for Needle C, k1, m1R, knit to end of needle; for Needle D, knit to last stitch, m1L, k1. [4 stitches increased]
Next Round: Knit to end of round.
Repeat last two rounds 6 (7, 8) more times. [54 (62, 70) total stitches; 14 (16, 18) stitches each on Needles A and C; 13 (15, 17) stitches each on Needles B and D]
FOOT
Round 1: For Needles A and B, *k1 through back loop (tbl), p1, repeat from * to last stitch on Needle B, k1 tbl; knit across Needles C and D.
Repeat Round 1 until piece measures 7¼ (8, 8¾) inches from cast-on edge, or 2 (2¼, 2½) inches less than desired length from Toe to back of Heel.
NOTE: It is always best to measure the foot length of the intended wearer. If you don’t have that measurement, here are some guidelines for the length from Toe to back of Heel, based on shoe size.
WOMEN’S SIZES
US size 6 shoe (European 37) = 9 inches
US size 7 shoe (38) = 9¼ inches
US size 8 shoe (39) = 9⅝ inches
US size 9 shoe (40) = 10 inches
MEN’S SIZES
US size 9 shoe (European 42) = 10½ inches
US size 10 shoe (43) = 10¾ inches
US size 11 shoe (44) = 11 inches
US size 12 shoe (45) = 11½ inches
US size 13 shoe (46) = 11¾ inches
GUSSET
Increase Round: For Needles A and B, *k1 tbl, p1, repeat from * to last stitch on Needle B, k1 tbl; for Needle C, k1, m1R, knit to end of needle; for Needle D, knit to last stitch, m1L, k1. [2 stitches increased]
Next Round: For Needles A and B, *k1 tbl, p1, repeat from * to last stitch on Needle B, k1 tbl; knit across Needles C and D.
Repeat last two rounds 8 (9, 11) more times. [72 (82, 94) total stitches: 14 (16, 18) stitches on Needle A; 13 (15, 17) stitches on Needle B; 23 (26, 30) stitches on Needle C, 22 (25, 29) stitches on Needle D]
Next Row (partial row): For Needles A and B, *k1 tbl, p1, repeat from * to last stitch on Needle B, k1 tbl.
HEEL
NOTE: You will work the Heel back and forth in rows on Needles C and D only.
Row 1 (right side): K24 (30, 34), slip slip knit (ssk), k1, turn work.
Row 2 (wrong side): Slip 1 (see Notes) with yarn in front (wyif), p4 (10, 10), purl 2 together (p2tog), p1, turn work.
Row 3: Slip 1 with yarn in back (wyib), [k1 tbl, p1] 2 (5, 5) times, k1 tbl, ssk, k1, turn work.
Row 4: Slip 1 wyif, p1, [p1 tbl, k1] 2 (5, 5) times, p1 tbl, p2tog, p1, turn work.
Row 5: Slip 1 wyib, [p1, k1 tbl] 3 (6, 6) times, p1, ssk, k1, turn work.
Row 6: Slip 1 wyif, p1, [k1, p1 tbl] 3 (6, 6) times, k1, p2tog, p1, turn work.
Row 7: Slip 1 wyib, *k1 tbl, p1, repeat from * to 2 stitches before gap caused by last turn, k1 tbl, ssk (with stitch before and after gap), k1, turn work.
Row 8: Slip 1 wyif, p1, *p1 tbl, k1, repeat from * to 2 stitches before gap, p1 tbl, p2tog (with stitch before and after gap), p1, turn work.
Row 9: Slip 1 wyib, *p1, k1 tbl, repeat from * to 2 stitches before gap, p1, ssk, k1, turn work.
Row 10: Slip 1 wyif, p1, *k1, p1 tbl, repeat from * to 2 stitches before gap, k1, p2tog, p1, turn work.
Repeat Rows 7-10 two (2, 3) more times. [27 (33, 37) stitches on Needles C and D]
Repeat Rows 7 and 8 one more time. [25 (31, 35) stitches on Needles C and D]
ALL SIZES
Next Round (partial round, right side): Slip 1 wyib, *p1, k1 tbl, repeat from * to end of Needle D, m1L in gap between end of Needle D and beginning of Needle A. [1 stitch increased]
LEG
Continuing in the round with the right side facing you…
Round 1: For Needles A and B, *k1 tbl, p1, repeat from * to last stitch on Needle B, k1 tbl, m1R in gap between end of Needle B and beginning of Needle C; for Needles C and D, *k1 tbl, p1, repeat from * to end of round. [54 (64, 72) total stitches: 14 (16, 18) stitches each on Needles A and B, 13 (16, 18) stitches on Needles C and D.]
Round 2: *K1 tbl, p1, repeat from * to end of round.
Repeat Round 2 until Leg measures 1 inch from top of Heel.
Change to larger needles.
SMALL + LARGE SIZES ONLY
Odd Rounds 1-13: K1 tbl, p1, repeat from * to end of round.
Round 2: *[K1 tbl, p1] 2 times, 1/2 RTC (see Notes), p1, k1 tbl, p1, 1/2 LTC (see Notes), [p1, k1tbl] 2 times, p1, repeat from * to end of round.
Round 4: *K1 tbl, p1, 1/2 RTC, [p1, k1 tbl] 3 times, p1, 1/2 LTC, p1, k1 tbl, p1, repeat from * to end of round.
Round 6: *[1/2 RTC, p1] 2 times, k1 tbl, p1, [1/2 LTC, p1] 2 times, repeat from * to end of round.
Round 8: Repeat Round 4.
Round 10: Repeat Round 6.
Round 12: Repeat Round 4.
Round 14: *1/2 RTC, [p1, k1 tbl] 5 times, p1, 1/2 LTC, p1, repeat from * to end of round.
Round 15: *Slip 1 wyib, bring yarn forward, slip stitch back to left needle, slip same stitch wyib, [p1, k1 tbl] 7 times, p1, slip 1 wyib, bring yarn forward, slip stitch back to left needle, slip same stitch wyib, p1, repeat from * to end of round.
MEDIUM SIZE ONLY
Odd Rounds 1-13: *K1 tbl, p1, repeat from * to end of round.
Round 2: *[K1 tbl, p1] 2 times, 1/2 RTC (see Notes), p1, 1/2 LTC (see Notes), [p1, k1tbl] 2 times, p1, repeat from * to end of round.
Round 4: *K1 tbl, p1, 1/2 RTC, [p1, k1 tbl] 2 times, p1, 1/2 LTC, p1, k1 tbl, p1, repeat from * to end of round.
Round 6: *[1/2 RTC, p1] 2 times, [1/2 LTC, p1] 2 times, repeat from * to end of round.
Round 8: Repeat Round 4.
Round 10: Repeat Round 6.
Round 12: Repeat Round 4.
Round 14: *1/2 RTC, [p1, k1 tbl] 4 times, p1, 1/2 LTC, p1, repeat from * to end of round.
Round 15: * Slip 1 wyib, bring yarn forward, slip stitch back to left needle, slip same stitch wyib, [p1, k1 tbl] 6 times, p1, slip 1 wyib, bring yarn forward, slip stitch back to left needle, slip same stitch wyib, p1, repeat from * to end of round.
CUFF
Switch to smaller needles.
Round 1: *K1 tbl, p1, repeat from * to end of round.
Repeat Round 1 five more times.
Bind off using a Long-Tail Tubular Bind Off (and omitting Set-Up Round 2) or, for an easier finish, bind off loosely in pattern.
FINISHING
Carefully unravel Provisional Cast-On and slip live stitches onto two needles, with top-of-foot stitches on one needle and sole stitches on the other. [13 (15, 17) stitches per needle]
Graft Toe closed, using 10-inch tail and Kitchener Stitch.
Weave in ends, closing any gaps if necessary, and block as desired.


Do you have a copy of this pattern in cuff-to-toes? I have never been able to knit the toes-up patterns?
Thanks
Hi Steph,
Thanks for your question! We don’t currently have a cuff-down version of this pattern, but I’d be happy to recommend some of our sock patterns that are constructed this way. A few patterns you might like are the Perfect Fit Socks,
the Easy Heel Colorblock Socks, and the
Boot Socks.
I hope this helps!
All the best,
Carly
I know your comment is old now but for anyone else who wants to know about knitting these too down… It is possible to work this pattern in reverse. This type of heel can also be done top down. It of course looks different, but it still works. I’ve used this heel multiple times and have seen if used in top down patterns.
What part of toe-up gives you problems? Kate Atherley has a fantastic book “custom socks” that helped me. Have you taken a sock class?
The reason I like cuff down is because this bind off like so many others does not feel stretchy at all. I had so much hope because I hadn’t tried this long tail tubular bind off before!! Now I feel like I put so much effort into a perfect sock that I loved just to have it not be as comfortable to put on due to the bind off. It also seems to flare after being stretched.
I wonder if a ribbed bind off would have been better… or next time I would just do it cuff down because a stretchy cast on looks and feels nicer to me.
I recommend Jeny’s surprisingly stretchy bind off for toe up socks. There are good tutorials available, both for those who learn by watching and those who prefer written instructions.
Would the pattern work by duplicating the ankle to just before cuff portion to extend it or would it be too narrow in the calf?
Hi Jennifer,
Thanks for writing in! I think that duplicating the LEG section might result in a too-small circumference to fit over the calf, but what you could do is work some increases along the way. That would make this section a bit wider!
All the best,
Lili
Would you be able to make a video tutorial on this pattern? It’s beautiful, I’m a beginner knitter and videos really help me learn. Thanks!
Hi Zoe,
Thanks for reaching out. I’m afraid that we do not have the time and resources at the moment to make a tutorial for this pattern. We’re so sorry about that! In the meantime, I’d recommend checking out all of our other tutorials, so you can learn about specific techniques that are used in these socks.
All the best,
Lili
Do you need 2 skeins for one pair of socks?
Hi Linda,
Thanks for reaching out to double check! Yes, this pattern uses 2 skeins of Morning. Hope this helps!
All the best,
Lili
Oh, this is gorgeous! Do you have any recommendations for sizing this to work with fingering weight yarn? Thanks!
Hi Stephanie,
Thanks for reaching out, and I’m glad to hear that you’re enjoying this new pattern! Unfortunately, this pattern is quite intricate, and it would take a lot of work to rewrite for a fingering weight yarn, which we currently don’t have the resources for. One suggestion I have though, is that if you were planning on knitting one of the two smaller sizes, you could size up and knit a size or two above, which should even out the sizing. However, that depends on which size you’re aiming for!
If you end up trying to modify this pattern on your own, please let us know how it goes!
All the best,
Lili
If you knit with two strands of fingering weight you get the equivalent of a DK/light worsted weight yarn.
Knit a swatch doubling the yarn and see if you get the right gauge.
Is the pattern for these beautiful socks available in a PDF? I have difficulty working from a computer. Thank you!
Hi Beth,
I’m glad to hear that you’re enjoying our newest pattern! To download a PDF version of this pattern, you can follow these steps: If you’re on your computer, you’ll find a “print” icon in the right column just below the “Save To Favorites” button. If you’re on a mobile version of the site, you will find the “print” icon below the pattern and above the comments.
Click on this button, and a window will pop up where you can delete whichever parts of the pattern you don’t want to print. When you hover over any image or a text block, it will be highlighted in yellow and a “trash” icon will appear. Just click on this icon to delete anything that’s not necessary to the pattern! For example, you may decide to shorten the pattern by omitting certain images or the list of materials. Then, click on the “PDF” button in the upper left-hand corner of the pop-up window. Once your PDF has finished downloading, just click the “Download PDF” button, and it will be saved to your computer! (You can also click the “Print” button if you’d like to print the pattern.)
I hope this helps!
All the best,
Lili
Why the Provisional Cast-On and then having to close it with the Kitchener stitch at the end? This seems unnecessarily fussy. Is there a reason you didn’t use a typical toe up cast on like Judy’s Magic Cast On?
Hi Michelle,
Thanks for writing in. This was a design choice for these socks, but you can absolutely substitute the provisional cast-on for Judy’s Magic Cast-On if you find that method easier! The provisional cast-on and kitchener stitch are more commonly known techniques than Judy’s Magic Cast-On, which makes this pattern more accessible to knitters who are just starting out in sock knitting!
All the best,
Lili
Oh thank you. I was about to start the pattern as I got my beautiful Linen Quill in the mail and Judy’s Magic Cast-on is my favorite way to start toe up socks. It is smoother than finishing with Kitchener, though there are ways to mitigate that too.
I was a bit surprised at the number of stitches for the toe, must be a very squared off toe.
Love this pattern.
Laura
What a lovely pattern! Would you have recommendation for a yarn sub that is wool rather than cotton? Thank you!
Hi Gretchen!
Thank you so much! For a similar weight wool yarn, I suggest either Good Wool or Cashmere Merino Bloom for your House Socks! Good Wool will make for a springy, squishy, classic wool sock, while Cashmere Merino Bloom will make for a more plush, cozy, and fluffy sock.
I hope this helps with your project planning!
All the best,
Margaret
It does! Thank you!
Greetings 🙂
Just trying to get my head around the gauge…Morning has a gauge of 5 – 5.5 st per inch using 3.75 – 4mm needles. But this pattern uses 2.75 – 3mm needles with a gauge of 6.5 st per inch. So that results in a denser fabric? And it’s not a sock yarn per se however it does work okay for socks and is durable?
Love it but just deciding on whether to spend that much on one pair of socks!! Thank you 🌸
Hi Margie!
Thank you for your question! Morning is knit at a tighter gauge in this pattern to create for a more durable and slightly thicker sock than you would have with a fingering weight wool, for example. These socks are meant to be a cozy slipper-sock that you can reach for on a chilly morning, and with the machine washable blend of cotton and yak, they are easy to care for so they’re always available for your next cool day!
All the best,
Margaret
Hi again team
So I am having trouble with at the completion of the heel.
I completed Round 10 of the heel leaving 35 stitches on Needles C and D. Then I turn to have the right side facing.
For the ‘All sizes’ next round which appears to be a partial round on Needles C and D, if I follow the instructions ; Slip 1 wyib, *p1, k1 tbl, repeat from * to end of Needle D, m1L in gap etc THEN the ridge lines are incorrect.
Looking at Needle C after the heel, I have these first few stitches:
k, k, p, k, p, k etc
HOWEVER if I do the partial instructions, I’ll have this :
Slip1 wyib, *p1, k1tbl, repeat
THIS would mean my
k, k, p, k, p would become ;
Slip 1, p, k, p, k
ie my pattern gets incorrect ridges
This does not seem right! What am I doing wrong?
Thank you
Hi Margie!
Thank you for your question! Since the instructions under “All Sizes” start on the right side, these stitches (and the resulting ridges) will line up with the established pattern in the Heel section, as follows:
Heel Row 9, Right side: Slip 1 wyib, *p1, k1 tbl….
All Sizes, Right side: Slip 1 wyib, *p1, k1 tbl…
The upcoming M1R/M1L increases will become the purl stitches between ridges eventually, since the end of the All Sizes row and the beginning of the next round (on Needle A) are both k1tbl stiches. These will also help to connect your heel to the top of the foot portion before working the leg.
I hope this helps clarify this section, and we’re here if you have any other questions!
All the best,
Margaret
Hmm. Sorry there is still something wrong. The large size I’m knitting ends on Heel Row 10 as per pattern…not row 9 as you indicate…which is also the right side. If I turn after Row 9 I’ll be turning to the wrong side.
The pattern says “Repeat rows 7-10 until there are 35 stitches on C and D”..
This ends on a purl row (10) correctly to turn to the right side. Then unfortunately the ridges do not line up. I’m not going mad…I don’t think!! 🙂
Not to worry Margie! I see how I made things more confusing and am so sorry about that. To clarify, row 10 will still be the last short row for the large size before moving onto the “ALL SIZES – Next Round (partial round, right side)” section.
The “All Sizes” row is similar to what you would have been doing in row 9 to balance and complete the ribbing pattern. You’ll still be working with an odd number of stitches between needles C and D and will complete that by slipping the first stitch and ribbing the remaining 34 stitches, which are in pairs. The table you laid out matches up with what we’d expect so if your work lined up while completing row 9, we recommend trusting what’s written for the remaining partial row!
I hope this helps, but we encourage you to reach out to us at customerservice@purlsoho.com for more hands on help if needed!
All the best,
Margaret
Ufftah, Thank you for your help with this beautiful pattern and yarn. I’m having the same issue. After completing 7 – 10 x 3 for the large size, i have 35 stitches between 2 circulars and the twisted rib is established on both. Right side facing (heel) is K-K-P-K, ready for row “11” if you will. Using all sizes instructions, If I slip wyif then *P,Ktbl repeat, I am also off one for the twisted rib.
If I slip the first stitch and maintain the already established twisted rib, I reach the instep and the twisted rib is still established. There is no need to make a stitch between the heel and instep and the pattern continues unbroken without a need to make a stitch between the end of the instep and the heel. It works perfectly that way. Not sure what occurs when it comes time for the pretty detail at the cuff.
Thank you so much.
Laura
I meant slip with yarn in back not front.
Hi Laura,
Thank you so much for reaching out about this! We’ve taken another look at this point in the pattern and agree that something isn’t quite right. I’ve passed your question along to our design team, and they’re currently working on finding a solution for this issue. I will follow up with you once they’ve figured out what changes need to be made to the pattern in order it to all work out.
Apologies for the delay getting back to you, but hopefully I’ll have an answer soon so you can move forward in your project! And thanks again for bringing this to our attention.
All the best,
Lili
Lili, thanks so much. I decided to take another look too.
With the heel stitches, each row ends on a KK or a PP and the following row you reestablish twisted rib by “converting” the second stitch to the established pattern after slipping the first stitch.
– needles A/B begin/end with Ktbl
– the smaller sizes end on a Ptbl PP (row 8) and the following row you would reestablish the twisted rib and adding the extra stitch between the instep/sole maintains the twisted rib and gives enough stitches to create the 18 stitch pattern repeat on the top.
– the larger size, I’m making needs 72 st for the 18 pattern repeat, but it does not allow for maintenance of the twisted rib which is off a stitch.
– interestingly at the end of the heel for the larger size, with 70 stitches twisted rib is nicely maintained all around instep/sole (heel) but of course 2 stitches too few for the pattern repeat. I had considered just doing twisted rib all the way up the cuff, but the beauty of the decorative cuff was one of the things that attracted me to the pattern.
I am not clever enough to adapt the pattern for a 70 stitch count. I look forward to a solution and appreciate so much your efforts have the designers look at it again.
Best
Laura
PS i am a very careful and experienced knitter and wonder if it would be easier to have evenness of gauge with the stockinette made on US2 with a circular and the twisted rib on US1.5 with a circular so that the product is more even? Even tightening up on my twisted rib (until my fingers were sore) i could not get even row gauge so the instep side is a little longer rendering the top a little wrinkly over the instep.
Hi Laura,
Those are some great observations! Thank you so much for taking the time to look into this pattern more as well. You’ve pinpointed the issue exactly–for the larger size, the twisted rib stitch works over 70 stitches, but the decorative cuff needs 72 stitches. But those two increase stitches to get from 70 to 72 throw off the ribbing pattern!
And I think you could definitely use circular needles for this pattern, if that helps keep your tension even! We wrote the pattern for DPNs or magic loop in particular since many knitters don’t have very, very short circulars on hand. But if you do own those, then they would be perfect!
All the best,
Lili
Wondering if the designers have come up with a solution for the large size and maintaining the twisted rib? Looking forward to making these socks and using the beautiful yarn i purchased from PurlSoho for the project.
Laura
Hi Laura,
Thanks for checking back in! This issue is currently with our tech editors at the moment, and we’re really hoping that they’ll find a solution within the next few days. Apologies for the lengthy delay, but I will absolutely reach out to you once everything is fixed! And thank you so much for your patience!
All the best,
Lili
Hi again, Laura,
Good news! We’ve finally been able to determine the corrections needed for the Large size, and the pattern has been updated. The pattern on this page is now correct, and I’d also recommend taking a look at our Errata page for more details about exactly what we changed. Thank you again so much for your patience while we made sure that the pattern instructions are the best they can be!
All the best,
Lili
Hi Margie,
I wanted to let you know that we actually ended up fining some errors with this section of the Large size, and the pattern has been updated. We are so sorry for the inconvenience, but hope that these updates help you move forward with your socks! The pattern on this page is now correct, and I’d also recommend taking a look at our Errata page for more details about exactly what we changed. Thank you again so much for your patience while we made sure that the pattern instructions are the best they can be!
All the best,
Lili
Lili,
I’m really thrilled to cast back on and make the house sock, now that the pattern is corrected!! I am going to use 2 different needle sizes US 1.5 for the instep and US 2 for the sole, so that i don’t struggle with the twisted rib being loose compared to the stockinette. I just can’t keep them the same gauge otherwise. The swatch worked perfectly. I prefer two circulars to magic loop for socks anyway and I have all the proper cord sizes as I’m a sock fanatic and make them constantly.
Thank you again for your help and thank the design team!
Laura
You’re very welcome, Laura! That sounds like a great approach, and I’m glad that your swatch worked perfectly. Happy knitting!
All the best,
Lili
This is a beautiful pattern and as always so clearly written.
I just finished my gauge swatch and though I’m a huge fan of tiny needles, knitting this lush heavy yarn on US 1.5 is a little hard on the fingers. I’m a tight knitter and get 7 st/inch with stockinette, instead of the 6.5/inch in the gauge notation. But my twisted rib gauge is way off 30 st/4 inches instead of your 34/4” on the same size needle. I blocked the swatch and I know how to knit TBL and how to purl TBL so I feel certain i have done the stitches correctly. I also knit the gauge swatch in the round to account for how much tighter my knitting is in the round. I note that the cuff is not knit in this fashion in the pattern but in the usual Ktbl then purl.
Question, if i go up to a US2 to fix my stockinette stitch, I will bet that I’ll overshoot the gauge and I would have to do the opposite for the twisted rib as I have fewer st/inch than is called for. I’m pretty sure i would not be able to knit with this yarn on smaller than US1.5.
Any advice? And also I’m not sure why both K&P in the twisted rib for the gauge swatch are TBL.
Thank you for your assistance.
Hi Laura,
Thank you so much for writing in with such carefully detailed observations! We took a closer look at this pattern with your feedback in mind, and in doing so, we have edited the gauge swatch instructions to reflect that the gauge should be knit in the same stitch pattern in the round as the socks themselves – k 1tbl, purl 1 normally. Thank you so much for pointing this out to us!
Hopefully, with this change, your gauge swatches should match a little more closely between (half) twisted rib and stockinette stitch swatches. We apologize for the error but sincerely appreciate your eye for detail and kind feedback!
All the best,
Margaret
For clarification re: gauge, wouldn’t the 26 stitches over 4 inches be for the larger needles, not the smaller ones?
Also, why use the provisional cast on? A Turkish cast on would have completely eliminated the need to graft the toe afterwards.
Hi Tricia!
Thank you for your questions. Both gauge measurements listed are meant to be knit with the smaller size needles. This is because twisted rib tends to have many more stitches per inch unstretched than stockinette stitch!
As for the cast on, this was a design choice for these socks, but you can absolutely substitute the provisional cast-on for a Turkish cast-on if you prefer that method! The provisional cast-on and kitchener stitch are more commonly known techniques, which makes this pattern more accessible to knitters who are just starting out in sock knitting!
All the best,
Margaret
I love the look of these socks, but have only made 2 pairs of cuff down so far. Would this be a big stretch for me, as a beginner? If so, could you please recommend a sock pattern that would be more appropriate?
Thank you so much!
Hi Katharine!
Thank you for your question! While these socks would be a manageable challenge for a beginner sock knitter with some sock knitting experience, I would instead suggest our Easy Heel Colorblock Socks or our Boot Socks! Alternatively, our Perfect Fit Socks are a great ribbed sock pattern, too. We’re always here to help with any pattern you choose, should you have any questions along the way.
I hope this helps with your project planning, and happy sock knitting!
All the best,
Margaret
Hello, and thank you for the beautiful pattern! I’m just about finished with the first sock, but am a little confused about round 15 immediately before the cuff begins. After bringing the yarn forward, do I simply purl the next stitch? Can’t quite figure out if I’m missing something. Thanks!
Hi Maria!
Thank you for your question. After slipping the first stitch with yarn in back, you will bring the yarn forward between your needles. Then, you will slip that same first stitch to your left needle. Next, move the yarn back between your needles to be held behind the work again, and slip the stitch for a final time to your right needle. Then, you can move your yarn between your needles to prepare for purling the next stitch, and continue on to the rest of the round! This will wrap the base of the first slipped stitch all the way around with your working yarn, before continuing in the twisted rib pattern.
I hope this helps, and we’re here if you have any other questions!
All the best,
Margaret
Aha! Thank you Margaret, I see my mistake!
Maria
You are very welcome, Maria, and we hope you enjoy knitting the last part of these socks!
All the best,
Margaret
When does the needle size change? I have started my first (ever toe up sock) and I can’t see where the needle size goes up.
I found it!
Hi Aileen!
We’re glad to hear you found it! In case this is helpful for others, we wanted to reply to confirm that you will switch to larger needles at the end of the LEG section before the specific size instructions (“SMALL + LARGE SIZES ONLY/MEDIUM SIZE ONLY”).
I hope this helps, and happy knitting!
All the best,
Margaret
As recommended, I am using the Morning yarn and needle sizes recommended in the pattern but I do not get the correct gauge size (1/2 inch too large in both directions). Any suggestions? Needle size is already only 1.5 US for this rather bulky yarn? Anyone else having this problem?
Hi Linda,
We’re so sorry to hear you’re having difficulty reaching gauge for this pattern! While admittedly this gauge is a unique one (being on a smaller needle with a dk weight yarn), one thing to double check is that you are knitting your gauge swatch in the round, alternating between k1 tbl and p1. If you’ve tried this already, you may need to go down to a size US 1 to reach gauge. Twisted rib tends to have many more stitches per inch unstretched than stockinette stitch, which is another factor that goes into this unique gauge measurement, so using a smaller size will help fit even more stitches in!
If you would like to use Morning for a different project, I suggest checking out our Men’s Socks for Giving Away pattern, which is also designed for a dk weight yarn but on a larger size needle.
I hope this helps give you some options for either continuing on with your socks or inspiring you to use this yarn in other ways!
All the best,
Margaret
Hi I’m knitting the small size on double pointed needles and at the heel now. I have 23 stitches on needle C and my first row asks me to knit 24 then ssk, k1 and turn.. should I knit into needle D and then turn? This way I don’t have a free needle to work with. I’m confused, can you help? Kindly, Tess
Hi Tess,
Thanks for reaching out. Yes! At this point you will knit onto Needle D and then turn your work. The way the heel is constructed, you will work partial rows, turning your work before reaching the end, but each partial row increases in length, forming the curve of the heel. So your first partial row (Row 1) will only go slightly past the center of your live stitches (right past the break between Needles C and D), but further partial rows will go further before you turn the work. Hope this helps clarify things!
All the best,
Lili
Do you think this pattern would work with Knitting Yarn? I realize I’d have to always hand wash them, but I have become obsessed with hand knit socks and don’t always want to break the bank for a pair.
Hi Kathleen,
Yes, Knitting Yarn would be great for these socks! I’d just recommend knitting up a gauge swatch beforehand, since a 100% merino wool yarn will behave differently than a cotton/yak blend. You may need to size up or down your needles to get the right gauge!
All the best,
Lili
Good morning, I’m a new knitter and really messing up on the HEEL. I completed row 6 or 7 then when I started to ssk or p2tog (with the stitch before and after the gap) on rows 7, 8,9,10 I was knitting more and more into needle B. Does “before and after the gap” always mean the gap between 2 needles? Where might I have gone wrong?
Thank you, kindly.
Hi Lynn,
Thanks for reaching out! The gap actually means the gap between stitches, not the gap between needles. When you turn your work on each row, that creates a small space between two stitches–this is the gap that the pattern references! So when you reach this point on each row repeat, you’ll either ssk or p2tog with the stitch before and after the gap. Hope this helps clarify things!
All the best,
Lili
I have finally just finished these socks in Morning. While the pattern LOOKS beautiful, I have had several issues.
1. The thick and sturdy yarn knit at such a tight gauge on small needles caused me to have to stop various times to rest my hands. Knitting these actually caused tendinitis in my hands. I put them on hold for a couple of months, and just casting them off last night caused my hands to ache again for much of the night.
2. Cotton yarn is much less forgiving and stretchy. While I got gauge, I find the ankle to be on the narrow side and it’s difficult for me (let alone the intended gift recipient) to get my foot to pass through and around the bend into the foot part… and my foot is a B width at best, ie, average.
3. These socks are now on sock blockers. They have been soaked and wrapped up in towels to get rid of as much water as possible, and 12 hours later they are still almost wet—way more than damp—even in my extremely dry summer high mountain desert climate where *everything* seems to dry in nanoseconds. I shudder to imagine my niece trying to get these to dry in the winter in the damp east coast climate…. All in all, I think the pairing of this pattern and this yarn was a complete fail, and I’m writing this in the hopes of preventing others from making this mistake.
Again, the pattern is lovely (I just did a Judy’s Magic Cast On—the idea that it’s “simpler” to do a provisional cast on and *then* also have to do Kitchener stitch with this thick yarn seems a very odd notion to me—learn the magic cast on and you will never look back) but they have suggested a completely inappropriate yarn, heaven only knows why. Try this with something much less thick and unyielding.
Hi Bev,
Thank you so much for taking the time and care to write to us about this! We appreciate your honest feedback and wanted to let you know what we followed up with your concerns over email. We’re hoping to hear back from you soon, so please let us know if you’ve received our message!
All the best,
Lili
Hi!
Sorry if this is a silly question- I haven’t started yet and was just reading through to see if this is something I think I’d be able to do as I’m slightly beginner knitter.
When the instructions switch to the heel it says
“ 23 (26, 30) stitches on Needle C, 22 (25, 29) stitches on Needle D]
HEEL
NOTE: You will work the Heel back and forth in rows on Needles C and D only.
Row 1 (right side): K24 (30, 34), slip slip knit (ssk), k1, turn work.”
If you only had 26 stitches on needle C here- how would you knit 30 as the next directive? Do you move some from D to C first? Or move all the stitches to either C or D first and knit all the stitches back and forth between C and D? But then you’d start with 51 stitches?
That’s the only part I don’t understand otherwise I’m excited to start this project!
Hi Eden,
That’s a great question! We are so happy to hear you are looking to try out this pattern. You can just continue knitting on to the next needle for those last stitches. So if you have 26 sts on one needle, you can knit through those in pattern and then knit 4 from the next needle. If it’s more helpful, you can shift your stitches around to have all your heel stitches on one needle.
I hope this answers your question but if you need further instruction, feel free to let us know and we can help you out.
Happy knitting,
Gavriella
hello,
I love this sock pattern, it is darling! I am a self taught knitter and have made simple socks, mittens, sweaters, a vest, and several hats. I am familiar with cable stitches. this pattern appears full of skills I don’t think I have. I was wondering if this would be beyond my skill level and was looking for a posted level. thank you
Hi Patti,
Thanks for writing in! It sounds like you have all the skills necessary to begin this pattern! I would encourage you to give it a try and should you hit any snags, we are always here to assist you!
Happy knitting,
Gavriella
I love this pattern and I’ve made it twice in the medium size and it worked perfectly. I am now making the size small. I’m confused in the leg section, the part following the change to larger needles. I can’t make sense of the directions for small and large sizes together when those sizes have differing stitch numbers. The directions seem to be written for 18 sts per needle as in the large size. I don’t understand how to make this work for the smaller number of sts in the small size. I so appreciate any assistance!!
Hi Barbara,
Great question, and I can see how these instructions are tricky! The rounds in this section are actually written to work for any multiple of 18 stitches, even if you don’t have 18 stitches on each needle. Your total stitch count for the small size should be 54, which is 18 times 3. So you will repeat the instructions within the asterisks a total of 3 times as you work your way through each round.
I hope this helps clear things up, but please let me know if any other questions arise!
All the best,
Lili
Thank you! That makes sense!