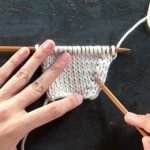
Make 1 Right (m1R) + Make 1 Left (m1L)
Often, when you’re shaping a toe, a neckline, a triangular shawl, or any number of other possible knitting projects, you will be instructed to make 1 right (m1R) or make 1 left (m1L). One of knitting’s most common increases, this technique increases your stitch count by 1 stitch. It leans either to the right or left so that your increases can follow the lines of the design, flowing with the slant of a V-neck or the gusset of a mitten. Follow along with our Make 1 Right + Make 1 Left Tutorial to master this simple technique!
First, A Mnemonic Device
Lots of knitters have a hard time committing this technique to memory. As you learn these increase, keep this little mnemonic device in mind:
Make 1 right: “Right” has 5 letters in it and so does “front,” so you work into the front of the stitch to make 1 right.
Make 1 left: “Left” has 4 letters in it and so does “back,” so you work into the back of the stitch to make 1 left.
Okay, now that we’ve got that straight, here’s how to make 1 right and left!
M1R + M1L: Video Tutorial
M1R + M1L: Step-By-Step Tutorial
Make 1 Right (m1R)
To “make 1 right” (m1R), use the left needle to pick up the strand between the last stitch you knit and the one you’re about to knit, bringing the needle from back to front. Leave the strand on the left needle.
Next, insert the tip of the right needle knitwise into the front leg of the strand and knit as usual.
You now have one new, right-leaning stitch on the right needle!
Make 1 Left (m1L)
To “make 1 left” (m1L), pick up the bar between the stitch you knit and the one you’re about to knit, bringing the needle from front to back.
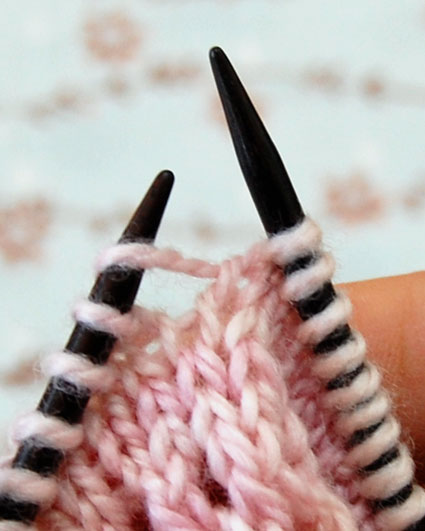
Next, insert the tip of the right needle knitwise into the back leg of the strand and knit as usual.
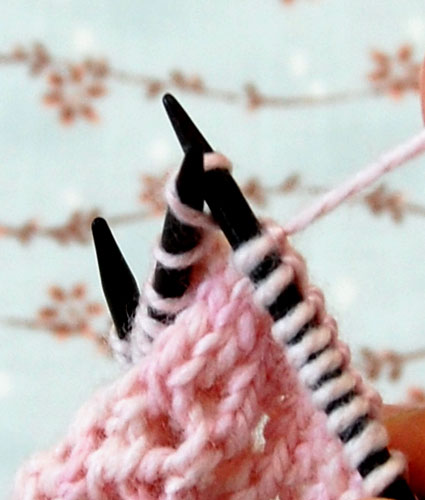
You now have one new, left-leaning stitch on the right needle!
Looking for more inspiration? Explore all of our free knitting patterns and knitting tutorials, buy one of our many knitting kits and yarn bundles, and shop for beautiful yarn. We have over 35 gorgeous natural fiber yarns in 100’s of magnificent colors, designed to bring integrity, beauty, and joy to your next knitting project and only available at Purl Soho!
Short, sweet, succinct. I love these videos which have provided me with valuable information. Turns out that I have been doing things the wrong way. Thank you.
Love the video aesthetics.
Love your simple demo and your pace!
You have terrific knitting videos! You're the best! Have you ever thought about doing knit-alongs for some of your patterns. Schedule a date for a specific pattern ( give people time to order your yarn) and have a go of it- knitting blast!
Kim
Thanks!! Short and sweet and 100% clear. I have been knitting for 41 years, and that was the first time I have learned a technique so easily!
Do you work the first stitch when you begin a row as well as the last stitch? or just the first stitch? In your video it looks like you do both, which I tried to do as well but my edges are not turning out as pretty (it looks more like knots as oppose to the braid edge you have)
Hi Nicky!
That’s a very good question. Different hand-knitters handle the first and last stitch in very different ways. Sometimes the work ends up with a naturally smooth edge, and sometimes it’s bumpy. It’s hard to explain why, but sometimes pulling the first or last stitch tighter to try to make the edge smoother will actually cause it to be bumpier. You can also sometimes slip the first stitch as if to purl (with the yarn in front) on each row to make a “slipped stitch selvedge.”
Hope this helps!
Thomas
Very clear and helpful video, thank you
Thanks for explaining that so clearly!
Your tutorial was excellent. I was explicit and had a very clear visual presentation. Thank you. I was able to obtain M1L and M1R knit stitches required in my pattern.
Really clear and concise; thank you.
My pattern says to m1L and m1R in the first row. How do I pick up a bar between cast on stitches?
Hello Bev!
With this technique, you should use a cast on that’s a little more substantial, such as Long Tail. That way, you’ll be able to build a strong foundation so you can create these increases. If your pattern allows it, you can always stitch one row on the wrong side first and then start the pattern you’re working on. Thanks for writing in and don’t hesitate to write in again if you’re still questioning! -Alyson
I am working on a top down raglan pullover with a cable on the front. The instructions call for Left Cable Increase (LCI) and Right Cable Increase (RCI), both of which use a make 1, so this tutorial is very helpful. However, the RCI make 1 is tricky and I am curious if you can advise how to make one in this way. Here are the instructions:
Slip 1 onto cable needle and hold it in back, k1, place the stitch from the cable back on the left needle, m1r, k2. Where I am having trouble is it hard to find which stitch to pick up for the m1r. Can you help?
Hello Taryn,
I would guess that the bar you need to pick up would be in between the stitch that is on the cable needle and the first stitch on your left hand needle. Does that make sense? Please feel free to email customerservice AT purlsoho DOT com so we can help you troubleshoot further! Thanks for writing in! -Alyson
great instructions thanks
LOVE LOVE LOVE your videos! Thank you – all the way from Australia!
Awesome! Thanks to your instructions I can finally understand how to do this! It is much appreciated!
Hello
Your tutorial is fantastic and easy to follow.
Thank You
Kala
Hello, I am knitting a pattern which asks for “Inv-R (Invisible Increase Right)” and “Inv-L (Invisible Increase Left)”. Is this the same as m1R and m1 L as described in this tutorial? I can’t seem to find any specific instruction with this exact wording. Thanks in advance.
Hello Genevieve,
That is a great question! There are a couple ways to do a m1 increase so it can be a bit confusing. However, the method used in this tutorial will create an invisible increase (I use it all the time!). The pattern you are using will be referring to this method. I hope that helps. Please let us know if you have any other questions.
All the best,
Allison
Thank you so much for creating this video, it’s short, simple and clear, so refreshing!
Thank you for the tutorial. It’s simple and easy to follow and I love the needles used in the pictures. Where are they from?
Hi Lucy,
Thanks for you kind words! The needles used in the video are Crystal Palace Straight Bamboo Needles. The needles used in the photos are Blue Sky Alpacas luxurious Double Pointed Rosewood Needles. Both are available from Purl Soho!
Happy knitting!
Cassy
Estou aqui, revisando e reaprendendo, estes maravilhosos vídeos. Muito obrigada, pela sua atenção.
Hello, Sonia!
Thank you for writing in! We really appreciate hearing from you and we are delighted that you are finding our video tutorials to be helpful! Again, thank you!
Best wishes,
Kumeko
I am working on the Bobble Sheep Pillow. In this pattern on certain rows the very first stitch is a M1L. Since there aren’t two stitches to go between, what do I pick up to use as the “bar”? Do I just pick up something in the first stitch? Very confused.
The video is great!
Thanks for any help you can give.
Hi Sharon,
Glad you like the video! If you need to M1L at the beginning of the round you simply pick up the bar in between the first and last stitch. Make sure your beginning of round marker is slipped to the right-hand needle first though. Best of luck on the project! It’s so cute!
Thanks,
Adam
Thank you for this excellent video and clear demos that are easy to follow. I had never used this method for increasing stitches and like it a lot. I’m also making the Giant Bobble Sheep Pillow. The no. 17 needles are a hoot, especially the double pointed ones…feels like I’m all thumbs!
Great tutorial! I am working on a project that requires tight knitting, and love the idea of these invisible increases, but it is nearly impossible to do them because of the smaller needles and thicker yarn. Any tips to help with this?
Hi Marie,
Thanks for the lovely comment! I suggest that you work your increases on your needle tips since the tip circumference is smaller. This makes it easier to insert your right-hand needle into the bar between the stitches. Hope this helps!
-Adam
Hi! I’m currently working on the rectangular colorblock bias blanket and I feel like I’m doing my m1L incorrectly – I’m getting a hole in every other row as if I’ve done a yo. My m1R looks great. Is it normal to have a bit of a gap with the m1L?
Thanks!
Hi Devin,
Thanks for writing in! When you make one left you pick up the bar in between the stitches from the front and knit that bar through the back loop. Make sure you are picking up the bar in the right way and that you are also knitting through the back loop. You intentionally want to knit the increase twisted so it closes the hole. If you are doing everything correctly, it might be your tension or gauge. Let me know! I’m glad to help in any way!
Best,
Adam
thank you for this. I’ve started knitting a pattern that just specifies “m1” and have discovered the big holes left when I’ve used the m1L on both sides! Annoyingly, the designer has done this on the sweater as well, as it’s on the photos, which seems daft! I’m pleased I found this… though I’m not so pleased with the prospect of frogging the front piece and reknitting!!
Hello, when doing an m1L/R do you following through with a stich? Or is it just the picking up of the strand. I’m asking because I’m making your ‘Traveling Cable Hand Warmers’. My question arises for the ‘Set-up Round’. When you make the m1L do you follow through with the stitch? and then p2? Or is it just the pick up of the strand then pearl with your new loop and pearl one more (for the total of p2)?
Thanks!!
Hi Veronica,
Thanks for the question! When you M1L/M1R you pick up the strand in between stitches and either knit it through the front or back depending on which increase you are doing. Let me know if you still are having trouble.
All the best,
Adam
Hi –
I have just started the Bobble Sheep Pillow. Row 6 is a purl row in the pattern – do I still use the M1L and M1R as indicated or do I need to do a M1pL and M1pR instead on the even rows?
Thanks for the help.
Jill
Hi Jill,
Thanks for the question! No need to M1P. M1R/M1R will suffice since they happen right before and after a knit stitch. It blends quite nicely into the fabric and plus, the bobbles obscure most of the decreases anyway. Best of luck!
-Adam
Hello, thank you for the easy demo, and now I can enjoy
adding this to my repertoire.
Thanks for this video – it was exactly what I needed! These abbreviations are coming up quite frequently in patterns, and I’ve been inconsistent with them – I think I have it now!
This is very helpful. Also Ive fallen in love with that pink and white variegated yarn that is shown in the demo. What yarn is that?
Hi Judy,
Thanks for the wonderful comment! I don’t know exactly which yarn is shown in the tutorial but I am going to guess it’s Koigu KPM in color 2121.
-Adam
Hi! Thank you for the great video. I want to make two M1R, one after the other. Is it possible? I just don’t know where to pick up the yarn in the second increase.
Thank you!
Hi Annie,
Thanks for the lovely compliment! The best way to do this is to M1R, K1 and then M1R again. You don’t want to make two M1R out of one stitch bar because it will be too tight and quite noticeable.
All the best,
Adam
Hello,
In my project I have to increase stitches on the RS by M1R and M1L. On the WS I have to knit the stitches as they appear. But I can’t really make out whether to knit or purl them. Advice would be appreciated.
Hi Dees,
Thanks for the question. If you are knitting stockinette, you’ll want to purl the increased stitches on the purl side.
All the best,
Adam
Is this M1R and M1L the same as INC -R and INC-L?
Hi Jeri,
Thanks for the question. Many patterns describe increases in different ways. My guess is that the pattern you are following lets you pick whichever increase method you prefer. Best of luck!
-Adam
I am knitting the Julie Hoover Goode swearer …it says
Inc-R and Inc.-L would this be the same as M1R and M1L?
Just wondering. Thanks.
Oh for goodness sakes..just noticed someone asked the very same question as me….guess I know my answer. Thanks. I will continue on.
If I am required to do a M1R and a M1L on a purl row, would I purl this stitch or knit it? This is at the centre point of a shawl.
Hi Evelyn,
I apologize for the late reply. To M1R on the Purl side, you would Purl through the front of the stitch, to M1L on the Purl side you would Purl through the back of the stitch.
I hope this helps,
Melissa
Thank you so much for your clear instruction! I knit the ‘european’ way so it looks a bit strange to me, but your instruction and explanation have made it impossible for me to NOT understand!! I’m bookmarking your site – thanks again!
Awsome! Thanks. Just what I needed.
My M1L is generating large spaces in the work whereas my M1R areas look great. Any tips on how to avoid this issue on the M1L side?
Hi Hillary,
Thanks for reaching out! It is hard to say what might be going wrong without being able to see your work in person, but both the m1R and m1L should appear the same without any holes. I would double check to make sure you are knitting through the back of the picked up stitch when working the m1L, and if you are still having problems, please feel free to send us a picture of your stitches at [email protected] so we can troubleshoot this!
Best,
Julianna
This increase is amazing. But is it the same as Knitting front & back as far as an increase goes?
I guess I am asking if they are interchangeable?
This looks so much easier than a kfb.
Thank you!!
Jana
Hi Jana,
Thanks for writing in! A Make One and Knit Front and Back are actually not interchangeable if you are following a pattern that calls for one or the other. A Make One is worked in between stitches, while a Knit Front and Back uses up a stitch, so exchanging one for the other can throw off your stitch count.
I hope that helps!
Julianna
Thank you for the very straight forward video. I’m a left handed knitter and a beginner knitter 😉 Because I’m knitting in the other direction would I knit the M1r first? Thanks!
Hello Alexandra,
Thank you for reaching out! This depends on how you are knitting backwards, but this sounds logical! You could knit up a small swatch to see which way you m1l and m1r are leaning and that will give you a solid answer.
I hope this helps and happy knitting!
-Marilla
Love the videos!
Im practicing this stitch. I woukd love to make this swatch.
Can you give me some instructions? I want to make this edging.
Thanks!
Hi Risa,
Thanks for reaching out! For our swatch, we are simply knitting two stitches before the m1L and two stitches after the m1R and purling all the stitches on the wrong side. Although it looks a bit fancy, it is just due to the line of increases along each diagonal edge!
I hope that helps!
Julianna
Thank you. The throw that I’m knitting is coming up beautifully
Thanks for a clear demonstration of these increases.
I’m confused about which to use on either side of my gussets. On most patterns I’ve seen, M1R is used on the right side of the gusset and M1L on the left. On the pattern I’m using now, though, it’s opposite, and you seem to be doing to opposite too – you make one left on the right side and make one right on the left. Can you clarify which way is best and will make my thumb gussets lay the best?
Hi Jenny,
Thanks for reaching out! Usually you want to have your increases point the same direction that your fabric is moving, so for a gusset, you would use a M1R on the right side and M1L on the left, as you have seen before, but it’s not a hard and fast rule! It’s not uncommon for a pattern to switch the placement of the angled increases for a decorative effect, or even switch them around mid-pattern to create lines that move in different directions – both increases lay flat, so the fit and drape of the item won’t be affected, but it does create an interesting visual effect.
I hope that clears things up, and happy knitting!
Julianna
Just what I needed! Thank you for your excellent tutelage!
On the bobble sheep pillow, row 5…I’m so confused. Can you please send the whole row, as I’m not sure which asterisk I’m supposed to do twice, and it’s not coming out right. when I come to the first marker my count is off and there are two bobbles right next to each other
Hi Sandy,
Thanks for reaching out! I’m happy to write out Round 5 for you! I find it helpful to break it up into separate lines as follows:
M1L, K2
(MB, K3), repeat to 3 stitches before next marker
MB, K2, M1R, slip marker, K2
M1L, K2
(MB, K3), repeat to 3 stitches before next marker
MB, K2, M1R, slip marker, K2
These 6 lines comprise the entire Round 5. I hope that helps, and please feel free to reach out if you have any other questions!
Best,
Julianna
I love yalls videos. I’ve learned so much fro you guys. Question about the m1L: How would you do it if the next stitch on your left needle is a yarn over (from the previous row). I’m having trouble finding the bar between the stitches. Hope that makes sense ?
Hi Christina,
Thanks for writing in! Hmm, that is a new one for me! Are you working on a Purl Soho pattern? I actually don’t think it’s possible to work either a M1L or M1R immediately before a yarn over, as the bar you would normally pick up is part of the yarn over. I would check to make sure that your stitches aren’t off and that the M1 is supposed to be before the yarn over, and if it isn’t a Purl pattern, I would also take a look at the designer’s stitch glossary or special instructions to see if they mean for you to work a different stitch. Although we, and most pattern writers, would call the increase we show here and only this increase a M1, I have seen patterns where the designer will use the term M1 to mean a different type of increase.
I hope that helps!
Julianna
Hello,
I’m knitting an item in the round that calls for 4 increases (m1R and m1L before/after each marker) beginning with the right front (m1R), knit to next marker at left front m1L 2 times. After my first to increases on the front, when I begin the increase for the back, will I use m1L and end with m1R (opposite of the front)?
I hope that makes sense.
Thank you!
Hi Michelle,
Thanks for writing in! It’s hard to say without seeing your pattern, but I would guess that you will work the increases in the same order on the back as you did on the front. A m1r leans to the right and a m1l leans to the left, so when you are looking at either the front or back of a sweater or other shaped piece, you will usually work the m1r on the right edge and a m1l on the left edge, which means you will start with a m1r and end with a m1l on the front of the piece, and again start with a m1r and end with a m1l on the back.
I hope that helps!
Julianna
Loving your video on the M1R and M1L. I get into a mess when I go to knit the next row through from the other side the stitches look confusing.
Hi Ireen,
Thanks so much for writing – I’m so glad to hear that the video is helpful to you! I’m hoping that it’s cleared up your confusion about knitting up the next row, but if you have any questions, please reach out and let us know!
Happy Knitting!
Cassandra
Hi, thanks for the very useful video. You’re always very helpful on these, and the format is very easy to follow. You knit quickly and I may be confused, but it seems like you’re doing an unusual variation on the knit stitches that make up the body of the swatch, picking up an extra bar after slipping the stitch. Is this true? And is there a pattern you utilize this in on your online store? TY. If it’s just a regular knit stitch done quickly then I’m just puzzled by the speed, I guess 🙂
Hi there,
We can confirm, this is just a regular knit stitch used throughout the video! There should always be that bar between your stitches. Hope this clears things up!
Kindly,
Anna
Super clear instructions! Great video and photos. Thank you.
PS. Not sure if you play the piano or not but you have the fingers for it! 🙂
Love the photo’s you provided! Simple, clear, visual reminder of how to M1L & M1R without having to rewind the video 🙂
Thanks so much!
I use your tutorial for my friends and students on the regular!! Best one, clear, simple, awesome pictures. Thank you!!
I am needing to m1L and m1R starting from cast on. Since there are two bars between the stitches instead of just one I can’t figure out which bar to use! Can you help?
This is a great explanation. Thanks! Quite honestly, after knitting for over 40 years now, afraid I’ve done M1L every time, regardless of what pattern says. There is a difference in appearance. Who said an old dog can’t learn new tricks?
simple and excellent explanation Thank you
In your Arched Gusset Mittens the m1L and m1R are stacked right on top of each other and I couldn’t tell where the strand I need to pick up is. Any pointers? I opted to just do e-loop increases, they worked but maybe the m1s would look better, I’d like to try them at least.
Hi Judy,
Thanks for reaching out! Even though the pattern has the increases stacked, this wont change how the increase works! You can work them the same way you would normally since you are simply making the stitch from the strand between the two stitches below.
I hope this clears things up!
Warmly,
Gianna
Trying to figure our M1L and M1R in twisted rib stitch for Twisted Rib Pullover. Do we treat them as knit stitches?
Hi AE,
Thanks for reaching out. You can work the m1L and m1R increases in the twisted rib stitch exactly as you would in a non-twisted knit fabric! Hope this helps clarify things.
All the best,
Lili
Thank you for the mnemonic for M1R – I could never remember
I am a bit confused round 1 has 52 stitches but round 2 needs 60 stitches where are the missing 8 coming from?
Hi Annette,
Thanks for reaching out. Can you let us know what pattern you’re working from? I’ll keep an eye out for your reply, and then I’ll be able to give you advice!
All the best,
Lili
I am knitting the colorful corners baby blanket. States to K2, m1L, knit, m1R, K2. My question, other items I’ve done have the m1R on the right side of the piece, and m1L on left. Is the pattern correct with m1L on right, m1R on left…should I just follow the directions and quit second guessing 😉
Hi Stephanie,
Thanks for reaching out! The placement of increase stitches in this pattern was a design choice, and it results in a slightly different looking edge. Both methods work perfectly well though!
All the best,
Lili
Hi, when making M1L and M1R, although they’re twisted are they still knit stitches on the RS? I have a pattern that requires me to work across the back in pattern and I wasn’t sure if the new M1 stitch is a knitted or purled stitch. Thanks!
Hi Sam,
That is a great question! This will all really depend on the instruction of the specific pattern you are knitting but typically a m1R or m1L will be considered a knit stitch after it is made on the right side of your work. If you make 1 on the wrong side, you will have a purl bump at the back, so you should purl that stitch on the right side. I hope this helps but please let us know if you have any other questions!
Warmly,
Gavriella
Hi there. I’m am doing an m1r and m1l for a ribbed pattern and am getting confused. It’s your simple ribbed shrug pattern. When I’ve made the m1r and m1l knitwise increases in Round 1, and then proceed to repeat the round again, are the previous rounds increases “knit” stitches? Likewise, when I m1r and l purlwise, can I conclude the new stitches are purls? I’m having trouble because I’m asked to “work in pattern round” yet the ribbing changes the pattern. Does this make sense?
Hi Kathryn,
Thank you for writing in! That is correct! You will work those increases as knit stitches unless otherwise noted in the pattern. For this pattern specifically, there will be points in which there are more knit or purl stitches in a row as you begin to increase. After you have established the knits and purls, you will work in pattern for the subsequent stitches meaning you will knit all the knit stitches and purl all the purls. I hope this helps!
Happy knitting,
Gavriella