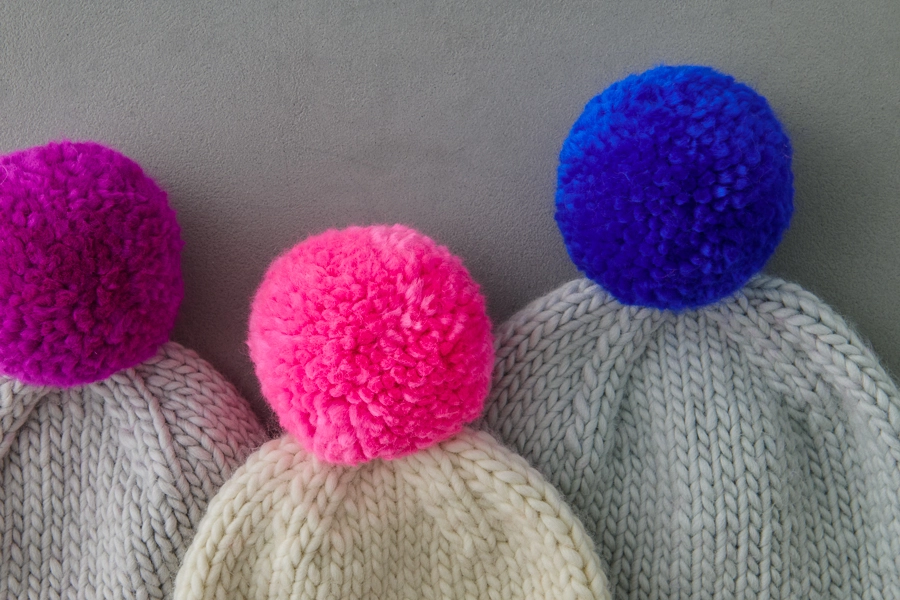

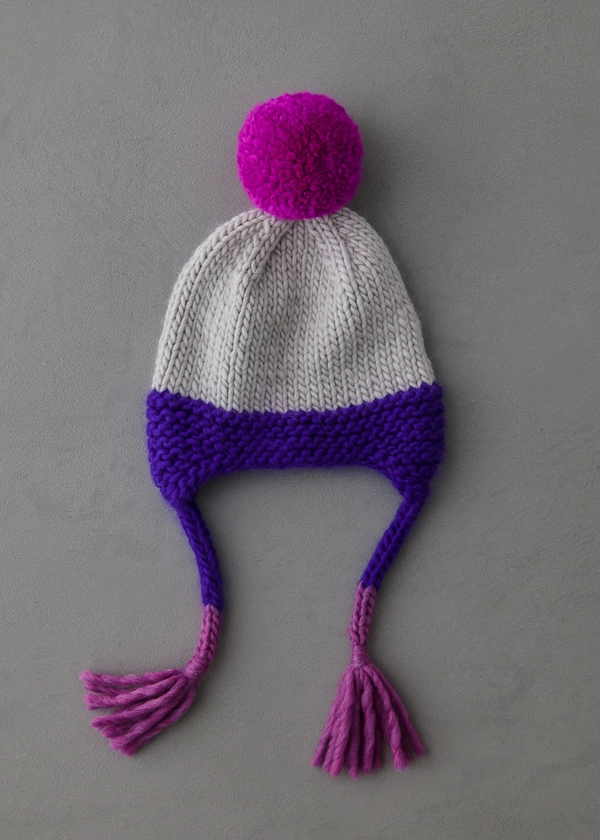
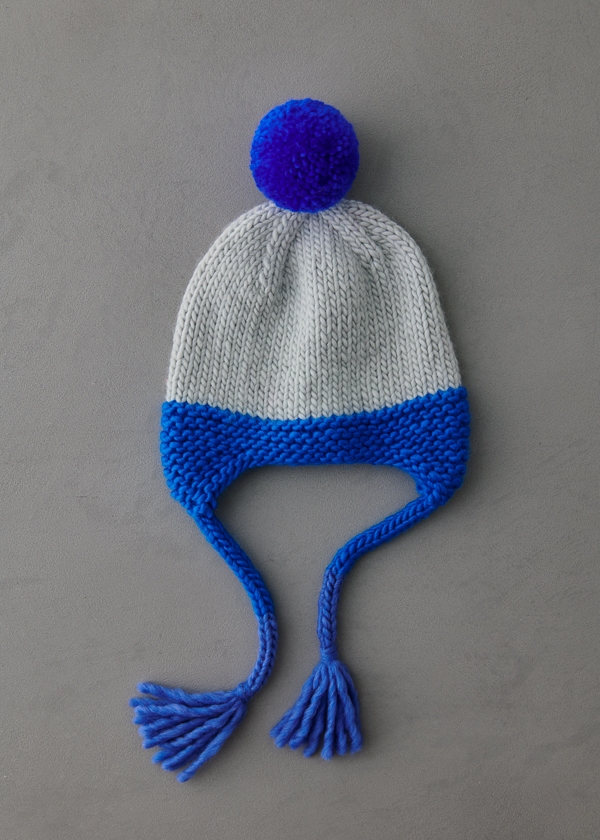
Merry Ear Flap Hat
Looking for reasons to be merry this year? We’re not saying bright colored tassels and fluffy pom poms are going to return this holiday season to “normal,” but we’ll take what we can get!

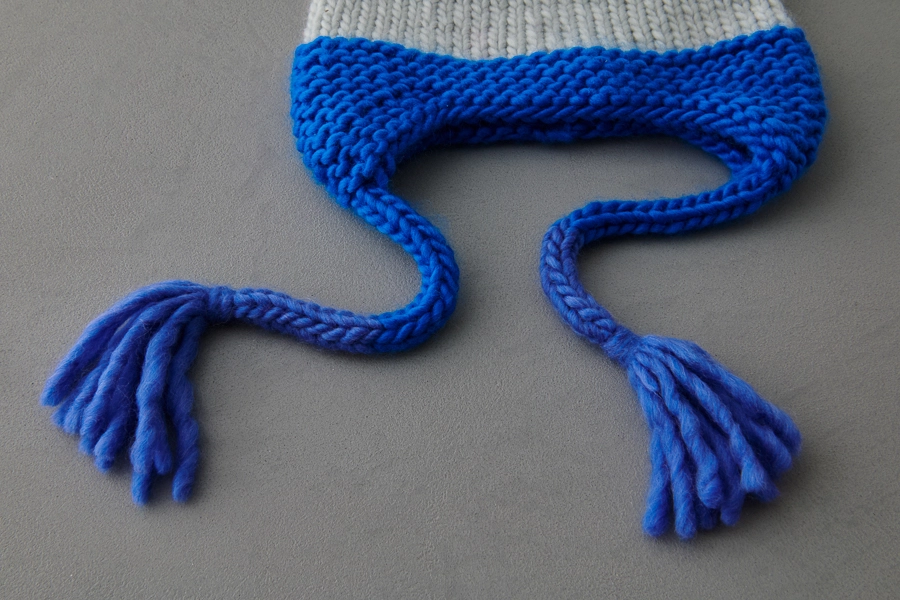
Our Merry Ear Flap Hat pumps as much cheer into every little bit as it possibly can. Adorable tassels, chunky I-cords, cozy garter ear flaps, a contrasting-color crown, and a pom pom to top all pom poms, these hats know how to stretch a good thing!

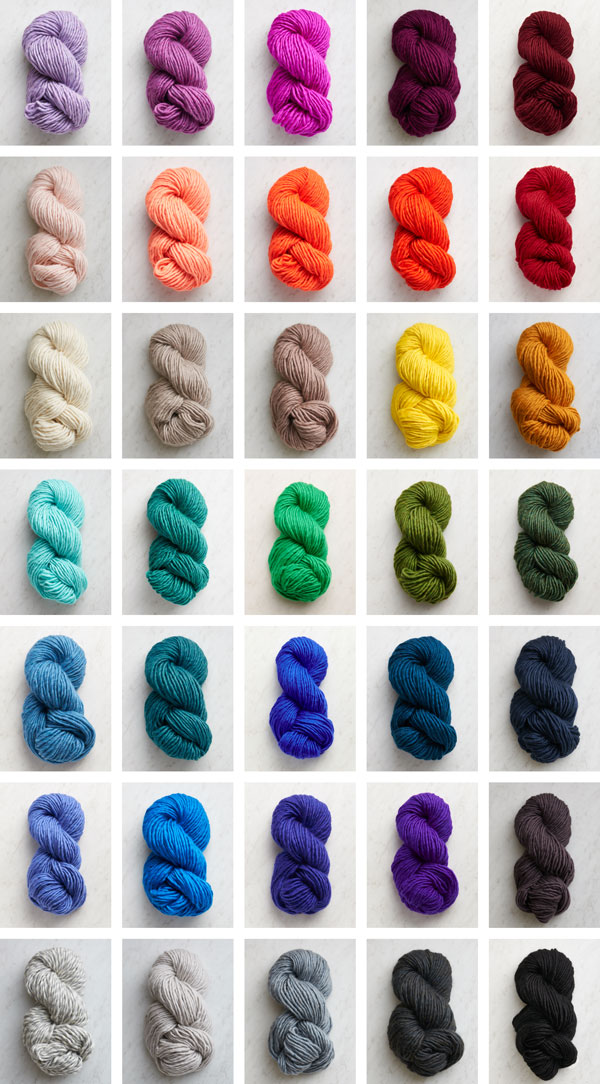
In our super soft Super Soft Merino, we love the graphic impact, as much as the warm toastiness, of our Merry Ear Flap Hat. And with ten(!!) new colors of Super Soft Merino to choose from, things are really starting to look bright.
We recommend making a lot of Merry Ear Flap Hats this year… For everyone’s happiness!

Designed by Purl Soho designer, Jake Canton. Click here to see even more of Jake’s designs!
Share your progress + connect with the community by tagging your pics with #PurlSoho, #PurlSohoBusyHands, #PurlSohoMerryEarFlapHat, and #PurlSohoSuperSoftMerino. We can’t wait to see what you make!
Materials
- Color A (I-cords + Tassels): 1 skein of Purl Soho’s Super Soft Merino, 100% merino wool. Each skein is 87 yards; approximately 10 (13, 16, 18) yards required.
- Color B (I-cords + Cuff): 1 skein of Super Soft Merino; approximately 24 (26, 32, 40) yards required
- Color C (Body + Crown): 1 skein of Super Soft Merino; approximately 33 (43, 57, 70) yards required
- Color D (Pom Pom): 1 skein of Super Soft Merino; approximately 40 (40, 40, 40) yards required
- US 11 (8 mm), 16-inch circular needles
- A set of US 11 double pointed needles
- 4 stitch markers, including one unique
- Purl Soho’s Pom Pom Maker Set, Extra Large + Jumbo size
NOTE: To make a solid color hat with a pom pom, you’ll need 2 (2, 2, exactly 2 or maybe 3) skeins. Without a pom pom, you’ll need 1 (1, 2, 2) skein(s).
We made our samples in these fun palettes…

Baby/Toddler Size
- Color A: Peachy Pink
- Color B: Super Orange
- Color C: Heirloom White
- Color D: Super Pink
Kid/Junior Size
- Color A: Lotus Flower
- Color B: Wild Violet
- Color C: Oyster Gray
- Color D: Bougainvillea Pink
Adult Small Size
- Color A: Mountain Blue
- Color B: Cobalt Blue
- Color C: Artemisia Green
- Color D: Blue Blue
Gauge
12 stitches and 18 rounds = 4 inches in stockinette stitch
12 stitches and 22 rounds = 4 inches in garter stitch
Sizes
Baby/Toddler (Kid/Junior, Adult Small, Adult Large)
Finished Circumference: 13¼ (16, 18¾, 21¼) inches
Finished Height: 7 (8, 9, 10) inches
Notes
Short Row Shaping: wrp-t (wrap and turn)
Keeping yarn in back, slip next stitch purlwise from left needle to right needle. Bring yarn to front. Return slipped stitch to left needle. Turn work so wrong side is facing you.
To see this technique in action, visit our Short Row Tutorial and follow along with the wrap and turn on the knit side section (at 0:30 seconds), except do not bring the yarn to the back before you turn.
Pattern
Make I-Cords
With Color A, cast 3 stitches onto a double pointed needle. Knit I-cord for 1 (2, 3, 3) inches. Cut Color A.
Join Color B, and continue knitting I-cord for 2 (3, 4, 4) inches. Cut Color B and set aside.
Make a second I-cord identical to the first.
Begin Cuff
With Color B, cast 9 (11, 13, 15) stitches onto circular needles; with right side of an I-cord facing you, knit across 3 I-cord stitches; cast on 17 (21, 25, 29) more stitches, making sure to pull cast-on tail tightly behind I-cord for first stitch; with right side of remaining I-cord facing you, knit across 3 I-cord stitches; cast on 8 (10, 12, 14) more stitches, again pulling cast-on tail tightly behind I-cord for first stitch. [40 (48, 56, 64) total stitches]
Place unique marker and join for working in the round, being careful not to twist the stitches.
Set-Up Round: Purl to end of round.
Work Left Ear Flap
Short Row 1 (right side): K12 (14, 16, 18), wrap + turn (wrp-t, see Notes).
Short Row 2 (wrong side): K2 (2, 3, 3), wrp-t.
Short Row 3: Knit to previous row’s wrap, knit wrapped stitch as usual knit stitch, wrp-t.
Repeat Short Row 3 seven (7, 9, 9) more times, ending with a wrong side row.
Work Right Ear Flap
Short Row 1 (right side): K26 (30, 36, 41) wrp-t.
Short Row 2 (wrong side): K2 (2, 3, 3), wrp-t.
Short Row 3: Knit to previous rows wrp-t, knit wrapped stitch as usual knit stitch, wrp-t.
Repeat Short Row 3 seven (7, 9, 9) more times.
Next Round: Knit to end of round.
Continue Cuff
Round 1: Purl to end of round.
Round 2: Knit to end of round.
Repeat Rounds 1 and 2 one more time, then repeat Round 1 one more time.
Cut Color B.
Work Body
Join Color C and work in stockinette stitch, knitting every round, until piece measures 5 (5½, 6, 6½) inches from cast-on edge, measuring at end of round.
Work Crown
Set-Up Round: K5 (6, 7, 8) place marker (pm), [k10 (12, 14, 16), pm] 3 times, knit to end of round.
Round 1: [Knit to 2 stitches before next marker, knit 2 together (k2tog), slip marker, slip slip knit (ssk] 4 times, knit to end of round. [8 stitches decreased]
Round 2: Knit to end of round.
Repeat Rounds 1 and 2 three (4, 5, 6) more times. [8 stitches remain]
Cut yarn and pull tail through remaining stitches.
Finish
Tassels
With Color A, cut six 7-inch lengths of yarn. Using a tapestry needle, thread each length halfway through the tip of I-cord at bottom of Ear Flap to make 12 strands of fringe. Wrap the I-cord cast-on tail several times around the base of the fringe where it joins the I-cord. Thread the tail down through the wraps and trim the fringe and tail to desired length.
Pom Pom
If you’re using Purl Soho’s Pom Pom Maker Set, use the Extra Large Pom Pom Maker and the 3-inch Trim Guide. With Color D, follow our Pom Pom Tutorial’s instructions for a one-color pom pom.
Attach Pom Pom
Thread each pom pom tail separately through the top of the crown to the inside of the hat. Tie the tails into a knot, then thread the tails up through the pom pom itself and trim them flush with the pom pom.
Weave In + Block
Weave in ends and steam block, if desired.


Good morning! Such a cute pattern! Can u estimate about how many hats you could make from the yarn. So if I buy the yarn for the toddler size….am I able to switch up colors and make another in opposite colorway?? Thanks
Hi Lynn,
Thanks for writing in! Each skein of Super Soft Merino is 87 yards and for the toddler size we used approximately 10 yards of Color A, 24 yards of Color B, 33 yards of Color C, and 40 yards of Color D! I think you could definitely get away with making two hats from each skein with reversed colors!
All the best,
Gianna
What a beautiful hat. Wish it had been published earlier. A wonderful hat to make for charities!
Looks like a warm hat. I’m wondering why there is a small adult size pattern, but nothing for medium or large adult size patterns.
Thank you.
Hi Anne,
Thanks for reaching out! We actually offer this hat pattern in Baby/Toddler, Kid/Junior, Adult Small, and Adult Large! You can find all of this information under the SIZE section of the pattern.
All the best,
Gianna
What a nice hat? I’d love to try this but would you be able to provide stitch information for a large size?
I actually meant extra large size 🙂
Hi Julia,
Thanks for reaching out! We don’t have a written pattern for this hat in an extra large size but thank you for expressing your interest and I will be sure to pass this along to the rest of the team!
All the best,
Gianna
Hi, it’s a great pattern. Please could you tell me the equivalent weight of wool for UK? Thanks
Hi Sue,
Thanks for reaching out! This patterns works with our Super Soft Merino which is a Bulk Weight yarn and uses a suggested Knitting Needle size US 11 (8mm) or a suggested Crochet Hook L – M (8 – 9 mm)!
I hope this helps!
Gianna
Hi I’m a French grandmother and would appréciate a lot to have a pattern translation . I’d love to try this for my grandaughter Juniper . She is 5 , lives in Saint Simon Ga.
Thank you for your answer
Hi Luciana,
Thanks for reaching out! We don’t currently offer translated patterns, but thank you for expressing your interest and I will be sure to pass this along to the rest of the team!
All the best,
Gianna
For the cuff, how do you incorporate the i-cord stitches?
Hi Katelyn,
Thanks for reaching out! With Color B, you will cast on 9 (11, 13, 15) stitches onto your circular needles. Then with the right side of one of your I-cords facing you, knit across 3 I-cord stitches; cast on 17 (21, 25, 29) more stitches, making sure to pull cast-on tail tightly behind I-cord for first stitch; with right side of remaining I-cord facing you, knit across 3 I-cord stitches; cast on 8 (10, 12, 14) more stitches, again pulling cast-on tail tightly behind I-cord for first stitch. 40 (48, 56, 64) total stitches.
I hope this helps!
Gianna
Hi Gianna
I have some questions too.
1.
After casting on 9 stitches(for babies) and knitting across 3 icord stitches, how can i keep casting on? after knitting across stitches, i have only one tail in the needle.
So does casting on mean in the first place “single casting on” with one thread under the left thumb and up and loop on the needle?
2.
For ear flap, after short row2, what does it mean by knitting wrapped stitch as usual knit stitch, wrp-t.??
i am lost in Short row3! pls let me know!!
Thank you very much
i hope your reply
ByeBye
Hi May,
Thanks for reaching out! I’d be happy to answer your questions:
1. After you knit across the 3 i-cord stitches, you’ll bring the second strand of the cast-on along with you to begin casting on again! Just make sure to pull cast-on tail tightly behind the i-cord for first stitch, so that you can continue using it.
2. I would recommend taking a look at our Short Rows: Wrap + Turn tutorial! In that video, we demonstrate exactly how to knit a wrapped stitch with its wrap.
I hope this helps!
All the best,
Lili
What is the actual yardage for the parts of Kids/junior and adult small? I am trying to make reverse colors for a kid and adult hat and wondering how may skeins.
Hi Gail,
Thanks for reaching out! You can find all the information on the approximate yardage we used under the material section! Each skein of Super Soft Merino is 87 yards. For the Kids/Junior size we used 13 yards of Color A, 26 yards of Color B, 43 yards of Color C, and 40 yards of Color D. For the Adult Small we used 16 yards of Color A, 32 yards of Color B, 57 yards of Color C, and 40 yards of Color D.
Happy knitting!
Gianna
I want to knit this for my 2 year old grandson. I asked my daughter to measure the circumference of his head and she got 19.5 inches. I usually knit a small/medium hat for myself but my head circumference is 22”. Are the measurements listed in the pattern correct? They seem very small.
Hi Lisa,
Thanks for reaching out! The measurements in the pattern are correct, keep in find the finished circumference will be a bit smaller than the actual head measurements since the hat will stretch a bit and you want the fit to be snug! The model is wearing the Adult Small size for reference.
All the best,
Gianna
Hi, my son asked me to knit a hat with ear flaps so I thought I would try even though I am a BEGINNER knitter.
I just finished Begin Cuff by Purling to the end of round meaning I have total of 64 stitches(adult large) on my circular needle and I am moving on to ‘Work left ear flap’. I do not quite understand from here. Do I knit 18 and wrp-t once? And then turn to the wrong side and knit 3 and wrp-t once? I wish there was a video or at least pictures of all the steps of how to.
I really love all your patterns but some of them are a bit challenging for beginners. Thanks
Hi Kate,
Thanks for reaching out! That is correct! We have an excellent Short Rows: Wrap + Turn tutorial that will show you exactly how the wrap and turns work and what they should look like.
I hope this helps and please feel free reach out with any more question you have going forward!
All the best,
Gianna
Gianna, I had the same question as Kate. You didn’t really answer the question. When you finish the first round of purl and are about to begin the ear flap you start to knit. I am making a baby hat so I K12- but I am ON THE WRONG SIDE when I do that. So which Wrap+turn do I follow? The knit or the purl. In this case the Purl side is the RIGHT side and the Knit side is the Wrong side
Hi Jan,
Thanks for writing in! Keep in mind this hat is knit in garter stitch so both right and wrong sides should be knit stitches! The set up round which is the only round of purl stitches is on the wrong side so then when you move onto short row 1 you are working on the right side of the fabric. For the baby size you follow the short row as written, so for short row 1 (right side) you are K12 stitches, wrapping the stitch and then turning the work (wrp-t, see Notes). You then move directly onto short row 2 (wrong side) K2 stitches wrap and turn your work.
I hope this clarifies things for you, happy knitting!
Gianna
Is this hat supposed to have a lot of negative ease. My 2 year old grandson’s head circumference is 19.5”. I am thinking of making him the 2nd size because of the circumference listed.
Thanks in advance for the info.
Hi Lisa,
Thanks for reaching out! There is some negative ease, the hats will stretch a bit when worn! The model is wearing the Adult Small for reference!
All the best,
Gianna
I love this hat. I am a bit confused about the cords. After I knit them, do I bind them off or leave the 3 stitches live? Can you explain further what the right side of the I cord is?
Hi Micheal,
Thanks for reaching out! After knitting the cords you leave the stitches live and out them to the side, you don’t bind them off!
All the best,
Gianna
The hat is so cute, love to make form my granddaughter for next winter, she is only 6 months old and has many hats right now, so early next winter would be good. I have made a few things for her ie, mittens, jacket and sweater and I am very surprised at the needle size. I guess that the wool that I have used has been heavier so I used a size 7 needle. Will the results be different?
Hi Jo,
Thanks for writing in! For this pattern we used a bulky weight yarn, so we used an US 11 needle! If you were to knit this yarn with a US 7 it would be way too small of a needle resulting in a much too tight hat! A US 7 needle would be more appropriate for a lighter weight yarn, like a worsted weight!
All the best,
Gianna
Hi! I love all the Purl Soho patterns, thank you so much for the free pattern options! I am making my first Merry Ear Flap hat. when the instructions say, “knit to previous row’s wrap, knit wrapped stitch as usual, wrp-t”, I should knit the previous row wrap by lifting the wrap and knitting together with the stitch, correct?
Then I wrap the next stitch, correct?
Thank you for your help! Stay safe!
Megan
Another question 🙂
When I knit through the icord stitches when casting on, do I place the stitch back on the left needle after each stitch? As opposed to having the knitted stitch end up on my right needle?
Thank you again! Megan
Hi Megan,
Thanks for reaching out again! When you knit the three stitches from the I-Cord they should go on the right (working) needle so you can continue to cast on the rest of the stitches from there!
I hope this clarifies things, happy knitting!
Gianna
Hi Megan,
Thanks for reaching out! Yes that is correct! You will knit the previous rows wrap by lifting the wrap and knitting together with the stitch and then wrap the next stitch! Our Short Rows: Wrap + Turn tutorial is a great resource to use and will show you exactly how to work the stitch with its wrap!
Happy knitting!
Gianna
What kind of cast-on do you recommend for this hat?
Hi Heidi,
Thanks for reaching out! You can use a basic cast on for this hat, Long Tail Cast On or Cable Cast On would both work great!
I hope this helps, happy knitting!
Gianna
Hi. This is such a cute pattern. i am trying to make this hat in the baby/toddler size.
when knitting the ear flaps, is the wrap & turn k2 wrp-t, k2. so you basically wrap & turn, then knit 2 between the wrp-t. and is repeating short row 3 seven times just knitting 2 between wrap & turn? I feel like i am not getting something right.
Hi Lori,
Thanks for reaching out! For row 2 you will be knitting 2 stitches then wrapping and turning the work but then for row 3 you are knitting to the previous row’s wrap, and then knitting the wrapped stitch as usual then wrp-t. So after knitting 2 wrapping and turning you are working to the wrapped stitch but then working the wrapped stitch before you wrap and turn the next stitch. This means you are expanding the row each time because you are working the wrap and then going onto the next stitch before preforming the wrp-t (more than 2 stitches every row!) You then repeat row 3 seven more times which will expand the rows each time creating the ear flap shape!
I hope this clarifies things!
Warmly,
Gianna
That definitely clarifies things. I did not realize what it meant to knit wrapped stitch as usual. Now I get it! Thank you so much!
Hi there! Looking to get a little more input on how stretchy these are when using recommended needle size and weight yarn. I am knitting these for a big-headed family (2 adults w/23 1/2” and 23 7/8” heads, baby w/a 19” head!). I’m assuming the adult large will not stretch enough to accommodate the adults, and feel comfortable tweaking the pattern a bit to account for their noggins. As far as the baby goes, I am considering going adult small, but want to make sure it would still be snug on his 19” head. Thank you for any advice you can provide! 🙂
Hi Emily,
Thanks for reaching out! These hats should comfortably stretch 1-2 inches, I think you should be alright to go with the Adult Large size, though it may be a snug fit on the 24″ head! As for the baby I would suggest knitting the Kid/Junior or Adult Small size, the Kid/Junior will fit a bit more on the sung side and the Adult Small should fit comfortably with some room to grow!
I hope this helps!
Gianna
How do you hide the yarn ends in the I cord when switching colors? I tried wrapping them inside by carrying the new color underneath the yarn end but, doesn’t look very neat. Thank you.
Hi Sandi,
Thanks for reaching out! I would recommend waiting until the end to weave in all the end for the most clean and neat look! I recommend checking out our Weaving in Your Ends tutorial! You may also find our tutorial for Wet Splice (aka Spit Splice) interesting.
I hope this helps, happy knitting!
Gianna
When casting on for size I am making, the directions state, “cast on 13 stitches then with right side of icord facing me, knit across the 3 icord stitches then cast on 25 more stitches, making sure to pull cast-on tail tightly behind icord for first stitch”. I have cast on 13 stitches and with the working yarn, knit across the 3 icord stitches, then continue with same working yarn to cast on more stitches. Is the cut end of my 3 icord stitches considered to be the “cast-on tail”?
Hi Sandi,
Thanks for reaching out! The cast on tail is the yarn you first used when you began casting on your stitches! It will be the end that was shorter when you began, not the one connected to the ball of yarn!
I hope this helps, happy knitting!
Gianna
I still am not clear on this. After casting on 13 stitches I knit across the icord. My cast on tail of yarn is at the right-sided end of my right hand needle. Not next to the icord i just incorporated into the left of my 13 cast on stitches. So I don’t understand how to wrap the cast on tail behind the icord without stretching that tail across the back of those 13 stitches. Was I supposed to turn after casting on 13 so that the icord would be incorporated at the start of the 13 stitches? Thank you.
Hi Sandi,
No worries I am happy to help! You will use the cast on tail to make those 13 stitches, so the tail will be waiting right at the end of the 13 stitches where you will then knit those 3 stitches from the icord. So you will only be pulling the tail tightly over only those 3 stitches (not 13 since the tail will be at the end where you finished casting on the stitches) so that you can then continue to cast on the rest of the stitches!
I hope this clears things up!
Warmly,
Gianna
Thank you Gianna. It just occurred to me that the pattern instructions are assuming a long-tail cast on. Since I rarely use that cast on method, and the pattern doesn’t specify a cast on method, I could not figure out why I would still be carrying the cast on tail. Thanks again. I appreciate your assistance.
Hi Sandy,
I am confused, the left flap is completed.My cast on was 64. Doesn’t the ear flap add more stitches to the crown? Are the flaps opposite each other?
It doesn’t appear so in the directions but looks like it in the picture. I appreciate your help.Thank you.
Jill
Hi Jill,
Thanks for reaching out! The ear flaps actually don’t change the number of stitches since you are working back and forth in short rows to add the shaping rather than increasing or decreasing stitches! Also, the ear flaps are basically identical, they are not different from each other, but they are direct across the hat from each other so that they rest in the same location.
I hope this helps clear things up!
Gianna
I love this hat! And the super soft merino is a dream! I just finished my first one and had a question about the finish. Towards the end, do you switch to double pointed needles? And if so, when would you make that switch? My circular needles got very tight at the end and I ended up stopping 2 rows early because I couldn’t work on my needles with so few stitches. It looks fine, but I’m planning to make several so wanted to try to do it right. Thank you!!
Hi Meaghan,
You definitely will want to switch to using double-pointed needles to complete the top of the hat! I’d suggest switching whenever it becomes uncomfortable or difficult to work with your circular needle. If you don’t prefer working with double-pointed needles, another option would be to use a longer circular needle and work the Magic Loop Technique instead! It’s a great way to avoid DPNs and still work small circumference projects with ease.
I hope this helps as you plan for your future hats!
Warmly,
Kelsey
Thank you!
If I want to use 2 colors, one (A) for the earflaps, iCord, tassles and pompom, and one (B) for the body, how many skeins of ear are needed? Thank you.
Dana
Hi Dana,
Thanks for writing in. To make an adult-sized hat with just two colors, you’ll need two skeins for the earflaps, i-cord, tassels, and pom poms, and one skein for the body! Hope this helps.
All the best,
Lili
You could also use two circular needles instead of DPNs. I always use them instead of magic loop or DPNs.
Do you have a recommendation for getting rid of the jog in the back of the hat where yarn the color changes? It is very obvious and I’d like to avoid it if possible. Such a cute hat!
Hi Patti,
Thanks for writing in. Take a look at our tutorial, Stripes in the Round! This tutorial is geared towards avoiding jogs when knitting stripes, but the technique can also apply to the one color change in this hat. Hope this helps!
All the best,
Lili
I am knitting this hat…my question is – how do you recommend to cast on the stitches after you incorporate the 3 stitches from the I-cord? Thank you fir your help.
So I was able to figure out the cast on situation…I read back on some previous questions – I started over and kept a long cast on tail from my original Long tail cast on after casting on the 15 stitches ( making large adult size) I was able to use the tail to do the additional cast ons.
Worked out well. Now I have another question. After doing the left ear flap – repeat row 3 – 9 times more. I did that. Do I complete this last row to the beginning? Not sure where I begin the right ear flap.
Thanks for your help.
me again….figured out how to start the second ear flap….yippee! This is a very fun knit. Love Jake Canton’s patterns!
Happy New Year everyone at Purl Soho. 🎉
Hi Barbara,
Thanks for writing in, and I’m so happy to hear that you ended up figuring out your questions so fast! I’m going to post answers to them here as well, in case others have the same questions.
As for the method of cast-on after incorporating the i-cord stitches, you should continue using long-tail! Just make sure to pull the cast-on tail tightly behind the 3 stitches of the i-cord as you continue casting on.
In answer to your question about starting the second (right) ear flap, Short Row 1 in the WORK RIGHT EAR FLAP section specifies exactly how many stitches you’ll need to knit to get in position to start it.
Happy knitting!
All the best,
Lili
Hi. I am knitting this hat for baby/toddler on 16 “ circular needles. I can’t make this work as this length seems too long for such a small size hat. Am I doing something wrong or do you suggest a shorter circular needle? Please let me know what size so I can order one. Thank you for your help.
Hi Jean,
Thanks for reaching out. Both the baby/toddler and the kid/junior sizes must be knit on DPNs for the entirety of the hat! This is because, as you’ve noticed, the 16″ circular needles are too long, since the circumference of the hat itself is less than 16 inches. The pattern is definitely misleading, since it says to cast on to circular needles, but hopefully my explanation helps clarify things!
All the best,
Lili
Cute hat! Do you think Lovebird is an equivalent enough weight to work for the contrast color/ear flap part? It’s such an adorable yarn and I thought it’d look cute in this pattern with a solid contrast in the super soft merino.
Thanks!
Hi Adrianne,
Thanks for writing in. I think using Lovebird for the contrast color is a wonderful idea! It will work very nicely, but I’d recommend swatching to see what needles you should use to match the gauge (you may end up needing a different size just for the contrast color portion). Hope this helps!
All the best,
Lili
I printed out your free pattern and purchased my yarn from you about 1 month ago. Do I have the corrected pattern or the one with the errata?
Hi Ilene,
Thanks for reaching out! The pattern is correct and should be fully up to date! If you printed this out a month ago, it should be accurate!
Warmly,
Gianna
I made an Adult size hat, which turned out perfectly! My son tried it on, and it actually fit. THEN I blocked it, and somehow made it bigger — what did I do wrong do you think? And how do I fix it?
Thanks!
Hi Stormie,
Thanks for reaching out! What likely happened, is that when you blocked the hat it got a bit overstretched, and then dried to those dimensions. When the yarn is wet it will want to grow, so it is important when blocking something, when you are laying the piece out, you use a tape measure to help form it to the dimensions stated in the pattern. I would recommend re-blocking the hat, and when you lay it out make sure to squish and form it into place so the hat measures either 18¾ inches in circumference and 9 inches tall for the Adult Small size or 21¼ inches in circumference and 10 inches tall for the Adult Large size. For more info, I would also recommend checking out our Blocking tutorial!
I hope this helps, happy crafting!
Gianna
Hello, i have merino superwash left over, could it a good yarn for this hat, what do you think about superwash? I have been told to avoid it especially for sosks tks again
Hi Ginette,
Thank you for reaching out! The best way to determine if your yarn would work well with this hat is to make a gauge swatch. That way, you can see if the weight and qualities of the yarn would suit your desired finished hat fabric! If gauge swatching seems daunting, we have a handy tutorial called All About Gauge to reference.
Additionally, using superwash wool for a hat in general would be a great option, as you can more easily wash your hat to freshen it up as needed!
I hope this helps!
All the best,
Margaret
Me again, i am beginning the cuff, why we cast 13 st before the first icord and only 12 after the second one? Tks
Hi Ginette,
That’s a great question! The reason that you cast on a different number there is because there should be an odd number of stitches (25 stitches) between the i-cords. That number doesn’t divide equally into two parts, which is why one side of the back of the hat has one more stitch than the other!
All the best,
Lili
Tks again!
Good morning, can you explain in more details the short row 3, do we have to knit stitches together? I am lost, tks,
Hi Ginette,
That’s a great question! Because this pattern is in garter stitch, the wraps blend in with the purl bumps, so you do not need to knit each wrapped stitch with its wrap. You can just knit the wrapped stitches as normal knit stitches, ignoring the extra loop of the wrap!
All the best,
Lili
Tks a lot
Hi, for the section work body, it is specified 6 inches from cast on edge so we do not include the flap, right? You mean 6 inches from the edge of the back or front?
Tks again, Ginette
Hi Ginette,
Yes, you will measure this distance from either the back or front of the hat (they’re the same length), but not including the ear flaps! Hope this helps!
All the best,
Lili
Many tks
Hi, I’m knitting the setup round for the crown in the adult large size. The marker placement only accounts for 56 stitches not the 64 that I have. Knit 8 place marker then (knit 16 place marker) 3 times.
Am I reading this correctly?
Thanks.
Hi Michelle,
Thanks for reaching out! The final 8 stitches are included in the instruction to “knit to end of round,” which occurs as the last part of Set-Up Round. Hope this helps clarify things!
All the best,
Lili
Question…do you have a machine washable alternative to Super Wash Merino that would work for this hat pattern? Thanks!
Hi Kim,
I’m afraid that we do not currently have a machine washable bulky weight yarn. We’re so sorry about that! If you’re open to an alternative solution, I’d recommend holding two strands of a machine washable worsted weight yarn (like Anzula’s For Better Or Worsted) together so that you can meet the gauge of the pattern. Hope this helps!
All the best,
Lili
Thanks, Lili. Appreciate the quick response and alternative suggestion.
Do you have a video tutorial of any of the hats? It would make it sooo much easier to knit.
Thank you
Hi Lillian,
I’m afraid that we do not have a video tutorial of this entire pattern, but we do have tutorials for all of the techniques used! I’ve linked them all below:
Short Rows: Wrap + Turn
I-Cord
Pom Pom Tutorial
Knit Two Together (k2tog)
Slip Slip Knit (ssk)
Tassel
I hope this helps, and please don’t hesitate to reach out to us if any questions come up when you’re knitting!
All the best,
Lili