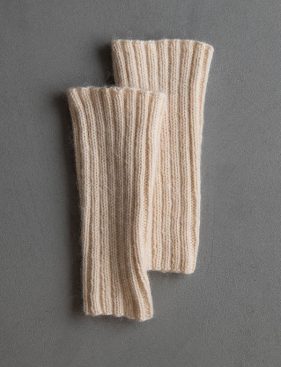
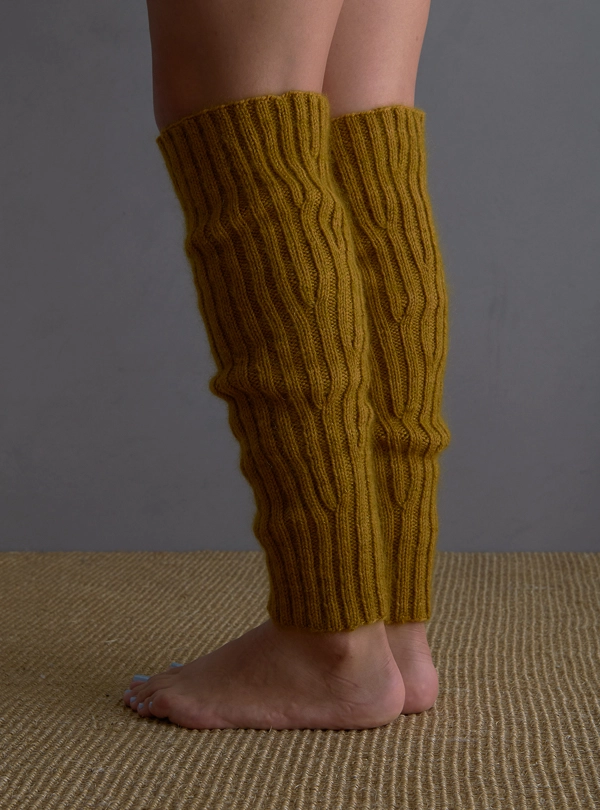
Lovely Ribbed Leg Warmers
Poor legs… They need sweaters, too! Our Lovely Ribbed Leg Warmers keep your lower limbs warm and cozy, because when it’s cold, it’s cold all over.

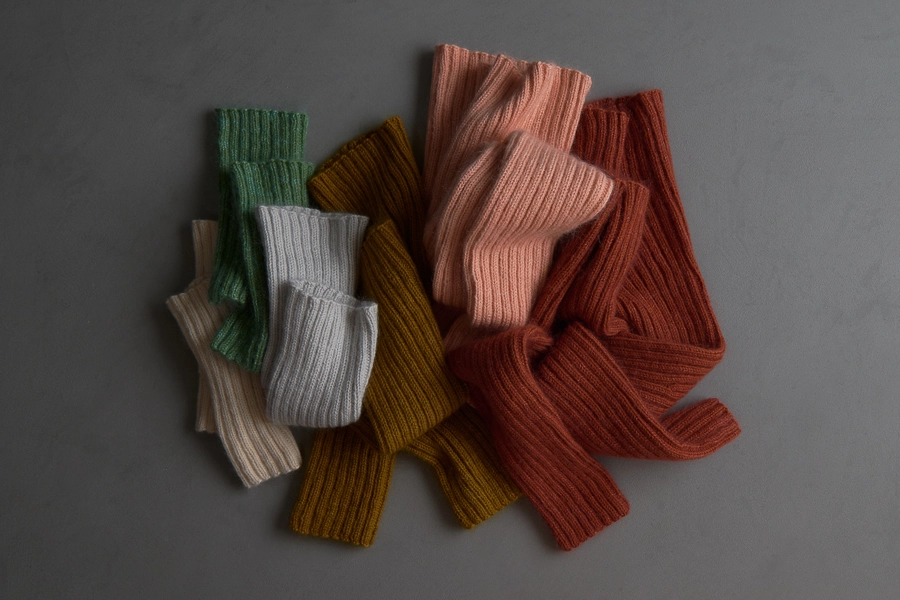
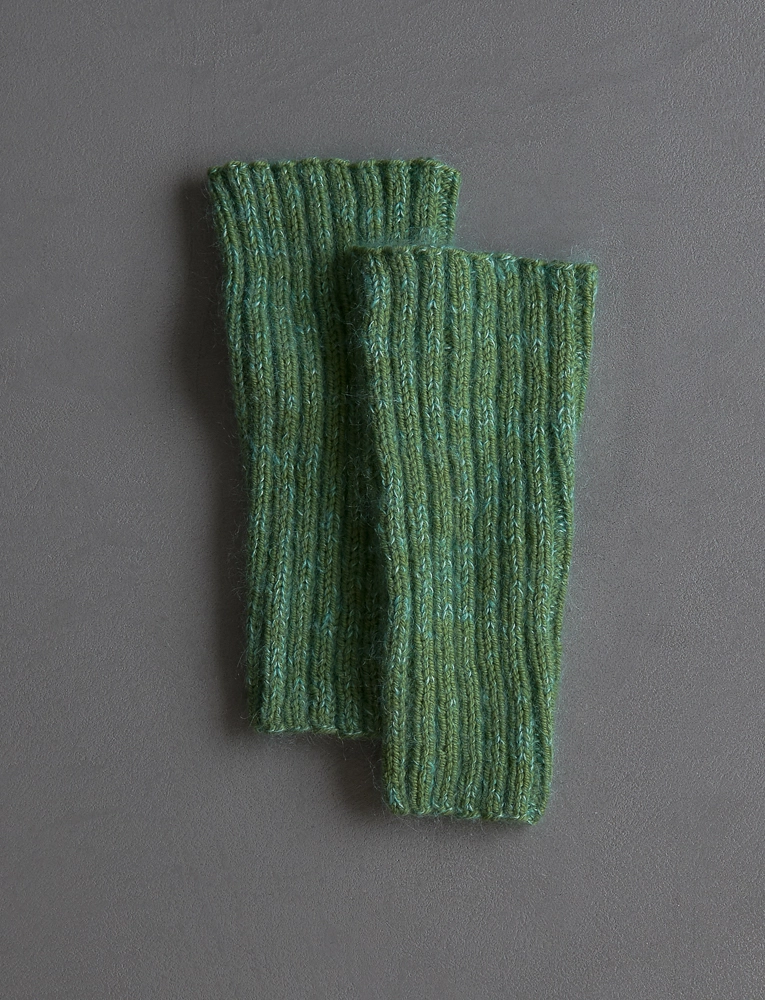
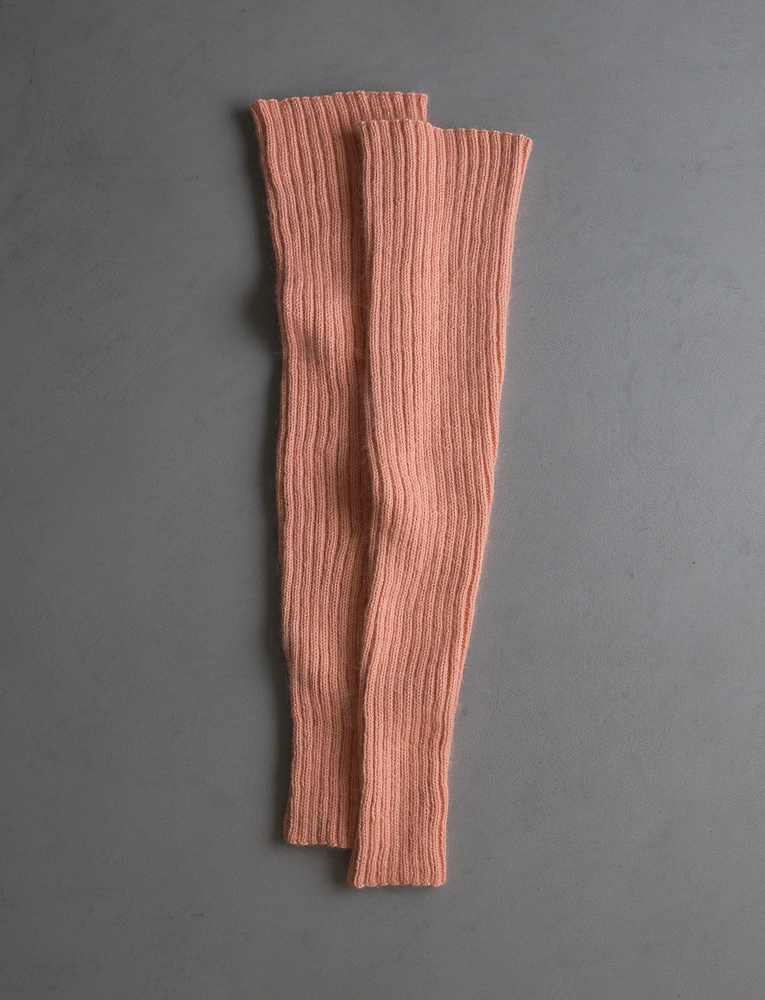
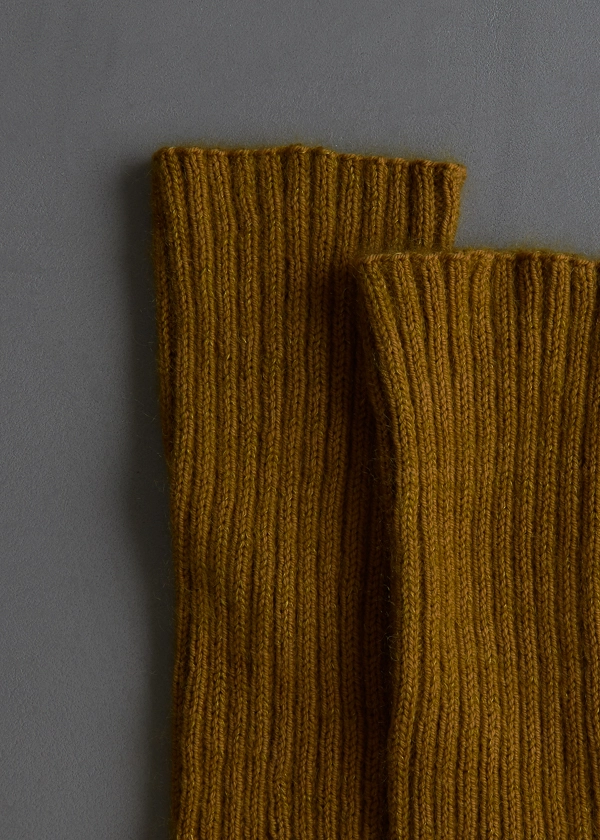
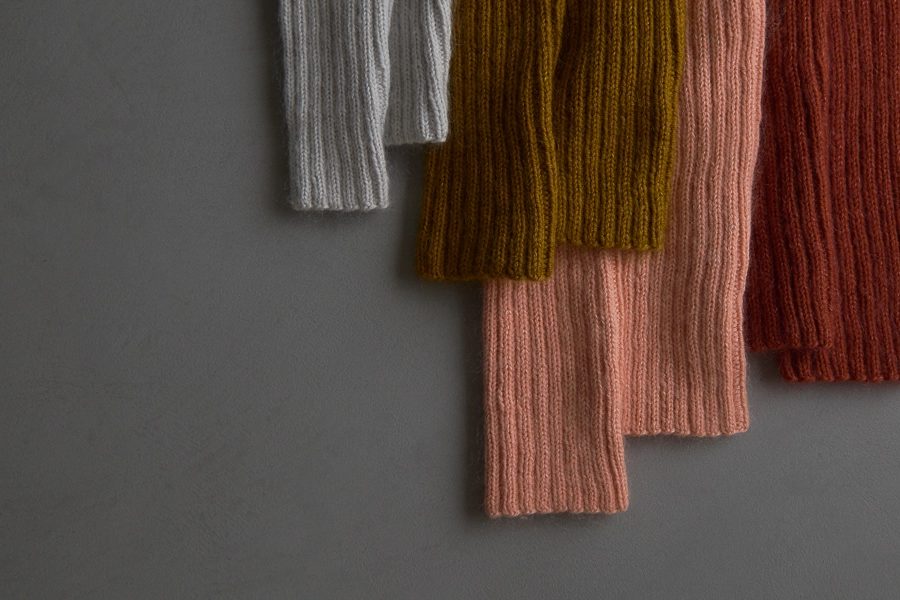
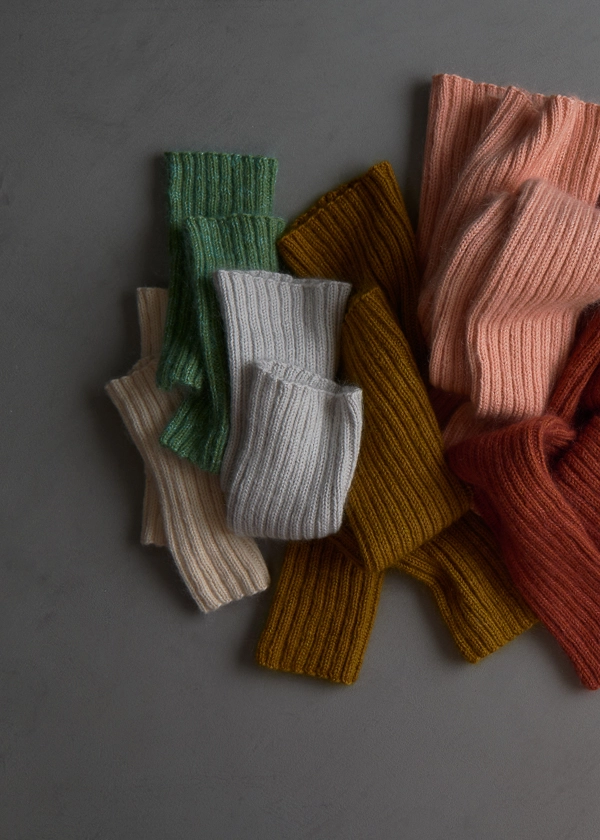
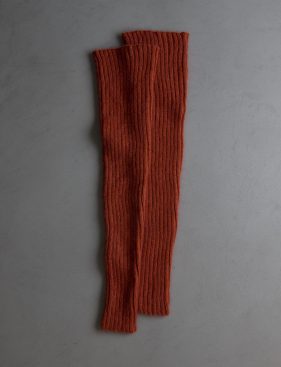
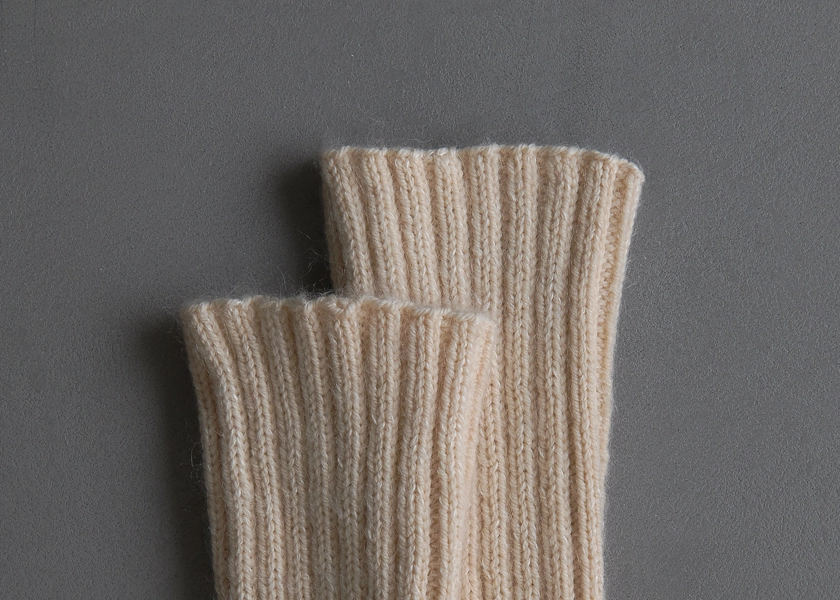
In a nice and stretchy 2×2 rib, these lovelies hug you right where they need to and also have shaping up the back to make sure everything stays put! Choose from a to-the-knee version, shown above, and an up-to-the-thigh version, below.

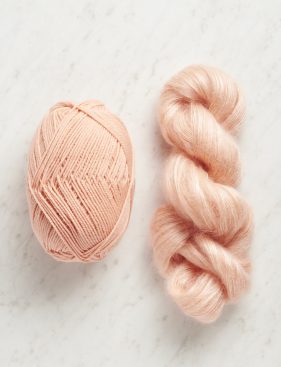
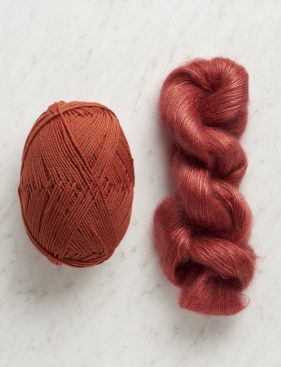
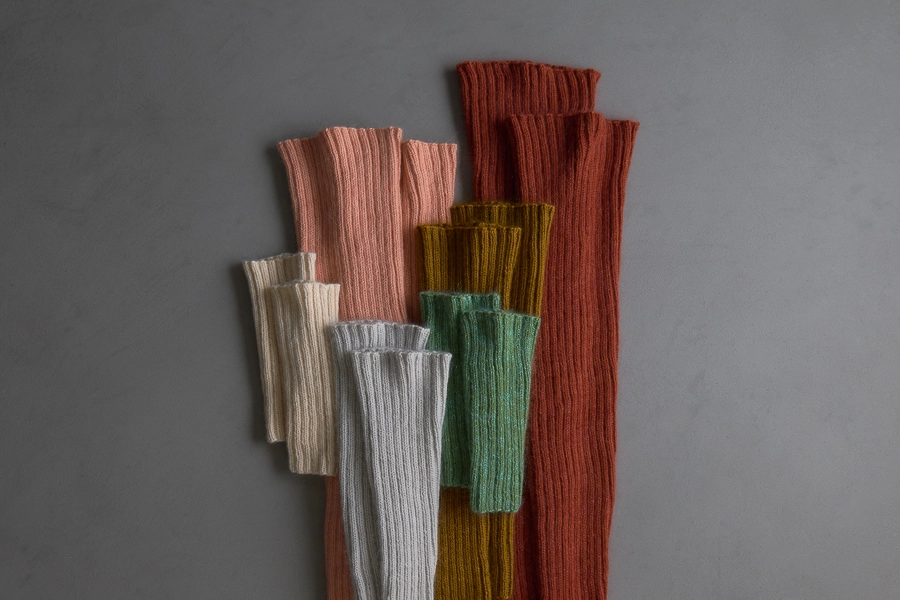
Lovely Ribbed Leg Warmers are especially lovely in a combo of our Falkland merino Wigeon and our silk and mohair Tussock. The Wigeon lends durability, stretch, and classic good looks, while the Tussock brings depth and some fuzzy fun. We suggest a bunch of pretty duos below… Your gams will love ’em!
Designed by Purl Soho designer, Jake Canton. Click here to see even more of Jake’s designs!
Share your progress + connect with the community by tagging your pics with #PurlSoho, #PurlSohoBusyHands, #PurlSohoLovelyRibbedLegWarmers, #PurlSohoWigeon and #PurlSohoTussock. We can’t wait to see what you make!
Materials

- Yarn A: Purl Soho’s Wigeon, 100% fine Falkland merino. Each ball is 359 yards/ 100 grams.
- Short Version: 1 (1, 2, 2, 3, 3) ball(s); approximately 225 (310, 480, 630, 790, 915) total yards required
- Long Version: 1 (2, 3, 3, 4, 5) ball(s); approximately 330 (500, 730, 1120, 1465, 1745) total yards required
- Yarn B: Purl Soho’s Tussock, 60% super fine kid mohair and 40% silk. Each skein is 328 yards/ 25 grams.
- Short Version: 1 (1, 2, 2, 3, 3) skein(s); approximately 225 (310, 480, 630, 790, 915 total yards required
- Long Version: 1 (2, 3, 4, 5, 6) skein(s); approximately 330 (500, 730, 1120, 1465, 1745) total yards required
- A set of US 4 (3.5 mm) double pointed needles
Gauge
35 stitches and 33 rounds = 4 inches in 2×2 rib, unstretched, holding a strand of Yarns A and B together
Sizes
For kids and adults to fit calf circumference of 9¼ (10½, 12, 13, 15½, 18) inches in Short and Long lengths
- Finished Circumference at Ankle: 5½ (6½, 6¾, 7¾, 9¼, 10½) inches, unstretched
- Finished Circumference at Calf (top of Short version): 8¼ (9¼, 10½, 11½, 13¾, 16) inches unstretched
- Finished Circumference at Thigh (top of Long version): 10 (11, 12¼, 14¼, 17¼, 20½) inches unstretched
- Finished Length:
- Short Version: 9 (11½, 16, 19, 20, 20) inches
- Long Version: 13 (16½, 22, 29½, 32, 32½) inches
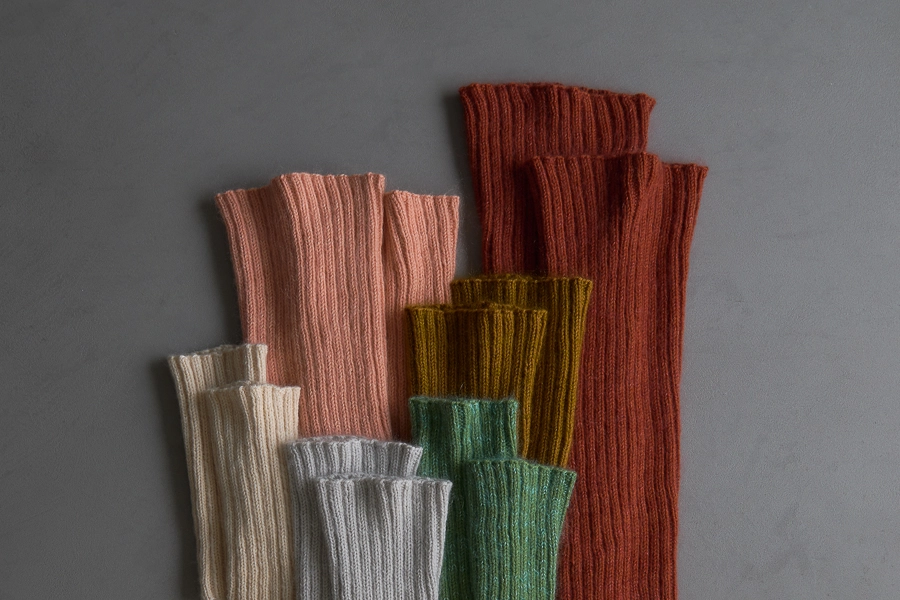
We knit our samples in the following colors (NOTE: Some of these colors are no longer available)…
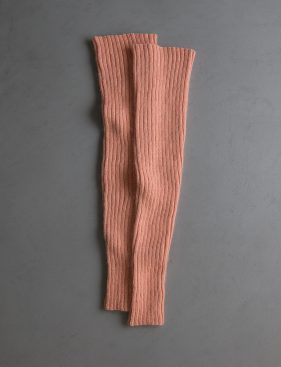
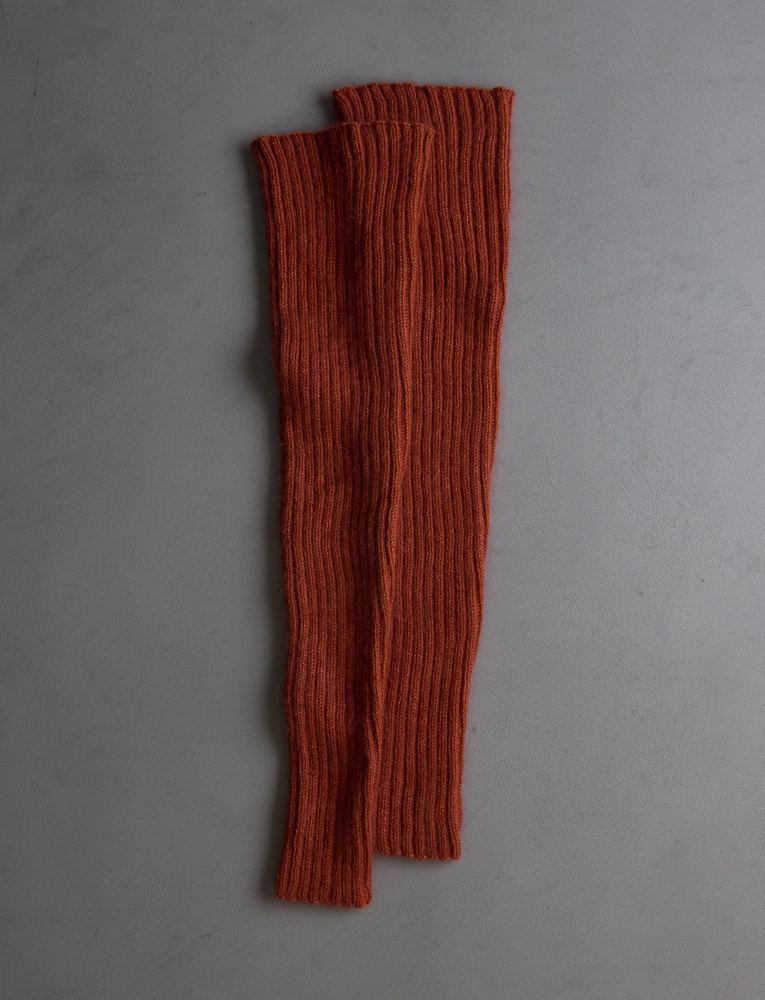
13-inch size, Long Version: Honeysuckle Pink + Tea Rose
13-inch size, Long Version: Whiskey Brown + Anjou Pear
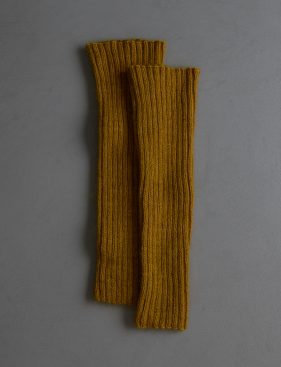
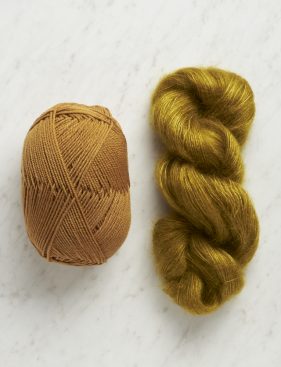
13-inch size, Short Version: Yellow Curry + Golden Lichen
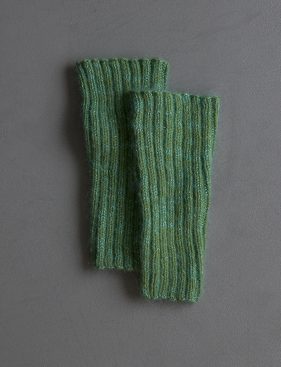
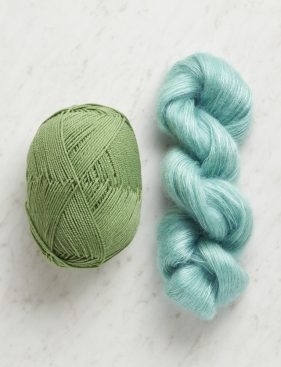
9¼-inch size, Short Version: Green Willow + Bright Verdigris

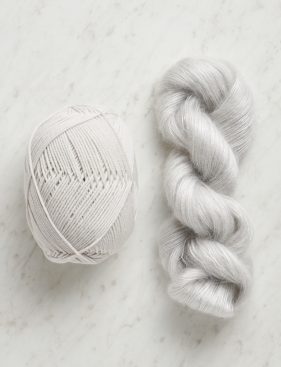
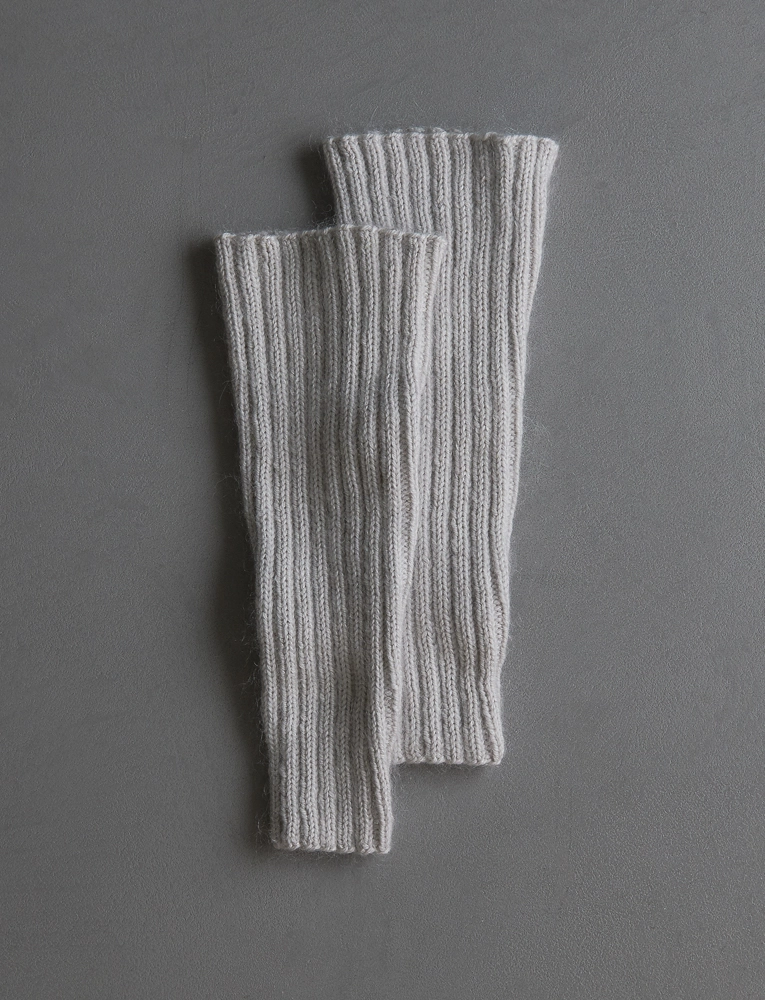
9¼-inch size, Tall Version: Gray Mist + Silver Needle
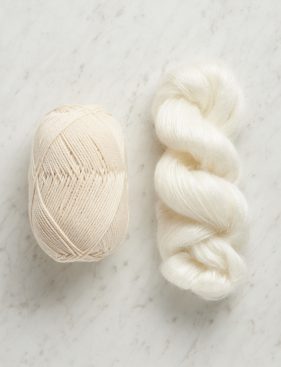
9¼-inch size, Short Version: Warm Ecru + Warm Ivory
And here are even more color ideas!
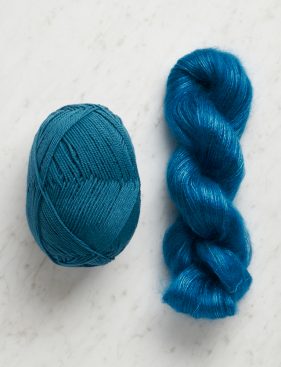
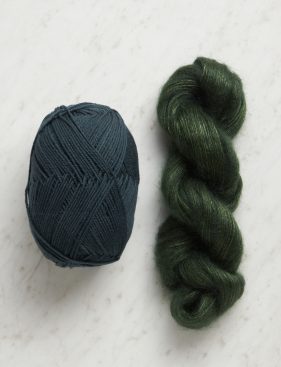
Sap Green + Cypress Green; Gulf Green + Cerulean Sea
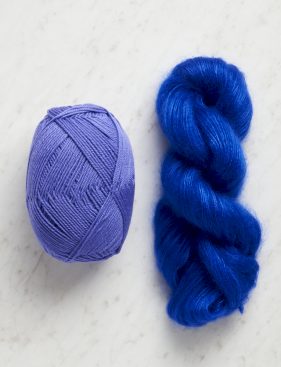
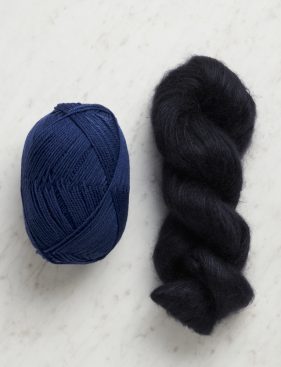
Bright Iris + Lapis Lazuli; Blue Abyss + Blue Black
Pattern
BEGIN
With one strand of Yarn A and one strand of Yarn B held together, cast on 48 (56, 60, 68, 80, 92) stitches. We used a basic Long Tail Cast On.
Place marker and join for working in the round, being careful not to twist the stitches.
Round 1: *K2, p2, repeat from * to end of round.
Repeat Round 1 until piece measures 1 (2, 3, 4, 4, 4) inch(es) from cast-on edge.
INCREASE
**Round 1: K2, make 1 left (m1L), p2, *k2, p2, repeat from * to end of round. [1 stitch increased]
Round 2: K2, m1L, k1 p2, *k2, p2, repeat from * to end of round. [1 stitch increased]
Round 3: K2, make 1 purlwise (m1p), *k2, p2, repeat from * to end of round. [1 stitch increased]
Round 4: K2, p1, m1p, *k2, p2, repeat from * to end of round. [1 stitch increased]
Round 5: *K2, p2, repeat from * to end of round.
Repeat Round 5 for ½ (¾, 1, 1¼, 1, ¾) inch(es) more.
Round 6: *K2, p2, repeat from * to last 4 stitches, make 1 right (m1R), k2, p2. [1 stitch increased]
Round 7: *K2, p2, repeat from * to last 5 stitches, k1, m1R, k2, p2. [1 stitch increased]
Round 8: *K2, p2, repeat from * to last 6 stitches, k2, m1p, k2, p2. [1 stitch increased]
Round 9: *K2, p2, repeat from * to last 7 stitches, k2, p1, m1p, k2, p2. [1 stitch increased]
Repeat Round 5 for ½ (¾, 1, 1¼, 1, ¾) inch(es) more.**
SHORT VERSION
Repeat from ** to ** 2 (2, 3, 3, 4, 5) more times. [72 (80, 92, 100, 120, 140) stitches]
Repeat Round 5 for 2 (2, 1, 1, 1, 1) more inch(es).
Go on to Finishing section, below.
LONG VERSION
Repeat from ** to ** 4 (4, 5, 6, 8, 10) more times. [88 (96, 108, 124, 152, 180) stitches]
Repeat Round 5 for 2 (2, 1, 1, 1, 1) more inch(es).
Go on to Finishing section, below.
FINISHING
Bind off loosely in stitch pattern. Here’s how…
Bind-Off Row: K2, *[pass first stitch over, p1] 2 times, [pass first stitch over, k1] 2 times, repeat from * to last 2 stitches, [pass first stitch over, p1] 2 times.
Cut yarn and pull tail through remaining stitch.
Weave in ends and wet block if desired.


what size needles do you recommend?
Hi Beth,
Thanks for reaching out! We used a set of US 4 (3.5 mm) double-pointed needles!
Warmly,
Gianna
What would the gauge be without the use of the Tussock?
Hi Libby,
Thanks for reaching out! Since we created this pattern using both Tussock and Wigeon, I don’t have the gauge available without the addition of Tussock for this pattern. The gauge of Wigeon on its own (in a basic stockinette stitch, not in the ribbed stitch) is 5.75-6.25 stitches per inch on a US 5 or 6 (3.75 or 4 mm)
However, the addition of Tussock doesn’t change the overall gauge too much, so if you plan on making these leg warmers without Tussock the gauge will be pretty similar to the written gauge. I would suggest starting off by working a gauge swatch to see how it compares and if you will need to make any necessary adjustments!
I hope this helps, happy knitting!
Gianna
If I’m firmly between sizes, would you recommend sizing up or down? My calf is 14.5″. Thank you!
Hi Anna,
Thanks for reaching out! I would suggest going down in size if you are in-between sizes to ensure that the leg warmer will stay up! Since these are ribbed they will stretch quite a bit!
Warmly,
Gianna
How can I print this pattern with just the instructions and not all the photos?
Hi Susan,
Thanks for writing in! Yes, you can certainly print the pattern without the images! If you’re on a desktop version of the site, you will find a “print” icon in the right column just below the “Save To Favorites” button. If you’re on a mobile version of the site, you will find a “print” icon below the pattern and above the comments.
Follow the easy on-screen instructions to delete whichever parts of the pattern you don’t want to print or save. For example, you may decide to shorten the pattern by omitting certain images or the list of materials. To remove images, click the drop-down next to the image icon and change from 100% to 0%.
Warmly,
Gianna
Love these (and all of Jake’s designs), perfect for getting my fall knitting going, but I’m a bit over holding 2 yarns together – my last few projects called for it. I have some lovely PS yarns in my stash, can you recommend a few that would work on their own and get gauge without daring feats of math ? Thanks !
Hu Laurie,
Thanks for reaching out! The addition of tussock doesn’t change the gauge too much, so if you would like to use one strand a sportweight yarn should be fine to use, but you can also possibly go up to a light worsted/dk weight depending on your tension! I would suggest starting off by working a gauge swatch with the yarn you plan on using a see how it compares to the gauge of the pattern!
Happy knitting!
Gianna
WHAT IS THE COST OF THESE YARNS
Hi Nanci,
Thanks for writing in! Our yarn Wigeon is $22.00 a skein and Tussock is $19.00 a skein!
Warmly,
Gianna
I don’t think leg warmers are in my future (my calves probably don’t need any added dimension!), but I love the combination of these two yarns and the colors you have. Can you give me an idea of what these two, held together, and worked in a stockinette may be equivalent to? DK or perhaps worsted?
Hi Patrice,
Thanks for reaching out! These two combined are about the same gauge as a heavier sport weight or light dk weight!
Happy knitting!
Gianna
Great – thank you. Now I’ll start hunting for the perfect project.
pk
My granddaughter wants her leggings in Tussock “Partly cloudy blue”. Would the “Blue Parakeet ” in Wigeon be a good match to pair it with or
Gray mist & Silver needle be a better combo?
Hi Joyce,
Thanks for reaching out! For Partly Cloudy Blue I think Blue Parakeet would be the best match! I also think Gray Mist and Silver Needle would be a beautiful combination, but would definitely be a bit more subtle than the blue combination.
I hope this helps, happy knitting!
Gianna
Hi!
Is there any reason these could not be knit using magic loop?
Hi Martha,
Not at all, you could absolutely knit these using the Magic Loop technique! Whichever method you find more comfortable will work just fine with this pattern!
Warmly,
Kelsey
These are quite lovely and I’ve toyed with the idea of making leg warmers for a few years now. I’m doing the math on your recommended yarns and it would cost around $120 to knit up a pair. Do you have any more budget-friendly yarns to recommend?
Hi Allison!
We definitely have some more budget-friendly options for you! We recommend our Good Wool or Cricket by Anzula for this pattern, held by itself without Tussock in this case! Both of these yarns will give you the softness and stretch you’d want in leg warmers and come in an assortment of colors, from earthy neutrals to brighter hues. Cricket is also machine washable! And with all yarn substitutions, doing a gauge swatch is always helpful to make sure you’re hitting the gauge in the pattern. Hope these suggestions are helpful and have a great day!
Kindest regards,
Catherine
Thanks Catherine!
How many balls of Cricket would I need to buy in order to make the pattern?
Hi Serena,
That’s a great question! It depends on the size you’d like the make. Each skein of Cricket comes with approximately 250 yards so I would check that against the yardage requirements we listed in the Materials. We’re happy to let you know how much is needed for sure if you specify whether or not you’re interested in the long or short version and which circumference best fits the recipient around the calf.
I hope that helps!
All the best,
Zha Zha
Instructions for Rounds 3 & 4 and Rounds 8 & 9 don’t specify whether they are m1p right or m1p left. Your online m1p instructions show both left and right, and even that’s confusing as video shows knitter working on wrong (purl) side of knitting, but a leg warmer knitter sees only the right side since work is on double pointed needles. Which m1p do you suggest for these pairs of rows, 3 & 4 and 8 & 9? Thank you in advance
Hi Lisa,
I’d be happy to clarify the m1p used in this pattern! While there are two different ways to work a m1p (a left-leaning and a right-leaning), both look identical on the purl-side of the fabric; because each m1p is worked in the purl section of the ribbing, either way will work so you can choose the method that’s most comfortable for you. We do include a note about this in our tutorial for M1P, but it’s easy to overlook in this part of the pattern! I hope this helps!
Warmly,
Kelsey
I see you provide the unstretched sizes. How much stretch should we allow for? I’m trying to determine what size to make for my niece.
Hi Lauren,
Thanks for writing in! With the ribbing, the leg warmers should stretch comfortably up to 2-3″
Happy knitting!
Gianna
I love these! But unfortunately I’m allergic to mohair. Is there a different yarn you’d recommend instead of the tussock? Thanks so much!
Hi Nicole,
Thanks for reaching out. I can certainly help you find an alternative yarn so you’re not using Tussock! We designed this pattern using Wigeon and Tussock held together to give the knitted fabric a bit of “fluff” from the mohair. However, since you can’t use mohair, then I’d actually recommend using just one DK weight yarn, instead of two held together! Specifically, I think that Cashmere Merino Bloom would be perfect. However, if you’re worried about the cashmere content (cashmere and mohair are both made from goat hair), then Flax Down would also be a good alternative. Hope these recommendations help!
All the best,
Lili
Hi , just about to attempt these lovely warmers.
Am a bit confused about the gauge. Why if it’s 2 by 2 rib does it have 35 stitches, an odd number. Maybe this is a stupid question, as I am not a really experienced knitter. And when you say 4 inches , are we assuming its a 4 inch square. many thanks
Sarah
“35 stitches and 33 rounds = 4 inches in 2×2 rib, unstretched, holding a strand of Yarns A and B together”
Hi Sarah,
Thanks for reaching out. This just means that the 4 inch mark falls in the center of a rib! I hope this clarifies things, but if you’re still confused about the gauge, I highly recommend our tutorial called All About Gauge. I even learned some interesting, new tidbits myself while looking over it, and you may, too!
All the best,
Lili
I’m in love with the tan/gold ones but you are out of stock on the yellow curry wigeon. Do you expect to get this back in soon?
Hi Kimberly,
Thanks for letting us know you’re interested in this color! We’re hoping to have more back in stock around February of next year but were able to find a few still available that will be released online shortly.
I’d recommend refreshing your page and checking that soon if you’d like to grab some! You can also reach out to us via email at customerservice@purlsoho.com if you have trouble finding any.
All the best,
Zha Zha
When I start row 3, after the k2, m1p, pattern calls for k2, p2. The k2 after the m1p sit on top of purls. Is that right? I’ve redone the increase rows twice and still have the same issue. Thanks.
I figured out what I did wrong. I work on 2 circular needles. I stopped knitting after first needle. Got distracted. When I returned I started the next round instead of finishing the round I was on. No wonder I was having trouble.
After I M1L in round one, when I go to M1L in round two, I can’t find the bar between the stitches to pull up to use to make the next increase. This happens every round. Is there something I’m missing?
Hi Mommo,
Thank you for reaching out to us! Finding the bar for a M1L can sometimes be a bit tricky. If it’s alright with you, would you mind sending us a photo of your project and what you’re currently looking at? Having a visual will really help us with troubleshooting your issue! You can email us any time at customerservice@purlsoho.com.
Thanks again for your comment!
All the best,
Cat
I love these and want to make a pair for my mom. She is a very tiny woman, but her kneecaps are 16″ due to her arthritis. Can you tell me how many skeins I need for the long version and how I can get them bigger around the knees? Also what is the softest yarn you have that can still make these leggings? Thank you very much.
Hi Angela,
Thanks for reaching out. I can absolutely help you figure out how to make these for your mom! However, because 2 x 2 ribbing is so stretchy, you may not need to make any modifications at all. I’d recommend picking the size to make based on her calf measurement, and it should fit over her knees as well. If it’s getting a bit tight though, then I’d recommend increasing the rate of increase rounds, so that the circumference has increased more by the time the leg warmers reach her knees (you can have her try them on as you go for the best fit). As for the yarn, both Wigeon and Tussock are extremely soft yarns, so I think you’ll love working with them!
All the best,
Lili
Hi! Would these be possible to do on circular needles or would it be too tight? Thank you!
Hi Julie,
Thanks for reaching out! You could use circular needles, but only with the Magic Loop method! For more tips on that, I recommend checking out our wonderful Magic Loop tutorial!
Warmly,
Gianna
I may make these leg warmers in good wool. How much would I need ? Thanks
SuZi
Hi Suzi,
Thanks for writing in! In Good Wool, you would need for the Short Version of the Leg Warmers: 1 (1, 2, 2, 3, 3) ball(s); approximately 225 (310, 480, 630, 790, 915) total yards required depending on what size you make. For the Long Version of the Leg Warmers, you would need 1 (2, 2, 3, 4, 5) ball(s); approximately 330 (500, 730, 1120, 1465, 1745) total yards required.
And with any yarn substitutions, it’s always a great idea to do a gauge swatch to make sure your gauge is consistent with the pattern’s! We have a tutorial called All About Gauge on this if you’re interested in learning more.
Hope this helps!
All the best,
Cat
I would like to make this long version pattern for my friend who is tall and slim. The total length would be at least 32.5″ but her calf circumference is 13 and her thigh circumference is 17. How do I adjust the pattern so it’s long enough but the leggings stay up?
Hi Wendy,
Thanks for reaching out. I would recommend following the instructions for size 13, but adding extra rounds in pattern between each increase round! Specifically, I’d suggest repeating Round 5 more times than written during the INCREASE section. I hope this helps!
All the best,
Lili
Hi! I would love to knit these up in black yarn. Any recommendations?
Thx!
Hi Missy,
Thanks for reaching out. I have a few suggestions of yarns that I think will work and which come in black! First, Flax Down in Kettle Black would be a great option, although the strands of linen add a heathered look to it. Brooklyn Tweed’s Arbor in Kettle and Anzula’s Cricket in Black would also work well!
As always, we recommend making a gauge swatch before starting a project to be sure you’re working with the right needles, especially when substituting yarns. If this is daunting, I’d recommend checking out a tutorial called All About Gauge, which covers some incredibly helpful information. I hope this helps!
All the best,
Lili
Hello. I’m having trouble figuring out which size to make for my daughter. Her measurements are:
Ankle 9.5
Calf 14.75
Thigh 22
Leg from ankle to thigh 29
Can you suggest which size to knit of the long ones?
Hi Elizabeth,
Thanks for reaching out! The leg warmers will comfortably stretch 1-2 inches so I would suggest making size 18!
Warmly,
Giamma
Is the gauge correct? 35 seems too tight…
Hi Sandra,
Thanks for writing in! The gauge is correct at 35 stitches for 4 inches.
I hope this clears things up!
Gianna
I am having a really hard time picking a size for the long version
My measurements are
Ankle – 8 in
Calf – 15 in
Top of thigh – 16 in
Hi Kristen!
Thank you for your question! Based on your measurements, I think the third size inside of the parentheses to fit a calf circumference of 13 inches would be your best choice, because these leg warmers stretch! If you would like, you could also knit a gauge swatch just to see how your unstretched fabric measures, and compare that against the sizes we listed, just to make sure that your leg warmers will fit as intended.
I hope this helps and happy knitting!
All the best,
Margaret
I have made these lovely leg warmers for my dog trainer. They fit perfectly. However, because she is very active when she wears them, they end up around her ankles and I have made the long ones! I’m wondering if you have come up with any solutions for this problem. I’m thinking about elastic yarn, but wanted to contact you for ideas. I sure hate to spend all that time and money on something that will not be used! Thank you in advance for any advice you may have.
Hi Brenda!
Thank you for asking! We want to help make sure these leg warmers are functional for your dog trainer, so I would suggest sewing in a piece of elastic along the top edge! I would either use a sewing machine to attach a loop of elastic along the inner top of the leg warmer, or fold the top inch of the leg warmer over on itself and thread a piece of elastic through, tacking it together to create a loop. To enclose the piece of elastic, you could use our Knit Hem tutorial as a way to create a knit cover for the elastic. A third option would be to create I-cord “draw strings” and thread them through the knit hem, so that you can tie the top of each leg to the desired tightness!
I hope this helps provide some solutions!
All the best,
Margaret
Thank you for this reply. I’m intrigued by the I-cord ” draw strings. I was going to go with elastic, but thought this sounded like a really good idea!
I KNEW you guys had a solution.
I was curious about combining the saffron yellow (Tussock) with the yellow Curry (Widgeon). Too yellow? Has anyone used that combo? I would love to see a photo of a swatch of those two colors together before committing. Thanx!
Hi Carole,
Thanks for reaching out. I think that those two colors together will create a lovely golden look! We haven’t made a swatch with them, but I’m curious as well to hear if anyone else has.
All the best,
Lili
I’m looking at the length measurements and wondering about them. The short version is 9”, and my leg from outside ankle bone to the narrow part of leg just below the knee is 12.5 inches. This would seem to say that I need to make the longer version, but I don’t want to take it well above the knee!
Which way does the 9” go? Down the leg, or around it? I’m finding this measurement to be confusing. Thank you.
Hi Lucille,
Thanks for reaching out. There are actually different heights for each size, in both the Short and Long Versions! I’ll list those below:
Short Version: 9 (11½, 16, 19, 20, 20) inches
Long Version: 13 (16½, 22, 29½, 32, 32½) inches
The 9-inch tall height for the Short Version and the 13-inch tall height for the Long Version are only in the very smallest size! If you make a larger size, then the leg warmers will be longer as well. Hope this helps clarify how the sizes work for this pattern!
All the best,
Lili
I am going to knit these beautiful leg warmers for a friend. I think I have pegged her mostly down for the Size 15 1/2 the issue is that she has a pretty large calf and think it could be larger than the 15 1/2 size will allow, what can I do to adjust this? …also can I adjust the height…she is only 5’5. For my leg warmers me 5’4 I am going with 29 1/2. Can I adjust hers to be the same length even if I start with the 15 1/2 ?
Hi Liz,
Thanks for reaching out! To adjust the fit of these leg warmers, you can adjust the placement of the increases. By working more increase rounds, that will increase the circumference, making the fit work better for your friend. You can also adjust the height by working fewer repeats of Round 5 (plan 2 x 2 ribbing). Hope this helps!
All the best,
Lili
I’m usually right on gauge…not loose or tight knitter but swatching for the leg warmers is not going well.
Have swatched on needle 4 with 35 sts which is measuring 5” . Then on needle 3 measuring 4 and a half. I’m using wigeon and tussock. From Ravelry research only a few have used a 3. Go to a #2?
Hi Diane,
Thanks for reaching out. Since different patterns are designed by different designers who all have different natural knitting tension, it’s actually quite common to be off gauge for some patterns, but not others! It sounds like swatching on a size 2 is the right move at this point. Judging from your previous swatches’ measurements, a size 2 should bring it to the correct gauge!
I’d also recommend double checking that you’re measuring your swatch completely unstretched. This means that you shouldn’t see any of the purl bumps when you’re measuring it, since they’ll be hidden behind the knit ribs. Hope this helps!
All the best,
Lili
If I knit this in a worsted (50g/100m) yarn, how many stitches should I cast on? I have a lot of trouble with gauge!
Hi Lia,
Thanks for writing in! To figure out your cast-on number, you will want to first knit a gauge swatch in pattern (if this is daunting, we have a wonderful tutorial called All About Gauge). Once you know how many stitches you are getting per inch, you can multiply that number by the finished circumference at the ankle of the size you’re planning to make and cast on the nearest multiple of 4. Then you can follow the pattern as written!
All the best,
Lili
Do you have a video or photo to go along with these instructions? I need some visualization…
Hi Bern,
Thanks for your question! While we don’t have a video specifically showing how this project in particular is knit up, we offer many tutorials and video tutorials that include the techniques used in this pattern here (https://www.purlsoho.com/create/knit/tutorials/). I hope this helps!
All the best,
Cat
I have a lot of linen quilt fingering weight left from a project. Would it be possible to double up on the yarn and use it for these leg warmers?
Hi Jane,
Thanks for writing in! I think that Linen Quill doubled might still be too thin for this project, but you can absolutely try, since you already have the yarn on hand. I’d recommend knitting up a gauge swatch in pattern to see if you’ll be able to match the gauge for this project! You may need to size up your needles to get the right gauge.
All the best,
Lili
Hi would it be possible to knit these leg warmers on straight needles as I don’t seem to be able to manage with the magic loop on a circular needle
Hi Sheila,
Thanks for reaching out. You can also knit these on DPNs, if you’d rather knit on straight needles than circulars!
All the best,
Lili
I see that Cricket is no longer available. Is there another machine washable yarn you would recommend for this pattern? I want to make the long version.
Hi Maureen,
I’m afraid that we do not currently carry any machine washable DK weight yarns that will work for this pattern! We have a few options, but they all include plant fibers, which do not have enough elasticity for the leg warmers to stay up on your legs. We’re so sorry for the inconvenience! However, since Cricket is made by a third-party brand (Anzula), you can likely find it from another source still. I’d recommend checking out Anzula’s website to see where they’re selling this yarn!
All the best,
Lili
Thanks very much!
I have completed one leg of the long version for my daughter. They are lively. However, I am having a hard time with the bind off – K2, *[pass first stitch over, p1] 2 times, [pass first stitch over, k1] 2 times, repeat from *. Can I use Jenny’s Stretchy bind off and achieve the same affect for the bind off row. Thanks.
Hi Toni,
Thanks for reaching out. You can absolutely use Jenny’s Surprisingly Stretchy Bind-Off for this pattern! However, I also wanted to explain the recommended bind-off more, since it’s actually simpler than it may appear as written. All you’re doing is binding off in pattern! That means that you keep knitting the 2 x 2 ribbing pattern on the bind-off row, while passing the first stitch over the second and off the needle as you progress. Hope this helps!
All the best,
Lili
I have created an account as requested and am wanting to download a leg warmer pattern but it won’t print. Why?
Hi Roger,
Thanks for reaching out! Because this is a free pattern, you do not need an account to access it. Here’s how you can download a printer-friendly version directly from this page: If you’re on your computer, you’ll find a “print” icon in the right column just below the “Save To Favorites” button. If you’re on a mobile version of the site, you will find the “print” icon below the pattern and above the comments.
Click on this button, and a window will pop up where you can delete whichever parts of the pattern you don’t want to print. When you hover over any image or a text block, it will be highlighted in yellow and a “trash” icon will appear. Just click on this icon to delete anything that’s not necessary to the pattern! For example, you may decide to shorten the pattern by omitting certain images or the list of materials. Then, click on the “PDF” button in the upper left-hand corner of the pop-up window. Once your PDF has finished downloading, just click the “Download PDF” button, and it will be saved to your computer! (You can also click the “Print” button if you’d like to print the pattern.)
Hope this helps!
All the best,
Lili
Hello ! I try to knit this beautiful pattern but when I start increasing, I’m having holes… An idea of what’s happening 😅?!
Thank you !
Hi Anne-Laure,
I’m sorry to hear that you’re experiencing holes in your knitting when you do the increase stitches! Would you be able to send a photo of your work to customerservice@purlsoho.com? That way, we’ll be able to better visualize what’s going on and figure out what’s happening!
All the best,
Lili
This might be a goofy question, but I have never used double pointed needles before. How many do I use here and is there a tutorial for joining in the round with them? The one I see is for circular needles. Thanks.
Hi Emily,
Not goofy at all… We all had our first time using double pointed needles! You will put your stitches on three double pointed needles and knit with a fourth double pointed needle. Our Double Pointed Needles tutorial shows you how to cast on, join in the round, and knit with double pointed needles. If you’re not ready to broach double pointed needle territory (although it’s a pretty vital skill to acquire at some point!), you could also knitting these leg warmers with 12-inch circular needles (unless you’re making the smallest sizes). There’s even a third option with is the Magic Loop technique, which uses long circular needles to knit small circumferences.
Lots of options! Please let us know if you run into any obstacles with whatever route you choose… We’d be very happy to get you over them!
Best,
Whitney
Thank you! I did some more digging around and found this tutorial after I asked my question, and am now on the increase rounds. Your tutorials are seriously the most helpful ones I’ve come across online. I am glad to have conquered the DPN with your great help!
I am confused by the increase row three. It states to made one purlwise, then it says k2 p2 to continue. This makes the ribbing pattern not sit right on each other. Is this correct or am I misreading it? Thanks
Hi Emily,
Yes, increase Round 3 is correct! You knit the first two stitches, then create a new purl stitch, and then get back into the regular 2 x 2 ribbing by knitting 2 stitches. These 2 stitches are the “m1L, k1” from Round 2, so they should line up with the k2 on Round 3. Hope this helps!
All the best,
Lili
I love the color Beach Stone in the Tussock. Can you recommend a good match in the Widgeon?
Hi Renee,
Beach Stone is a lovely color! I think it goes best with Wigeon in Warm Ivory, since both are warm off-white shades.
All the best,
Lili
Hi there, what size leg warmers is the model wearing? Also, I’m planning to knit these in circular needles, what size cord would you recommend using?
Many thanks
Hi Meg,
Thank you for writing in! The model here is wearing the 13-inch long and short versions! Assuming you will be knitting with the magic loop method, I would recommend 32″ or longer but really whatever feels most comfortable for you!
Happy making!
When should I be making 1 pur-lwise left versus right? The video you link to has the person knitting on the wrong side of the work. I know this should be so simple, but I wish it said left or right as it specifies for the m1k increases.
Hi Anna,
Thank you for writing in! In this case, the purls don’t need to exactly lean to the right or left since they will not appear as knits on the right side. We recommend working either a left or right-leaning purl stitch throughout just to get a consistent look on the finished project. I hope this helps but please let us know if you have any other questions!
Happy knitting,
Gavriella
Hi, sorry if this is a stupid question but this is my first project. Do you cast on 48 stitches to each needle or onto one needle and then distribute? Doesn’t the first needle need one extra stitch for joining in the round? Thanks in advance.
Hi Jane,
Thank you for writing in! That is not a silly question at all! For this pattern, you will want to distribute your stitches around all three of your needles leaving one free to knit with. I’d recommend dividing your cast-on number by 3 for each needle and as you knit, if you feel you’d rather have more or less per needle, you can just slip them over to redistribute. You don’t need to cast on any additional stitches for working in the round. I hope this helps but please let us know if you have any other questions!
Happy knitting,
Gavriella
Thank, you that was helpful. However, I can’t find the starting string for the tussock yarn?
Hi Jane,
You are very welcome! Just to confirm, have you already wound it into a ball or cake? I find tussock easiest to work with from the outside string to avoid tangling since the mohair strands tend to stick a little. If you have wound your skein, I would suggest gently tugging the outter most strands to see if one is your tail end!