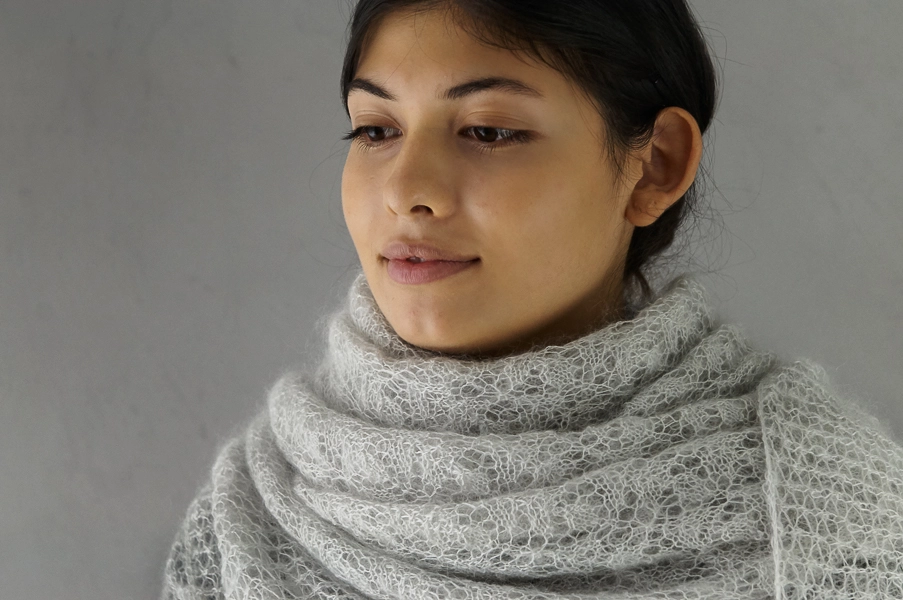

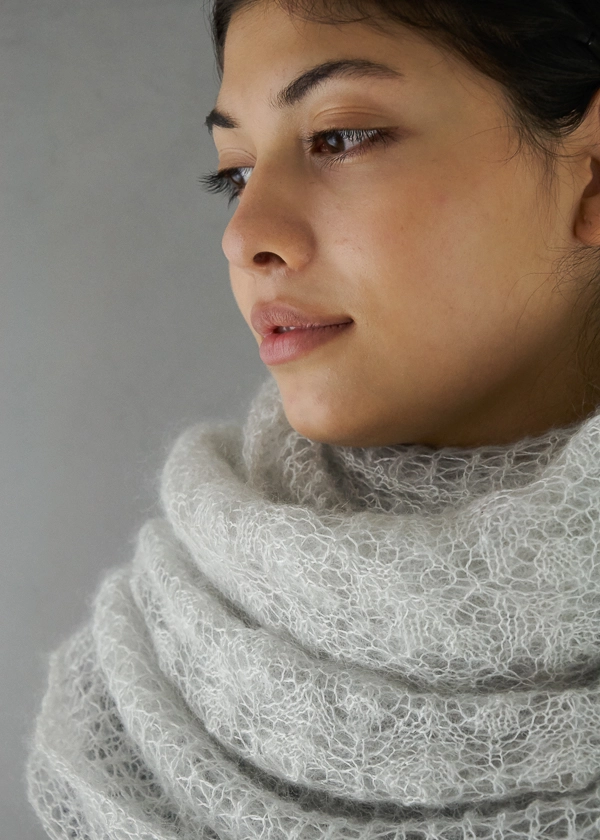
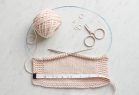
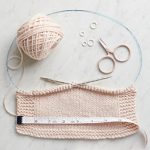
Cumulus Wrap
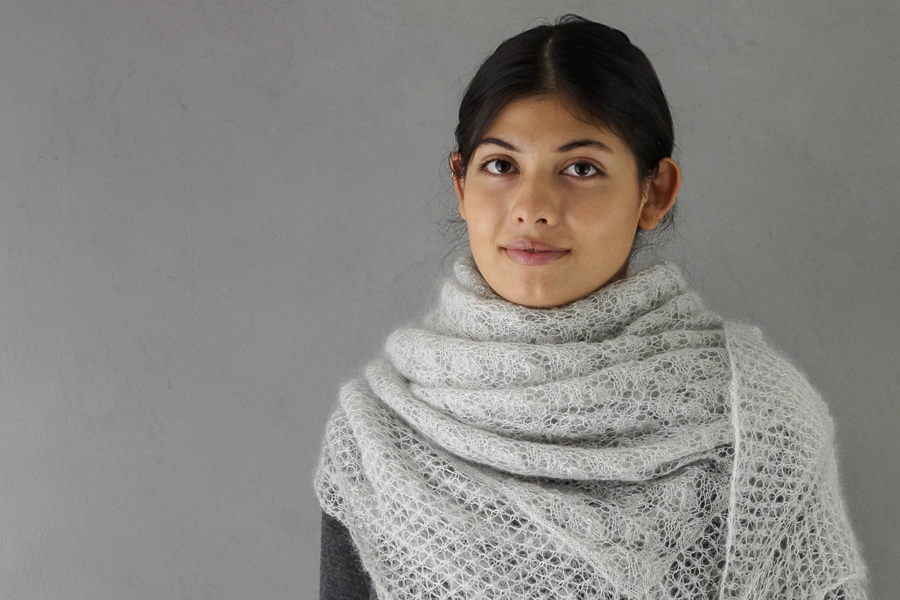
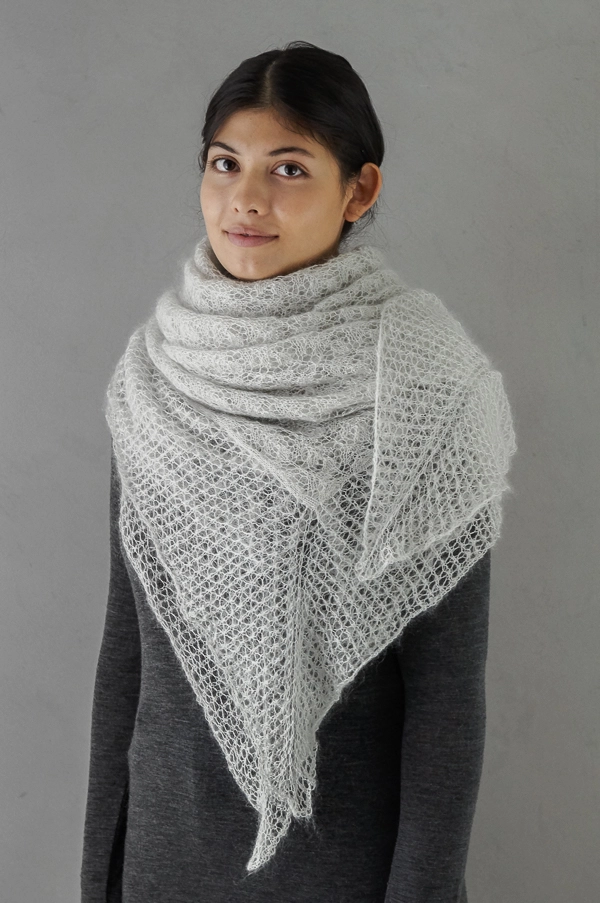
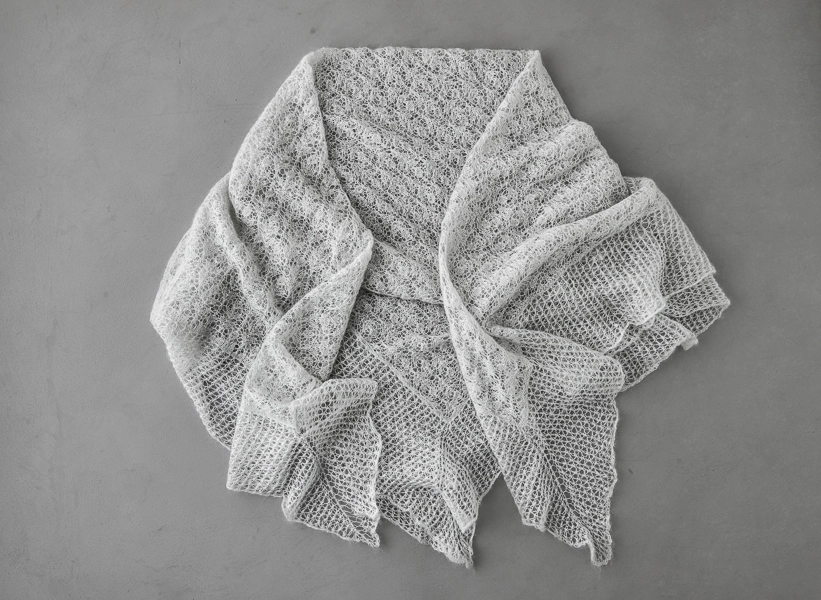
We’re not sure if the Cumulus Wrap can slide through a wedding ring, but our Orenburg-inspired shawl aspires to the same breathtaking beauty as those legendary pieces from the Russian banks of the Ural.
Definitely not an instant gratification kind of knit, this one is more about the process, the slow advance of delicate lace growing row by row. For many of us, completing the Cumulus Wrap may count as one of our highest knitting achievements!
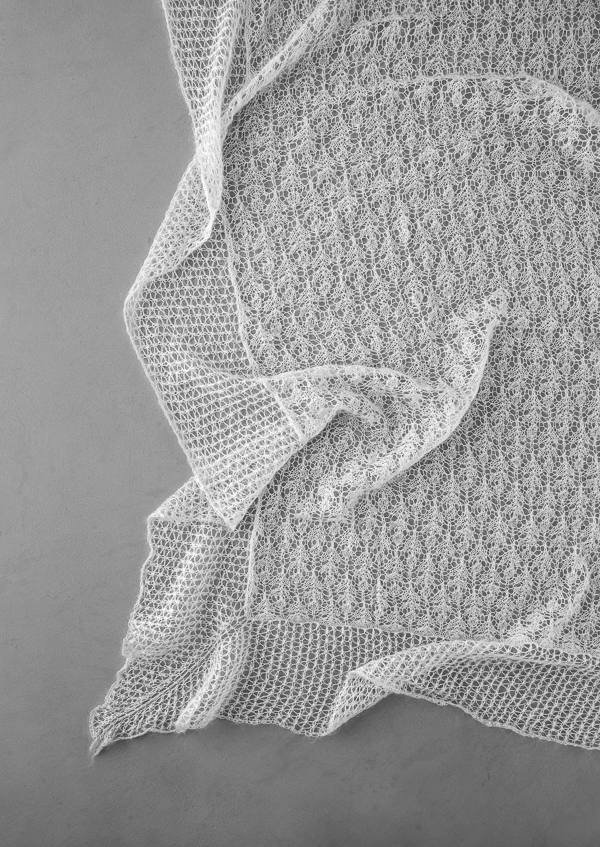
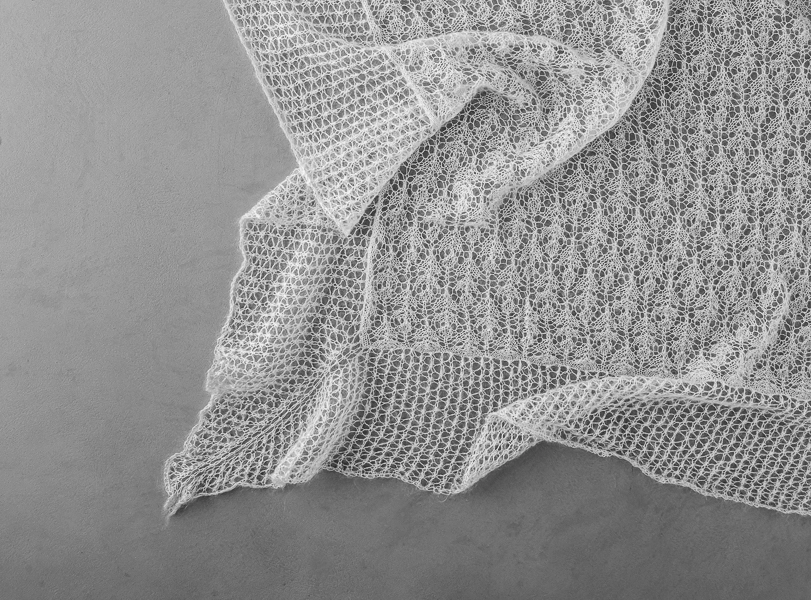
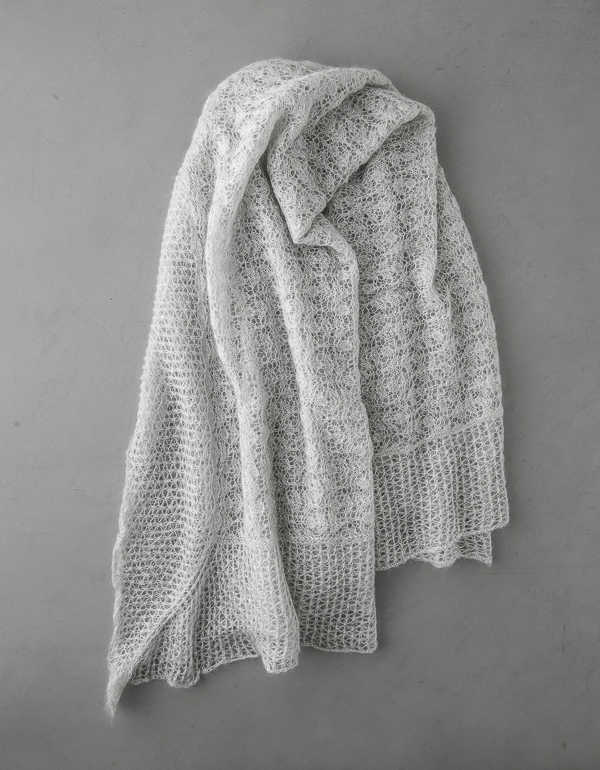
If the knitting is a challenge in patience, the construction is simple. You first knit the center panel, following either written or charted instructions, then you pick up around the perimeter and work the border in the round in a contrasting lace pattern.
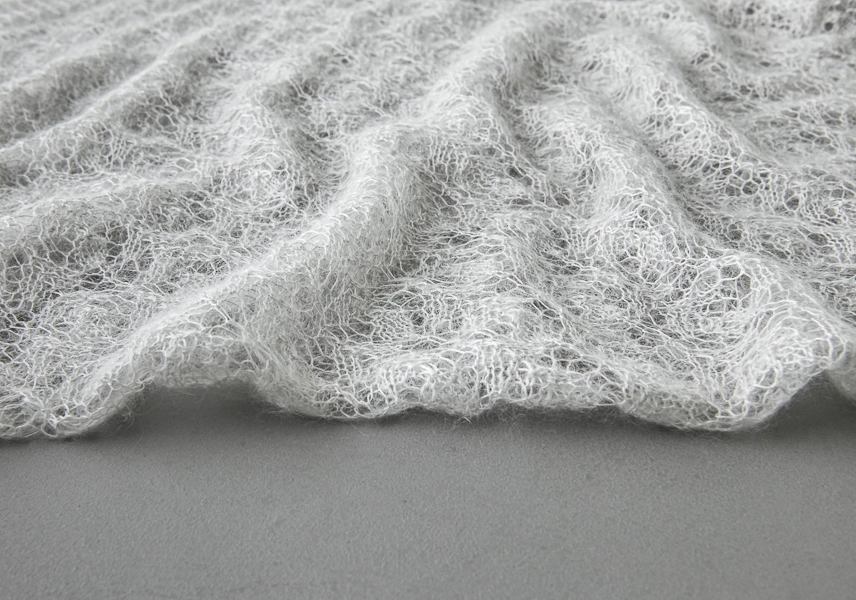
The Russian shawls that inspired this one were traditionally hand knit in a very fine down hair grown by indigenous Orenburg goats. More recently a thin thread of silk has been added to help the shawl hold its shape, but the result is the same: a fabric that is feather-light but warm and cozy, diaphanous but durable.
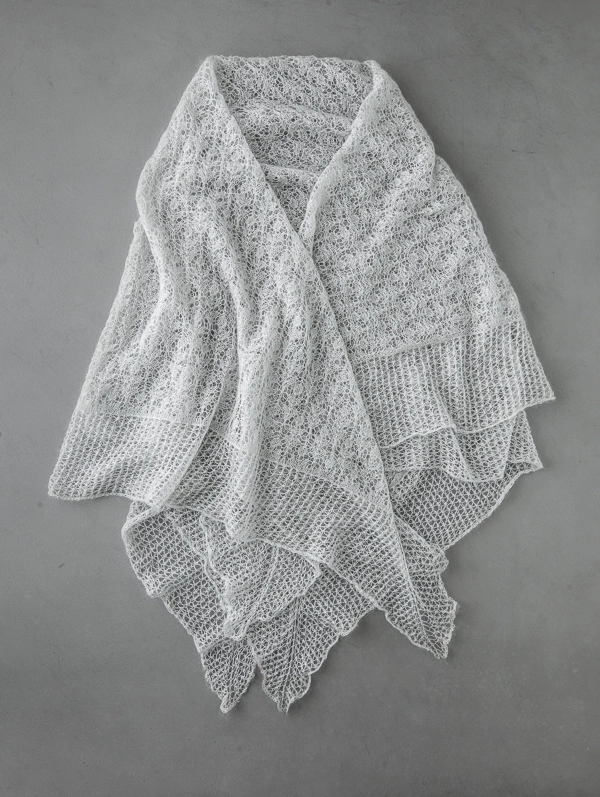
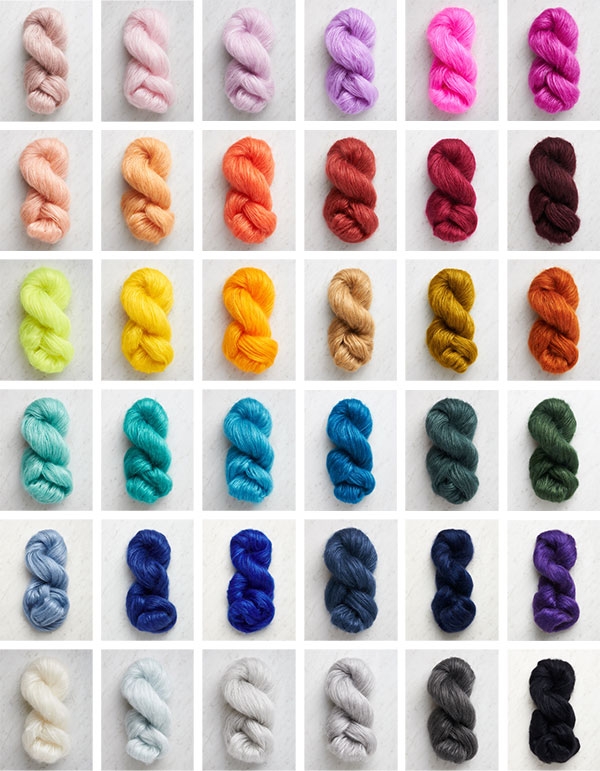
In homage and with similar effect, we used our gorgeous mohair-silk Tussock yarn in the color Silver Needle, a cool neutral that shines like the moon. Stick with the classic or give your Cumulus Wrap its own spin with three dozen colors to choose from, and cast on for this season’s epic knit!
Designed by Purl Soho designer, Jake Canton. Click here to see even more of Jake’s designs!
Share your progress + connect with the community by tagging your pics with #PurlSoho, #PurlSohoBusyHands, #PurlSohoCumulusWrap, and #PurlSohoTussock. We can’t wait to see what you make!
Materials
- 8 skeins of Purl Soho’s Tussock 60% super fine kid mohair and 40% silk. Each skein is 328 yards/ 25 grams; approximately 2,598 total yards required. We used the color Silver Needle.
- US 4 (3.5 mm), 60-inch circular needles
- A second US 4, 60-inch circular needle (optional)
Gauge
25 stitches and 40 rows = 4 inches in Center Panel and Border stitch patterns
28 stitches and 36 rows = 4 inches in stockinette stitch
Size
Unblocked Overall Dimensions: Approximately 56 inches wide x 60 inches long
Finished Overall Dimensions: Approximately 60 x 60 inches
Finished Center Panel Dimensions: Approximately 44 x 44 inches
Notes
Stitch Multiple
The Center Panel pattern is worked over a multiple of 10 + 5 stitches.
SLIP 1, K2TOG, PSSO
Slip 1 stitch purlwise, knit 2 stitches together, pass slipped stitch over k2tog and off needle. [2 stitches decreased]
NOTE: Our Lovely Leaf Lace Scarf pattern includes step-by-step photos of this technique.
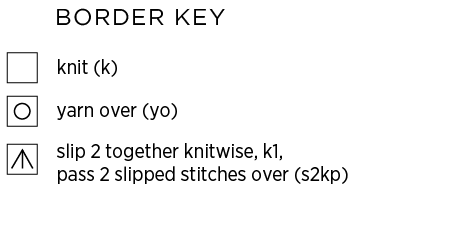
S2KP
Slip 2 stitches together knitwise, knit next stitch, pass two slipped stitches over knit stitch and off needle. [2 stitches decreased]
NOTE: Learn more about this technique with our Slip Slip Knit Pass Tutorial.
Pattern
Center Panel
Cast on 275 stitches. We used a basic Long Tail Cast On.
Set-Up Row 1 (wrong side): Purl to end of row.
Set-Up Row 2 (right side): Knit to end of row.
Set-Up Row 3 (wrong side): Purl to end of row.
Following either the Written Instructions or Chart, below, repeat Rows 1-28 of Center Panel Stitch Pattern 15 times, then repeat Rows 1-16.
Center Panel Stitch Pattern: Written Instructions
Row 1 (right side): K2, *k1, yarn over (yo), k3, slip 1, k2tog, psso (see Notes), k3, yo, repeat from * to last 3 stitches, k3.
Row 2 (wrong side) and all following wrong side rows: Purl to end of row.
Row 3: K2, *[k1, yo] twice, knit 2 together (k2tog), slip 1, k2tog, psso, slip slip knit (ssk), yo, k1, yo, repeat from * to last 3 stitches, k3.
Row 5: Repeat Row 1.
Row 7: K2, *k2, yo, k2, slip 1, k2tog, psso, k2, yo, k1, repeat from * to last 3 stitches, k3.
Row 9: K2, *k3, yo, k1, slip 1, k2tog, psso, k1, yo, k2, repeat from to last 3 stitches, k3.
Row 11: K2, *k1, k2tog, yo, k1, yo, slip 1, k2tog, psso, yo, k1, yo, ssk, repeat from * to last 3 stitches, k3.
Row 13: K2, ssk, yo, k2, yo, *slip 1, k2tog, psso, yo, k2, yo, repeat from * to last 4 stitches, k2tog, k2.
Row 15: K2, ssk, k3, yo, *k1, yo, k3, slip 1, k2tog, psso, k3, yo, repeat from * to last 8 stitches, k1, yo, k3, k2tog, k2.
Row 17: K2, [ssk] twice, yo, k1, yo, *[k1, yo] twice, k2tog, slip 1, k2tog, psso, ssk, yo, k1, yo, repeat from * to last 8 stitches, [k1, yo] twice, [k2tog] twice, k2.
Row 19: Repeat Row 15.
Row 21: K2, ssk, k2, yo, k1, *k2, yo, k2, slip 1, k2tog, psso, k2, yo, k1, repeat from * to last 8 stitches, k2, yo, k2, k2tog, k2.
Row 23: K2, ssk, k1, yo, k2, *k3, yo, k1, slip 1, k2tog, psso, k1, yo, k2, repeat from * to last 8 stitches, k3, yo, k1, k2tog, k2.
Row 25: K2, ssk, yo, k1, yo, ssk, *k1, k2tog, yo, k1, yo, slip 1, k2tog, psso, yo, k1, yo, ssk, repeat from * to last 8 stitches, k1, k2tog, yo, k1, yo, k2tog, k2.
Row 27: Repeat Row 13.
Row 28 (wrong side): Purl to end of row.
Go on to the Center Panel: Finishing section, below.
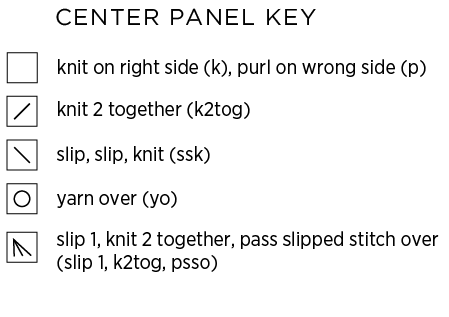
Center Panel Stitch Pattern: Chart
NOTE Begin this chart in the bottom right corner. Right-side rows are odd numbered and read right to left. Wrong-side rows are even numbered and read left to right. Work your way up the chart to the top line.
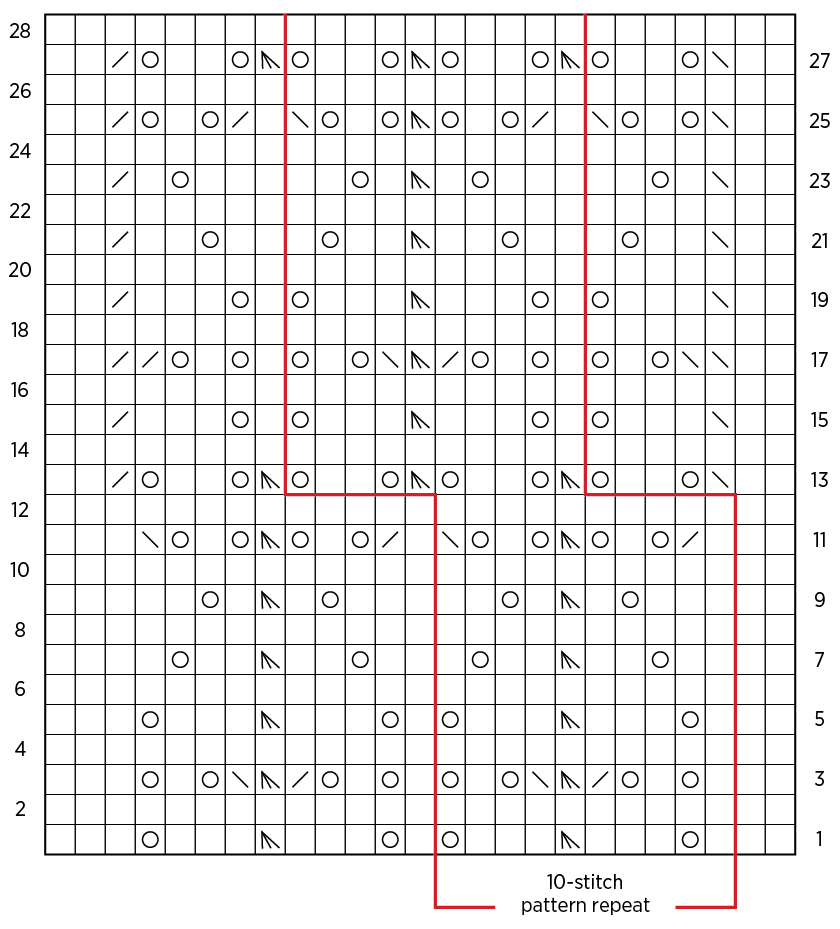
(Want to see it bigger? Click here and view the chart as a PDF!)
Center Panel: Finishing
Next Row (right side): Knit to end of row.
Next Row (wrong side): Purl to end of row.
With right side facing you, bind off knitwise, leaving final bind off stitch on the needle.
Border
With right side facing you and bind-off edge at top, rotate the Center Panel 90 degrees clockwise, so the left-hand selvage is at the top. Pick up and knit one stitch into every other stitch along entire selvage. [217 stitches picked up; 218 stitches on needles]
With right side still facing you, rotate the Center Panel 90 degrees clockwise, so the cast-on edge is at the top. Pick up and knit one stitch into every cast-on stitch 4 times, then skip one cast-on stitch, repeat along entire cast-on edge. [218 stitches picked up 436 stitches on needles]
With right side still facing you, rotate the Center Panel 90 degrees clockwise, so the right-hand selvage is at the top. Using second circular needles, if desired, pick up and knit one stitch into every other stitch along entire selvage. [218 stitches picked up; 654 stitches on needles]
With right side still facing you, rotate the Center Panel 90 degrees clockwise, so the bind-off edge is at the top. Pick up and knit one stitch into every bind-off stitch 4 times, then skip one bind-off stitch, repeat along entire bind-off edge. [218 stitches picked up; 872 stitches on needles]
Place a unique marker and join for working in the round.
Set-Up Round: *K218, place marker (pm), repeat from * to end of round. NOTE: The final stitch marker will be the unique end of round marker, so do not place another marker on the final repeat.
UPDATE, DECEMBER 23, 2020: We’ve corrected the number of picked up stitches along each edge, as well as the total number of border stitches. We’re sorry for initial errors, but they’re accurate now. If you already picked up the initial 880 stitches, you can still work the pattern by skipping ahead to Rounds 5 and 6, repeating those for the entire border.
Following either the Written Instructions or Chart, below, work Border Stitch Pattern.
Border Stitch Pattern: Written Instructions
Round 1: [*Yo, k1, yo, s2kp (see Notes), repeat from * to 2 stitches before next marker, yo, k1, yo, k1] 4 times. [2 stitches increased each corner]
Round 2: Knit to end of round.
Round 3: *Yo, s2kp, yo, k1, repeat from * to end of round.
Round 4: Knit to end of round.
Round 5: [Yo, k1, *yo, k1, yo, s2kp, repeat from * to 3 stitches before next marker, (yo, k1) 3 times] 4 times. [4 stitches increased each corner]
Round 6: Knit to end of round.
Repeat Rounds 5 and 6 until border measures 8 inches from pick-up edge, ending with Round 6.
Go on to Finishing section, below.
Border Stitch Pattern: Chart
NOTE: Begin this chart in the bottom right corner. Read all rows right to left, repeating 4-stitch repeat until indicated number of stitches before next marker, then working stitches to marker, then returning to 4-stitch repeat after marker, to end of round. Knit Rounds 1-4 one time, then repeat Rounds 5 and 6 until border measures 8 inches from pick-up edge, ending with Round 6.
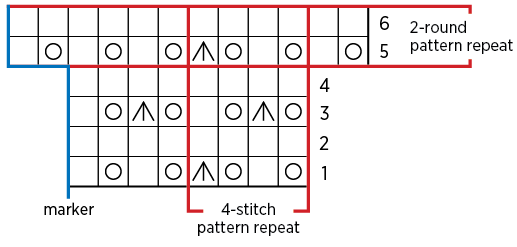
(Want to see it bigger? Click here and view the chart as a PDF!)
Finishing
Bind off loosely knitwise.
Weave in the ends and wet block.


It’s so pretty! Would it be possible with straight needles?
Hi Nuria,
Thanks for reaching out! This would be a tough pattern to work on straight needles since you are working across so many stitches at a time. On straight needles the stitches would be very crowded so that is why we recommend using the 60″ circular needles!
Happy knitting!
Gianna
Lovely!
What suggestions do you have for adapting this pattern to a scarf?
Hi Marsha,
Thanks for reaching out! Depending on the dimensions you would like for a scarf, you can easily adjust the center panel width as you desire making sure to keep the same multiples of stitches, the center panel pattern is worked over a multiple of 10 + 5 stitches!
Please let us know how this turns out, happy knitting!
Gianna
Wow! Beautiful!
I love your cumulus wrap pattern. I cannot wear mohair and wonder if you have a optional yarn recommendation? Thank you for your assistance.
Hi Debbie,
Thanks for writing in! It will definitely change the overall effect of the wrap, but depending on the direction you want to go in there are several yarns that I believe would look lovely in this pattern! Our Linen Quill or Sweetgrass would be beautiful or even Spectrum Silk, Burnish, or Cattail Silk. I do recommend making a gauge swatch with whichever yarn you decide to use to insure that you are consistent with the pattern!
Please let us know how this turns out! Happy knitting!
Gianna
If I wanted to make this without mohair, would I replace it with o e of your fingering weight or lace weight yarns? Admiring mineral silk and posy.
Hi Miriam,
Thanks for reaching out! Tussock is technically a fine lace weight, but it has so much body and bloom that we prefer to use it as a fingering weight like we did for this pattern! Mineral Silk is a fine lace weight and may be a bit too fine for this pattern, but Posy could be very lovely in this design! I would recommend doing a gauge swatch to insure that you are still consistent with the pattern when changing yarns.
Please let us know how this works out! Happy knitting!
Gianna
I’m thinking of making it in 2 colors, one for the center and a different one for the border. How many yards (or skeins) would you suggest for each section?
Hi Ruth,
Thanks for reaching out! That is such a great idea! For the center panel we used about 6 skeins for the center and 3 skeins for the boarder. I would recommend leaving one skein of each color unwound in the event you don’t end up using the full amounts so that you can return them for store credit within 6 months!
Please let us know how this turns out and happy knitting!
Gianna
I’d love to see a picture of that!
Such a beautiful pattern. I have been wanting to knit a baby shawl and I was wondering if you think this could be appropriate. Thanks, Rebecca
Hi Rebecca,
Thanks for reaching out, I am glad to hear you like this pattern! I believe you could easily size this down as long as you keep the same stitch pattern, the Center Panel pattern is worked over a multiple of 10 + 5 stitches.
Happy Knitting!
Gianna
I love many of your patterns but how do you print them? I can’t keep my phone open and keep a row count. Thank you
Hi Sammie,
Thanks for reaching out!
If you’re on a desktop version of the site, you will find a “print” icon in the right column just below the “Save To Favorites” button. If you’re on a mobile version of the site, you will find a “print” icon below the pattern and above the comments. Follow the easy on-screen instructions to delete whichever parts of the pattern you don’t want to print or save. For example, you may decide to shorten the pattern by omitting certain images or the list of materials. To remove images, click the drop down next to the image icon and change from 100% to 0%.
I hope this helps, happy knitting!
Gianna
Do you have any tips us left handed knitters working the charts?
Hi Sybil,
Thanks for reaching out! Standardly, there is not much difference between left and right hand knitting, so the chart for this pattern should be followed the same either way! Which way do you knit? Are you a continental knitter? That may be affection how you interpret the chart!
All the best,
Gianna
I ordered the Tussock yarn in the cloud blue color and love it. I have wound it and have begun working on the Cumulus Shawl pattern. I have had to begin it a few times because I got off count in the first few rows by being distracted- my own fault! My question is, does the entire center panel pattern always remain at 275 stitches or does that change? I might be off count once again, but thought I would ask for clarification.
Thank you!
Hi Susy,
Thanks for reaching out! Throughout the center panel the stitch count will change since there are so many k2tog, yo, and ssk stitches. I would recommend placing stitch markers between ever stitch repeat to keep track of all the stitches!
I hope this helps, please let us know how this turns out!
All the best,
Gianna
This is a gorgeous pattern! I’m trying to challenge myself with each new item I knit, and this would be a good learning experience. Question: why is the second circular needle optional and not required?
Hi Susan,
Thanks for reaching out! You can use the options 2nd circular needle when picking up the stitches around the edge to create the boarder since it is such a large amount of stitches!
I hope this helps, happy knitting!
Gianna
I would love to make this for my daughter’s wedding next Fall. Would you recommend Heritage White or Silver Needle with an Ivory gown? Could I get a sample of both? Thank you!
Hi Joanne,
Thanks for reaching out! This wrap would be so lovely for your daughter’s wedding! With an ivory gown I would recommend Heirloom White! We do have color cards in mind for the future but nothing concrete yet. In the meantime, if you’d like to see a skein in person, we recommend ordering whatever color you’re interested in Tussock. If you’re not happy after seeing it, you can exchange it for store credit and, hopefully, a color you like better! In any case it’s incredibly helpful to know there’s interest in samples, so I’ll be sure to pass the thought on to the rest of the team.
Please let me know if you have any other questions!
All the best,
Gianna
Thank you so much for posting this pattern and the yarn!🤗
I have been a knitter sonce age 9 and this is the ‘most beautiful’ knitted shawl/scarf I have ever seen! 👏👏❤👍😃
I am loving this knit, which is really straightforward once you get going – it’s perfect as my second-ever lace project! But (even though I did a tension square) the width of my centre panel is 52 inches – is this going to be way too big?! And how should I adjust to keep it a square when I get to the border?
Hi Kacey,
Thanks for reaching out! Hmm that is interesting, did your gauge swatch match the written gauge? I don’t think it will be too big, and it will still work for a wrap. I would recommend then working the pattern until the piece measures 52″ so that it is still a square going into the boarder!
I hope this helps and please feel free to reach out with any more questions!
Warmly,
Gianna
Thanks Gianna! I think my needles might be a bit bigger than the pattern. Having completed the centre panel with no issues (in about eight weeks) I thought the border would be a piece of cake but I’m finding it hard to keep track of! I knit the centre until it was square, and picked up the right number along each edge, though I had to adjust from the pattern to fit my rows, but somehow I’m struggling now. I’m worried that my corner stitches aren’t quite on the corners – do you think this will be fixed by blocking? Also, I seem to have thrown the pattern off by a stitch and I can’t work out how to get back on track. I have knit nearly two inches of the border but maybe I have to rip it out and start over 😭
Hi Kacey,
Thanks for reaching out! I am glad to heat that this is coming together! You can definitely adjust the corners a bit when you block the finished piece but if you are off by a stitch and its throwing the pattern off then I would probably suggest to go back and start the boarder over again to insure that the stitch pattern works out correctly!
I hope this helps and please let me know if you have any more questions!
Warmly,
Gianna
Gianna, I FINISHED IT!! So happy – the border was so unforgiving of mistakes but I got there in the end.
Advice for others: Think of the border like seed stitch, you’re stacking them above their opposite stitches, in a criss-cross. Also I wish there had been instructions for a stretchy cast-off – I did a VERY loose knitwise bind-off and I find that it still creates a hard edge that’s uncomfortable compared to the soft, stretchy lace… I may re-do this over time.
But other than that, I’m SO delighted to have accomplished this STUNNING PATTERN, and relatively quickly – in case anyone is interested, the centre panel took about 7-8 weeks and the border was about another 6-8 (including the 2-3 times I ripped out inches of work to start again).
Another gorgeous item in my hand-knit Purl Soho wardrobe! Thanks team. Big heart eyes emoji from me xx
Hi Kacey,
Thanks for writing in! I am so thrilled to hear that you have finished! This is such a big project, so that is quite an accomplishment! Thank you for sharing your tips, I am sure other knitters taking on this challenging piece will find this so helpful!
We would absolutely love to see your finished piece if you are on Instagram you can tag us at @purlsohobusyhands or use the hashtag #purlsohobusyhands
All the best,
Gianna
Just pure curiosity here. How long did this take to complete? I started this in early December for my daughter’s wedding in late September. I have completed 4 reps of 28 rows. I’ll probably do 16 more reps, so it won’t be quite as large as the one you have pictured. I don’t really worry about gauge with scarfs and shawls all that much. I’m more than likely gonna decrease the border as well, not sure how much, but maybe at least by half. Just wondering what your thoughts would be about my chances of completing this in a timely manner. I have two part time jobs and I can knit at least 2-3 rows/day. I haven’t attempted the border yet. The body gave me fits in the beginning 😬. Any tips for picking up the border stitches? I know this is long. Sorry and thanks for your input. I LOVE your patterns and website!!!!
Hi Shara,
Thanks for reaching out! This is definitely a big project! It is very time consuming and definitely does take quite a bit of time to complete. As long as you stick with it and work on it consistently (even at least 2-3 rows a day!) I think you will certainly be able to finish by September! As for picking up stitches, I recommend checking out our wonderful Picking Up Stitches tutorial, it is an excellent resource to use!
I hope this helps and please feel free to reach out with any more questions!
Warmly,
Gianna
Shara, I started mine around October 2020, with a goal to finish one repeat (28 rows) per week. However, it’s taken more like 2 or even 3 weeks per repeat on the central square, so I’m now at the start of my 9th repeat. It helps that I do a lot of weekly phone calls with friends, during which I try to work on this.
Hi Shara, the centre panel on mine took around eight weeks of fairly intensive knitting – but it was the border that really killed me! Ends up being thousands of stitches per round, so it took hours by the end of it, and mistakes in the border pattern were so hard to fix – and counting for the border pick-ups was a pain, took me three or four tries/ripping out. BUT it’s done now and it was so worth it! Hope yours is going well. I thought of going narrower on the border just to get it done quicker but I’m glad I didn’t as the lovely delicate tapered corners are SO special 🙂
Hi Gianna,
Beautiful. I have not tackled lace, and I’m wondering What method of joining yarn are you using for this wrap? I’m also wondering if you have any images of this wrap people have don in a different color.
Thank you,
Deanna
Hi Deanna,
Thanks for reaching out! For all of our samples we use the simple method of joining a new ball in like we do in our Adding a Ball of Yarn tutorial! I don’t have any photos of this wrap that people have made, but you may be able to find some on Ravelry or Instagram by searching “Cumulus Wrap”!
I hope this helps!
Warmly,
Gianna
Is this pattern available as a pdf. I use Knit Companion and this format won’t work,
Hi Ann,
Thanks for reaching out! If you go to the right side of the pattern and click where it says PRINT, it will open up the document and then at the top left side you can click PDF and it will open up a PDF download of the pattern!
I hope this helps, and please feel free to reach out with any more questions!
Warmly,
Gianna
Hi.. I’m a beginner with a great many aspirations!! ☺️ The pattern is advanced for me however I’m in love with the tussock.. can you suggest a simpler pattern I can apply this yarn to?? Thanks
Hi Janet,
Thanks for reaching out! I am also completely in love with Tussock and we have a few lovely wrap options that use it and are very simple and straight forward! I would recommend Elementary Wrap In Tussock or Open Air Wrap In Tussock!
I hope this helps and please feel free to reach out with any more questions!
Warmly,
Gianna
Hi , this is so lovely. would it be possible to make this without the border?
Hi Amy,
Thanks for reaching out! You could certainly work this pattern without the boarder since you work the Center Panel first and then pick up stitches! Keep in mind though that without the boarder the finished size will be quite a bit smaller. The finished dimension of the Center Panel are 44 x 44 inches, so if you wanted it to be larger the Center Panel pattern is worked over a multiple of 10 + 5 stitches!
Warmly,
Gianna
I’m a beginner but at some point I’d love to do this !
Beautiful! If I wanted to do the border in a different color from the main section, how many skeins would I need for each? I think this could look stunning with a contrasting border!
Hi Jackie,
Thanks for reaching out! That is such a fun idea! For the center panel we used about 6 skeins and 3 skeins for the boarder. I would recommend leaving one skein of each color unwound in the event you don’t end up using the full amounts so that you can return them for store credit within 6 months!
Please let us know how this turns out and happy knitting!
Gianna
I went in and tried to order 8 skeins, checked to go to check out and all I got was the screen with my total of and a revolving circle that would not quit. I was unable to type in any of the fields information re: name, address, billing etc. This is after a 20 minute wait. Would like to be able to finish my order.
Hi Janett,
Thanks for reaching out! I am so sorry to hear that you are having problems checking out!! If you email us at customerservice@purlsoho.com we can absolutely help you proceed with your purchase from there!
Warmly,
Gianna
I’m so excited to start this gorgeous knitting challenge! The yarn is so beautiful. I’d like to make a small test piece in a non-fluffy yarn to be fully comfortable with the centre pattern. How many stitches should I cast on to create a small test piece?
Hi Anne,
Thanks for reaching out! That is a great idea! I always recommend to work a gauge swatch prior to beginning to insure you are consistent with the pattern! The Center Panel pattern is worked over a multiple of 10 + 5 stitches, so to get an accurate representation of the pattern I would suggest casting on 25 or 35 stitches!
I hope this helps and please let me know if you have any more questions!
Warmly,
Gianna
Hello, lovelies! When I ordered the supplies, all that was available for needles was US 4 in the 40 inch. I ordered 2 sets, but, silly me, didn’t set up the border using both sets. I now am on row 6 of the border and know this will get much larger. Is it too late to change to both sets of circular needles and continue in the round? I’ve never done it before, but think I could figure it out. Thoughts? Suggestions? Thanks, Shara
Hi Shara,
Thanks for reaching out! I would recommend switching to both needles, this will be much more manageable and easy to knit when the piece is growing! And you can certainly do this now. I suggest evenly splitting your stitches and transferring half to the second set of needles, you can do this by either slipping them on or knitting them on!
I hope this helps and please let me know if you have any more questions!
Warmly,
Gianna
Can you clarify what is supposed to happen in rows 13 and 27 of the center pattern? The instructions show an extra yarn over in the first seven stitches, increasing that section to eight stitches, and you show one stitch decreased in the final eight stitches, making that seven stitches. It keeps the overall stitch count correct, but you don’t show the 10-stitch repeat shifting over one stitch to account for this. Help! Thank you.
Hi Sara,
Thanks for reaching out! I am happy to help but I am not sure if I completely understand your question! Are you working from the chart or the written pattern?
For row 13 and 27 you will be K2, ssk, yo, k2, yo, you will then begin the repeat: *slip 1, k2tog, psso, yo, k2, yo, you will repeat this from the * till you reach the last 4 stitches, where you will k2tog, k2.
Warmly,
Gianna
I’m working from the chart, but the effect will be the same if I use the written instructions. Using row 13 – if I do as you say K2, ssk, yo, k2, yo, my first stitch of the repeat (s1, k2tog, psso) moves over one stitch and will not be directly above the same stitch as in row 11. The chart shows it being directly above.
Gianna – if you count the stitches at the start of row 13, you have one k2together, but two yarn overs. So, you increase the stitches in this section (before the repeat starts) by one stitch. But on row 14 (and on) you still only show seven stitches in this section.
Hi Sara,
Thanks for reaching out! I took a look at the section you’re having trouble with, and I think that you might be missing that first ssk instruction before the repeats begin. In both the charted and written instructions, the number of yarn overs is equal to the number of stitches decreased in the various ssk, k2tog, and [slip 1, k2tog, psso] decreases. It’s easiest to see when looking at the chart; there is one yarn over for the first ssk, one yarn over for the last k2tog, and two yarn overs for each of the three [slip 1, k2tog, psso] 2-stitch decreases. This should keep the stitch count even throughout.
I hope this helps clarify the pattern! If you have additional questions, you can always email us at customerservice@purlsoho.com for more assistance!
All the best,
Kelsey
Hi Sara,
If you follow those written instructions, the [slip 1, k2tog, psso] decrease should occur in the same spot as it did in Row 11; It can look a little different because of the yo that is occurring just before you work the decrease, but it should all line up properly!
I hope this helps, and let us know if you have any other questions!
All the best,
Kelsey
I’m having major issues with the border and have ripped it back to the beginning stitch 4 times. I have counted my stitches many times. Looking at the chart, are the s2kp’s supposed to alternate every other row as you go around on rows 5 & 6? What I mean is, on rows 1-4, the s2kp’s are stitch 4 on row 1 and stitch 2 on row 3. So should the s2kp’s be stitch 4 on row 5 and stitch 2 on row 7? Does this make sense? Please help! I am so frustrated. Thanks for your input.
Hi Shara,
Thanks for reaching out! For me the best way to work around intricate lace work like this is to reference both the chart and the written instruction to m=insure I am following the steps correctly! Once you have picked up and worked the initial set up round of the boarder you will begin the lace pattern where the s2kp’s will alternate as you go, Round 1: [*Yo, k1, yo, s2kp repeat from * to 2 stitches before next marker, yo, k1, yo, k1] you will repeat the section in the brackets 4 times so you have 2 stitches increased at each corner. So for round 1 you will be working the s2kp technically on stitch 2 with a yo on each side. Then round 2, 4 and 6 you will just be knitting evenly. For row 3 you will Yo, s2kp, yo, k1, repeat from * to end of round, so this time you will be working the first s2kp on the 1st stitch. The for round 5 you will be [Yo, k1, *yo, k1, yo, s2kp, repeat from * to 3 stitches before next marker, (yo, k1) 3 times] 4 times. [4 stitches increased each corner] so this time the first s2kp will take place on the 3rd stitch.
I hope this helps and please let me know if you have any more questions!
Warmly,
Gianna
Yes, Gianna, that helps immensely. I did do the math, too, and have a total of 896 stitches on the needles after completing round 5. So every other row will be increasing 16 stitches over the entire row, right? Thanks for the quick response. I was tearing my hair out.
Hi Shara,
That’s correct! With every row 5 that you work, you will increase by 16 sts total. Let us know if you run into any other questions!
Warmly,
Kelsey
This is one of the most beautiful patterns I have ever seen!! This is my third ever lace pattern and I must say it is a really lovely knit! It’s fun and has a good rhythm! I also love the Terrace Wrap in greenfinch yellow Cattail Silk, which I am making at the same time for my wife (in secret, while she’s at work I knit hers and in the evenings I knit this one!)
Thank you for making this girl a happy knitter!
I’m a little confused about the unblocked vs. blocked dimensions. The finished center panel is described as 44″x44″, with the finished overall dimensions 60″x60″. That means 8″ of border on each side. Indeed, the instructions say to knit until you have 8″ of border. But how is it that apparently the center-panel lace stretches after blocking, but the border does not? Further, why do the unblocked overall dimensions (56″x60″) should the wrap only stretching in one direction after blocking? At just over 8 repeats into the center, it looks like I’ll see both length and width increase with blocking.
I’m using the yarn of a commercial cashmere cardigan I unraveled, but it appears I’ll have a square (unblocked) center panel at *12* repeats, plus 16 rows, rather than 15. Thanks for your help!
Hi Christi,
Thanks for reaching out! I’d be happy to answer your questions about the Cumulus Wrap! Because of how this pattern is designed, I would not recommend adapting it to a different number of repeats. If you go with 12 repeats instead of 15 as is listed in the pattern, you will end up needing to adapt the border pattern to account for the lower number of stitches. It’s sounding like your gauge might be off, so I’d double-check that you’re getting the same gauge called for in the pattern before continuing on!
Lacework really comes alive after it’s blocked and determining the accurate dimensions of lacework as you work can be deceptive because there’s so much flexibility in the fabric; it’s common for the width to appear thinner than it will actually block out to be. For this reason, it’s very important to make sure that you knit and block a gauge swatch before beginning your project, to ensure that you’re using the appropriate needle size to get the gauge called for in the pattern. That way, you can feel confident that you’re knitting the correct dimensions as you work on your larger piece. After you’ve completed your project, you can use the blocking process to gently encourage the piece into the proper dimensions listed on the pattern’s schematics.
In my own experience of lacework with yarns like Tussock, I’ve found that, before blocking, the width measurement tends to be shorter than what the true measurement will be after blocking. That’s why the unblocked dimension of the Cumulus Wrap shows the width is shorter than it is after blocking.
I hope this helps clear things up! If you have any other questions, you can reach out to us at customerservice@purlsoho.com for additional help!
Warmly,
Kelsey
Hi! I’m interested in knitting this pattern & just did a preliminary read through. On the first pick up row for the border it says 217 sts picked up, 218 sts on needle. Maybe it’s just not obvious to me since I haven’t done the knitting yet, but where is that extra st coming from? Is it the last st from the bind off?? I didn’t see it specified, so I’m not sure (or maybe I just missed it); & for all other edge rows 1 st picked up = 1 st on needle (does that make sense?). I also saw that the border section had an update for the numbers. The border should have a total of 872 sts picked up (218 on each edge); but the correction states 880 total border sts & no other mention of edge st numbers (i.e. 220 on each edge). I’m confused about the “actual” numbers. Sorry for the long message. Thank you for your time & assistance, both are greatly appreciated!!!
Hi Kimberly,
Thanks for writing in! The number of stitches listed in the pattern is correct as written now. As you can see in the correction update, we initially had the pick-up amount as 880 stitches but have since corrected it to be 872 stitches! So the stitch count of 872 is the correct amount.
For the first row, you should already have one stitch on your needle (this is the last stitch of your bind off) and then will pick up 217 stitches giving you a total of 218 stitches!
I hope this clears things up!
Gianna
hello! knitting this pattern I missed some stitches, it’s too late to undo the work. how can i do? please give me some advice on how to fix the fallen stiches invisibly. Thank you! excuse me but i am italian and don’t speak (and write) english very well.
Hi Lea,
Thanks for reaching out! You could try to “ladder down” to fix the stitches, but this can be quite tricky with lace patterns. Likely the easiest option would be to take out the rows until you have reached the missed stitches so that you can add them back onto the needle and then continue working in the stitch pattern!
I hope this helps, happy knitting!
Gianna
You suggest that for the border you can use two circular needles. Can you explain more on how that would work??
Hi Lynn,
Thanks for reaching out. The reason we suggest using two circular needles at this point is because there are so many stitches that they’re going to be very cramped on just one needle! To use two circulars at once, you’ll start with half your stitches on one and half on the other (which won’t actually ever change). Find your working yarn, and then work the following half of the stitches just on the circular needle that they’re already on (so using both tips from the same needle). Then, work across the remaining stitches using only the second circular needle. I hope this helps clarify things!
All the best,
Lili
On my third repeat and needed to join yarn after I got a knot I couldn’t undo. I saw the comment above re joining and the reply to join yarn as you would in non-lace knitting—for weaving in, do you recommend duplicate stitch, following the pattern? It’s my first time knitting lace, and for once googling wasn’t getting me the answers I’m looking for! Thanks
Hi Anna,
Thanks for reaching out. Yes! I’d recommend following the pattern in duplicate stitch. That creates the most invisible woven-in ends, since they follow the path of the yarn in the stitches exactly. Hope this helps!
All the best,
Lili
Hi!
I am in love with this wrap. I want so badly to knit it for my wife.
I’m wondering, out of curiosity and not because of preference, if you have any photos of the cumulus wrap knit in another color. Hard to imagine it looking better than silver needle, though.
Thanks!
Hi Cameron,
Thanks for reaching out, and I’m glad to hear that this pattern has caught your eye! We haven’t knit it in any other colors ourselves, but a number of people have made their own and posted their work on Ravelry. I’d recommend checking those projects out at this link. A number of them knit it in other colors, and I think their projects look amazing!
All the best,
Lili