

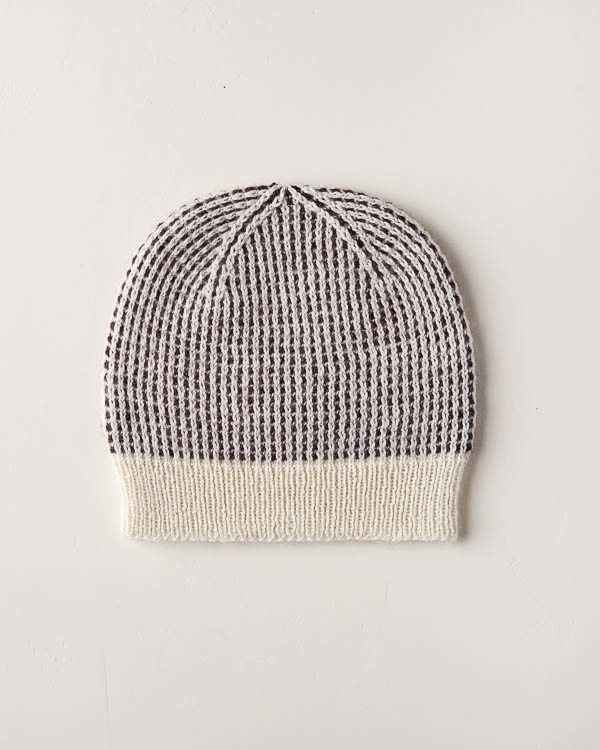
Dappled Hat, Mitten + Hand Warmer Set
When the setting sun pours through half-covered branches to pepper light over newly fallen leaves, it’s time to bundle up in our Dappled Hat, Mitten + Hand Warmer Set!
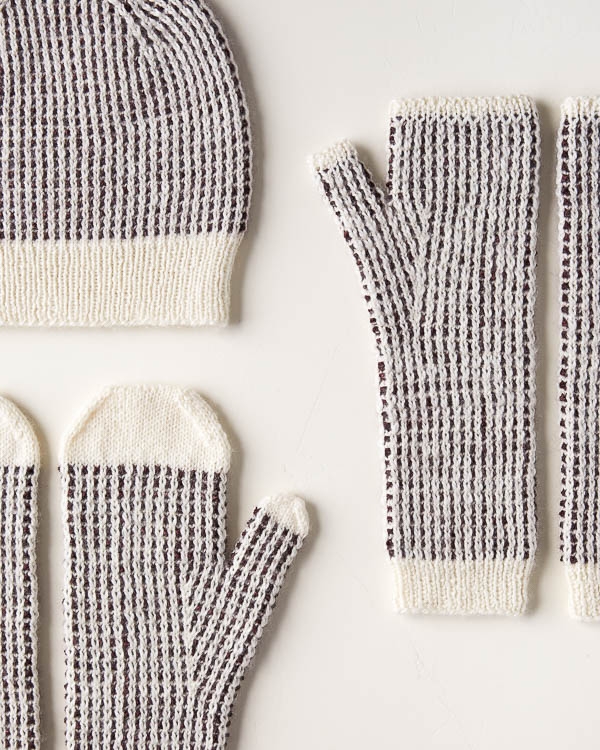
The two-color waffle texture of these pieces looks wonderfully intricate, but it’s really just a super simple slip stitch pattern. Unlike Fair Isle or intarsia knitting, here, you only need to handle one color of yarn each round. If you’re new to slip stitch knitting, prepare for an “aha” moment!
All the pieces in our Dappled Hat, Mitten, + Hand Warmer Set are knit from the bottom up. And the free patterns are sized for kids to adults (plus a little baby hat), so everyone can get in on the dapple action!

We knit our set in beautiful Posy, a soft and durable blend of 75% superwash merino, 15% cashmere and 10% nylon. Posy comes in 16 gorgeous hand-dyed colors, which equals we-don’t-know-how-many amazing two-color combos!

The slip stitch pattern plus the beautiful blend of yarn makes for a squishy and cozy fabric, perfect for keeping hands and heads toasty from the onset of fall through the holidays and beyond!

Designed by Purl Soho designer, Jake Canton. Click here to see even more of Jake’s designs!
Share your progress and connect with the community by tagging your pics with #PurlSoho, #PurlSohoBusyHands, #PurlSohoDappleHatMittenAndHandWarmerSet, and #PurlSohoPosy. We can’t wait to see what you make!
Materials


Hat
- Main Color: 1 (1, 1, 2, 2) skein(s) of Purl Soho’s Posy, 75% superwash merino, 15% cashmere, 10% nylon. Each skein is 159 yards/ 50 grams; 85 (120, 155, 190, 225) yards required. We used Heirloom White. (NOTE: We no longer offer Posy, but choose from one of our other fingering weight yarns.)
- Contrast Color: 1 skein of Posy; approximately 35 (50, 65, 80, 95) yards required. We used Black Cherry.
- US 1 (2.5 mm), 16-inch circular needles (Junior and Adult sizes only)
- Set of US 1 double pointed needles (Baby and Kid sizes only)
- US 2 (3 mm), 16-inch circular needles (Junior and Adult sizes only)
- Set of US 2 double pointed needles (All sizes)
- Stitch markers, including one unique marker
Mittens Or Hand Warmers
- Main Color (MC): 1 (2, 2, 2) skein(s) of Posy, 75% superwash merino, 15% cashmere, 10% nylon. Each skein is 159 yards/ 50 grams; approximately 110 (185, 240, 285) yards required. We used Heirloom White.
- Contrast Color (CC), Mittens: 1 skein of Posy; approximately 45 (70, 95, 110) yards required. We used Black Cherry.
- Contrast Color (CC), Hand Warmers: 1 (1, 2, 2) skein(s) of Posy; approximately 60 (105, 160, 205) yards required. We used Black Cherry.
- Set of US 1 (2.5 mm) double pointed needles
- Set of US 2 (3 mm) double pointed needles
- Stitch markers, including one unique marker
- Small stitch holder or scrap yarn
Gauges
35 stitches and 68 rows = 4 inches in slip stitch pattern
40 stitches and 48 rows = 4 inches in 1×1 rib
Sizes
Hat
Baby (Kid, Junior, Adult Small, Adult Large)
- Finished Circumference: 14½ (15½, 16½, 18¼, 20) inches, comfortable stretching about 1 inch
- Finished Height: 6 (7¼, 8, 9¼, 10¼) inches, with instructions to modify
Mittens + Hand Warmers
Kid (Junior, Adult Small, Adult Large)
- Finished Circumference At Palm: 5 (7, 8, 9) inches, comfortably stretching about 1 inch
- Mittens’ Finished Height From Cuff To Tip: 7½ (8½, 10½, 11½) inches, with instructions to modify
- Hand Warmers’ Finished Height From Cuff To End of Palm: 9 (10½, 11¼, 12¼) inches, with instructions to modify
Notes
Hand Dyed Yarn
If you’re using hand dyed yarn, like our Posy, you may want to re-fix the dye before you begin in order to prevent the colors from bleeding when you wash the finished piece. For tips on how, visit our Re-Fixing Dye Tutorial.
Slip Stitches
Slip stitches purlwise with yarn in back (wyib) unless directed otherwise.
Lifted Increase
RLI (Right Lifted Increase): Lift right leg of stitch below next stitch on left needle onto left needle and knit it. [1 stitch increased]
LLI (Left Lifted Increase): Lift left leg of stitch 2 rows below stitch on right needle onto left needle and knit it through the back loop. [1 stitch increased]
For more information on these techniques, please visit our Lifted Increase Tutorial.
M1R (Make 1 Right): Pick up bar between last stitch you knit and the one you’re about to knit with left needle, bringing needle from back to front and knit into the front of stitch.
For more information on this technique, please visit our Make 1 Right Tutorial.
Hat Pattern
Cuff
With Main Color (MC), cast 128 (136, 144, 160, 176) stitches onto smaller circular needles (or smaller double pointed needles, if making Baby or Kid sizes). We used a basic Long Tail Cast On.
Place unique marker and join for working in the round, being careful to not twist the stitches.
Round 1: *K1, p1, repeat from * to end of round.
Repeat Round 1 until piece measures 1¼ (1½, 1¾, 2, 2¼) inches from cast-on edge, or to desired Cuff length.
Body
Change to larger circular needles (or larger double pointed needles, if making Baby or Kid sizes).
Rounds 1 and 2: With MC, knit to end of round.
Round 3: With Contrast Color (CC), *slip 1 (see Notes), k1, repeat from * to end of round.
Round 4: With CC, *slip 1, p1, repeat from * to end of round.
Repeat Rounds 1–4 until piece measures 4 (5, 5¾, 6¾, 7½) inches from cast-on edge, or until 2 (2¼, 2¼, 2½, 2¾) inches from desired finished height, ending with Round 3.
Crown
NOTE: For all sizes except Baby and Kid, change to double pointed needles when stitches no longer comfortably fit around the circular needles.
Set-Up Round: With CC, *[slip 1, p1] 16 (17, 18, 20, 22) times, place marker, repeat from * to end of round.
Rounds 1 and 2: With MC, *slip slip knit (ssk), knit to 3 stitches before next marker, k2tog, k1, repeat from * to end of round. [8 stitches decreased each round]
Round 3: With CC, *slip 1, k1, repeat from * to end of round.
Round 4: With CC, *slip 1, p1, repeat from * to end of round.
Rounds 5 and 6: With MC knit to end of round.
Rounds 7 and 8: Repeat Rounds 3 and 4.
Repeat Rounds 1–8 one more time. [96 (104, 112, 128, 144) stitches]
All Sizes
Repeat Rounds 1–4 five (5, 6, 7, 8) more times. [16, (24, 16, 16, 16) stitches]
Kid Size Only
Repeat Round 1 one more time. [–, (16, –, –, –) stitches]
Cut CC.
Next Round: With MC, knit to end of round.
Cut MC, leaving an 8-inch tail. Thread tail on tapestry needle and draw through remaining stitches twice. Pull tight and insert needle through top of Crown to inside of hat.
Mittens + Hand Warmers Pattern
Cuff
With MC, cast 44 (56, 66, 72) stitches onto smaller double pointed needles and divide among three needles. We used a basic Long Tail Cast On. [Needle 1: 14 (18, 22, 24) stitches; Needle 2: 16 (20, 22, 24) stitches; Needle 3: 14 (18, 22, 24) stitches]
Place unique marker and join for working in the round, being careful to not twist the stitches.
Round 1: *K1, p1, repeat from * to end of round.
Repeat Round 1 until piece measures 1 (1, 1, 1¼) inches from cast-on edge, or to desired Cuff length.
Body
Change to larger double pointed needles.
Rounds 1 and 2: With MC, knit to end of round.
Round 3: With CC, *slip 1 (see Notes), k1, repeat from * to end of round.
Round 4: With CC, *slip 1, p1, repeat from * to end of round.
Mittens Only
Repeat Rounds 1–4 until piece measures 1½ (1¾, 2, 2½) inches from cast-on edge, or until desired length to base of hand, ending with Round 3.
Move on to Gusset section below.
Hand Warmers Only
Repeat Rounds 1–4 until piece measures 4½ (4¾, 5, 5½) inches from cast-on edge, or until desired length to base of hand, ending with Round 3.
Move on to Gusset section directly below.
Gusset
Set-Up Round: With CC, [slip 1, p1] 3 times, slip 1, place marker (pm), *p1, slip 1, repeat from * to last 9 stitches, p1, pm, [slip 1, p1] 4 times.
Round 1: With MC, knit to 1 stitch before next marker, RLI (see Notes), k1, slip marker (sm), knit to next marker, sm, k1, LLI (see Notes), knit to end of round. [2 stitches increased]
Round 2: With MC, knit to end of round.
Round 3: With CC, *slip 1, k1, repeat from * to 2 stitches before next marker, slip 1, m1R (see Notes), slip 1, sm, **k1, slip 1, repeat from ** to next marker, sm, slip 1, m1R, ***slip 1, k1, repeat from *** to end of round. [2 stitches increased]
Round 4: With CC, *slip 1, p1, repeat from * to end of round.
Rounds 5 and 6: With MC, knit to end of round.
Round 7: With CC, *slip 1, k1, repeat from * to end of round.
Round 8: With CC, *slip 1, p1, repeat from * to end of round.
Repeat Rounds 1–8 three (4, 5, 6) more times, ending with Round 8. [60 (76, 90, 100) total stitches; Needle 1: 22 (28, 34, 38) stitches; Needle 2: 16 (20, 22, 24) stitches; Needle 3: 22 (28, 34, 38) stitches]
Cut CC.
Thumb Hole
Set-Up Round: With MC, k7 (9, 11, 13), place previous 7 (9, 11, 13) stitches onto stitch holder or scrap yarn, knit to last 9 (11, 13, 15) stitches, slip 1, slip remaining 8 (10, 12, 14) stitches onto same stitch holder or scrap yarn. [45 (57, 67, 73) stitches remain on needles; Needle 1: 15 (19, 23, 25) stitches; Needle 2: 16 (20, 22, 24) stitches; Needle 3: 14 (18, 22, 24) stitches]
Slip last stitch from Needle 3 to Needle 1, knit first 2 stitches together on Needle 1, slip that stitch back to Needle 3.
NOTE: This k2tog knits the stitches from the left and right of the Thumb Hole together.
Palm
Resume working in the round.
Set-Up Round: With MC, knit to end of round. [44 (56, 66, 72) stitches; Needle 1: 14 (18, 22, 24) stitches; Needle 2: 16 (20, 22, 24) stitches; Needle 3: 14 (18, 22, 24) stitches]
Round 1: Join CC, *slip 1, k1, repeat from * to end of round.
Round 2: With CC, *slip 1, p1, repeat from * to end of round.
Rounds 3 and 4: With MC, knit to end of round.
Repeat Rounds 1–4 until piece measures 1½ (2, 2½, 3) inches from Thumb Hole, or until desired Palm length, ending with Round 2.
Cut CC.
Hand Warmers Only
Change to smaller double pointed needles.
Round 1: With MC, *k1, p1, repeat from * to end of round.
Repeat Round 1 for 1/4 inch.
Bind off in pattern.
Cut MC.
Go on to Thumb section below.
Mitten Top (Mittens Only)
Round 1: With MC, knit to end of round.
Repeat Round 1 for 1/2 inch.
Decrease Set-Up Round: Needle 1: Knit to end of needle; Needle 2: K8 (10, 11, 12), pm, knit to end of needle; Needle 3: Knit to end of needle.
Shape Top Of Mitten
Round 1: Needle 1: K2, ssk, knit to end of needle; Needle 2: Knit to 3 stitches before marker, k2tog, k1, sm, k2, ssk, knit to end of needle; Needle 3: Knit to last 3 stitches, k2tog, k1. [4 stitches decreased]
Kid + Junior Sizes Only
Round 2: Knit to end of round.
Repeat Rounds 1 and 2 two more times. [32 (44, –, –) stitches; Needle 1: 11 (15, –, –) stitches; Needle 2: 10 (14, –, –) stitches; Needle 3: 11 (15, –, –) stitches]
All Sizes
Repeat Round 1 two (3, 7, 7) more time(s). [24 (32, 34, 40) stitches; Needle 1: 9 (12, 14, 16) stitches; Needle 2: 6 (8, 6, 8) stitches; Needle 3: 9 (12, 14, 16) stitches]
Kid + Adult Small Sizes Only
Slip 1 stitch from Needle 1 to Needle 2, and slip 1 stitch from Needle 3 to Needle 2. [Needle 1: 8 (-, 13, -) stitches; Needle 2: 8 (-, 8, -) stitches; Needle 3: 8 (-, 13, -) stitches]
All Sizes
Next Round: Needle 1: K2, slip first stitch over second stitch to bind off 1 stitch, ssk, knit to end of needle; Needle 2: K1, k2tog, k1, remove marker, k2, slip first stitch over second stitch to bind off 1 stitch, ssk; Needle 3: Knit to last 3 stitches, k2tog, k1. [18 (26, 28, 34) stitches; Needle 1: 6 (10, 11, 14) stitches; Needle 2: 5 stitches; Needle 3: 7 (11, 12, 15) stitches]
Slip 3 stitches from Needle 2 to Needle 1; slip 2 stitches from Needle 2 to Needle 3. [9 (13, 14, 17) stitches on each of two needles]
Cut MC.
Use Kitchener Stitch to graft Mitten Top closed. If you need help with this, please visit our Kitchener Stitch Tutorial.
Thumb
Place 15 (19, 23, 27) on-hold Thumb stitches onto 4 double pointed needles. [Needles 1 – 3: 4 (5, 6, 7) stitches; Needle 4: 3 (4, 5, ,6) stitches]
With right side facing you and beginning with right-most Thumb stitch, join MC.
Set-Up: Needles 1 and 2: Knit to end of needle.
Join to work in the round and place a unique stitch marker to mark end of round.[Needle 3 is now first needle of round]
Set-Up Round: Needle 3: Knit to end of needle; Needle 4: Knit to end of needle, pick up and knit 1 stitch to left of Thumb Hole; Needle 1: Knit to end of needle; Needle 2: Knit to end of needle. [1 stitch picked up; 4 (5, 6, 7) stitches on each needle]
Round 1: With CC, *slip 1, k1, repeat from * to end of round.
Round 2: With CC, *slip 1, p1, repeat from * to end of round.
Rounds 3 and 4: With MC, knit to end of round.
Repeat Rounds 1–4 until Thumb measures 1 (1¼,1¼, 1½) inches from Thumb Hole, or for Hand Warmers, until ¼ inch from desired Thumb length.
Mittens Only
Round 1: With MC, knit to end of round.
Repeat Round 1 until Thumb measures 1½ (1¾, 1¾, 2) inches from Thumb Hole, or until 5/8 inches less than desired Thumb length.
Shape Tip
Round 1: Needle 3: Ssk, knit to end of needle; Needle 4: Knit to 3 stitches from end of needle, k2tog, k1; Needle 1: Ssk, knit to end of needle; Needle 2: Knit to 3 stitches from end of needle, k2tog, k1. [4 stitches decreased]
Kid Size Only
Round 2: With MC, knit to end of round.
Repeat Rounds 1 and 2 one more time. [8 stitches]
Junior, Adult Small + Large Sizes Only
Repeat Round 1 – (2, 3, 4) more time(s). [8 stitches]
All Sizes
Transfer stitches from Needle 3 to Needle 4 and transfer stitches from Needle 1 to Needle 2 so there are 4 stitches on 2 needles.
Use Kitchener Stitch to graft top of Thumb closed.
Cut MC.
Hand Warmers Only
Change to smaller double pointed needles.
Round 1: With MC, *k1, p1, repeat to end of round.
Repeat Round 1 for ¼ inch.
Bind off in pattern.
Cut MC.
Finishing
Weave in ends and make a second Mitten or Hand Warmer!
Block both as desired.


These are gorgeous. I’m wondering how far the 1 skein of the main colour goes? If I was wanting to make adult sizes in all three patterns would I need to buy one skein of Heirloom White Posy (i.e. one for each piece) or would one skein cover them all?
Hi Lucy,
Thanks for writing in! We have a handy “Yardage Breakdown” above the lets you know how much yarn we used for each size of each of the three items! We hope that this helps let you decide how much yarn you will need. For example the Adult Small hat uses 190 yards of the main color and 80 yards of the contrast color and the Adult Large Hat uses 225 of the main color and 95 of the contrast color. Depending on what sizes you would like to make, you can add up the yardages and see how many skeins you will need!
Best,
Cassy
Is it possible to download the pattern?
Hello Kabira,
Thanks for reaching out!
If you’re on a desktop version of the site, you will find a “print” icon in the right column just below the date and tags. If you’re on a mobile version of the site, you will find a “print” icon below the pattern and above the comments.
Follow the easy on-screen instructions to save as a PDF.
I hope this helps and happy knitting!
-Marilla
Hi!
You didn’t leave sizing.
You just have CO numbers. But don’t say which sizing they are.
Hello Elle,
Thank you for reaching out! If you scroll down a bit, past “yardage breakdown” and “gauge” you will find “sizes” which will give you all the sizes and measurements to determine your size.
Happy knitting!
-Marilla
Hi Purl Soho, FYI in the directions for the M1R I believe it should say pick up from back (says pick up from front). I always remember by saying right, rear. Lovely patterns and as always awesome directions. Thanks so much. I love your patterns and yarns are beautiful. Cheers, Gwen
Hi Gwen,
How embarrassing! Thanks for letting us know, we have fixed the error!
Best,
Cassy
J’aime beaucoup vos modèles est-il possible de les traduire en français. Un grand merci. Bien cordialement.
Bonjour Odile,
Merci pour votre message! Malheureusement, nos patrons sont toujours en anglais!
Merci,
Cassy
No where in the hat instructions does tell when to use the RL1or the LL1.!
Hello Carol,
Thanks for reaching out! You are correct, we use these techniques to knit up the Mittens and Hand Warmers, but not the Hat.
Happy knitting!
-Marilla
Hello Purl Soho,
When I use the print-function of this beautiful hat, your Easy Heel Colorblock Socks show up in the right top corner.
Hello Elsje,
Thank you for reaching out! I think this might be happening when you select your browsers web print option rather than our print function. If you’re on a desktop version of the site, you will find a “print” icon in the right column just below the date and tags. If you’re on a mobile version of the site, you will find a “print” icon below the pattern and above the comments.
Follow the easy on-screen instructions to delete whichever parts of the pattern you don’t want to print or save. For example, you may decide to shorten the pattern by omitting certain images or the list of materials. To remove images, click the drop down next to the image icon and change from 100% to 0%.
I hope this helps and happy knitting!
-Marilla
when making the hat, how does when carry the second color along so that you don’t have to cut each time.
Hi Gabriel,
Great question! We actually have a tutorial on Knitting Stripes in the Round which applies perfectly here! Although you will be following the dappled stripe pattern, you will still be switching colors by twisting your yarns together exactly the same way as if you were doing regular stripes.
I hope that helps!
Julianna
I wound my yarn before refixing it. Am I going to end up with a mess? The combos I bought were Black Cherry + Winter Heath and Beetle Blue + Sour Gooseberry.
Curious as to why this is an extra step on the buyer’s end rather than doing it as a finishing process before selling.
Thanks!
Hello Alexis,
Thank you for reaching out! The best way to test this it to snip off a small part of each color and soak the colors you will be using together. This will let you know if the colors will bleed onto each other after you have knit it.
Ideally we wouldn’t have any bleeding, but it is the nature of a hand dyed yarn. With any hand dyed yarn there will always be a chance of bleeding. It is always better to err on the side of caution rather than have you beautiful knitted project bleed and be ruined.
I hope this clears things up for you and let us know if you have any further questions!
-Marilla
I have some dk weight yarn I would love to use for these. If I used a size 5 needle, and made the child’s size, do you think that would fit an adult hand? Thank you in advance!
Hello Lisa,
Thank you for writing us! The first type to this experiment would be to knit up a little gauge swatch in pattern. This will tell you how much larger your mittens will come out to be and if this will work or not.
I hope this helps and let us know how it goes!
Warmly,
Marilla
Good morning! This is a beautiful pattern which I hope to try out soon. I was just wondering…if I were to attempt this slip-stitch colorwork pattern by knitting flat instead of in the round, would the instructions be different as regards the k1, p1 sequence? I always look forward to your emails – everything is so gorgeous!
Thank you very much!
Kind regards, Irene
Hello Irene,
Thank you for these kind words! This is a great question – to knit this pattern flat you will just need to be aware of having a right side and a wrong side.
The pattern would read;
Row 1 (Right side)- Knit main color
Row 2 (Wrong side) – Purl main color
Row 3 and 4 – Slip 1 knit 1 with contrast color
I hope this helps and happy knitting!
-Marilla
Hi, Marilla, and thank you for your reply and explanation!
I’m off from work today and will try a sample this afternoon!
Thanks,
Irene
Hi. I’m using this flat pattern to create a gauge swatch and I’m getting rows of colors rather than dapples. I’ve got 48 stitches on my needles for the swatch since I assume all I needed was to keep an even number (as per all the cast on values for the various sizes of the hat), but obviously I’m missing something. Any help would be greatly appreciated! Thanks!
Hi Julia,
Thanks for reaching out, and I apologize for the confusion! To work the stitch pattern flat, you do actually need an odd number of stitches. Also, on row three, you will work all the slipped stitches with the yarn in back, and on row 4, you will work all the slipped stitches with the yarn in front. The full stitch pattern for working flat should read:
Row 1: Knit with MC
Row 2: Purl with MC
Row 3: *Slip 1 wyib, K1* with CC
Row 4: *Slip 1 wyif, K1* with CC
I hope that clears things up!
Julianna
Thanks so much! I thought I was going a bit daft! My hat is knitting up so beautifully. Thank you for the pattern and for your fabulous support!
in the mitten top decrease, there are 6 stitches on needle 2 when knitting the size adult small. your directions give directions for decreasing 8 stitches (sizes junior and adult large), but not for 6 stitches (adult small).
Hi Christine,
Thanks for reaching out! Our apologies for this error in the pattern! We have added a section to rearrange the stitches to work for the Kids and Adult Small sizes.
Kid + Adult Small Sizes Only
Slip 1 stitch from Needle 1 to Needle 2, and slip 1 stitch from Needle 3 to Needle 2. [Needle 1: 8 (-, 13, -) stitches; Needle 2: 8 (-, 8, -) stitches; Needle 3: 8 (-, 13, -) stitches]
Best,
Cassy
Hi. I am going to be using PurlSoho Season Alpaca for the hat (I know there will be modifications due to the difference in weight) and am wondering if I should “fix” the color for this yarn? I’ll be using Heirloom White and Raw Sienna. If so, is the process the same as for the Posy? Thanks so much!
Hello Julia,
Thank you for reaching out- what a beautiful color combination! You will not need to re-fix our Season Alpaca. We reccomend re-fixing Posy because it is a hand dyed yarn.
Happy knitting!
-Marilla
Hi,
I’m knitting the hat in junior size and I’m Almost done, and it Loki g beautiful but the crown is confusing me. The instructions say 8 stitches decreased in rounds 1&2 of the crown but by my calculations it’s actually 16 (ssk and k2tog x8 in each of the two rounds). I’m ending up with 112 stitches in the first run through of rounds 1-8 of the crown whereas instructions say I should have112 after repeating twice. Would love your help! Hat is so beautiful and my daughter can’t wait to wear it! Thanks!
Hi Masha,
Thanks for reaching out! I am happy to help! When placing the markers for the crown decrease, you will have a total of 4 markers after finishing placing the markers. For the set up round to place the markers for the junior size you will, with CC [slip 1, p1] 18 times (36 stitches), place marker, CC [slip 1, p1] 18 times (36 stitches), place marker, CC [slip 1, p1] 18 times (36 stitches), place marker, CC [slip 1, p1] 18 times (36 stitches), place marker (this marker may already be here as it will be the beginning of the round). This will result in 4 total markers!
This means that if you decrease one stitch on either side of each of the markers, this will be a total of 8 stitches decreased!
I hope that this helps clear things up!
Cassy
I’m working on the adult small dappled hat crown and don’t understand the decrease instructions. Rounds 1 and 2 indicate 8 stitches decreased per round but if you decrease before and after the markers that’s 16 stitches each on rounds 1 and 2 or 32, when you repeat rounds 1-8 the second time that’s another 32 or 64 stitches decreased. Should round two be just knit all stitches? Am I reading this incorrectly?
Hi Leslie,
Thanks for reaching out! I am happy to help! When placing the markers for the crown decrease, you will have a total of 4 markers after finishing placing the markers. This means that if you decrease one stitch on either side of each of the markers, this will be a total of 8 stitches decreased!
I hope that this helps clear things up!
Cassy
I want to make this hat with 2 strands of Woolfolk Tyne . I change to size 2 and 3 needles to approximate gauge for adult small but the hat was enormous. Starting again. Any suggestions on needle size and yarn? I’m not planning to dapple, just want the hat shape.
thanks!
Leslie
Hi Leslie,
Thanks for reaching out! Woolfolk Tynd should actually be a good substitute for Posy since it knits up to the same gauge, so you should be able to use it without making any pattern adjustments. It sounds like your gauge is probably off, so I would recommend knitting a gauge swatch in the slip stitch pattern before beginning again – although you will not be changing colors, you will still have to use the slip stitch pattern since that does affect the gauge quite a bit.
Best of luck and I hope that helps!
Julianna
I was wondering if you think I could make this in Tosh Merino light. I think that modern fair isle an whiskey barrel would look so good, but I don’t know it it will fit this pattern, or how I will have to adjust the pattern for it.
Hello Campbell,
Thank you for reaching out! This sounds like a stunning combinations and should work beautifully without any need to adjust.
Happy knitting!
-Marilla
Hi there,
Do you think the pattern for the hand warmers would work well substituting with Tussock and Haiku? Would I need to adjust anything in your opinion?
Thank you!
Michelle
Hello Michelle,
Thank you for reaching out! Tussock and Haiku are thinner yarns so, unfortunately they are not compatible with this pattern.
Happy knitting,
Marilla
Re the mitten thumb: I’m a little confused by what “right side facing you and beginning with right most thumb stitch.” Not sure which is the right side.
Hello LM,
Thank you for reaching out- this is a great question! The right side of your mitten is the side that is the outside of your mitten rather than the wrong side which is the inside of your mitten.
I hope this clears things up and happy knitting!
-Marilla
Good Morning. Making the hat for my grandson who is 1. He has a 48cm head (about 18,5 inches). I don’t seem to be able to convert hat circumference size to head size and usually end up starting the hat two or three times. Must be an easier way? thank You
Hi Liane
Thanks so much for writing in! This pattern comes in a range of sizes, from baby to adult large, and comfortably stretches an inch. If you are using the Posy or another fingering weight yarn, the kid size should fit him, but if your worried, try the junior size and there will be room to grow. I also recommend swatching first, so your gauge will match the patterns. I hope this helps!
Happy Knitting
Jessica
Love this pattern! You stated if you want to knit the hat flat you should have an odd number of stitches. Does that mean to cast on one less stitch in the beginning? And how does this affect the decreases, i.e. is the3re one less stitch at the end of the row? Thank You, Confused in CT!
Hi Liane,
Thanks for writing in! Although we have instructions for knitting the stitch flat to help with knitting a gauge swatch we don’t have instructions for knitting the hat itself flat. If you would like to take a stab at it, however, I would recommend adding a stitch. Each row of the decreases will then end with an etra stitch.
I hope that helps!
Julianna
Hi.
Could you please confirm the gusset for mittens/handwarmer instructions. Round 3.
Are there really 2 lots of m1R or should one of them be a m1L
Hi Irene,
Thanks for reaching out! Yes, that is correct! The angled lines of increases are created by the RLI and LLI in Round 1. The M1R increases are much less noticeable, so there’s no need to work paired angled increases on this row!
Happy knitting!
Julianna
I’m wondering if I did order yarn from you and also the bulky knit pattern hat please reply! Sherry Daniels 🙃
Hi Sherry,
Thanks for writing in! If you email us at customerservice@purlsoho.com we can pull up any past orders you may have!
All the best,
Gianna
I’m making the hand warmers and I think I’m confused with round 3. With CC, when I slip 1 K1 to two stitches before the marker. Two stitches before the marker I’m at the slip 1 stitch. So if I then slip 1 again (before m1R), i get two stitches of MC together. And the pattern is no longer aligned.
I’m not sure I’m explaining this correctly, but do hope you understand what I’m saying so you can confirm if that’s correct.
That’s round 3 of the Gusset section
Hi Paty,
Thanks for reaching out! For Round 3 of the Gusset you should be working with the CC, *slip 1, k1, repeat from * to 2 stitches before next marker, slip 1, m1R (see Notes), slip 1, sm. This will create a new stitch in the contrasting color between two stitch of the main color! If you are working the pattern correctly, at this point the pattern should continue to be aligned. Since you are creating a gusset and increases stitches there will be one line of MC stitches that continue straight up and the new stitches will branch off from that (as you can see in the photos.)
I hope this clarifies things for you!
Warmly,
Gianna
Thank you 🙏
Do you have any images of the hat on a person? I’m wondering about the fit- is it close fitting or does the top have some ease or floppiness?
Thanks!
Hi Melinda,
Thanks for reaching out! Unfortunately, we don’t have photos of this hat on a model but you may be able to find photos of this pattern made by our customers on Revelry or Instagram! The hat comes out pretty fitted, I wouldn’t consider it a floppy hat!
I hope this helps, happy knitting!
Gianna
Great idea- thanks!
Hi! I love the shape and texture of the hat pattern. Curious how it would work out in Simply Camel, as far as yarn substitution any issues? Can you provide gauge in stockinette for Posy so I could compare? How would stitch definition be with the camel yarn and using just one color? Thank you!
Hi Marly,
Thanks for reaching out! I think Simply Camel would work great with this pattern! Posy and Simply Camel are both fingering weight so the gauge will be pretty similar! You can find this information on the “Product Details” section on the yarn page! Simply Camel is 6.5-7.5 stitches per inch and Posy is 7-8.5 stitches per inch depending on the needle size used (we used a US 2 or 3 for the Camel Gauge and a US 00-3 for the Posy Gauge.) I would suggest working a gauge swatch with Simply Camel in the stitch pattern and compare that to the gauge of the pattern prior to beginning.
I also think that one color will look beautiful in this stitch pattern and you will still get a good stitch definition!
I hope this helps and please let me know if you have any more questions!
Warmly,
Gianna
Hello,
Can I replace Posy for Linen Quill Worsted for this project? I have a couple of extra skeins and I’d love to knit the hand warmers.
Thank you!
Hi Marcela,
I actually wouldn’t recommend using Linen Quill Worsted for these hand warmers. This is because the pattern was designed with a fingering weight yarn, and Linen Quill Worsted is worsted weight, which is much heavier, and your hand warmers would turn out way too large! However, if you’re interested in using your extra skeins of this yarn to knit hand warmers, I want to suggest some of our other patterns that are designed for worsted weight yarn: Wide Rib Hand Warmers, Simple Hand Warmers, and Seed Stitch Hand Warmers. I hope this helps!
All the best,
Lili
Hi there,
I am just wondering about the instructions for the LLI on round 1 for the gusset..
Round 1: With MC, knit to 1 stitch before next marker, RLI (see Notes), k1, slip marker (sm), knit to next marker, sm, k1, LLI (see Notes), knit to end of round. [2 stitches increased]
…Is the knit 1 considered part of the LLI? Or do we do knit the next stitch as part of the LLI? Hope that’s clear 🙂
Hi Debbie,
Thanks for reaching out, and that’s a great question! In this pattern, we do not consider the k1 part of the LLI. I’ve definitely seen other designers instruct how to do lifted increases differently (some do include a k1 as part of the increase itself), but in our version, we just consider the lifted increase to be picking up the leg of another stitch and knitting that. As long as you follow the instructions for the lifted increases in the NOTES section of this pattern, everything will work out perfectly!
All the best,
Lili