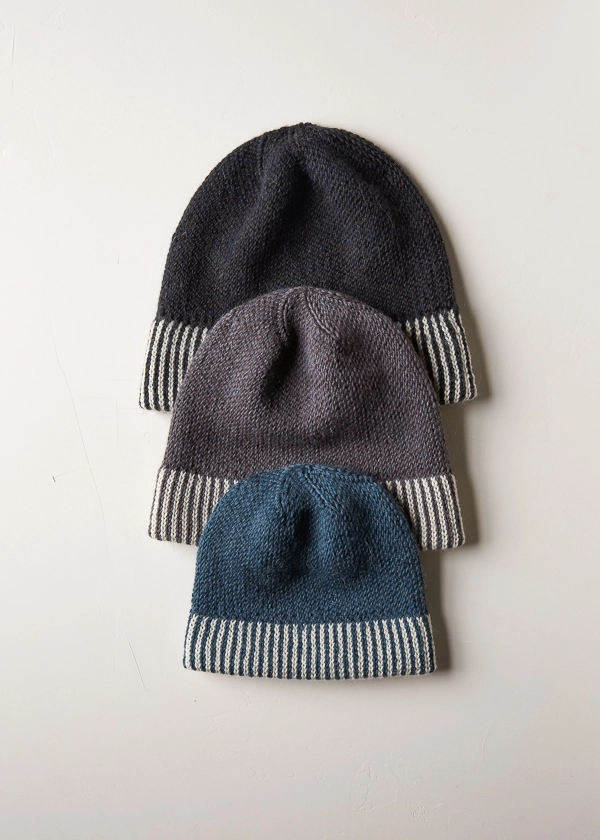
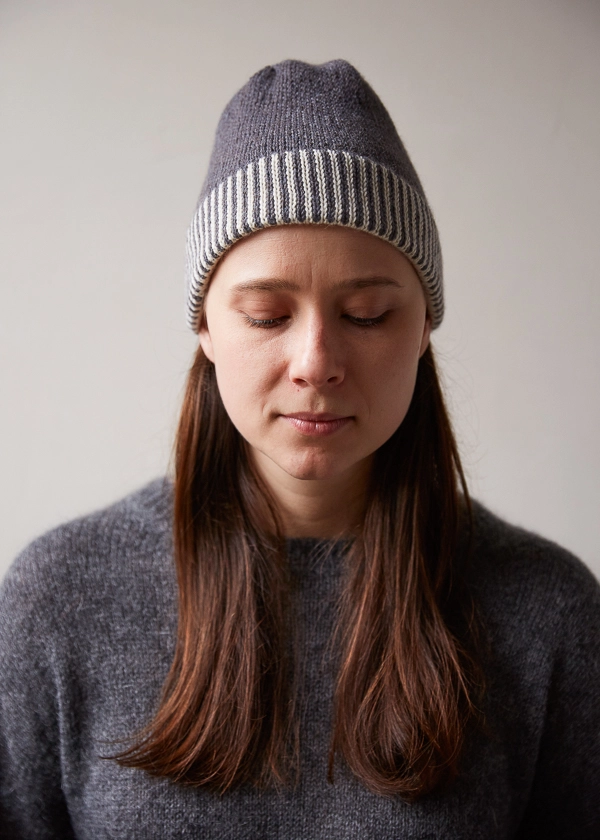
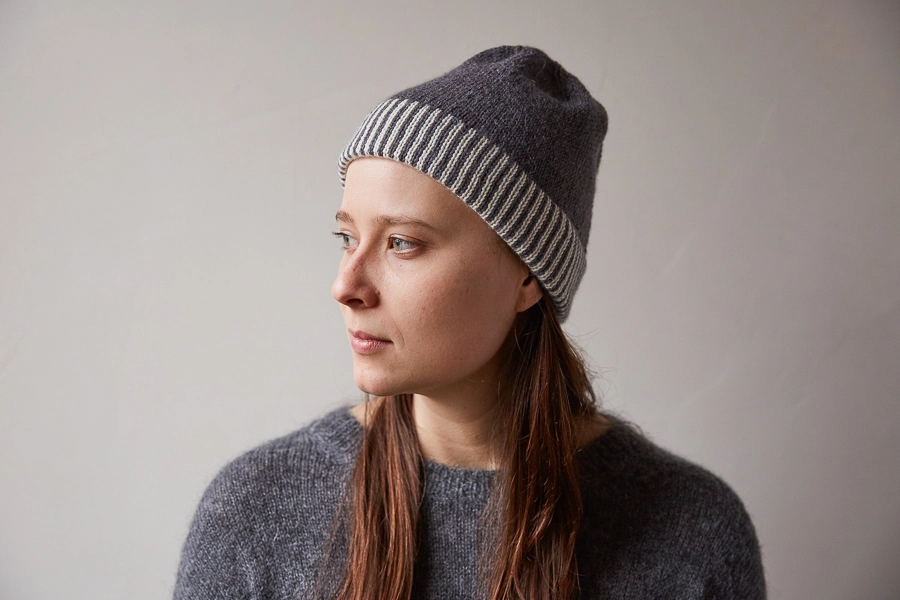
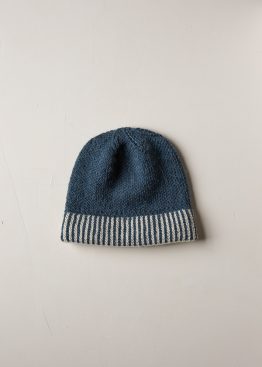
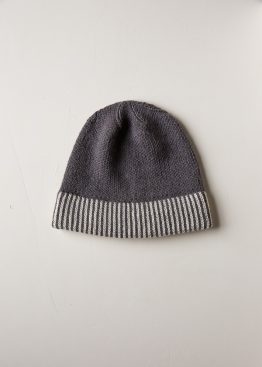
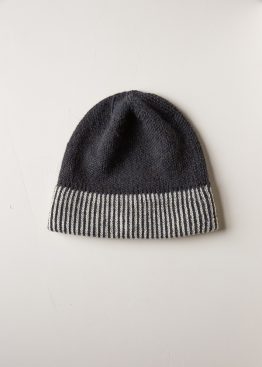
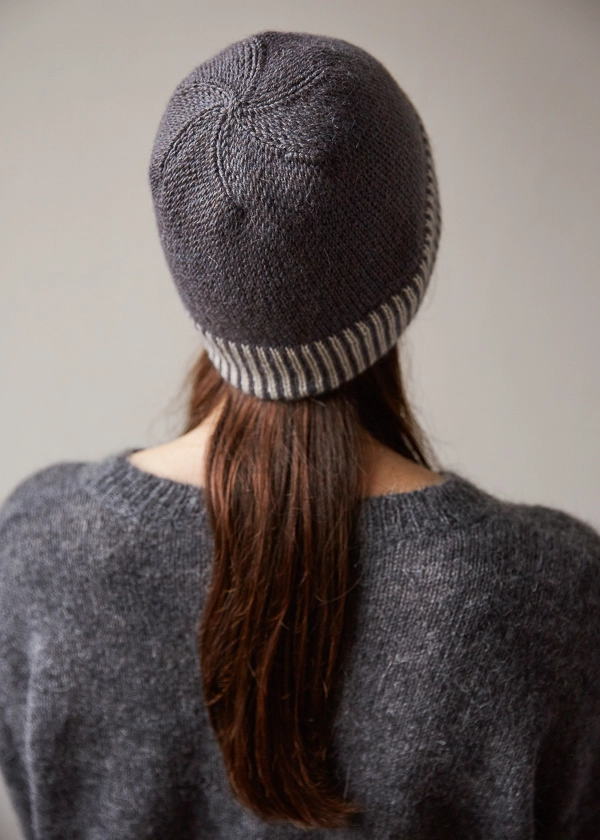
Striped Cuff Hat
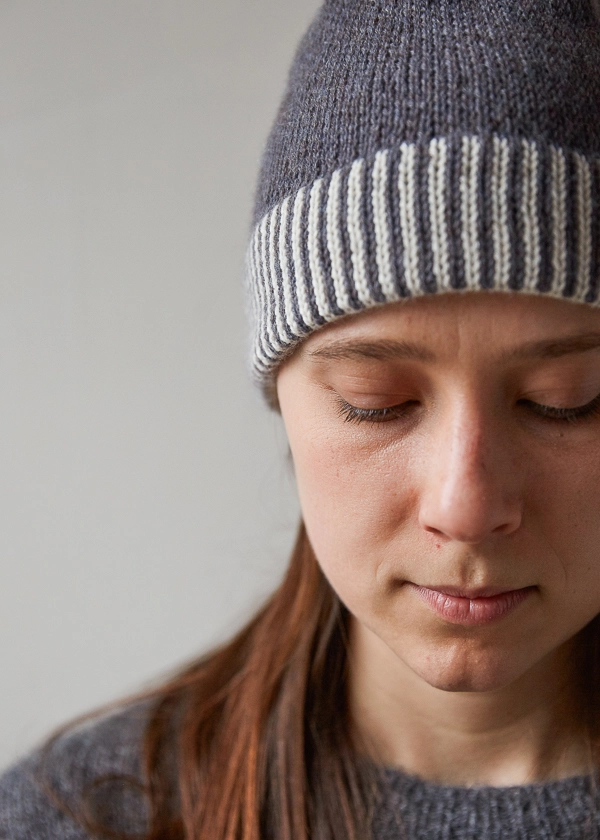
Our Striped Cuff Hat really puts us in the mood to hop the soonest Amtrak to Maine for a winter wonderland injection, but no way are we taking it off when we get back to the crowded streets of Manhattan!

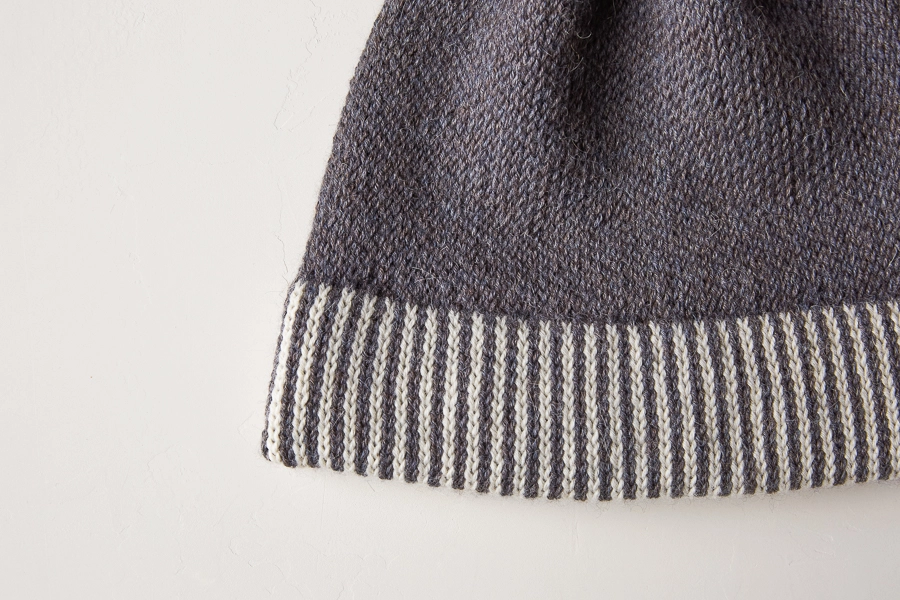
Knit up in our gorgeous sportweight Season Alpaca, the Striped Cuff Hat keeps you warm without a whole lot of bulk. The double layer hem does the job of ear flaps without the fuss, and the super softness of the baby alpaca keeps you nice and cozy.
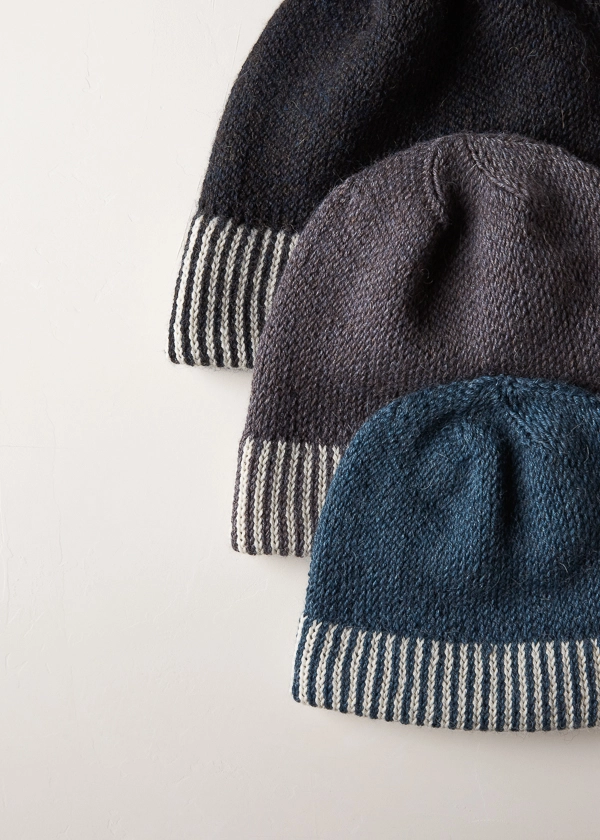
Despite their complex appearance, the stripes are cleverly made with a simple slip stitch pattern. We love their crisp definition and that they are just unique enough to make a statement.
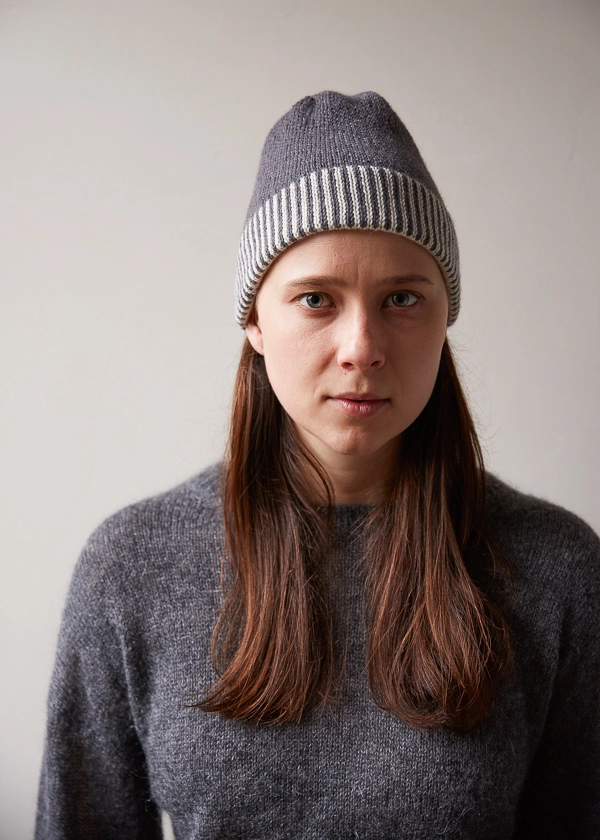
A true classic, this winter staple looks as smart in the woods of Maine as it does on the streets of midtown. Sized for everyone from infants to adults, our Striped Cuff Hat is happy to join the family!
Designed by Purl Soho designer, Jake Canton. Click here to see even more of Jake’s designs!
Share your progress and connect with the community by tagging your pics with #PurlSoho, #PurlSohoBusyHands, #PurlSohoStripedSuffHat, and #PurlSohoSeasonAlpaca. We can’t wait to see what you make!
Materials
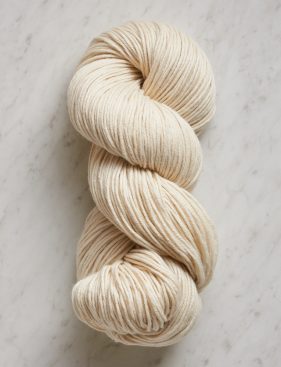
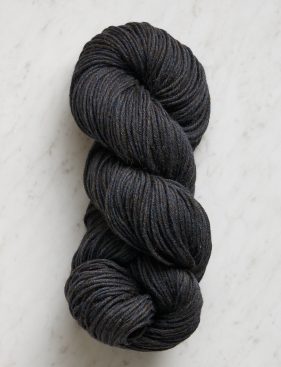
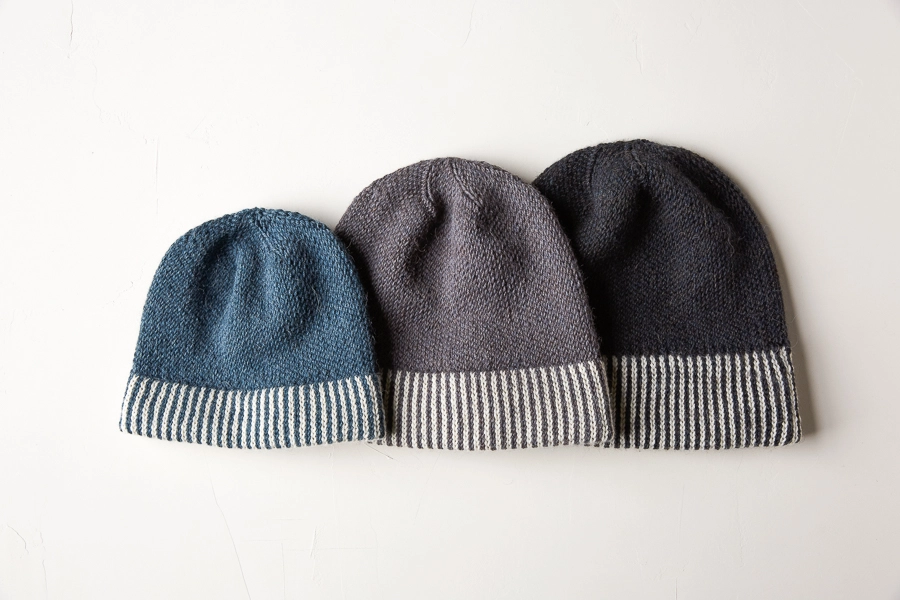
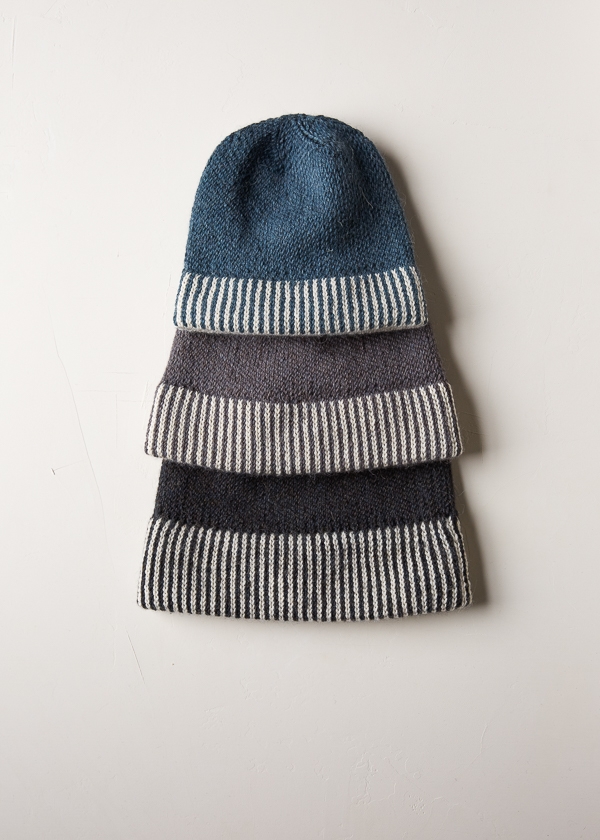
- Main Color (MC): 1 skein of Purl Soho’s Season Alpaca, 100% baby alpaca. Each skein is 218 yards/ 100 grams; approximately 111 (157, 188) yards required. We used (shown above, from top to bottom)…
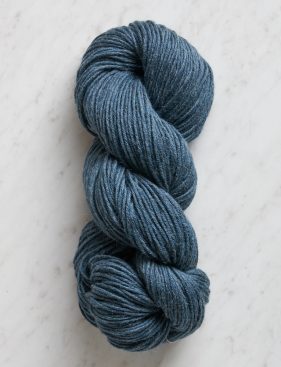
- Ebbtide Blue (Baby)
- Trout Brown (Kid Large/ Adult Small)
- Stillwater Blue (Adult Medium)
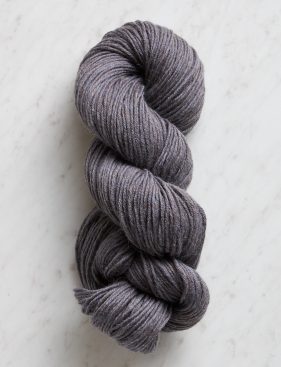
- Contrast Color (CC): 1 skein of Season Alpaca. Approximately 37 (60, 97) yards required. We used Heirloom White.
- US 7 (4.5mm), 16- or 20-inch circular needles
- US 7 double pointed needles
- 5 stitch markers and 1 unique stitch marker
NOTE: This is enough yarn to make 2 identical Baby size hats; or 2 Baby, Kid Small, or Kid Large/ Adult Small hats, switching the MC and CC yarns. It’s not enough yarn to make 2 Adult Medium or Large hats.
For the Provisional Cast On you will also need…
- A few yards of smooth scrap yarn
- A crochet hook to fit the size of the scrap yarn
- Spare circular needles, US 6 or smaller, any length
Gauge
28 stitches and 52 rounds = 4 inches slip stitch pattern
Sizes
Baby (Kid Small, Kid Large/Adult Small, Adult Medium, Adult Large)
- Finished Circumference: 15½ (17¼, 18¾, 20½, 22¼ ) inches
- Finished Height, from folded edge of cuff to top of crown: 6½ (7½, 8½, 9½, 10½) inches
Note
Slip all slipped stitches purlwise with yarn in back.
Pattern
Work Inside Of Cuff
With Scrap Yarn, cast 108 (120, 132, 144, 156) stitches onto larger circular needles, using a Provisional Cast On.
Set-Up Round: With Main Color (MC), knit to end of round.
Place unique marker and join for working in the round, being careful to not twist the stitches.
Round 1: *K1, slip 1 (see Note), repeat from * to end of round.
Round 2: *Slip 1, k1, repeat from * to end of round.
Repeat Rounds 1 and 2 one more time.
Cut MC.
With Contrast Color (CC), repeat Rounds 1 and 2 until piece measures 2 (2½, 2½, 3, 3) inches from cast-on edge.
WORK VERTICAL STRIPE PATTERN
Joining MC…
Round 1: With MC, *k1, slip 1, repeat from * to end of round.
Round 2: With CC, *slip 1, k1, repeat from * to end of round.
Repeat Rounds 1 and 2 until piece measures 3¾ (4¾, 4¾, 5¾, 5¾) inches from cast-on edge.
Cut CC.
With MC, repeat Rounds 1 and 2 one more time.
Weave in all ends before creating Hemmed Cuff.
Create Hemmed Cuff
Slip Provisional Cast-On onto smaller circular needles, following instructions of Provisional Cast-on Tutorial. [108 (120, 132, 144, 156) stitches on each set of circular needles]
Fold the Cuff up inside the hat, wrong sides together, so the two circular needles are parallel to each other, working needles in front and spare needles behind.
Next Round: Continuing with the MC and using the right-hand end of the working needles, *knit together 1 stitch from front needles and 1 stitch from back needles, slip 1 from the back left-hand needle to the front right-hand needle, slip 1 from front left-hand needle to front right-hand needle, repeat from * to end of round. [162 (180, 198, 216, 234) stitches on working needles]
Next Round: *Slip 1, k2tog, repeat from * to end of round. [108 (120, 132, 144, 156) stitches]
Work Body Of Hat
Continuing with MC…
Round 1: *K1, slip 1, repeat from * to end of round.
Round 2: *Slip 1, k1, repeat from * to end of round.
Repeat Rounds 1 and 2 until piece measures 5½ (6½, 7, 7½, 8½) inches from folded edge of Cuff.
Shape Crown
Set-Up Round: *[K1, slip 1] nine (10, 11, 12, 13) times, place stitch marker, repeat from * to end of round, without placing marker on last repeat. [5 stitch markers placed; 6 total, including end-of-round marker]
Next Round: [K2tog, *slip 1, k1, repeat from * to next stitch marker, slip marker] 6 times. [6 stitches decreased]
Repeat last round until 18 stitches remain, changing to double pointed needles when necessary.
Next Round: *K2tog, slip 1, remove stitch marker, repeat from * to end of round, leaving end-of-round marker in place. [12 stitches]
Next Round: [K2tog] 6 times. [6 stitches]
Cut MC, leaving an 8-inch tail.
Thread the tail onto tapestry needle and thread needle through remaining 6 stitches. Pull taut. Bring the tail to inside of hat and weave it in.
Weave in any remaining ends and block if desired!


That’s a really pretty pattern. But if one is allergic to alpaca, what else do you recommend to knit it with?
Hello Genia,
Thank you for reaching out! I think that our Mulberry Merino yarn would be a lovely substitute. This yarn is slightly thicker than Season Alpaca, so I would knit a gauge swatch before jumping in to avoid surprises along the way.
Happy knitting,
Marilla
the required materials section says 16 or 20 inch circular, but instructions call for using a larger and then a smaller. So, do you need to have 16 and 20 not one or the other? thank you.
Hello Gabriel,
Thank you for reaching out! The smaller needle is in reference to your Provisional Cast-On for which you will need a spare US 6 needle. The larger needle referenced in the pattern is the US 7 needle (16 or 20inch).
I hope this clears things up and happy knitting!
-Marilla
Is there enough heirloom white in one skein to do the contrasting color for two hats?
Hello Jewel,
Thank you for reaching out! Yes- you will have plenty of heirloom white to use for a contrast color on another hat.
Happy knitting!
-Marilla
Can I use a long circular needle (magic loop method) instead of DPNs? If so, what length would I need to get?
Hello Fern,
Thank you for reaching out! You could certainly use magic loop, I find that a 32″ cord works best for magic loop.
Happy knitting!
-Marilla
I have two questions do you ever sell yarn swatch cards and do you have loyalty rewards program?
Hi Liz,
Thanks for writing in! As a smaller company, we are not currently able to produce color card for our yarns but it is a great idea that we will keep in mind for the future! Additionally, while we do not have a loyalty program, we do offer a free pattern when you sign up for our newsletter. The newsletter makes you aware of new free patterns as well as events that we may be having as well as an occasional sale or promotion!
I hope that this helps!
Cassy
Does the sizing account for the fact that alpaca grows with wearing?
Hello Denise,
Thank you for writing in! The sizing is measured from freshly knit hats, so it does not account for general stretch over time from wear.
I hope this helps!
Happy knitting!
-Marilla
Regarding the Gauge swatch, I started knitting it using the slip stitch pattern, and it seemed to roll in on itself — am I doing it right? Knit 1, slip 1, 28 stitches, 52 rounds?
Thanks!
Hi Stormie,
Thanks for reaching out! This section will tend to roll a bit but don’t worry! It gets tacked down on the inside. For round 1, you will *K1, slip 1, repeat from * to end of round for 28 stitches. The gauge is given for 4 inches, so 28 stitches across and 52 rounds should give you a 4 inch square!
I hope that this helps!
Cassy
Thanks! I’m excited to start!
Hello
Could you explain more about how to slip the stitches to another pair of needles at the start of the hemmed scuff section ? In particular what shall I do with the crochet chain with scrapped yarn ?
Many thanks
Hello Clementine,
Thank you for reaching out! This part can be a little tricky, but all you are doing is placing your live stitches that were knit onto you crochet chain onto a new needle and then pulling the chain out so that you are ready to knit with these stitches. It is always hard to fully explain this without a visual aid so I would recommend look at our provisional cast on Tutorial as well.
I hope this helps and if you continue to have questions just let us know!
Happy knitting,
Marilla
I’m starting “Vertical Stripe Pattern” and I have a question: Directions say to join MC and then Round 1 with MC……etc. I’m not sure what to do with the CC….?
Thanks,
Stormie
Hello Stormie,
Thank you for reaching out! During round 1 you are going to let your CC just wait at the beginning of the round until you get back to it for round 2. When you start round 2 you will work your CC color while your MC remains at the biggening of your round.
I hope this helps and let us know if you have any further questions!
Happy knitting!
-Marilla
I love the pattern, and yarn, but have had trouble understanding transferring the stitches for hemmed Cuff. The pattern says, “knit together 1 stitch from front needles and 1 stitch from back needles, that in itself is confusing. Then there are a series of transferring back left to front right, and left front needle to right, followed by another knit together from front needles and 1 stich from back. I have started and ripped out this hat three times because I’ve ruined the hat at this stage. Is there a tutorial on line for this step? or can you explain or simplify? Thanks
Hello Lisa,
Thank you for reaching out! The front and back needles are in reference to the fact that you should have your needles that you have been knitting your cuff with and the needles that you used to pick up your provisional cast on. This means you will have live stitches at the top and bottom of your cuff. You will then fold up the cuff causing there to be a front and back needle, or a needle on the outside(front) and a needle on the inside (back). Once you have oriented your two rows of stitches you are ready to begin knitting these stitches together.
I hope this simplifies the process for you and let us know if we can clarify any of this for you!
Happy knitting and good luck!
-Marilla
I have a question under the Shape Crown section. After the set up around is the next round. It says [“K2tog, *slip 1, k1, repeat from * to next stitch marker, slip marker] x times.” (x stitches decreased)
My question is do I only knit two together at the very beginning of the round, or do I knit two together after each slip marker? Isn’t that the only way I will decrease stitches?
Thanks!
Stormie
Hi Stormie,
Thanks for writing in! Yes, you will be decreasing after each marker! It can be a little confusing at first to read patterns written with both brackets and asterisks, but you can think of the section marked by asterisks as a repeat within a repeat. The full repeat is contained by the brackets.
I hope that clears things up!
Julianna
I am on the second round of decreases for the crown, and following the instructions I will end with a slip1 before the next marker instead of a k1. In other words, I won’t complete the *slip1, k1* before the next k2.tog.
Please rush answer, this might be my favorite project ever. It is beautiful and I want to finish. 🙂
Hi Laura,
Thank you for reaching out! It sounds like you might be +/- 1 stitch. After the first round of crown decreases you should have 102 stitches total (17 sts per section), followed by 96 after the second round (16 sts per section). Check your stitch counts between markers to locate your trouble spot. If you’re +1, I suggest working the k2tog in that section as a k3tog instead to get rid of that pesky extra stitch. If you’re -1, work a Make 1 Backwards Loop where you’re missing your k1 before the next marker. I hope this makes sense and is helpful!
Happy knitting!
Gaby
Hi. I just saw your hat pattern and enjoyed reading comments. Along the way I noticed that Marilla is answering. I find that a very unusual name and just recently came across it from watching Anne with an E on Netflix which is a beautiful movie of 2 seasons of episodes. Love the lady who played Marilla , such a neat name ! Canadian ??? French??
I love all your yarn and patterns and goodies .
Marjorie
Hello Marjorie,
Thank you for this lovely comment! I am, in fact, named after the character Marilla from the novel Anne of Green Gables.
Warmly,
Marilla
Hello!
I’m trying to do the decreases for the striped hat, but keep getting ladders where the decreases occur. Is this because of the slipped stitches? How do I keep this from happening? I’ve already tinked back 3 times.
Thanks,
Shelly.
Hi Shelly,
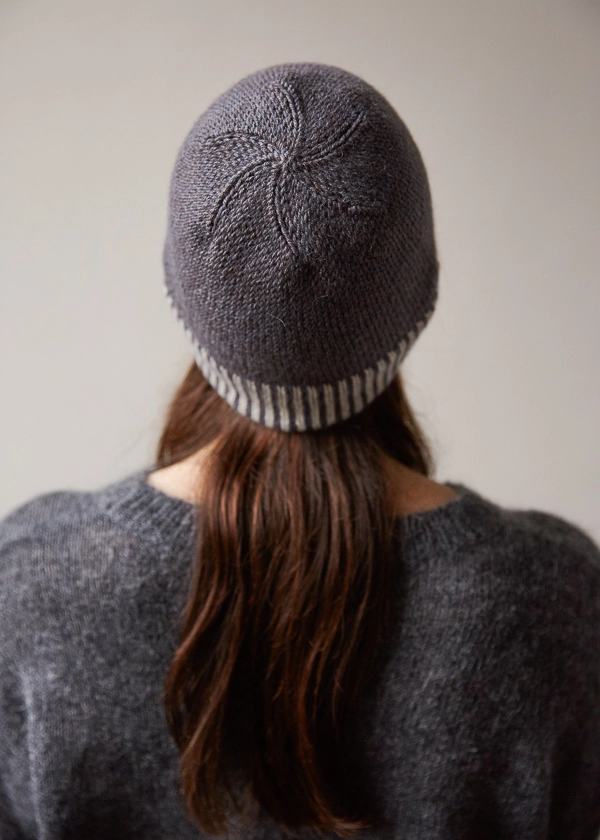
Thanks for reaching out! If you look closely at the second picture from the top, you can see that the decreases in this hat are more pronounced than they would be in a stockinette hat, which is caused by the slip stitch pattern. To keep the k2tog from being too loose, I would suggest giving the yarn a tug right before the first knit stitch after each decrease – once you have knitted that stitch, it will “lock” the extra tension in place to prevent ladders. Another thing to consider is what type of marker you are using. I sometimes find that even moderately bulky markers will cause ladders, but I don’t have any problems with thin metal markers such as Cocoknits Colored Opening Stitch Markers or Precious Metal Stitch Markers.
I hope that helps!
Julianna
Hello
thank you for the beautiful pattern. I have a comment wouldn’t it be better to have odd number of stitches like 121 133 1nd 145 so when you come to the end of the round you just continue with K 1 and slip 1. I am a novice so I am sure I am certainly wrong. But thought just to ask. Thank you for your beautiful designs.
Annie
Hello Annie,
This is a great question! You are actually creating vertical stripes from slipping your contrast color in round one and your main color in round two your. This means that you don’t want your knits and slips to line up from round 1 to round 2.
I hope this clears things up for you and happy knitting!
-Marilla
Can you clarify several things. When you begin the first row where you knit one, slip one and get to the end the last stitch is a slip. Then when you begin the second role, the first stitch is a slip one, then knit. So the result is two stitches that are slipped next to one another. It was advised to me by someone in the store that I should start the second row with a knit stitch but then the stitches don’t line up properly – slip stitch in the row directly below. Not sure if this makes sense but about ready to give up on this pattern. Help.
Hi Diane,
Thanks for reaching out, and please don’t give up! It is correct that when switching from Round 1 to Round 2 you will slip two stitches in a row, and when switching from Round 2 to Round 1 you will knit two stitches in a row. This does create a slight “seam” at the back of the hat, but results in stripes that line up correctly!
I hope that helps!
Julianna
I want to start off by saying thanks for so many great patterns, and the help you provide along the way.
I am wondering I can use the one-step method you posted about on youtube, instead of the two-step that was linked in an earlier question. I’ve never done that sort of cast-on before and the one-step seems easier.
Thanks again!
Hi Christianne,
Great question! Either a One Step or Two Step provisional cast on will work equally well for this hat. I personally prefer the one step method and use it for any pattern that calls for a provisional cast on.
Happy knitting!
Julianna
When. I cast on enough stiches for an adult hat the yarn is terribly bunched in the needles, it seems far to large to actually fit as a hat. Does this appearance of bulk thin out as you knit up from the cast on row?
Hello Sam,
Thank you for reaching out! Yes, the bunchy-ness will decrease as you go. It is always better for your stitches to be scrunched together than to be stretched out.
I hope this helps and happy knitting!
-Marilla
thanks for the pattern. I’ve been working on this for a couple of weeks and I have two questions: 1) the inside cuff, I did rounds 1 & 2 w/ MC, then cut MC; then 1&2 with CC. Was I supposed to continue with CC all the way up for 2-1/2″? I think I misread this and kept switching back and forth every four rounds between MC & CC which resulted in horizontal stripes.
for the outside of the cuff I got the vertical stripes correct.
Q#2). picking up the provisional cast on is complicated – is the point to just join the two sides? is there a video which might demonstrate the join? I have the prov cast-on done, but I can’t find a video on joining the inside & outside.
thanks so much
-rg
Hi Richard,
Thanks for reaching out! Yes, for the inside of the cuff, you should have done just the first five rounds in the main color, and worked the rest of the inside in the contrast color. However, I think horizontal stripes on the inside of the cuff sounds like a very neat design feature and it doesn’t affect the rest of the pattern!
If you are having trouble picking up the stitches from the provisional cast on, I would suggest picking them up with a needle a few sizes smaller than your main needle – sometimes these stitches can shrink up a bit before you get back to them so a smaller needle will be easier to use for this step. The provisional cast on allows you to join the two ends together for the hem of the hat as seamlessly as possible. Our Knit Hem video may be helpful, though keep in mind we did not use a provisional cast on for this video – instead, we picked up stitches from the cast on, but otherwise the joining technique is the same.
I hope that helps!
Julianna
Hi there,
I’m stuck on getting the gauge! How do I k1s1 on the wrong side of I’m knitting flat?
Thanks!
Hello Ashley,
This is a great question! I would actually reccomend knitting a swatch in the round for this hat.
I hope this helps and let us know if you have any other questions!
Happy knitting!
-Marill
Hi. Is it possible to do a monogram on the main part of the hat?
Hello Cynthia,
Thank you for reaching out! You can monogram your knitwear by using the duplicate stitch.
Happy knitting,
Marilla
Hello!
This is a beautiful pattern, and I love the Season Alpaca colours you’ve chosen!
I would love to make a few of these hats for our foster babies, but I am wondering first if you have any experience / have heard any reviews about how well these stay on baby heads. What about stretching out over time? Would I be able to make one that will fit multiple newborns (we have frequent short term foster placements).
Thank you for your help. It’s amazing to me that you guys so faithfully answer all these questions on patterns that are offered free to begin with. 🙂
Hi Summer,
Thanks so much for writing in, and what a lovely heartwarming project! We haven’t heard any complaints, but this stitch isn’t particularly elastic, so while it doesn’t lose its shape or stretch out, it also won’t be particularly stretchy to fit a variety of head sizes. Instead, you may want to consider our Lovely Ribbed Hat which is also out of Season Alpaca. The 2×2 ribbing is very springy and should make a nearly one-size-fits-all-babies hat!
I hope that helps, and we commend you for taking such good care of those sweet babies!
Julianna
Thank you for responding, Julianna! I appreciate the suggestion. You guys are so good to your readers!
I think my main goal is to have a hat that stays on the babies’ heads well. I’m fine to knit up several different sizes, but I’d like something that doesn’t push up off their head all the time — either because it’s stretched out, or because it doesn’t have enough stretch in it. Does that make sense? Do you have any additional recommendations with that in mind?
Thanks again!
Hi Summer,
Yes, I see what you mean! I do still think the Lovely Ribbed Hat is a good choice because the ribbing stitch is so springy, but you may want to consider a different fiber than alpaca. Season Alpaca is wonderfully soft, but alpaca doesn’t have any inherent stretch, so it can lose its shape and stretch out over time. The ribbing stitch and tight gauge of the Lovely Ribbed Hat do a lot to counteract that, but a yarn made out of a bouncier fiber, like merino, will still hold its shape better over time. Our Classic Ribbed Hat and Fluffy Brioche Hat are both knit out of Cashmere Merino Bloom, which has a lot of elasticity due to the wool content, and the 1×1 ribbing will do a great job at keeping a snug and secure fit around babies’ heads!
Best,
Julianna
If alpaca stretches over time, why would it be used in a hat? I have 5 skeins of baby alpaca, 60gm ea. What would you recommend I knit with that, and which one of your patterns for a 38 bust? Your company has many beautiful patterns. I would consider myself an intermediate knitter that love circular knitting.
Hello Sandra,
Thank you for reaching out! While Alpaca does stretch over time, this hat is knit fairly tightly which helps to prevent this. If your hat does start to stretch re- blocking your hat will help to reverse some of the stretching out.
Do you know the gauge of your yarn? I’m sure we have a good fit for it!
I hope I can help and happy knitting!
-Marilla
Hello! I have a question. I’m would like to make this hat in an adult large (to fit a teenage boy) and see the finished size is 22.5 circ. However, when I cast on the 156 it is much longer cast on than I would anticipate for a 22in hat. Does the k1sl1 pattern “shrink up” as you’re knitting? It seems like it would be much larger than 22 in around. Thanks!
Hello Christine,
Thank you for reaching out! You are correct, the stitch is very dense so it will shrink as you knit. I would recommend knitting up a little swatch to make sure you are on gauge, just to avoid any unpleasant surprises.
I hope this helps and happy knitting!
-Marilla
Hi!
I would like to make this hat (large adult) out of some left over Maxima yarn. I have a lot left from a previous project. But I have no idea what size of needles to use – and I really don’t completely understand determining the gauge. Any help would be appreciated!
Thanks!
Hi Teresa,
Thanks for writing in! Since this hat is written for sport weight yarn, which is quite a bit smaller than your worsted weight yarn, you will have to do a bit of math to adapt the pattern. I would suggest knitting a gauge swatch in the slip stitch pattern on a US 10 or 11 needle, both to determine what needle size will make the most pleasing fabric texture and to measure your stitches per inch. You can then multiply your stitches per inch by 22.25 inches for the Adult Large and round to the nearest multiple of 6 to determine how many stitches to cast on. When you get to the set-up round of the crown shaping, just make sure your stitch markers are placed so they divide your stitches into 6 equal sections.
I hope that helps, and happy knitting!
Julianna
Hello
Can Season Alpaca and Cashmere Merino Bloom be used interchangeably? They both have 218 yards for 100 grams. Or is my logic faulty?
Thank you
Alpana
Hi Alpana,
Thanks for reaching out! Although Cashmere Merino Bloom and Season Alpaca have the same yardage per skein, they do not knit up to the same gauge. Alpaca is a denser, heavier fiber than cashmere or merino, so it creates a yarn with fewer yards per pound. Season Alpaca is a sport weight yarn that gets 6 to 7 stitches per inch on a US 3-5 needle, while Cashmere Merino Bloom is a light worsted or DK weight yarn that gets 5 – 5.5 stitches per inch on a US 5-7 needle.
I hope that clears things up!
Julianna
Hi! I want to make this for someone whose head measures 23 inches around. Will the adult large fit, or should I add another 6 or 12 stitches when I cast on? Thank you!
Hi Amanda,
Great question! For the best fit, hats should have two to four inches of negative ease. Based on the finished measurements of this hat, you may even want to make the Adult Small! The Adult Large will still work, but will have a slouchier fit, while the Adult Small will fit more like a tight beanie.
I hope that helps!
Julianna
Hi! Love this pattern! I’m currently working on the body of the hat and I’m wondering which part is considered the “folded edge of Cuff,” the bottom edge, or the edge that meets the body? I’m guessing it’s referring to the bottom edge, but “folded edge” sounds very specific so I want to make sure I’m not mistaken.
Also, I had a ton of trouble with the hemmed cuff and now I’m curious what went wrong. When I folded it and put the working needles in front, the vertical striped side was on the inside of the fold, so if I had knit the two ends together the vertical stripes would’ve been hidden. I pulled the smaller circular needles through the larger ones to invert it so that the vertical stripes would be on the outside, but then the working yarn was on the wrong side of the circular needles. What did I do wrong?
Thanks!
Hi Zoe,
Thanks for reaching out! You are correct, the folded edge of the cuff is the bottom edge! As for the cuff of the hat, I am not sure what could have happened to make that section so difficult! If you feel like it you can send us a photo of your work to our email customerservice@ourlsoho.com and we can troubleshoot further!
All the best,
Gianna
Hi! I am working the Shape the Crown section and I am having a terrible time with it. I have read through the comments and am pulling the wool tight after the k2tog but when I keep slipping the marker, I am ending up with a huge stitch that has been slipped a bunch of times. I am also not getting the lovely swirl pattern from the picture. Am I supposed to *slip 1 knit 1 and then move the marker to the next stitch at the end of each section? help!
Hi Diane,
Thanks for reaching out! I am happy to help! The markers should stay in the initial place where you placed them in the set up round! I think the problem may be that you are slipping the same stitch too many times, since you repeat the Next Round: [K2tog, *slip 1, k1, repeat from * to next stitch marker, slip marker] 6 times. [6 stitches decreased] until you have 18 stitches remaining, you should be working the the k2tog at the start of each marker and the previous rows slip stitch should be included in the k2tog! You then will slip the next stitch which was perviously a knit stitch so that you aren’t slipping a stitch more than once. This will also create the swirl look!
I hope this clears things up but please feel free to reach out with any more questions!
Warmly,
Gianna
Hello. I love the look of this hat. May I suggest working on a pattern for matching mittens with the same striped cuff. I think this would be a beautiful addition to your pattern collection.
Hi Cullen,
Thanks for reaching out and for your kind words! That is a great suggestion, I will be sure to pass this along to the rest of the team!
Warmly,
Gianna
Hi,
I see that this pattern calls for using a size 7 needle, but the season alpaca yarn calls for size 3-5. Has the thinking about what size needle should be used for season alpaca changed since this pattern was published, or is there a reason particular to this pattern for using a size 7 needle? I am inclined to use a size 5 needle to do this pattern because that is what would work best with the yarn, but am afraid that the hat would turn out much smaller. Thanks!
Hi Erin,
Thanks for reaching out! We used a US 7 for this pattern to obtain the written gauge, and we still recommend using a 7 for this hat! I would suggest working a gauge swatch first to compare your gauge to the gauge of the pattern, if you are having a hard time getting gauge on a 7 you can certainly go down in needle size!
Warmly,
Gianna
Hello and thank you for another beautiful pattern! I am working on the crown and it’s giving me a run for my money! I am making the small adult size (132 stitches). After the decrease set up round , I have 22 stitches in between each marker. After the first round of decreases, have 126 stitches in total, with 21 stitches in each section. I can’t figure out how to end each section on a k1. I saw the other comment where you suggested working a k3 instead of a k2. Is it ok if I have to do that in each section or will that wreck my pattern.
I am knitting this for my grandson who has been waiting patiently for me to figure this out,
Thank you so much for any help you can offer!
Hi Christina,
Thanks for reaching out. It seems like you’re completely on the right track, since you’re seeing your stitch count decrease by 1 between each marker after the decrease round! The pattern can definitely be confusing, because you actually won’t end each section on a k1 each time. When you start with an even number of stitches between the markers, then you will end each section on a k1 after decreasing, but when you start with an odd number of stitches, then you’ll end on a slip 1. Overall, you’re doing everything right, so I would advise against altering the pattern. Hope this helps clarify things!
All the best,
Lili
Thank you so much, Lili, for your reply! I appreciate th clarification! I was able to finish with confidence and this hat is lovely!
Hello,
I’m at the point where I create the hemmed cuff, and am having difficulty understanding the directions. Are the working needles the larger needles? Meaning the spare needles are the smaller needles that picked up the stitches from the provisional cast on?
Also, it seems like the stripe should be facing outwards, but I cannot figure out how to do this and make it work?
Hi Anne,
Thanks for writing in. The working needles are indeed the larger needles! You’ll only use the smaller, spare needles to hold the stitches from the provisional cast-on as you knit them together with the other stitches. To make sure the stripes of the cuff appear on the outside, you’ll need to fold your cuff in the correct direction. This means folding the bottom (solid color) half up inside the tube of the hat. This way, the inside of the cuff will be on the inside, and the outside will be on the outside!
All the best,
Lili
Do you know if there is a matching or similar scarf pattern that goes with this hat?
Hi April,
Thanks for reaching out. I’m afraid that we don’t have a matching scarf pattern for this hat, but we do actually have some similar patterns for cowls that you might enjoy instead! I think that either the Corrugated Cowl or the Newsprint Cowl would go very well with this hat. Hope this helps!
All the best,
Lili