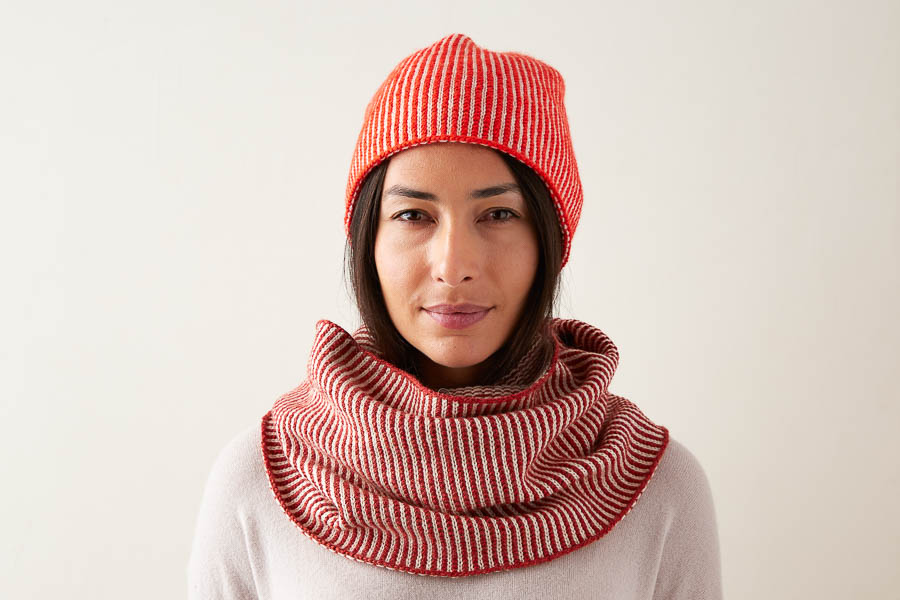
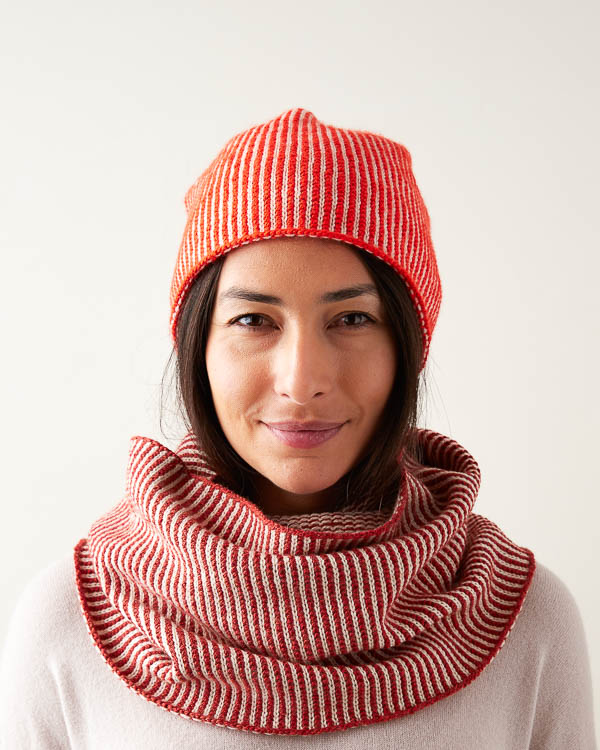
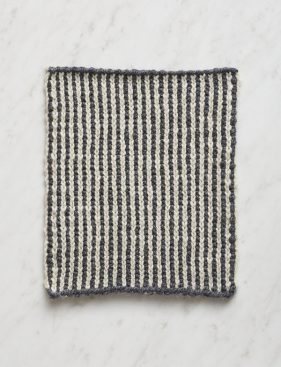
Corrugated Hat + Cowl
From crisp cast ons to exquisite decreases, the design for our Corrugated Hat + Cowl has been considered, tweaked, and reconsidered, so you get to be, “I’m just gonna knit this up, throw it on, and be pretty darn certain it’s going to look amazing!”

Forget complicated… The knitting for this set is really just clever slip stitches that you’ll master in under a minute, and each round involves just one yarn, so you’ll never even have to hold more than one strand at a time.

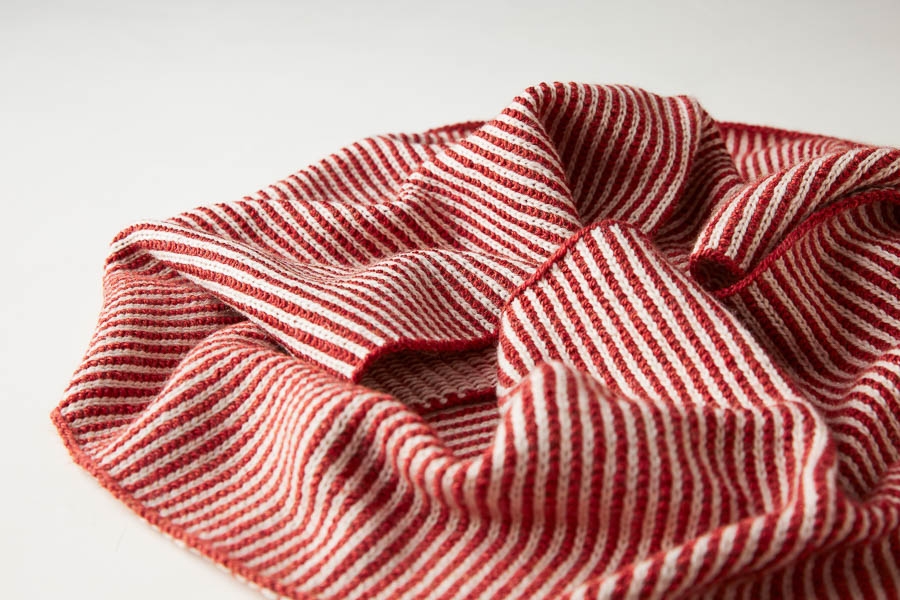
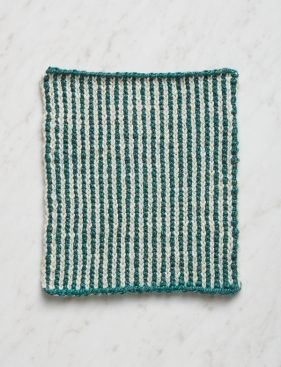
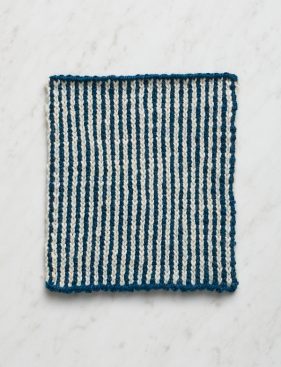
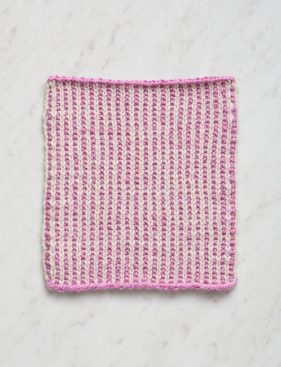
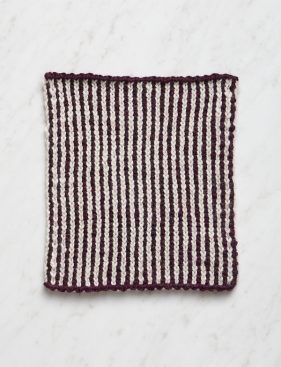
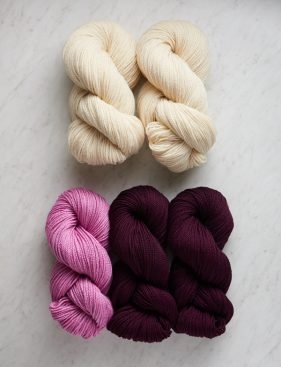
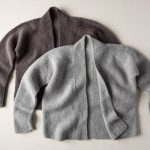
For our hat and cowl combo, we chose two opposites-attract yarns: our undyed and rustic Good Wool, plus a colorful choice of Mulberry Merino, whose merino-silk blend adds a touch of refinement. We just added 17 stunning new colors to our Mulberry Merino collection, so we were able to use one beautiful color for the hat and a slightly different one for the cowl, making for a pretty stunning duo!
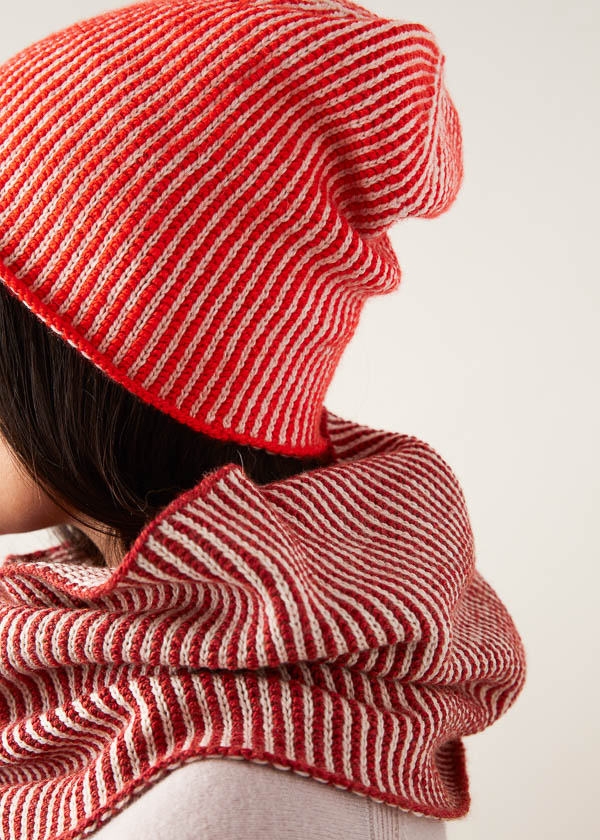
We picked bright Red Poppy and toasty Red Pine for our version, but choose from a spectrum of two gorgeous colors of Mulberry Merino and two skeins of Good Wool in Heirloom White… And cast on for a truly considered knit!
Designed by Purl Soho designer, Jake Canton. Click here to see even more of Jake’s designs!
Share your progress and connect with the community by tagging your pics with #PurlSoho, #PurlSohoBusyHands, #PurlSohoCorrugatedHatAndCowl, and #PurlSohoGoodWool. We can’t wait to see what you make!
Materials
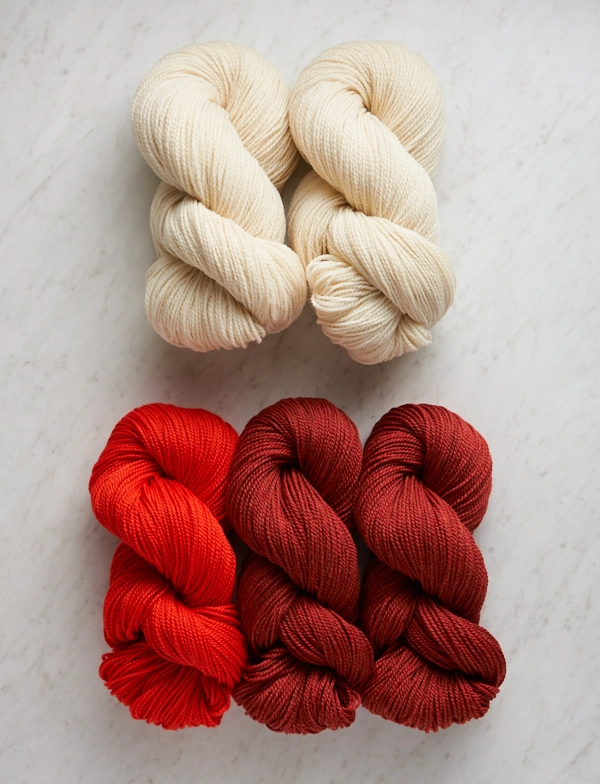
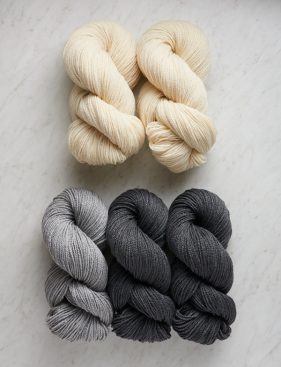
To knit your own Corrugated Hat + Cowl Set, you will need five skeins total. You will need…
- Yarn A: 2 skeins of Purl Soho’s Good Wool, 100% Andean highland wool. Each skein is approximately 383 yards/ 100 grams. We used Heirloom White.
- Yarn B: 1 skein of Purl Soho’s Mulberry Merino, 80% extra fine merino wool and 20% silk. Each skein is approximately 247 yards/ 100 grams. We used Red Poppy. (NOTE: We no longer offer Mulberry Merino, but choose from one of our other sport weight yarns.)
- Yarn C: 2 skeins of Mulberry Merino. We used Red Pine.
NOTE: The Hat requires approximately 45 (65, 90, 115, 135) yards of Yarn A and 55 (75, 110, 135, 160) yards of Yarn B. The Cowl requires approximately 370 yards of Yarn A and 415 yards of Yarn C.
You will also need…
- US 7 (4.5 mm), 16-inch circular needles (for Kid, Adult Small, Adult Medium, Adult Large Hats only)
- US 7, 32-, 40-, or 47-inch circular needles (for Cowl only)
- A set of US 7 double pointed needles (for all Hats)
- Stitch markers, including one unique one
And here are some more color ideas…
Green Peppercorn + Green Spruce
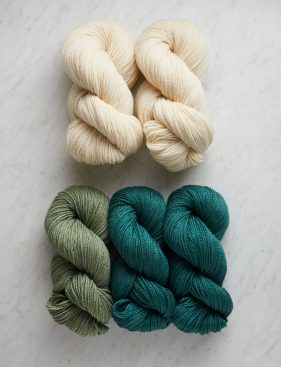
Yarn A: Heirloom White; Yarn B: Green Peppercorn; Yarn C: Green Spruce
True Turquoise + High Tide

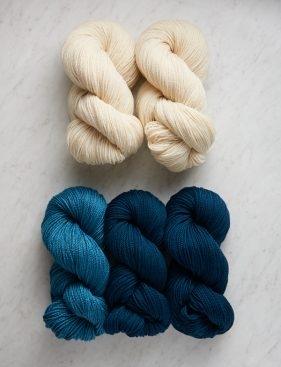
Yarn A: Heirloom White; Yarn B: True Turquoise; Yarn C: High Tide
Alpine Rose + Red Plum
Yarn A: Heirloom White; Yarn B: Alpine Rose; Yarn C: Red Plum
Cinder Gray + Gray Shade
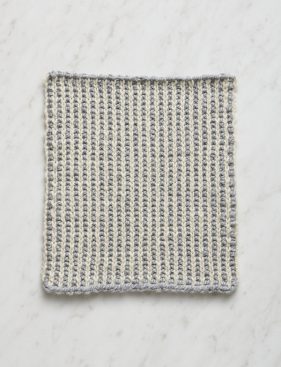
Yarn A: Heirloom White; Yarn B: Cinder Gray; Yarn C: Gray Shade
Gauge
29 stitches and 30 round pairs = 4 inches in stitch pattern
NOTE: When you count rounds, each round you see is actually 2 rounds worked, i.e. a “round pair.”
Sizes
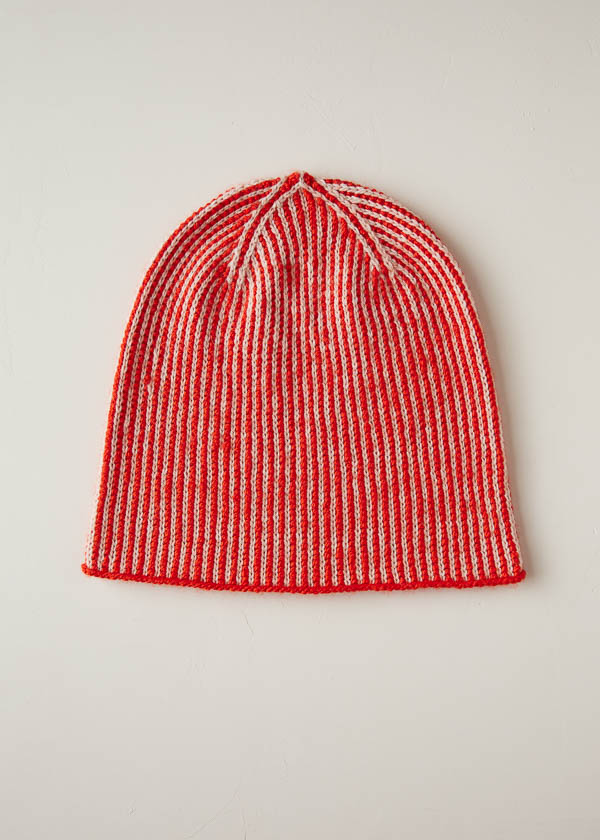
Hat
Baby (Kid, Adult Small, Adult Medium, Adult Large)
- Finished Circumference: 14¼ (16½, 18¾, 21, 23¼) inches
- Finished Height: 6½ (7¾, 9½, 11, 11¾) inches from rolled edge
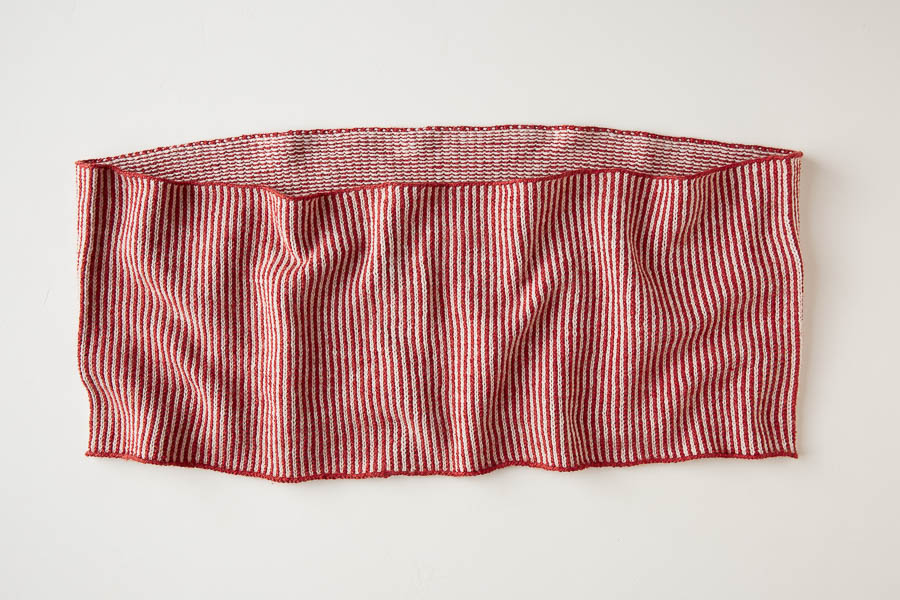
Cowl
One Size
- Finished Circumference: 55¼ inches
- Finished Height: 12 inches
Notes
Slip Stitches
Slip all slipped stitches purlwise with yarn in back.
Stitch Multiple
This Cowl pattern is worked over any even multiple of stitches.
S2kp: Slip 2, Knit 1, PSSO
Slip 2 stitches together knitwise with yarn in back, knit 1, pass 2 slipped stitches over knit stitch and off right needle. [2 stitches decreased] For additional help visit our S2kp Tutorial.
Hat Pattern
Begin
With Yarn B, cast 104 (120, 136, 152, 168) stitches onto 16-inch circular needles (or double pointed needles if making Baby size).
Place unique marker and join for working in the round, being careful to not twist the stitches.
Round 1: With Yarn A, *k1, slip 1 (see Notes), repeat from * to end of round.
Round 2: With Yarn B, *slip 1, p1, repeat from * to end of round.
Repeat Rounds 1 and 2 until piece measures 4¾ (5¾, 7½, 8½, 9) inches from cast-on edge, unrolled, ending with Round 1.
Shape Crown
NOTE: For all sizes except Baby, change to double pointed needles when stitches no longer comfortably fit around circular needles.
Set-Up Round: With Yarn B, *[slip 1, p1] 13 (15, 17, 19, 21) times, place marker (pm), repeat from * 2 more times, [slip 1, p1] 13 (15, 17, 19, 21) times.
Round 1: With Yarn A, [ssk, *k1, slip 1, repeat from * to 4 stitches before next marker, k1, k2tog, slip 1, slip marker (sm)] 4 times. [8 stitches decreased]
Round 2: With Yarn B, [slip 2, *p1, slip 1, repeat from * to 4 stitches before next marker, p1, slip 2, p1, sm] 4 times.
Round 3: With Yarn A, [ssk, *slip 1, k1, repeat from * to 4 stitches before next marker, slip 1, k2tog, slip 1, sm] 4 times. [8 stitches decreased]
Round 4: With Yarn B, *slip 1, p1, repeat from * to end of round.
Repeat Rounds 1–4 three (4, 5, 6, 7) more times. [40 stitches remain]
Next Round: With Yarn A, *ssk, [k1, slip 1] 2 times, k1, k2tog, slip 1, sm, repeat from * to end of round. [32 stitches remain]
Next Round: With Yarn B, *slip 2, p1, slip 1, p1, slip 2, p1, sm, repeat from * to end of round.
Next Round: With Yarn A, *ssk, slip 1, k1, slip 1, k2tog, slip 1, sm, repeat from * to end of round. [24 stitches remain]
Next Round: With Yarn B, *slip 1, p1, repeat from * to end of round.
Next Round: With Yarn A, *ssk, k1, k2tog, slip 1, sm, repeat from * to end of round. [16 stitches remain]
Next Round: With Yarn B, *slip 3, p1, sm, repeat from * to end of round.
Next Round: With Yarn A, *s2kp (see Notes), slip 1, sm, repeat from * to end of round. [8 stitches remain]
Next Round: With Yarn B, *slip 1, p1, repeat from * to end of round.
Cut Yarn B.
Next Round: With Yarn A, knit to end of round, removing all markers as you come to them.
Cut Yarn A, leaving an 8-inch tail. Thread tail onto tapestry needle and draw through remaining stitches twice. Pull tight and insert needle through top of crown to inside of hat.
Weave in ends and block as desired.
Cowl Pattern
With Yarn C, cast 400 stitches onto 32-, 40- or 47-inch circular needles.
Place unique marker and join for working in the round, being careful to not twist the stitches.
Round 1: With Yarn A, *k1, slip 1 (see Notes), repeat from * to end of round.
Round 2: With Yarn C, *slip 1, p1, repeat from * to end of round.
Repeat Rounds 1 and 2 until piece measures 12 inches from cast-on edge, unrolled, ending with Round 1.
Cut Yarn A.
With Yarn C, bind off in 1×1 rib stitch pattern. Here’s how…
Bind Off Row: K1, *p1, pass first stitch over, k1, pass first stitch over, repeat from * to last stitch, p1, pass first stitch over. Fasten off last stitch.
Weave in ends and block as desired.


Love this pattern, thank you PS!! 🙂
It appears that the natural color is worsted weight, and the colored yarn is DK weight.
Is that correct? Thanks!
Hi Jennifer,
Thanks for reaching out! You are correct that Good Wool can knit up at either a light worsted or a DK gauge, while Mulberry Merino is a sport weight yarn. The difference in weights is fairly minimal so they work quite well together both for this hat and cowl set and our Double Knit Blanket.
Happy knitting!
Julianna
Love the cowl & just want to make the cowl only.
How many skeins would I need? My thought is one heirloom white & 2 Mulberry Merino…..making the circumference slightly shorter. Appreciate your thoughts on this.
Hi Elaine,
Thanks for writing in! We used almost all of one skein of Good Wool and two skeins of Mulberry Merino for the cowl alone, so this should still be a good amount even if you are making the cowl a bit shorter.
I hope that helps!
Julianna
The pattern Corrugated Cowl, how do I print off a copy? There’s no load tab. Could you provide a link or pdf, please. I sure hope so. Thanks so very much.
Hi Jan,
Thanks for reaching out! You can certainly print or save a PDF of our free patterns! If you’re on a desktop version of the site, you will find a “print” icon in the right column just below the date and tags. If you’re on a mobile version of the site, you will find a “print” icon below the pattern and above the comments.
Follow the easy on-screen instructions to delete whichever parts of the pattern you don’t want to print or save, such as the hat pattern. For example, you may decide to shorten the pattern by omitting certain images or the list of materials. To remove images, click the drop down next to the image icon and change from 100% to 0%.
I hope that helps!
Julianna
I’m thinking of making these pieces in 2 colors of Good Wool only.
I like the neutral colors and the price. Wondering, though, is Good Wool scratchy at all?
Thanks for your time!
Hi Lee,
Thanks for reaching out and what lovely idea – I love using the natural colors of Good Wool together for colorwork projects! Good Wool does have a hearty, pleasingly rustic texture, and although it is not as soft as merino, I find it plenty soft for next-to-skin wear.
Best,
Julianna
Reading the pattern I noticed for the hat no yarn C was listed and for the cowl no yarn B was used
There must be an error. Thank you for checking.
I love the look of the photo.
Hi Joan,
Great question! This is correct! We use the same color of Good Wool for both the hat and the cowl but different colors of Mulberry Merino for each. So for the hat, you will use colors A and B and for the cowl, you will use colors A and C! As the colors of Mulberry Merino that we put together for each bundle are coordinating, you will get a hat and cowl that have a similar look and feel but slightly different colors!
I hope that this clears things up!
Cassy
Thank you, now I understand, the hat and
cowl are slightly different
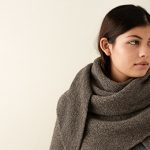
Hi, is this cowl doubles around the neck? Fifty five inches seems to wide to not be but it doesn’t look doubled in the picture.
I noticed the good wool in heirloom white is a dk weight. I have 2 skeins of cashmerino Bloom in wheat as I changed my mind on a project. Could I use that instead of the good wool if I am only making the cowl? Alternatively, is there any reason to not do the cowl in all mulberry merino? Would think it would be a bit softer and less itchy. Thanks lisa
Hi Lisa,
Great questions! Yes, although the second layer is hard to spot, our model is wearing the cowl wrapped twice – it is quite long! We love using Good Wool because of its generous yardage and interesting texture, but substituting either Cashmere Merino Bloom or another color of Mulberry Merino would be a wonderful alternative.
Happy knitting!
Julianna
I would like to make just the cowl but I notice that the white color in the good wool is sold out. What is a good substitute? Would it work to use 2 different colors of the mulberry merino or do you need different textures of yarn to show off the stripes? Thank you!
Hi Judy,
I’m so sorry that we are out of stock of Good Wool in Heirloom White! You could definitely substitute either another color of Mulberry Merino or Cashmere Merino Bloom – while Good Wool does add a bit of texture, as long as you use two contrasting colors, the stripes will still stand out quite well!
Best,
Julianna
What cast-on method would you recommend for the cowl? I wish more patterns would indicate this. (I know many people have a preferred method that they use for everything but I’d like to know what the designer thought was the best for any given pattern.)
Hello Trish,
Thank you for reaching out! I reccomend using a long tail cast on for this project.
Happy knitting!
-Marilla
I want to make adult medium size hat only, so only one skein each of A and B?
Thanks just double checking
Hello Beth,
Thank you for reaching out! You are correct, to make just the hat you will only need yarns A and B.
Happy knitting!
-Marilla
I am making the hat portion of this pattern. On the shaping of the crown, at the ends of decrease row 1, I am only counting 5 stitches decreased rather than the 8 as stated. The same goes for decrease row 3.
Hi Jane,
Thanks for reaching out! After completing the decrease set up round, you should have four markers, including the beginning of round marker, dividing your stitches into four equal sections. When working each odd numbered decrease round, you will be repeating the entire bracketed section, which begins with a ssk and ends with a k2tog and k1, in each quadrant of the hat, so you will be decreasing 8 total times. I suspect when reading the repeat you missed going all the way back to the first bracket!
I hope that clears things up!
Julianna
Thank you for the clarification. That is exactly what I did. Love your patterns, videos, and comment sections. They have solved so many questions for me. And of course, love all of your yarns. They are exquisite. Wish you would open a branch in St. Louis. There is nothing like tactile capabilities.
Then what are asterisks for? You say ” repeat from * “, as is usual, not from the brackets. I believe this is a typo. I’ve been trying to figure out what was wrong, counting 5 decreases. Glad I read these to confirm my suspicion.
Otherwise, I love this stich and will try all the patterns with it. Thanks
Hi Audrey,
Thanks for reaching out! The asterisk is not a typo, it is there to indicate the section you are repeating within the brackets! In this case the asterisk indicates you will repeat a k1 slip 1 after the ssk until you reach 4 stitches before the marker.
So for row 1 you will [ssk, then you will *k1, slip 1, and repeat this (from the *) to 4 stitches before your next marker, then you will k1, k2tog, then slip 1, and slip your marker (sm)] you will then repeat the entire bracket 4 times leaving you will 8 stitches decreased!
I hope this clears things up!
Warmly,
Gianna
Gabbie,
The yarn suggests needle sizes 4-6, however, the pattern states needle size 7. Why?
Thank you,
Tiffany
Hi Tiffany,
Thanks for reaching out! The Corrugated Rib stitch tends to create a denser fabric than most stitches, so we went up a needle size to counteract this. The recommended needle sizes on the label are a suggestion but often depending on one’s personal tension as well as the nature of the stitch you are using, you may need to use a larger or smaller needle than is recommended.
I hope that clears things up!
Julianna
I would like to make the cowl but only big enough to go around the neck once. Would it work to make it half as long? And if so, would I then just need half as much yarn? That seems logical to me, but I am a beginner knitter and worried that I am missing something. I have my eye on some of the beautiful colors that you have for this cowl. It looks quite do-able for a beginner!
Thank you!
Hello Judy,
Thank you for reaching out! You are absolutely correct- half the size means half the yarn. The cowl can be worked of any even stitches so for example if you want it to have a circumference of 27 1/2 inches you would cast on 200 stitches.
I hope this helps and happy knitting!
-Marilla
When I started the hat, casting on with the green and then beginning the k1,s1 with the white I am finding that my hat is not coming out striped but really all green. What has gone wrong? I’ve made about 5 rounds and only the green is showing even though I alternate rounds green and white.
Thanks!
Katie
Hi Katie,
Thanks for reaching out! I suspect that, on the Yarn B rows, you are slipping your stitches with the yarn in front. It isn’t specified in the row, but in the notes section before the pattern begins, you will see there is a note that all slipped stitches should be done purlwise with the yarn in back. This should make your stripes appear as they should!
I hope that helps!
Julianna
I’ve made the cowl for a friend and loved the stitch pattern. Is there a way to make it flat (not in the round) to make a wrap s
Instead of a cowl?
Hi Eileen,
Thanks for writing in! Unfortunately, we do not have instructions for working this stitch pattern flat. Although Fisherman’s Rib is a bit more complicated than the slip stitch pattern we used for the Corrugated Cowl, it does give a similar effect and our Color Dipped Scarf might be a good jumping off point!
I hope that helps!
Julianna
What is the circumference of the cowl? I see it is 12″ deep. I’m trying to calculate how much yarn I’d need to make a striped pullover sweater using the same stitch pattern.
Thanks!
Hello Jessie,
Thank you for reaching out! The finished circumference of this cowl is 55¼ inches.
Happy knitting!
-Marilla
Hello
I have just finished both hat and cowl adult small.
Both lovely.
Thanks for a great pattern.
What suggestions do you have for the left over yarn?
Hi Maria,
Thanks for writing in, and I’m so happy to hear you enjoyed knitting our hat and cowl! If you used our bundle, you should have enough yarn left to make two more Corrugated Hats, one with each contrast color. Or, you could use the leftover Good Wool to make a pair of Slip Stitch Handwarmers and the Mulberry Merino to make a color blocked version of our Classic Ribbed Hat!
I hope one of these options works for you, and happy knitting!
Julianna
Thank you so very much Julliana.
Your suggestions helped me a lot.
Is there a way to do the cast-on for the hat, where it will not flip up (as in your photos, and as in my hat!)? Thanks.
Hi Carmella,
Thanks for reaching out! Unfortunately, there isn’t a cast on that will prevent curling when knitting a stitch pattern that naturally curls. If you would prefer the edge of the hat to lay flat, you will need to start with a stitch that will not curl up – an inch or so of 1×1 ribbing on a needle two sizes smaller than your main needle should do it!
I hope that helps!
Julianna
Thanks, Julianna. I thought of this too, but I like the look of diving right away into the pattern. If one were to do ribbing, can you explain why needles 2 sizes smaller; would this not make it tight? Or would one work an elastic cast on? Having learned how to cast on the continental way, I find the various elastic cast-ons confusing…
Hi Carmella,
Generally, when knitting hats, you want the brim to be tighter than the rest of the hat so it stays on better. The slip stitch pattern knits up at a much tighter gauge than a regular stockinette or ribbing would, so using a smaller needle will make the diameter of the ribbed brim match the diameter of the hat. A long tail cast on is plenty stretchy to go along with ribbing on a hat, so there is no need to use a special cast on – usually, you will use those for garments that need to stretch over a large part of the body, such as a neckline of a sweater or the cuff of a sock.
Best,
Julianna
Hey
Thank you for a very lovely pattern.
I am Knitting the hat, but I cannot get the decreasing (8stc)….. ssk at first marker i get. But befordring next m one is only decreasing 1 stc. How do i get the 8, what am i missing?
Best regards
Lis
Hi Lis,
Thanks for reaching out! When working the set-up round for the decreases, you should have placed 4 markers, dividing your hat into 4 equal sections. In each following decrease row, you will then repeat the section within the asterisks, which contains both a ssk and a k2tog, once in each of the four sections, for a total of 8 decreases in each row.
I hope that clears things up!
Julianna
Hello ! I had the same results as what Lis is talking about here above … after a whole full 8times of 4 rounds. The pattern as it is written right now does not include the “kks” between the asterisks, and i did not realize in time. I really would hope to find a way to finish the crown without having to un-knit all my 32 rounds … 🙁 What should you suggest ? (to picture it : 1 section does end up with 10, and the 3 others have 26)
🙁
Thanks for your help !!
Hi Juli,
Thanks for reaching out! I am sorry to hear about that! If you are missing decreases and have already worked all the rounds it would be quite difficult to finish without having the appropriate 8 stitches to pull together the top. You could work a few extra decreases in a final row or 2 to get to the right number but it may change the look of the hat. It would be more work but it may be worth it to unknit those rows and re-work the decrease rounds with both the k2tog and ssk stitches in each section so that the hat has a nice finished look!
All the best,
Gianna
Thanks Gianna ! I’ll try to motivate myself to unknit properly all this !!
You are so right, after all this hard work, it would make a better ending. But i still wonder how i seem to be the only one seeing that the asterisk (*) in the pattern is not including the « ssk » part ?! 😉
You are not the only one, Juli! The asterisk is absolutely in the wrong place, and I’m surprised it hasn’t been corrected or a note added. Luckily I realized it wasn’t working out right after only one and a half rounds, but it was still really frustrating to have to go back and undo it all. It’s a good pattern (and my hat looks great so far!) but that one error is a big one. Good luck with your repair- I’m sending you endless patience! 🙂
I am decreasing at the crown where ssk’s are required, and doing this as I have done lots of times before – slipping the two stitches knitwise. It is not looking as nice as in your pattern (actually rather awful!) and so I followed the link to your ssk video, and see that you slip the first slip knitwise, and the second purlwise, which I have not seen before. So I am going to unravel what I have done and go with this. If this is indeed what you intended, maybe add this to the pattern?
Hello Carmella,
Thank you for reaching out and this great suggestion! I will certainly pass it along. While either ssk will work if you slip one knitwise and one purlwise it just tightens up the stitch.
I hope this is helpful and happy knitting!
-Marilla
I started the hat but was confused and didn’t like how the first few rows looked. So I frogged it. Do you join in the round the first row of color B before you start color A? If yes, what is your favorite method of joining in the round for that hat?
Curious if you end up slipping the stitch, that is not the color you are holding in your hand while knitting or purling.
I was concerned about the edge rolling up. Has anyone posted the hat with the rib?
Hi Jennifer,
Thanks for reaching out! The best way to join the work in the round is to place the marker on your right needle and directly go on to knit the first stitch on the left needle! In this case you are casting on with Color B and then you start knitting with Color A and you treat it the exact same way as if you were knitting with one color. As the pattern progresses you will be slipping the stitch that is the opposite color you are working on and that is how you get the unique stitch pattern! Also, due to the nature of this stitch pattern the edge should not roll much or even at all! If there is slight rolling you can easily fix that with blocking the hat when you finish knitting!
All the best,
Gianna
Help! I messed up again. I think I got confused about which direction I was knitting. So I frogged. Do you think it would help if I had placed a rs or ws marker? Would I be purling on the ws and knitting on the rs. Or do you have another way I won’t get confused regarding which direction I am knitting.
Thank you!
Hi Jennifer,
Thanks for reaching out again! Oh no!! I am sorry to hear that! Since you are working in the round you should only be knitting across the right side of the work and not the reverse side at all. Since you are only working on the right side of the fabric and knitting and purling on the right side it may help to write out the instructions and make a check every time you complete a knit or purl row so you can keep track of which row you have completed!
I hope this helps, happy knitting!
Gianna
Would you be able to suggest a cowl circumference that would be better suited to men?
I have purchased two kits, and find that the 55.25″ circumference to be striking and with so many options for draping and doubling up and such. By the same token, however, I find that the size makes for a very feminine finished item.
I am hoping for something in the way of a ‘turtleneck sweater without the sweater’ (by which I mean on the snugger side) but am having trouble gauging the extent to which the cowl will stretch over my head with the pattern!
With regards to cowl height, I am thinking 6″, but can adjust that once the cowl is underway.
I would appreciate hearing your thoughts!
Hi Mark,
Thanks for reaching out! For a for fitted cowl I would suggest a circumference of approximately 20″! The pattern works over a multiple of even stitches so I would recommend a cast on of 144 or 146 stitches!
I hope this helps and please let us know how this turns out!
Warmly,
Gianna
Yahoo! So excited! Thank you so much! I appreciate it, and will do!
Hi! I Made this hat for my son and I absolutely love it! Do you think this stitch could work for a sweater? And how it is worked on the flat? Thanks
Hi Barbara,
Thanks for reaching out! I am so glad to hear that you enjoyed this pattern and that your son loves it! I think this stitch would be super fun for a sweater! We don’t currently have written instructions for working this stitch flat but thank you for expressing your interest and I will be sure to pass this along to the rest of the team!
Warmly,
Gianna
I would love to make this hat with two strands of line weight (black) for the first color, and two strands of tussock (blue black) as the second color. What do you think? Fuzzy stripes? Perhaps the gauge would end up being about the same?
Thank you so much, A
Hi A,
Thanks for reaching out! I think that is a very fun idea! I would recommend working a gauge swatch first to see how it compares to the original pattern and you can make any adjustments from there!
Warmly,
Gianna
Hi! I was hoping to make the cowl for a 4-year-old who is about 3.5-ft tall. How many inches circumference would you suggest? And should I make it about 6” tall?
Hi Eda,
Thanks for reaching out! I would recommend measuring the shoulder width of the child before hand to calculate the width for the cowl! I think 6″ would be a good overall height for a child !
Warmly,
Gianna
Has anyone at Purl knitted up a monochrome version of this hat? I’m loving the shape/drape — and wondering if it would work well in Cashmere Merino Bloom / all one color.
Hi A,
Thanks for reaching out! I haven’t seen anyone make this all in one color but I think it would look very cool that way! You may be able to find some photos of customers who have made this on Ravelry or on Instagram! I think it would also look lovely in Cashmere Merino Bloom! CMB is a bit thicker than Good Wool and Mulberry Merino so I suggest working a gauge swatch first!
Warmly,
Gianna
Hi there,
My hat was looking good until I tried the crown. It didn’t look as neat as yours.
Can I ask, is the marker from the set up round on the 42nd stitch, yarn b/purl stitch?
“Set-Up Round: With Yarn B, *[slip 1, p1] 13 (15, 17, 19, 21) times, place marker (pm), repeat from * 2 more times, [slip 1, p1] 13 (15, 17, 19, 21) times.”
Doing this I have a marker on stitch 168 and then the original round marker on stitch one (Yarn A).
This got me a little confused when I came to the first round of the cowl because I didn’t put the marker on stitch 168, but used the round marker, ie started the end of the pattern 4 stitches before the round marker. I then cheated and didn’t slip the marker for the final repeat of the round’s pattern. I had to do this to ensure that the k1, p1 and vice versa’s kept the stripy pattern.
“Round 1: With Yarn A, [ssk, *k1, slip 1, repeat from * to 4 stitches before next marker, k1, k2tog, slip 1, slip marker (sm)] 4 times. [8 stitches decreased]”
After 7 rows of the crown it looked so messy, except one instance of the pattern at the beginning of the round where I didn’t slip that marker stitch.
The SSK has to be using yarn A then yarn B, so that the next knit stitch is on yarn A and keeps the pattern.
If the above makes any sense, can you see where I might be getting things wrong?
Hi Sarah,
Thanks for reaching out! I think that the problem may be that you have misplaced the stitch markers! If you were off even by one stitch it could offset the decrease pattern. Keep in mind that when you are working the set up round that you are working the slip 1 purl 1 x amount of times, so for example if you are making the smallest size you would be slip 1 purl 1 13 times, 26 stitches total and then placing the marker!
I hope this helps and if you are still having. troubles with the look of the decreases feel free to send our team some photos of your work to customersevice@purlsoho.com and we can troubleshoot further from there!
Warmly,
Gianna
Yes thanks. I now have a fabulous hat, not looking too bad at all.
I love this pattern but was looking for a cotton hat (something cooler). Do you have yarn suggestions for a non-wool, cooler alternative for this pattern…? Also, I would only be making the hat. Thank you!
Hi Lisa,
Thanks for reaching out! I would recommend using our lovely Cotton Pure! It is also a sport weight yarn so it should work with this pattern but I do recommend working a gauge swatch first to insure you are consistent!
Warmly,
Gianna
Hi. I love this pattern! I am making it with 100% cotton. Since I tend to be a loose knitter, I went down to a size 6 needle but the stitches are super, super tight! Do you think it’s because I went down to a size 6 or could it just be the cotton…? Wondering if I should up my needle size to a 7… What do you think? Thank you!
Hi Lisa,
Thanks for reaching out! It sounds like it could be a combination of both the cotton yarn and the smaller needle size. Cotton is less elastic than wool, so there won’t be as much give with the fibers; that, combined with working on the smaller needle is probably what’s causing your stitches to be so tight. I’d recommend knitting up a swatch on the US7s to see if that helps things relax a bit more; if you like how things are working on the US7, then you might want to restart your project using the larger needle!
I hope this helps, and please let us know if you have any other questions!
Warmly,
Kelsey
Hi! I followed the pattern for the cowl exactly, except decreased it to 200 stitches. The ends of it are curling. Do you know why? Can I fix that by blocking it? Thanks!
Hi Paro,
Thanks for reaching out. Blocking your cowl will definitely help minimize the curling at the edges!
All the best,
Lili
Hi, I’m making the hat and at the shape crown part – set-up round with yarn B. Is this row all one color of yarn B? Thanks so much for such lovely, modern yarns and patterns.
Hi Sang,
Thanks for reaching out, and thank you for your kind words! Yes, the Set-Up Round in the SHAPE CROWN section is worked with Yarn B only. Just remember to work one last Round 1 before moving on to this section, in order to maintain the alternation of the colors. Hope this helps clarify things!
All the best,
Lili
Would Linen Quill work to make this hat? If I remember right it is DK weight.
Hi Ines,
Thanks for reaching out. I’m afraid that Linen Quill is a fingering weight yarn, so it’s too thin for this pattern! This pattern was designed for a sportweight yarn, so I would recommend using Good Wool, Wigeon, or Season Alpaca. Hope this helps!
All the best,
Lili