Incline Decline Cardigan
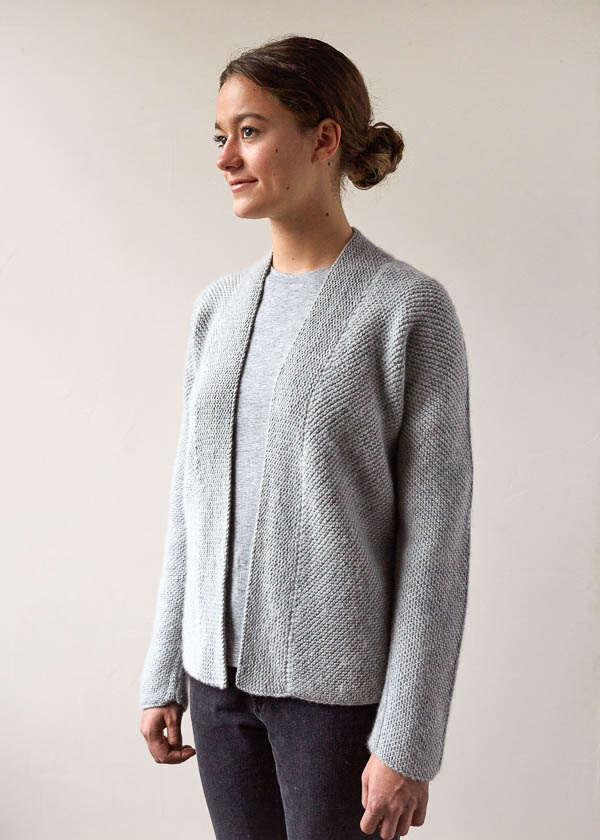
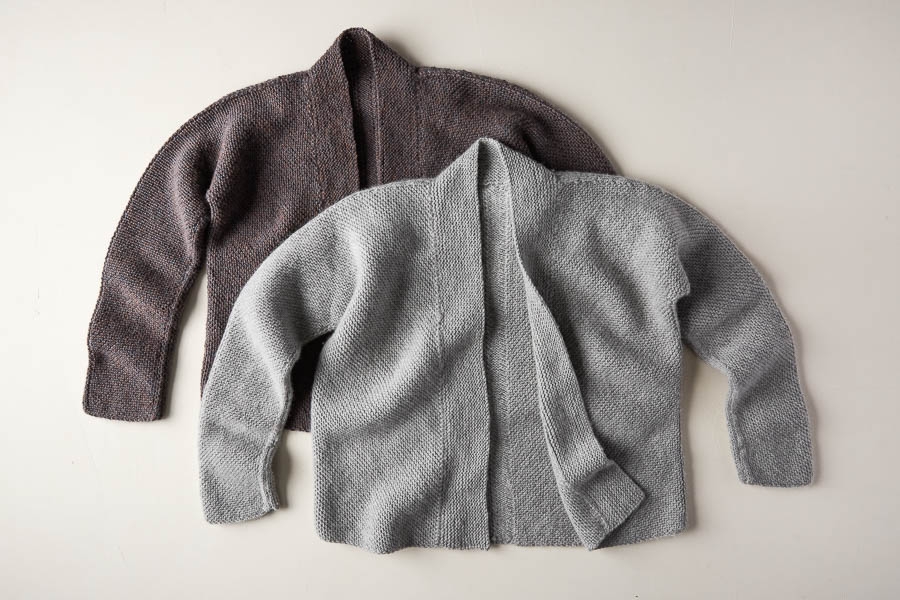
The lines and planes of our Incline Decline Cardigan form their own hibernal landscape, like spare slopes converging in a valley or branches stretching from a bare tree… Quiet details and big gestures.
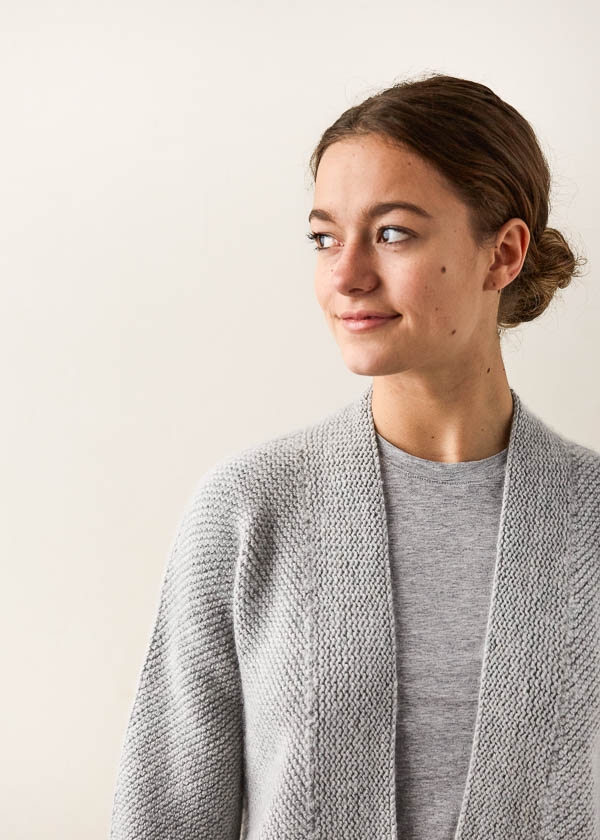
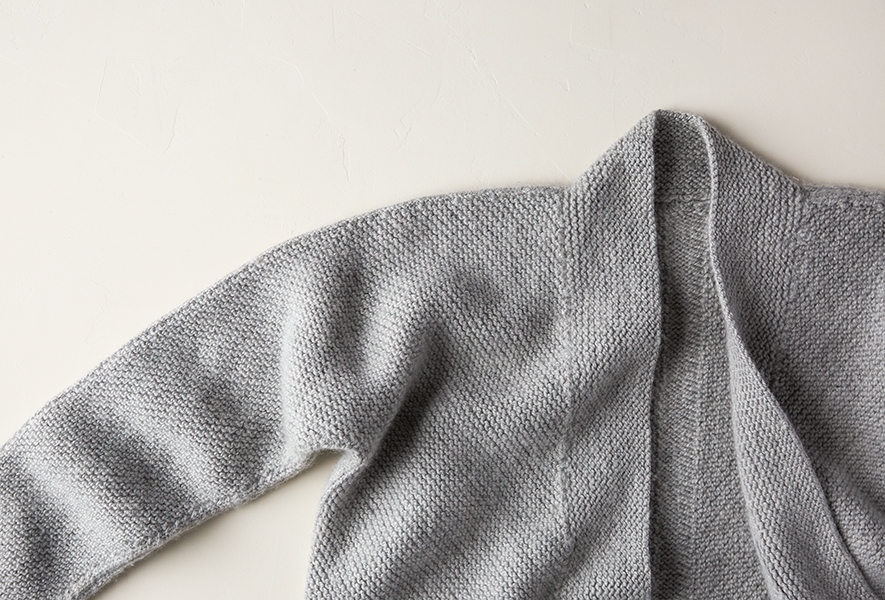
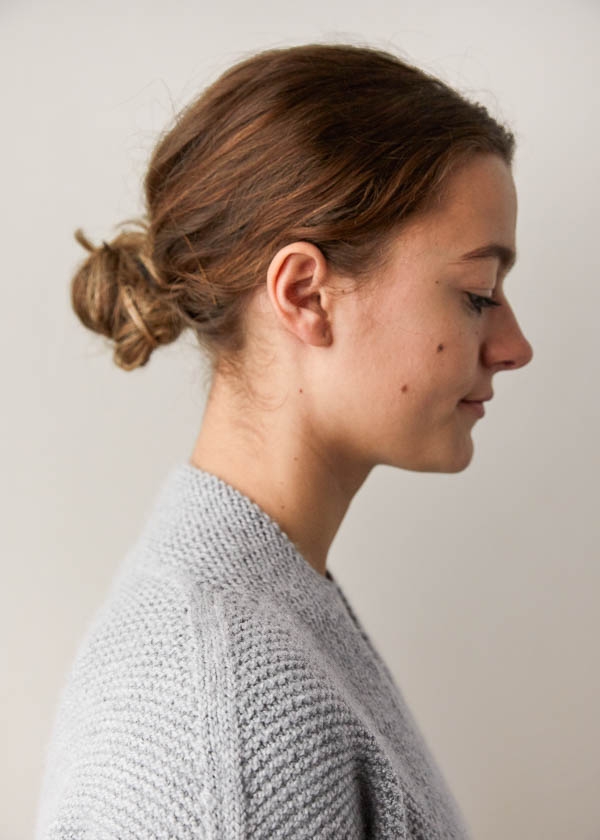
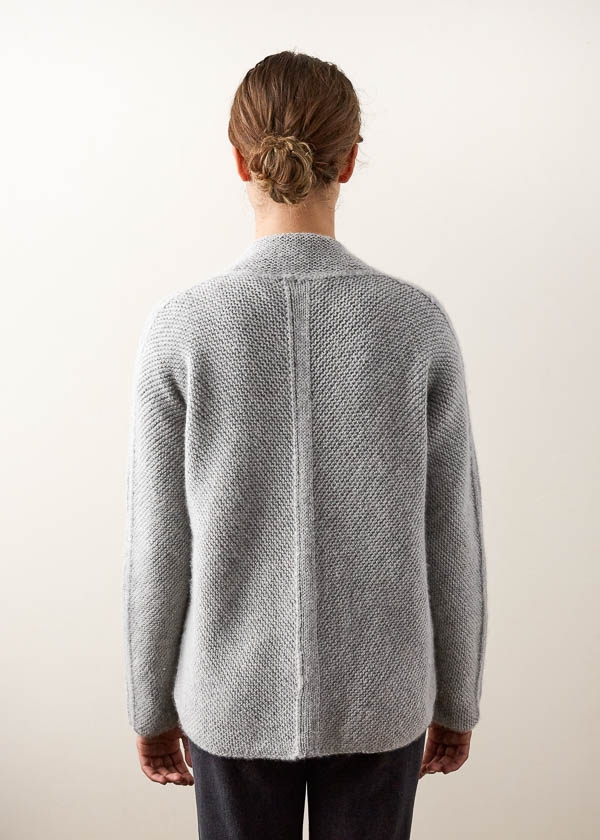
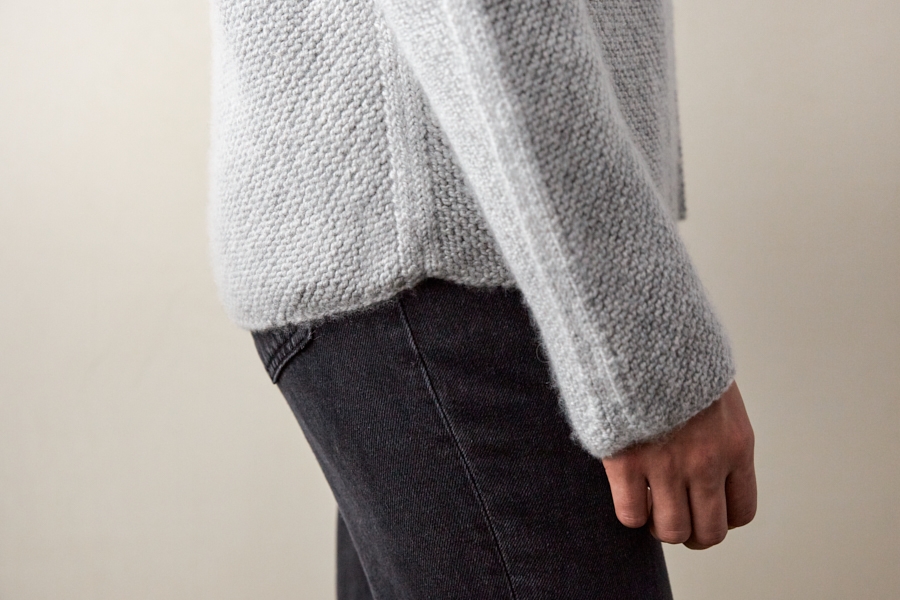
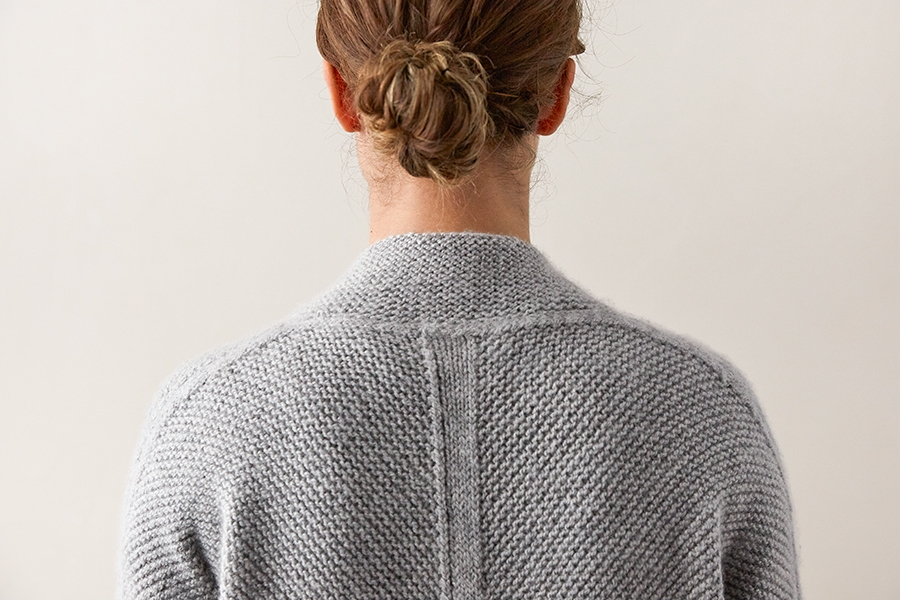
Garter stitch is put to good use here in a multi-directional design that features bands of stockinette at the seams. These simple stitches are the perfect language for the unconventional construction of this very fascinating knit.
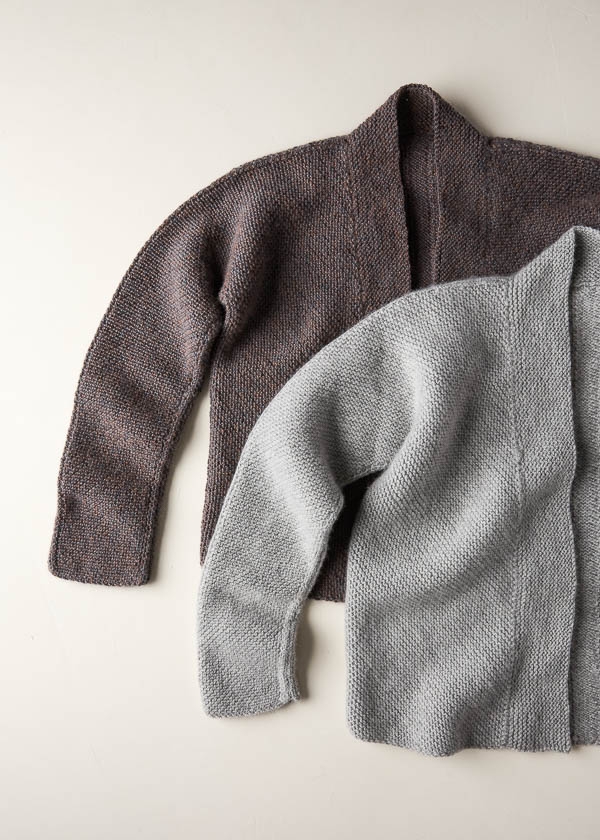
It is composed of four pieces: two fronts and two backs. Each piece is knit on the bias, which, technically, means that the grain of the fabric is on the diagonal and, practically, means that you increase, decrease, or both at the beginning and end of each row…. Pretty cool and kind of an adventure!

Once you’ve knit the two back pieces (starting at each cuff), you join them up the center of the back, then you throw the two fronts into the mix and sew the seams along the shoulders, sleeves, and sides. Lastly, you’ll pick up stitches to knit the garter stitch band and collar.
And to give a beautiful drape and super-soft feel to the whole thing, we used our gorgeous Cashmere Merino Bloom. It’s a wonderful yarn to accompany you on this winter knitting excursion!
Designed for Purl Soho by Mary Anne Benedetto.
Share your progress and connect with the community by tagging your pics with #PurlSoho, #PurlSohoBusyHands, #PurlSohoInclineDeclineCardigan, and #PurlSohoCashmereMerinoBloom. We can’t wait to see what you make!
Materials
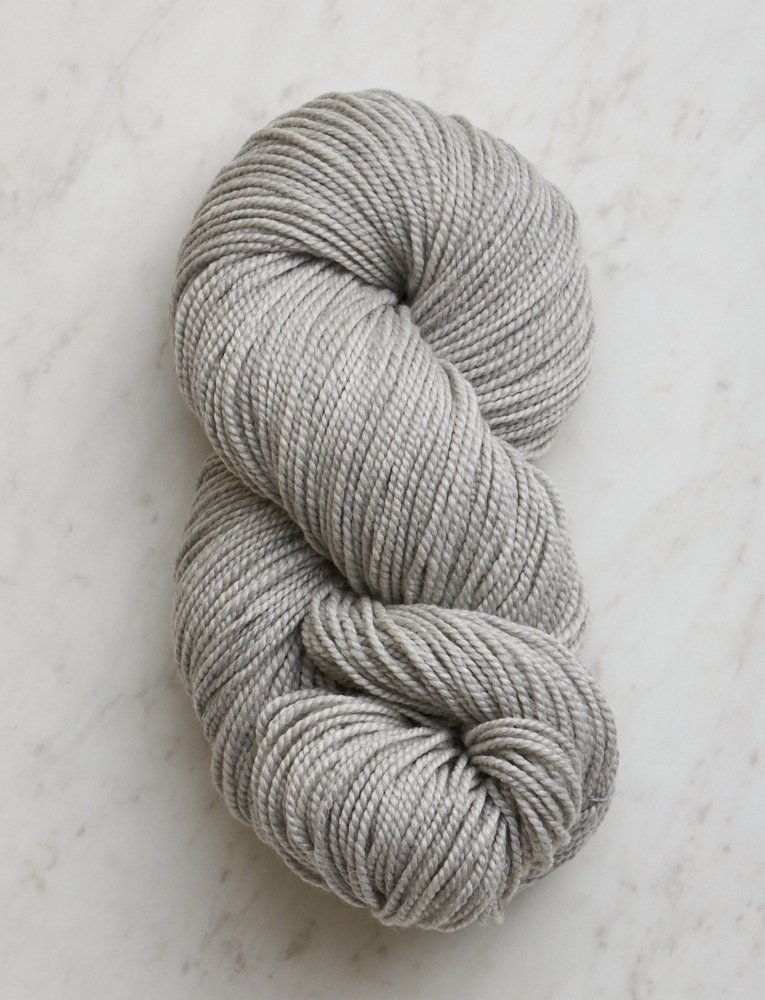
- 6 (7, 7, 8) (9, 10, 11, 11) skeins of Purl Soho’s Cashmere Merino Bloom, 75% extra fine merino wool and 25% cashmere. Each skein is approximately 218 yards/100g; approximately 1225 (1335, 1510, 1685) (1895, 2025, 2175, 2255) yards required. We used Dove Gray (Blue Rust, shown in some of the photos up top, is no longer available).
- US 7 (4.5 mm), 32-inch circular needles
- A set of US 7 double pointed needles
- Stitch holders or scrap yarn
- Stitch markers
- Removable stitch markers
- An Incline Decline Cardigan Pattern
Gauge
20 stitches and 40 rows = 4 inches in garter stitch
Sizes
NOTE For help picking a size, please check out our Understanding Ease + Selecting Size Tutorial!
39 (42, 47, 51) (55, 59, 64, 67)
To fit actual chest circumference of 31–35 (34–38, 39–43, 43–47) (47–51, 51–55, 56–60, 59–63) inches, with approximately 4–8 inches of ease
- Finished Chest Circumference: 39 (42, 47, 51) (55, 59, 64, 67) inches
- Finished Length From Shoulder To Bottom Edge: 20¾ (21½, 22¾, 24) (25¾, 26¼, 27, 27½) inches
- Finished Length From Underarm To Bottom Edge: 14 (14, 15, 15) (16, 16, 16, 16) inches
- Finished Sleeve Length From Cuff To Underarm: 18 (18, 18½, 18½) (18¾, 18¾, 19, 19) inches
SAMPLE: The Dove Gray sweater pictured here is size 42, worn with 8 inches of ease.
Pattern

The Incline Decline Cardigan Pattern is available for purchase as a PDF download only.


Having put my knitting down for a couple of weeks I have returned to this sweater and am now confused about grafting the neck stitches together. I have three stitches on either side of the center back on do needles and wondering what I’m supposed to graft them to?
I will email photos of my situation. Thanks so much!
Hi Jill,
Thanks for reaching out and for sending over the photos! So for those 6 total stitches you will be grafting them together using the Kitchener Stitch (you can click that and it will take you to our wonderful tutorial!) This will close up the back of the neck seamlessly!
I hope this helps and best of luck finishing off your cardigan!
Warmly,
Gianna
On page 2 of the pattern, when finishing the left front sleeve it says “place stitches on st holder or scrap yarn. Do not cut yarn.” Then… you go on to start the Left front body, and it says “Cast 3 stitches onto circular needles”… but it does not say “with new ball/skein of yarn”. So… I did not cut the yarn, and then used the same yarn I did the left front sleeve with, and cast on, and the two have been joined the whole time. I can now see this may not have been what was meant! Could you please confirm, that I was supposed to start the Left front body with a NEW, SEPARATE ball of yarn. And if so, you may want to update the pattern. And.. I will now have to cut that yarn, so hopefully that won’t cause too much consternation.
Hi Susan,
Thanks for reaching out! You will not be cutting the yarn after completing the Left Front Sleeve and will be putting that piece to the side along with the yarn (since you will be picking this back up later.) You will then start off the next sleeve with a new skein to cast on the 3 stitches since you are starting a new piece of the pattern!
I hope this clears things up!
Warmly,
Gianna
Hi,
I’m trying to knit the shape sleeve section.
I’m not sure what I’m doing wrong. I followed the steps, but I’m only at 54 stitches, and the width is already at 9 inch, and I’m supposed to be doing 64 inches. The length is still super short.
The pieces diagram shows that the sleeves should be gradually increased in wide, but my sleeve is square at the end and then quite quickly it expands to 9 inch.
Please help!
Hi Ariel,
Thanks for reaching out! Please send a photo of your sleeve to our email customerservice@purlsoho.com and we can troubleshoot further from there!
Warmly,
Gianna
I have thoughts now about frogging this entire sweater! I have written to you twice before for explanations and here I am questioning again! Are the back shoulders square? I have frogged and knitted this area again because I couldn’t imaging that it was correct and it came out square again. As I sew the sleeves together now there is an awkward “bump” created by the square shoulder that I’m not sure I can block out. Is this right or wrong?
Many thanks!
Hi Jill,
Thanks for reaching out again! That should be correct, but you can absolutely send us a few photos of your work to customerservice@purlsoho.com and we can make sure everything is looking alright or troubleshoot what may be going on further from there!
Warmly,
Gianna
Hi Jill,
Thank you for sending over the photos! To me it doesn’t look like you did anything wrong and this is something that can absolutely be fixed when you block the sweater! My only question is did you block the individual pieces before sewing them together like we suggested in the pattern? That would be my best guess for why things looking a bit bumpy/twisting! So for future reference, with a sweater like this we always recommend blocking the pieces before putting the sweater together, this will make sewing it much easier. Luckily you can block the sweater now and get the same even look!
I hope this helps and please let me know if you have any more questions!
Warmly,
Gianna
Thanks so much for your continued guidance! I did block the pieces first but I didn’t try to “round out” the square shoulder. So happy to know that this will block out properly. 🤗
After reading the comments and replies, I am still confused about the left front sleeve as to whether the yarn should have been cut after transferring the stitches to scrap yarn even though the instructions say “Do not cut yarn”. Should the cast on 3 stitches on the circular needles for the left front body have been started with new yarn or a continuation of the yarn from the sleeve.
Hi Sandra,
Thanks for reaching out! You will not be cutting the yarn after completing the Left Front Sleeve! You will be putting that piece to the side along with the yarn (since you will be picking this back up later.) You will then start off the next sleeve with a new skein to cast on the 3 stitches since you are starting a new piece of the pattern!
I hope this clears things up!
Warmly,
Gianna
I put aside my incline/decline for a few weeks and cannot figure out how to put it back together. I have completed the 2 front bodies plus attached the sleeves. I have completed the right and left back sleeves and the right and left back bodies, but I cannot figure out how to join the 2 back body pieces. One time they looked like wings and when I switched them, they looked crooked. I’m not sure which is the selvege nor the bottom edges. Please help me! Thanks in advance.
Hi Wendy,
Thanks for reaching out! It sounds like to me that you are at the step JOIN BACK BODY PIECES! With the right side of both body pieces facing you, you should have those 65 (71, 79, 85) (93, 99, 107, 113) stitches on hold for the left side, you will then transfer the on hold left side stitches onto the needles with the right side stitches (those should still be on the needles.) This should be oriented so that you will work across Right Back Body, then Left Back Body stitches when beginning with a right-side row. After you have this set up you can work the Joining Row (right side): K3, m1L, knit to last 2 Right Back Body stitches, k2tog; cable cast on 1 stitch, place marker (pm), cable cast on 3 stitches, pm, cable cast on 1 stitch; working across Left Back Body stitches, ssk, knit to last 3 stitches, m1R, k3. [135 (147, 163, 175) (191, 203, 219, 231) stitches total]
I hope this helps and please let me know if you have any more questions!
Warmly,
Gianna
Thanks Gianna. I actually did it exactly like that a few weeks ago and then looked at it, forgetting that the backs are on the bias. So I ripped it out. But when I followed your instructions (exactly like on the pattern) and re-aligned the backs so that the bottom edge was straight, the whole thing made sense to me! Duh!
Wendy
Hi Wendy,
Thanks for your response! I am glad you figured it out and are back on track!
Please let me know if you have any more questions!
Warmly,
Gianna
Hi Gianna,
This is a beautiful pattern.
I’ve been reading the questions and also the remarks from people who have knitted this sweater on Ravelry. It seems that there is quite a bit of confusion around the proper orientation and shape, and piecing it all together. One person mentioned that it would help to have some photos or at least sketches showing what things should look like and where they should go. Have you or anyone at Purl Soho thought of improving the pattern with some additional images?
I hesitate to buy such an expensive pattern and then get stuck halfway through since I’m not that gifted when it comes to rearranging puzzle pieces!
Hi Gina,
Thank you so much for reaching out! This is such a beautiful pattern- I actually just cast on to start one for myself!
I know it can be a bit confusing, especially when it comes to assembling the pieces, so thank you for expressing your interest in photos or sketches. I will certainly pass this along to the rest of the team!
I totally understand if you don’t want to invest in this pattern without visual resources, but I want you to know that if you do end up making this pattern we and more than happy to assist you at any step along the way! You can leave a comment or question here and I will respond as soon as possible, or you can email us directly at custumerservice@purlsoho.com and we can work with you directly there. We can also schedule a zoom call at any point if you need additional help! This would especially be a great resource to use when the time comes to orient the pieces together, we can work with you directly over a call to insure that you have everything in the right order!
I hope this helps and please let me know if you have any questions!
Warmly,
Gianna
I am in the process of knitting the back and sleeves and it is going okay, but I am concerned that I may not have enough yarn for all the assembly as well as the shawl collar. Yikes. My yarn is TIDE POOL, color 1510 heather, LOT 270585. Might there be a skein of this in one of your wearhouses that you might keep in reserve for me in case I need it? I should know more in a couple of weeks.
Hi Wendy,
Thanks for reaching out again! If you send us an email with this information to customerservice@purlsoho.com we can check with the warehouse to see if we have any of that Lot available!
Warmly,
Gianna
I have written them. Fingers crossed there’s another skein available. Thanks for your quick response.
Wendy
I have successfully completed all of the pieces. Now to sew it up. There are stitches under the arms that I have to put together somehow with kitchener joining. I don’t see what is happening in this step. What is it supposed to look like? It is a mystery.
Hi Marta,
Thanks for reaching out! Basically you will be using using Kitchener Stitch and will graft 3 (3, 4, 5) (7, 9, 10, 11) stitches! You will begin by doing this on the front piece, then you will work the back, you will do this on both the right and left sides. Finally once the stitches are all grafted together you will seam together the underarms.
I hope this clears things up!
Warmly,
Gianna
This is a beautiful sweater and I had fun knitting it (once I figured out how all the pieces fit together, which is not at all obvious when knitting it for the first time). But … I think the sizing is off. The sleeves were about 4″ too long, while the rest of the sweater more or less fit. (I did check my gauge before beginning). For the first time in my life, I literally cut into my finished knitting with scissors to shorten the arms. This was a last resort, but I had to do if I wanted to be able to wear the sweater — which I do, since it’s so pretty and unusual.
Hi Melanie,
Thanks for reaching out! I am so glad to hear that you have finished this pattern! I have actually heard of this happening before, the sizing is not off, but it is easy to measure the length of the sleeve from the wrong side and end up with sleeves that are too long. The sleeves should measure 18 (18, 181⁄2, 181⁄2) (183⁄4, 183⁄4, 19, 19) inches along the Bottom Sleeve selvage (the edge at end of right-side rows) if you measured from the opposite side you will end up with sleeve about 4″ longer than they are supposed to be.
Happy knitting!
Gianna
Hi Gianna! I have a quick question on this as I also want to make sure I understand the sizing before I finish the sleeve front. The pattern says that the Bottom Sleeve salvage is “the edge at end of right-side rows” and I see that your comment says the “beginning” of right-side rows. I believe one edge is already longer (the edge that is sort of diagonal off the needle), so should we be measuring the longer edge (which I think is the “end” of right-side rows?) so that the sleeves are not too long? Thanks!
Hi Savannah,
Thanks for reaching out! That is correct and my apologies for any confusion, I realized I made a typo in the comment above (i have edited by original comment to reflect this change). You will want to measure the sleeve along the Bottom Sleeve selvage (the edge at end of right-side rows, not the beginning)! This is the side that should be longer than the other.
I hope this clears things up, happy knitting!
Gianna
I am interested in making this sweater, but I am wondering if there is a comparable yarn substitute? I was hoping for more of a black color than what is shown with the Charcoal Onyx. Thank you!
Hi Linda,
Thanks for reaching out. Most of our other DK weight yarns would work great for this pattern! In particular, I’d recommend Brooklyn Tweed’s Arbor, which comes in a few different dark colors that might catch your eye. Hope this helps!
All the best,
Lili
I have lost my right side marker on the left front sleeve, how do I figure out which is the “bottom sleeve selvedge”?
Hi Jess,
Thanks for writing in! If you are on the left front sleeve, you will notice that the wrong side rows start with a slip 1, purl two. I would suggest taking a close look at your work and trying to identify where you see these stitches at the edges of your work. Rather than trying to identify the slip or knit stitch at the start of the row, look a couple of stitches in to see if you can spot those two purl stitches that each wrong side row begins with. This will let you know which side is the wrong side so you can then place your marker on the opposite side. I hope this helps but if you need further assistance please let us know!
Warmly,
Gavriella