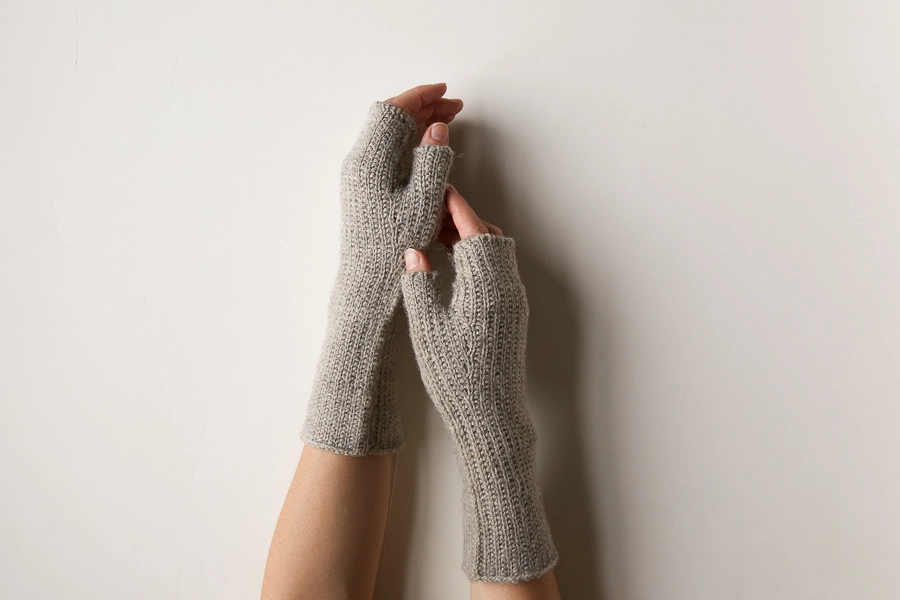
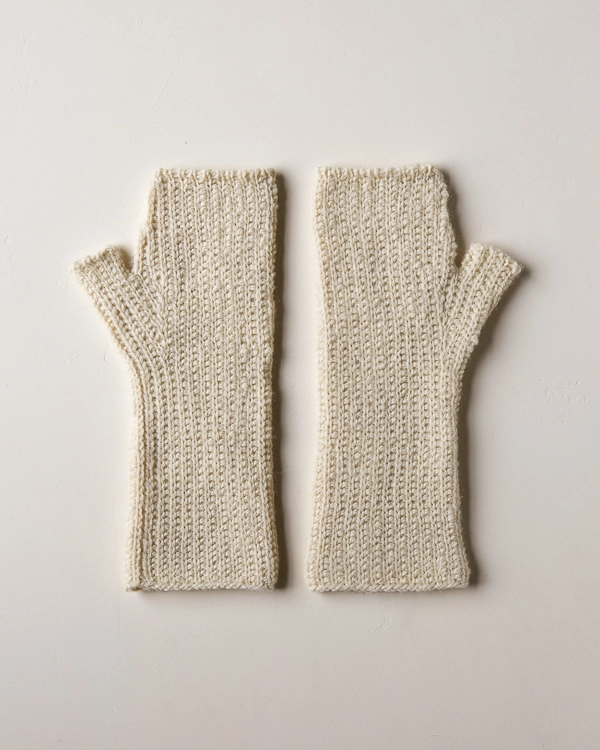
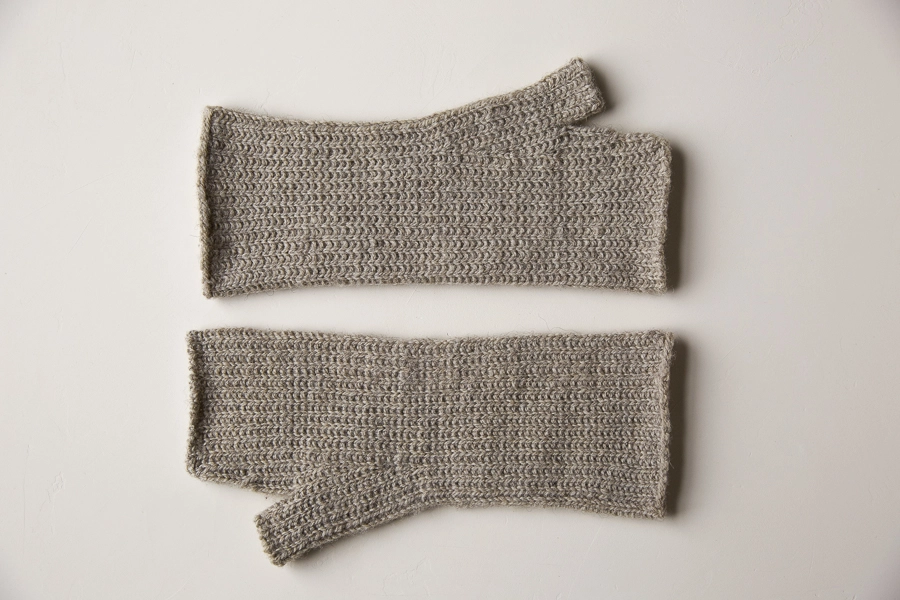
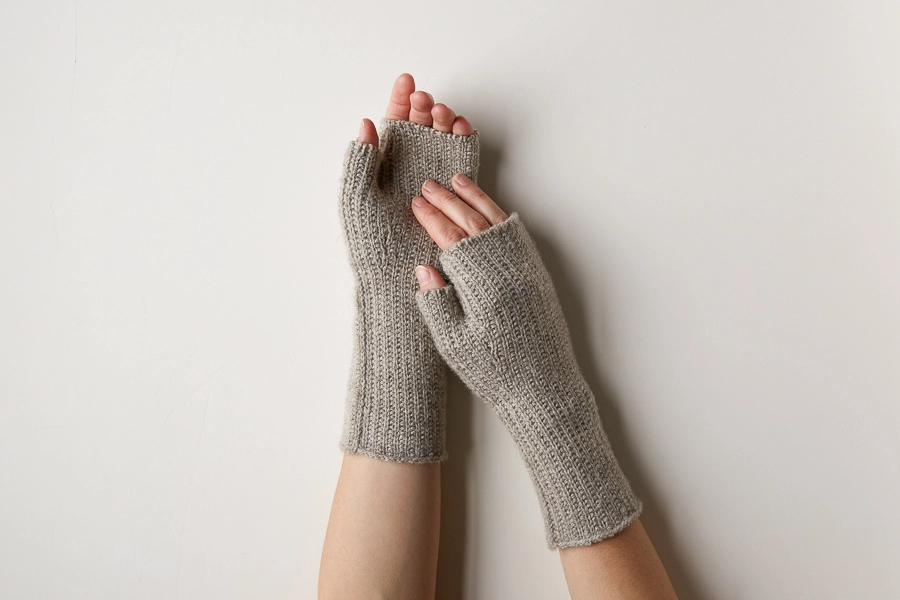
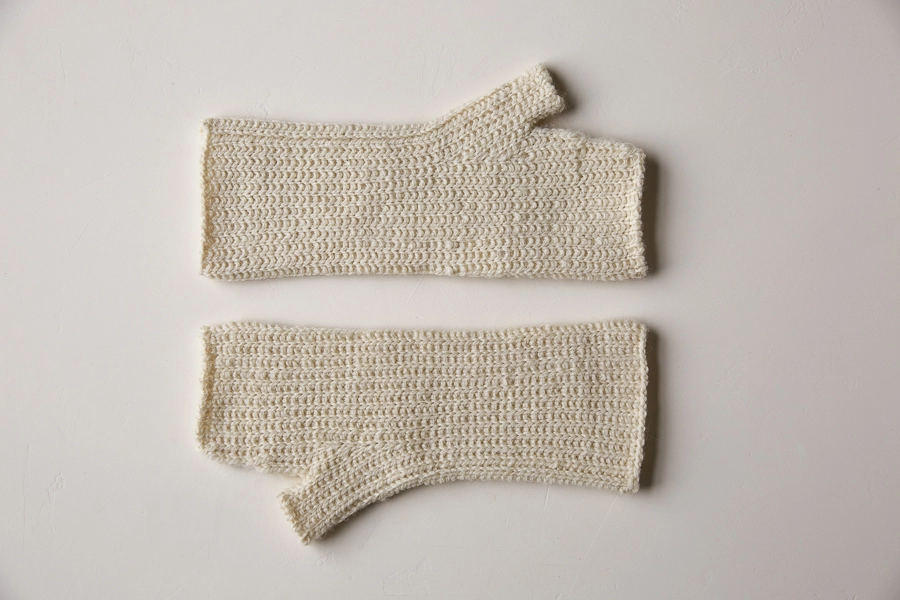
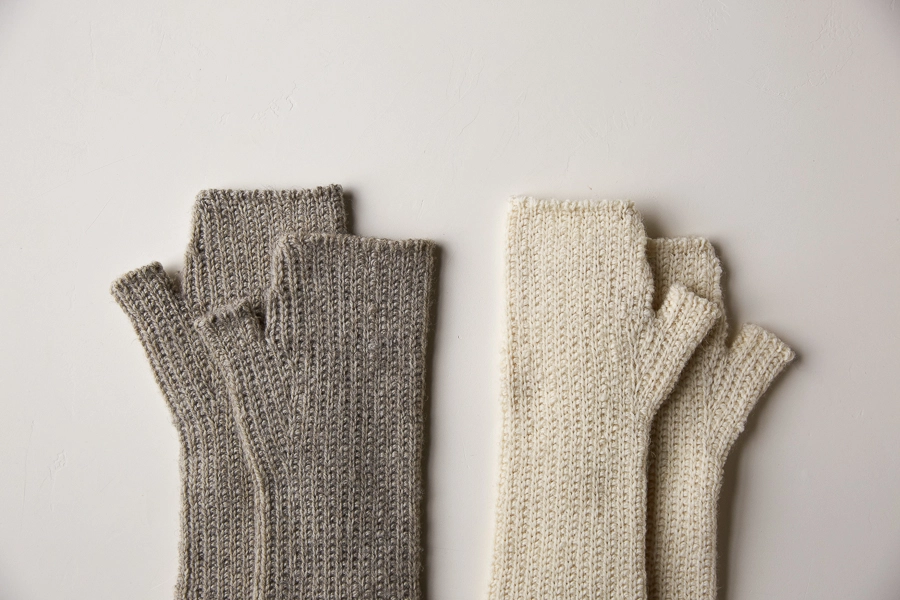
Slip Stitch Hand Warmers
Texting while you walk your dog, searching the bottom of your bag for keys, catching up on emails in an under-heated café… all these things are better with warm hands and free fingertips. And this comely pair of Slip Stitch Hand Warmers makes these little daily tasks better!

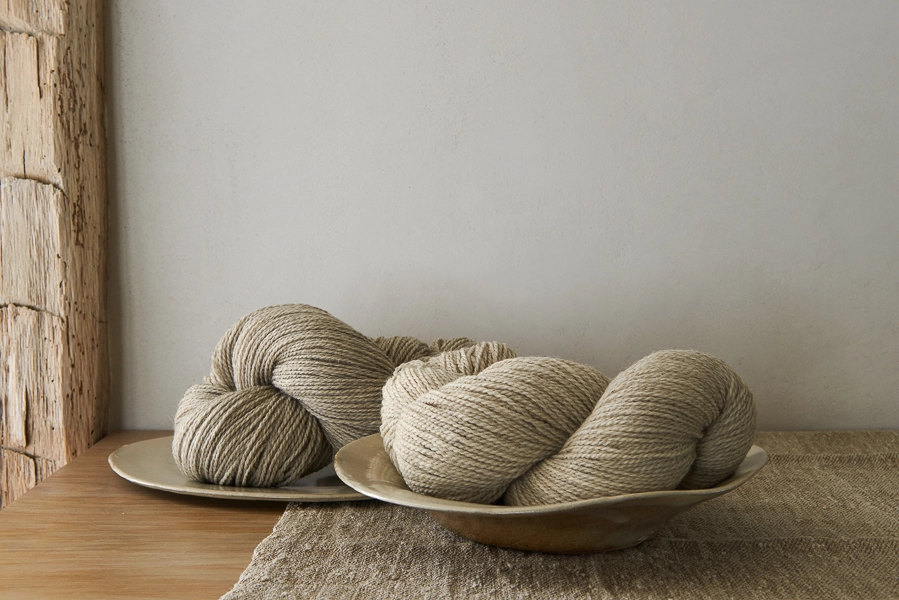
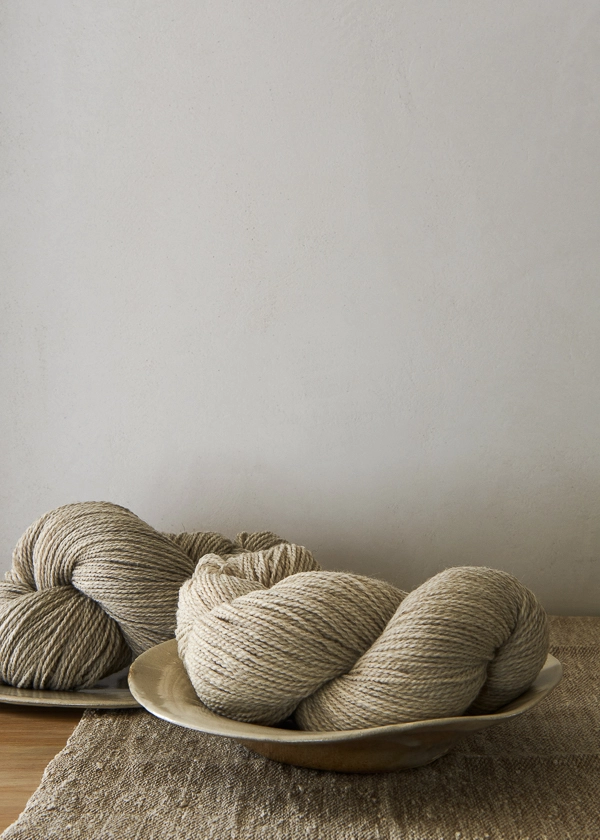
In traditional Good Wool, the latest addition to our family of yarns, this super simple slip stitch pattern is reminiscent of a classic thermal shirt. And the natural beauty this yarn lends to these hand warmers makes them just as amenable to a walk in the woods as to a morning subway ride.

You just need one skein of Good Wool to make one or two adult-size pairs, and since this yarn is our most affordable yet, casting on will hardly put a dent in your wallet. And who wouldn’t warm to that?
Designed by Purl Soho designer, Jake Canton. Click here to see even more of Jake’s designs!
Share your progress and connect with the community by tagging your pics with #PurlSoho, #PurlSohoBusyHands, #PurlSohoSlipStitchHandWarmers, and #PurlSohoGoodWool. We can’t wait to see what you make!
Materials
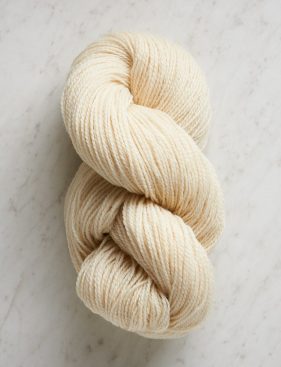
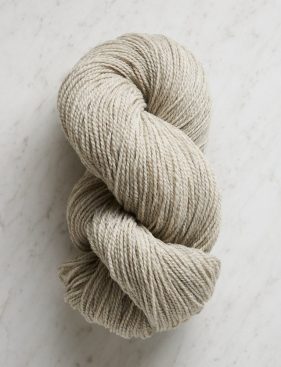
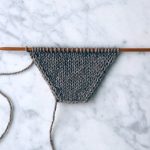
- 1 skein of Purl Soho’s Good Wool, 100% undyed Andean highland wool. Each skein is 383 yards/ 100 grams; approximately 157 (200) yards required. We used Heirloom White (left) and Driftwood Gray (right).
- A set of US 7 (4.5mm) double pointed needles
- 2 stitch markers
NOTE: One skein is plenty to make two pairs of Small Hand Warmers; just enough to make two pairs of Medium Hand Warmers; or plenty to make one pair of Large.
Gauge
28 stitches and 52 rounds = 4 inches in slip stitch pattern
Sizes
Adult Small (Medium, Large)
Finished Circumference: 7 (8, 9) inches
Finished Height: 10 inches, adjustable
Notes
Slip Stitches
Slip all slipped stitches purlwise.
Lifted Increases
RLI (Right Lifted Increase): Lift right leg of the stitch below the next stitch on the left-hand needle onto the left-hand needle and knit it. [1 stitch increased]
LLI (Left Lifted Increase): Lift the left leg of the stitch 2 rows below the stitch on right-hand needle onto left-hand needle and knit it through the back loop. [1 stitch increased]
For further assistance using these techniques, please visit our Lifted Increases Tutorial.
Make 1 Purlwise
m1p (Make 1 Purlwise): With the left-hand needle, pick up the horizontal strand between last stitch on right-hand needle and first stitch on left-hand needle from back to front, then purl into the front loop of the strand.
For a video demonstration of this technique, visit our Make 1 Purl Tutorial. (We use a right-leaning m1p in this pattern, but because the right and left m1p look the same when worked on the right side of the fabric, you can use either one here.)
Pattern
Cuff
Cast on 50 (56, 64) stitches using Long Tail Cast On and distribute them among three double pointed needles: 17 (19, 21) stitches on Needle 1; 16 (18, 22) stitches on Needle 2; and 17 (19, 21) stitches on Needle 3.
Join for working in the round, being careful to not twist the stitches.
Round 1: *K1, slip 1 wyib (with yarn in back), repeat from * to end of round.
Round 2: *Slip 1 wyib, p1, repeat from * to end of round.
Repeat Rounds 1 and 2 until piece measures 5 inches from cast-on edge, or until the desired length to base of hand, ending with Round 1.
Gusset
Set-Up Round: [Slip 1 wyib, p1] 2 times, slip 1 wyib, place marker (pm), p1, *slip 1 wyib, p1, repeat from * to last 6 stitches, pm, [slip 1 wyib, p1] 3 times.
Round 1: *K1, slip 1 wyib, repeat from * to 1 stitch before next stitch marker, RLI (see Notes), k1, slip marker (sm), slip 1 wyib, **k1, slip 1 wyib, repeat from ** to next stitch marker, sm, k1, LLI (see Notes), slip 1 wyib, ***k1, slip 1 wyib, repeat from *** to end of round. [2 stitches increased]
Round 2: *Slip 1 wyib, p1, repeat from * to 2 stitches before next stitch marker, [slip 1 wyib] 2 times, sm, p1, **slip 1 wyib, p1, repeat from ** to next stitch marker, sm, [slip 1 wyib] 2 times, p1, ***slip 1 wyib, p1, repeat from *** to end of round.
Round 3: *K1, slip 1 wyib, repeat from * to 2 stitches before next stitch marker, k2, sm, slip 1 wyib, **k1, slip 1 wyib, repeat from ** to next stitch marker, sm, k2, slip 1 wyib, *k1, slip 1 wyib, repeat from * to end of round.
Round 4: *Slip 1 wyib, p1, repeat from * to 2 stitches before next stitch marker, slip 1 wyib, m1p (see Notes), slip 1 wyib, sm, p1, **slip 1 wyib, p1 repeat from ** to next stitch marker, sm, slip 1 wyib, m1p, ***slip 1 wyib, p1, repeat from *** to end of round. [2 stitches increased]
Round 5: *K1, slip 1 wyib, repeat from * to end of round.
Round 6: *Slip 1 wyib, p1, repeat from * to end of round.
Rounds 7 and 8: Repeat Rounds 5 and 6.
Repeat Rounds 1-8 two (2, 3) more times. [62 (68, 80) stitches]
Repeat Rounds 5 and 6 one (2, 2) more time(s).
Repeat Rounds 1 – 4 one time. [66 (72, 84) total stitches: 25 (27, 31) stitches on Needle 1; 16 (18, 22) stitches on Needle 2; 25 (27, 31) stitches on Needle 3]
Repeat Rounds 5 and 6 one time, removing stitch markers on the final round.
Thumb Hole
Set-Up Round: [K1, slip 1 wyib] 4 (4, 5) times, place the previous 8 (8, 10) stitches on a stitch holder or scrap yarn, *k1, slip 1 wyib, repeat from * to last 10 (10, 12) stitches, k1, slip remaining 9 (9, 11) stitches onto same stitch holder or scrap yarn. [49 (55, 63) stitches remain]
Palm
Rejoining into the round by working the first stitch to the left of the Thumb Hole…
Round 1: *Slip 1 wyib, p1, repeat from * to last stitch, slip 1 wyib.
Round 2: *K1, slip 1 wyib, repeat from * to last stitch, k1.
Repeat Rounds 1 and 2 for a total of 1 inch, ending with Round 1.
Next Round: K1, k2tog, *slip 1 wyib, k1, repeat from * to last 4 stitches, slip 1 wyib, ssk, k1. [2 stitches decreased]
Next Round: [Slip 1 wyib] 2 times, *p1, slip 1 wyib, repeat from * to last 3 stitches, p1, [slip 1 wyib] 2 times.
Next Round: K2tog, *slip 1 wyib, k1, repeat from * to last 3 stitches, slip 1 wyib, ssk. [2 stitches decreased]
Repeat from Round 1 one time. [41 (47, 55) stitches]
Repeat Round 1.
Bind Off
We used a Kitchener Stitch Bind Off to make a nice and stretchy finished edge, but a regular knitwise bind off would work as well!
For Kitchener Stitch Bind Off…
Alternating between two empty double pointed needles and working the stitches off of one needle at a time, slip all the knit stitches onto one empty needle and all the purl stitches onto the other. Hold the two needles parallel, with wrong sides of fabric facing each other and bind off using the Kitchener Stitch. Repeat these steps for the stitches on the remaining double pointed needles.
Cut the yarn.
Thumb
Place the 17 (17, 21) Thumb stitches as evenly as possible onto 3 double pointed needles.
With the right side of fabric facing you and starting with right-most Thumb stitch, join yarn…
Round 1: *Slip 1 wyib, k1, repeat from * to last stitch, slip 1 wyib.
Now joining to work in the round…
Round 2: *P1, slip 1 wyib, repeat from * to last stitch, p1.
NOTE: There will be a small gap between the Palm and the base of the Thumb. When you weave in the ends, use the starting tail of the Thumb to close up that gap.
Repeat Rounds 1 and 2 until Thumb measures 1 inch or to desired length.
Bind off, using Kitchener Stitch, setting up with Step 2 and then Step 1 of our Kitchener Stitch Tutorial; then repeating the remaining steps in the following order: Step 5, Step 6, Step 3, Step 4.
Make a second identical hand warmer, weave in the ends of both, and block as desired!


Thank you for everything PURLSOHO!!
Hi, I love the minimalist look of these hand warmers, but I don’t enjoy using dpns, I feel I’m quite clumsy with them. I was planning to use two smaller circular needles to make these. Should I keep anything special in mind or just proceed with dividing the stitches in roughly half. Thanks for any advice you can give me.
Hi Rupa,
Thanks for writing in! If you would like to use two circular needles in place of DPNs, you will want to divide the stitches roughly in half. Once you reach the gusset, you may want to rearrange your stitches a bit to make things easier make more sense. In essence, you can divide your stitches any way that you like that will make it easiest to work the pattern!
I hope that this helps!
Cassy
Hello,
Is there a way to make a gauge swatch not in the round? Could you perhaps write out the pattern to convert it for straight needles?
Thanks.
Hi Natalie,
Thanks for writing in! It is possible to knit a flat gauge swatch for these hand warmers, but keep in mind that it won’t be quite as accurate as an in-the-round swatch! To knit the stitch flat, you can cast on an even number of stitches and work the following two rows:
Row 1: *K1, slip 1 wyib (with yarn in back), repeat from * to end of row
Row 2: *K1, slip 1 wyif, repeat from * to end of row
I hope that helps!
Julianna
Hi again,
If it is in fact measuring 7.5″ around (small size) what would you guesstimate the needle size to go down to if I am aiming for 7″ around? Size 6, or 5?
Hi Natalie,
I would suggest going down one needle size at a time and doing a gauge swatch to check the measurement and see if it is the one you are looking for to adjust the pattern!
Happy knitting!
Gianna
Je comprends rien aux explications.
What sizes are shown in the samples?
For the small size, what is the approx. length of the top portion from bottom of where thumb hole starts?
Hi Natalie,
Thanks for reaching out! The samples shown are the adult small and medium! the top portion is approximately 5″.
I hope this helps!
Gianna
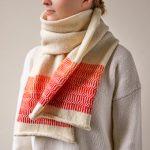
You noted the colors of Good Wool used for the samples. However, the sample being worn by the model looks different from either one that is pictured above it. Is the darker one (next to the Heirloom White) Driftwood Gray as well as the one being worn?
I know that sometimes colors can look different depending on how it was photographed, but please clarify whether there are 2 or actually 3 different color yarns shown here?
Hi Natalie,
Thanks for writing in again! There are only 2 samples of the hand warmer shown here, in Heirloom White and Driftwood Gray. The model is wearing the Driftwood Gray option! The color may be a bit lighter on the model due to the lighting when it was photographed.
All the best,
Gianna
I would use circulars is just safe because i am clumsy as well
Hi!
I have just cast on and knit the first few rows… and it is BIG! I started with the medium size, but then restarted with the small size. It is still way too big for me, but they are for my brother and he has larger hands/arms.
I am using worsted weight yarn, and this is probably my issue. Can I just cast on fewer stitches? Perhaps 46? Or would that mess with the pattern later on?
Hi Laura,
Thanks for writing in! It sounds like you may not be getting gauge. I would suggest knitting a gauge swatch on smaller needles and see if you can achieve the gauge required for this project. If you are using a true worsted weight, it may not be possible to get the gauge that we are getting here. In that case, you may want to try an alternate yarn that will allow you to get gauge as modifying the pattern for an alternate gauge will take a reworking of the pattern.
Best,
Cassy
I’m puzzled. You describe this yarn as light worsted/dk, but with 383 yards per 100g, it seems like it would be more of a heavy fingering to light sport weight?
Hi,
Great question! Different fibers and different yarn constructions can make for different yardages per 100 gram skein of the same knit gauge. For instance, alpaca is quite a heavy fiber so a 100 gram skein of worsted weight alpaca will have far fewer yards than a 100 gram skein of worsted weight wool. Good Wool is a lightly spun 2 ply wool and as such had quite a bit more yardage than you would expect than you would for a tightly spun 3 or 4 ply wool that knits up at the same gauge!
I hope that this clears things up!
Cassy
Look great ! However l have uncertainly with -Lift increase stiches
Can you post up tuition video
Thanks
Hi Aggie,
Thanks for writing in! We do have handy tutorials for the lifted increases! They can be found here: https://www.purlsoho.com/create/lifted-increases-rli-lli/
Best,
Cassy
I’m just at the gusset and as I look ahead to the thumb opening, I’m not quite understanding how it w ill work without casting on stitches to rejoin in the round. I just finished 2 other fingerless glove patterns and both have one casting on stitches.
Maybe it will become clear after I’ve done the gusset increases, but now I don’t see it.
Thanks!
Hi Leslie!
Thank so much for your question! The thumb stitches will be placed on a stitch holder or scrap yarn and not worked during the palm section. You won’t have to pick up any stitches but you will have to move the thumb stitches that were on hold back onto your needles to work in the round later on in the pattern.
I hope this helps!
Carly
I’m at this point too where I rejoin after slipping thumb stitches onto waste yarn. 49 sts for small means I now have two Knit stitches side by side after the join. Won’t this make for a very obvious vertical stripe? Your photos don’t show this part of the glove so I can’t examine if I’ve made a mistake…please clarify!
Hi Annamarie,
Thanks for reaching out. You’re absolutely correct! You will have 2 of the same type of stitch right next to each other for the PALM (and for the THUMB as well), so there will be a vertical stripe. It shouldn’t be too visually obtrusive though!
All the best,
Lili
Where on your hand do you measure to determine your size? Wrist? Knuckles? Palm including thumb?
Thank you.
Hi Carol,
Great question! You will want to measure around your palm just above your thumb being sure to exclude your thumb!
Best,
Cassy
Hi,
In the size info, what part or parts of the hand warmer measures 7 (8, 9) ?
Hi Natalie,
Thanks for reaching out! The 7 (8, 9) measurement is the circumference of the hand warmer. The circumference should be the same from top to bottom, with the exception of where the thumb is!
Happy knitting!
Gianna
Hi, Im trying to check the gauge, with the 28 sts. Row 1 worked ok, but how can I purl 1, slip1 wyib when my first stitch is the last slipped stitch of the previous row ?
Thank you for your help
Sorry, in my previous question I forgot to mention row 2, in which the first stitch is the slipped one from row 1,
Thank you.
Hi Teresa,
Thanks for writing in! When working this stitch pattern, you will work in rounds alternating round 1 and round 2. When you complete round 1, you will begin round 2 by slipping one stitch with yarn in the back and then moving your yarn to the front to purl the next stitch. Once you complete round 2, you will begin round 1 again by knitting into the stitch that you had slipped on the previous round. Round 1 will always begin with a knit 1 and round 2 will always begin with a slip 1 with the yarn in the back!
I hope that this clears things up!
Cassy
Do you have other things made with this stitch? without gussets
maybe socks ? well the place between the heels and toe.
could this also be called a slipped rib?
Hello Faun,
Thank you for reaching out! We do not have a sock pattern using this stitch, however if you have a simple sock pattern that you like you could add this pattern to the top of the foot into the ankle.
I hope this helps and happy knitting!
-Marilla
How do you count your gauge in a slip stitch pattern? Count pearl bumps and multiply times 2?
Thanks
Hi Mary,
Thanks for your question! To measure the stitch gauge, you will count the alternating columns of knit and purl stitches horizontally. The measure the row gauge, you can choose to either count one column of knit stitches or one column of purl bumps, and you are correct that you will multiply by two to get your actual row count.
Happy knitting!
Julianna
Is this yarn washable?
Hi Jean,
Thanks for writing in! Our washing instructions for Good Wool are to hand wash cold and lay flat to dry.
Best,
Julianna
Thank you for this great free pattern!
I’m working on the gusset rounds 7 and 8. The instructions are to repeat rounds 5 and 6.
I am interpreting this to mean:
Round 7 – repeat Round 5
Round 8 – repeat Round 6
Is this correct?
Thank you for your help!
Hi Rae,
Thanks for the kind words, and yes, you are interpreting the pattern correctly!
Best of luck and happy knitting!
Julianna
row 2 –you slip one WYIB then purl 1 which leaves my yarn in in front. The next slip one WYIB — Do i take yarn to back to slip?? This has confused meThank you
Hello Christine,
Thank you for reaching out! You are exactly right, after purling you will put your yarn in back to slip your stitch.
I hope this helps and happy knitting!
-Marilla
Hello!! I love the pattern and thanks for making these a free resource. So I am at the thumb hole bind off. I’m confused about how the Kirchner stitch work for a circular hole. It seems like it’s just going to seal the hole. Howe the stitches set up in order for this out-of-sequence Kitchener finish?
Hello Lucy,
This is a great question! Here we are the Kitchener technique to bind off rather than closing up two sides. To do this you will be alternating between two empty double pointed needles and working the stitches off of one needle at a time, slip all the knit stitches onto one empty needle and all the purl stitches onto the other. Hold the two needles parallel, with wrong sides of fabric facing each other and bind off using the Kitchener Stitch. Repeat these steps for the stitches on the remaining double pointed needles.
I hope this makes sense and let us know if we can clarify anything for you!
Happy knitting,
Marilla
Hi again, I am working on the thumb portion of the glove, but I seem to be doing something wrong because the stitches look like purl stitches.
When I start off with the thumb, am I starting from the inside area where the thumb meets the palm? (Not sure this really matters tho). Also, should I be working in a counter clockwise direction.
Do you have any other ideas what I might be doing wrong?
Thanks very much!!
Hi Rae,
Hmm, this is a tough one! Is it possible you are knitting the thumb inside out? Wherever you start the thumb, you should be knitting in the usual direction, from right to left, with the outside of the thumb facing you. Also, you should be knitting on the edge of the thumb opening that is closest to you, rather than knitting on the far side of the opening. If that doesn’t clear things up, please feel free to send us a picture of your work at customerservice@purlsoho.com so we can troubleshoot this for you!
I hope that helps!
Julianna
Greetings.
I am stuck at the beginning, trying to knit the gauge. It calls for 28 stitches but also to work in the round, which would result in 27 stitches after the yarn is joined. Do I need to cast on 29 stitches for the gauge and 51 stitches for the small-sized fingerless mitten?
Thank you.
Hi Jennifer,
Thanks for writing in! If you are using a joining method that uses up a stitch, such as passing a stitch over or knitting the first and last stitches together, you will need to add one stitch to your cast on. Since these methods are optional, most patterns will assume that you join in the round without using them, so unless the pattern includes instructions for passing a stitch over or something similar, you will probably have to add one whenever you are joining in the round.
I hope that clears things up!
Julianna
Hello,
I am at the beginning trying to get the right size and gauge with the needles and yarn I have. I am using size 6 needles and light dk weight yarn. I see the gauge is 28 stchs/52 rds = 4 inch. But will that just help me change the length of the warmer? What if I want to make sure the circumference is similar to the size medium. How should I check this? And how should I make changes with the number of cast on stitches? Thank you!
Hello Jennie,
Thank you for reaching out- these are great questions! This gauge is telling you the width and the hight of our pattern. It means that we got a 4″ by 4″ square with 28 stitches and 52 rounds. If you know what your gauge is or how many stitches per inch you are getting then you can choose if you want to add some stitches to the pattern or go up in needle size, depending on your preference. Depending on your gauge you might be able to just go up to the largest size and get a size closer to the medium size. However the only way to really know the best course of action is if you know your gauge.
I hope this all makes sense and let us know if you have any further questions!
Happy knitting!
-Marilla
Hello,
I’m trying to do this project but having trouble with the round 1 and 2. Is there any chance you can show in a tutorial row 1 & 2? The pattern isn’t the same in each needle. Thank you for your help.
Hello Daniela,
Thank you for reaching out and for your suggestion! While we don’t have a tutorial for this project, I would be happy to help! Is there a particular thing that is tripping you up that I could help you with?
Best,
Marilla
Hi,
I’d love to knit these with the Good Wool. And after that, can you suggest other yarns that may substitute well- especially to get some bright color options. Perhaps Mulberry Merino?
Thanks!
Hi Natalie,
Thank you for writing in! I think the idea of these hand warmers in Mulberry Merino is just lovely and would work very nicely. Your gauge will likely be a bit different, so I recommend a gauge swatch to see if any needle adjustments should be made. This pattern calls for around 200 yards for the Medium size, so one skein should be just fine for a pair of handwarmers!
Happy knitting!
Gaby
Thanks Gaby,
Would you recommend I first try with a size 5 or 6 (or 7) needle using Mulberry Merino?
(I will probably just start knitting the garment- because for me it seems just as easy as knitting a swatch in the round…and maybe more accurate in my case.)
Instead of aiming for the gauge in the pattern, (since there are multiple size options), perhaps I can see if I am happy with the fabric I am getting, and choose the size (small, medium, or large) that will get me the right fit based on my gauge. Would that be a good way to go?
Again, please recommend a needle size to start with. Thanks!
Also, how stretchy are these compared to stockinette stitch? How would you recommend choosing a size?
Hi Natalie,
Good question! I recommend trying the needle size called for by the pattern first. Once you have knit a bit in the round and have an idea of your gauge you can make any modifications (if necessary) from there. You may not need to change your needle size at all! In general, it is best to aim for the gauge of the project, so if you have too many stitches per inch, go down a needle size; too few stitches per inch, go up.
According to the sizing above, Adult Small (Medium, Large) will result in a finished circumference of 7 (8, 9) inches respectively, so I would recommend comparing these measurements to your own hand. This stitch is not terribly stretchy widthwise, so if you may want to size up if you find you are in-between.
Best,
Gaby
Thanks– very helpful!
Hi,
I have knit about an inch of the pattern (small size) with Mulberry Merino on size 7, and it measures about 7.33″ around, which is about 27.27 st/in.
Would you recommend going down a needle size? (Especially because the recipient has hands on the petite size.)
Hi Natalie,
Great question! You are awfully close to the right size, but especially if the recipient is petite, I do think going down a needle size would be a good idea!
Happy knitting!
Julianna
Hi Julianna-
It seems tricky getting an accurate circumference measurement with only 1″ of length…. sometimes it seems as large as 7.5″ around, which makes me wonder if I should go down two sizes to a size 5 needle. Perhaps I will knit another inch and see if that helps. (What would you say regarding a size 5 vs 6?)
I am thinking once completely knit, the fabric doesn’t give or stretch as much width-wise.
Hi,
I have another question- because it is hard to see the detail very well in the photos. The vertical rows of purl bumps- they don’t seem very raised, like they are meant to be pretty flush against the fabric and not sticking out. Would you agree?
Hi Natalie,
Thanks for writing in! You are correct, the purl stitches are not raised out of the fabric and are more flushed with the rest of the stitches. It gives this pattern a wonderful texture, reminiscent of a classic thermal shirt!
I hope this helps, happy knitting!
Gianna
Thanks Gianna.
I am new to the Kitchener stitch. When binding off for the Palm, do I first cut the working yarn then use that for weaving? How long of a tail do you recommend I leave for doing the bind-off?
Hi Natalie,
Thanks for reaching out! You use the working yarn for the bind off without cutting it! Our Kitchener Stitch tutorial is a great resource to use!
I hope this helps!
Gianna
Ok….I estimated 36″ of tail… and that left me 16″ after the bind off– (making the small size.) So, worked out.
I made a go of the Kitchener stitch, and it went well! So glad I learned something new. It help me to find the method written out step by step, and by the end I got the hang of it without looking at the written steps.
But I had to make sure I had the tension just right as I went along, because I’m not sure how to go back and adjust the tension (the way it shows in the tutorial) because it’s very difficult to see the yarn when it’s the same color and not contrasting.
Thanks!
Hi Natalie,
Thanks for reaching out again! I am very glad to hear that this worked out for you and you had a good experience with the Kitchener Stitch!
All the best,
Gianna
Hi. I love this and promised a friend fingerless gloves this winter. But I’m a beginner who can knit and purl on straight needles and sometimes circular. I’ve never used double pointed or increased and decreased. This looks so difficult on my own. What do you think? Other than the easy kit combo, is there another pattern that could be easier? I love how polished these look! Thanks.
Hi Charlene,
Thanks for writing in! I think this pattern is totally doable for a beginner level knitter! Luckily, to assist you along the way, we have some excellent tutorials on using Double Pointed Needles, Make 1 Purlwise (m1p), and Lifted Increases (RLI + LLI) which are all the techniques you need for this pattern! There are several other hand warmer patterns that we offer, but besides the Simple Hat + Hand Warmer pattern they will all involve Double Pointed Needles and similar increasing techniques!
I hope this helps, happy knitting!
Gianna
Thanks Gianna. I did see in the earlier comments a pattern for straight needles to make these gloves. Should I try that instead? Double needles and new stitches are so intimidating! And with COVID, I can’t run downtown to have you fix my mistakes. Thanks!
And if I get the size 7 bamboo double needles which length?
Hi Charlene,
Thanks for writing in again! I would recommend buying a set of 6″ US 7 DPNs for this project!
All the best,
Gianna
Thanks! You are out of stock but I’m patient.
Hi Charlene,
Oh shoot, sorry about that! While we do not have a firm ETA on restocking the DPNs, we are hoping that it will arrive soon. You can sign up to be notified when we get it back in stock. To do so, go to the Double Pointed Bamboo Knitting Needles page, select the size that you are interested in and enter your email address. When the needles arrives, we will email you right away!
All the best,
Gianna
Thanks Gianna! I’m eager to get started!
Hi. I have the yarn and needles but just stare at them as this pattern seems a bit hard for me. Do you offer a video consultation to get me started?
Hi Charlene,
Thanks for reaching out! We do offer Zoom meetings to help get you started! You can email us at customerservice@purlsoho.com to set something up!
Warmly,
Gianna
Thanks Gianna! Stay warm!
Hi, when going from round to round 2 you slip two neighbouring stitches, the last from r1 then the first of r2, both with the yarn in back, so you end up with a longer strand on the back that spans both slipped stitches. Is this correct please?
Hi Lou,
Thanks for reaching out. You are absolutely correct! There will be a longer strand in back of the last stitch of Round 1 and the first stitch of Round 2, since these are both slipped. Hope this helps clarify things!
All the best,
Lili