Bamboo Shell
Knitting in front of nail-biting soccer matches has its pitfalls. High tensions result in tight knitting. Jumping in celebration leads to dropped stitches. Mournful losses extinguish all desire to even pick up your needles. Oh, but when a game is good and you’re working in speedy, soft bamboo, progress really barrels along!
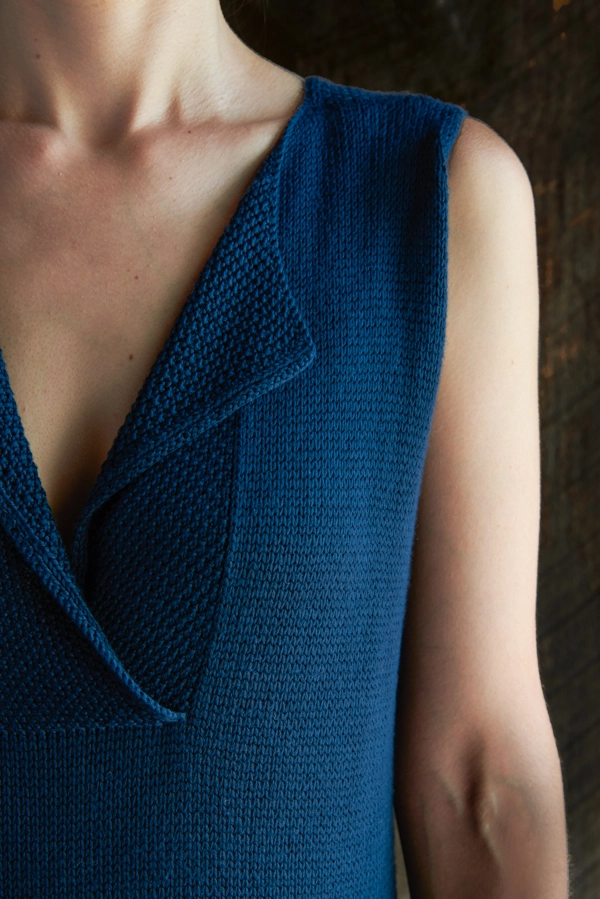
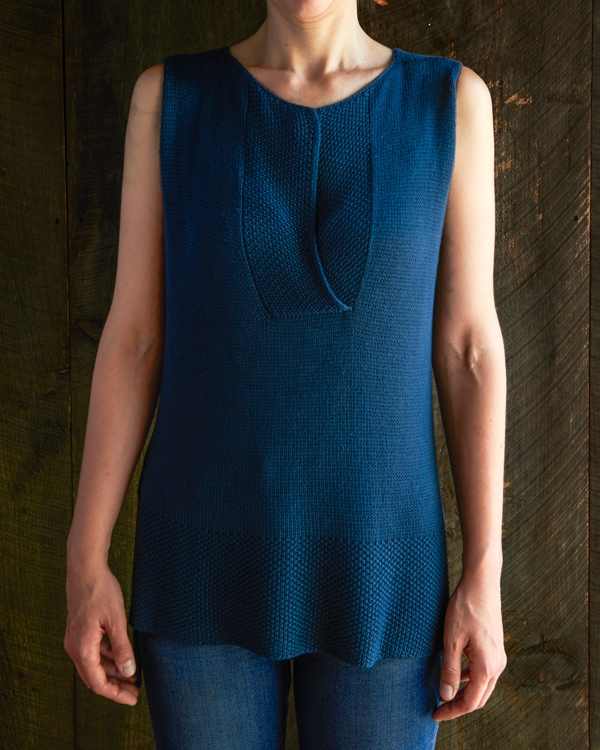
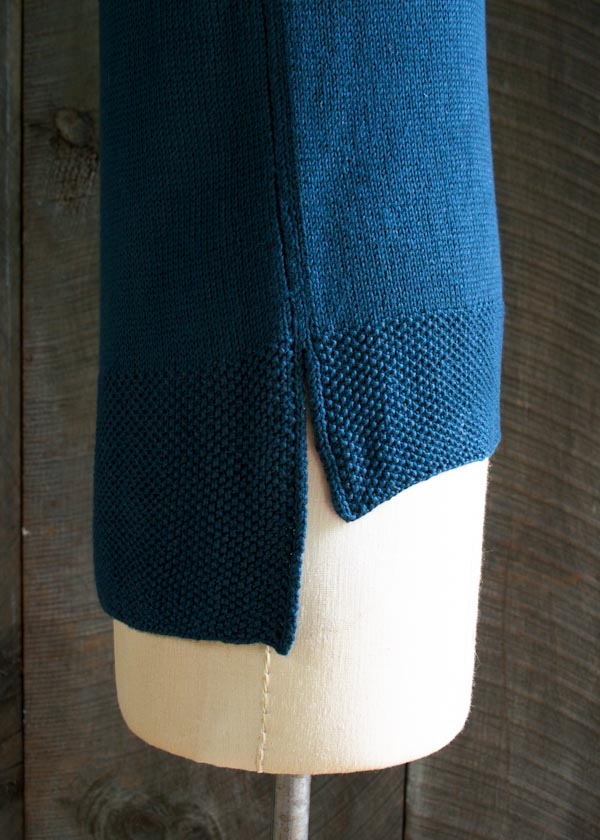
I did not initially envision this top to be quite so long, but before I knew it, I had breezed through 6 inches of seed stitch and 12 inches of stockinette, bidding farewell to the cropped top dancing in my head and saying hello to an elegant, hip-length version. Loving this length, but unable to quite let go of my original vision, my Bamboo Shell pattern gives instructions for both, plus an in-between waist-length style.
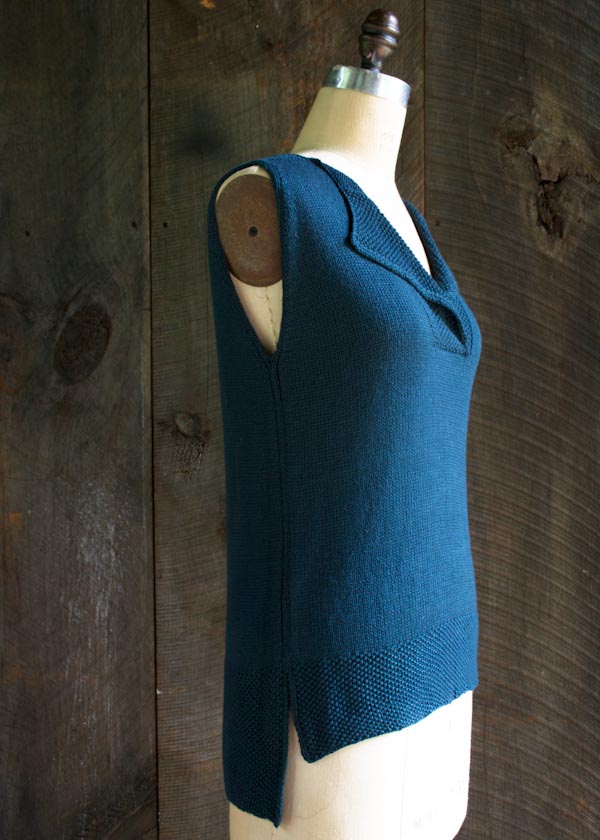
Back to the action… The fast-growing back of my sweater meant I needed to quickly work up and over the shoulders in order to knit a slightly shorter front. Translation: I had a lot of knitting ahead of me, but a lot of soccer too! I couldn’t have been happier.
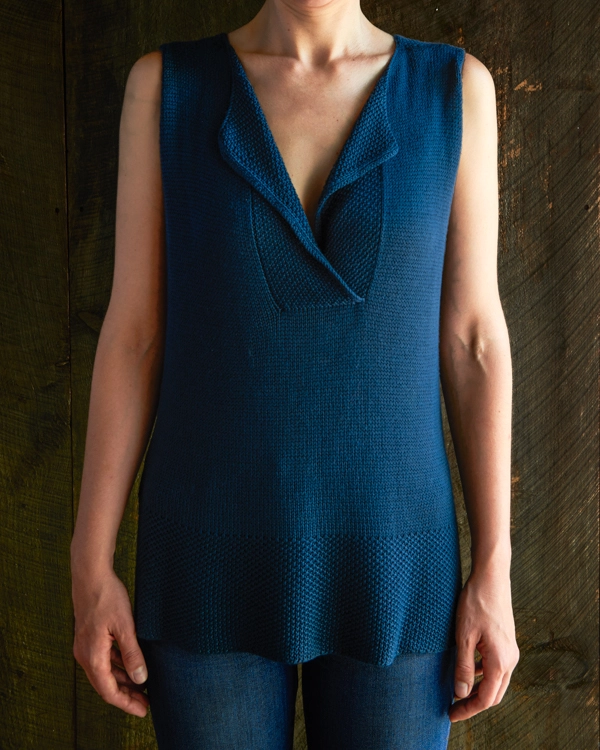
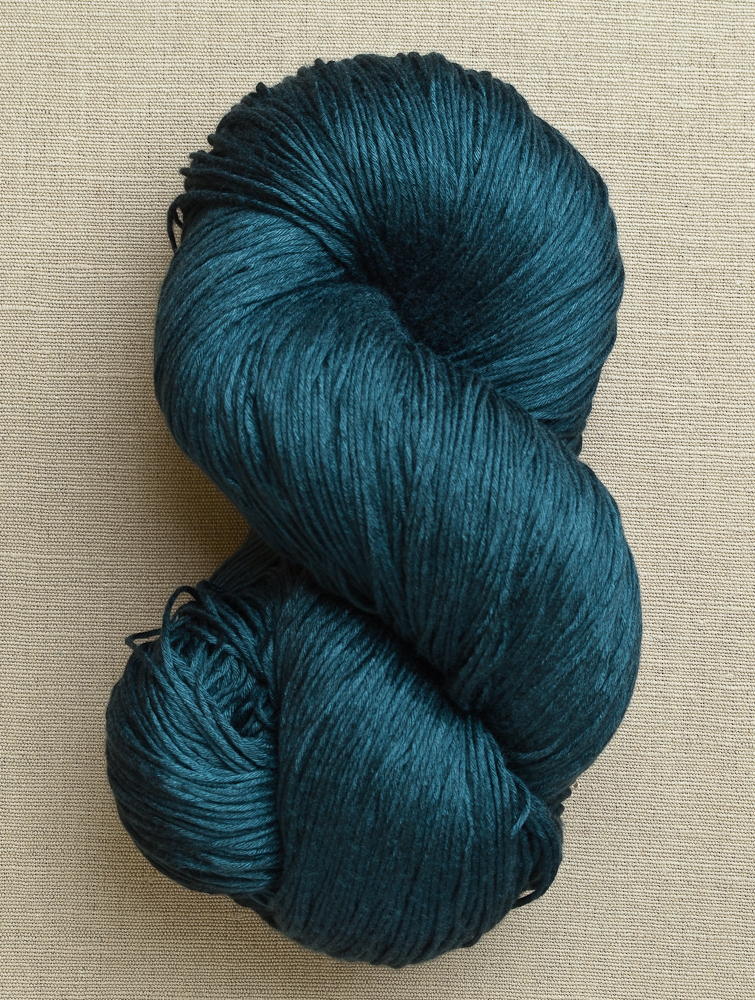
Habu’s Dyed Bamboo is beyond delightful. It’s cool and quick, but what’s even better is its magical property of perfecting stitches. My knitting was far from steady during these past few weeks of exciting soccer action, and yet, my stitches have never looked so smooth and even.
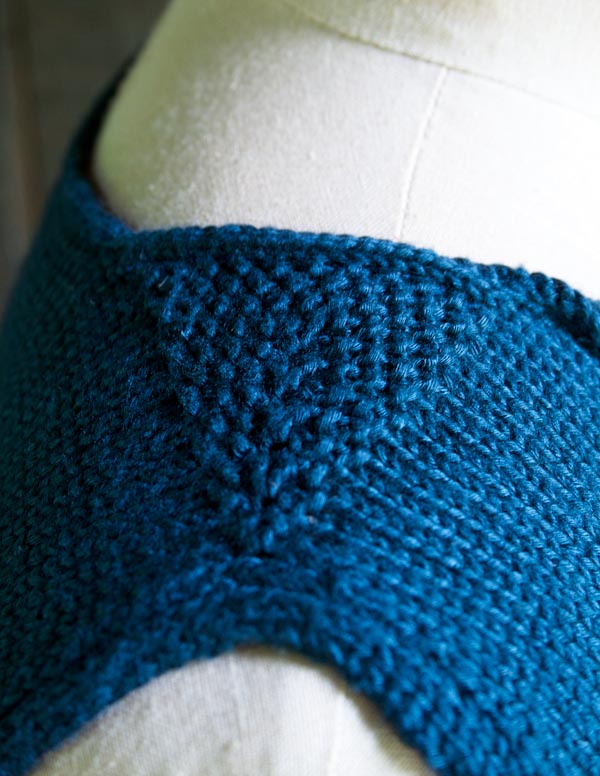
Perhaps it is the Dyed Bamboo’s rich, saturated color and subtle sheen that highlights stitch patterns so well. Shoot, maybe it was the magic surrounding the World Cup. I know not! What I do know is that I’ll be knitting this Bamboo Shell again. Baseball anyone? -Laura
Designed by Purl Soho designer, Laura Ferguson.
Share your progress and connect with the community by tagging your pics with #PurlSoho, #PurlSohoBusyHands, #PurlSohoBambooShell, and #PurlSohoBurnish. We can’t wait to see what you make!
Materials
- Habu’s Dyed Bamboo, 100% bamboo. Each skein is 760 yards/ 269 gram hank. (NOTE: We no longer offer Habu Dyed Bamboo, but choose from one of our other sport weight yarns.)
- Short, waist-length shell: 1 (2, 2, 2, 2) skein(s); approximately 638 (733, 832, 945, 1063) yards required.
- Medium, dropped-waist shell: 1 (2, 2, 2, 2) skein(s); approximately 694 (797, 903, 1024, 1149) yards required.
- Long, hip-length shell (pictured here): 1 (2, 2, 2, 2) skein(s); approximately 751 (860, 974, 1103, 1236) yards required.
OR
- Purl Soho’s Burnish, 100% rayon from bamboo. Each skein is 339 yards/ 100 grams. (NOTE: We no longer offer Burnish, but choose from one of our other sport weight yarns.)
- Short, waist-length shell: 2 (3, 3, 3, 4) skeins; approximately 638 (733, 832, 945, 1063) yards required.
- Medium, dropped-waist shell: 3 (3, 3, 4, 4) skeins; approximately 694 (797, 903, 1024, 1149) yards required.
- Long, hip-length shell (pictured here): 3 (3, 3, 4, 4) skeins; approximately 751 (860, 974, 1103, 1236) yards required.
You will also need…
- US 3 (3.25 mm), 16 or 24-inch circular needle
- US 3, 12-inch or longer spare circular needle
- 2 stitch markers
Gauge
27 stitches and 32 rows = 4 inches in stockinette stitch
Sizes
NOTE For help picking a size, please check out our Understanding Ease + Selecting Size Tutorial!
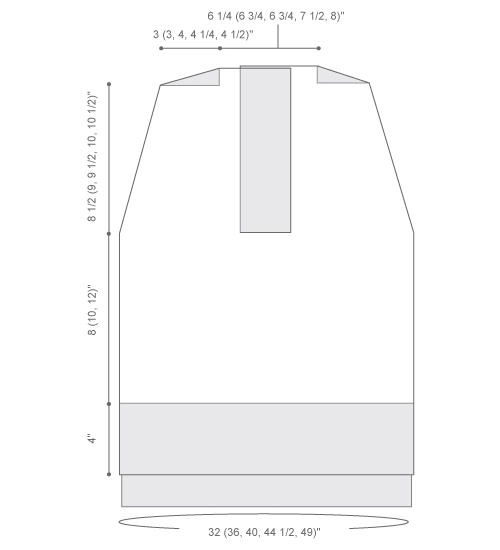
32 (36, 40, 44½, 49)
- Finished Chest Circumference: 32 (36, 40, 44½, 49) inches
- Length from Shoulder to Underarm: 8½ (9, 9½, 10, 10½) inches
- Length from Underarm to Front Bottom Edge for Short (Medium, Long) versions: 12 (14, 16) inches
- Length from Underarm to Back Bottom Edge for Short (Medium, Long) versions: 14 (16, 18) inches
Ease: This garment is designed with a 1 to 3-inch ease around the chest.
Sample: Pictured here is Size 36, Long.
Notes
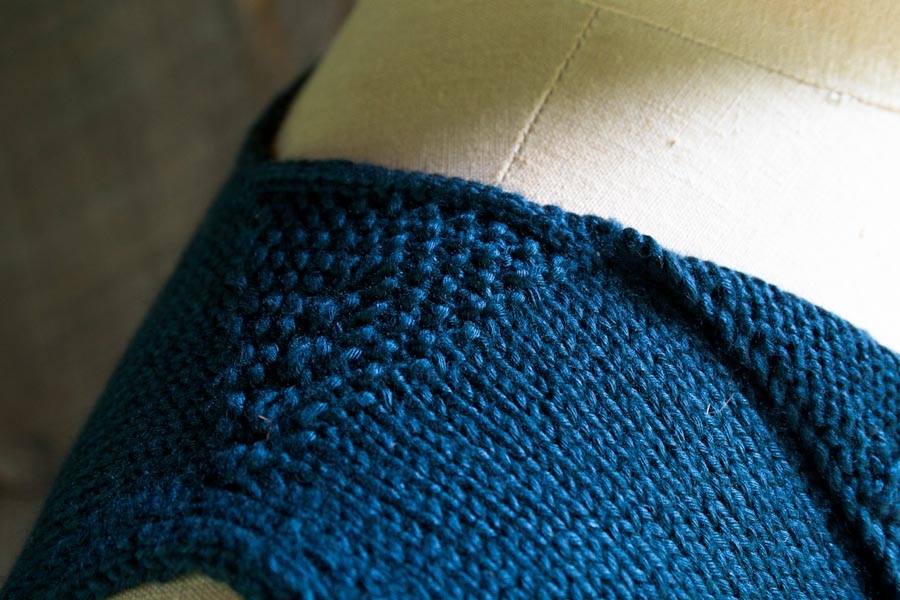
The shoulders of this shell are shaped using short rows. For our complete Short Row Tutorial, please click here. NOTE: Because the short rows are worked in seed stitch in this pattern, you do not have to pick up the wraps; simply ignore the wraps when you come to them and work the wrapped stitch normally.
wrp-t (wrap and turn): Bring yarn to front, slip next stitch purlwise from the left needle to the right needle, bring yarn to back, return the slipped stitch to the left needle, bring yarn to front, turn work.
Pattern
Back
Begin at Bottom Back Edge
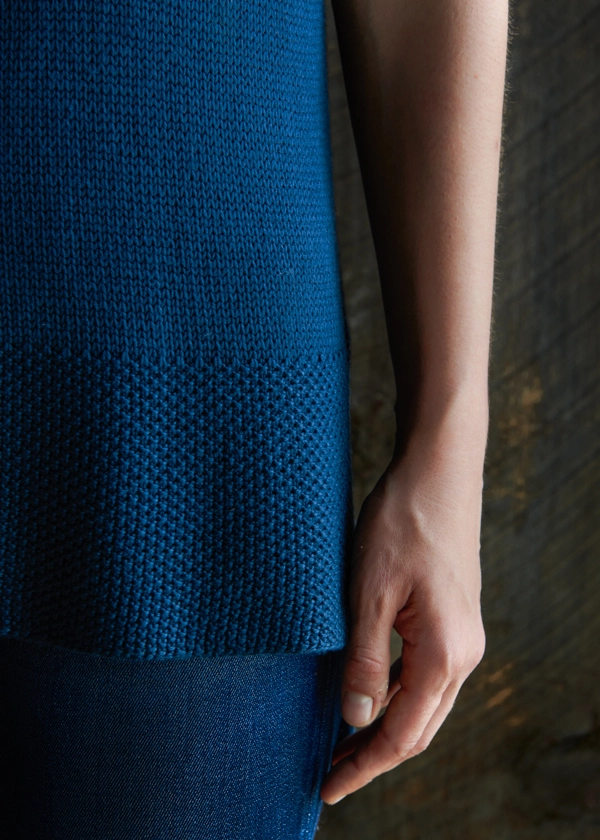
Cast on 108 (122, 136, 150, 166) stitches. We used a basic Long Tail Cast On.
Row 1 (wrong side): P2, [k1, p1] to last four stitches, k2, p2.
Row 2: K2, [p1, k1] to last four stitches, p2, k2.
Repeat Rows 1 and 2 until pieces measures 6 inches, or desired height of Back Edge, ending with Row 2.
Continue Back Body
Row 1 (wrong side): P2, k1, purl to last three stitches, k1, p2.
Row 2: K2, p1, knit to last three stitches, p1, k2.
Repeat Rows 1 and 2 until piece measures, for the short (medium, long) shell, 14 (16, 18) inches from the cast on edge, or desired height to underarm, ending with Row 2.
Shape Back Armholes
SIZES 44 1/2 AND 49 ONLY
Row 1 (wrong side): P2, k1, purl to last three stitches, k1, p2.
Row 2: K2, p1, ssk, knit to last five stitches, k2tog, p1, k2. [2 stitches decreased]
Repeat Rows 1 and 2 – ( – , – , 3, 9) more times. [ – ( – , – , 142, 146) stitches]
ALL SIZES
Row 1 (wrong side): P2, k1, purl to last three stitches, k1, p2.
Row 2: K2, p1, knit to last three stitches, p1, k2.
Row 3: Repeat Row 1.
Row 4: K2, p1, ssk, knit to last five stitches, k2tog, p1, k2. [2 stitches decreased]
Repeat Rows 1 – 4 four (17, 18, 17, 15) more times. [98 (86, 98, 106, 114) stitches]
SIZE 32 ONLY
Row 1 (wrong side): P2, k1, purl to last three stitches, k1, p2.
Row 2: K2, p1, knit to last three stitches, p1, k2.
Rows 3 and 4: Repeat Rows 1 and 2.
Row 5: Repeat Row 1.
Row 6: K2, p1, ssk, knit to last five stitches, k2tog, p1, k2. [2 stitches decreased]
Repeat Rows 1 – 6 seven ( – , – , – , – ) more times. [82 ( – , – , – , – ) stitches]
Shoulders and Front Armholes
Separate for Left and Right Shoulders
Row 1 (wrong side): P2, k1, purl to last three stitches, k1, p2.
Row 2: K2, p1, k14 (14, 20, 22, 24), p1, k2, place previous 20 (20, 26, 28, 30) stitches on stitch holder or scrap yarn for Right Shoulder, bind off next 42 (46, 46, 50, 54) stitches, k1, p1, knit to last three stitches, p1, k2. [20 (20, 26, 28, 30) stitches remain for Left Shoulder]
Left Shoulder
NOTE: For this portion of the pattern, you will be working back and forth in short rows, turning the work part way through each row rather than continuing to the end for the needle. For our complete Short Rows Tutorial, click here. Also, for this section, you will be working just the 20 (20, 26, 28, 30) stitches of the Left Shoulder.
Row 1 (wrong side): P2, [k1, p1] to last four stitches, k2, p2.
Row 2: K2, [p1, k1] 6 (6, 9, 10, 10) times, wrap and turn (wrp-t; see NOTES at beginning of pattern).
Row 3: [K1, p1] to last four stitches, k2, p2.
Row 4: K2, [p1, k1] 5 (5, 7, 8, 8) times, wrp-t.
Row 5: Repeat Row 3:
Row 6: K2, [p1, k1] 4 (4, 5, 6, 6) times, wrp-t.
Row 7: Repeat Row 3.
Row 8: K2, [p1, k1] 3 (3, 3, 4, 4) times, wrp-t.
Row 9: Repeat Row 3.
Row 10: K2, [p1, k1] 2 (2, 1, 2, 2) time(s), wrp-t.
Row 11: Repeat Row 3.
Row 12: Repeat Row 8.
Row 13: Repeat Row 3.
Row 14: Repeat Row 6.
Row 15: Repeat Row 3.
Row 16: Repeat Row 4.
Row 17: Repeat Row 3.
Row 18: Repeat Row 2.
Row 19: Repeat Row 3.
Left Front
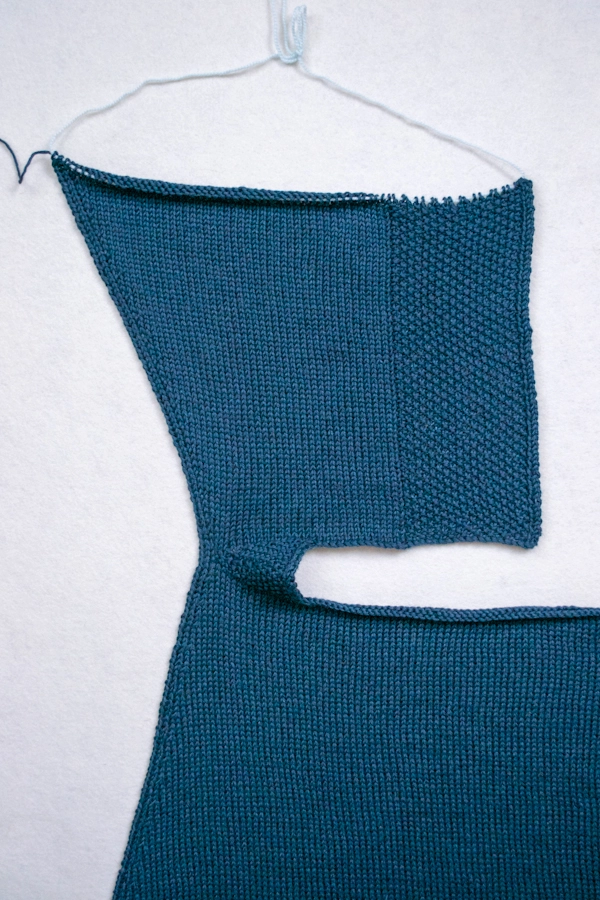
Set-Up Row (right side): Cable cast on 32 (34, 34, 36, 38) stitches, working across newly cast-on stitches and remainder of row… k2, [p1, k1] nine times, p2, place marker, knit to last three stitches, p1, k2. [52 (54, 60, 64, 68) stitches]
Shape Left Front Armhole
SIZE 32 ONLY
Row 1 (wrong side): P2, k1, purl to marker, [k1, p1] to last four stitches, k2, p2.
Row 2: K2, [p1, k1] to two stitches before marker, p2, knit to last four stitches, make 1 right (m1R), k1, p1, k2. [1 stitch increased]
Row 3: Repeat Row 1.
Row 4: K2, [p1, k1] to two stitches before marker, p2, knit to last three stitches, p1, k2.
Row 5: Repeat Row 1.
Row 6: Repeat Row 4.
Repeat Rows 1 – 6 seven ( – , – , – , – ) more times. [60 ( – , – , – , – ) stitches]
ALL SIZES
Row 1 (wrong side): P2, k1, purl to marker, [k1, p1] to last four stitches, k2, p2.
Row 2: K2, [p1, k1] to two stitches before marker, p2, knit to last four stitches, make 1 right (m1R), k1, p1, k2. [1 stitch increased]
Row 3: Repeat Row 1.
Row 4: K2, [p1, k1] to two stitches before marker, p2, knit to last three stitches, p1, k2.
Repeat Rows 1 – 4 four (17, 18, 17, 15) more times. [65 (72, 79, 82, 84) stitches]
SIZE 44 1/2 AND 49 ONLY
Row 1 (wrong side): P2, k1, purl to marker, [k1, p1] to last four stitches, k2, p2.
Row 2: K2, [p1, k1] to two stitches before marker, p2, knit to last four stitches, m1R, k1, p1, k2. [1 stitch increased]
Repeat Rows 1 and 2 – ( – , – , 3, 9) more times. [ – ( – , – , 86, 94) stitches]
ALL SIZES
Cut yarn. Place 65 (72, 79, 86, 94) Left Front stitches on stitch holder or scrap yarn.
Right Shoulder
NOTE: for this section, you will be working just the 20 (20, 26, 28, 30) stitches that have been on hold for the Right Shoulder. And again, you will be working back and forth in short rows, turning the work part way through each row rather than continuing to the end of the needle.
Set-Up Row (right side): With the right side facing, join yarn, k2, [p1, k1] to last four stitches, p2, k2.
Row 1 (wrong side): P2, [k1, p1] 5 (5, 9, 10, 10) times, k1, wrp-t.
Row 2: [K1, p1] to last three stitches, p1, k2.
Row 3: P2, [k1, p1] 4 (4, 7, 8, 8) times, k1, wrp-t.
Row 4: Repeat Row 2.
Row 5: P2, [k1, p1] 3 (3, 5, 6, 6) times, k1, wrp-t.
Row 6: Repeat Row 2.
Row 7: P2, [k1, p1] 2 (2, 3, 4, 4) times, k1, wrp-t.
Row 8: Repeat Row 2.
Row 9: P2, [k1, p1] 1 (1, 1, 2, 2) time, k1, wrp-t.
Row 10: Repeat Row 2.
Row 11: Repeat Row 7.
Row 12: Repeat Row 2.
Row 13: Repeat Row 5.
Row 14: Repeat Row 2.
Row 15: Repeat Row 3.
Row 16: Repeat Row 2.
Row 17: Repeat Row 1.
Row 18: Repeat Row 2.
Right Front
Set-Up Row (wrong side): Cable cast on 32 (34, 34, 36, 38) stitches, working across newly cast on stitches and remainder of row… p2, [k1, p1] nine times, k2, place marker, purl to last three stitches, k1, p2. [52 (54, 60, 64, 68) stitches]
Next Row: K2, p1, knit to marker, [p1, k1] to last 4 stitches, p2, k2.
Shape Right Front Armhole
SIZE 32 ONLY
Row 1 (wrong side): P2, [k1,p1] to two stitches before marker, k2, purl to last three stitches, k1, p2.
Row 2: K2, p1, k1, make 1 left (m1L), knit to marker, [p1, k1] to last 4 stitches, p2, k2. [1 stitch increased]
Row 3: Repeat Row 1.
Row 4: K2, p1, knit to marker, [p1, k1] to last 4 stitches, p2, k2.
Row 5: Repeat Row 1.
Row 6: Repeat Row 4.
Repeat Rows 1 – 6 seven ( – , – , – , – ) more times. [60 ( – , – , – , – ) stitches]
ALL SIZES
Row 1 (wrong side): P2, [k1,p1] to two stitches before marker, k2, purl to last three stitches, k1, p2.
Row 2: K2, p1, k1, make 1 left (m1L), knit to marker, [p1, k1] to last 4 stitches, p2, k2. [1 stitch increased]
Row 3: Repeat Row 1.
Row 4: K2, p1, knit to marker, [p1, k1] to last 4 stitches, p2, k2.
Repeat Rows 1 – 4 four (17, 18, 17, 15) more times. [65 (72, 79, 82, 84) stitches]
SIZE 44 1/2 AND 49 ONLY
Row 1 (wrong side): P2, [k1,p1] to two stitches before marker, k2, purl to last three stitches, k1, p2.
Row 2: K2, p1, k1, m1L, knit to marker, [p1, k1] to last 4 stitches, p2, k2. [1 stitch increased]
Repeat Rows 1 and 2 – ( – , – , 3, 9) more times. [ – ( – , – , 86, 94) stitches]
ALL SIZES
Row 1 (wrong side): P2, [k1,p1] to two stitches before marker, k2, purl to last three stitches, k1, p2.
Front
Connect Right Front and Left Front
Place Front Left stitches on spare needle.
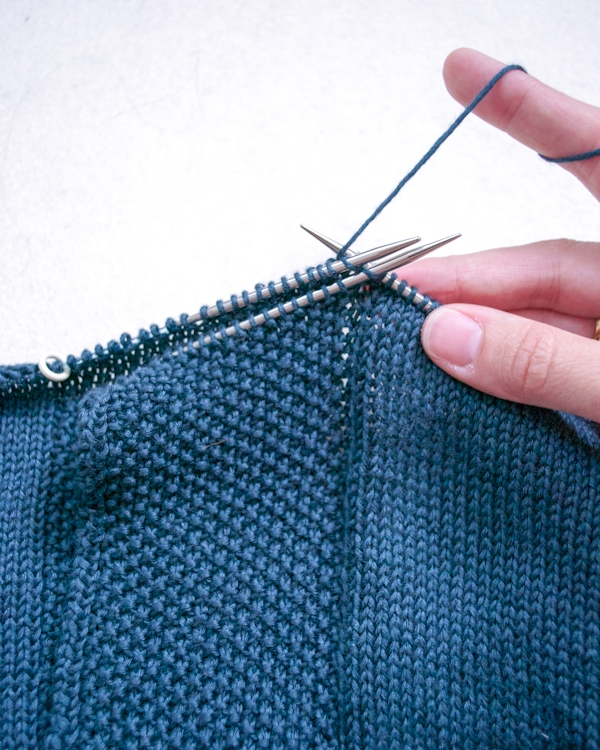
Set-Up Row (right side): Starting with the Right Front stitches, k2, p1, knit to marker, remove marker; holding the needle with the Front Left stitches behind and parallel to the needle with the remaining Front Right stitches and simultaneously working the stitches on both needles… p1, k18, p1, k2, remove marker on back needle; now working just the Front Left stitches, knit to last three stitches, p1, k2. [108 (122, 136, 150, 166) stitches]
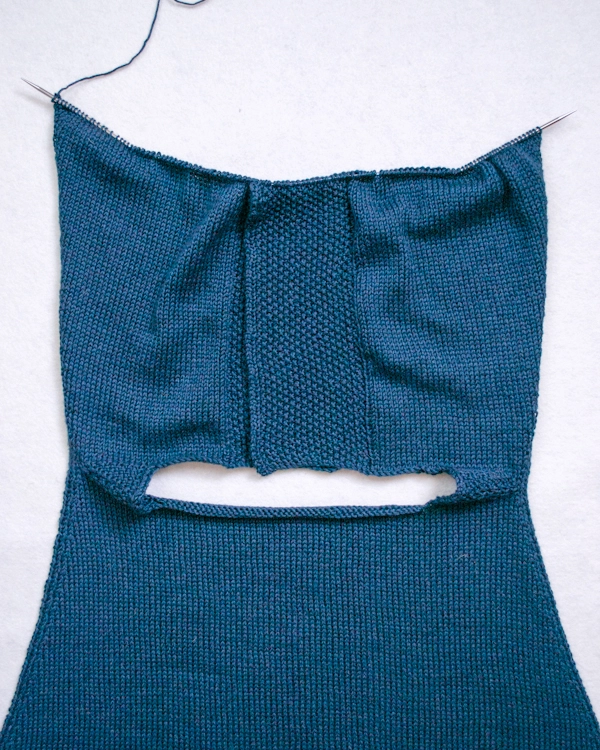
Continue Front Body
Row 1 (wrong side): P2, k1, purl to last three stitches, k1, p2.
Row 2: K2, p1, knit to last three stitches, p1, k2.
Repeat Rows 1 and 2 until piece from the Connect Right Front and Left Front measures the same distance as from the beginning of the Back Armhole shaping to the top of the Back Edge.
Finish with Bottom Front Edge
Row 1 (wrong side): P2, [k1, p1] to last four stitches, k2, p2.
Row 2: K2, [p1, k1] to last four stitches, p2, k2.
Repeat Rows 1 and 2 until Front Edge measures 4 inches or desired height of Front Edge.
Bind off in stitch pattern.
Finish
Side Seams
Use mattress stitch to seam the sides from the top of the Front and Back Edges to the beginning of the Front and Back Armhole shaping.
Armholes
With the right side facing and beginning at the center of the underarm, pick up 1 stitch from each stitch along the entire armhole edge, binding off as you go.
Neckband
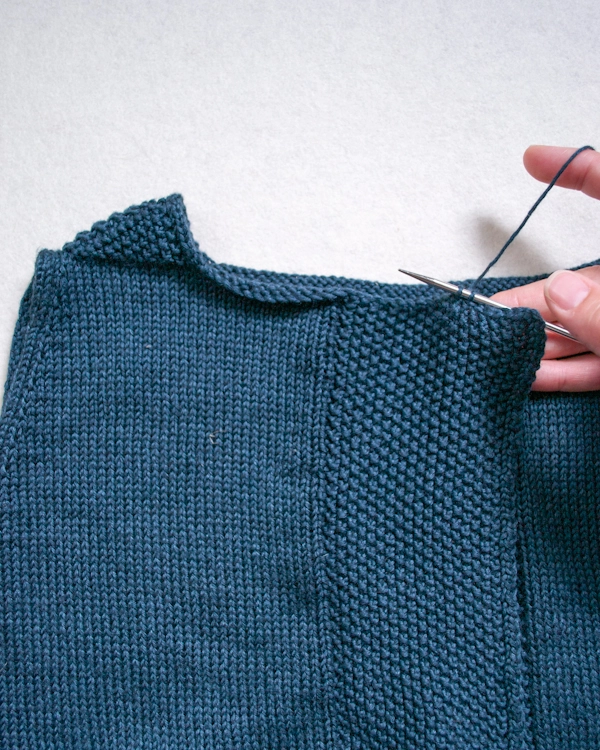
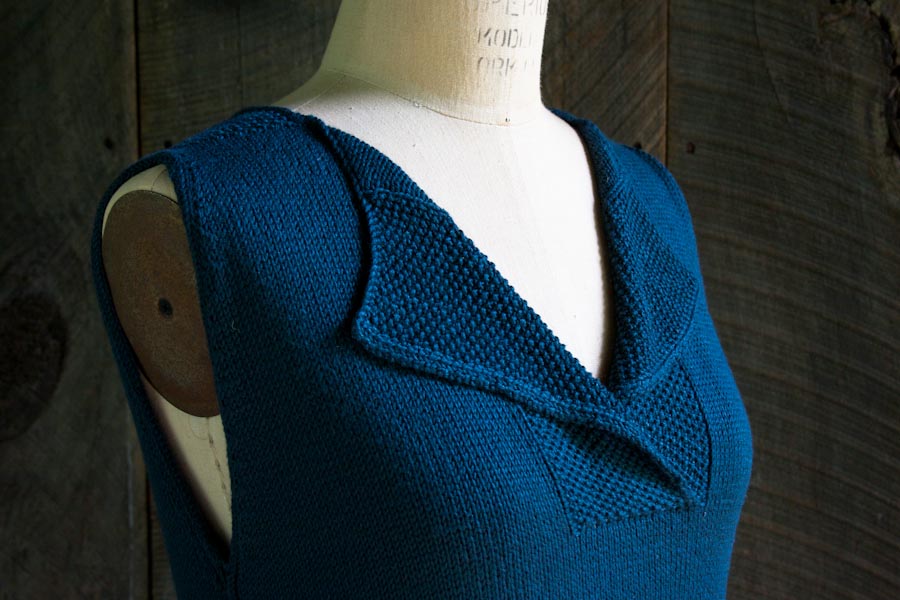
With the right side facing and beginning with the Front Right, pick up 1 stitch from each stitch along the entire neckline edge: first the Front Right, then the Right Shoulder, then the back Neck, then the Left Shoulder and finally the Front Left, binding off as you go.
Tails and Block







I love this shell & would like to knit it. Would you have any information on the actual yardage needed for sizes? I can't imagine you'd need the whole 1400 yards for a sleeveless shell.
This is a gorgeous shell! Would you ever think about making it a summer weight sweater with short sleeves?
Hi Ann,
What a wonderful idea! We always love suggestions from our customers and will keep your suggestion in mind! Thank you!
Best,
Adam
Beautiful work! Gorgeous yarn!
Love the detailing on this top. I bet it drapes like crazy in the bamboo. I always love the designs on here. Keep up the good work!
Thank you so much for sharing this lovely pattern. I am in love with the drape of bamboo, so love the soft neck opening in this top.
This is a very exciting pattern I can't wait to try. I LOVE working with bamboo. Could you list how many yards are needed for each size if substituting another yarn? Thank you.
Dear Purlbee,
I have opened your newsletter in several browsers, but i never get the pictures.
It is the same for any item on your website: no pictures! Real pity!
Is there something I need to do to also see the pictures? 'Download pictures' does not work.
Regards,
Juliette
I love this pattern and the yarn looks stunning – but quite pricey. Would you have any suggestion for yarn that would work but not quite as expensive?
Thank you so much
so pretty! Unfortunatly, my knitting skills are still a work-in-progress. This will have to wait a while.
Very nice! 🙂
Hi
love this top – what weight is the yarn? I notice that there are several weights of the recommended yarn.
Hello Angie D and Lori…
Here are the yardages for the projects:
– Short, waist-length shell: 638 (733, 832, 945, 1063) yards of Habu's Dyed Bamboo
– Medium, dropped-waist shell: 694 (797, 903, 1024, 1149) of Habu's Dyed Bamboo
– Long, hip-length shell (pictured here): 751 (860, 974, 1103, 1236)yards of Habu's Dyed Bamboo
Hope this helps! Glad you like the project. Thank so much for writing in.
Laura
Hi Barb.
I would love to suggest some alternative yarns!
Cascade's Ultra Pima (cotton): https://www.purlsoho.com/purl/products/item/7117-Cascade-Yarns-Ultra-Pima
Louet's Euroflax (linen): https://www.purlsoho.com/purl/products/item/380-Louet-Euroflax-Originals
Blue Sky's Skinny Cotton (cotton): https://www.purlsoho.com/purl/products/item/3823-Blue-Sky-Skinny-Cotton
For Less Summery Alternatives…
Anzula's Cricket (merino/ cashmere/ nylon): https://www.purlsoho.com/purl/products/item/8710-Anzula-Cricket
Koigu's KPM (merino): https://www.purlsoho.com/purl/products/item/410-Koigu-Wool-Designs-Koigu-Premium-Merino-KPM
Blue Sky's Alpaca Silk (alpaca/ silk): https://www.purlsoho.com/purl/products/item/722-Blue-Sky-Alpaca-Silk
Blue Sky's Sport Weight (alpaca) – Solids: https://www.purlsoho.com/purl/products/item/714-Blue-Sky-100-Sport-Weight-Alpaca-Solids
Blue Sky's Sport Weight (alpaca) – Melange: https://www.purlsoho.com/purl/products/item/1105-Blue-Sky-100-Sport-Weight-Alpaca-Melanges
Please let me know if you have any questions about any of these yarns or anything else!
Laura
Laura – thank you so much for all the great alternative suggestions – I really appreciate your help with that. And thanks, too, for ideas for cooler seasons.
I love Purl Bee – there are always so many great projects I want to make (I just need more time :-)! don't we all?)
Thanks again!!
Very nice! 🙂
awesome! this is going to my queue!
Are there larger sizes beyond 49' or alterations for short rows in the bust?
Hi Kristy.
Habu's Bamboo could be classified as either a light Sport Weight or heavy Fingering Weight. I worked it up at 6 3/4 stitches to the inch and find that yarns on the thinner end of the Sport Weight spectrum, would work quite nicely as well, but so do heavier Fingering Weight yarns (especially those with a slight bloom).
Often times, depending on the fiber or weight of a yarn, and how tightly or loosely I like it knit, a single project could take a variety of types of yarns. I hope this hasn't confused matters.
Please let me know if you have any questions regarding a specific yarn you are considering (or about anything else!).
Thanks,
Laura
Hi Bev801,
Unfortunately this pattern, at the moment, only goes up to Size 49 with a 49-inch circumference bust. I appreciate your request for optional short rows at the bust. I will put this on our list of things to do! I am not sure when we will get to it, but it sure would be a great addition to the pattern.
Thank you again for the request and for writing in.
Best,
Laura
I absolutely adore you guys..you inspire me to knit pass my own mental limitations! thank you for Rocking!!
I love this top! Absolutely beautiful. I’m wondering if you have ideas or suggestions on how to modify it and add some sleeves? I’d love this as a fall top!
Hi Jessica,
Thanks for writing in. I love that idea. Unfortunately we don’t have the resources (time) at this moment to re-work this pattern to include sleeves. But I’d love to help trouble shoot with you along the way if you decide to go for it and have any questions! Some thoughts on the topic…
First, I would work the body in the round. You could cast on the back and front separately in order to achieve the differing lengths and then join them and work in the round up to the underarms. The decreasing for the armholes are similar to a compound raglan. It would be easy enough to work your sleeves from the cuff, up. Then join them at that point and mirror the decreases along then armhole shaping.
Another option would be to make the top exactly as instructed here and then pick up along the armholes and work short rows to for a sleeve cap, eventually joining in the round, decreasing as you work towards the cuff.
I’ll keep your request in mind and see if we can get something published this Fall / Winter that may be in line with what you’re looking for!
Thanks again for writing in.
Laura
Just finished the Lattice Top and Cable Back Shell….They are gorgeous. Can’t wait to make the Bamboo Shell. Thank You for so many wonderful patterns….they are all so…’uptown’.
Louise! Thank you for your kind and generous message. I am thrilled to hear you’ve been enjoying the patterns!
Laura
I absolutely love this and just bought the yarn to make it! Although I love this teal bamboo, I found a mixed fibre in more of a light peach colour! (: cannot wait to cast onto my addi clicks! xx
Thanks for another great pattern!
I believe there is a mistake in the Separate for Left and Right Shoulders section. I’m making the size 36 version and I’m supposed to have 86 stitches at the start of this section. It then says to work 26 stitches and put them on hold for the right shoulder – then to bind off 46 stitches and work the remaining 26 stitches for the left shoulder. This would total 98 stitches, not 86 stitches though. Shouldn’t it be bind off 34 stitches, not 46?
Thanks,
Jennie
Hi Jennie!
Thanks so much for writing in.
For Size 36…
You have a cast on of 122.
After you shape the armholes you’re down to 86 stitches.
Then when it’s time to separate for the Left and Right Shoulder, you’ll have 20 stitches for each shoulder, 40 total for shoulders. So, 86 total stitches – 40 shoulder stitches = 46 stitches for the back of the neck.
I think you may be looking in the wrong spot if you’re reading the “26” that stitch count aligns with the next size up. For size 36, you should be following the instructions just inside of the parentheses.
Please let me know if you have any questions!
Thanks.
Laura
I’m making Bamboo Shell for size 32 which I started 108 stitches, shaping armholes then I’m down on 92 stitches.
I’m sure that I made a mistake. In your instruction, after repeating 1-6 seven more times, I suppose to have 82 stitches instead of 92 stitches. Is it correctable just before separating for Left and Right Shoulders?
Please help me ASAP.
Thank you in advance.
kyu
Hi Kyu Youn.
Unfortunately, I think your best bet is to rip back to where you think the mistake is and then rework the decreases. If you don’t want to do that, you’ll have to integrate the 10 extra stitches into the remainder of that pattern, essentially rewriting everything from the section called Shoulders and Front Armholes, on.
Please let us know if you have any questions!
Laura
OK – I think I realise where we are off. I think both Kyu and I went to “size 32 only” and didn’t do “all sizes” before jumping down to size 32 only. Perhaps to correct this you could combine the all sizes and size 32 only.
It also would be easier to read “a total of 10 (or 16) stitches decreased” since sometimes I think people might miss that your totals for all sizes are actually five times and size 32 eight times. (I probably would have realized that my math didn’t add up before I started if I had read ” size 32: a total of 26 stitches decreased.” at the end of the section before starting “shoulders and front armholes”.)
Other than that, I have knit a number of your patterns and have enjoyed them. They are easy enough so you can do them while watching tv but interesting enough that you want to finish the project.
Hey Tess!
Thanks for writing in. This is great information. It’s always wonderful to hear about people’s experiences with the pattern. Also, thank you for your kind words about our other patterns. Hope you keep knitting them!
Laura
I had that same problem too! I have counted my bottom cast-on and come up with 92 stitches as well…. I don’t know where to rip back to in order to fix it.
I am making this for my sister in size 32. She is 5’2″ tall. What would be the best length for her petite frame?
Hi Vincenza.
I would recommend the shortest length for someone 5’2″.
Let us know how she likes it!
Happy knitting.
Laura
Good morning,
I do not quite understand why you suggest Ultra Pima as an alternative for Habu’s Dyed Bamboo, as U.P.’s gauge is 22-24 st. per 4″ for needle size 3.75-4.00mm and Habu’s is 20-32 st. per 4″ for needle size 2-3.25mm.
I suppose that would make a lot of a difference to the size of the finished top.
Kind regards
Hello again,
I forgot to ask what the circumference of the Bamboo top’s bottom is.
Hello Elsje.
The circumference of the bottom is the same as the circumference at the chest. There is no waist or hip shaping.
Thanks for writing in.
Laura
I have a question regarding the possibility of adding sleeves to this beautiful shell.
Can stitches be picked up alongside the armholes or is that totally impossible?
So sorry for asking a question that has already been asked (about the sleeves).
Hi Elsje.
Please don’t apologize! We’re thrilled you like the project and it’s inspired you to modify it to make it your own! Please let us know if you have any additional questions!
Laura
I have actually an additional question: why is picking up stitches along armhole and neckline and knitting one row alongside necessary, it looks so finished already! Is that to make things flatter?
I have just gathered front left and right and am so amazed, everything works perfectly ! It is indeed a super pattern. Thank you so much!
Elsje
Hi Elsje.
Thanks for writing in and asking that question.
I picked up and bound off around the already finished-looking underarm edges and neckline to help maintain the structure and shape of the piece. I would have done this with any yarn, but it was especially important to do this since I was working with Bamboo, which has a tendency to grow and stretch. Picking up and binding off minimizes (if not eliminates) any excess growth or stretching.
Thanks again for writing to us.
I’m so glad you like the pattern!
Laura
Hi there. Can you give me an idea of skill level please? I am an intermediate beginner and am looking for something other than a scarf or wrap to try. Thanks.
Hi Karin.
I would definitely encourage you to try this pattern! The trickiest part will be the shoulders. That wedge or triangle of seed stitch is worked on short rows… but the great thing is, if you wanted to skip that section or simple work a few rows of seed stitch evenly, that’s fine, it won’t affect the fit too much! Plus we’re always here to help along the way in case you get stumped. Holler if you have any questions! Laura
I love the look of this pattern, but can’t obtain Habu in Australia. I have found a Bamboo-Wool mix (60% bamboo, 40% wool) that is listed as being “8ply” with the standard gauge of 22 sts to 10cm on 4mm needles. Do you think this would work?
I was thinking I could knit a size smaller than I need on the 4mm needles (instead of 3.25mm as in the pattern) in the hope it comes out at roughly the right size… Does this sound reasonable?
Thanks!
Hello Pearly!
The gauge that your yarn recommends is actually fewer stitches per 10cm than the pattern calls for (27 stitches = 10cm), which means that your stitches are coming out larger than the pattern. If you made a smaller size, it could definitely work, but I would make a gauge swatch to make sure that you can’t just try and knit the yarn tighter so you can obtain the gauge of the pattern. Going ahead and making a size smaller is just more of a risk without measuring and estimating the gauge first.
Hope this helps and best of luck! -Alyson
Thanks Alyson!
I’ll swatch on the 3.25,3.75 and 4.0 mm needles and see what I get. I may get lucky and hit gauge with the 3.25mm needles as recommended. (I somehow always hit stitch count but never row count.) Though if I ever come across Habu yarns in my travels, I’m going to grab some just to try! It looks sooooo luscious!
I just loved the look of the Bamboo Shell and decided to make it. I found 2 skeins of Jill Dream, Morning Glory and off I go. I did a swatch and had to go down to size 2 needles. I have a inch done and my house cleaning will just have to wait! Thank you Laura.
Hi,
I’m looking for a first shirt/sweater to knit. I’m new at this. Is there a way to find “easy” to do knits on your site?
Thank you.
Beth Flolo
Hi Beth,
Knitting sweaters are fun and you’ll learn a lot! I recommend looking at the Sriped Spring Shirt or the Classic Hemmed Crewneck pattern to start. The Purl Soho Pullover and the Over the Top Top are also good beginner sweaters. I love love love knitting sweaters and I hope one of these will make you love it too!
-Adam
I’d like to do this with the 4 skeins of Purl Soho Line Weight. If I doubled-up the yarn would the 988 yards be enough? Would it be thick enough? Thank you!
Hi Katrina,
Thanks for writing us. This pattern uses a fingering weight yarn, so you’ll want to use the Line Weight single. I think that with your four skeins of Line Weight you should be fine. Thanks!
-Adam
I love this and can’t wait to get started! I have a question about selecting the right size. When I take my measurements I’m a 36 around the chest but if I made the armholes bigger that an 8 1/2 they would be huge. I’m typically a size 6 in women’s clothing. What size would you recommend I go with, the 32 or 36?
Thanks!
Hi Keri,
Thanks for writing in! For our sizing, we provide the finished measurements and a suggested ease. For this garment, you would take your chest measurement and add 1-3 inches to get the fit seen here. For you that would be 37, 38 or 39 inches based on a 36 inch circumference. In this case you would choose either the 36 or the 40 based on how you would like the garment to fit. If you would like a bit of a tighter fit, you could go with the 36. A 32 inch finished chest circumference would have 4 inches of negative ease and be quite tight indeed. We hope that providing measurements rather than sizes helps you better select a size that will fit!
I hope that this helps!
Cassy
Hi there, I’m nearly done, but there ‘s a section I don’t understand, under “Continue Front Body”
Repeat Rows 1 and 2 until piece from the Connect Right Front and Left Front measures the same distance as from the beginning of the Back Armhole shaping to the top of the Back Edge.
I’m just not sure what this means? Can you give me a sense of how many inches/or rows to knit for this part?
Best, Sarafina
Hello Sarafina,
Thanks for reaching out! I hope I can clarify this section of the pattern for you. When you get to the “Continue Front Body” section you are knitting the front part of the Shell between the bottom of the collar and the top of the seed stitch bottom edge. The reason you want the front and back sections to be the same length is so that when you are seaming at the end they will line up correctly. However this section should measure close to 8, 10, or 12 inches.
I hope this helps. Please let me know if you have any further questions!
-Marilla
Hi, I love the pattern! I just wanted to know if there was PDF version of this I could download?
Thanks.
Hi Taylor,
Thanks for writing in! You absolutely can download our patterns as PDFs. If you’re on a desktop version of the site, you will find a “print” icon in the right column just below the date and tags. If you’re on a mobile version of the site, you will find a “print” icon below the pattern and above the comments.
Follow the easy on-screen instructions to delete whichever parts of the pattern you don’t want to print or save. For example, you may decide to shorten the pattern by omitting certain images or the list of materials.
Best,
Cassy
Hi!
I am so excited to do this shell in the yarn but was wondering if you could help me make this pattern so it’s in the round verse pieces and stitching it up.
Any help would be so welcomed! Since I invested in the suggested yarn I don’t want to screw this up. 🙂
Thanks again!!
Beth
Hello Beth,
Thank you for reaching out! This should be a fairly straight forward modification, all you need to do is work the body in the round. You could cast on the back and front separately in order to achieve the differing lengths and then join them and then work in the round up to the underarm.
Let us know if you have any questions and happy knitting!
-Marilla
Hello,
This is a lovely top and I want to knit it with a bamboo yarn I already have, however I get a gauge of 24 using 2 1/2 US needles, and I cant find smaller needles.
Any suggestions?
Hi Carla,
Thanks for reaching out! Our Addi Turbo and Addi Turbo Rocket needles do go all the way down to a US 000, so you can try a smaller needle if you wish! However, I would also check that you are swatching with the correct weight of yarn. Bamboo yarn comes in many different weights, and the Habu Dyed Bamboo we used is a fingering weight yarn. If yours is a heavier yarn, such as a DK or worsted weight, you may have a hard time getting the correct gauge without adjusting the needle size quite a bit and may wish to find a similar pattern that is written for the correct weight of yarn instead.
I hope that helps!
Julianna
Hi-
I definitely am planning on making this beautiful shell. However, I’m wondering how I should maintain this after finishing it. Should I hand wash it, or can it be machine-washed?
Hi Iris,
Great question! The washing instructions for Habu XS-24 Bamboo are the dry clean or handwash and lay flat to dry.
Happy knitting!
Julianna
Hello! I love the look of this shell, and I definitely want to try it out! I think that Purl Soho has its own line of bamboo yarn now, right? Would that work instead of the Habu yarn for this pattern?
Hi Vandana,
Great question! Yes, Burnish is a fantastic substitute for Habu Bamboo! Since it comes in smaller skeins, you will need 2 (3, 3, 3, 4) skeins for the short length, 3 (3, 3, 4, 4) skeins for the medium length, or 3 (3, 3, 4, 4) skeins for the long length.
Happy knitting!
Julianna
I’ve taken my pattern question to two knitting groups and none of us can make heads or tales of the Bamboo Shell instructions where we shape back armholes. The math doesn’t add up.
Let’s say I’ve cast on 108 stitches, I follow the 4 row repeat for the armhole…
“repeat rows 1-4 four(17, 18, 17,15) more times 998, 86,106, 114) stitches”
If a do 4 repeats, that’s a decrease of 8, leaving 100 not 98 stitches.
We have no clue what (17, 18, 17,15) is supposed to mean…
Going crazy! I so want to make this shell…
Hello Cathy,
Thanks for reaching out- I hope I can Help! You are doing 4 MORE repeats making it a total of 5 repeats.
I hope this clears things up and happy knitting!
-Marilla
Would this pattern work in cattail silk? I love the tunic length!
Thank,
Jenn
Hi Jenn,
Thanks for writing in! We’re so happy to hear you’re excited about our Bamboo Shell and agree that this pattern would be lovely in Cattail Silk. With a variety of cool and warm tones to choose from, it sounds like a perfect warm-weather piece!
Happy knitting!
Gaby
Can you tell me the skill level for knitting the garment? The knitting techniques seem simple but the garment construction appears to be difficult. At what point in the construction requires the most attention and skill? How important is considering the ease in the finished garment? Is the ease important for the drape? , Can the garment be too big and roomy because of the ease? Is the garment designed to slip over a blouse? How can I incorporate to different sizes into the garment for bust and hips?
Hi Letha,
Thank you for your kind words! We don’t rate the difficulty of our patterns because we want people to feel free to try things that are “too hard” for them, but I am happy to describe the techniques you will need to use! The garment construction is actually fairly straightforward. The majority of the garment is simple knits and purls, and the armholes and neckline are shaped with basic increases and decreases. The only potentially tricky parts might be the short rows in the shoulders or joining the overlapped left and right fronts, but we have included pictures and links to tutorials in the pattern that should clarify each step and make it quite approachable. We intended for the top to fit with 1 to 3 inches of positive ease, but since the sizes are the actual finished chest measurements, you can easily pick a size that will fit however you like – for instance, if you plan on wearing it over another shirt, you may want to choose a size with 3 inches of ease, or possibly even a bit more. As with any knitted garment, you can choose a size with even more ease if you prefer a loose and somewhat boxy fit. If you aren’t sure, I would recommend measuring the chest of a tank top or shirt that you already own and like the fit of to see how it compares to our sizes!
We don’t have instructions for modifying the fit of different portions of the pattern, but since the pattern isn’t too complicated, you should be able to cast on the back for the size you want to fit at your hips, and then decrease at the side seams to get to the number of stitches for the size you want to fit at your chest, and then mirror the shaping with increases on the front of the garment.
I hope that helps, and happy knitting!
Julianna
I m confused about wrap T and am newer to that skill for the left shoulder section. . The video Link is not functional in the pattern. Seems odd as when I turn I need to knit not purl so not sure I am doing it right. Most wraps purl after turning.
Thanks
Juli
Hi Juli,
Thanks for reaching out! In this pattern, the short rows are done in seed stitch, so you will be knitting the first stitch after turning in order to maintain the stitch pattern. The different stitch pattern causes the orientation of the stitches (knit vs purl) to be different from what you might expect when doing short rows in stockinette stitch. Hope this helps clarify things!
All the best,
Lili
Thanks I figured it out. But oh I have a problem. I made the back too long and am going to run out of yarn for the front seed section. Is there any left in your store stash? I have the teaI color in the Habu xs-24B-7 I have reached out to a few on Ravelry too but no response yet. Ugh.
Thanks
Juli
Hi Juli,
It’s been many years since we carried this Habu yarn, so I’m afraid that we no longer have any skeins leftover. We’re so sorry about that! Fingers crossed someone on Ravelry replies to you soon though!
All the best,
Lili