Your basket is empty.
Continue Shopping


Painted Yoke Cardigan
Our Painted Yoke Cardigan for babies and toddlers is a wearable watercolor, with joyful brushstrokes of our self-striping Novella yarn against a warm white canvas.
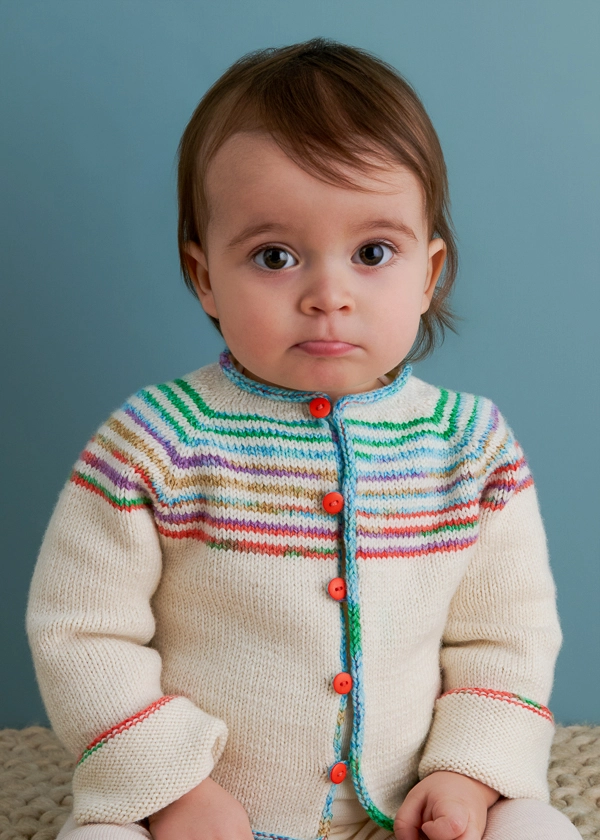
If you’re new to sweater-knitting, starting in miniature is a great way to ease yourself in. The Painted Yoke Cardigan’s easy top-down construction and stockinette fabric makes the knitting a breeze. A note about sleeve length: a little extra length that you can cuff gives a handknit more milage for fast-growing kids!

The fun and whimsy of this sweater come courtesy of our Novella yarn. The Heirloom White is a solid color, but the rest of the collection is multi-colored “self-striping” yarn—a wonderfully simple way to bring playful colorwork to your Painted Yoke Cardigan. Two-row stripes break up Novella’s shifting colors into a painterly field, where a brushstroke of sky blue might meet a streak of grass green, followed by a dab of poppy red.

You’ll also use the self-striping color to work an I-cord that flows from color to color around the whole edge of the cardigan. The very last step is adding the button loops with a crochet hook and sewing down the buttons.

Aside from the self-striping fun, Novella is also a delight to hold in your hands and knit. Made in Italy, it is 92% extra fine merino, the softest grade of merino there is, plus 8% mulberry silk. The merino lends body and bounce to the yarn, while the silk adds luster to its surface and beauty to its drape.

Choose the color of Novella you want to dip into and pick up just one ball, plus a few more in Heirloom White. We suggest looking at the swatches for each of the 9 self-striping colors on the product page for a clear look at how the colors will unfold in your Painted Yoke Cardigan. We chose Flower Patch for an exuberant garden of colorful blooms, spring leaves, and sunny sky!

Pattern designed and written by Purl Soho designer, Hiromi Glover. See even more of Hiromi’s work on her Instagram!
Story written by Andrea Lotz for Purl Soho.
Materials

- Purl Soho’s Novella, 92% extra fine merino and 8% mulberry silk. Each ball of this sport-weight yarn is 142 yards/ 50 grams.
- Main Color (MC): 2 (3, 3, 3, 4) balls; approximately 240 (315, 340, 410, 515) total yards required. We used Heirloom White.
- Contrast Color (CC): 1 ball; approximately 55 (65, 75, 80, 95) total yards required. We used the color Flower Patch.
- US 3 (3.25 mm), 24-inch circular knitting needles
- A set of US 3 double pointed needles
- US 3, 32-inch circular knitting needles for I-cord edging
- Stitch markers
- Stitch holders or scrap yarn
- A size B (2.25 mm) crochet hook
- One to six ½-inch button(s). We used Purl Soho’s Medium Round Buttons in Orange.
- A Painted Yoke Cardigan Pattern PDF
NOTE: If you want to use Magic Loop for the Sleeves, you won’t need the 24-inch circular or double pointed needles listed above… Just stick with the 32-inch ones throughout!
GAUGE
25 stitches and 36 rows = 4 inches in stockinette stitch
SIZES
Newborn (6 months, 1 year, 2 years, 4 years)
- Finished Chest Circumference: 18 (20¾, 21½, 22½, 24¼) inches
- Finished Body Length from Bottom Edge to Underarm: 5 (5¼, 5¼, 6, 7½) inches
- Finished Body Length from Bottom Edge to Top of Shoulder: 8¾ (9½, 10, 11¼, 13¼) inches
- Finished Sleeve Length: 5½ (7¼, 7½, 9½, 11) inches
Samples: The sweater shown here is the 2-year size.
PATTERN

The Painted Yoke Cardigan Pattern is available for purchase as a PDF download only.
Share your progress and connect with the community by tagging your pics with #PurlSoho. We can’t wait to see what you make!


Learn About Novella + All Our Beautiful Yarns
The beauty of Novella is in its creative possibilities! A specially dyed self-striping yarn, Novella is always surprising to knit, with stripe following colorful stripe. And more… Its plies are two subtly different colors, adding depth and fascination to every stitch. Made in Italy, Novella is a sport-weight yarn, made with 92% extra fine merino wool, the softest merino there is, plus 8% mulberry silk. The merino lends body and bounce to the yarn (and fun to your knitting experience!), while the silk adds luster to its surface and also beauty to its drape. Combine more than one color, stripe it with a solid color, change directions… Novella is asking to play!
More Free Knitting Patterns
- Be sure to explore our growing collection of free Novella knitting patterns and cast on!
More Sport-Weight Yarns
- Shop our entire collection of sport-weight yarns (What is sport-weight yarn, really? Learn all about sport-weight yarn in our deep-dive article!)
- If you want to use a different yarn, be sure to take the time to get the correct gauge. Need help? Check our All About Gauge Tutorial, our Yarn Substitution article, and our Complete Guide To Yarn for lots of helpful information.
More Yarns With Similar Fiber
- Shop merino wool yarn
- Shop silk yarn
Looking for more inspiration? Explore all of our knitting patterns (including tons of free knitting patterns) and knitting tutorials, buy one of our many knitting kits and yarn bundles, and shop for beautiful yarn. We have over 55 gorgeous natural fiber yarns in 1,000s of magnificent colors, designed to bring integrity, beauty, and joy to your next knitting project and only available at Purl Soho!




I wish this came in adult sizes too in the pattern! I love it!
Hi Gillian,
Thanks so much for reaching out with your comment. I’m so glad the Painted Yoke Cardigan caught your eye.
I’ll be sure to pass your interest in an adult size to our team, thanks so much for sharing your thoughts!
Happy knitting!
Hills
yes yes yes!
I third this comment!!!
Yes please!! Adult sizes 💃
Love the colours and style, would love to get this project going 🙂
Could I use a 100% wool sport weight yarn for the body of this sweater? (50g/168m; 6 stitches per inch). Thanks!
Hi Kris,
Thanks so much for writing in with your question. I’m so glad the Painted Yoke Cardigan caught your eye!
This would likely work! However, I would always recommend knitting (and blocking) a gauge swatch to ensure you can achieve the gauge listed in the pattern and that you like the look and feel of the finished fabric.
I hope this helps, and happy knitting!
Hills
again!! you post a perfect pattern for me with yarn unavailable!!!
Love the painted yolk cardigan yet the heirloom white not available!
What is the best match for the novella?
Hi Sydell,
We’re so sorry for our late response! We recommend Daily Wool Sport in Heirloom White as a good substitute! There is more yardage per skein, so you’ll only need 1 or 2 skeins of Daily Wool Sport, depending on what size you’re making.
Novella in Heirloom White sold out much more quickly than we anticipated, but we are expecting it to be available again by the beginning of August.
We hope this helps!
All the best,
Allison
Super cute pattern! What other yarns would you recommend that are a little easier to care for but just as colorful? I can’t imagine giving a gift of a baby sweater that needs to be handwashed and line dried!
Hi Barbara,
Thanks for reaching out! I’m so glad you love the Painted Yoke Cardigan as much as we do!
I would suggest taking a look at Daily Wool Sport as it features some really beautiful shades and would knit up to the 6.25 stitches/inch gauge listed in the pattern. Its care instructions list “machine wash alone in cold water + machine dry on low heat,” so it should also meet your need for an easy to care for baby sweater, too!
I would always recommend knitting (and blocking) a gauge swatch to make any adjustments needed to achieve gauge and to ensure you like the look and feel of the finished fabric.
I hope this helps, and happy knitting!
Hills
Can I make this sweater with just one color?
Hi Louise,
Thanks so much for writing in with your question. I think this sounds like a lovely modification to the pattern, and it can definitely be done.
Wherever it says to cut the MC and add the CC, you can just ignore that instruction and keep following the pattern as written. You’ll want to add the yardage requirements of the MC and the CC for the size you want to make in order to determine how much yarn you’ll need.
I hope this helps, and happy knitting!
Hills
Working on this sweet cardigan but have run into a snag early on. In short row 1, I’m asked to M1L four consecutive times. When I does this, by picking up the bar created between each of the new stitches, I end up with a large hole beneath this increase when I get to the next row, almost as though I’m creating a buttonhole. I’m certain I’m doing this increase wrong but can’t figure out how to correct the problem. I’ve tried to find tips online but can’t find anything applicable. Help!
Any suggestions?
Hi Anne,
Thanks so much for reaching out. Short rows can be tricky and I’m happy to help.
I’ve pasted the first short row instruction below:
Where it says “make 1 right (m1R)” and “make one left (m1L)” it’s providing both the longer name for the increase, and the abbreviation. That way, we can use the abbreviation later without having to reference the longer name of the increase. So you actually only need to increase once when you see those instructions. When you repeat four times, you’ll be repeating the entirety of, “[Knit to 1 stitch before next marker, m1R, k1, slip marker (sm),
k1, m1L].”
I hope this helps, and please feel free to reach out with any other questions you might have.
Happy knitting!
Hills
Of course. It makes perfect sense now. Thank you!!
Hi Anne,
Thanks for your reply! I’m so happy this was helpful for you!
Happy knitting,
Hills
I would die for an adult sized version of this pattern! It’s amazing
Duly noted! Thanks for letting me know you’re also interested.
Happy knitting, Aly!
Hills
I just purchased this pattern to make for a 1 year old. I would love to also make it for her 6 year old sister. Any chance that exists for a 6 year old as well? Thank you.
Hi Katja,
Thanks so much for reaching out. I’m really glad to see the Painted Yoke Cardigan caught your eye!
I’m so sorry to share that, sadly, this pattern isn’t currently available for size 6 years old. I will absolutely pass this suggestion on to our team, and thank you so much for sharing your interest with us!
Please feel free to reach out with any other questions you might have, and happy knitting!
Hills
Is there a tutorial on how to add the buttonholes using a crochet hook? Thank you.
Hi Katja,
Thank you so much for reaching out!
While we don’t have a video showing this buttonhole technique, we do have a helpful photo tutorial covering the basic crochet stitches you’ll need. If you check out our Crochet Basics tutorial, you’ll want to focus on the Making a Foundation Chain and Slip Stitch techniques. To make the buttonhole, just insert your hook through a stitch under the i-cord edging (with the wrong-side facing you), pull a loop through, chain 7 like in the foundation chain, then insert your hook back into the starting point, slip stitch to close the loop, and finally cut your yarn and pull the tail through to secure it.
If you’d like, you can also find some great resources by searching “crochet buttonhole loop” on your preferred search engine.
I’ll also be sure to pass this tutorial request along to our team, and I’m really grateful you shared your interest!
We hope this helps, and feel free to reach out if you have any other questions.
Happy crafting,
Hills
Hi,
When it is time to separate the body from the sleeves, it says to knit to marker, remove marker 2x, before putting the next stitches on a string. When I do it, I think it should only be once. Am I missing something?
Thanks,
Jane
Hi Jane,
Thank you so much for reaching out with your question, and I’m sorry to see you’ve run into some trouble.
We repeat knitting to the marker and removing the marker twice, as you need to knit past the point that will be separated for the sleeves, and place the already worked stitches on scrap yarn or a stitch holder.
Could you share with me which size you’re making, and I can look more closely at the pattern for your size? I would be so glad to get to the bottom of this with you!
I’ll keep an eye out for your reply!
Kindly,
Hills
I am running into confusion on this section as well in 6 mo size. I’m at the point where the yoke shaping is done and I’m ready to divide body and sleeves I work to 1st marker and remove it, 2nd marker and remove it. It says to move previous 39 st. to holder. If I didn’t do anything wrong. that leaves 5 stitches left on the right needle. This doesn’t make sense to me and I’m afraid I did something wrong. Please help!
Hi Suzanne,
I’m so sorry to read that you’ve run into a hiccup here! I’m having a little trouble picturing this concern through words alone. Could you kindly send us a photo of your work to [email protected]? We would love to take a look at your marker placement and get you back on track!
All the best,
Hills
This is a lovely pattern. I often knit while watching a movie and sometimes forget an increase. It is super helpful to include the number of stitches that should be between each stitch marker when increasing for the sleeves. I can’t be the only one who has to figure out where that extra stitch should go!
Hi Stacy,
Thank you so much for reaching out. I’m so sorry to read you ran into a bit of trouble, but really glad you’ve loved the pattern so far.
If you start with your initial stitch count, you’ll be adding two stitches between each marker…one before the marker and one after. You’re repeating this increase between each marker, 4 times. This is called a raglan increase, and you can usually count on this!
To find a stitch count for the end of your row, you can add 8 to each of the starting stitch counts for the number of repeats you’re working.
From the section prior, we can see that you’re starting with [77 (83, 87, 91, 95) stitches]. The increase portion before dividing for the sleeves increases on Row 1, and by 8 stitches each repeat. You’re told to work this repeat, 4(5,6,6,7) more times, then repeat Rows 1 and 2 one more time. [165 (187,207, 211, 231) stitches] Therefore, your increases are worked 5,6,7,7,8 times.
The stitch counts after each repeat would be:
85 (91, 95, 99, 103)
93 (99, 103, 107, 111)
101 (107, 111, 115, 119)
109 (115, 119, 123, 127)
117 (123, 127, 131, 135)
– (131, 135, 139, 143)
– (-, 143, 147, 151)
– (-, -, -, 159)
I hope this helps! Please feel free to circle back with any follow-up questions!
Happy knitting,
Hills
In the “Continue Shaping Yoke” section, Row 1, shouldn’t the instructions read [knit to…one stitch before…next marker(?) in order to be consistent with the previous instructions when making the m1R?
Thank you!
Hi Tanya,
I’m sorry to read you may be running into a bit of trouble here! I understand where you’re coming from; it looks like a very subtle difference in the sample, and I’m happy to help.
It looks like the pattern, as it’s written, accurately represents the sample in the photo. The position of the increase will change from the yoke to the sleeves and body. If you look very closely at the photo on page 2 of the pattern, and imagine you are working from the yoke down, you can see that in the white portion of the yoke, the new stitches are formed before (or after) the stitch next to the center of the raglan. As the piece progresses, you’ll see new rows sprouting from the row directly next to that central raglan stitch.
I just emailed you a photo with the increases circled for your reference.
I hope this helps, and happy knitting!
Hills
Hi there.
I have just started knitting this pattern and I have a question regarding the raglan increases.
Before adding in the contrast stripes, increases are worked around each marker as follows: knit to one stitch before marker, M1R, K1, slip marker, K1, M1L and continue.
Once the contrast yarn is added, increases are instructed differently as follows: knit to marker, M1R, slip marker, K1, M1L and continue. So there is only one knit stitch around the marker here, but two previously.
Is this correct?
Hi Wyn,
Thank you so much for reaching out with this great question! I’m happy to help here!
I’ve checked the pattern, and this is correct! The increases do move in closer to the center stitch as you change from the single-color yoke to the striped yoke. I also just emailed you a photo, which should help illustrate where these increases are worked. If you imagine you are working top-down, you can look for the spots where new rows “sprout” out from old rows.
I hope this helps, and please feel free to reach back out anytime.
Happy knitting,
Hills
Hi!
I’m working on the i-cord bind off around the body edging of this beautiful sweater. The edges are curling – it’s especially a problem along the bottom of the sweater. I had hoped that the i-cord would flatten it out but not so.
I substituted Season Alpaca for the MC because Novella was out of stock. But that shouldn’t affect the curling, should it?
Any tips? Thank you.
Hi Rebecca!
I’m so sorry to read that you’re running into a bit of trouble with curling, but I’m so glad to see the project is turning out beautifully, regardless.
We’ve had really great success by turning our projects to the wrong side while blocking. Then we pin down any curling from the wrong side to resolve it during the blocking stage.
I’d also suggest taking a look at your I-cord. It’s also possible that you may be working your I-cord at a tighter tension, which would draw the edges in and create a curl. If this is the case, I’d suggest going up a needle size for your I-cord. It doesn’t really sound like that’s the case, though, as it seems like you had some curling before the edge work and had hoped this step would resolve it.
Curling is very common in stockinette stitch, but substituting Season Alpaca shouldn’t have increased this tendency. We recommend wet blocking Season Alpaca and laying it flat to dry. You can steam the piece for the final touches, and this might also help resolve any residual curling. This step has been really helpful in some of my own projects. I would like to note that Season Alpaca will take a good amount of time to dry, so maybe consider factoring that into your blocking plans!
I hope one of these tips works well for you! Please reach back out anytime.
Happy knitting,
Hills
Any chance of getting an adult size pattern for this!!! Absolutely love!!
Hi Laura,
Thank you so much for reaching out today about the Painted Yoke Cardigan.
We don’t currently have an adult-sized pattern in the works for this cardigan, but I love the idea and will be sure to pass it along! Thank you so much for letting us know you’re interested in it!
In the meantime, you might consider checking out the Classic Crewneck Cardigan or the Classic Knit Jacket!
Thanks again for your suggestion! Please feel free to reach back out anytime.
Happy knitting,
Hills
I’m really confused on the finishing instructions, specifically on the “work body edging” pick-up round. Do I break the yarn after the last stitch on the end of bottom row before I pick up and knit along the right front edge? Do I also break the yarn each time I’m instructed to “pick up and knit” along the neckline, left front and before I knit across the remaining bottom live stitches?
Hi P,
I’m so sorry you’re running into some trouble with the finishing instructions for your Painted Yoke Cardigan.
You don’t need to break the yarn for this stage. You’ll want to work with your contrast color yarn, starting at the bottom of the body (with slip stitches), up towards the neckline, and back down again. Then you’ll use the I-cord bind-off to create that beautiful edge.
If you’re still running into trouble, please don’t hesitate to reach back out. We’re also available by email at [email protected], and we offer complimentary 1-on-1 Help sessions to work through tricky spots like this! We would love to get you back on track.
Kindly,
Hills
I absolutely loved knitting this adorable sweater! The instructions were super clear—thank you! My only problem is after knitting the I-cord edging, the edges are rolling up. Will this resolve when I block it? Any special blocking instructions so it lays flat?
Hi Kathleen,
Fantastic work on finishing your Painted Yoke Cardigan!!
We recommend blocking the piece with the wrong side facing down and pinning the edges to resolve any curling. Sometimes, when adding an I-cord edge, the tension can be a bit different than the rest of the garment…You may consider going up a needle size for (future I-cord edges specifically) to help maintain even tension.
I hope this helps, but please feel free to reach back out anytime!
Kindly,
Hills
Hi,
I’ve purchased yarn for this project x3 to make 3 sweaters. I’ve followed the pattern for the 4 years size. I am up to the second sleeve with the MC and I’ve run out of yarn. I’ve gone back to re-read the materials required and it states for the MC 3 skeins for a total of 515 yards is required. However each skein of yarn is listed containing 142 yards. 3 skeins of 142 yards only adds up to 426. Is this a miscaclucation? How can I compensate for the additional yardage required?
Hi Ester,
Oh no! I am so sorry for the trouble this has caused you. I’ve reached out to our team to correct this error! In the meantime, could you kindly email us at [email protected]? We are very eager to get this sorted for you! Thank you so much!
We’ll keep a keen eye out for your email!
Kindly,
Hills
Knitting this adorable sweater for my grand niece. Using 32” circular needles, and finishing the work body edging. I have returned on-hold body stitches to my needles, slipped 35 stitches from left needle to right, joined CC on the 36th stitch and knit to end of row. Now I’m stuck at the corner.
With the same right needle, and without breaking the yarn, how do I pick up and knit stitches along the right front edge from bottom corner to the neckline? My left end of the circular needle is no longer in play. What am I missing? Thank you.
Hi Lynn,
Thanks so much for writing in! Once you have worked across the rest of the row with your contrast color, you will want to drop your left needle, turn the sweater 90 degrees, and use your right needle to pick up and knit stitches along the Right Front. Then repeat this for the Neckline Cast-on Edge and the Left Front essentially forming a large tube before moving onto the I-Cord Bind Off.
You may find our Picking Up Stitches Tutorial helpful in visualizing how this is done. The “Along a Vertical Edge: Stockinette Stitch” instructions will correspond to your Right and Left Fronts and the “Along a Horizontal Edge” for the Neck-line Cast-on Edge.
I hope this helps, but please feel free to email us at [email protected] and we’d be happy to help further!
Happy knitting!
Mia
Do you recommend wet blocking this sweater?
Hi Nancy,
Thank you so much for reaching out about the Painted Yoke Cardigan.
We recommend you weave in all ends, hand-wash to block, and lay it flat to dry.
I hope this helps, and feel free to reach out anytime!
All the best,
Hills