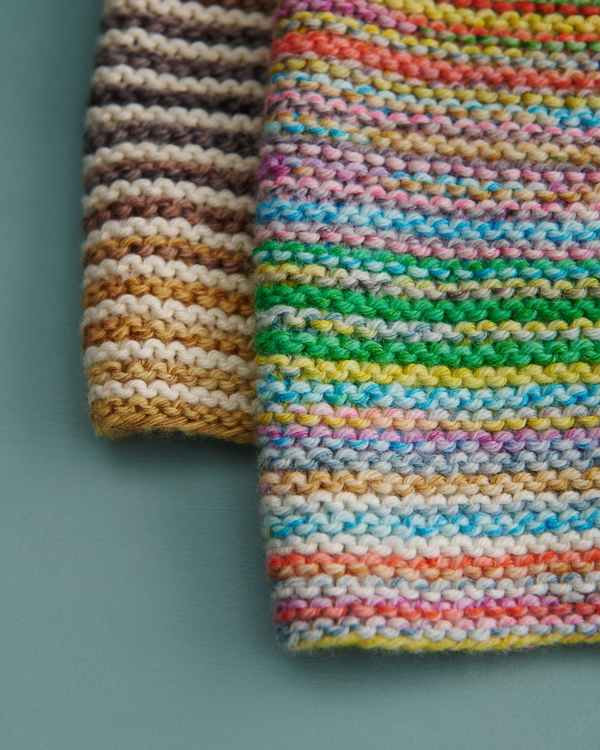
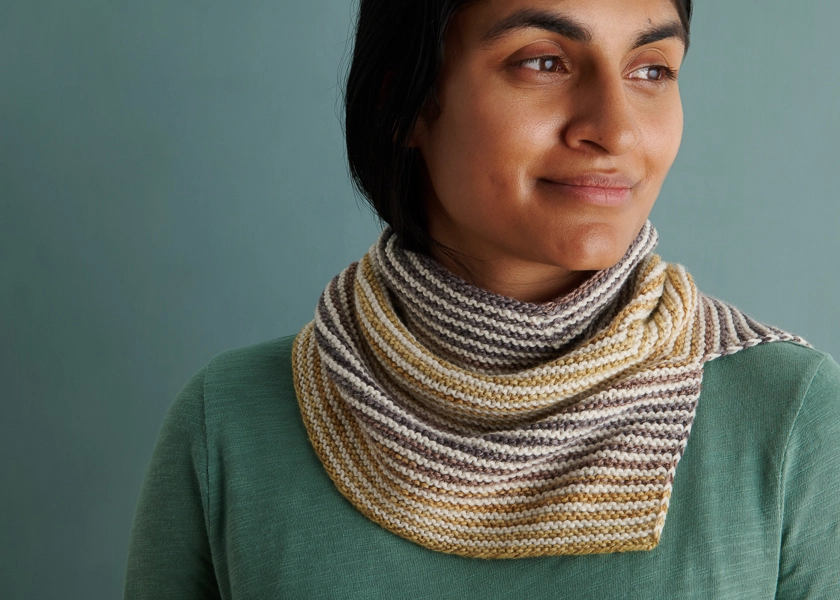
Candy Stripe Cowl
Our Candy Stripe Cowl takes two colors of our new self-striping Novella yarn, adds simple garter-stitch stripes, and stripes upon stripes, it’s like a candy store in here!
What may look like a mind-boggling knit is actually so simple a beginner can do it! It’s just a matter of alternating two different colors of Novella, each with its own self-striping pattern.
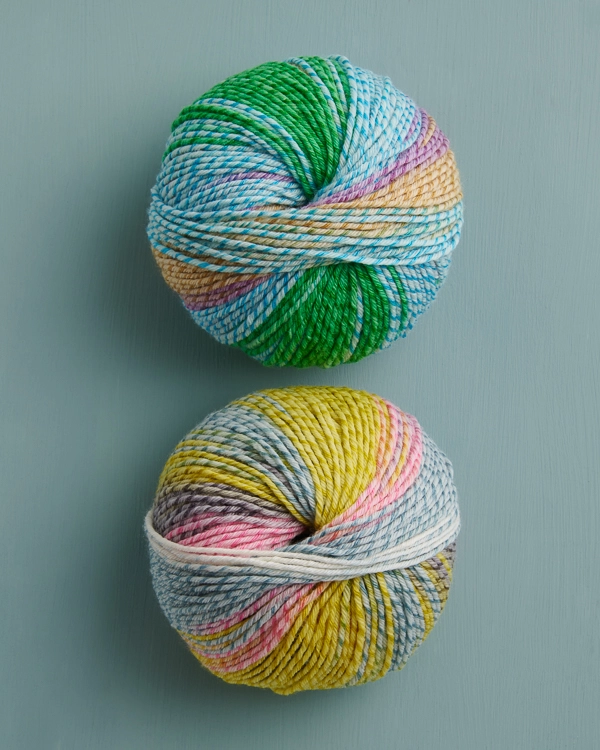
A “self-striping” yarn is dyed in a pattern of colors, so that when you knit it, the colors form repeating stripes, thick ones if your knitting is narrow and skinny ones if it’s wide.
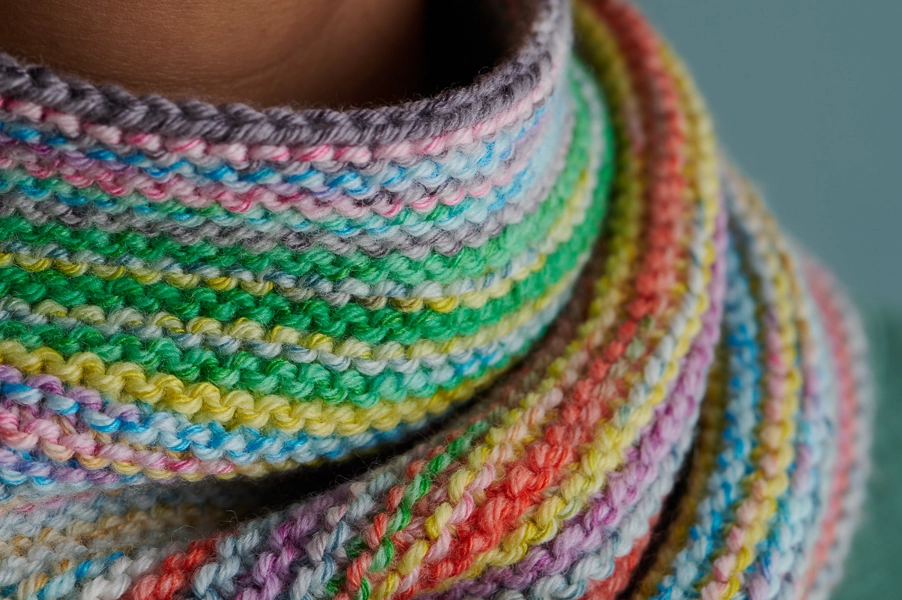
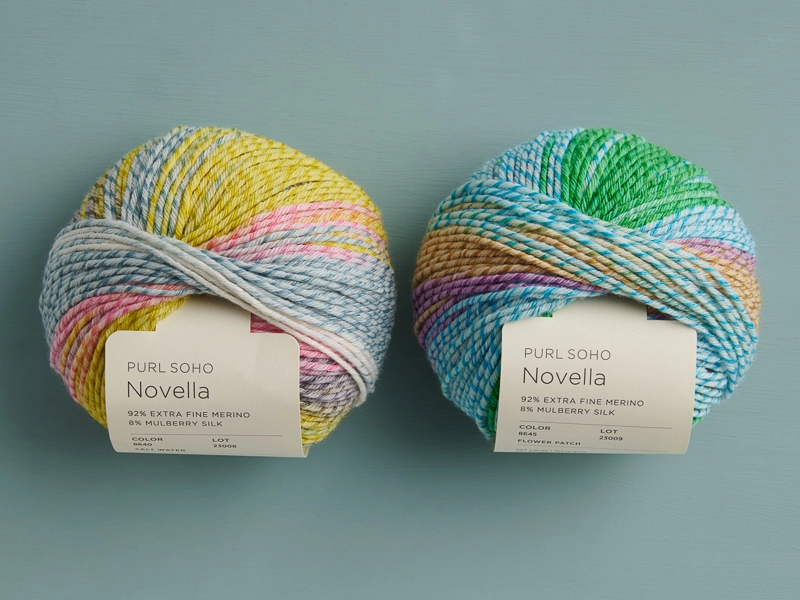
Novella is just that kind of yarn but with an additional twist. Not just a series of colors, Novella has two colors spun together throughout its overall multi-color repeat. For example, you can see below that the sky blue section of the yarn is a mix of vivid blue and pale blue and that the same is true for every color. The effect is softly marled colors with a beautiful depth and fascination.
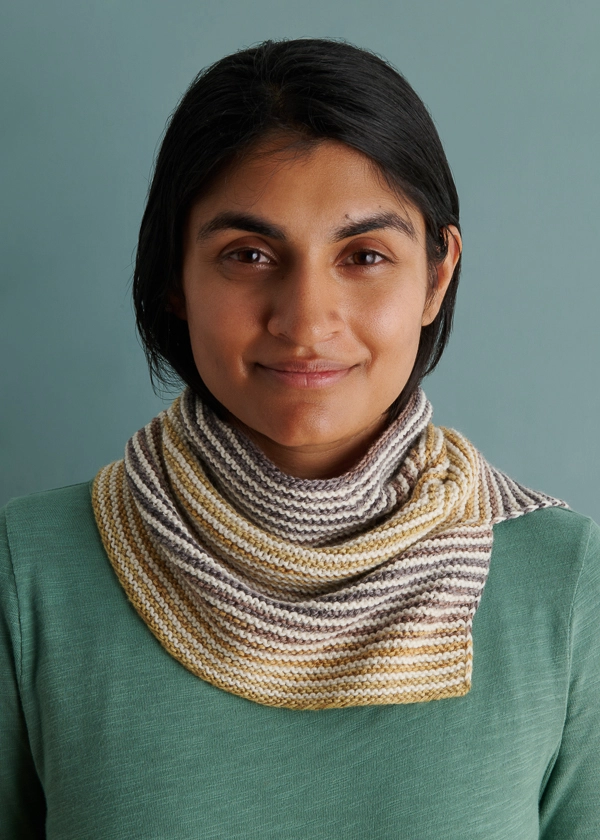
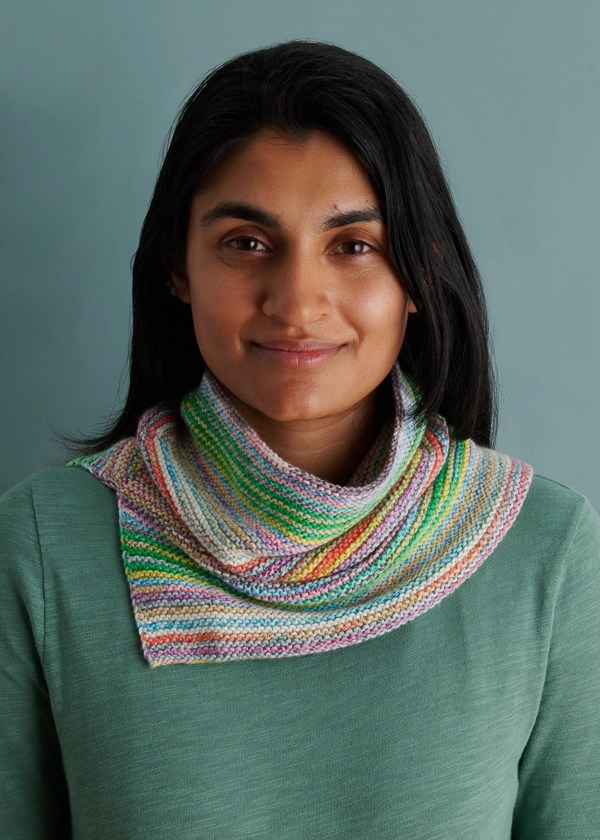
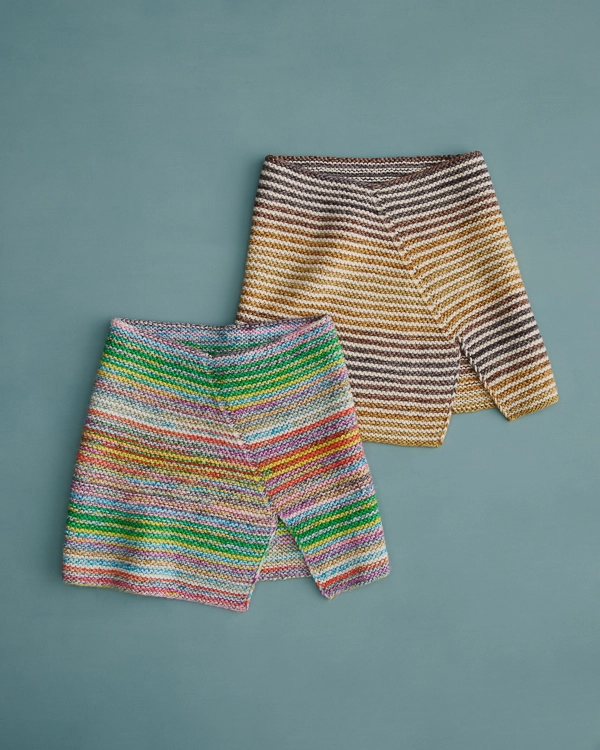
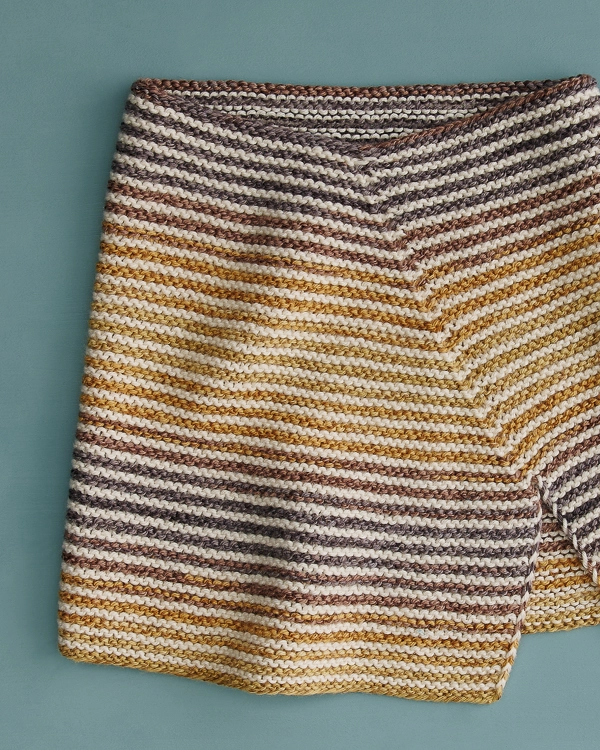
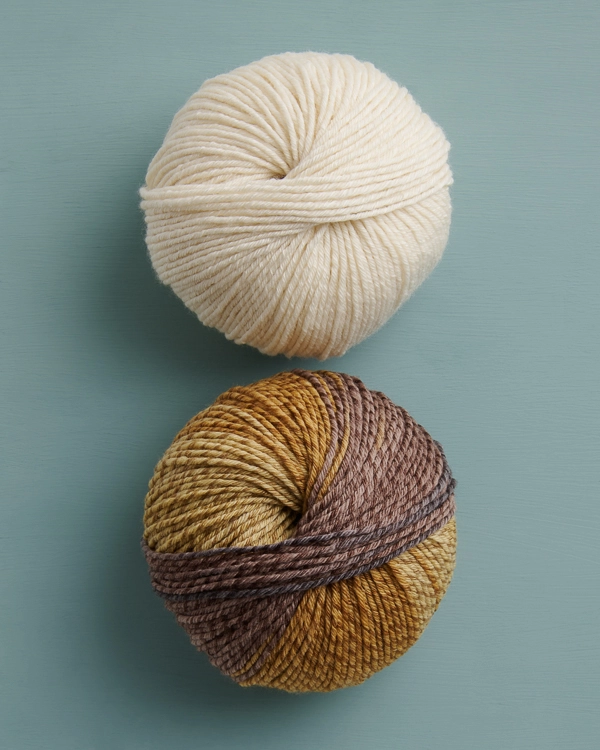
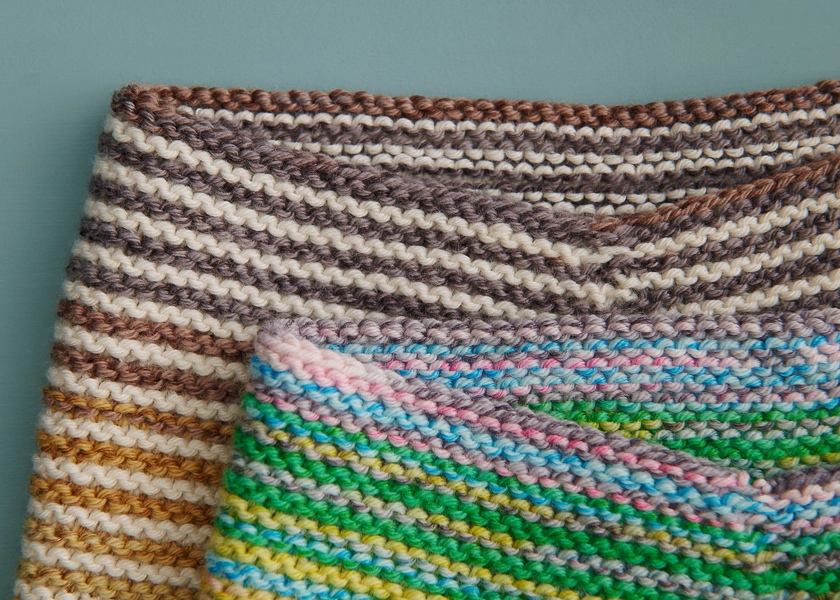
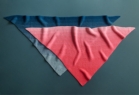
The brightly colored Candy Stripe Cowl is actually a mix of the two colors above, two rows of Flower Patch, then two rows of Salt Water Taffy. They mingle serendipitously but always beautifully… It’s impossible to go wrong! Look how different, but equally lovely, the mix of Desert Ridge is with simple Heirloom White (below). You can really see the distinctive stripes but the shifting color remains soft and undulating and just beautiful!
Aside from all its colorful tricks, Novella is, at its heart, a wonderful yarn to hold in your hands and wear around your neck. Made in Italy, it is 92% extra fine merino, which is the softest merino there is, plus 8% mulberry silk. The merino lends body and bounce to the yarn (and fun to your knitting experience!), while the silk adds luster to its surface and also beauty to its drape.
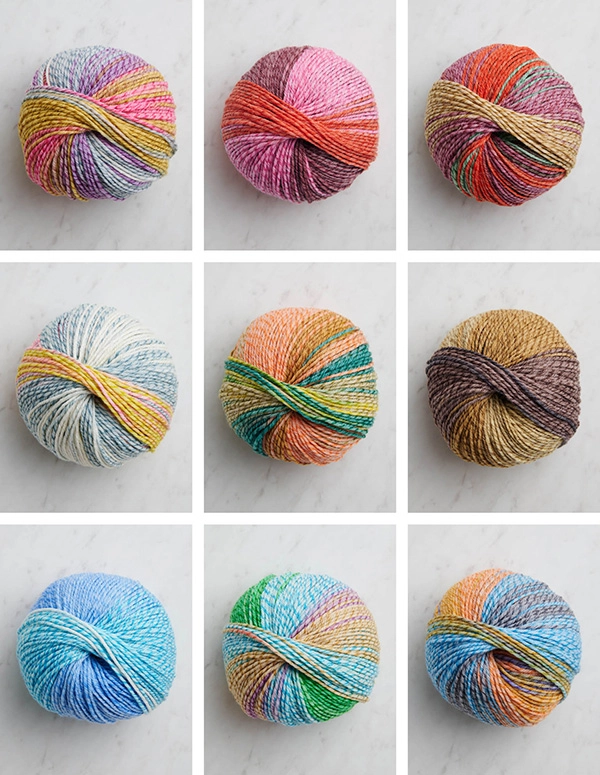
To make a Candy Stripe Cowl, you will only need two balls of Novella in two colors. We have five Candy Stripe Cowl Bundles to choose from, or explore your own combo by picking two colors of Novella that you think will pleasantly surprise you!
Designed by Purl Soho designer, Gianna Mueller. Click here to see even more of Gianna’s designs!
Share your progress and connect with the community by tagging your pics with #PurlSoho, #PurlSohoBusyHands, #PurlSohoCandyStripeCowl, and #PurlSohoNovella. We can’t wait to see what you make!
Materials
Pick up two balls of Novella in two colors or one of our Candy Stripe Cowl Bundles. It comes in five playful palettes and includes…
- 2 balls of Purl Soho’s Novella, 92% extra fine merino and 8% mulberry silk. Each ball is approximately 142 yards/ 50 grams.
- Color A: 1 ball; approximately 142 total yards required
- Color B: 1 ball; approximately 142 total yards required
You will also need…
- US 6 (4 mm), 24-inch circular needles
Samples: We used Salt Water Taffy + Flower Patch and Desert Ridge + Heirloom White for our cowls!
GAUGE
22 stitches and 44 rows = 4 inches in garter stitch
NOTE: We used every last yard for our cowls! To avoid running short, please re-use your swatch yarn (and avoid cutting it, if you can), double check your gauge, and be conservative with tails!
SIZE
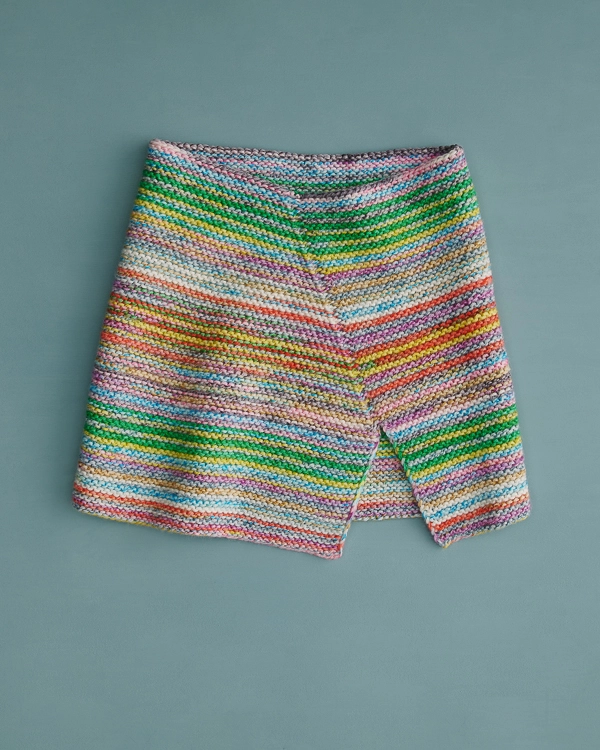
- Finished Circumference at Top: 18¼ inches
- Finished Circumference at Bottom: 24¾ inches
- Finished Height: 9¾ inches
NOTES
Slip Stitches
Slip all slip stitches purlwise with yarn in front.
SLIP STITCH COLOR CHANGE
In Rows 1 and 3 of the Beginning section, you will change colors while working a slip-stitch selvage. Here’s how…
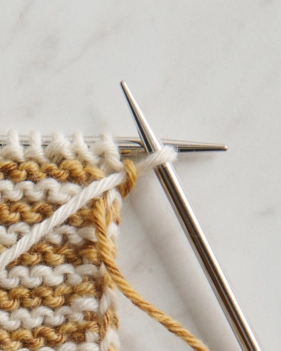
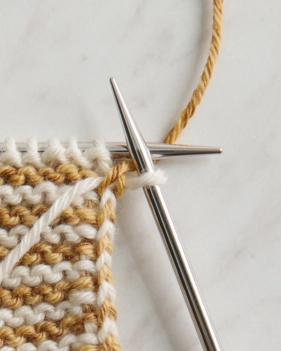
Slip 1 purlwise with yarn in front, then hold old yarn over the new yarn (shown above, left: The white is the old yarn and the brown is the new,). Pick up new yarn and move it to the back of work, ready to knit (shown above, right: Note how the new yarn [brown] has caught and “trapped” the old yarn [white].).
Then continue knitting… The result is a pretty, striped slip-stitch selvage!
PATTERN
UPDATE January 4, 2024: We originally published this pattern with 10 total repeats in the Beginning section, but a few customers were running out of yarn. We have since reduced the number of repeats, so you should have plenty of yarn to finish your cowl!
BEGINNING
With Color A, cast on 136 stitches. We used a basic Long-Tail Cast On.
Set-Up Row (wrong side): With Color A, knit to end of row.
Row 1 (right side): With Color B and working Slip Stitch Color Change (see Notes), slip 1 (see Notes), knit to end of row.
Row 2 (wrong side): With Color B, slip 1, knit to end of row.
Rows 3 and 4: With Color A, repeat Rows 1 and 2.
Repeat Rows 1–4 seven more times, until piece measures approximately 3 inches from cast-on edge.
Mark one end of the final row with a removable stitch marker or piece of scrap yarn.
DECREASE
NOTE: You will not work a slip-stitch selvage in this section. Do not cut yarn between stripes.
Row 1 (right side): With Color B, k1, knit 2 together (k2tog), knit to end of row. [1 stitch decreased]
Row 2 (wrong side): With Color B, knit to end of row.
Rows 3 and 4: With Color A, repeat Rows 1 and 2. [1 stitch decreased]
Repeat Rows 1–4 seventeen more times, making sure to have a few yards of Color A left over. [100 stitches remain]
With Color A, bind off all stitches knitwise, leaving a long tail.
SEAM
Fold piece in half so wrong sides are together and the selvages are aligned.
Following our Seaming Garter Stitch tutorial, and beginning at the bind-off edge, use the tail to sew selvages together, stopping when you reach the stitch marker at the beginning of the Decrease section. Sew through the final stitch a couple of times to secure.
FINISHING
Weave in the ends and gently wet block!


Good morning. This would work with 2 balls of the same colour yarn too, wouldn’t it?
Hi J,
That’s a great question! Yes, you could definitely use 2 balls of the same color of Novella for this cowl and it will look stunning! Please let us know if we can help with anything else!
All the best,
Cat
Hi, given that this pattern uses the full skeins, can you advise how far in to start a long tail cast on (assuming knitting to gauge) in order to not run out of yarn? I keep ending up with extra long tails in my cast ons. Thanks!
Hi Elyse,
Thanks for your question! You will want to make a tail of approximately 3½ times the width of your project for a longtail cast-on. If you want to be more precise about the yardage you could even use the cable cast on method as it doesn’t require much of a tail and ensures you use just the right amount of yarn each time.
Happy knitting,
Gavriella
Love the pattern shape and potential for color movement. Thoughts on knitting the neck section in the round?
Thanks so much.
Kay Stuntz
Hi Kay,
Thanks for your question! You can definitely knit the “Decrease” portion of the cowl in the round as opposed to flat! To do so, you’d just need to alternate one round of knits followed by a round of purls, all while doing the decreases as instructed. For this pattern, when you get to the “Decrease” section, you can just join in the round for “Row 1 (right side)” and knit one round instead. Then, for the next round, just purl all stitches! Afterwards, do all knits for Round 3 and then all purls for Round 4. Repeat rounds 1 – 4 until you have 100 stitches left, bind off knit-wise, and you’re all set!
Since you will be knitting stripes in the round with your colors A and B, here’s our Stripes in the Round tutorial (https://www.purlsoho.com/create/stripes-in-the-round/) for how to carry up the colors as you knit!
I hope this helps, and please let us know if you have any other questions!
All the best,
Cat
Any Christmas color combinations that you’d recommend?
Hi Angela,
Thanks for your question! Fall Dahlias, Fairy Tale, and Farmers Market have a Christmas vibe, so any combination of these would be fabulous for the holidays! Alternating one of these shades with Novella in Heirloom White would also be very festive and let the colors pop even more. I hope this helps!
All the best,
Cat
Would there be a way to do this in the round, so that you wouldn’t have to seam it?
Hi Kelly,
You could totally incorporate knitting in the round for this project so you wouldn’t have to do any seaming! After completing the split hem in the “Beginning” section (this part would be knit flat), you can knit the “Decrease” section in the round by alternating one round of knits followed by a round of purls, all while doing the decreases as instructed. When you get to the “Decrease” section, you can join in the round for “Row 1 (right side)” and knit the round instead. Then, for the next round, just purl all stitches. Afterwards, do all knits for Round 3 and then all purls for Round 4. Repeat rounds 1 – 4 until you have 100 stitches left, bind off knit-wise, and you’re done!
Since you’ll be knitting stripes in the round with your colors A and B, here’s our Stripes in the Round tutorial (https://www.purlsoho.com/create/stripes-in-the-round/) for how to carry up the colors as you knit! I hope this helps!
All the best,
Cat
If I join in the round at the beginning of the decreases, the right side will fall to the inside making it wrong side out. I guess this would be ok as I can just turn it at the end. Does this make sense ?
Hi Annie,
Thanks for writing in! That is correct! One thing you can do to correct this is simply work an additional row before joining in the round to be on the opposite side of your work. I hope this helps!
Happy knitting,
Gavriella
Any suggestions on sizing this cowl for an 8-year-old granddaughter? She’ll love the colors, I know. I’m planning on making matching cowls for her and her mother. Thanks!
Hi Janine,
Thanks for your comment! To make a smaller version of this cowl, just cast on 124 stitches rather than the original number so the bottom hem is smaller and measures 22.5 inches based on the gauge in the pattern. Then, you can proceed with knitting the pattern as written, working through the “Decrease” section as you normally would until you have 88 stitches left on your needles! This way, the top circumference of the cowl is smaller as well and measures 16 inches. Then, just bind off and you’re all set!
We recommend checking your work as you go and adjusting the length of the cowl, i.e. the number of rows, based on what’s best for your project. And when making pattern adjustments, we especially recommend doing a gauge swatch to make sure your gauge is consistent with the pattern. Here’s our guide on swatching if you’d like more information (https://www.purlsoho.com/create/2020/08/20/all-about-gauge/)!
I hope this helps!
All the best,
Cat
Hi – What adjustments would you suggest to make the cowl child sized? Presumably I’d need to use double pointed needles? Thoughts? Just ordered a bunch with the hope I can do this!
Hi Susan,
Thank you for your question! To make a smaller version of this cowl, you can just cast on 124 stitches instead so that the bottom hem of the cowl measure about 22.5 inches based on the gauge in the pattern. Then, you can proceed with the pattern as written, working through the “Decrease” section until you have 88 stitches left on your needles so the top of the cowl now measures 16 inches. Then, just bind off to complete your cowl!
This cowl is knit flat and then seamed, so if you’re knitting this flat, you won’t need to use double pointed needles. But if you’d prefer to knit this in the round, you can definitely use double pointed needles as you progress through the “Decrease” section! To knit the cowl in the round, you would start off knitting the cowl flat to create the hem and then join in the round at the start of the “Decrease” section; then just alternate a round of all knits with a round of all purls, working the decreases as instructed! You can also try 16-inch circular needles for the “Decrease” section as those would likely work well too.
We recommend checking your work as you go and adjusting the length of the cowl, i.e. the number of rows, based on what’s best for your project. And when making pattern adjustments, we especially recommend doing a gauge swatch to make sure your gauge is consistent with the pattern! Here’s our guide on swatching if you’d like more information (https://www.purlsoho.com/create/2020/08/20/all-about-gauge/).
I hope this helps, and please let us know if you have any other questions!
All the best,
Cat
A wonderful simple idea with a great look!
I made it in rounds because I always try to avoid seams. The decreases add a nice design element to the cowl.
Hi Angela,
Wow, you’re quick! It really is a fun one to knit, isn’t it?
I just mentioned to Ann, another knitter who commented here and asked about why we wrote the pattern flat, that we were avoiding purl rounds. But some people’s purl rounds are other people’s seams… You do have to do one or the other, though!
Thank you for letting us know about your process and success… We love to hear it!
Best,
Whitney
I just ordered the yarn, but is the pattern available in a form that doesn’t require 16 pages of printing? Thank you.
Hi Ruth,
Thanks for your question! Here’s how we recommend printing patterns from our website:
If you’re on your computer, you’ll find a “print” icon in the right column just below the “Save To Favorites” button. If you’re on a mobile version of the site, you will find the “print” icon below the pattern and above the comments.
Click on this button, and a window will pop up where you can delete whichever parts of the pattern you don’t want to print. When you hover over any image or a text block, it will be highlighted in yellow and a “trash” icon will appear. Just click on this icon to delete anything that’s not necessary to the pattern! For example, you may decide to shorten the pattern by omitting certain images or the list of materials. Then, just click on the “Print” button in the upper left-hand corner of the pop-up window!
I hope this helps! Please feel free to email us at customerservice@purlsoho.com if you have any other questions!
All the best,
Cat
I would love to knit this cowl but I would like to knit it with one color and not do the switch to a different color. Is this possible and if yes, how many balls of yarn do I need? Thank you!
Maria
Hi Maria,
Yes, that is totally possible and a very easy change to make. You’ll still need just two balls of Novella, and you can ignore the instructions to change colors and slip the selvage stitch.
Knitting with Novella is a ton of fun, even with one color… We hope you love it and please let us know if you have any other questions!
Best,
Whitney
Good morning . Is there a way to revert this to print iut? Thank you
Hi Patti,
Thanks so much for your comment! Here’s how we recommend printing patterns from our website:
If you’re on your computer, you’ll find a “print” icon in the right column just below the “Save To Favorites” button. If you’re on a mobile version of the site, you will find the “print” icon below the pattern and above the comments.
Click on this button, and a window will pop up where you can delete whichever parts of the pattern you don’t want to print. When you hover over any image or a text block, it will be highlighted in yellow and a “trash” icon will appear. Just click on this icon to delete anything that’s not necessary to the pattern! For example, you may decide to shorten the pattern by omitting certain images or the list of materials. Then, just click on the “Print” button in the upper left-hand corner of the pop-up window!
Please feel free to email us at customerservice@purlsoho.com if you have any other questions!
All the best,
Cat
Why not join in the round for X amount of inches then work back and forth for the open edge that loops over your shoulder? You could still make a lively slip stitch edge.
Hi Ann,
You could absolutely do that! The reason we don’t is that garter stitch in the round requires you to purl every other round, but garter stitch flat is all knit stitches. Since most people find knitting easier than purling (and we tend to agree!), we decided to stick to garter stitch flat and opted for a simple seam to whip it into shape!
Thank you so much for asking, and if you decide to go the in-the-round route, please let us know if you need any help!
Best,
Whitney
Hello – What an intriguing yarn and pattern. Is it possible to make a scarf or wrap instead of the cowl using this yarn with a stockinette or garter stitch pattern?
Hi Barbara,
Absolutely! The Beginning section of the pattern is essentially a garter-stitch scarf pattern. If you cast on the number suggested, you will get a 24.75-inch wide scarf (more like a wrap), but you can cast on any number you’d like. If you’re getting the same gauge as we are, just multiply the width you’d like by 5.5 and cast on that number. For example, a 10-inch scarf would be 10 x 5.5 = 55 cast-on stitches. Then, just follow those four rows for the length of a scarf!
Please let us know if you need any more help, and we hope you have as much fun knitting your scarf as we did our cowls!
Best,
Whitney
Whitney – Thank you! If I want the scarf to be 10 inches wide and 60 inches long, how many skeins would I need. Would 4 skeins be enough?
Hi Barbara,
Great question! You would need 6 balls of Novella to make a scarf in those dimensions. I hope this helps, and please let us know if we can help with anything else!
All the best,
Cat
If you were to make a baby blanket – what no of stitches would give the same effect? for the salt water taffy combination …and how many balls of yarn to complete it?
Hi Mary,
Thanks so much for your question! To make a garter stitch baby blanket inspired by this cowl, you would need 10 balls of Novella for a blanket that measures about 30 inches by 37 inches. I highly recommend double checking that your gauge is consistent with the pattern by knitting a gauge swatch, and here’s our tutorial on swatching if you’re interested in more information (https://www.purlsoho.com/create/2020/08/20/all-about-gauge/)! If you’re getting gauge, you can cast on 165 stitches for a blanket width of approximately 30 inches and then knit until the project is 37 inches or the length that you prefer. I hope this helps!
All the best,
Cat
I am interested in knitting this in the round. I assume I would cast on the same number of stitches, then knit and purl until the desired length. At the split would I just start working back and forth instead of in the round. Is it that simple?
Thanks for your help, I love this look!
Jo
Hi Jo,
Thanks for writing in! This cowl is actually knit from the bottom up, so you would cast on the original amount of stitches, knit the “Beginning” part back and forth in rows to create the split hem, and then switch over to knitting in the round for the “Decrease” section while still doing the decreases as written! When you get to the “Decrease” part, you can join in the round for “Row 1 (right side)” and knit one round instead. Then, for the next round, just purl all stitches. Afterwards, do all knits for Round 3 and then all purls for Round 4. Repeat rounds 1 – 4 until you have 100 stitches left, and lastly bind off knit-wise!
Since you will be knitting stripes in the round with your colors A and B, here’s our Stripes in the Round tutorial (https://www.purlsoho.com/create/stripes-in-the-round/) for how to carry up the colors! I hope this helps!
All the best,
Cat
This is great! Thanks so much!!!
I have ordered the yarn. Is there a print version of the pattern without all the photos…don’t want to print out 27 pages!
Thank you
Hi Martha,
I would recommend using the “print” function on this page, rather than printing directly from your browser! If you’re on your computer, you’ll find a “print” icon in the right column just below the “Save To Favorites” button. If you’re on a mobile version of the site, you will find the “print” icon below the pattern and above the comments.
Click on this button, and a window will pop up where you can delete whichever parts of the pattern you don’t want to print. When you hover over any image or a text block, it will be highlighted in yellow and a “trash” icon will appear. Just click on this icon to delete anything that’s not necessary to the pattern! For example, you may decide to shorten the pattern by omitting certain images or the list of materials. Then, just click on the “Print” button in the upper left-hand corner of the pop-up window!
All the best,
Lili
Would it be possible to get swatches of the other bundle colors? There’s a couple I think are pretty but I’m having a hard time picturing them in stripes with each other. Thank you!
Hi Jessica,
I’m afraid that we haven’t yet made swatches for each of the bundle colors. I can absolutely see how useful that would be though, and I’ll let our design team know that there’s interest in seeing this!
All the best,
Lili
Hello! This looks like a great gift idea! Would this pattern work with a Worsted weight yarn! I have Rios malabrigo yarn in my stash.
Many thanks for your inspirational posts!
Hi Harriet,
Yes, you can absolutely make this cowl with a worsted weight yarn! You’ll just need to adjust your cast-on number so that the cowl comes to the correct size.
To figure out your cast-on number, you will want to first knit a gauge swatch in pattern. Once you know how many stitches you are getting per inch, you can multiply that number by the width that you would like and cast on the nearest whole number. Then you can follow the pattern essentially as written!
The only other thing you’ll need to change is how many times you work the repeated rows. This number will be smaller since your gauge will be larger, so I’d recommend just going by measurement instead. The BEGINNING section is worked until the cowl measures 3.5 inches from cast-on, and then you’ll work the DECREASE section until the cowl measures 10.5 inches from cast-on.
I hope this helps, and please let me know if you have any other questions on these modifications!
All the best,
Lili
Thank you so much for your clear and helpful reply! Almost finished this cowl and it is a bit bulky using worsted yarn, but it will be very warm!! For the next one I will use your yarn suggestion.
Hi! I am really interested in knitting this cowl but am having a hard time visualizing colors. Fall Dahlias is the one that I keep coming back to; the second color I’m not so sure. I’d like something that acts as a quiet backdrop rather than adding more color or high contrast, if that makes sense. Fall Dahlias is so pretty as it is, and I’d like the second color to showcase that. Maybe Desert Ridge? Any recommendations?
Thank you!
Hi Kate,
Thanks so much for your question! I think Desert Ridge would look great with Fall Dahlias! You could also go with Heirloom White to make the Fall Dahlias really pop. I hope this helps, and please let us know if you have any other questions!
All the best,
Cat
I didn’t have enough yarn to complete the project as written. The final height of the cowl ended up being 9.25 inches, not 10 .5 inches. It still turned out beautiful, though.
Hi Jodi,
We are so happy to hear you have finished your Candy Stripe Cowl! The finished piece can occasionally come out smaller than the intended size. We recommend blocking your finished piece to the dimensions in the pattern but if you are happy with the result then you can skip this step!
Thank you for writing in and if you have any other questions, please don’t hesitate to let us know.
Happy making,
Gavriella
Hi. I am a bit confused. If I cast on 136 stitches and there are 19 decreases, how do I end up with 100 stitches remaining? Did I miss something?
Hi Donna,
Thanks for writing in, and we’re happy to help! There are 36 total decreased stitches in the DECREASE section. You work one decrease on Row 1 and a second on Row 3. Then, you repeat Rows 1 – 4 seventeen more times, for a total of 18 times. Since there are two decreases within these four rows, you’ll end up working 36 decreases over the course of all the repeats. I hope this helps clarify things, but please let me know if you have any other questions!
All the best,
Lili
Just finished the cowl, and it’s lovely, except for the seam. The selvedge edge of the decrease looked very different from the garter seam tutorial. Did I lose track of which side was the right side? Maybe a line drawing could have helped?
Hi Margie,
Thanks for reaching out with your question! Your cowl should have a clean slip stitch selvage edge for the bottom half where you work even and then the decrease section should have ridged sides as you don’t work any slip stitches in this section. You might have continued the slip stitch selvage edge up the side? If so, you can follow along working 1 stitch into the fabric that way you care able to work within the ridges of the garter stitch sections. I hope this helps but if you need further assistance, please don’t hesitate to let me know!
All the best,
Gavriella
Regarding knitting in the round: After I knitted the flat part and started with the decrease section with a knit row I get a stockinette row. So do I start off with a purl row and then alternate with a knit row to keep the garter stitch. I cannot make the first decrease row a knit row and keep the garter stitch.
Thanks for your help.
Hi Kay,
Thanks for reaching out! The Candy Stripe Cowl is actually knit completely flat in garter stitch (knitting both right and wrong sides) so there is no need to join. If you want to alter the pattern to knit in the round, you will need to alternate between knit and purl rounds to complete the cowl. You can do that by placing a stitch marker, purling one round, and then knitting the next, adding your decreases to your knit rounds if that’s where you would like them to be placed. I hope this helps!
Happy knitting,
Gavriella
Happy knitting,
Gavriella
Thank you Gavriella. The reason for my question was that previous answers to those who wanted to knit in round sounded like after joining you knitted a row . You confirmed that the first row after knitting would be a purl row. Just wanted to clarify if there are others confused. I love the pattern and appreciate your help.
Kay
No problem at all Kay. I am always happy to help makers along the way!
Have a great weekend!
Hi Hi,
If I want it narrower and a bit taller can I just continue the decrease patter for a while or do fewer rows in the beginning and then do more decreases at the top? What would you suggest instead of 7? Maybe 5 to start and then a few extra decreases at the top? Thanks!
Hi Jane,
That sounds like a lovely idea! I’d suggest adding more decrease rounds at the same rate as the pattern. You can follow the instructions as is but instead of ending at the DECREASE section working rounds 1-4 eighteen times, I’d work 1-4 until you are happy with the size of your cowl. One thing to keep in mind is this might require a bit more yardage so I’d be sure to have an extra skein of each color. I hope this helps but please let me know if you have any other questions!
Happy knitting,
Gavriella
Thanks Gavriella. I’m kind of stunned at how off my gauge is. I’m usually right on gauge with your yarn and your needle selection (sometimes I have to go up because I knit tightly). Should these really be knit on size 6 needles? It seems more like a 4 or 5 would make sense and that is also what the yarn label calls for. I got a bit over 4.5 inches for the row and stitch numbers above and I knit tightly. Thanks!
Hi Jane,
Thanks for your question! Gauge can vary from knitter to knitter depending on knitting style and technique. The recommended needle size for the pattern is what was used for the sample by the designer but we always recommend doing a gauge swatch to make sure you are able to get the same gauge using your own knitting style and tension. For your gauge swatch, you will always want to cast on more than the gauge of the pattern to make sure you can get an accurate measurement. Since this pattern is 22 stitches and 44 rows = 4 inches in garter stitch, you will want to swatch with at least 26-28 stitches in garter stitch as the side stitches will almost always vary slightly from those on the main body of the fabric. You can also check out our All About Gauge Tutorial here for a more in-depth explanation about swatching before knitting a pattern. I find it helpful when I need to make any needle adjustments for my own projects as well!
All the best,
Gavriella
Forgive my ignorance but why is this knitted on circulars if it’s knitted flat?
Hi Helen,
Thanks for writing in! This pattern suggests knitting on a circular cable needle so that the length of the project has room to fit comfortably on your needles. Although this pattern is knit flat, using circular needles can make knitting less stressful on your hands and also allows you to better control your stitches as they won’t be all scrunched up on a straight needle. I hope this helps but if you have any other questions, we are always here to assist you!
Happy knitting,
Gavriella
Hi! This is a lovely cowl with lovely yarn!
My question is this:I’m ready to bind off and wonder if the standard bind off will make the cowl edge stretchy enough to go over my head?
Hi Kristin,
A standard bind-off will work just fine for this pattern! If you’re finding that your bind-off stitches are too tight, then I’d recommend moving up a needle size or two just for the bind-off row. Hope this helps!
All the best,
Lili
I’m in the homestretch for this cowl (& I’m enjoying it!). I’d like to knit another one. Just to make the project a little bit different, I’m thinking of using just one color (maybe a variegated yarn) & knitting it in stockinette. If I use yarn the same size as Novella, would I need the same amount of yarn as 2 balls of Novella (284 yds)? Or, does stockinette use more (or less) yarn than an all garter stitch piece? Thanks very much for your help.
Hi Deb,
Thank you for writing in! What a wonderful idea! Stockinette stitch uses significantly less yarn than garter stitch so you should be good to go with 284 yards!
Happy knitting,
Gavriella
I’m at the decrease part of the pattern. I’m working in just one color (Sea Urchin). Instructions say that the first row of the decrease section should be on the right side. I’m embarrassed to say this but, I really don’t know which is the right or wrong side of my cowl! Because I am working in one color, I didn’t bother to keep track of how many rows I was knitting…I just worked it until the piece measured 3″ from the CO row (as stated in the instructions). Does it really matter which side I begin the decrease on?
Hi Pam,
Thank you for writing in! Since both sides are the same, at this point in the pattern, you can choose which side you would like to be your right side, place a removable marker on your work, and then proceed to the decreases. I hope this helps but please let me know if you have any questions!
Happy knitting
Great! Thank you!
Hi!
I have decided to make this cowl with a single color. I like the look of the slipped stitch edge. If I am using just one color would I start each row by slipping the first stitch purlwise?
Thanks for your help!
Jo
Hi Jo,
That is correct! You will just slip the first stitch of every row with the yarn in front for a nice neat edge! Please let us know if there is anything else we can help with!
Happy knitting,
Gavriella
I would like to try this with some “stash” yarn and knit in the round before purchasing the Novella yarn. Want to be sure I can do it before investing in this yarn. What size is the Novella? …fingering, sock, dk, etc. Thank you
Hi Peggy,
That is a great question! Novella is a sport-weight yarn with a suggested gauge of 6.25-6.75 stitches per inch. I hope this helps!
Happy knitting,
Gavriella
Thank you for the quick. reply.
Oh my! I am usually right on target with gauge, but not this time. I am almost done and will not have enough yarn to finish and the bottom edge is larger than it should be. I am willing to start over with smaller needles and be more aware of how things are going… but… will the yarn recover if I undo it all and re-roll the balls? I have planned on making two of this, so I would like to get the first one right before I start on the second.
Hi Janet,
Thank you for writing in! Your yarn should be fine to rip out and start over. We recommend winding it into a ball as you go to make sure it doesn’t tangle along the way!
Happy knitting,
Gavriella