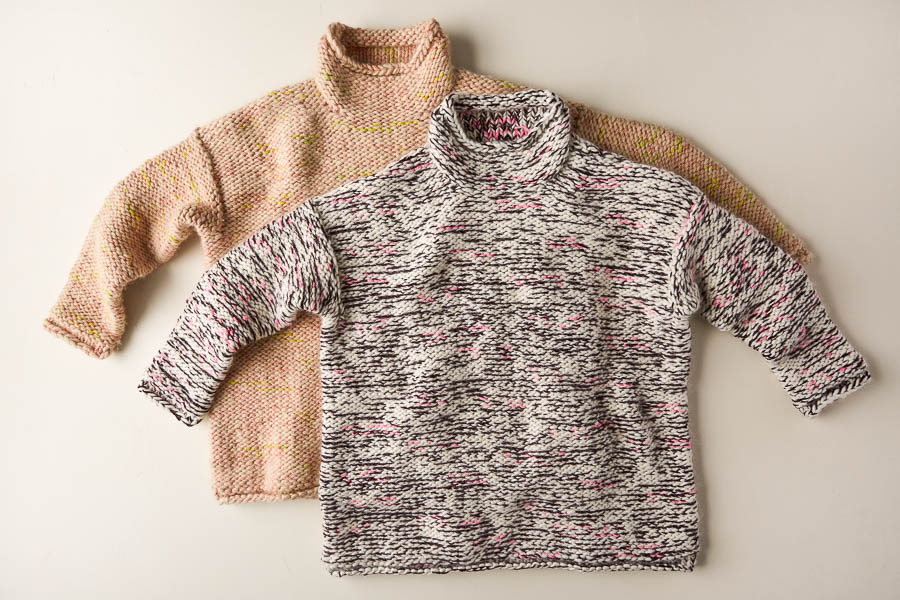

Kaleidoscope Sweater
The color play of our Kaleidoscope Sweater may seem random, but it is actually created by the well-considered choices of human whimsy. It’s your own intention makes this super quick, super feel-good knit, also, super special.

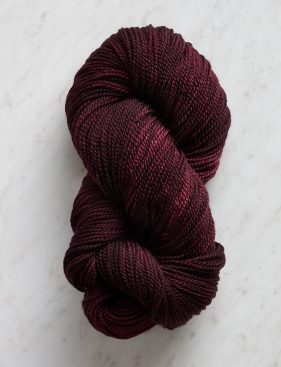
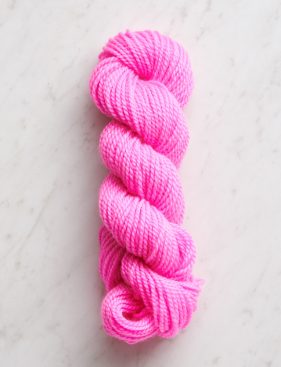
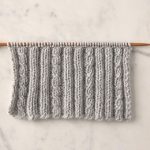
To create this kaleidoscopic swirl of color, you cut lengths of Pocket Posy (shown here in Azalea Glow) and knit them in with Super Soft Merino and Posy (here, in Black Cherry) held together. The result is streaks of color, like a hand-painted yarn that you get to design!

Construction is just as smart and simple. You knit in the round from the bottom up, divide at the underarms, and work the front and back separately with a drop shoulder construction. Join the shoulders, then pick up and work the collar.
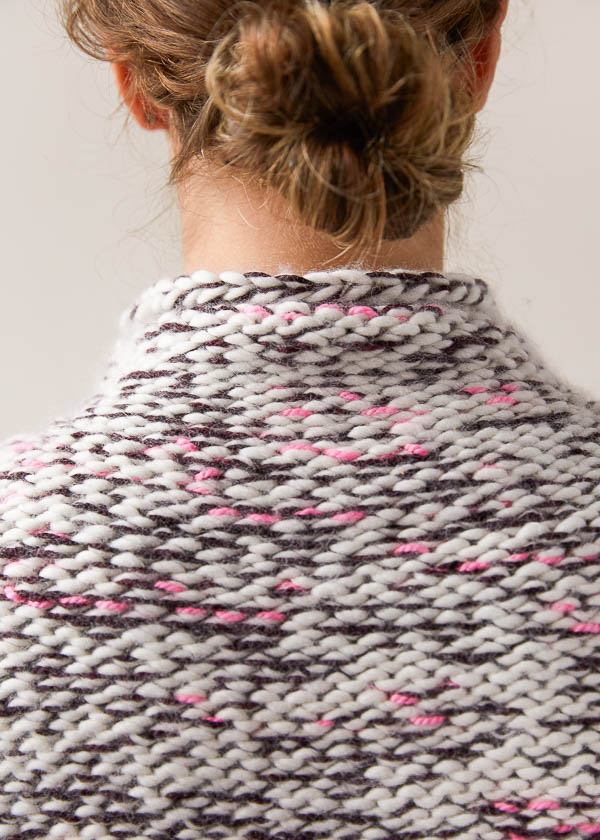
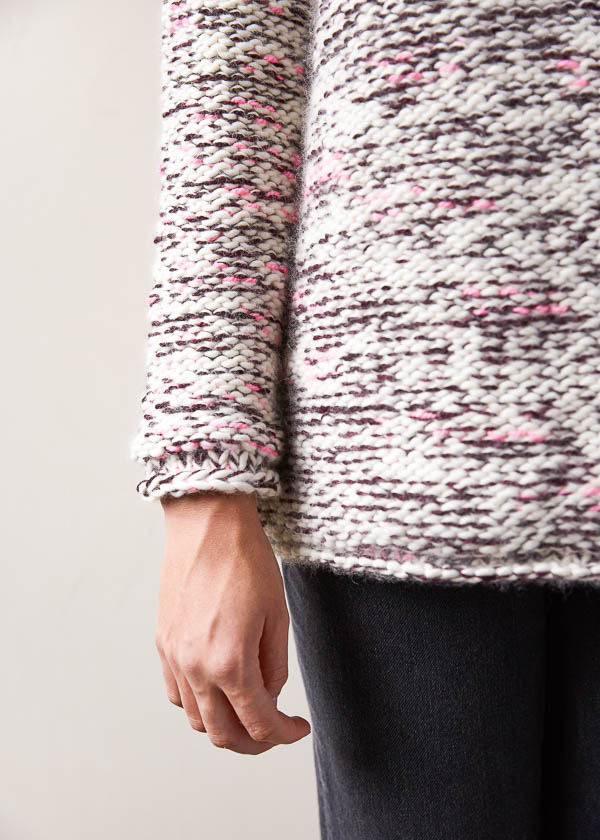
Finally, pick up each sleeve and work in the round from the top down. Little reverse stockinette rolled edges lend a chunky banded flourish, like chic bracelets and a necklace knit right in. This is a really fun, creative project, with a free pattern… and every opportunity to make happy accidents happen!
Designed by Purl Soho designer, Adam Aronowitz.
Share your progress and connect with the community by tagging your pics with #PurlSoho, #PurlSohoBusyHands, #PurlSohoKaleidoscopeSweater, #PurlSohoSuperSoftMerino, and #PurlSohoPosy. We can’t wait to see what you make!
MATERIALS
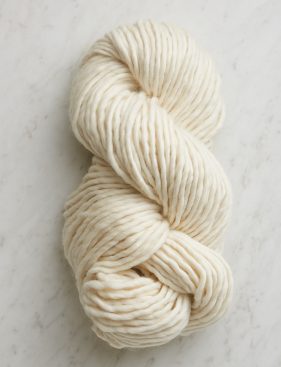
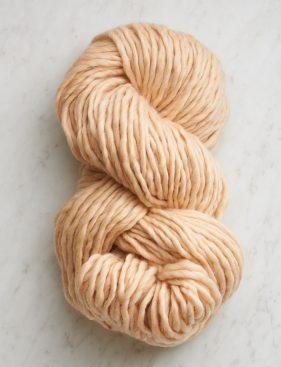

- Yarn A: 7 (8, 9, 9, 10) (11, 11, 12, 13) skeins of Purl Soho’s Super Soft Merino, 100% merino wool. Each skein is approximately 87 yards/ 100 grams; approximately 605 (665, 730, 780, 835) (885, 950, 1005, 1050) yards required.
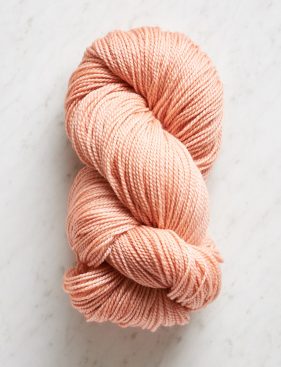
- Yarn B: 4 (5, 5, 5, 6) (6, 6, 7, 7) skeins of Purl Soho’s Posy, 75% superwash merino, 15% cashmere, and 10% nylon. Each skein is approximately 159 yards/ 50 grams; approximately 605 (665, 730, 780, 835) (885, 950, 1005, 1050) yards required. (NOTE: We no longer offer Posy, but choose from one of our other fingering weight yarns.)
- Yarn C: 1 skein of Posy; approximately 90 (95, 105, 115, 120) (130, 140, 145, 150) yards required.
For our sweaters, we used the colors…
- Yarn A: Heirloom White; Yarn B: Black Cherry ; Yarn C: Azalea Glow
- Yarn A: Honey Pink; Yarn B: Pink Nectar; Yarn C: Sour Gooseberry
You will also need…
- US 15 (10 mm), 36- or 40-inch circular needles (depending on size you are making)
- US 15, 16-inch circular needles
- A set of US 15 double pointed needles
- Stitch markers
- Stitch holders or scrap yarn
GAUGE
10 stitches and 14 rows = 4 inches in stockinette stitch, holding Yarns A and B together
SIZES
NOTE For help picking a size, please check out our Understanding Ease + Selecting Size Tutorial!
40 (44, 48, 52, 56) (60, 64, 68, 72)
To fit actual chest circumference of 28-32 (32-36, 36-40, 40-44, 44-48) (48-52, 52-56, 56-60, 60-64) inches, with approximately 8–12 inches of ease
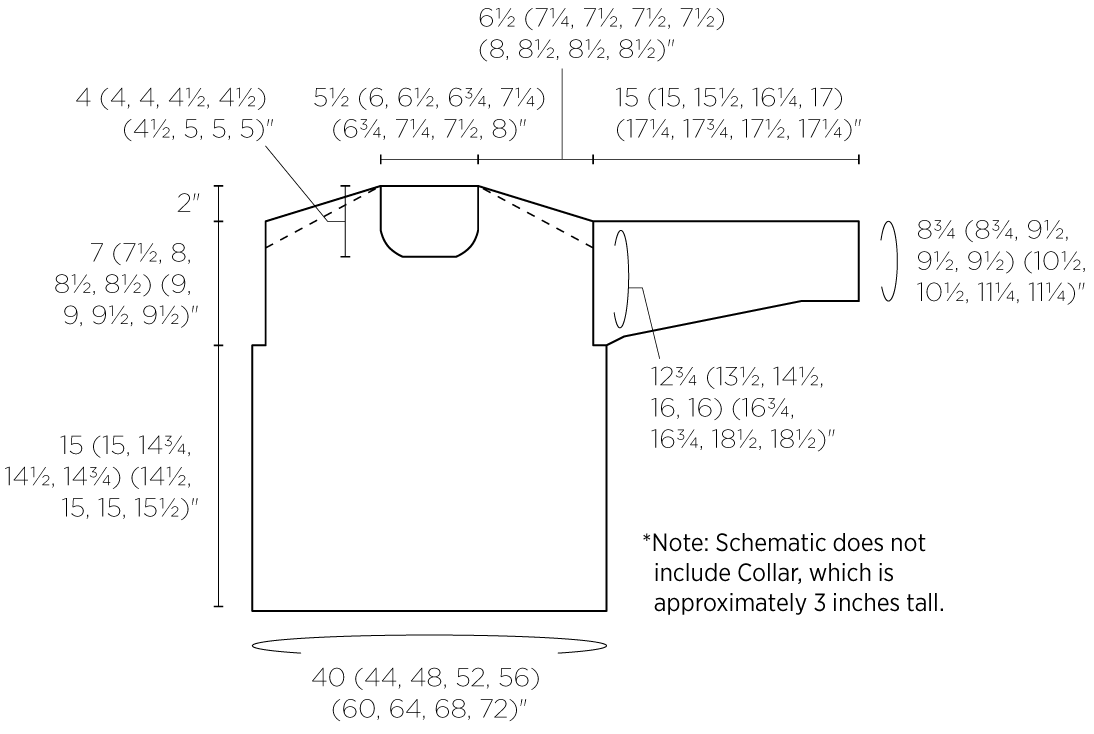
- Finished Chest Circumference: 40 (44, 48, 52, 56) (60, 64, 68, 72)
- Finished Length from Center Back to Bottom Hem: 24 (24½, 24¾, 25, 25¼) (25½, 26, 26½, inches
- Finished Sleeve Length from Underarm: 15 (15, 14¾, 14½, 14¾) (14½, 15, 15, 15½) inches
SAMPLE: The sweaters pictured here are size 44, worn with 12 inches of ease.
NOTES
CONSTRUCTION
You will knit this sweater in the round from the bottom up, divide at the Underarms, and work the Front and Back separately with a drop shoulder construction. You will join the Shoulders, then pick up and work the Collar. Finally, you will pick up each Sleeve and work it in the round from top down.
When working in the round, note that you will knit the Body with the wrong side facing you and the Collar and Sleeves with the right side facing you. Throughout the pattern “right side” refers to the “knit” side of the fabric, and “wrong side” refers to the “purl” side. All references to left and right refer to the sweater as constructed (whether knit side out or purl side out), as usual with knitting patterns.
SPECIAL INSTRUCTIONS
SHORT ROWS: WRP-T (WRAP AND TURN)
- On the right side: Keeping yarn in back, slip next stitch purlwise from left needle to right needle. Bring yarn to front. Return slipped stitch to left needle. Bring yarn to back. Turn work so wrong side is facing you.
- On the wrong side: Keeping yarn in front, slip next stitch purlwise from left needle to right needle. Bring yarn to back. Return slipped stitch to left needle. Bring yarn to front. Turn work so right side is facing you.
For more information about this technique, please visit our Short Rows Tutorial.
SSP (SLIP SLIP PURL)
Slip 2 stitches knitwise one at a time, return them to left needle in new orientation, purl them together through back loops. [1 stitch decreased]
For help with this decrease, visit our Slip Slip Purl Tutorial.
YARNS A, B + C
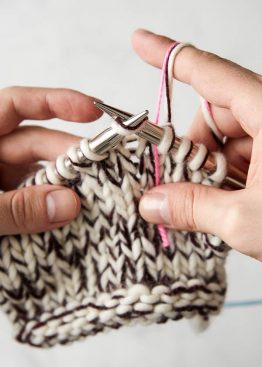
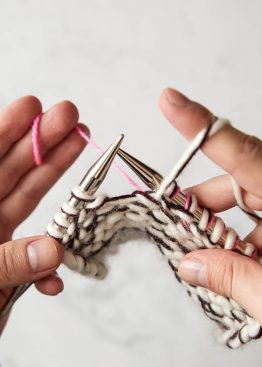
As you work this garment, you will always hold a strand of Yarn A and Yarn B together. In addition, as instructed, you will add a 15-inch strand of Yarn C. Be sure to vary where in the round or row you begin the Yarn C strand, and try to be as random as possible for an all-over pattern. To eliminate weaving in too many ends, add in the Yarn C strands as follows…
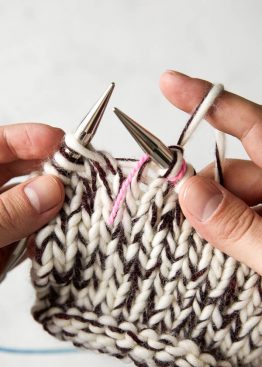
Whether the knit or purl side is facing you, add Yarn C by draping the tail toward the knit side, leaving an approximately 2-inch tail. Work Yarns A, B, and C together until a 2-inch tail remains of Yarn C. Leave the Yarn C tail on the knit side of the work and continue working to the end of the round or row with just Yarns A and B. You can leave these tails dangling on what will be the wrong side of the garment… Don’t worry, they’ll stay put!
Here’s what the beginning and end of knitting with Yarn C looks like on the knit side…
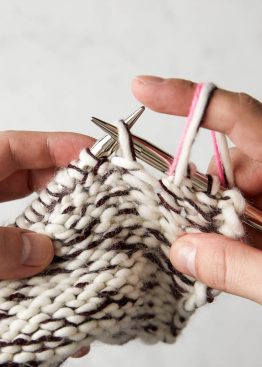
On the purl side…
PATTERN
Cut about a dozen 15-inch strands of Yarn C, ready to be worked in (see Special Instructions). Cut more as necessary.
BODY
Holding Yarn A and Yarn B together and using a Long-Tail Cast On, cast 50 (55, 60, 65, 70) (75, 80, 85, 90) stitches onto 36- or 40-inch circular needles, place marker (pm) for Right Side, cast on 50 (55, 60, 65, 70) (75, 80, 85, 90) more stitches, pm for end of round. [100 (110, 120, 130, 140) (150, 160, 170, 180) total stitches: 50 (55, 60, 65, 70) (75, 80, 85, 90) stitches each for Front and Back]
Join for working in the round, being careful not to twist the stitches.
Rounds 1-3: Purl to end of round, randomly adding in one strand of Yarn C every round (see Special Instructions).
Round 4: Knit to end of round, adding in one strand of Yarn C randomly.
Repeat Round 4 until Body measures 15 (15, 14¾, 14½, 14¾) (14½, 15, 15, 15½) inches from rolled edge (do not unroll).
DIVIDE FRONT + BACK
Division Round: K2 (2, 3, 5, 7) (9, 10, 12, 14), place previous 4 (4, 6, 10, 14) (18, 20, 24, 28) stitches (including marker) onto stitch holder(s) or scrap yarn for Left Underarm; knit to 2 (2, 3, 5, 7) (9, 10, 12, 14) stitches before next marker, place previous 46 (51, 54, 55, 56) (57, 60, 61, 62) stitches onto stitch holder(s) or scrap yarn for Front; k4 (4, 6, 10, 14) (18, 20, 24, 28) stitches, place these stitches (including marker) onto stitch holder(s) or scrap yarn for Right Underarm; knit to end of round. [46 (51, 54, 55, 56) (57, 60, 61, 62) stitches remain for Back]
BACK
WORK ARMHOLES
NOTE: In this section, you will work back and forth on Back stitches only. Add in a strand of Yarn C randomly every other row throughout this section.
Row 1 (wrong side): Purl to end of row.
Row 2 (right side): Knit to end of row.
Repeat Rows 1 and 2 until Armholes measure 5½ (6, 6½, 7, 7) (7½, 7½, 8, 8) inches, ending with a wrong-side row.
SHAPE BACK SHOULDERS
NOTE: In this section, you will be working back and forth in short rows, turning the work partway through each row rather than continuing to end of row. For extra help, see both Special Instructions and our Short Rows Tutorial. Continue to add in one strand of Yarn C randomly every other row throughout this section.
Short Row 1 (right side): Knit to last 2 (3, 2, 2, 2) (2, 3, 3, 3) stitches, wrp-t (see Special Instructions).
Short Row 2 (wrong side): Purl to last 2 (3, 2, 2, 2) (2, 3, 3, 3) stitches, wrp-t.
Short Row 3: Knit to 2 (3, 2, 2, 2) (2, 3, 3, 3) stitches before previous wrap, wrp-t.
Short Row 4: Purl to 2 (3, 2, 2, 2) (2, 3, 3, 3) stitches before previous wrap, wrp-t.
Short Row 5: Knit to 2 (2, 3, 3, 3) (3, 3, 3, 3) stitches before previous wrap, wrp-t.
Short Row 6: Purl to 2 (2, 3, 3, 3) (3, 3, 3, 3) stitches before previous wrap, wrp-t.
Repeat Short Rows 5 and 6 four more times.
Partial Row (right side): Knit to end of row, knitting wrapped stitches with their wraps as you come to them (see Short Rows Tutorial).
Next Row (wrong side): Purl to end of row, purling wrapped stitches with their wraps as you come to them.
Cut yarn, leaving a 50-inch tail.
Place 46 (51, 54, 55, 56) (57, 60, 61, 62) Back stitches onto stitch holder(s) or scrap yarn.
FRONT
WORK ARMHOLES
NOTE: In this section, you will work back and forth on Front stitches only. Add in a strand of Yarn C randomly every other row throughout this section.
Next Row (wrong side): With wrong side facing you, rejoin Yarns A and B and purl to end of row.
Row 1 (right side): Knit to end of row.
Row 2 (wrong side): Purl to end of row.
Repeat Rows 1 and 2 until Armholes measure 4½ (5, 5½, 5½, 5½) (6, 5½, 6, 6) inches, ending with a wrong-side row.
NECKLINE
NOTE: In this section, you will divide Front into Right and Left Necklines, working each side separately. Add in one strand of Yarn C randomly every 4th row throughout Right and Left Necklines.
Division Row (right side): K19 (21, 22, 22, 22) (23, 24, 24, 24), place these stitches onto stitch holder(s) or scrap yarn for Left Neckline; k8 (9, 10, 11, 12) (11, 12, 13, 14), place these stitches onto separate stitch holder or scrap yarn for Center Front Neck; knit to end of row. [19 (21, 22, 22, 22) (23, 24, 24, 24) stitches remain for Right Neckline]
SHAPE RIGHT NECKLINE
Next Row (wrong side): Purl to end of row.
Decrease Row (right side): K4, slip slip knit (ssk), knit to end of row. [1 stitch decreased]
Repeat last 2 rows 2 more times. [16 (18, 19, 19, 19) (20, 21, 21, 21) stitches remain]
Work even until Right Armhole measures 8½ (9, 9½, 10, 10) (10½, 10½, 11, 11) inches from Right Underarm, ending with a wrong-side row.
Cut yarns, leaving 6-inch tails. Place remaining stitches onto stitch holder or scrap yarn.
SHAPE LEFT NECKLINE
Return 19 (21, 22, 22, 22) (23, 24, 24, 24) on-hold Left Neckline stitches to circular needles.
Next Row (wrong side): With wrong side facing you, join Yarns A and B and purl to end of row.
Decrease Row (right side): Knit to last 6 stitches, knit 2 together (k2tog), k4. [1 stitch decreased]
Repeat last 2 rows 2 more times. [16 (18, 19, 19, 19) (20, 21, 21, 21) stitches remain]
Work even until Left Armhole measures 8½ (9, 9½, 10, 10) (10½, 10½, 11, 11) inches from Left Underarm, ending with a wrong-side row.
Do not cut yarns.
JOIN SHOULDERS
Place first and last 16 (18, 19, 19, 19) (20, 21, 21, 21) stitches of Back Neckline onto separate double pointed needles for Shoulders, leaving 14 (15, 16, 17, 18) (17, 18, 19, 20) remaining stitches on holder for Back Neck. Also place Right and Left Front Neckline stitches onto separate double pointed needles. With knit side of garment facing you, hold Back Shoulder and corresponding Front Shoulder stitches parallel with purl sides of fabric together. Using working yarn (or 50-inch tail) and a spare double pointed needle, work a 3-Needle Bind Off to join the Shoulders together.
For help with this technique, visit our 3-Needle Bind Off Tutorial.
Repeat for other Shoulder.
COLLAR
NOTE: In this section, you will work the Collar in the round with wrong (purl) side facing you. Add in one strand of Yarn C every other round throughout the Collar.
Turn garment wrong-side-out, so purl side is facing you.
Pick-Up Round: Starting at Left Shoulder and using 16-inch circular needles, rejoin Yarns A and B and pick up and knit 8 (8, 8, 9, 9) (10, 10, 10, 10) stitches along Left Front Neckline; place 8 (9, 10, 11, 12) (11, 12, 13, 14) on-hold Front Neck stitches onto a double pointed needle and purl across these stitches; pick up and knit 8 (8, 8, 9, 9) (10, 10, 10, 10) stitches along Right Front Neckline; place 14 (15, 16, 17, 18) (17, 18, 19, 20) on-hold Back Neck stitches onto a double pointed needle and purl across these stitches; pm and join for working in the round. [38 (40, 42, 46, 48) (48, 50, 52, 54) total stitches]
Round 1: Purl to end of round.
Repeat Round 1 until Collar measures 2½ inches from Pick-Up Round.
Next Round: Knit to end of round.
Repeat last round 2 more times.
Bind off loosely with Yarns A and B only.
SLEEVES
NOTE: You will work each Sleeve in the round from the top down. The marker for each Underarm will now act as end-of-round marker. Add in one strand of Yarn C every other round throughout entire Sleeve.
Pick-Up Round: With wrong (purl) side facing you, place on-hold Underarm stitches and marker onto a double pointed needle. Using double pointed needles or 16-inch circular needles, rejoin Yarns A and B and pick up and knit 28 (30, 30, 30, 26) (24, 22, 22, 18) stitches evenly around entire Armhole, purl to end-of-round marker. [32 (34, 36, 40, 40) (42, 42, 46, 46) total stitches]
Next Round: Purl to end of round.
Repeat last round until Sleeve measures 1 inch from Underarm.
Decrease Round: P2, purl 2 together (p2tog), purl to last 4 stitches, ssp (see Special Instructions), p2. [2 stitches decreased]
Repeat Decrease Round every 3 (2½, 2½, 2, 2) (2, 2¼, 2, 1¾) inches 3 (2, 4, 3, 6) (7, 2, 1, 8) more times, then every 2¾ (2¼, 2¼, 1¾, 1¾) (0, 2, 1¾, 0) inches 1 (3, 1, 4, 1) (0, 5, 7, 0) time(s), changing to double pointed needles if necessary. [22 (22, 24, 24, 24) (26, 26, 28, 28) stitches remain]
Work even until Sleeve measures 14 (14, 14½, 15¼, 16) (16¼, 16¾, 16½, 16¼) inches from Underarm.
Next Round: Knit to end of round.
Repeat last round 2 more times.
Bind off loosely with Yarns A and B only.
Make one more identical Sleeve.
FINISHING
WEAVE IN ENDS + BLOCK
Turn garment knit side out and weave in all ends of Yarn C that are 2 inches away the Neckline and Sleeve openings, as well as the bottom edge and cuffs. You can leave all other Yarn C tails loose, but if they pop through to the purl side, just weave them back through to the knit side.
Weave in all remaining ends and close up holes at Shoulders, Neckline and Underarms if necessary.
Block as desired. If working with Super Soft Merino, we recommend lightly steam blocking.


Look pretty ! I wonder what size for mâle?
Thanks a lot,
Virginie
Hi Virginie,
Thanks for writing in! Since the sizes are given as the finished chest measurement of the sweater, you can select whatever size will fit the person you are knitting for, regardless of their gender. We recommend choosing a size with 8 to 12 inches of positive ease, or a size 8 to 12 inches larger than the wearer’s actual chest measurement, for a cozy, relaxed fit.
Happy knitting!
Julianna
Awesome as usual!
Any suggestion to adapt this to a man? I was thinking to go just as it is! 🙂
Hi Lucio,
Thanks so much for the kind words! Like many of our designs, this sweater is a unisex design that can be worn by anyone! The only modification you may need to make would be to add some length to the sleeves and/or body of the sweater if necessary.
I hope that helps and happy knitting!
Julianna
Is there anyway this pattern can be written to reflect straight needles instead of circular needles? It would be very much appreciated…thanks!! love your patterns and site.
Hi Jayne,
Thanks for the kind words and for reaching out! At this time we do not have instructions for knitting this sweater on straight needles; however, I will be sure to forward your request along to the design team!
Best,
Julianna
beautiful….straight needle adaption much appreciated.
I would like to knit your sweater with a solid color so I guess the other two yarns make it a sweater knit in a super bulky yarn right?
Hello Denise,
Thank you for reaching out! Yes, the gauge for this sweater would fall under the super bulky category. As long as you are getting a gauge of 10 stitches and 14 rows per 4 inches in stockinette stitch you will be good to go.
Happy knitting!
-Marilla
This pattern is so great and the yarn is beautiful but…it’s just so expensive. Any less pricy ways to make this sweater? Sorry but in my size this sweater will cost me almost $300 to knit. Thanks very much.
Hi Ruth,
We hear you! We totally understand that sometimes our yarn suggestions are more of an inspiration than a reality for many people. We are always happy to recommend less expensive (but still beautiful!) alternatives. In this case, we suggest that you try using Cascade 220 held triple – two strands of Natural or your chosen main color and one strand of a contrast color as Yarn B. I would still use two skeins of Pocket Posy for Yarn C to add the little pops of color! You will need 6 (6, 7, 8, 9, 10) skeins of Cascade 220 for your main color and 3 (3, 4, 4, 5, 5) for Yarn B. I would also definitely recommend knitting a gauge swatch!
Thank you so much for asking. We’re sure that lots of other readers will thank you, too!
Best,
Julianna
Thanks very, very much Juliana. Much appreciated.
Hi
I wondered if this would work with cashmere bloom charcoal helix and the new bluish rust with dove grey for the accent strips or maybe something else from the new bloom colors. Using two strands of same color to substitute for the super soft merino and one strand for the main posy strand and a contrast color of same bloom for what is neon pink in the picture.
I will make a gauge and fingers crossed but would love your thoughts.
Thanks!!
Hello Jane,
Thank you for reaching out- this sounds very exciting! My concern would be substituting a strand of Posy for a strand of Cashmere Merino Bloom, as Posy is so much thinner than Cashmere Merino Bloom. Your best best is to swatch and see what happens!
Let us know how it goes and happy knitting!
Marilla
Hi Julianna,
I love this sweater and i am knitting it to my daughter, in a solid colour (with yarn that i have in my stash), the smaller size.
But i dont urderstand very well you you mean here:
“Division Round: K2, place previous 4 stitches (including marker) onto stitch holder or scrap yarn; knit to 2 stitches before next marker, place 46 stitches just worked onto stitch holder or scrap yarn for Front; k4, place these stitches (including marker) onto stitch holder or scrap yarn; knit to end of round. [46 stitches remain for Back]”
Thank you very much for your help.
ana
Hello Ana,
Thank you for reaching out! This portion of the pattern you have worked the body of the sweater and you are dividing the front and back of the sweater to work the front and back separately flat. This means that while you are working on your back shoulders, you will need to have your front stitches and bother your armhole stitches on holders. This portion of the pattern explains the process of doing this. When we say “place previous 4 stitches (including marker) onto stitch holder or scrap yarn” we are referring to the stitches that you most recently knit.
I hope this helps and happy knitting!
-Marilla
Hello Marilla,
thank you very much for your reply.
I was confused because 2 stitches are before the marker, it is of the other side, and I supposed that I was not understanding.
(I am portuguese and my english is not the better).
Thank you again
Ana
I am confused about the set up row to divide the front and the back. I knit 2 stitches and then put those 2, the marker and the 2 before the marker onto the stitch holder? But then when I need to continue knitting the working yarn is not on the other needle put on the stitch holder?
Hi Laura,
Thanks for reaching out! After placing the four underarm stitches on a holder, your yarn will still be attached to the last stitch on the holder. You can then continue to knit across the front stitches since the yarn will still be adjacent to the next stitch on the needle.
I hope that clears things up!
Julianna
Hi!
I’m currently knitting this sweater with the suggested yarn.
Is it safe to hand wash this sweater? Or will I have to dry clean it?
Thank you!
Hello Marie,
Thank you for reaching out! This sweater can be hand washed, though I would not put it in your machine on the hand wash setting.
Happy knitting!
-Marilla
I plan to make the smallest size, but longer. Should I increase Yarn A to 8 skeins and Yarn B to 3 skeins?
Thanks
Hi Ann,
Great question! This sounds like it should work! It will truly depend on how much longer you would like to make your sweater but I think that this is a good starting point!
Best,
Cassy
I love this sweater and have a number of skeins of super soft merino but I would like to substitute the posy with a completely natural yarn from Purl. Cashmere merino bloom, woolfolk far or mulberry merino seem like they might be too heavy. I don’t really want to use pure cashmere due to the expense. Any suggestions? Thanks!!
Hi Jane,
Thanks for reaching out! You are correct that the yarns you were considering are all too heavy to substitute for Posy, as it is a fingering weight yarn. I would recommend using Linen Quill, Woolfolk Tynd or Sno, Koigu KPM and KPPPM, Brooklyn Tweed Peerie, or any other fingering weight yarn in the fiber content you prefer.
I hope that helps!
Julianna
It looks gorgeous!
I plan to knit it using one solid color – in that I case, how many skeins do I need?
thank you!
Hi Hila,
Thanks for writing in! We were able to knit this sweater at the gauge in the pattern by holding a strand of super bulky Super Soft Merino along with fingering weight Posy held together on a US 15 needle, so if you are planning on omitting the Posy for a solid colored sweater, I would recommend knitting a gauge swatch to make sure you will still be able to obtain the same gauge. If so, you won’t need to add any more Super Soft Merino as the ultimate yardage won’t be affected. Another option would be to use colors of Super Soft Merino and Posy that match or are very similar so you will be more likely to get the correct gauge.
I hope that helps, and happy knitting!
Julianna
Good morning,
I was thinking about making this sweater with Super Soft Merino in Soft Black. Would you be able to suggest a Posy color that would pair well with Soft Black? Thanks so much,
Megan
Hi Megan,
Absolutely! This sweater pattern uses two different colors of Posy alongside the Super Soft Merino, so here are a few options for a color combo that I think will go well with Soft Black:
Pink Nectar + Pink Smoke
Lilac Mist + Lilac Petal
Pear Green + Pink Papaya
Hope these give you some inspiration!
All the best,
Lili
Hi! I would love to make this sweater….but I’m really struggling with the color selection and not being able to hold the yarns together! I’ve come up with a few combinations and was hoping I could get your feedback! I’m at both ends of the spectrum…..and also wondered if you’ve seen some others knit up in different combinations? 1st combo: sea salt(A), mourning dove (B), and pink nectar? 2: grey fig (A), Black cherry (B), and a lilac/lavender? I also love the Rose granite Merino if you had any suggestions? Thank you so much! I’d love to try to order these today with the sale price!
Heather
Hi Heather,
Thanks for reaching out, and we’re happy to help select colors! Your first combination based on Super Soft Merino in Sea Salt is very low contrast – but that’s not necessarily a bad thing! All three colors are similar value, so the Posy accents will blend in for a more subtle heathered look, like our Honey Pink version shown here. Gray Fig is one of my favorite colors, and adding Black Cherry and a lighter color like Winter Heath would add a bit more contrast and pop! If you decide to go with Rose Granite, I think Mourning Dove and either Pink Nectar or Winter Heath would be great matches.
Best,
Julianna
Can you suggest a substitute for the Honey Pink which is sold out? Thanks!
Hello Lisa,
Thank you for reaching out! As a substitute for Honey Pink I think that either Seasalt or Rose Granite would work beautifully!
I hope this helps and happy knitting!
-Marilla
Hi! I love this pattern! I was wondering if it could be worn inside out so the knit stitch is showing? Thanks!
Hello Kate,
Thanks for reaching out! You certainly can wear this sweater with the knit side showing. You could also switch all the knits to purls and purls to knits when constructing the sweater.
I hope this helps and happy knitting!
-Marilla
Hi! I would love to knit this sweater in gray denim. Could you help select colors that would work together? Thank you!
Hi Joanne,
Thanks for reaching out! Gray Denim is a lovely cool-toned neutral, so you have quite a few options! If you would like to stick with a more subtle palette, Posy in Lilac Mist and Pocket Posy in Winter Heath would be quite nice with Gray Denim. Or, you could use Posy in Winter Heath and Pocket Posy in Azalea Glow for a sweater with a bit of pop!
I hope that helps, and please do let us know how it turns out!
Julianna
Hello! I am really looking forward to making this sweater, but I see you no longer carry Cascade 220 as a substitute for super soft merino. Do you have another option for a more economical substitute for super soft merino? I’d like to use something with the same gauge if possible. Thanks!
Hi Emily,
Great question! Our new Big Good Wool should work well in this sweater! I would use two strands of Big Good Wool to substitute for yarns A and B, either in the same color or in two colors for a marled appearance, and then use Pocket Posy for the pops of Color C. You will need 5 (5, 6, 7, 7, 8) skeins total of Big Good Wool, plus the same number of Pocket Posy skeins listed above.
Happy knitting!
Julianna
I am in the middle of this sweater and have just finished the short rows section. On the rows when the wraps get knitted in, the tutorial is worked so that the wraps fall to the purl side of the knitting — which is usually the wrong side. But in this pattern, the purl side faces out, so the putting the wraps on the purl side looks terrible. What am I not understanding about this pattern?
Hi Julia,
Thanks for reaching out! It is true that wrap and turns look a little more prominent on the purl side of stockinette, but we found that the marled fabric disguised everything quite well. If you aren’t happy with how they look, I would suggest substituting German Short Rows, which should look the same on both sides of the work!
Happy knitting!
Julianna
I’m working on this sweater and I’m at the step where I’m about to join the shoulders. I just watched your 3-Needle Bind Off Tutorial. The instructions on the pattern say to put the purl sides together. The tutorial shows the knit sides together, and you do a knit stitch; for this pattern with the purl sides together, do we do a purl stitch? I hope this questions makes sense. Thanks.
Hi Heidi,
Thanks for reaching out! Even though you will be holding the purl sides together for this sweater, you will still work the 3-Needle Bind Off in the same manner by knitting the stitches together. Although it’s certainly possible to purl a 3-Needle Bind Off together, the seam will look exactly the same from the right side whether you knit or purl, so there’s no need to change anything!
Happy knitting!
Julianna
Hi! If I’m just using this pattern with one yarn, should I switch up to Genghis? Will the fabric be too open if I just use Super Soft Merino?
Hi Charlotte,
Thanks for reaching out! I would recommend sizing up the yarn if you plan on not using Posy with the Super Soft Merino, the fabric may be a bit open since the recommend needle size for Super Soft Merino is a US 11 and the pattern is worked on a US 15.
Genghis would be a beautiful yarn for this pattern! I would also recommend doing a gauge swatch before starting the pattern to insure your gauge with a different yarn is still consistent!
Happy knitting!
Gianna
Hi! I’m working on this sweater (size small) and at the step where I’m picking up stitches for the sleeves. I have many more that 30 I can pick up. The height and short rows on the back alone give almost that many stitches. Do you not pick up every row? Only the odd rows? Is my guage severely off? Thanks for your help!
Hi Laura,
Thanks for reaching out! Please send us a photo of your work to customerservice@purlsoho.com and we can troubleshoot further from there!
All the best,
Gianna
Hi! I’m thinking about using sea salt (or rose granite?), winter health, and fern green. I’m open and interested to know your opinion! Thanks for the help.
Hi Caroline,
Thanks for reaching out! I think Sea Salt or Rose Granite would look lovely with Winter Heath and Fern Green! I think Sea Salt is a bit more of a neutral color and will bring out the green a bit more, and Rose Granite is a bit more rosy and warm and will bring out the purple in Winter Heath a bit! I think either combination would be very beautiful and unique!
Please let us know which you end up going with!
Warmly,
Gianna
Hi there I keep on coming back to the sweater, it’s so beautiful 🙂 but I am struggling with yarn choices as some yarns and colours aren’t available. I would like to start with a main aqua base like Cascade 220 Aqua or your Merino in Eggshell Blue. I then want to use my Main posy as Azalea Glow but it isn’t available so was going to substitute with Pocket Posy ( 3 skeins Posy = 12 skeins Pocket Posy) and then as Pocket Posy has hardly any colours I was thinking Line Weight in Cosmic Yellow or Koigu KPM 1280 – from a technical point of view will these combinations work, and also from a colour point of view have I gone a bit mad? 🙂 The alternative would be aqua, white and Azalea Glow Pocket posy which might show a nicer contrast?! What do you think? Many thanks in advance
Hi Charlotte,
Thanks for reaching out! I agree this is such a wonderful sweater and I am obsessed with your idea of Eggshell Blue, Azalea Glow and especially adding in Line Weight in Cosmic Yellow! I think that would be such a fun combination and from a technical standpoint, the addition of the fingering weigh yarns doesn’t have a huge overall effect on the gauge so substituting Posy out for Line Weight or even KPM should work fine!
Please let us know how this turn out!
Warmly,
Gianna
Hi Gianna thanks so much for getting back to me and confirming that those yarns would work. Thanks also for giving me the courage to go ahead with my slightly wacky colour choices! 🙂 I have just received my first delivery of purl soho yarn and the colours are so vibrant! I am so excited to start knitting with these! Thanks again for all your help 🙂
I love the color combo but this project is way beyond my skill level. Is there a way to make a wrap with this look instead? Thank you.
Hi Aimee,
Thanks for reaching out! You could certainly use this stitch/color combinations for a wrap instead! I would recommend starting out by working a gauge swatch in the stitch pattern, you can then calculate your cast on amount from there (a typical wrap is about 18×70″!) You can the start out the wrap following the imstructions in this pattern for incorporating the different colors in!
I hope this helps and please let me know if you have any other questions!
Warmly,
Gianna
Following up on Heidi’s comment back on May 7, 2020 regarding joining the shoulders, I was confused by that phrasing also!
Pattern says to “purl the sides together”. Then it says to do the 3 needle bind off, which is done with a knit stitch. So the wording suggests that there is a row of purling and then the bind off row. But that makes no sense! Can you clarify?
Many thanks!!
Hi leann,
Thanks for reaching out! It is actually just to hold Front Shoulder stitches parallel, purl sides together, not to actually purl the sides together! So once you have it oriented with the purl sides together, you will then use the working yarn (or 50-inch tail) and work a 3-Needle Bind Off to join the Shoulders together. Even though you will be holding the purl sides together for this sweater, you will still work the 3-Needle Bind Off in the same manner by knitting the stitches together, not purling them.
I hope this clears things up!
Warmly,
Gianna
Thank you for clarifying the instructions for me. When I saw Heidi’s question I began to second guess myself on that step. But what you describe is exactly what I ended up doing, thank heavens! I’ve made this sweater three times now, the first time as written above, and then two times more with only one strand of super soft merino. Very pleased with the results!
Love your website and your yarns. Thank you!
Hi LeAnn,
Thanks for reaching out again and for your kind words! I am so glad I could help and I love to hear that you enjoy this sweater pattern!
Warmly,
Gianna
How would I be able to adapt to 3/4 sleeves?
Hi Louri,
Thanks for reaching out! Since the sleeve are worked in the round from the top down you can easily follow the instructions as written and work until you reach your desired length!
Warmly,
Gianna
Hi Gianna:
I am making this sweater and have reached the stage where I work the armholes. The pattern says that I repeat Rows 1 and 2 until the armholes measure 6 1/2 (for me). From what point do I start to measure my 6 1/2 inches? The stitch marker which I have placed on the stitch holder or the last of the stitches I have placed on the stitch holder?
Hi Gerry,
Thanks for reaching out! You will want to measure 6 1/2″ from where you put the stitches on hold!
Warmly,
Gianna
Would Woolly Wool work with this sweater? If so, how many skeins should I get for the 44 size?
Hi Gillian,
Thanks for reaching out. I’m afraid that Woolly Wool will be a bit too thick for this pattern! I’d be happy to recommend some other patterns that you could use that yarn for though–let me know if that would be helpful!
All the best,
Lili
Hi Lili,
Yes, could you please recommend some other sweater patterns for Woolly Wool?
Thanks,
Gillian
Hi Gillian,
We have two wonderful sweaters designed specifically for Woolly Wool: Brandi Cheyenne Harper’s Sea Sweater Coat and Brioche Bomber Cardigan. Our designs written for Gentle Giant would also work great with Woolly Wool, since those two yarns are very similar in weight. So I’ll also recommend Brandi’s Gentle Cardigan as well as Good Night, Day’s Seed Pod Pullover. I hope these recommendations give you inspiration for your project!
All the best,
Lili
Hi Lili,
I’m confused by the language below (pasted in from the pattern above). I started the sweater and did my 3 purl rows and now am knitting every round. I thought this means the knit side is facing me which I would have thought is the “wrong side” and that is what the first sentence below says (this sweater is purl side out, right?). Then the second sentence below from the patter says that the knit side of the fabric is the “right” side and the purl side is the wrong side. I’m totally confused because I thought I was knitting wrong side facing me and that is the knit side. Would love help untangling my brain on this. Thanks!!!
“When working in the round, note that you will knit the Body with the wrong side facing you and the Collar and Sleeves with the right side facing you. Throughout the pattern “right side” refers to the “knit” side of the fabric, and “wrong side” refers to the “purl” side. All references to left and right refer to the sweater as constructed (whether knit side out or purl side out), as usual with knitting patterns.”
Hi Jane,
Thanks for writing in. I can absolutely help clarify the construction of this pattern for you! Essentially, you will knit the body inside-out and then turn it the opposite way before working the collar and sleeves. At the beginning of the Collar section there is this note: “Turn garment wrong-side-out, so purl side is facing you.” This way, you’ll be able to work the majority of the pattern in the knit stitch, since many people prefer that over the purl stitch! I hope this helps clear things up.
All the best,
Lili
Hi,
I am confused about the terms, Back and Front stitches.
For example:
“WORK ARMHOLES
NOTE: In this section, you will work back and forth on Back stitches only.”
Do you mean knitting through the Back loop in this case?
Thank you!
Hi NM,
Thanks for reaching out! After you work the Division Round in the DIVIDE FRONT + BACK section, you will have your live stitches separated into 4 groups: 2 groups of stitches on scrap yarn for each underarm, 1 group of stitches on scrap yarn for the Front, and the remaining stitches on your needles for the Back. In the BACK section, you will be working only these stitches on your needles! Since you’re working flat now (instead of in the round), you will be working back and forth across these “Back” stitches. Hope this helps clarify things!
All the best,
Lili
Oh! Got it!
Thank you so much!