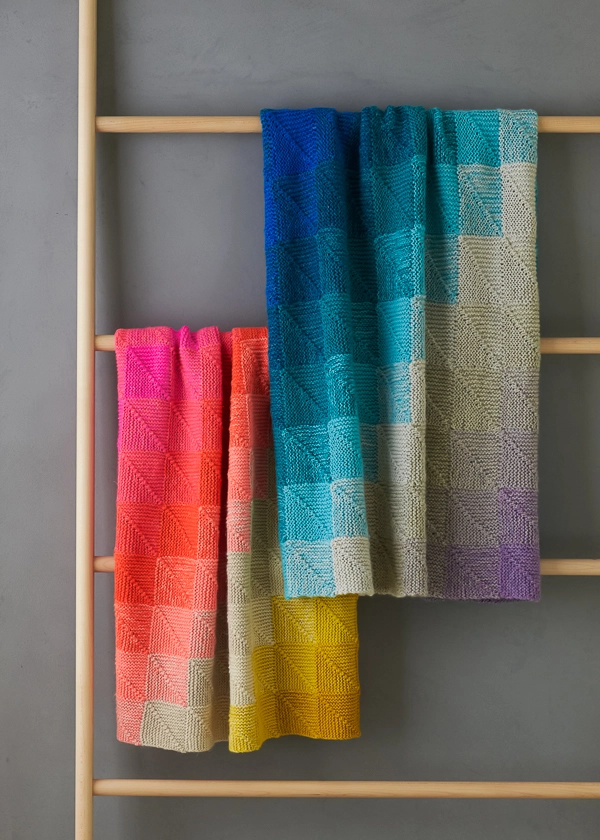
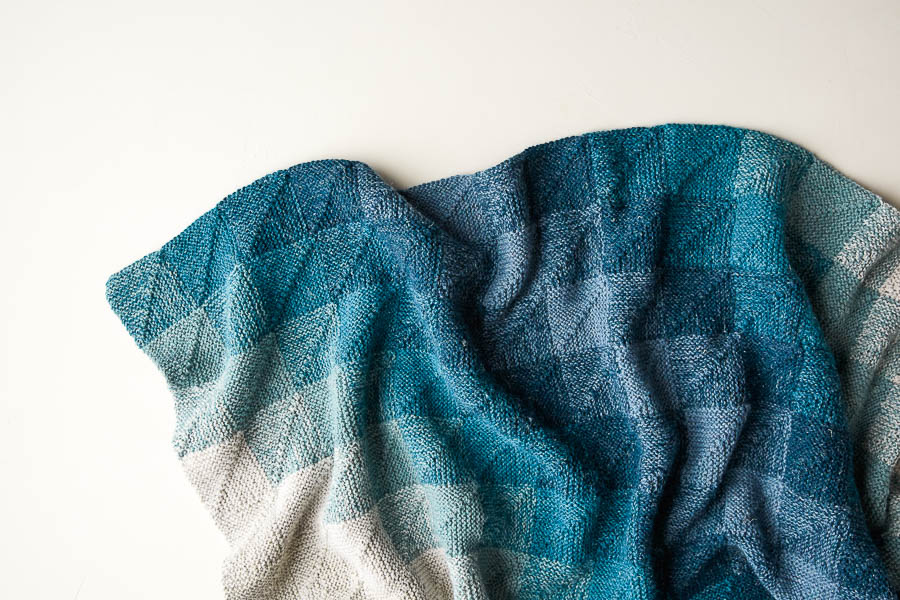
Mitered Corner Blanket
For the New Year, our gloriously artful Mitered Corner Blanket! A masterpiece in construction, color, and design, this next-level knitting project is as close as you can get to painting with yarn, nearly calling for a signature in the corner.
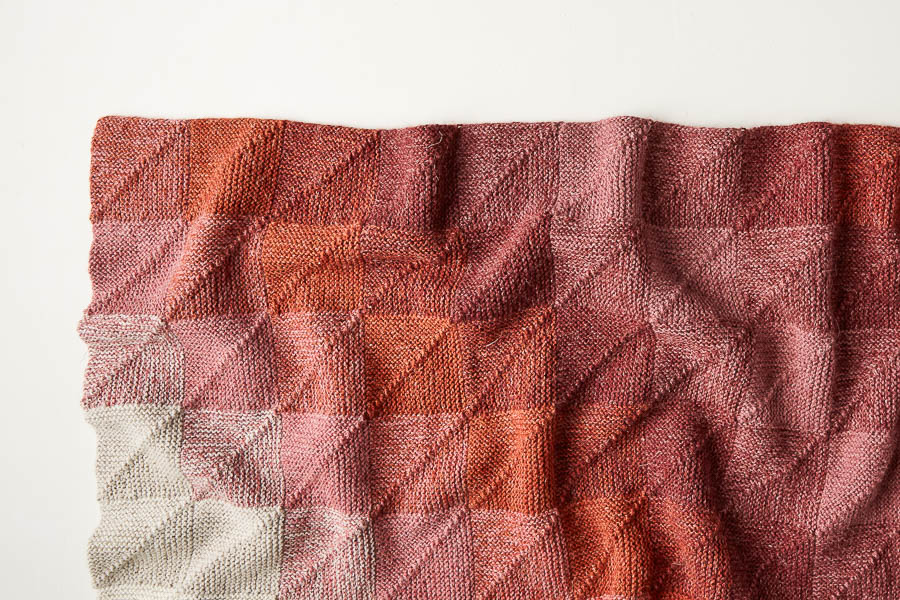
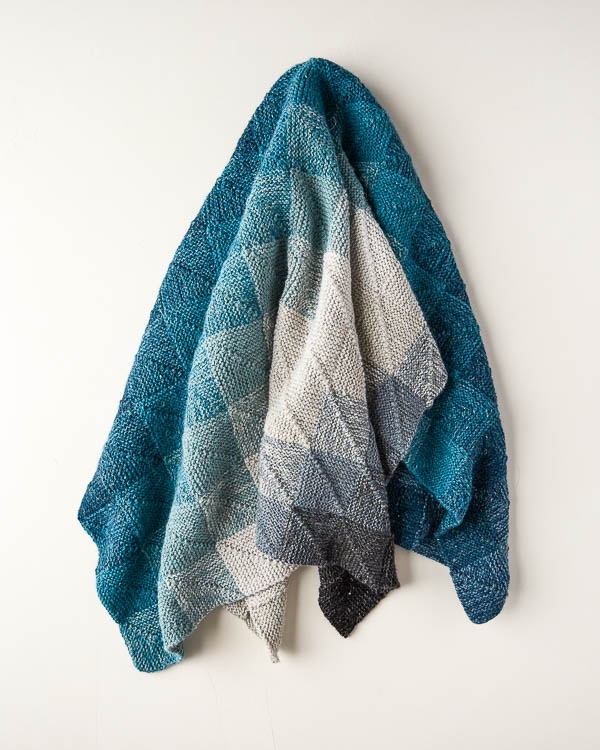
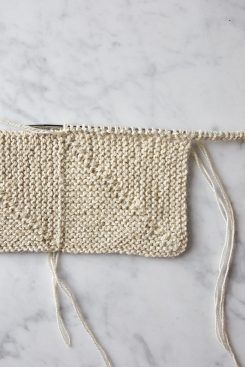
Its watercolor-y wonders run deep, with 192 squares that require absolutely no sewing. You just knit each square from corner to corner and pick up stitches along one or two sides of adjoining squares to continue with the next one, gradually gliding from one combo of colors to another.

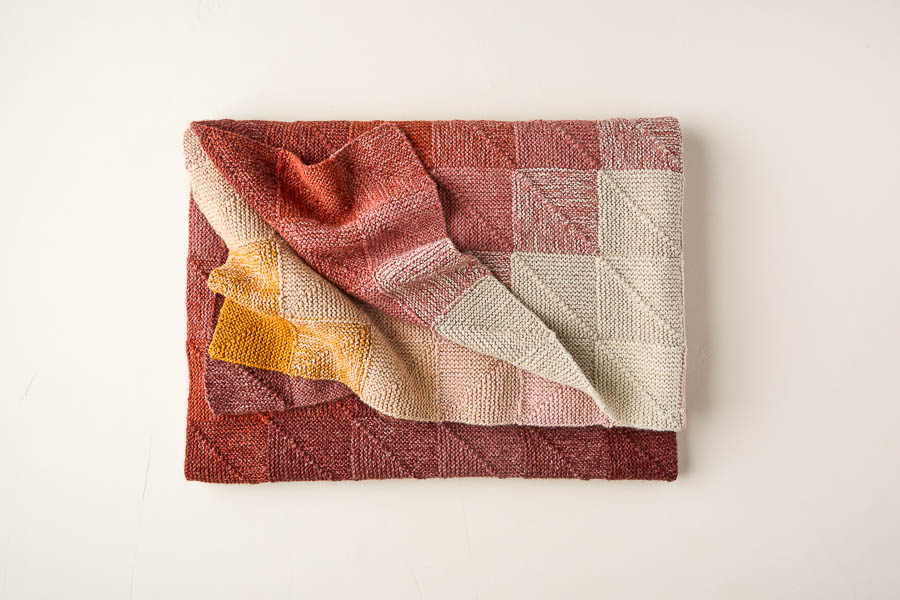
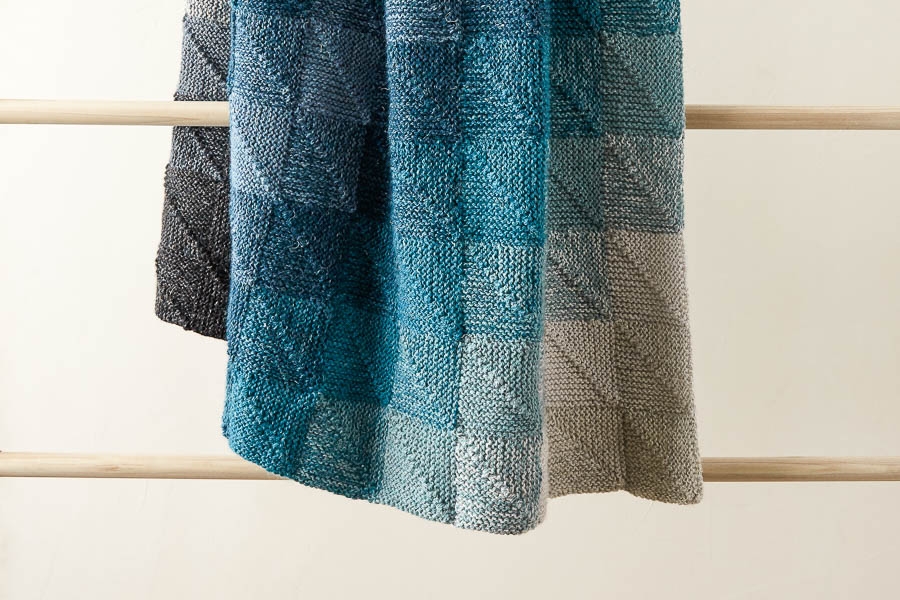
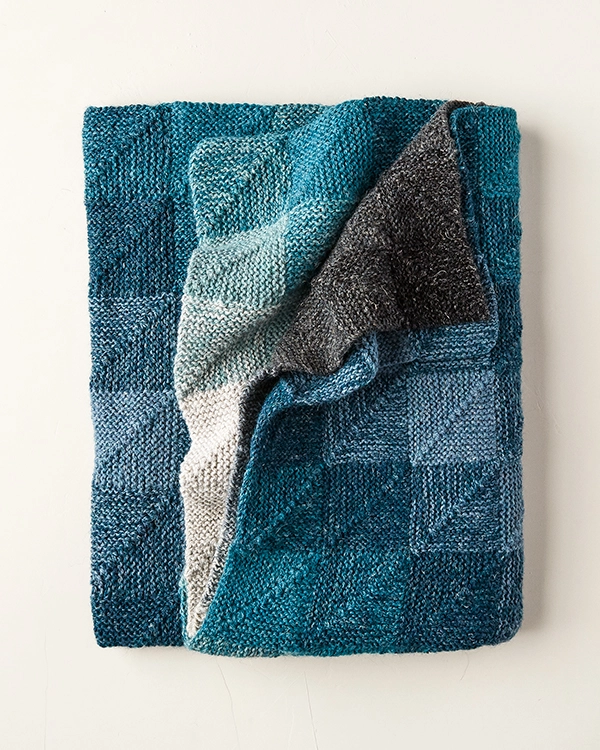
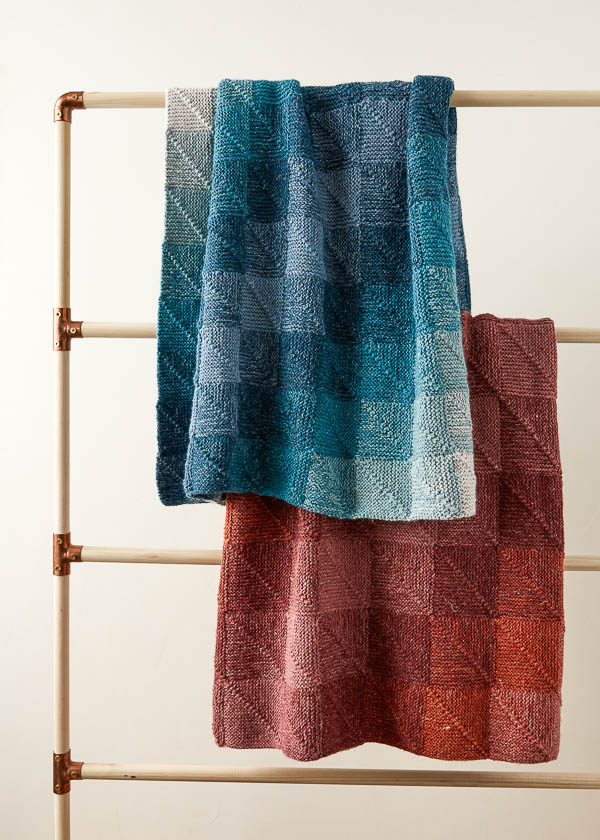
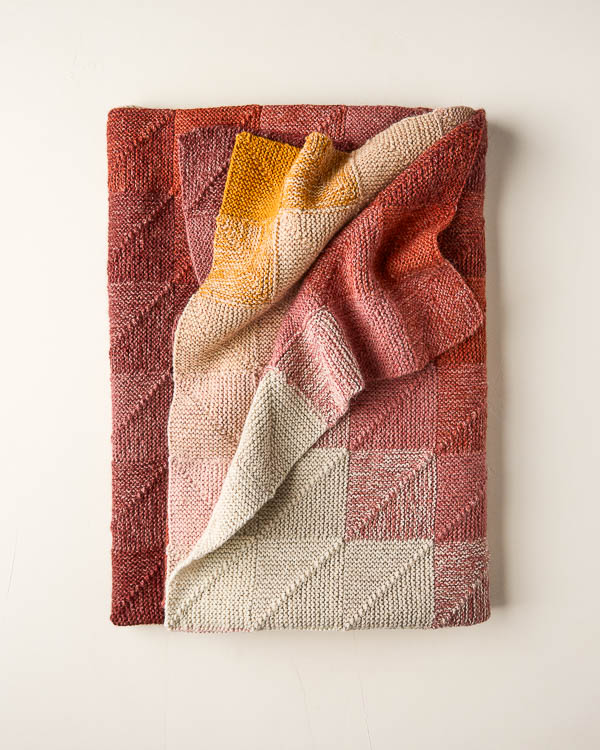
All these beautiful in-between shades and gradations are possible by using our Linen Quill doubled. Get all the yarn you need with our Mitered Corner Blanket Bundle, available in two palettes: Warm and Cool. Both versions ripple through color with stunning beauty: a sometimes subtle, sometimes dramatic flow, from deep saturation to pale expanse, back to rich concentration, transformed.
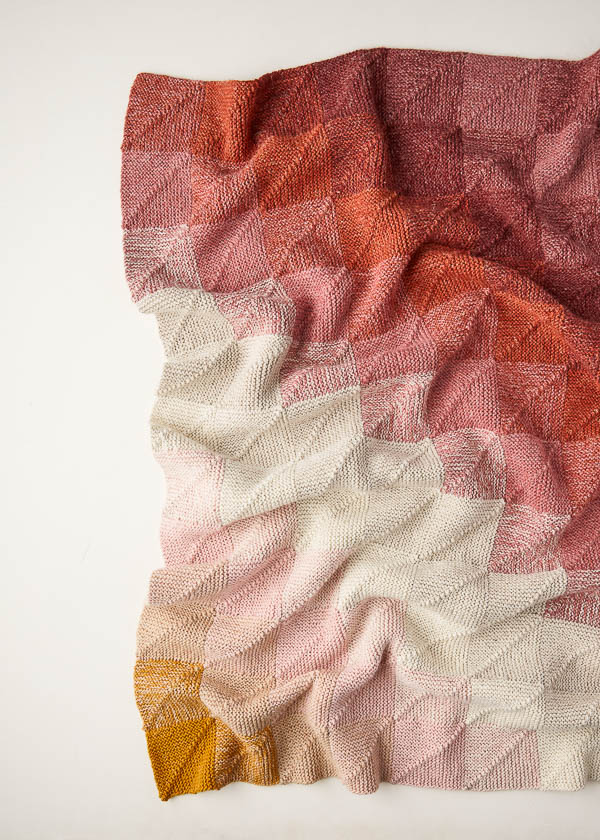
Both palettes are available in Small and Large Throw sizes. Either way, the 192-square construction is the same, but for the Small Throw (pictured in Cool) each square is 3 x 3 inches, and for the Large Throw (pictured in Warm) each one is 4 x 4. In any size or color, this is the perfect get-involved winter project, a work of art to really immerse yourself in, as legit for hanging on the wall as it is for hanging on the couch!
Update: New Colors!
January 24, 2020
Our wonderfully watercolor-y Mitered Corner Blanket is now available in two glorious new palettes! The super fresh and punchy Dawn and Mountain color combos join our classic bundles, Warm and Cool, for a total of four equally stunning options. Read all about our two new color additions here!
Designed by Purl Soho designer, Jake Canton. Click here to see even more of Jake’s designs!
Share your progress and connect with the community by tagging your pics with #PurlSoho, #PurlSohoBusyHands, #PurlSohoMiteredCornerBlanket, and #PurlSohoLinenQuill. We can’t wait to see what you make!
Materials
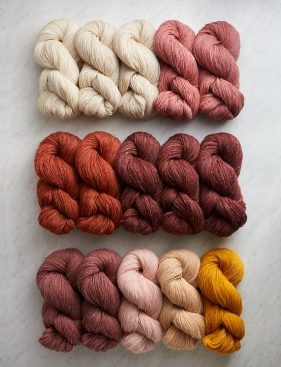
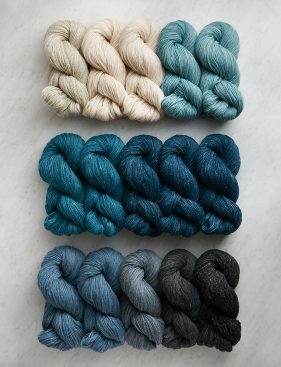
Our Mitered Corner Blanket Bundle comes in two sizes: Small Throw (top row, above) and Large Throw (bottom row). Choose also from a Warm (left) or Cool (right) palette.
The Small (Large) Bundle includes…
- 15 (19) skeins of Purl Soho’s Linen Quill, 50% fine highland wool, 35% alpaca and 15% linen; each skein is 439 yards/ 100 grams.
- Color A: 1 (2) skein(s); approximately 336 (650) yards required
- Color B: 2 (2) skeins; approximately 555 (857) yards required
- Color C: 2 (3) skeins; approximately 768 (1116) yards required
- Color D: 2 (3) skeins; approximately 879 (1309) yards required
- Color E: 3 (4) skeins; approximately 971 (1447) yards required
- Color F: 2 (2) skeins; approximately 507 (765) yards required
- Color G: 1 (1) skein; approximately 208 (341) yards required
- Color H: 1 (1) skein; approximately 140 (189) yards required
- Color I: 1 (1) skein; approximately 34 (74) yards required
The colors included with each palette are…
Warm Bundle
- Color A: Pale Oats
- Color B: Wheat Flour
- Color C: Lychee Pink
- Color D: Kiln Red
- Color E: Chestnut Red
- Color F: Rosewood Pink
- Color G: Peony Pink
- Color H: Honey Pink
- Color I: Turmeric Yellow
Cool Bundle
- Color A: Oatmeal Gray
- Color B: Pale Oats
- Color C: Vintage Celadon
- Color D: True Turquoise
- Color E: High Tide
- Color F: Mountain Bluebird
- Color G: Gray Denim
- Color H: Stillwater Blue
- Color I: Kettle Black
NOTE: For the Small Throw, we only used a little bit of the third skein of Color E. If you don’t end up needing it, you can return unwound yarn for a refund within 30 days of purchase, or within 6 months, for store credit. Our Return Policy has all the details! Also, a couple of customers making the Small Throw have reported running out of Color D. Please double check your gauge and be conservative with Color D tails!
You will also need…
- US 6 (4 mm), circular or straight needles
- A stitch marker
Gauge
22 stitches and 44 rows = 4 inches in knit garter stitch and in purl garter stitch, with yarn held double
Each Small Throw square should be 3 x 3 inches; each Large Throw square should be 4 x 4 inches.
NOTE: You will make some squares with all knit stitches and some with all purl stitches. Make sure your garter stitch is on gauge for both. You may have to adjust your needle size so they are!
Sizes
Small Throw (Large Throw)
Finished Dimensions: 36 inches wide x 48 inches long (48 inches wide x 64 inches long)
Notes
You will double the yarn throughout the pattern, pulling two strands together.
S2kp (slip 2, knit 1, psso): Slip 2 stitches together knitwise wyib, knit 1, pass slipped stitches over knit stitch and off right needle. [2 stitches decreased]
Pattern
Begin With Square 1
With two strands of Color A, use a Long Tail Cast On to cast on 31 (41) stitches.
Set-Up Row (wrong side): Knit 14 (19) stitches, pm, knit to end of row.
Row 1 (right side): Knit to 3 stitches before stitch marker, s2kp, remove marker, k1, pm, knit to end of row. [2 stitches decreased]
Row 2 (wrong side): Knit to end of row.
Repeat Rows 1 and 2 until 1 stitch remains.
Cut yarn and pull the tail through the final stitch.
Square 2
With 1 strand of Color A and 1 strand of Color B, use a Long Tail Cast On to cast on 15 (20) stitches.
With the right side facing you, orient Square 1 so the cast-on edges are on the right-hand and bottom sides of the square. Pick up 16 (21) stitches along the top edge of Square 1, picking up only 1 leg of each edge stitch.
NOTE: For some tips on picking up, please visit our Picking Up Stitches Tutorial.
Set-Up Row (wrong side): Knit 14 (19) stitches, pm, knit to end of row.
Row 1 (right side): Knit to 3 stitches before stitch marker, s2kp, remove marker, k1, pm, knit to end of row. [2 stitches decreased]
Row 2 (wrong side): Knit to end of row.
Repeat Rows 1 and 2 until 1 stitch remains.
Cut yarn and pull the tail through the final stitch.
Squares 3-16
Working to create a line of 16 squares, continue by casting on 15 (20) stitches and picking up 16 (21) stitches along the top edge of each previous square. Follow the instructions for Square 2 and use the Blanket Schematic above to determine which combinations of yarn to use for each square.
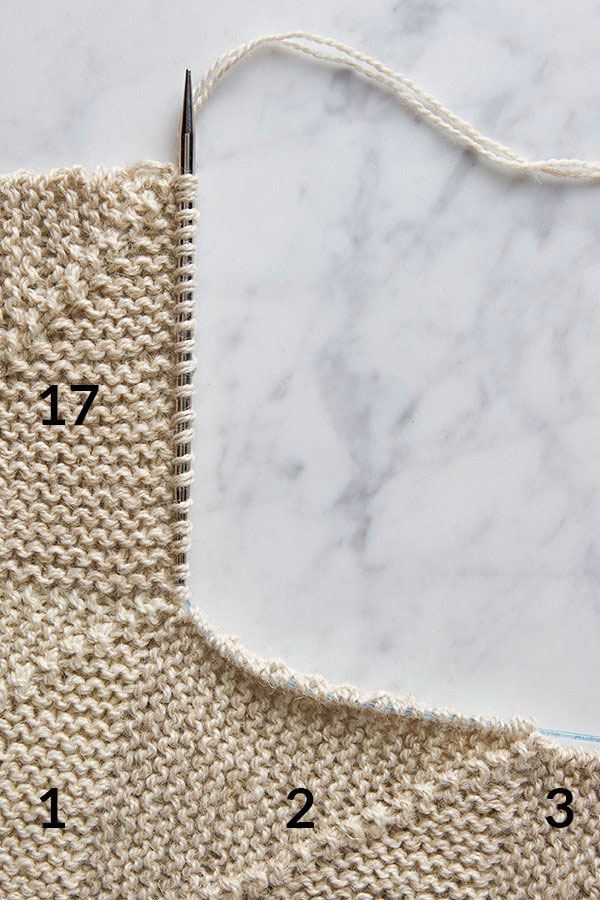
Square 17
With 1 strand of Color A and 1 strand of Color B, use a Long Tail Cast On, Purlwise to cast on 15 (20) stitches.

With the wrong side facing you, orient Square 1 so the cast-on edges are on the right-hand and bottom sides of the square and Square 2 is on the left-hand side. Pick up 16 (21) stitches purlwise along the top edge of Square 1, making sure to pick up only 1 leg of each edge stitch.
Set-Up Row (right side): Purl 15 (20) stitches, k1, p1, pm, purl to end of row.
Row 1 (wrong side): Purl to marker, p1, k1, purl to end of row.
Row 2 (right side): Purl to 3 stitches before stitch marker, s2kp, remove marker, p1, pm, purl to end of row. [2 stitches decreased]
Repeat Rows 1 and 2 until 1 stitch remains.
Cut yarn and pull the tail through the final stitch.
Square 18
With the right side of the fabric facing you, orient the completed squares so that Squares 1-16 are a horizontal row on the bottom and Square 17 is at the top left corner. With 2 strands of Color B, pick up 16 (21) stitches along the top edge of Square 2 and then pick up 15 (20) stitches along the right-hand edge of Square 17.
Set-Up Row (wrong side): Knit 14 (19) stitches, pm, knit to end of row.
Row 1 (right side): Knit to 3 stitches before stitch marker, s2kp, remove marker, k1, pm, knit to end of row. [2 stitches decreased]
Row 2 (wrong side): Knit to end of row.
Repeat Rows 1 and 2 until 1 stitch remains.
Cut yarn and pull the tail through the final stitch.
Squares 19-32
Follow the instructions for Square 18, referring to the Blanket Schematic to determine which combinations of yarn to use for each square.
Continue
Following the instructions for Squares 17-32, continue to knit each column of squares starting with Squares 33-48. Refer to the Blanket Schematic for the order of the squares and the combinations of yarn used for each square.
Finish
Weave in the ends and block as desired.


Hello there,
I just began working on this beautiful blanket. I’ve cast on 20 stitches for square 2, but I’m a bit confused with how to pick up stitches from square 1.
-After casting on, do you use the remaining long tail to pick up the stitches?
-What do you mean by picking up only 1 leg of each stitch? Would I be doing it right if I simply follow your picking-up stitch tutorial?
Thanks so much!
Hi Veronica
Thanks for the question! After you cast on the 20 stitches your yarn will still be at the end of your right needle, and you will use it to pick up and knit the next 16(21) stitches from Square 1. After picking up the stitches, your work should look like the second picture under Square 2. Although we, unfortunately, don’t have the resources at the moment to do a photo tutorial, I will try my best to explain this step! If you look at the stitches directly below each garter ridge, you will be able to see the individual V-shaped or teardrop-shaped stitches – you may have to stretch the garter ridges away from each other to see this clearly. When picking up each edge stitch, you will insert your needle directly into the middle of the V closest to the edge of the square, so that only one leg of the V, or stitch, is to the right of the needle. Since you are holding your yarn doubled, there will be two strands of yarn, but just one leg of the actual stitch. You can then wrap your yarn as if to knit and pull up the new stitch. I hope this helps!
Happy knitting
Jessica
I’m not having trouble picking up those stitches from square one and the photo DOES look like what I’ve got. BUT I can’t figure out how to begin knitting with the new yarn hanging where it is …
I’m missing something….!
Hi Barbara,
Glad to hear that your stitches look correct so far! Once you’ve picked up all the required stitches, you can just turn your work so that the wrong side is facing you. When you’ve done that, your working yarn will be in the exact position to begin knitting Set-Up Row (wrong side). Hope this helps!
All the best,
Lili
Why do you pick up only one keg of the edge stitch rather than both legs?
Hi Maura,
Thanks for reaching out! You only pick up 1 leg because both legs would cause the stitch to drop. Please check out our Picking Up Stitches tutorial, it will show you the correct way to pick up stitches for the most neat look!
All the best,
Gianna
Hello
Can you please let me know how much of the third skein of Kiln red (colour D) do you end up using for the large size? I have some left over and wondering if I need to buy a third skein or not…
Thanks
Kate
Hi Kate,
Thanks for reaching out! For the large throw, we used about 1,309 yards of Kiln Red, so you won’t have very much leftover at all! For a few of the colors in this blanket, if your gauge isn’t spot on, you may run out of yarn, so I would recommend double-checking your gauge and weighing your yarn as you go to see if you will have enough. If you would like to be on the safe side, you can always order the extra skein, and as long as it isn’t wound, you can return it for store credit!
Best,
Julianna
Hi! I own the bundle for the large red version of this beautiful blanket and was wondering which of the colors has the greatest amount of left over yarn, if any. I tend to cut off my swatch to keep as a yarn example and prevent reusing yarn more than thrice, but I know the pattern points out some of the yarn can be in tight supply.
Hi Carolina,
Great question! You should have plenty of extra yardage in Color H or I.
Happy knitting!
Julianna1
Thank you!
Hi, I purchased the large blanket bundle – warm colours. As I’m a slow knitter and I’m inclined to leave fairly long tails, are there any skeins that I might run short of? If so, I’d like to order them now, in case it’s discontinued before I finish it! I’m really enjoying the project and thanks for giving the pattern
Hi Margaret,
Great question! We have had a few reports of customers running out of Color D, which is Kiln Red in your bundle, so you could order one more skein if you’re concerned! Although nobody has actually run out of any other colors, the yardage is also quite close for Color A, Wheat Flour and Color F, Rosewood Pink. If you don’t end up needing the extra skeins and they haven’t been wound, you can return them for store credit!
I hope that helps, and happy knitting!
Julianna
I would love to make it with Sweetgrass fine. That yarn is soft and so nice to knit. What would be the right mix of colors to get shades of neutral?
Hi Diane,
Thanks for writing in! Although Sweetgrass Fine is too thin for this blanket, our original Sweetgrass comes in the same color palette and would be a wonderful choice! Since it only comes in five colors, you won’t be able to replicate the same gradient as the original blanket, but I think it would be lovely to shade from light to dark and back to light across the blanket diagonally. To do so, you will start by knitting Square 1 in two strands of Heirloom White, then knit Square 2 in one strand of Heirloom White and one strand of Pale Sesame, then knit Square 3 in two strands of Pale Sesame, then Square 4 in one strand of Pale Sesame and one strand of Buckwheat Beige, and so on until you knit Square 11 in two strands of the darkest color, Beech Bark. You will then move back through the colors from dark to light until you get to the end of the first row of squares. Before getting started, I would recommend printing out our color schematic and planning out your color combinations and changes, making sure each diagonal line of squares are knit with the same combination.
I hope that helps, and please let us know how it turns out!
Julianna
Thanks! I appreciate your suggestions.
Hi this blanket is beautiful. Do you have a graph that I could follow to show where to place each coloured square.? I can’t see the whole blanket in your pictures. Thanks
Hi Joanne,
Thanks for writing in! Yes, you can find a schematic of the entire blanket right under the heading “Squares 3-16!” If you would like to print it or view it larger, you can right click on the schematic and select “Open image in new tab.”
Happy knitting!
Julianna
Love this pattern. I was wondering if this could be knit with the Linen Quill Worsted rather than 2 strands of Linen Quill. If so, how many balls of each would I need? If this is not possible or would not look right, what other yarn could I use to achieve the same look but only using one strand? Thanks – can’t wait to try this.
Arlene Anderson
Hi Arlene,
Thanks for writing in! Although I would recommend knitting a gauge swatch before getting started, yes, you could certainly knit this blanket using a single strand of Linen Quill Worsted! The gauge and scale of the blanket will be very similar, but the color gradation won’t be quite as smooth as ours since each block will be a solid color instead of two colors blended together. You will need 2,207 (3,535) yards total divided between your chosen colors, or about 15 (20) yards per square. The best way to figure out how much of each color will need is to print out our diagram or plot out your blanket on graph paper. You can then count up how many squares there will be each color, multiply that number by 15 (20) yards per square, and then divide that number into 164 yards per skein of Linen Quill Worsted to determine how many skeins of each color to buy.
I hope that helps, and please do let us know how it turns out!
Julianna
What do you think about using the new linen quill worsted for this? Same size needle, and just calculate the yardage? Or go up in needle size, and just have a bigger blanket? Thanks!
Hi Amanda,
Great question! Although I would recommend knitting a gauge swatch before getting started, I think Linen Quill Worsted held single should work well on a US 7! The gauge and scale of the blanket will be very similar, but the color gradation won’t be quite as smooth as ours since each block will be a solid color instead of two colors blended together. You will need 2,207 (3,535) yards total divided between your chosen colors, or about 15 (20) yards per square. The best way to figure out how much of each color will need is to print out our diagram or plot out your blanket on graph paper. You can then count up how many squares there will be each color, multiply that number by 15 (20) yards per square, and then divide that number into 164 yards per skein of Linen Quill Worsted to determine how many skeins of each color to buy.
I hope that helps, and please do let us know how it turns out!
Julianna
I would love to knit this blanket! I’m still having trouble visualizing the process of picking up 16 stitches though. If you have one stitch from square 1 left on the needle, and you cast on 15, how many “new” edge stitches are you picking up? I’m afraid to dive in and try this blanket before I understand how it all works!
Hi Tracy,
Thanks for writing in! I know this seems like a complicated project but it is actually pretty easy! For Square 1 you will be repeating pattern Rows 1 and 2 until 1 stitch remains, and then you will cut your working yarn and pull the tail through the final stitch so bind it off! You will then be casting on 15 or 20 stitches (depending on what size you are making.) After that, with the right side facing you, orient Square 1 so the cast-on edges are on the right-hand and bottom sides of the square. Next, you will be picking up 16 (21) stitches along the top edge of Square 1, picking up only 1 leg of each edge stitch (please check out our Picking Up Stitches Tutorial!) After you pick up the stitches you will then continue on to the Set Up round and begin knitting the 2nd square!
I hope this clarifies things and please feel free to reach out with any more questions you may have going forward!
All the best,
Gianna
I love the colours and shapes in this blanket. I have tried knitting the first square several times and each time it has knitted up as a rectangle rather than a square with remaining stitches to the left of the decrease (mitre) line. I keep re-reading the instructions to make sure I am following them correctly but just can’t see my error. Please advise me.
Hi Barbara,
Thanks for reaching out! Please email us a photo of your work to our email customerservice@purlsoho.com and we can help troubleshoot further from there!
All the best,
Gianna
I’m a loose but very steady knitter with even tension. To make a 4-inch square, I’m working with size 5 needles and making fewer stitches per square. (I can’t fathom using a smaller needle to make a blanket.) But my square shapes are not consistent and it’s hard to find all 18 stitches to pick up. These are my stitch modifications. Shouldn’t this work?
• Rather than casting on 41 stiches at the start, cast on 35.
• At Square 2, cast on 17 and pick up 18 along the edge of Square 1.
• At the set-up row, knit 16 and place the marker.
Also, is the last stitch of each square “s2kp” or should it end on a knit?
I can’t believe I’m finding such a simple mitered square pattern to be so challenging! I have a strip 9-squares long but have not yet found my flow! Thank you for your thoughts and suggestions.
Hi Susan,
Thanks for reaching out! That looks like it should work to me, as long as you are consistent with each square! I recommend checking out our
Picking Up Stitches tutorial, it is very useful and may help you a bit! Also, the last stitch should not be a s2kp, for row 1 (right side) you should knit to 3 stitches before stitch marker, s2kp, remove marker, k1, pm, knit to end of row, 2 stitches decreased and ending with a knit stitch and then for Row 2 (wrong side) you should be knitting every stitch to the end of row.
I hope this helps, happy knitting!
Gianna
Thank you for the confirmation, Gianna! Could be that the pattern’s simplicity sets me too much at ease and my mind wanders! It’s lovely and the colors are gorgeous and I know the finished piece will be dazzling!
Hi Susan,
I totally understand what you mean! I am happy to help and can’t wait to hear how your blanket turns out, this is such a fun and beautiful pattern!
Happy knitting!
Gianna
I was wondering if there is a crochet pattern for this?
Hi Sarah,
Thanks for reaching out! Unfortunately, we don’t have this pattern available for crochet but thank you for expressing your interest and I will be sure to pass this along to the rest of the team!
Warmly,
Gianna
Hi! I understand this pattern almost 100%.. The only part I don’t understand is which squares will end up using all purl and which use all knit. Squares 1-16 use all knit, then when you cast on for square 17 it switches to all purl stitches all the way to 32.
Will you cast on knit wise for square 33 and then for the entire row it will be all knit stitch? Basically is it every other row will be knit then purl??
Hi Emily,
Thanks for reaching out! Yes, that is correct! For squares 1-16 you are knitting every row of each square, then for rows 17-32 you will purl every row of each square, and then so on and so forth switching between the two every other row!
I hope this helps!
Warmly,
Gianna
I didn’t think I was confused before, but now I am! I understand that square 17 is all purl, but the pattern instructions say that the rest of that row (18-32) is all knit (so that only the first square in each row after the first one is purl). Your note to Emily says rows 18-32 are also all purl. Which is correct? (Does it matter?) Also, I am getting holes between squares, especially as the blanket is getting heavier. That doesn’t seem to happen with a heavier yarn. What am I doing wrong?
Hi Jeanne,
Thanks for reaching out! Yes you are correct! I misspoke and it is in fact only square 17 that is purled and and 18-32 are knit! As for the holes, it may be because of the way you are picking up the stitches, I would recommend checking out our Picking Up Stitches tutorial! If you are still ending up with holes you can send our team a photo of your blanket to customerservice@purlsoho.com and we can trouble shoot further from there!
Happy knitting!
Gianna
So if I’m reading this correctly, only the first square in the second to 12th row in purl then the rest of the squares in each row are knit?
Hi Whitney,
Thanks for writing in! For squares 1-16 you will knit every row and then square 17 you will purl every row, you will then continue knitting every row for squares 18-32. Once you finish square 32 you will repeat rows 17-32 for 33-48.
I hope this clears things up, happy knitting!
Gianna
How do you pull two strands of the same color if knitting the small throw with only one skein of one color? Do you half the yarn some how? Im a bit confused on that part.
Hi Emily,
Thanks for reaching out! The best way to pull two strands is to Pull one from the outside and then pull the 2nd strand from the inside of the ball!
I hope this helps!
Warmly,
Gianna
Hi, hope you’re all keeping safe. I was just wondering whether you had any rough timescales on when the large warm bundle for this lovely blanket might be back in stock? I should have bought it when I first saw it!
Hi Georgina,
Thanks for reaching out! We anticipate that we will have Linen Quill and Linen Quill bundles back in stock in the spring! The best way to stay notified would be to put in your email on the Mitered Corner Blanket Bundle page and we will email you as soon as it is available!
I hope this helps, happy knitting!
Gianna
Hi! I just want to clarify the gauge swatch, do you knit the swatch with one strand of yarn, or two like in the blanket? Thanks in advance for the clarification 😁
Hi Niki,
Thanks for reaching out! To accurately check your gauge you will want to use the recommended needle and knit the swatch using two strands as you do in the blanket!
Warmly,
Gianna
I would love to purchase the Dawn or Mountain large throw bundle when one becomes available. Please let me know.
Hi Cinid,
Thanks for reaching out! If you go to the Mitered Corner Blanket Bundle product page you can select the color and size of the bundle you would like and enter your email directly below. We will then notify you as soon as it is back in stock!
Warmly,
Gianna
Hi, I am working on square two and it keeps knitting up so that the wrong side of the new square face the same way as the right side of the first square. I cast on the new stitches and then picked up stitches with the right side facing me. Then I knit the first row of the new square with the wrong side facing me, picked up stitches first and then the new cast on stitches followed. I have tried a couple of times and cannot figure out why it isn’t coming out correctly. Help appreciated!
Hi Rachel,
Thanks for reaching out! If you would like, please send us a few photos to customerservice@purlsoho.com and we can troubleshoot further from there!
Warmly,
Gianna
Thanks. I figured it out! It looks awesome so far.
This would be exquisite turned into a poncho!
Any hints on how to do this? I’m a beginner knitter but I love a challenge!
Hi Risa,
Thanks for reaching out! This would look lovely as a poncho! My best guess for the construction would be to break it up into two panels and then stitch them together leaving an opening for your head!
If you do make this please let us know how it turns out!
Warmly,
Gianna
Allo,
I just began working on this beautiful blanket. I’m doing the sample ; each large throw square should be 4 x 4 inches. I had to reduce the size of the needle to adjust to the sample. Now I am at the size US 3 and my sample still to large. Is it normal that I have to reduce that much?
Thank you for your help.
Suzanne
Hi Suzanne,
Thanks for reaching out! Every knitter’s gauge is unique and depending on how tightly or loosely you knit, it’s common to have to adjust the needle size you’re working with to achieve the correct gauge called for in a pattern. That being said, it does seem like quite a jump to go from US6 to US3 to obtain gauge. If you haven’t already, I’d recommend knitting up a gauge swatch and washing and blocking it as you would the finished piece; all our pattern’s gauges are based on blocked dimensions (unless otherwise stated), so you’ll want to make sure you’re blocking your swatch to get your most accurate gauge count. It could be that you are getting gauge on a larger needle, but you’ll need to block the swatch to be sure.
I hope this helps!
Warmly,
Kelsey
Hi – could you confirm which of the videos in the picking up stitches tutorials give the right instructions to match these? (I just finished square one, moving to square two.) The vertical garter edge video, which is what I thought this square pick up would need, does not note picking up only one leg, just notes picking up the strand between the two bumps. Is this saying the same thing?
Hi Lqs,
Thanks for reaching out! You are on the right track! If you are watching the tutorial you will want to follow the vertical edge garter stitch option. Even though the lingo between the tutorial and the pattern is a bit different they are essentially doing the same thing!
I hope this helps, happy knitting!
Gianna
Square 1…when I do a long-tail cast on and then knit the set up row, I am now on the wrong side instead of the right side for row 1. What am I doing wrong???
Hi Rachel,
Thanks for reaching out! When you use Long Tail Cast On, it will always orient you so that when you work the very first row you will be working over the “wrong side” of the fabric. So if you are finding that you are on the wrong side after working the setup row, it means you are most likely working the long tail cast on in reverse (we call this Long Tail Cast On, Purlwise) I would suggest checking out our standard Long Tail Cast On tutorial so ensure you have the correct orientation and that your set up row is worked over the wrong side.
I hope this helps, happy knitting!
Gianna
Hi,
I was wondering what way you would recommend finishing off the ends on this blanket? I want to do some before I get too far ahead.
Hi Linda,
That’s a great question! While there is no one right way to weave in your ends, I do have a recommendation for this pattern specifically. Since you’re adding each square by picking up the stitches on the previous ones, this leaves a little ridge on the wrong side. I would try weaving in your ends around these ridges, so the ends don’t disrupt the actual knitted fabric all that much. I also wanted to let you know that we have a wonderful tutorial about all the different options for weaving in ends, and I’ll link that right here! Hope this helps, and please let me know if you have any other questions.
All the best,
Lili
Can this pattern be adapted to a scarf
Having a quick look I am a bit brain fogged!
But like the idea of a scarf/shawl
Hi R,
You could absolutely adapt this pattern into more of a scarf/shawl shape! The entire pattern is comprised of small squares that are joined together to form the finished blanket, so you’ll just need to determine how many squares wide and long you’d like your finished piece to be and can adapt the pattern from there. If you need additional assistance, you can always reach out to us at customerservice@purlsoho.com and we’d be glad to help!
Warmly,
Kelsey
Do you think this project would work with a single strand of linen quill? Or would it be too thin
Hi Chrissy,
Thanks for reaching out! A single strand of Linen Quill would be too thin and require quite a few adjustments. If you would like to use a single strand instead of holding the yarn doubled, I suggest using Linen Quill Worsted! Just be sure to work a gauge swatch prior to beginning to ensure you are still consistent with the pattern!
Happy knitting!
Gianna
My purl squares are larger than my knit squares so I am using a smaller needle for the purl squares. Is there a reason why the first square in each column needs to be a purl square? I’m thinking of just doing all knit squares…
Hi Maureen,
That’s a great question! It’s common for your tension to be different when working knit and purl stitches so it’s a good idea to use a smaller needle on the purl squares (like in square 17) as you currently are to mitigate the difference in gauge. I totally understand the appeal of doing everything in knit stitch instead, but if you knit every square you would get a row of stockinette in these squares, creating an indentation.
I hope this helps clear things up and let us know if you have any further questions!
All the best,
Zha Zha
Hi Maureen,
I wanted to add one more suggestion to Zha Zha’s response to your question! If you want to knit all the squares, you could make one small change to how you cast on for the purl squares, and then be able to knit them. So instead of following the directions as written, here’s what you could do:
With the right side facing you, orient Square 1 so that the cast-on edges are on the left-hand and bottom sides of the square. Pick up 16(21) stitches along the top edge of Square 1, picking up only 1 leg of each stitch. Use the backwards loop method to cast on 14(19) more stitches. Then, just follow the rest of the instructions for Square 1 to complete this square!
The only difference here is that you’re picking up the stitches before casting on the additional stitches, instead of the other way around. And you will also need to use a backwards loop cast-on, rather than a long tail cast-on, which makes the cast-on edge look slightly different (but it’s not very noticeable in my opinion!).
Hope this helps!
All the best,
Lili
Hi! I just wanted to see if this did work for anyone. I’ve now done square 17 three times with the decreases ending up in the wrong location compared to the other squares/intent of the pattern. Thinking this might be the only way to make this work for my brain.
Thanks!
Jane
Hi Jane,
When I wrote up those alternate instructions for Square 17, I had tested them out on a small swatch! It definitely worked for me, but I’m also curious to see if others find it useful. If you decide to give my instructions a try, please let me know how it goes!
All the best,
Lili
I much prefer the suggested method to cast on after pick up which allows for knitting rather than purling square 17. I find the slight difference in edge to be negligible and much less notable than the difference in my somewhat “wonky” purled square. I have also found it easier to knit squares on the diagonal sticking to one color at a time. I am enjoying this project!
Hi Alison,
I’m so happy to hear that my suggestion was useful for you! Glad you’re enjoying the project.
All the best,
Lili
Can this blanket be done in Linen Quill worsted instead of holding the fingering double stranded?
Hi Leslie,
Thanks for your question! You could certainly knit this blanket in Linen Quill Worsted rather than holding Linen Quill double. I think it’d be a great idea, though, to do a gauge swatch beforehand to make sure you’re consistent with the pattern. We have a guide on that called All About Gauge if you’re interested in more information! Linen Quill Worsted is a bit thicker than two strands of Linen Quill held double, which would be closer to a DK weight, so doing a swatch can help determine if you need to adjust your needle size before starting the project. I hope this helps!
All the best,
Cat
Hello,
Because the cool color mitered blanket I want to do is out of stock, I was wondering if I could do this blanket in Season Alpaca? How many skeins of each please would I need for the large throw.
Thanks!
Hi Cynthia,
Thanks for reaching out. I first wanted to let you know that we’re hoping to have more Linen Quill in stock by mid- to late-January, so the Mitered Corner Blanket Bundle will come back in stock as well! But if the wait is too long for you, then you can definitely adapt the pattern for Season Alpaca.
To knit up this blanket in Season Alpaca, I’d recommend holding only one strand at a time, since that will come to about the same weight as the two strands of Linen Quill. To figure out how many skeins of each color you’ll need, just divide the yardage for each color (which you can find on the project page for the blanket) by 218, which is the yardage of 1 skein of Season Alpaca. Then, just round up to the nearest whole number, and that’s how many skeins you’ll need!
All the best,
Lili
Hi there! I’m about a third of the way through this gorgeous blanket. Is it just me, or does this gorgeous blanket deserve a knitted back to cover the seams in the back side.
Is this a crazy idea? Any pointers?
Hi JRS,
What a nice idea! I think a stockinette cover for the back would look really good and provide a textural contrast to the front side. Let me know if you end up trying out your idea; we’d love to see the results!
All the best,
Lili
Thanks Lili! I’m actually considering purchasing a second bundle and making the same blanket again so it is double sided with the same squares on each side!
I’d like to connect the squares somehow as I go to the original.
Is THAT an insane idea?! I really love this project and am sad to see it come to an end!
That is such a fun idea, and a great way to extend a project that you love working on! I’m not exactly sure how to connect the squares between blankets as you go, but I’d recommend testing out some different options. And you could always seam the blankets together after you’re completely done with both.
Please let me know how it goes if you try this out. If you want to share photos of your finished blanket(s) with us, feel free to send them to customerservice@purlsoho.com!
All the best,
Lili
Hello,
I am a knitter but I was wondering if you have the same or similar pattern in crochet?
Hi Nancy!
Thank you for your question! Unfortunately, we do not have a crochet version of this blanket, however I can suggest making an ombre granny square crochet blanket, or browsing our other crochet blankets here.
I hope this helps you find a similar crochet pattern!
All the best,
Margaret
Hi Hi,
Do you think this small throw could be modified to be a bit narrower and then longer to make a shawl? I worry about the seams people have noted on the back side and whether it would not look nice as a scarf as a result.
Thanks!
Jane
Hi Jane,
Thanks for writing in! I think that this pattern would make a stunning shawl! There will always be seams on the wrong side, but I think the overall beauty of the right side will overshadow those. If you’re worried though, you can always make a small swatch with some scrap yarn to test out how noticeable the seams will be. Just make a group of a few squares to get a sense for how it will look!
I hope this advice is useful!
All the best,
Lili
I have a square 17 question, Row 2 question. Working on the rs I’m purling until three before the marker, then put the yarn in the back to knit, slip the two stitches, knit the next stitch and psso, pass the yarn back to front to purl, pm, purl to end? The problem I’m having is when I psso, the knob formed by the psso looks entirely different than 1-16. I’m thinking so when I look at the pictures of 17. Thanks for your time.
Hi Jacque,
Thanks for reaching out, although I’m sorry to hear that Square 17 isn’t turning out as expected! Would you be able to send a photo of your work to customerservice@purlsoho.com? That will help us better visualize what’s going on!
All the best,
Lili
Thanks for responding! I saw an earlier post which answered my question that the s2kp didn’t change on block 17. I still couldn’t get the look of the other squares with purling so came up with my own solution. On block 17, I started it just like block one. I connected block 18 to block 2 and block 17. I’ll go back when finished and seam 1 & 17 and all other successive first row blocks when done!
Hello,
I am in love with this pattern/blanket and how it is looking so far, I am starting square 51. Could you possibly tell me how many rows there are when you complete a square? I’m just trying to get my counting app set up
Karena
Hi Karena,
Thanks for writing in! For Square 51, you’ll be following the instructions for Square 18. That means that you’ll need to knit a total of 31 rows if you’re making the small size, or 41 rows if you’re making the large size! At that point, you’ll have decreased all the way down to the final stitch. Hope this helps!
All the best,
Lili
Hi there,
I don’t think this query has been made already.
When I start a new square, I am struggling to maintain the tension between the stitches cast on to the needle and the stitches picked up on previous square so I’m ending up with a really loose patch at that middle point for the first few rows of the square.
Any tips for for more consistency where I attach the new cast on stitches to previous square ? I hope this makes sense.
Thanks!
Hi Eleri,
I’m sorry to hear that you’ve been having trouble maintaining tension when you attach the squares! Would you be able to send a photo of your work so far to customerservice@purlsoho.com? That way, we’ll be able to better visualize what’s going on!
All the best,
Lili
Hello! I’m so confused and feeling dumb. I do not get a square at all. From one side of the marker it remains 19, and from other side it goes down.
So i have 19k-pm on the needle-22k. Row1 – 16k- s2kp-remove marker from needle-k1-pm on the needle-k until end 22. Row2 – full row. Repeate. So decreasing goes on from one side of the marker. It won’t be a square.What am I doing wrong?
Hi Ana,
Thanks for writing in! We are so sorry this pattern has caused you some confusion. You should end up with a square once you work the set of rows down to 1 stitch. So to begin you have 22 stitches on one side of the marker and 19 on the other side. This is because you are only working with the 3 middle stitches to decrease each pass of row 1. You can think of it as 19 sts + 3 sts (decrease sts) and then another 19 on the other side. This will work the stitches into a square as you decrease in the middle three. I hope this helps better explain how this will eventually make a square but please let me know if you have any other questions. We are also always happy to set up a 1-on-1 zoom session to go over the pattern in more detail!
All the best,
Gavriella
I’ve recently begun working on my blanket after putting it aside for several years. I’m hoping to finish it soon and cross it off my list of unfinished projects. My goal is to complete two squares a night. Some nights I’m tired and don’t feel up to it but do it anyway. I’ve completed 166 squares of the twin size blanket. I keep it folded to a manageable size in my lap while working on it. This morning I laid it on the bed for the first time to see how it looked and realized I’ve used the wrong colors in 3 squares: #43, #133, and #134. I’m a perfectionist and it’s driving me crazy. I should know by now to double check my work before moving on, but in my rush to complete this project, and due to the size and bulk of it, I never unfolded it completely. I’m thinking of ripping out squares 166, 165, 150, 149, 133 &134. I know it will be tedious work to undo the interior squares. I’m not sure I’ll make the effort to correct square 43, (maybe just embroider “oops” on it). Before I begin, I’d appreciate your opinion/advice as to whether this is possible or advisable. I don’t want to realize halfway into ripping out that I’ve not fully considered all of the possibilities for disaster. To your knowledge, has anyone else encountered this situation and, if so, how did they handle it? I could not find any other posts with this question.
Thank you so much for considering this and for any suggestions you can offer.
Hi Jean,
Thank you for writing in! We are so sorry to hear that your project didn’t turn out exactly as planned but we want to congratulate you on getting so much work done! Although we have not heard from others writing in about this issue, one thing you could do instead of pulling out all of your work is to embroider flowers or some sort of embellishment on the few squares that got misplaced! This could be a simple design detail that could bring joy and seem intentional each time you use your blanket! Please let us know if you have any other questions!
Warmly,
Gavriella
Hello,
How do you hold yarn double from 1 skein? The kit comes with only one skein of colors G, H and I. Thanks
Hi Elizabeth,
Thank you for your question! One thing you could do is knit with a strand from both the inside and outside of your cake of yarn after you have wound it. Another option would be to wind your yarn into two equal-sized balls so that you can knit with a strand from each. I hope this helps but please let me know if you have any questions!
Happy knitting,
Gavriella