

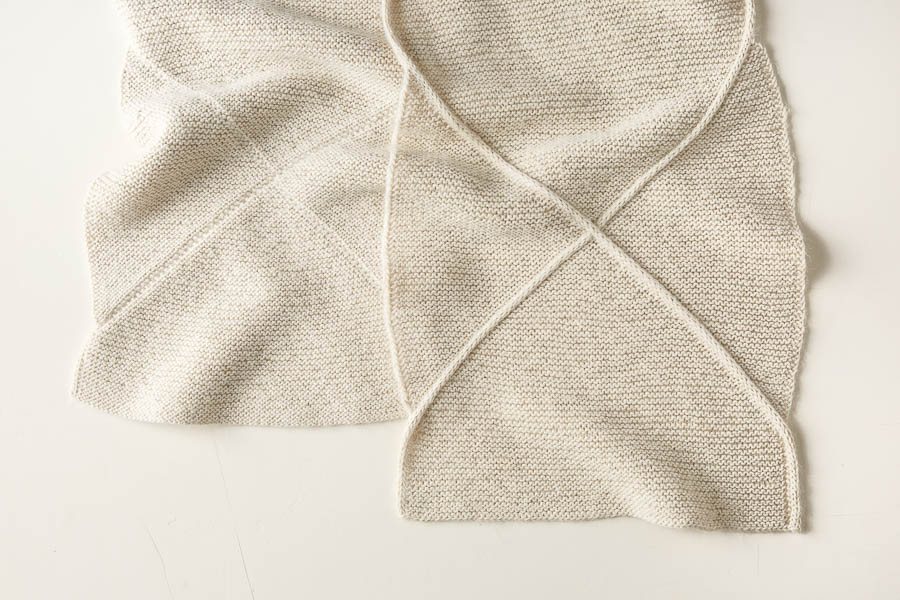

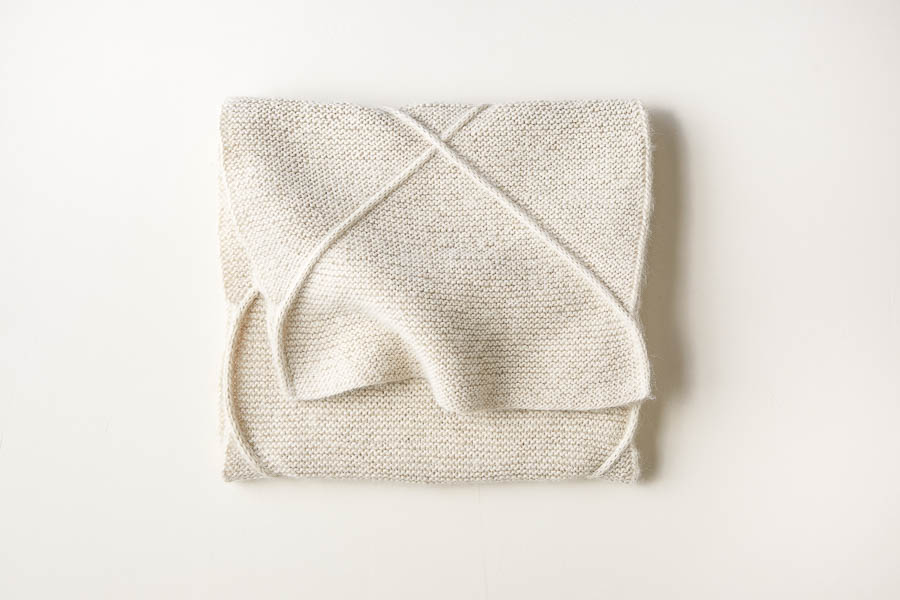
Delicate Cable Scarf
Our Delicate Cable Scarf pares down the intricacy and beauty of Aran knitting to its bare essentials: one spare cable floating across a sea of garter stitch.

Ideal for beginners and old pros alike, this lovely knit requires you to simply follow a single cable as it travels from selvedge to selvedge, enjoying nice garter-stitch breathers in between.

Our cozy Flax Down, a single ply blend of baby alpaca, extra fine merino and linen, creates crisp cables and a soft halo of warmth. We love that, in Heirloom White, our Delicate Cable Scarf is especially Aran Islands!

Stunningly simple and wonderfully comfy, the Delicate Cable Scarf is January knitting at its best!

Designed by Purl Soho designer, Jake Canton. Click here to see even more of Jake’s designs!
Share your progress and connect with the community by tagging your pics with #PurlSoho, #PurlSohoBusyHands, #PurlSohoDelicateCableScarf, and #PurlSohoFlaxDown. We can’t wait to see what you make!
Materials

- 5 skeins of Purl Soho’s Flax Down, 43% baby alpaca, 42% extra fine merino, and 15% linen. Each skein is 219 yards/ 100 grams; approximately 1002 yards required. We used Heirloom White. (NOTE: We no longer offer Flax Down, but choose from one of our other light worsted/dk weight yarns.)
- US 6 (4 mm) circular or straight needles
- A cable stitch holder
- Stitch markers
- 2 removable stitch markers (or little pieces of scrap yarn)
Gauge
24 stitches and 44 rows= 4 inches in garter stitch
Size
Finished Dimensions: Approximately 13 inches wide x 66 inches long
Notes
Slip Stitches
Slip all slipped stitches purlwise.
Cables
Left Cross (LC): Slip 3 stitches onto cable needle and hold in front of work, k1, then k3 from cable needle.
Right Cross (RC): Slip 1 stitch onto cable needle and hold in back of work, k3, then k1 from cable needle.
Cable 6 Front (C6F): Slip 3 stitches onto cable needle and hold in front of work, k3, then k3 from cable needle.
For our photo tutorial, please visit our Cable Tutorial.
Stitch Multiple
You can cast on any even multiple of stitches but will need to adjust the number of stitches between cables. To determine the number to knit in the Center Cross section (Next Row [wrong side]: Slip 1 wyif, k35, slip 6 wyif, knit to end of row), subtract 6 from the cast on number, divide by 2, then subtract one. For example, if you cast on 68 stitches, you would knit 30 instead of 35 stitches because 68-6 = 62/2 = 31-1 = 30. Later on in the Cable To Selvage section, knit one less than you did in the Center Cross section. Confused? Tell us in the Comments section below how many you’re thinking of casting on, and we’ll be happy to help you sort it out!
Pattern
Begin
Using a Long Tail Cast On, cast on 78 stitches.
Row 1 (wrong side): Slip 3 (see Notes) with yarn in front (wyif), knit to last 3 stitches, slip 3 wyif.
Row 2 (right side): Knit to end of row.
Repeat Rows 1 and 2 until piece measures 3 inches from cast-on edge, ending with Row 1.
Cable To Center
Row 1 (right side): LC (see Notes), knit to last 4 stitches, RC (see Notes).
Row 2 (wrong side): Slip 1 wyif, place marker (pm), slip 3 wyif, knit to last 4 stitches, pm, slip 3 wyif, k1.
Row 3 (right side): Slip 1 wyif, LC removing marker, replace marker, knit to 4 stitches before next marker, RC slipping marker, knit to end of row.
NOTE: When working RC, k3, slip marker, then knit stitch from cable stitch holder.
Row 4: Slip 1 wyif, knit to next marker, slip marker (sm), slip 3 wyif, knit to next marker, sm, slip 3 wyif, knit to end of row.
Row 5: Slip 1 wyif, knit to 3 stitches before next marker, LC removing marker, replace marker, knit to 4 stitches before next marker, RC slipping marker, knit to end of row.
Repeat Rows 4 and 5 until two cables are next to each other in center of fabric, ending with Row 5 and removing stitch markers on final row.
Center Cross
Next Row (wrong side): Slip 1 wyif, k35, slip 6 wyif, knit to end of row.
Next Row (right side): Slip 1 wyif, k35, C6F (see Notes), knit to end of row.
Next Row: Slip 1 wyif, k35, slip 6 wyif, knit to end of row.
Cable To Selvage
Row 1 (right side): Slip 1 wyif, k34, RC, LC, knit to end of row.
Row 2 (wrong side): Slip 1 wyif, k34, pm, slip 3 wyif, k2, pm, slip 3 wyif, knit to end of row.
Row 3: Slip 1 wyif, knit to 4 stitches before next marker, RC slipping marker, knit to 3 stitches before next marker, LC removing marker, replace marker, knit to end of row.
Row 4: Slip 1 wyif, knit to next marker, sm, slip 3 wyif, knit to next marker, sm, slip 3 wyif, knit to end of row.
Repeat Rows 3 and 4, ending with Row 3 when one stitch remains after second stitch marker.
Next Row (wrong side): Slip 1 wyif, remove marker, slip 3 wyif, knit to next marker, remove marker, slip 3 wyif, k1.
Next Row (right side): RC, knit to last 4 stitches, LC. Place a removable stitch marker or piece of scrap yarn at either end of this row.
Continue Even
Row 1 (wrong side): Slip 3 wyif, knit to last 3 stitches, slip 3 wyif.
Row 2 (right side): Knit to end of row.
Repeat Rows 1 and 2 until piece measures 3 inches from removable stitch marker, ending with Row 1. Remove removable stitch markers.
Repeat + Finish
Repeat from Cable To Center section through Continue Even section three more times.
With right side facing you, bind off knitwise.
Weave in ends and block as desired!


Hi..I have begun this 5 times and I read the comments. I’m still confused. The directions say in the row two, knit to the end, so does this mean no cable needle? I saw in a different comment the reply seemed to say to follow the first row. Thank you.
Hi Debra,
Thanks for reaching out. On Row 2, all you need to do is knit to the end of the row! The “Begin” section doesn’t actually include any cabling at all–you will start using your cable needle in the “Cable To Center” section. Hope this helps!
All the best,
Lili
Hi Lili, this is such a beautiful pattern, I consider myself an able knitter, but I have tried this 5 times and the markers are not clear…Such a shame, I love your projects, Is there anyway of making this pattern clearer…??
So many people here in the comments are struggling.
Many thanks
Sarah
Hi Sarah,
I am so sorry to hear that you’re being struggling to figure out this pattern! Can you let me know which instructions, in particular, you find to be unclear? We will absolutely take a closer look and see if there’s anything we can do to update the pattern to be easier to understand. I’ll keep an eye out for your reply!
All the best,
Lili
I casted on 68 stitches and when I finish the “cable to salvage” section I have more stitches and I can’t reach the end to continue with the “continue even ” section. What did I do wrong?
Hi Nikol,
Thanks for reaching out! I am happy to help but need a bit more information! Do you mean you are coming out with more than 68 stitches when you have finished or with the 68 stitches you can’t make it to the end?
Looking forward to hearing from you!
Gianna
I have 68 stitches but on the second to last row in the “cable to salvage” section,
after I slip 3 wyif I should have 1 stitch to knit according to the pattern but I have 3. I tried multiple times and every time I have the same amount of stitches until I reach the end of the row.
Hi Nikol,
I’m so sorry, but I think I realized what’s been throwing your stitches off! The pattern mentions that you can adjust the width so long as you make sure you’re casting on an even number, but unfortunately the instructions don’t account for certain areas when you’re called to work a specific number of stitches. For example, the first time this will be a problem is in the CENTER CROSS. If you’re casting on 78 stitches as suggested, the first row calls for you to “Slip 1 wyif, k35, slip 6 wyif, knit to end of row” but if you have 68 like you do, you’ll instead need to “Slip 1 wyif, k30, slip 6 wyif, knit to end of row.” You’ll knit 30 instead of 35 in this section. You’ll have to make this modification to make sure your cables are actually centered.
In turn, when you get to the CABLE TO SELVAGE section you should knit 29 instead of 34. If you knit 34 instead with 68 stitches instead of 78, then your marker placement will cause an extra stitch to be on one side.
Again, we’re so sorry for the confusion and are currently looking into how best to clear that up in the pattern going forward. I’ll be sure to follow up on what winds up happening!
All the best,
Zha Zha
Thank you so much for taking the time to reply.
I really want to make this pattern. Although I did the modification in order to center the cables, when it was time to reach the salvage I ended with more stitches to knit till the end.
I will stick to 78 stitches for now.
Have a nice day!
This is lovely! Thank you for the pattern. Would it be possible to make this with only one of the cables, so that it would have an asymmetrical sort of serpentine quality with the one cable snaking back and forth across the scarf? Wondering if that would ruin the overall structure or shape of the scarf? Any advice on how to modify the pattern to do that? I may knit a swatch and see if I can figure it out. Thanks!
Hi Anya,
Thanks for writing in. I think that’s a wonderful idea, and it’s definitely possible! What I would do is knit the pattern as written, except only follow the instructions for one of the cables, replacing everything else with plain garter stitch. I think making a swatch to test out this idea is a very good plan–that’s always what I do when modifying patterns!
All the best,
Lili
Hi!
I’m in Israel at the moment and there isn’t a huge selection of yarns here so im working with one with a gauge of just 15 stitches per 4 inches. So I calculated a cast on of 48 stitches. Can you help me understand which parts of the pattern I need to change? I didn’t quite understand the calculations in the instructions! Many thanks!
Hi Claire,
Thanks for reaching out. I can absolutely help you understand what the calculations mean for the rest of the pattern! Because your cast-on number is 48, your calculations are: 48 – 6 = 42 / 2 = 21 – 1 = 20. In the Center Cross section, you’ll need to replace k35 with k20, and in the Cable to Selvage section, you’ll need to replace k34 with k19. Other than that, you can work the pattern as written! I hope this helps.
All the best,
Lili
I have started this 3 times. The marker for RC on the ‘cable to center’ section doesn’t move and therefore that side of the cable doesn’t form. Please advise.
Thank you
Hi Linda,
Thanks for reaching out. I can see how the wording of the instructions can be confusing, but the marker will move for the RC as well! What you’ll need to do is slip the marker in the middle of working the RC–so slip it onto the righthand needle right after slipping the 3 stitches, but before knitting the stitch on the cable needle. This way, the marker will move forward by one stitch on each right side row, which moves the cable towards the center. Hope this helps clarify things!
All the best,
Lili
I’m on the second round of rows 4 and 5 at the start of cabling. My LC has 6 stitches on the outside of the cable but my RC only has 4. Is this correct? It seems that the RC stitch marker moves over each round slower than the LC. Am I missing something?
Hi Samantha,
Thanks for writing in! Each cable should move closer to the center at the same rate, so it sounds like there is something going on in your work. It may be that you’ve just missed working a few RC’s! I hope this helps you move forward in this project, but if you’re still having trouble, please send a photo of the cables to customerservice@purlsoho.com so we can take a closer look!
All the best,
Lili
Hi! I just finished knitting the delicate cable scarf. It’s beautiful but curls at the selvage. What would be the best way to block it? Thank so much!
Hi Patty,
Thanks for reaching out. I’d recommend wet blocking the scarf and laying it flat to dry!
All the best,
Lili
Hello hello great artists!
I simply love all your patterns and I am specially looking forward to start this one!!
but I would like to work with only 50 stitches.
Please help me with the calculations for both the center cross and also for the cable to selvage .
many many many thanks
Andrea
Hi Andrea!
Thank you for commenting! To adjust this scarf for a 50 stitch cast on, the number to knit in the Center Cross section will be 21 (since 50 minus 6 is 44, and 44 divided by 2 minus one is 21) and the number of stitches for the cable to selvedge is 20. This row will read: Next Row [wrong side]: Slip 1 wyif, k21, slip 6 wyif, knit to end of row.
I hope this helps!
All the best,
Margaret
WOW! It sure does 👍
Many many thanks….. here I go on a scarf adventure!
Hi – I love this pattern (Purl Soho is my goto for everything knitting!) – thank you for keeping website uptodate I miss you as my LYS in NYC!
I would like to make this as a throw(a large one) ….cast on 336 stitches!!! Can you help me with the calculations?
Many thanks!
Hi Sherri,
Thanks for reaching out about this! For a cast-on of 336 stitches, the number of stitches to knit in the Center Cross section would be 164. Then, in the Cable To Selvedge section, you would knit 163 stitches. Hope this helps!
All the best,
Lili
I really like this model. I started making the scarf but the design comes much bigger so in 66 inches I only get a drawing beyond the beginning and the end. Instead, the scarf in the picture has 3 patterns beyond the beginning and the end. Where am I wrong? I’m using needles 3,5
Hi Sonia,
Thanks for reaching out, although I’m sorry to hear that your scarf isn’t coming out as expected! It sounds like this issue might be related to your gauge. I’d recommend knitting a gauge swatch to make sure that you’re getting the same number of stitches and rows as indicated in the pattern: 24 stitches and 44 rows= 4 inches in garter stitch. You may need to size up or down your needles in order to get the correct gauge! If you would like to learn more about this, we have a handy tutorial called All About Gauge.
If you’re still running into problems with your project, I’d recommend reaching out to customerservice@purlsoho.com and sending us a photo of your work so far! We’ll be able to give more specific advice once we can visualize what’s going on.
All the best,
Lili
I love this scarf, but it’s way too big for me. How would you calculate this to be about 7 inches wide and about 54 inches long?
Thanks for any information you can provide.
Hi Sharon,
Thanks for reaching out! Because the gauge of this pattern is 24 stitches in 4 inches, then you would need to cast on 42 stitches to achieve a width of 7 inches. The next modification you’ll need to make is to the number of stitches between cables. For a cast-on of 42 stitches, you would need to knit the Next Row (wrong side) in the CENTER CROSS section like this instead:
Next Row (wrong side): Slip 1 wyif, k17, slip 6 wyif, knit to end of row
Later on in the CABLE TO SELVAGE section, knit one less than you did in the CENTER CROSS section! (So you would k16 in this section.) Other than that, you can basically follow the pattern as written, but only repeat the CABLE TO CENTER section to the CONTINUE EVEN section 2 more times, instead of 3 more times. This will result in a scarf that’s about 50 inches long, so to add the additional 4 inches, I’d recommend working the BEGIN section for 5 inches, rather than 3, and then continuing only the final repeat of the CONTINUE EVEN section for an additional 2 inches, until the scarf reaches 54 inches.
Hope this helps!
All the best,
Lili
Hello, I love this pattern and offered to make it for my sister who also loves it. 13 inches is wide for a scarf that is going around your neck twice. Can you tell me how wide it would be with your suggestion of casting on 68 sts? Thank you.
Hi Milann,
Thanks for reaching out! Based on the gauge of the pattern (24 stitches and 44 rows= 4 inches in garter stitch) a cast-on of 68 stitches will make a scarf that’s 11.3 inches wide. Hope this helps!
All the best,
Lili
Thanks. Problem! I’m on Cable to Center – Row 3. I slipped 1 wyif, did the LC which is slip 3 onto cable needle in front, knit 1, then knit three from cable needle (marker is removed) then replaced marker so there are 5 sts the the right of the marker. Is that correct. Now for the other end of the same row. You knit to 4 sts before the marker. The note below that says when working the RC, K3 but the RC directions on the first page has different directions for RC. I’m confused. Please tell me how to finish row 3. Thank you
Hi Milann,
What you’ve described in your comment is correct! The note written below this row just includes instructions for when to slip the stitch marker. The rest is exactly the same!
All the best,
Lili
Hello! I want to knit the Flax jumper from Tin Can Knits as part of a gift set with this scarf! The pattern includes a garter panel on the raglan sleeves. If the garter panel is 15 stitches wide, how would you suggest I adapt the delicate cables? TIA! 🙂
Hi Akira,
Thanks for reaching out, and that’s such a great idea! It can definitely work, but you’ll need to adjust the number of stitches in the garter panel, since this stitch pattern works over an even multiple of stitches. I’d recommend increasing each one to 16 stitches. Then, you can use the formula in the STITCH MULTIPLE section of the NOTES to determine the further modifications to the CENTER CROSS section!
First, subtract 6 from the stitch count, so 16 – 6 = 10. Then, divide this by 2, so 10 / 2 = 5. Now, you can plug the number 5 into the rows in the CENTER CROSS section, instead of the original 35 stitches! Then later on in the CABLE TO SELVAGE section, you would k4 instead of k34.
Hope this helps, and please let us know how it goes if you try this out! I think it will be beautiful.
All the best,
Lili
bonsoir,
je suis nouvelle sur ce site et débutante en tricot.
je trouve votre modèle superbe et que j’aimerais le réussir pour ma fille.
pouvez-vous me traduire vos abréviations wyif, point,kc, kd etc ..
merci beaucoup
Hi Christine,
Thanks for reaching out! We have a wonderful guide to all the abbreviations and terms we use in our patterns, which you can find right here. Hope this helps!
All the best,
Lili
Hi – I just finished the cables to center part of the pattern. I have one stitch separating the two cables. Is this correct?
Hi Michelle,
Thanks for reaching out. Unfortunately, there shouldn’t be a stitch between the two cables at this point–they should be right next to each other! What probably happened is that you missed cabling one of the cables on one row somewhere along the way. You could either undo your work and fix that, or there is a way to continue from where you are!
If you choose to continue, then the first thing to do is count your stitches and figure out the exact halfway point (since you should have an even number in total). Then, determine which side the extra stitch in the center falls on. With that in mind, work one more cable row, only cabling on the side with the extra stitch. Once you’ve done this, your cables will be right next to each other, in the correct position, and ready to move onto the CENTER CROSS section!
I hope this helps, and please let me know if you have any other questions.
All the best,
Lili
I don’t understand the first row … How to start? After slipping the 3 stitches then what do i do? Do i not knit them for the first row? Then start knitting at row 2?
Hi Es!
Thank you for writing in! On row 1, you will begin by slipping the first 3 sts and then you will knit each stitch until you have 3 unworked sts on your left needle. You will then slip the last 3 stitches with your working yarn in front of your work.
I hope this helps but please let us know if you need anything further and we would be happy to help you out!
Happy knitting,
Gavriella