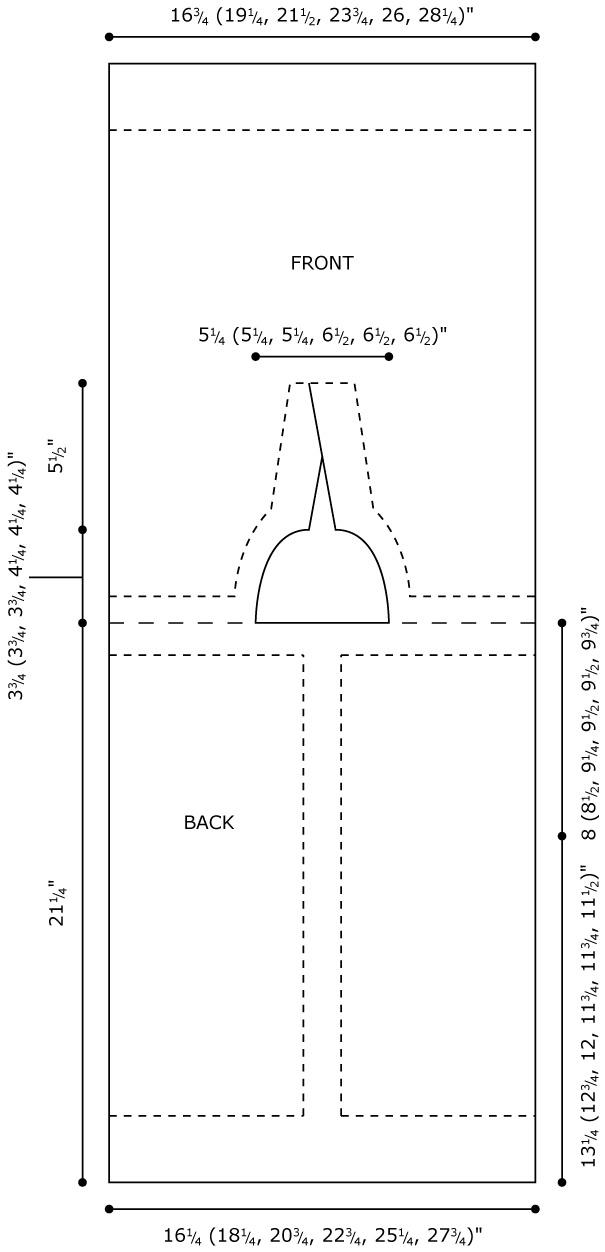
Cable Back Shell

The hard part about having a favorite item of clothing is that it wears out. About a year ago I knit a summer shirt called the Cap Sleeve Lattice Top, and boy, oh, boy, has it seen some action. Shockingly, there’s little sign of wear and tear. To keep it that way, I thought I’d knit up another sleeveless sweater to work into my rotation.
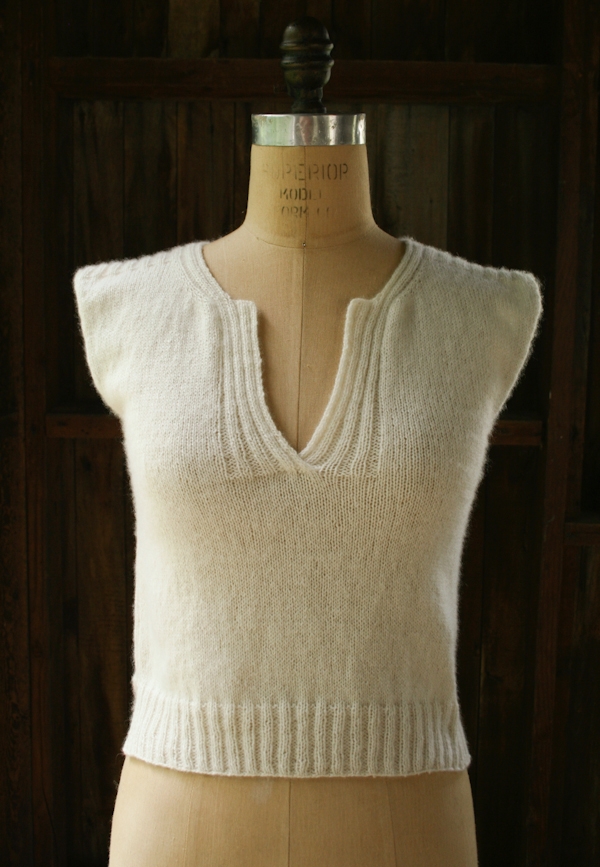
The Cable Back Shell, is perfect for the days I’m not wearing my Cap Sleeve Lattice. A simple knit with a few special moments of intrigue: twists and turns, dips and dives. Wait, now I’m thinking the Cap Sleeve may be just right for days I’m not wearing my Cable Back Shell!
This lofty cashmere top is a cloud of a shirt that hovers off the body with feminine elegance. Only Jade Sapphire’s sumptuous 2-Ply Mongolian Cashmere could produce such an ethereal fabric.
The Cable Back Shell is knit flat, starting at the bottom of the back and moving up and over the shoulders and down the front. Two short seams and you’re done, just like the Cap Sleeve Lattice Top. I hope you like its cousin just as much! -Laura
Designed by Purl Soho designer, Laura Ferguson.
Share your progress and connect with the community by tagging your pics with #PurlSoho, #PurlSohoBusyHands, and #PurlSohoCableBackShell. We can’t wait to see what you make!
Materials
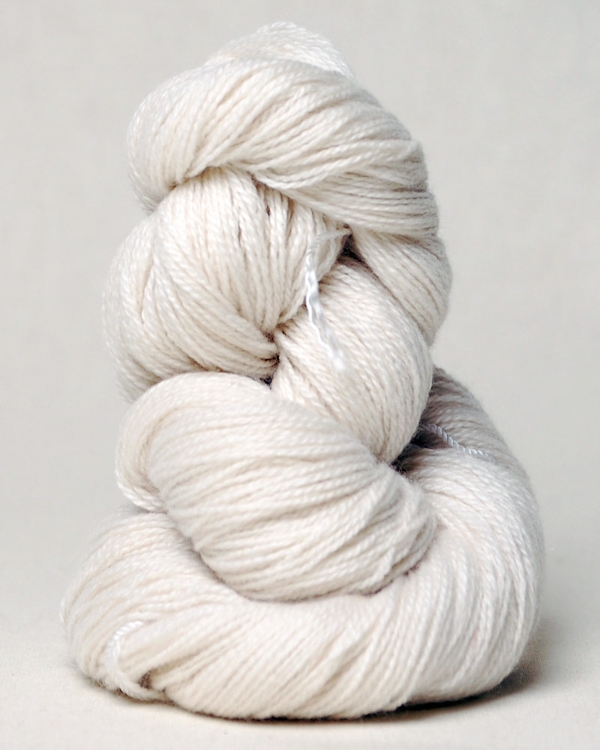
- 2 (3, 3, 3, 3, 4) skeins of Jade Sapphire’s 2-Ply Mongolian Cashmere. Each skein is 400 yards/ 55 grams; approximately 770 (875, 985, 1080, 1190, 1300) yards required. This is the color Ivory. (NOTE: We no longer offer Jade Sapphire’s 2-Ply Cashmere, but choose from one of our other fingering weight yarns.)
- US size 4 (3.5 mm), straight needles or 24-inch circular needle
- Cable needle or spare double pointed needle
- Stitch holder or scrap yarn
Gauge
7 stitches = 1 inch in stockinette stitch
Sizes
NOTE For help picking a size, please check out our Understanding Ease + Selecting Size Tutorial!
XSmall (Small, Medium, Large, XLarge, XXLarge)
- Bust Circumference: 33 (37½, 42¼, 46½, 51¼, 56) inches
- Length from Shoulder to Bottom Edge: 21¼, with directions to lengthen in 2½-inch increments
- Length from Underarm to Bottom Edge: 13¼ (12¾, 12, 11¾, 11¾, 11½) inches, with directions to lengthen in 2½-inch increments
EASE: This piece is designed to fit with an ease of at least 2 inches
Notes
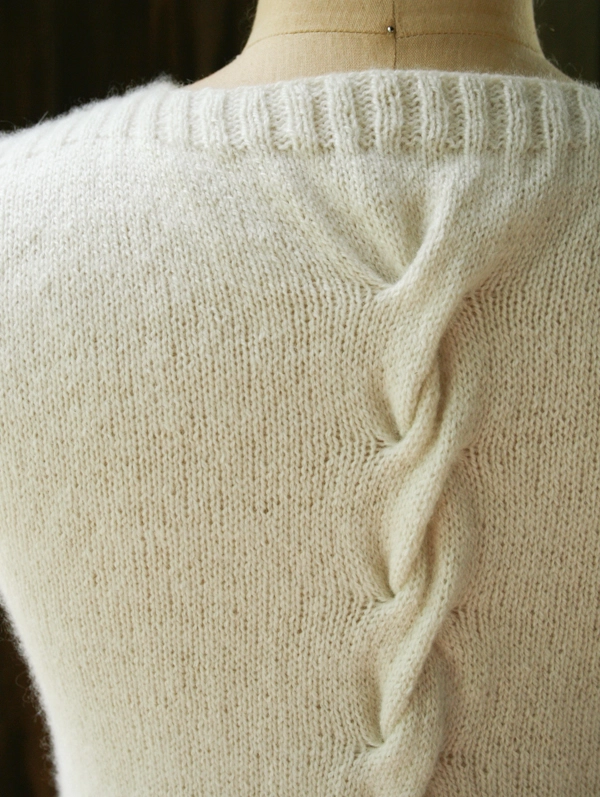
C22B: Cable 22 Back. Place 11 stitches on cable needle or spare double point and hold to the back of work, knit across following 11 stitches, then knit across 11 stitches on cable needle. For a cable tutorial, please click here.
Pattern
Back
Cast on 126 (142, 158, 174, 190, 206) stitches. We used a basic Long Tail Cast On.
Row 1 (wrong side): P2, *k2, p2, repeat from * to end.
Row 2: K2, *p2, k2, repeat from * to end.
Repeat Rows 1 and 2 until piece measures 2½ inches, ending with Row 2.
Next Row (wrong side): Change to stockinette stitch, beginning with a purl row, and work for 19 rows, ending with a wrong-side row.
Cable Row (right side): K52 (60, 68, 76, 84, 92), place marker (pm), C22B (see Pattern Notes above), knit to end.
**Work in stockinette stitch for 19 rows, ending with a wrong-side row.
Cable Row (right side): Knit to marker, slip marker (sm), C22B, knit to end.
Repeat from ** five more times or, to add 2½ or 5 inches in length, repeat from ** six or seven more times.
Work in stockinette stitch for 19 rows, ending with a wrong-side row.
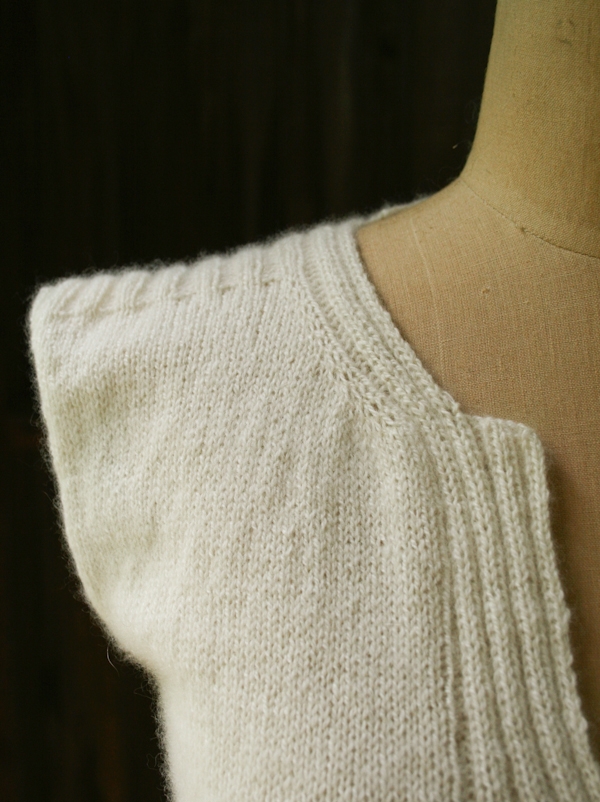
Shoulders and Neck
Row 1 (right side): K2, *p2, k2, repeat from * to end.
Row 2: P2, *k2, p2, repeat from * to end.
Repeat Rows 1 and 2 for 1¼ inches, ending with a wrong-side row.
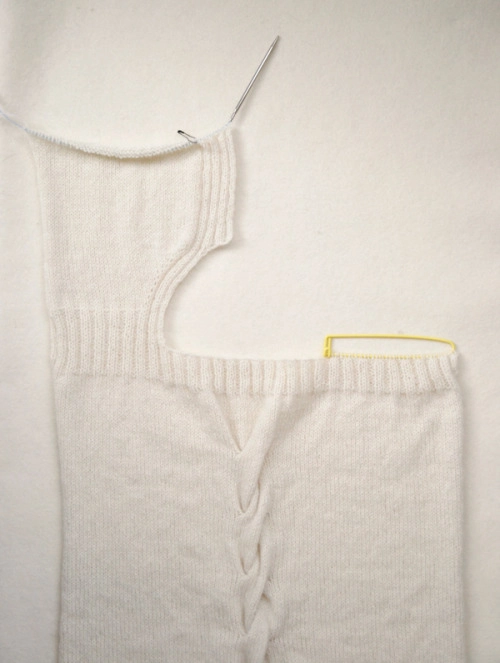
Next Row (right side): Work in established rib pattern for 38 (46, 54, 58, 66, 74) stitches, place previous 38 (46, 54, 58, 66, 74) stitches on stitch holder or scrap yarn, bind off 50 (50, 50, 58, 58, 58) stitches in pattern, removing stitch marker, work in rib pattern to end. [38 (46, 54, 58, 66, 74) stitches remain for each shoulder]
Front
Note: You will work the top Left and Right sides of the Front separately, starting with the Front Left. Stitch counts in the following two sections do not include the stitches on hold.
Front Left Shoulder Ribbing
Row 1 (wrong side): P2, *k2, p2, repeat from * to end.
Row 2: K2, *p2, k2, repeat from * to end.
Repeat Rows 1 and 2 until there are 2½ total inches of ribbing, including ribbing at top of Back, ending with a wrong-side row.
Front Left Neck
Row 1 (right side): [K2, p2] twice, pm, knit to end.
Row 2: Purl to marker, [k2, p2] twice.
Row 3 (increase row): [K2, p2] twice, sm, k1, m1R, knit to end. (1 stitch increased)
Row 4: Repeat Row 2.
Repeat Rows 3 and 4 four (four, four, five, five, five) more times. [43 (51, 59, 64, 72, 80) stitches]
Next Row (increase row): [K2, p2] twice, sm, [k1, m1R] twice, knit to end. (2 stitches increased)
Next Row: Purl to marker, sm, [k2, p2] twice.
Repeat previous 2 rows two more times. [49 (57, 65, 70, 78, 86) stitches]
Next Row (increase row): [K2, p2] twice, sm, [k1, m1R] three times, knit to end. (3 stitches increased)
Next Row: Purl to marker, sm, [k2, p2] twice.
Repeat previous two rows one (one, one, two, two, two) times. [55 (63, 71, 79, 87, 95) stitches]
Next Row (increase row): With right side facing, cable cast on 8 stitches, [k2, p2] four times, sm, knit to end. [63 (71, 79, 87, 95, 103) stitches]
Next Row: Purl to marker, sm, [k2, p2] four times.
Next Row: [K2, p2] four times, sm, knit to end.
Repeat previous two rows until piece measures 8 (8, 8, 8½, 8½, 8½) inches from the end of the Shoulder Ribbing.
Cut yarn and place Front Left stitches on hold.
Front Right Shoulder Ribbing
Note: You will now be shaping the Front Right. Stitch counts in the following two sections do not include the Front Left stitches on hold.
Rejoin yarn with wrong side facing.
Row 1 (wrong side): P2, *k2, p2, repeat from * to end.
Row 2: K2, *p2, k2, repeat from * to end.
Repeat Rows 1 and 2 until there are 2½ inches of ribbing, including ribbing at top of Back, ending with a wrong-side row.
Front Right
Row 1 (right side): Knit to last eight stitches, pm, [p2, k2] twice.
Row 2: [P2, k2] twice, sm, purl to end.
Row 3 (increase row): Knit to 1 stitch before marker, m1L, k1, sm, [p2, k2] twice. (1 stitch increased)
Row 4: Repeat Row 2.
Repeat Rows 3 and 4 four (four, four, five, five, five) more times. [43 (51, 59, 64, 72, 80) stitches]
Next Row (increase row): Knit to two stitches before marker, [m1L, k1] twice, sm, [p2, k2] twice. (2 stitches increased)
Next Row: [P2, k2] twice, sm, purl to end.
Repeat previous 2 rows two more times. [49 (57, 65, 70, 78, 86) stitches]
Next Row (increase row): Knit to three stitches before marker, [m1L, k1] three times, [p2, k2] twice. (3 stitches increased)
Next Row: [P2, k2] twice, sm, purl to end.
Repeat previous increase row one (one, one, two, two, two) times. [55 (63, 71, 79, 87, 95) stitches]
Next Row (increase row) (wrong side): With wrong side facing, cable cast on 8 stitches, [p2, k2] four times, sm, purl to end. [63 (71, 79, 87, 95, 103) stitches]
Next Row: Knit to marker, sm, [p2, k2] four times.
Next Row: [P2, k2] four times, sm, purl to end.
Repeat previous two rows until piece measures 8 (8, 8, 8½, 8½, 8½) inches from the end of the Shoulder Ribbing, ending with a wrong-side row.
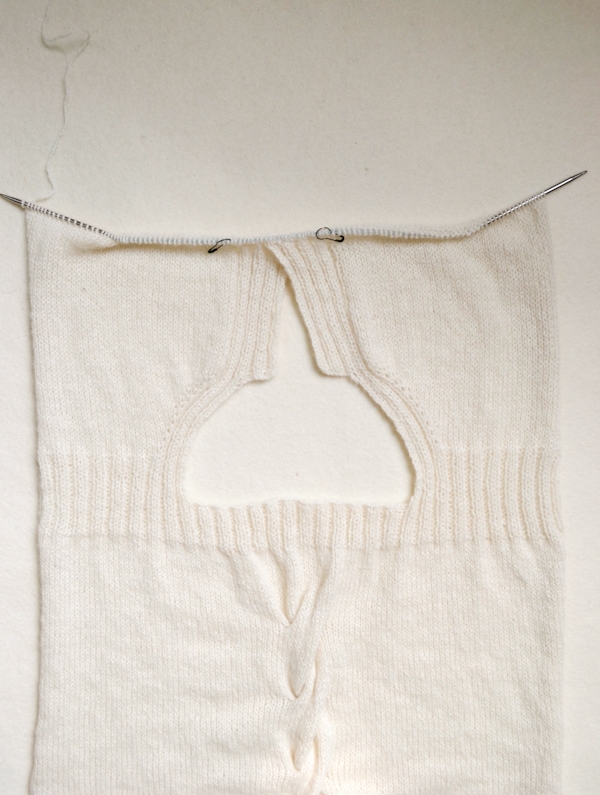
Join Front Right and Left
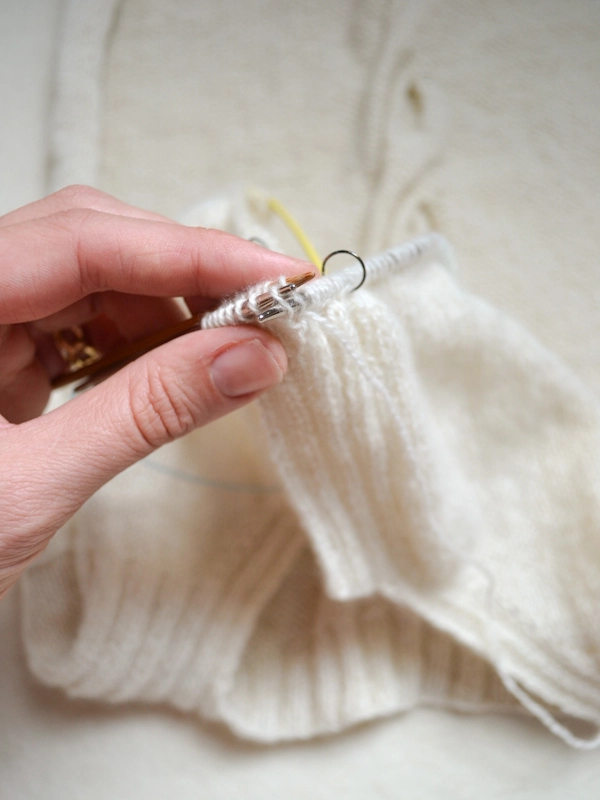
Row 1 (right side): Knit to marker, [p2, k2] twice, you will work the remaining 8 stitches of the Front Right and the first 8 stitches of the Front Left together. To do this, place 8 stitches from Front Left onto spare double pointed needle or cable needle and hold needle parallel to the working needle, with the working needle with the remaining stitches of the Front Right in front of the doubled pointed needle with the Front Left stitches, *[p2tog] twice (1 stitch from Front Left together with 1 stitch from Front Right), [k2tog] twice (1 stitch from Front Right together with 1 stitch from Front Left), repeat from * once. Now, continue working across Front Left stitches on hold, [k2, p2] twice, knit to end. [118 (134, 150, 166, 182, 198) total stitches]
Work in stockinette stitch across all stitches until the Front length is 2½ inches shorter than the Back length, ending with a right-side row.
Front Ribbing
Row 1 (wrong side): P2, *k2, p2, repeat from * to end.
Row 2: K2, *p2, k2, repeat from * to end.
Repeat Rows 1 and 2 until ribbing measures 2½ inches.
Bind off in pattern.
Side Seams
Fold the piece at the shoulders. Starting just above the bottom ribbed edges, use mattress stitch to sew the Front and Back together, ending 8 (8½, 9¼, 9½, 9½, 9¾) inches before the shoulder fold.
Armhole Edging
Beginning at bottom of armhole, rejoin yarn. Binding off stitches as you pick them up, pick up approximately 3 stitches for every 4 rows.
Weave in your ends and you’re finished!


Is it possible to work this sweater in the round? I’m not the best when it comes to matress stitch. I always seem to have a few extra on one side at the end unless it’s a thick yarn. 🙁 Thank you for your help.
Hi Katrina,
Thank you for the comment! This project should be doable in the round if you are comfortable altering the pattern as such. It will still require the chest and upper back be knit flat to make armholes and a neck opening but that will allow you to avoid doing the mattress stitch.
I’d love to hear how that works out and feel free to write back if you have anymore questions!
Good Luck!
Jake
Hello!
I’m finally working on the sweater, became side tracked with some scarfs, and I am wondering if it’s possible to get this pattern in row count instead of inches. Thank you.
Hello Karina,
The row gauge is approximately 10 rows per inch. Hope this helps! Happy knitting! -Alyson
Can you add this to the pattern? I kind of assumed it was 7 rows per inch as well since it didn’t say! It’s still coming out looking great but I know I’ll make one in a different colour and I’m a perfectionist 😀
Hi Brianne
Thanks for letting us know, we will try to get it updated shortly!
Happy Knitting
Jessica
Ok, so one last question/confirmation (hopefully). Your diagram shows the front part from underarm to shoulder is 9-1/4 inches while the back is 8 inches. I just want to make sure that both the front and the back should be 13-1/4 inches. i.e. work 13-1/4 inches in the round. Then I would put the front stitches on a stitch holder and work back (8 inches) to front (9-1/4 inches) then kitchener stitch the front together.
Hello Katrina!
Sounds like your plans to create this in the round are coming along very well! It makes sense to me that the front would be a little longer than the back to make some space for our women-ly curves 🙂 I think its intentional!
Let us know how it goes! -Alyson
What a versitile pattern! I have made it in linen and in a wool/cashmere blend. What a difference! Both are gorgeous and barely look like the same pattern. Guys say the linen one is sexy (!). I think that in wool, a longer length would look better maybe. Thanks for yet another great pattern!
Hi Katherine, Do you remember which yarn you used for the linen version?
What does sm mean? I know what pm means, but I haven’t ever seen sm.
Hello Katrina!
This abbreviation means “slip marker.” Its simply reminding you to transfer the marker from the left needle to the right needle. Thanks for asking! -Alyson
Thanks! I thought so, but since this is a gift I didn’t want to assume.
I’m done with the sweater and I just wanted to leave my words of thanks for helping me out in making this gorgeous sweater!! You all have assisted me in everything from picking out a less expensive yarn to confirming what I think the pattern is telling me to do. I really do appreciate what you all do for us here who love your patterns, shop and support!
Hello Katrina!
We’re so happy to have worked with you through this process! Keep up the hard work and happy knitting! -Alyson
Bonjour est ce possible d’avoir ce patron en français ?
Hello, Elodie!
Thank you for writing in! Unfortunately, we do not have a French translation of this pattern available. Sorry!
Best wishes,
Kumeko
Just a suggestion for people: you might want to make this sweater an inch or two longer. Have fun!
Hi, I was curious if I could use anzula squishy instead? Of course I would do a gauge.
Thanks,
Cassie
Hi Cassie,
Thanks for writing us! The Anzula Squishy is a bit thicker than the cashmere, but I think that since the Squishy doesn’t bloom as much you can get away with it. Do your gauge and decide from there, but I think you’ll be just fine!
Thanks,
Adam
Thank you! I’ll give it a try.
This is a lovely sweater and the yarn looks scrumptious. I’m curious about the brand of needles you are using.
Thanks, Linda
Hello Linda,
Thanks for the kind words! You can use any circular needle for this but I recommend Addi Turbo Rocket because the tip is nice and pointy for thin yarns. We only sell Addi brand circular needles and they come in blunt tip, bamboo and olive wood.
Thanks,
Adam
I’m not sure I’m binding off the picked up armhole stitches correctly. Am I to bind off the picked up stitches without knitting them?
I love the pattern… Thank you!
Hi Betsy,
Thanks for the kind comment! Yes, you will not knit the picked up stitches. The bind off is only for decorative edging. You will pick up two stitches then pass the first stitch over the second. Next you’ll pick up the next stitch and bind it off just like the last. I hope this clears things up!
Best,
Adam
You say there is 2″ of ease in this pattern. Negative or positive ease?
Hi Rita,
The ease in this is positive in this pattern.
Thanks,
Adam
This pattern is gorgeous! Whoever designed this has wonderful taste! I was wondering if I could knit up this pattern in a size Medium, with an addition of 2 inches of length in the body of the pattern, using 3 balls Anzula’s squishy yarn? Thanks in advance!
Hi Michelle,
Thanks for writing in and for the kind words! I think you could get away with doing three skeins of Squishy, but I would buy an extra one just in case. You could always see how far you get with the three skeins and if you don’t reach the 2 extra inches on the front, it can turn into a high-low top. Just a suggestion!
Best of luck,
Adam
Hi guys!
Thanks for a beautiful pattern (and the instructions to increase the length – it matters a lot for tall knitters)! Quick question – would it make a difference in the seaming if I did a slip stitch selvedge edge, vs. knitting or purling the first stitch on the row? Is one recommended over the other?
Thanks,
Cara
Hi Cara,
You can certainly do a slip stitch selvedge. It won’t affect anything!
-Adam
Hi! I am loving this pattern and so close to finishing! I’be never done something with armhole edging before and I’m a bit confused by it. If I can get an explanation of what this is supposed to do to the sleeves I think it would help me get the concept of what I am doing better.
Hi Emily,
Thanks for writing in and congratulations on almost finishing! The arm hole edging helps to prevent the arm edges from rolling under and creates a neat and lovely finish to the arm hole. The edging can also tighten up the arm hole if it is a touch loose!
I hope that this helps and best of luck!
Cassy
I couldn’t be more excited to try my first real, seamed garment. The seaming is what I am most nervous about. Do you recommend a row counter so that the seams match up? Just worried that the rows won’t match up and all will be lost when I get to that point. Is there some other trick? Thanks from a pretty newbie knitter! Gorgeous top BTW!
Hi Tia,
Thanks for writing in! Don’t be nervous, you can do this! When I am seaming up garments, I love to use locking stitch markers to help me out. I’ll attach the two sides using the stitch markers at various points and this helps so that my seams are nice and even and do not shift as I work my way up a seam. While we do not have a seaming video, I know that there are plenty of examples out on the internet that could be helpful!
Best of luck!
Cassy
Hi there! Question for you–I love this pattern, but the suggested yarn is a little pricey for me. Could you suggest an alternative? Thanks so much for your help 🙂
Hi Sara,
Thanks for writing us! I suggest you use Anzula Cloud or possibly Purl Soho Line Weight. Hope you like the suggestions!
-Adam
Hello,
First, I really like that top, it’s really gorgeous! It is the first time I decided to knit something for me, and I would like to know if I need to “block” my work before sewing it on the side and doing the armholes’ binding.
Thank you,
Pauline
HI Pauline,
Thanks for writing in! Congratulations on your first project for yourself! We did not block the sweater before working on the armholes. That said, you absolutely can if you would like. Especially if you are a tighter knitter, blocking before picking up can help give you a better idea of how the finished piece will fit. Just be sure to block after you have completed this as the yarn will relax a bit in the blocking process.
Best,
Cassy
Hi! I bought some cattail silk this summer and was thinking of making this garment. Thoughts!?! Btw I’d love visiting your shop, I just wish my husband hadn’t been with me I would have probably spent more time just perusing.
Hi Michelle,
Using our Cattail Silk as a substitute for the 2-ply cashmere would make a beautiful top! I would recommend doing a gauge swatch to make sure you like the finished drape and feel of the knitted fabric since the fiber content of these yarns are so different!
Happy knitting!
Carly
This is knitting up wonderfully for me in baby alpaca! I saw the question about finishing the sleeves above. Is there any suggestion you can provide that would help me to add a bit “more sleeve” to the arm holes so that it’s more in the direction of cap sleeve instead of a sweater vest look? Would appreciate any help you have here! Thank you!
Hi Ashely,
Thanks for your question! Unfortunately we do not currently have the resources to expand this pattern to include sleeves. You could in fact, pick up along the top and part way down the sides of the armhole and work short rows to create a cap sleeve. This will require a bit of trial and error but if you are up for a challenge, it could be quite nice!
Best,
Cassy
Good evening:
I’m making this sweater for a friend of mine and I’m up to the stockinette for 19 rows and going to do the cable but as i read the instructions i’m getting confused already.
What does this mean:
**Work in stockinette stitch for 19 rows, ending with a wrong-side row.
Cable Row (right side): Knit to marker, slip marker (sm), C22B, knit to end.
Repeat from ** five more times or, to add 2 1/2 or 5 inches in length, repeat from ** six or seven more times.
Work in stockinette stitch for 19 rows, ending with a wrong-side row.
Thank you so much for your help.
I will probably be bugging you for more help after I get through this challenging part.
Thanks again.
Concetta…)
Hi Concetta,
Thanks for writing in! I will try to clarify this for you! For this portion of the pattern, you will repeat everything between the “**” five times OR if you would like to add 2 1/2 inches to 5 inches of length, you will repeat six or seven times. I find it helpful to write this out long form from time to time. For 6 repeats (the original repeat plus the 5 additional repeats), the pattern would read:
Work in stockinette stitch for 19 rows, ending with a wrong-side row.
Cable Row (right side): Knit to marker, slip marker (sm), C22B, knit to end.
Work in stockinette stitch for 19 rows, ending with a wrong-side row.
Cable Row (right side): Knit to marker, slip marker (sm), C22B, knit to end.
Work in stockinette stitch for 19 rows, ending with a wrong-side row.
Cable Row (right side): Knit to marker, slip marker (sm), C22B, knit to end.
Work in stockinette stitch for 19 rows, ending with a wrong-side row.
Cable Row (right side): Knit to marker, slip marker (sm), C22B, knit to end.
Work in stockinette stitch for 19 rows, ending with a wrong-side row.
Cable Row (right side): Knit to marker, slip marker (sm), C22B, knit to end.
Work in stockinette stitch for 19 rows, ending with a wrong-side row.
Cable Row (right side): Knit to marker, slip marker (sm), C22B, knit to end.
Once you have completed this section you will, work in stockinette stitch for 19 rows, ending with a wrong-side row.
I hope that this helps clear things up!
Cassy
Hello Cassy:
Well first of all, I want to thank you for your reply and have ripped and started this sweater quite a few times. I’m a novice at knitting, but am not giving up on this gorgeous sweater.
I’m finally down to the part before the next row and now this is where the ?’s come in.
I do continue with the paragraph below, which I do undersand.
Next Row (right side): Work in established rib pattern for 38 (46, 54, 58, 66, 74) stitches, place previous 38 (46, 54, 58, 66, 74) stitches on stitch holder or scrap yarn, bind off 50 (50, 50, 58, 58, 58) stitches in pattern, removing stitch marker, work in rib pattern to end. [38 (46, 54, 58, 66, 74) stitches remain for each shoulder]
BUT I DON’T UNDERSTAND THIS. WHERE AM I ENDING THE SWEATER? IT SAYS I’M WORKING LEFT & RIGHT SIDES SEPARATELY.
HELP, I’M LOST AND THANK YOU..)
FRONT
Note: You will work the top Left and Right sides of the Front separately, starting with the Front Left. Stitch counts in the following two sections do not include the stitches on hold.
Hi Concetta,
Thanks for reaching out! It sounds like you are on the right track so far! Although it says to work the left and right portions separately, the sweater is knit all in one piece so you will be continuing with the stitches you already have instead of casting off or casting on a new piece.
After completing the row you included in your comment, you should have the stitches for the right shoulder on a stitch holder, the center stitches bound off, and the stitches for the left shoulder still on the needle. If you keep scrolling a bit more in the pattern, you will see instructions for the Front Left Shoulder Ribbing and Front Left Neck, which you will work using just the stitches that are still on the needle. Once you have completed those instructions your sweater should look just like the picture immediately under the Front Left Shoulder Ribbing heading, and you will cut your yarn and place those stitches on another stitch holder.
Next, you will return the stitches for the right shoulder to your needle, rejoin your yarn, and work the instructions for the Front Right Shoulder Ribbing and Front Right Neck on just those stitches. At this point, you will work the instructions to Join Front Right and Left, and will once again have just one set of stitches without anything on holders to complete the rest of the top.
I hope that helps! Let us know if you need any other parts of the pattern explained!
Best,
Julianna
Good Morning Julianna:
Thank you so much for replying back to me.
I’m going to give it a go after I fix the error I made..ugh. Had to pull out a few rows.
If I’m stuck, I just may call you at the store or hop on over I’m in Bklyn.
Have a great day…)
Hi Concetta,
I’m so glad you are persevering! We are always here to help, either online or in person!
Best,
Julianna
Hi!
I was wondering if it would be possible to add sleeves to this sweater. If so, are there any major changes to the pattern? Thanks!
Hi Chloe,
Thanks for your question! Unfortunately we do not currently have the resources to expand this pattern to include sleeves. You could in fact, pick up along the top and part way down the sides of the armhole and work short rows to create a cap sleeve. This will require a bit of trial and error but if you are up for a challenge, it could be quite nice!
Best,
Cassy
I’d like to knit this beautiful piece so that the front neckline goes across, similarly to the back neckline. Could you help me adapt the pattern? I’ll be knitting in XS size. Thank you!
Hi Beatrix,
Thanks for writing in! You certainly can give adapting the neckline a go! At present, we do not have the resources to adapt a pattern but I think that with a little trial and error, you could certainly give it a go! The main things to keep in mind are that you will want to make sure that your neck hole is large enough to comfortably go over your head and that in general, necklines in the front will need to be lower than in the back to fit comfortably. You could try casting back on the neck stitches that you bound off once you are done with the shoulder ribbing. Again, this may take some trial and error but if you are up for the challenge, I’d go for it!
Happy knitting!
Casst
Hi there,
I’m curious to learn if there’s any way to add sleeves onto this pattern? Ideally 3/4 sleeves is what I’m thinking.
Many thanks in advance!
Karin
Hi Karin,
Great question! I would look to our Over-the-Top Top for inspiration – it is constructed very similarly to the Cable Back Shell, but includes small cap sleeves. Once you have created these cap sleeves, it should work quite well to pick up stitches around each sleeve opening and knit to your desired sleeve length, as we did in our Striped Summer Shirt.
Happy knitting, and please let us know how it turns out!
Julianna
Hi there,
what a lovely top – sooo beautiful! I´m not sure about what size to knit considering the ease. Is the given bust circumference a body measurement to determin what size to knit or is it a garment measurement? If it is garment, is the ease already included?
Thank you!
Hi Claudia,
Thanks for reaching out! The bust circumferences in the size information are the finished measurements of the garment. We recommend that this top fits with two inches of ease, so you should choose a size that measures two inches larger than your actual bust measurement. However, if you prefer your sweaters to fit a little looser or tighter, you can use the finished garment measurements to choose whatever size will fit you the way you want it to!
I hope that helps!
Julianna
Hi! I’m confused at the “Joint Front Right and Left” part. Can you post a video showing how to p2tog with one stitch from Front Left together with 1 stitch from Front Right? Thank you!
Hi Claudia,
Thanks for writing in! We don’t have the resources at the moment to put together a video for this step, but I think I can help! You might get a little more information on how to do this from our Knit Hem or Three Needle Bind Off videos. These videos only shows knit stitches, but the concept of holding the needles parallel and working together stitches from the front and back needle is the same, no matter whether you are knitting or purling!
All the best,
Julianna
Hi there,
I’m in love with this pattern! The yarn is a bit expensive though, do you think that your Sweetgrass Fine would work for this? Thanks in advance!
Hi Katherine,
Thank you so much for the kind words! Although you will have to knit a swatch to make sure, yes, I think Sweetgrass Fine should be a wonderful substitute for this top! Better yet, you will only need 1 (1, 2, 2, 2, 2) skeins for each size.
I hope that helps, and please do let us know how it turns out!
Julianna
Getting ready to start this sweater; very excited. One question: On the Ravelry website, there’s a notation:
Errata available: http://www.purlsoho.com/create/knit/errata/ purlsoho.com
But the link isn’t working. Is this error still in the directions? or has it been updated?
Thanks so much.
Hi Terry,
Thanks for reaching out! Here is the link to the Errata! If you scroll down a bit you will find the note for the Cable Back Shell. The only correction made is Under FRONT RIGHT, the second to last line of instructions has been changed to: Next Row: [P2, k2] four times, sm, purl to end.
I hope this helps, happy knitting!
Gianna
I’m not an experienced knitter and I’m having trouble with the armhole finishing. I understand what the pattern says, but it’s just not coming out nicely. The edge looks messy, as opposed to clean and “finished” as it should. An experienced knitter friend suggested an alternative of picking up stitches all the way around the armhole and then binding them all off, rather than binding off as you pick up. Any feedback on whether this might provide a cleaner edge? Or, any other suggestions? Thank you!
Hi Jennie,
Thank for writing in. I agree with your friend’s advice! Picking up all the stitches and then binding them off on the next round will definitely make the edge look neater, since the extra round of stitches that produces will help to even out the tension.
All the best,
Lili