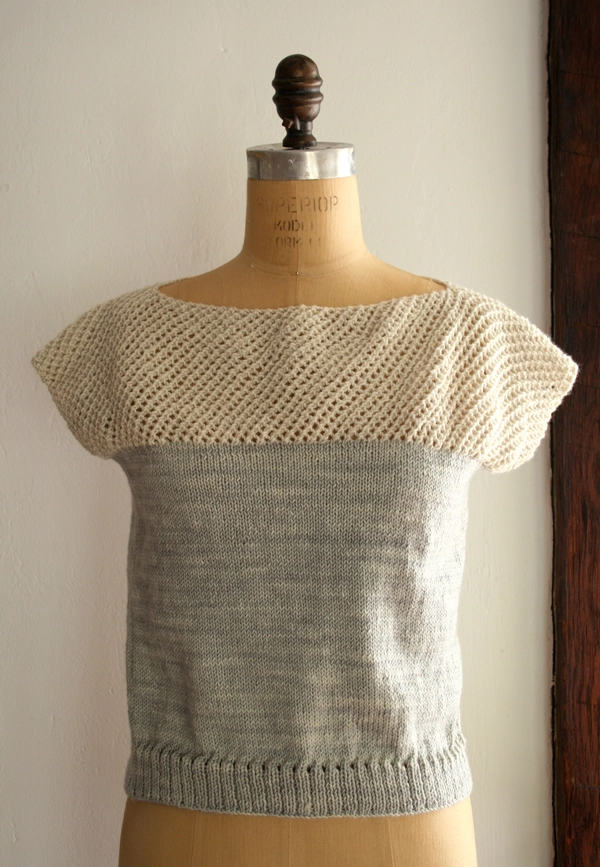
Cap Sleeve Lattice Top

I can remember lying for hours under the pergola in my grandmother’s yard. In the fall I’d watch the grid-like shadows shift across the grass as the sun moved across the sky. And in the spring I’d stare up, tracking the path of the vines weaving in and out of the lattice work structure. Empty or abundant, I loved the woven wood overhead.

My fondness towards this geometric patterning does not stop at the garden wall. It carries over to painted kitchen floors, pie crusts and, as you see here, knits! The lattice stitch I used is an organic interpretation of the woven grids and crisscrossing ridges that I find so fascinating and beautiful!
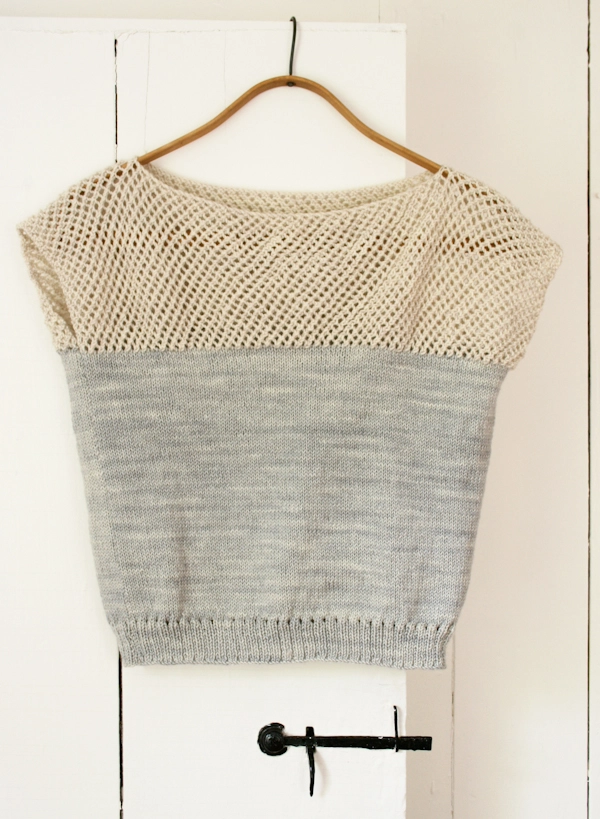
I made this Cap Sleeve Lattice Top with one of our newest (and most favorite!) yarns, MadelineTosh’s Tosh Sport. It’s a superwash merino wool, machine spun but hand dyed, with gorgeous depths of color (even in the neutrals). The pattern, like the sweater, is easy breezy, knit up the back over the shoulders and down the front, two seams and you’re done!
Watching the sparse grid of the pergola become overrun with wisteria and roses was a sure sign of the hot summer days to come. This sweater is a delightfully quick project to welcome spring and to wear right through summer. I think if I found myself sitting under that pergola right now, I’d be sporting this top, cool beverage in hand, gazing up at the greenery! -Laura
Designed by Purl Soho designer, Laura Ferguson.
Share your progress and connect with the community by tagging your pics with #PurlSoho, #PurlSohoBusyHands, and #PurlSohoCapSleeveLatticeTop. We can’t wait to see what you make!
Materials

- Main Color (MC): 2 (2, 3) skeins of Madeline Tosh’s Tosh Sport, 100% superwash merino wool. Each skein is 270 yards/ 100 grams; approximately 500 (540, 600) yards required. I used the color Silver Fox.
- Contrast Color (CC): 1 (1, 2) skeins of MadelineTosh’s Tosh Sport; approximately 250 (270, 300) yards required. I used the color Antler.
- US 5 (3.75 mm), 16- or 24-inch circular needles, depending on size you are making
- US 6 (4 mm), 16- or 24-inch circular needles, depending on size you are making
NOTE: You could also use Anzula’s Cricket, 80% superwash merino, 10% cashmere, 10% nylon. Each skein is 250 yards/ 100 grams; approximately 2 (3, 3) skeins of MC and 1 (2, 2) skeins of CC required. (NOTE: This yarn is no longer available.)
Gauge
24 stitches = 4 inches in stockinette stitch on larger needles
Sizes
NOTE For help picking a size, please check out our Understanding Ease + Selecting Size Tutorial!
34 (36, 38)
- Finished Chest Circumference: 34 (36, 38) inches
- Finished Length from Shoulder to Cast On Edge: 18½ (20½, 22½) inches
- Finished Length from Underarm to Cast On Edge: 12 (13, 14) inches
Note
To alter the size be sure to cast on an odd number that is a multiple of 3 plus 1.
Pattern
Back
Back Ribbing

Using the smaller needles and MC, cast on 103 (109, 115) stitches, leaving a 24 inch tail. We used a basic Long Tail Cast On.
Row 1 (Wrong Side): P1, *k1, p2, repeat from * to end.
Row 2 (Right Side): *K2, p1, repeat from * to last stitch, k1.
Repeat Rows 1 and 2 until piece measures 1¾ inches from cast on edge, ending with a WS row.
Change to larger needles.
Eyelet Row (RS): K2, *yarn over (yo), knit two together (k2tog), k1, repeat from * to last 2 stitches, yo, k2tog.
Back Body

Next Row (WS): Purl.
Next Row (RS): Knit.
Continue in stockinette stitch until piece measures 12 (13, 14) inches from cast on edge, ending with a RS row.
Cut yarn leaving a 24 inch tail.
Back Lattice
Change to CC.
Lattice Row 1 (WS): K1, *yo, k2tog, repeat from * to end.
Lattice Row 2 (RS): Knit.
Lattice Row 3 (WS): K2, *yo, k2tog, repeat from * to last stitch, k1.
Lattice Row 4 (RS): Knit.
Repeat Lattice Rows 1-4 until you have 6½ (7½, 8½) inches, ending with Lattice Row 4.
Back Neck

Next Row (WS): K1, (yo, k2tog) 11 (12, 13) times, bind off the following 57 (59, 61) stitches knitwise, *yo, k2tog, repeat from * to end. (46, 50, 54 stitches)
Front
Front Neck
Next Row (RS): K23 (25, 27) cable cast on 57 (59, 61) stitches, knit to end. (103, 109, 115 stitches)
Front Lattice
Starting with Lattice Row 3, work the four Lattice Rows until piece measures 6½ (7½, 8½) inches from cable cast on, ending with Lattice Row 4.
Front Body
Change to MC.
Next Row (WS): Purl.
Next Row (RS): Knit.
Continue in stockinette stitch until piece measures 10¼ (11¼, 12¼) inches from end of lattice stitch, ending with a WS row.
Eyelet Row (RS): K1, *yo, k2tog, k1, repeat from * to end.
Front Ribbing
Change to smaller needles.
Next Row (WS): *P2, k1, repeat from * to last stitch, p1.
Next Row (RS): K1, *p1, k2 repeat from * to end.
Repeat previous 2 rows for approximately 1¾ inches (1 fewer row than for Back Ribbing).
Bind off in pattern on WS, cut yarn leaving a 24 inch tail.
Finish
Seam the Sides
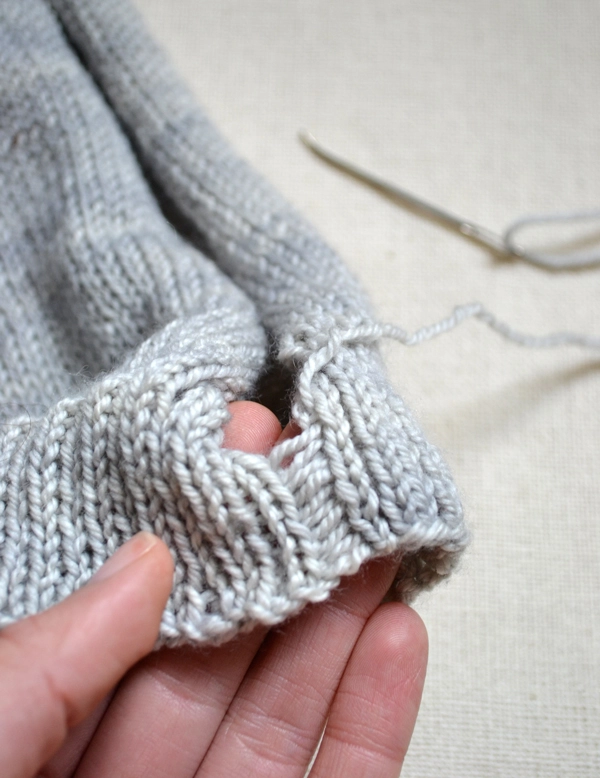
Take your knit piece and fold it in half so that the bottom hems align. Using the mattress stitch and the tails of yarn you left, seam the rib and stockinette sides of the sweater together at the main color.
Block your new top if you want and wear it all spring!


Think I could manage to do this little jumper for myself but being a bit older would like a bit more coverage on the cap sleeve, Any advice for making the sleeve a tad longer?
]
Many thanks – Helen
Hi Helen,
Thanks for writing in! Unfortunately due to the construction of this pattern and the stitch used, there isn’t really a way to extend the sleeve without re-constructing the top. Thank you so much for expressing your interest though! I will be sure to pass this along to the rest of the team!
Warmly,
Gianna
I am really keen on making this top for my daughter and I am wondering where you mention about changing size add stitches would I also be able instead to change needle sizes? …I am also puzzled why the needle sizes goes up for the stockinette stitch will this not make the fabric loose or Gappy instead of close knit?… Also could you make this with all same size needle throughout ??…
Hi Rachel,
Thanks for reaching out! You need the two needle sizes because it is standard for the ribbing to be knit with a size or two smaller needles than you would use for stockinette. This ensures that the fabric for the ribbing is taut and stretchy. So you need the smaller needle to knit the ribbing, you will then move to the next needle size for the body of the shirt, the stockinette stitch.
I hope this clears things up!
Gianna
Good morning
Is there anyway to change sizes for size 8 girls?
Hi Sharon,
Thanks for reaching out! Unfortunately, we don’t currently offer this pattern for child sizes. But thank you for expressing your interest, I will be sure to pass this along to the rest of the team!
Warmly,
Gianna
I also would love this pattern in child size. I just finished making it for myself and my 6 year old daughter says she wants one. I saw your response about sizing up for plus size – is it not possible to do something similar to adjust the pattern for a smaller child’s size?
Thanks,
Liz
Hi Liz,
Thanks for reaching out. I’d be happy to take a look at this to see if there are any simple modifications to change the size! Can you direct me to the comment you’re referring to? I can’t seem to find it, but it would definitely help me figure this out.
Thanks!
Lili
Sorry for my slow response! Here were the comments I was responding to:
Good morning
Is there anyway to change sizes for size 8 girls?
reply
Gianna says:
July 20, 2021 at 1:11 pm
Hi Sharon,
Thanks for reaching out! Unfortunately, we don’t currently offer this pattern for child sizes. But thank you for expressing your interest, I will be sure to pass this along to the rest of the team!
Warmly,
Gianna
Hi Liz,
Oh I see! It looks like Gianna didn’t give specific instructions on how to modify the pattern, which means there likely isn’t a simple way to do so. But we will definitely keep your interest in mind if we update this pattern in the future!
All the best,
Lili
PS. I just emailed you with the problem of increase 57 stitches with the lattice section. I forgot to mention that I am using a single color. I did not put in a lifeline at the beginning of the lattice. What did I do wrong?
I appreciate your advice. Thank you!
Hi Verna,
Thanks for reaching out! It looks like we never received your email! If you would like, please re-send your email to our customer service team at customerservice@purlsoho.com with the added information above and they can help you further from there. You can also submit your question here and we will get back to you within 24 hours.
Warmly,
Gianna
Good day,
I love this pattern, I was wondering if it could be knitted in the round shape with a circular needle, so no seem would be necessary.
Thank you.
Hi Daniele,
Thanks for reaching out! We only offer this pattern worked flat and then seamed up, but thank you for expressing your interest! I will be sure to pass this along to the rest of the team. If you are up for a bit of a challenge you can certainly try this out in the round! If you do, please let us know how this turns out!
Happy knitting!
Gianna
Wonderfully easy but difficult looking top. I made one for my bff’s birthday and she wore it on a cruise she took recently with myself and my husband. I’m making a second one for my sister’s birthday in April.
Hi,
I love the pattern, but I’m not finding the colors I want with the yarn you suggested. Do you know if I could use either the Flax Down or the Morning yarn? Both have lovely shades
Thank you!
Hi Malvina,
Thanks for writing in! For this pattern, we used a sport weight yarn that we, unfortunately, no longer carry. Morning and Flax Down are both dk/light worsted weights, so they are a bit thicker so I would not recommend using either of those. However, we have some great sport weight yarns that would be lovely in place of the original yarns! I would suggest using Good Wool or Wigeon! Either would be a great option, but I do recommend starting off by working a gauge swatch to ensure you are consistent with the pattern.
I hope this helps and please let me know if you have any more questions!
Gianna
I purchased the Purl Soho wool several years ago and am finally getting around to working on the Cap Sleeve Lattice Top pattern. I have started and ripped out the lattice part no less than 5 times. When looking at me work from the WS, it seems that the right side is angling in and the left side is angling out! Does that sound correct? I’m working the MED size with 109 stiches. Please help!
Hi Ana,
Thanks for reaching out. It’s hard for me to visualize what’s going on in your project, so would you be able to send us photos so we can troubleshoot? You can email them to us at customerservice@purlsoho.com!
Thanks,
Lili
Hi-I love this sweater—I made it 2 years ago and get loads of complements. My only quibble is that the neck is too wide for me. It slips off my shoulders. I’d like to make another one but want to alter the neck opening. Do I simply bind off/cast on fewer stitches? If so what number/multiples do you recommend?
Thanks.
Hi Grace,
Thanks for reaching out to us! We’re so excited to hear that you’re planning to knit a second Cap Sleeve Lattice Top, and I’d be happy to help you adjust the neck opening.
The neck hole can be adjusted by binding off fewer stitches in the Back Neck section of the pattern, then casting on that same number in the Front Neck section. The Lattice stitch is knit with a stitch multiple of 3 stitches + 1, so the bind-off number for this section should be an odd number. I’d recommend using stitch markers to mark where you’d like the neck opening to be so you can make sure it’s the right size and that the neck opening is centered.
I hope this helps, and please let me know if you have any questions!
All the best,
Carly
Can you please clarify the gauge required for this project? I’m confused with the pattern instructions saying
“6 stitches = 1 inch in stockinette on larger needles”
How many rows are required for the gauge?
Hi Ana,
Thank you for your question! For this project, any row gauge will work as long as you are achieving the stitch (horizonal) gauge of 24 stitches = 4″ on larger needles. This means that you can knit as many rows as needed for your gauge to reach each length measurement checkpoint in the pattern (for example, 1 3/4″ in the ribbing; 12, 13, 14 inches from cast on edge for back body; etc.).
I hope this helps clarify things, and happy knitting!
All the best,
Margaret
Hi! I am wondering-if I wanted to add some decreases in the lattice section for shaping, how could I do that without losing the bias and texture? I’ve tried k2tog on each end of the WS rows and it’ didn’t pan out.
Hi Annie,
Thanks for reaching out! I think that the best way to approach this is to swatch. You can work up a small swatch in the lattice stitch pattern and experiment with different decrease techniques on a piece of knitting that’s not attached to your project. I’d be happy to help you brainstorm as well! If you could let me know what sort of shaping you’re trying to achieve, that would be helpful.
All the best,
Lili
Hi, I’d love to make this top in a cotton or linen yarn as I live in a hot and humid part of Australia. Would it be suitable if I could find a yarn with the correct gauge, or do you have suggestions for a suitable yarn?
Thanks,
Lucy
Hi Lucy,
Thank you for writing in! This pattern will work in any sport-weight yarn and we believe a cotton blend would work wonderfully for your climate! We would recommend checking out Cotton Pure which is 100% organically grown cotton, making it a great yarn for lightweight fabrics! I hope this helps but please let us know if you have any questions!
Happy knitting,
Gavriella