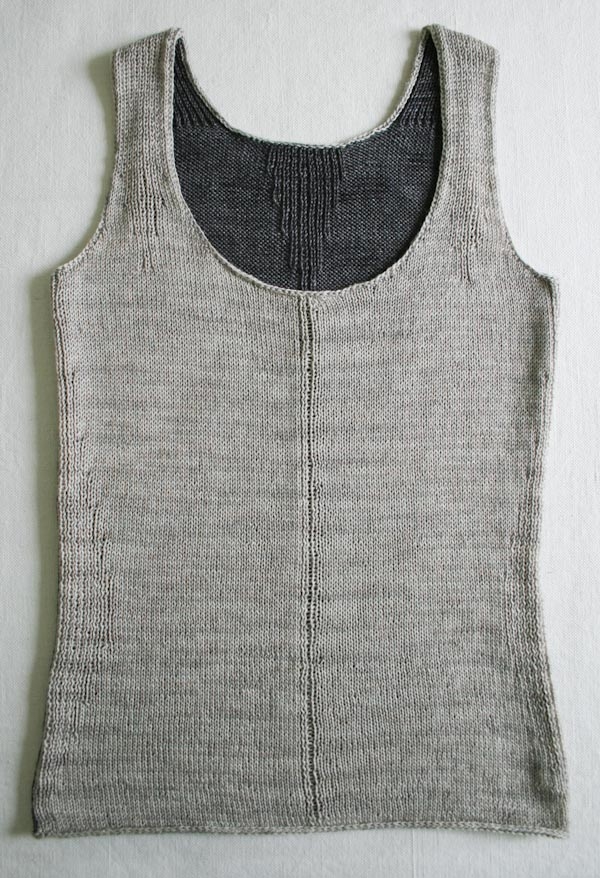
Rib-Wise Tank
“It’s tank top season y’allllllll!!!!!!!” This was recently yelled in my direction by a peppy pilates instructor who I think would have rather been teaching a 90s hip-hop sculpt class. As my arms began to burn, I bristled at the proclamation, but once in the comfort and security of my couch, knitting needles in hand, I had to admit that she was right. It IS tank top season, y’all.

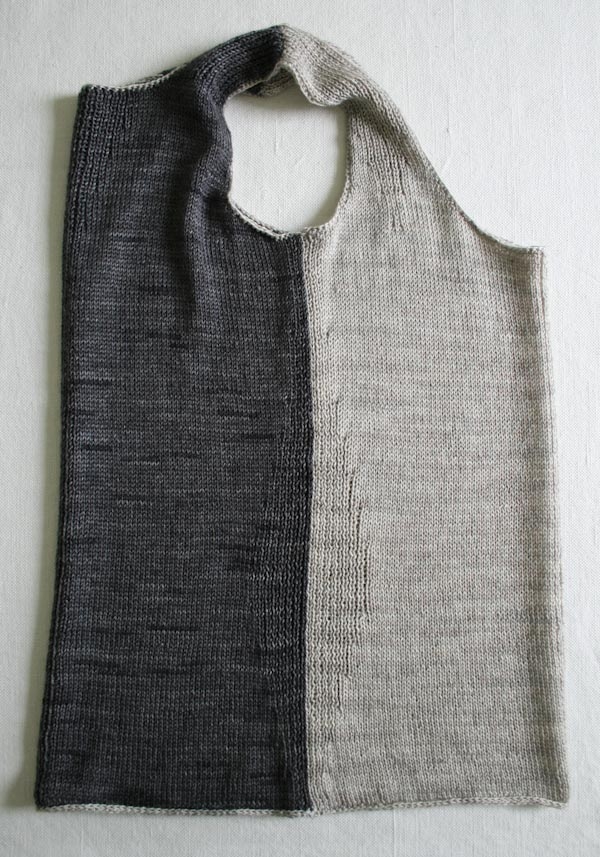
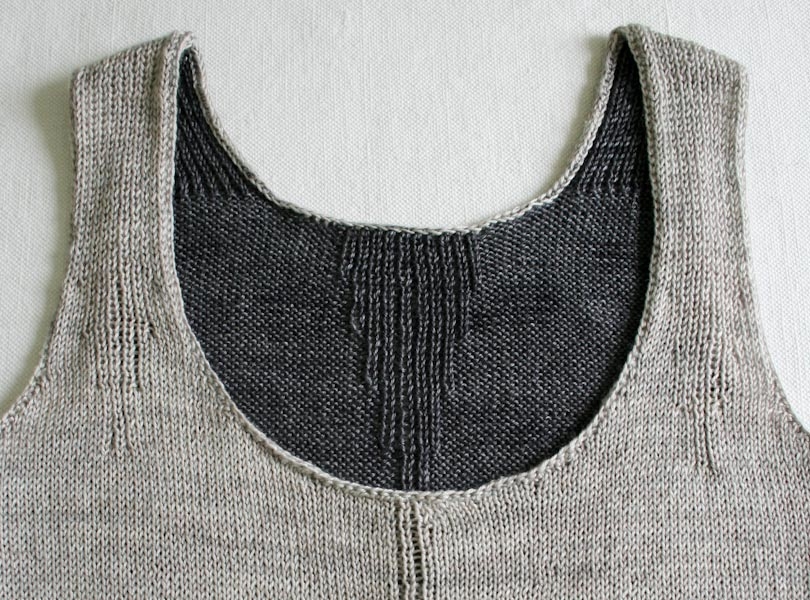
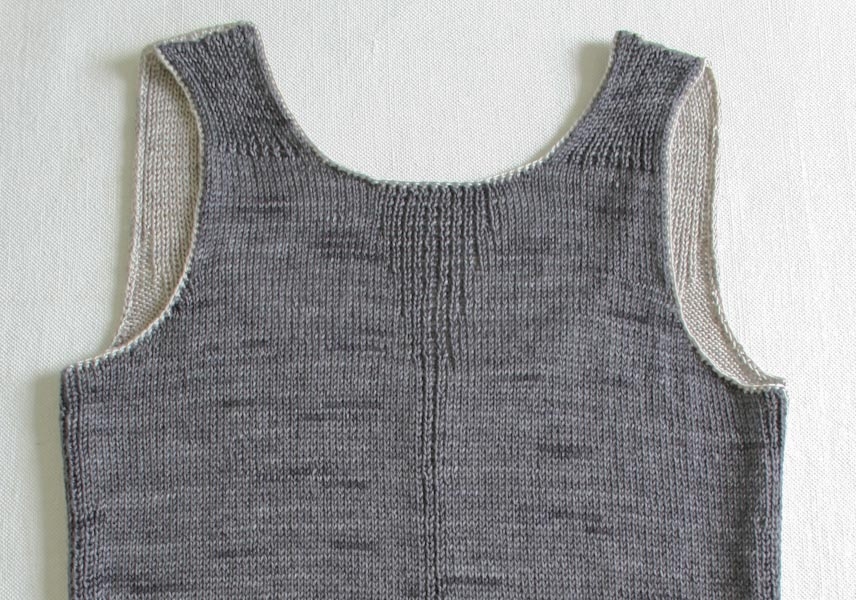
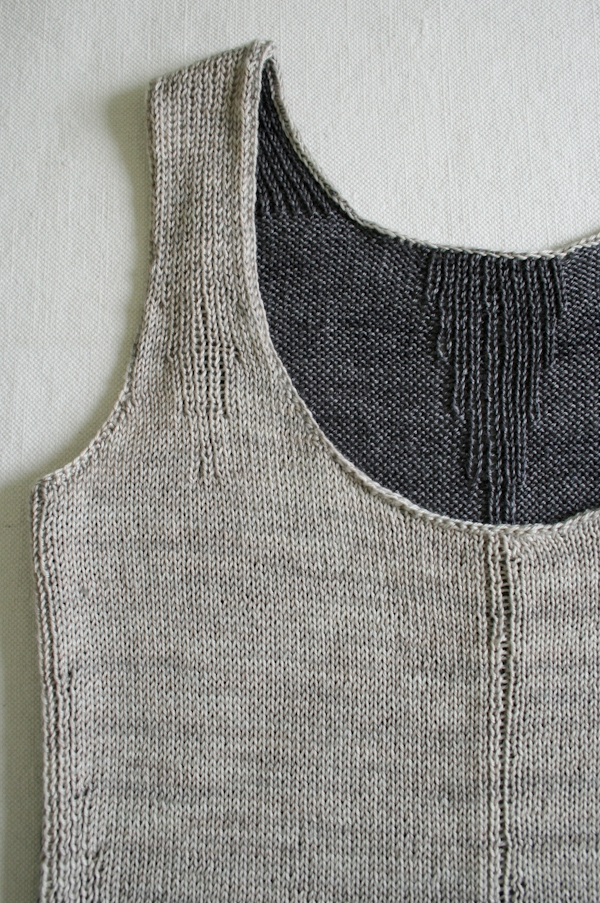
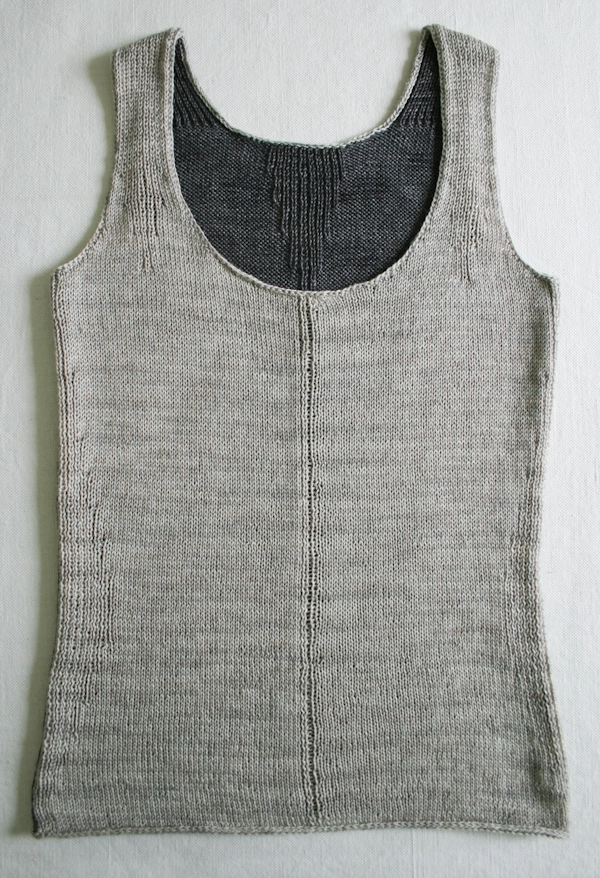
This simple Rib-Wise Tank is just right for the season with a bit of room to breathe but not so much that you’re weighed down in the heat. Ribbing along the sides, straps and between the shoulder blades creates subtle shaping and streamlining, while Anzula’s beautiful new Milky Way offers a soft shine, a slight drape and a cool touch.
Yarn lovers, if you adore the yarn used in this project, you’ll love exploring all of our other yarn collections! Discover over 45 thoughtfully designed yarns in nearly every natural fiber and in every spectacular color you can imagine. Only available here at Purl Soho’s online yarn store, where every skein is created with care and your creativity in mind!
You know, I learned something else that day at the gym… It’s SHORTS season y’alllllll!!!! But don’t worry, I need to spend a lot more time in the gym before you see knit shorts from me! -Laura
Designed by Purl Soho designer, Laura Ferguson.
Share your progress and connect with the community by tagging your pics with #PurlSoho, #PurlSohoBusyHands, and #PurlSohoRibWiseTank. We can’t wait to see what you make!

Materials
- Color A: 1 (1, 1, 1, 2) skein(s) of Anzula’s Milky Way, 80% Milk Protein, 20% Superwash Merino; approximately 500–1000 yards required. This color is Seaside.
- Color B: 1 (1, 1, 1, 2) skein(s) of Anzula’s Milky Way, 80% Milk Protein, 20% Superwash Merino; approximately 500–1000 yards required. This color is Black.
NOTE: If you want to work this Tank all in one color, you would need 2 (2, 2, 2, 3) skiens of Milky Way.
- US 3 (3.25 mm) straight or circular needle
- A set of size US 2 (3 mm) double pointed needles
- Stitch holder or scrap yarn
- A crochet hook size E or F (for Provisional Cast-On) (optional)
Shop our wonderful collection of fingering-weight yarn to find a suitable substitute for this project, and remember that it’s always a good idea to check your gauge before you cast on… Our All About Gauge Tutorial shows you how!
Gauge
28 stitches and 32 rows = 4 inches in stockinette stitch
Sizes
NOTE For help picking a size, please check out our Understanding Ease + Selecting Size Tutorial!
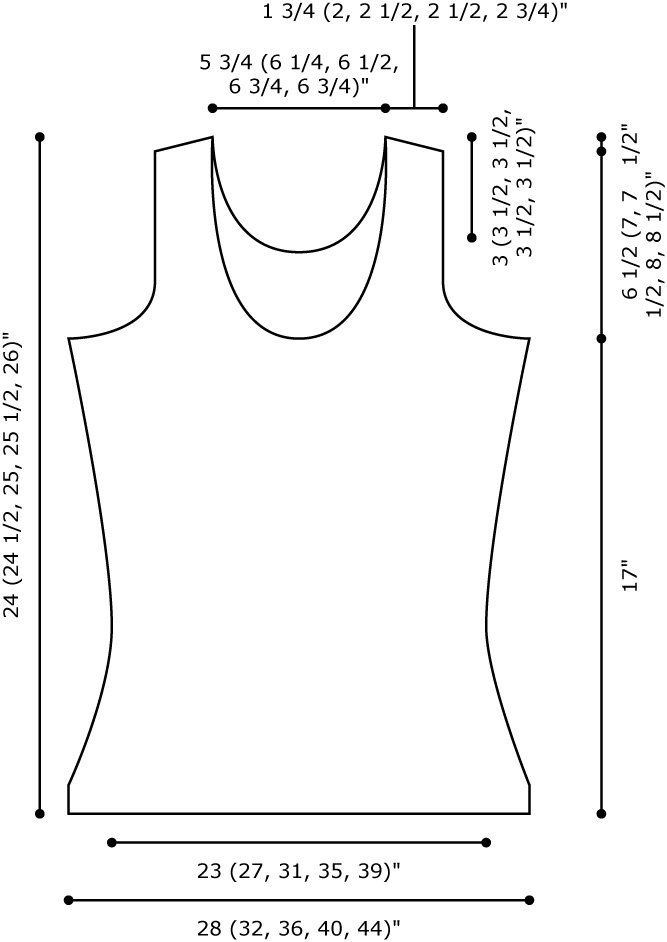
28 (32, 36, 40, 44)
- Bust Circumference: 28 (32, 36, 40, 44) inches
- Waist Circumference: 23 (27, 31, 35, 39) inches
- Length from Underarm to Bottom Edge: 17 inches
Notes
Stitch Patterns
Right Edge Ribbing
(panel of 17 stitches; 136 rows)
Set-Up Row (wrong side): P2, k1, p1, k1, p12.
Rows 1, 3, 5, and 7 (right side): K12, p1, k1, p1, k2.
Row 2 and all Wrong-Side Rows: Knit the knit stitches and purl the purl stitches as they face you.
Rows 9, 11, 13, and 15: K10, p1, [k1, p1] twice, k2.
Rows 17, 19, 21, and 23: K8, p1, [k1, p1] 3 times, k2.
Rows 25, 27, 29, and 31: K6, p1, [k1, p1] 4 times, k2.
Rows 33, 35, 37, and 39: K4, p1, [k1, p1] 5 times, k2.
Rows 41, 43, 45, and 47: K2, p1, [k1, p1] 6 times, k2.
Rows 49, 51, 53, 55, 57, 59, 61, and 63: P1, [k1, p1] 7 times, k2.
Rows 65-72: Repeat Rows 41 and 42.
Rows 73-80: Repeat Rows 33 and 34.
Rows 81-88: Repeat Rows 25 and 26.
Rows 89-96: Repeat Rows 17 and 18.
Rows 97-112: Repeat Rows 9 and 10.
Rows 113-136: Repeat Rows 1 and 2.
Left Edge Ribbing
(panel of 17 stitches; 136 rows)
Set-Up Row (wrong side): P12, k1, p1, k1, p2.
Rows 1, 3, 5, and 7 (right side): K2, p1, k1, p1, k12.
Row 2 and all Wrong-Side Rows: Knit the knit stitches and purl the purl stitches as they face you.
Rows 9, 11, 13, and 15: K2, p1, [k1, p1] twice, k10.
Rows 17, 19, 21, and 23: K2, p1, [k1, p1] 3 times, k8.
Rows 25, 27, 29, and 31: K2, p1, [k1, p1] 4 times, k6.
Rows 33, 35, 37, and 39: K2, p1, [k1, p1] 5 times, k4.
Rows 41, 43, 45, and 47: K2, p1, [k1, p1] 6 times, k2.
Rows 49, 51, 53, 55, 57, 59, 61, and 63: K2, p1, [k1, p1] 7 times.
Rows 65-72: Repeat Rows 41 and 42.
Rows 73-80: Repeat Rows 33 and 34.
Rows 81-88: Repeat Rows 25 and 26.
Rows 89-96: Repeat Rows 17 and 18.
Rows 97-112: Repeat Rows 9 and 10.
Rows 113-136: Repeat Rows 1 and 2.
Basic Rib Pattern
(odd number of stitches; 2-row repeat)
Row 1 (right side): P1, *k1, p1; repeat from * to end of pattern.
Row 2 and all Wrong-Side Rows: Knit the knit stitches and purl the purl stitches as they face you.
Front Shoulder Ribbing
[panel of 15 (15, 15, 23, 23) stitches]
Set-Up Row (Front Left Only): Purl.
Rows 1, 3, 5, 7, and 9 (right side): K6 (6, 6, 10, 10), p1, k1, p1, k6 (6, 6, 10, 10).
Row 2, 4, 6, and 8: Knit the knit stitches and purl the purl stitches as they face you.
Row 10: P4 (4, 4, 8, 8), k1, [p1, k1] 3 times, p4 (4, 4, 8, 8).
Rows 11-17: Knit the knit stitches and purl the purl stitches as they face you.
Row 18: P2 (2, 2, 6, 6), k1, [p1, k1] 5 times, p2 (2, 2, 6, 6).
Rows 19-25: Repeat Row 2.
Row 26: P0 (0, 0, 4, 4), k1, [p1, k1] 7 times, p0 (0, 0, 4, 4).
Row 27: Repeat Row 2.
SIZES 28 (32, 36) ONLY
Repeat Rows 26 and 27 for remainder of piece.
SIZES 40 and 44 ONLY
Rows 28-33: Repeat Row 2.
Row 34: P2, k1, [p1, k1] 9 times, p2.
Rows 35-41: Repeat Row 2.
Row 42: K1, [p1, k1] 11 times.
Row 43: Repeat Row 2.
Repeat Rows 42 and 43 for remainder of piece.
Back Neck Ribbing
(panel of 19 stitches)
Rows 1, 3, 5, and 7 (right side): K6, p1, [k1, p1] 3 times, k6.
Row 2 and all Wrong-Side Rows: Knit the knit stitches and purl the purl stitches as they face you.
Rows 9, 11, 13, and 15: K4, p1, [k1, p1] 5 times, k4.
Rows 17, 19, 21, and 23: K2, p1, [k1, p1] 7 times, k2.
Rows 25, 27, 29, and 31: P1, [k1, p1] 9 times.
Row 32: Repeat Row 2.
Repeat Rows 31 and 32 for remainder of piece.
Pattern
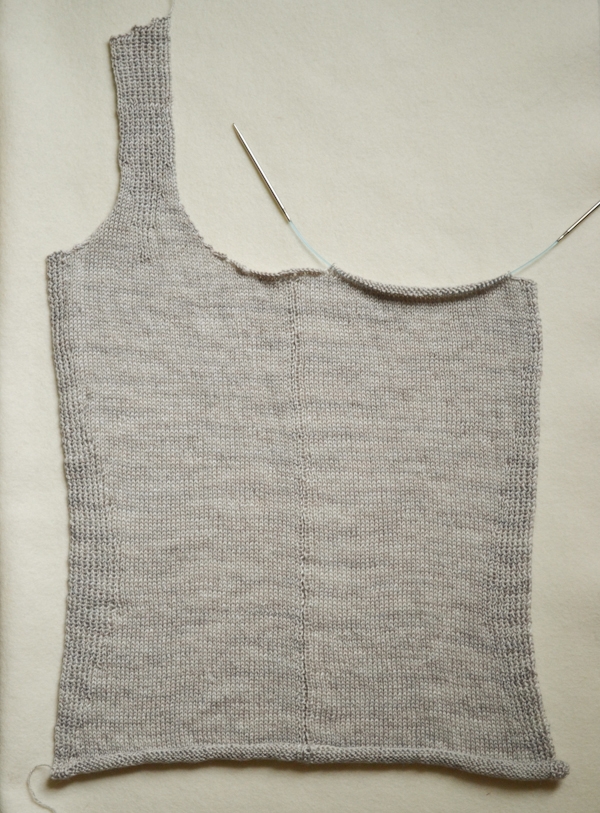
Front
Begin Front
With Color A, cast on 101 (115, 129, 143, 157) stitches. We used a basic Long Tail Cast On.
Set-Up Row (wrong side): Work in Right Edge Ribbing for 17 stitches, beginning with Set-Up Row, place marker (pm), p32 (39, 46, 53, 60), pm, k1, p1, k1, pm, purl to last 17 stitches, pm, work in Left Edge Ribbing to end, beginning with Set-Up Row.
Row 1: Work Left Edge Ribbing as established to first marker, work in stockinette stitch to second marker, work Basic Rib Pattern as established to third marker, work in stockinette stitch to fourth marker, work in Right Edge Ribbing as established to end.
Continue to work in patterns as established until Right and Left Edge Ribbing patterns are complete, ending with a wrong-side row, and removing first and last markers on final row. Place new markers 13 (17, 22, 22, 28) and 28 (32, 37, 45, 51) stitches in from each side edge, to mark Front Shoulder Ribbing.
Divide for Front Left and Front Right
Row 1 (Decrease Row, right side): Bind off 5 (7, 8, 9, 13) stitches in pattern, knit to 5 (7, 8, 9, 9) stitches before third marker, place previous 39 (42, 47, 52, 55) Front Left stitches on hold using a stitch holder or scrap yarn, bind off next 13 (17, 19, 21, 21) stitches in pattern, removing markers, work to end. [44 (49, 55, 61, 68) stitches remain for Front Right]
Shape Front Right Armhole and Neck
NOTE: You will work the Right and Left sides of the Front separately, starting with the Front Right. Stitch counts in the following section do not include the Front Left stitches on hold.
Row 2 (Decrease Row): Bind off 5 (7, 8, 9, 13) stitches in pattern, purl to end. [39 (42, 47, 52, 55) stitches remain]
Row 3: Bind off 4 stitches, work to marker, work Front Shoulder Ribbing, beginning with Row 1, to next marker, knit to end. [35 (38, 43, 48, 51) stitches remain]
Row 4 (Decrease Row): Continuing to work patterns as established, bind off 2 stitches, work to end. [33 (36, 41, 46, 49) stitches remain]
SIZE 28 ONLY
Row 5 (Decrease Row): Bind off 3 stitches, work to last 2 stitches, k2tog. [29 stitches remain]
Row 6: Work in established pattern.
Row 7 (Decrease Row): Bind off 2 stitches, work to last 2 stitches, k2tog. [26 stitches remain]
Row 8: Work in established pattern.
Row 9 (Decrease Row): Ssk, work to last 2 stitches, k2tog. [24 stitches remain]
Row 10: Work in established pattern.
Rows 11 and 12: Repeat Rows 9 and 10. [22 stitches remain]
Row 13 (Decrease Row): Ssk, work to end. [21 stitches remain]
Row 14: Work in established pattern.
Rows 15-18: Repeat Rows 13 and 14. [19 stitches remain]
SIZE 32 ONLY
Rows 5-12: Work Rows 5-12 of size XSmall. [25 stitches remain]
Rows 13 and 14: Work Rows 9 and 10 of size XSmall. [23 stitches remain]
Rows 15-18: Work Rows 13 and 14 of size XSmall. [21 stitches remain]
SIZE 36 ONLY
Row 5 (Decrease Row): Bind off 3 stitches, work to end. [38 stitches remain]
Row 6 (Decrease Row): Bind off 2 stitches, work to end. [36 stitches remain]
Rows 7-12: Work Rows 7-12 of size XSmall. [29 stitches remain]
Rows 13-18: Work Rows 9 and 10 of size XSmall. [23 stitches remain]
SIZE 40 ONLY
Rows 5-18: Work Rows 5-18 of size Medium. [28 stitches remain]
Row 19 (Decrease Row): Work to last 2 stitches, k2tog. [27 stitches remain]
Row 20: Work in established pattern.
SIZE 44 ONLY
Rows 5-18: Work Rows 5-18 of size Medium. [31 stitches remain]
Rows 19-22: Work Rows 19 and 20 of size Medium. [29 stitches remain]
ALL SIZES
Continuing to work first and last 2 (3, 4, 2, 3) stitches in stockinette stitch, and stitches between markers in Front Shoulder Ribbing, work even until armhole measures 6 1/2 (7, 7 1/2, 8, 8 1/2) inches, ending with a right-side row.
Shape Front Right Shoulder
Row 1 (Decrease Row, wrong side): Bind off 7 (7, 7, 9, 9) stitches in pattern, work to end. [12 (14, 16, 18, 20) stitches remain]
Row 2: Work in established pattern.
Row 3 (Decrease Row): Bind off 6 (7, 8, 9, 10) stitches in pattern, work to end.
Row 4: Work in established pattern.
Next Row: Bind off remaining 6 (7, 8, 9, 10) stitches in pattern.
Shape Front Left
With wrong side facing, rejoin Color A.
NOTE: To avoid confusion, the row numbers for this section will begin with Row 2 so that all right-side rows are worked on odd-numbered rows, as for the previous sections.
Row 2 (Decrease Row): Bind off 4 stitches, work to end. [35 (38, 43, 48, 51) stitches remain]
Row 3: Bind off 2 stitches, work to marker, work Front Shoulder Ribbing, beginning with Row 1, to next marker, knit to end. [33 (36, 41, 46, 49) stitches remain]
Row 4 (Decrease Row): Continuing to work patterns as established, bind off 3 stitches, work to end. [30 (33, 38, 43, 46) stitches remain]
SIZE 28 ONLY
Row 5 (Decrease Row): Continuing to work patterns as established, ssk, work to end. [29 stitches remain]
Row 6 (Decrease Row): Bind off 2 stitches, work to end. [27 stitches remain]
Row 7 (Decrease Row): Ssk, work to last 2 stitches, k2tog. [25 stitches remain]
Row 8: Work in established pattern.
Rows 9-12: Repeat Rows 7 and 8. [21 stitches remain]
Row 13 (Decrease Row): Work to last 2 sts, k2tog. [20 stitches remain]
Row 14: Work in established pattern.
Rows 15 and 16: Repeat Rows 13 and 14. [19 stitches remain]
SIZE 32 ONLY
Rows 5-12: Work Rows 5-12 of size XSmall. [24 stitches remain]
Rows 13 and 14: Work Rows 7 and 8 of size XSmall. [22 stitches remain]
Rows 15 and 16: Work Rows 13 and 14 of size XSmall. [21 stitches remain]
SIZE 36 ONLY
Rows Row 5 (Decrease Row): Bind off 2 stitches, work to end. [36 stitches remain]
Row 6 (Decrease Row): Bind off 2 stitches, work to end. [34 stitches remain]
Rows 7-16: Work Rows 7 and 8 of size XSmall. [24 stitches remain]
Rows 13-18: Work Rows 13 and 14 of size XSmall. [23 stitches remain]
SIZE 40 ONLY
Rows 5-18: Work Rows 5-18 of size Medium. [28 stitches remain]
Row 19 (Decrease Row): Ssk, work to end. [27 stitches remain]
Row 20: Work in established pattern.
SIZE 44 ONLY
Rows 5-18: Work Rows 5-18 of size Medium. [31 stitches remain]
Rows 19-22: Work Rows 19 and 20 of size Medium. [29 stitches remain]
ALL SIZES
Continuing to work first and last 2 (3, 4, 2, 3) stitches in stockinette stitch, and stitches between markers in Front Shoulder Ribbing, work even until armhole measures 6 1/2 (7, 7 1/2, 8, 8 1/2) inches, ending with a right-side row.
Shape Front Left Shoulder
Row 1 (Decrease Row, right side): Bind off 7 (7, 7, 9, 9) stitches in pattern, work in established pattern to end. [12 (14, 16, 18, 20) stitches remain]
Row 2: Work in established pattern.
Row 3 (Decrease Row): Bind off 6 (7, 8, 9, 10) stitches in pattern, work to end.
Row 4: Work in established pattern.
Next Row: Bind off remaining 6 (7, 8, 9, 10) stitches in pattern.
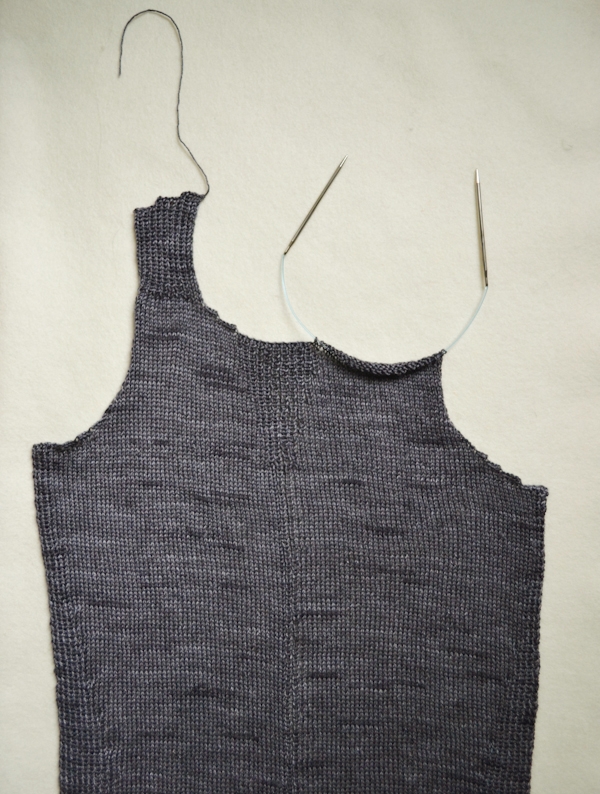
Back
Begin Back
With Color B, cast on 101 (115, 129, 143, 157) stitches.
Follow pattern for FRONT to beginning of armhole shaping, ending with a wrong-side row, removing markers on last row. Place new markers 41 (48, 55, 62, 69) stitches in from each side edge to mark Back Neck Ribbing.
Shape Armholes
Row 1 (Decrease Row, right side): Bind off 5 (7, 8, 9, 13) stitches in pattern, knit to first marker, work in Back Ribbing to next marker, knit to last 5 stitches, work in pattern as established to end. [96 (108, 121, 134, 144) stitches remain]
Row 2 (Decrease Row): Bind off 5 (7, 8, 9, 13) stitches in pattern, work in patterns as established to end. [91 (101, 113, 125, 131) stitches remain]
Row 3 (Decrease Row): Bind off 4 (4, 5, 5, 5) stitches, work to end. [87 (97, 108, 120, 126) stitches]
Row 4 (Decrease Row): Repeat Row 3. [83 (93, 103, 115, 121) stitches remain]
Row 5 (Decrease Row): Bind off 3 (3, 4, 4, 4) stitches, work to end. [80 (90, 99, 111, 117) stitches remain]
Row 6 (Decrease Row): Repeat Row 5. [77 (87, 95, 107, 113) stitches remain]
Row 7 (Decrease Row): Bind off 2 (2, 2, 3, 3) stitches, work to end. [75 (85, 93, 104, 110) stitches remain.
Row 8 (Decrease Row): Repeat Row 7. [73 (83, 91, 101, 107) stitches remain]
Row 9 (Decrease Row): Ssk, work to last 2 stitches, k2tog. [71 (81, 89, 99, 105) stitches remain
Row 10: Work in established pattern.
Repeat Rows 9 and 10 two (three, four, five, six) more times. [67 (75, 81, 89, 93) stitches remain.
Work even in pattern as established for 18 (16, 18, 20, 22) rows, ending with a wrong-side row.
Divide for Back Right and Back Left
Row 1 (Decrease Row, right side): Removing markers as you come to them, k26 (28, 30, 34, 36) and place these stitches on a stitch holder or scrap yarn for Back Right, bind off next 15 (19, 21, 21, 21) stitches in pattern, knit to end. [26 (28, 30, 34, 36) stitches remain for Back Left]
Shape Back Left Neck
NOTE: You will work the Right and Left sides of the Back separately, starting with the Back Left. Stitch counts below do not include the Back Right stitches on hold.
Row 2: Purl.
Row 3 (Decrease Row): Bind off 4 stitches, work to end. [22 (24, 26, 30, 32) stitches remain]
Row 4: Purl.
Row 5 (Decrease Row): Bind off 3 stitches, k1 (2, 3, 1, 2), pm, work Basic Rib Pattern to last 2 (3, 4, 2, 3) stitches, work in stockinette stitch to end. [19 (21, 23, 27, 29) stitches remain]
Continuing to work first and last 2 (3, 4, 2, 3) stitches in stockinette stitch and stitches between markers in Basic Rib, work even until armhole measures 6 1/2 (7, 7 1/2, 8, 8 1/2) inches, ending with a right-side row.
Shape Back Left Shoulder
Row 1 (Decrease Row, wrong side): Bind off 7 (7, 7, 9, 9) stitches in pattern, work to end. [12 (14, 16, 18, 20) stitches remain]
Row 2: Work in established pattern.
Row 3 (Decrease Row): Bind off 6 (7, 8, 9, 10) stitches in pattern, work to end.
Row 4: Work in established pattern.
Next Row: Bind off remaining 6 (7, 8, 9, 10) stitches in pattern.
Shape Back Right
NOTE: To avoid confusion, the row numbers for this section will begin with Row 2 so that all right-side rows are worked on odd-numbered rows, as for the previous sections.
With wrong side facing, rejoin Color B.
Row 2 (Decrease Row, wrong side): Bind off 4 stitches, work to end. [22 (24, 26, 30, 32) stitches remain]
Row 3: Knit.
Row 4 (Decrease Row): Bind off 3 stitches, work to end. [19 (21, 23, 27, 29) stitches remain].
Row 5: Work 2 (3, 4, 2, 3) stitches in stockinette stitch, pm, work Basic Rib Pattern to last 2 (3, 4, 2, 3) stitches, work in stockinette stitch to end.
Continuing to work first and last 2 (3, 4, 2, 3) stitches in stockinette stitch and stitches between markers in Basic Rib, work even until armhole measures 6 1/2 (7, 7 1/2, 8, 8 1/2) inches, ending with a right-side row.
Shape Back Right Shoulder
Row 1 (Decrease Row, right side): Bind off 7 (7, 7, 9, 9) stitches in pattern, work in established pattern to end. [12 (14, 16, 18, 20) stitches remain]
Row 2: Work in established pattern.
Row 3 (Decrease Row): Bind off 6 (7, 8, 9, 10) stitches in pattern, work to end.
Row 4: Work in established pattern.
Next Row: Bind off remaining 6 (7, 8, 9, 10) stitches in pattern.
Finish

Sew left and right shoulders together.
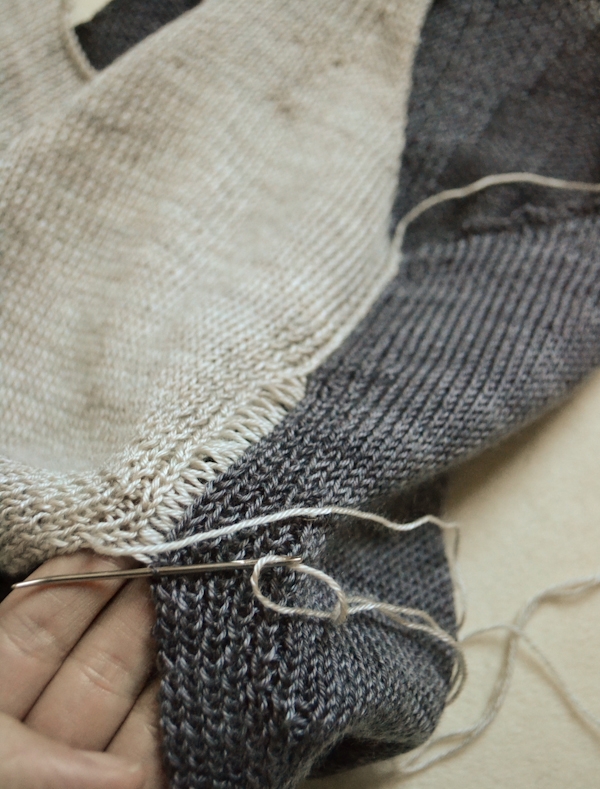
Using mattress stitch, sew the Front and Back together along each side.
Finish Bottom Edge, Armholes and Neckline
Cast 2 stitches onto a double pointed needle (for the neatest possible finishing, use a Provisional Cast-On). Knit an Attached I-cord around the bottom hem of the sweater, picking up 1 stitch for each of the cast-on stitches. When you are finished: If you used a Provisional Cast-On, join the beginning and end of the I-cord with the Kitchener Stitch. If you just cast on normally, bind off the I-cord and sew the beginning and end together.
In the same way, work Attached I-cords around the Armhole edges and Neckline.
Weave in your ends and block as desired.
Looking for more inspiration? Explore all of our free knitting patterns and knitting tutorials, buy one of our many knitting kits and yarn bundles, and shop for beautiful yarn. We have over 35 gorgeous natural fiber yarns in 100’s of magnificent colors, designed to bring integrity, beauty, and joy to your next knitting project and only available at Purl Soho!


Awesome idea! I have to finish the t-shirt first!
Does anyone foresee any problems following the front instructions for both sides. allowing the tank to do double-duty? I remember years ago finding a silk tank in a department store that was two layers and reversible with a total of four solid color options. I always thought it was an interestingly odd idea. I'm thinking if someone is large-breasted, this might not be a good idea but I'm not so…..any thoughts from anyone as to whether this would work or not would be appreciated.
This looks beautiful–I love the shaping in the waist and shoulders, and the black & white color scheme!
Before I cast on, though, I've got a question–and I might be wrong about it–but shouldn't the set-up rows for the right and left edge ribbing be written the other way around? So, instead of:
RIGHT EDGE RIBBING
Set-Up Row (wrong side): P2, k1, p1, k1, p12.
Rows 1, 3, 5, and 7 (right side): K2, p1, k1, p1, k12.
Should it be this:
RIGHT EDGE RIBBING
Set-Up Row (wrong side): P12, k1, p1, k1, p2.
Rows 1, 3, 5, and 7 (right side): K2, p1, k1, p1, k12.
Again, absolutely lovely–I'll be making this for sure!
This pattern looks amazing. It appears to be one of the best patterns I've ever used and shows such a lot of detail. Well done to the designer.
Could this tank top be made with Anzula Mermaid?
Hi Caroline.
Thank you so much for both the kind words and the question.
The ribbing patterns are correct.
The Right Edge Ribbing refers to the right edge, as if you are wearing the tank. So that first line of Right Edge Ribbing is for the wrong side (or inside) of the right side of the tank, again, if you are wearing it.
The tank has a series of increasing ribs at the edges of the front (the sides) as well as a small set of consistant ribs up the center. The Right Edge Ribbing begins on the wrong side (inside) of the tank with a few ribs then a chunk of stockinette (the purling) which takes you towards the center of the tank.
Does that help clear it up at all?
Thank you again for writing in and let me know if you have any other questions.
Laura
Hi Harts…
Structurally speaking, I do not foresee any problems with knitting the Front of the tank for both the front and back.
Let us know how it turns out!
Laura
Hi Brenda…
Yes, you could. Mermaid is going to have a bit more drape since it lacks the 20% merino that Milky Way has. So, the ribbing will not pull in quite as much, meaning there will be less shaping to the tank. But yes, it could be used for sure. Mermaid has such a nice sheen to it. It would be quite elegant.
Laura
this tank is absolutely perfect for summer! and next on my project list!!
thanks for the great pattern
=)
Perfect! Thanks for the pattern and the great pictures! Looking forward to making a cooler knit for the summer!!
sorry for being a grammar stickler but it's "y'all" NOT "ya'll". y'all being a contraction of you all NOT ya will. purl's posts are always amazing detailed so i just feel that your grammar should be held to same fine detail.
The Grammar Stickler…
Thanks You!
That exact thing was haunting me this morning. I had a nagging feeling that first y'all was misspelled. We got 2 or the 3 y'alls right, at least. And happily have them all correct now.
Thanks Again!
Laura
I mostly agree with Caroline: When you start working the set up row, you are on the left side of the tank – as you are wearing it. So, you should work p2, k1, p1, k1, p12, so the the ribbing will be at the side of the tank. But the instructions say: p12, k1, p1, k1, p2 which takes the ribbing to the center. Something is not very clear. BUT, ANYWAY THE PATTERN IS BEAUTIFUL, I already started it and I think I ll knit more than one, in different combinations. Thank you!
Hi Annalda and Caroline…
I totally see what you are talking about. But I think there is just some confusion…
After the long tail cast on, the set up row is on the wrong side, so this is what happens: ribs, purling, center ribs, purling, ribs
SET UP ROW: P2, k1, p1, k1, p12, p32 (39, 46, 53, 60), pm, k1, p1, k1, pm, purl to last 17 stitches, P12, k1, p1, k1, p2.
So the next row (and rows 3, 5, 7) would be:
ribs, knitting, center ribs, knitting ribs
ROW !: K2, p1, k1, p1, k12, work in stockinette stitch to second marker, work Basic Rib Pattern as established to third marker, work in stockinette stitch to fourth marker, K12, p1, k1, p1, k2
I really appreciate y'all writing in about this!
Does that help clear it up at all?
Laura
I have cast on the both the front and back twice now because I am going to do them TAAT. The first row after the cast on, which is a wrong side row states ' Set up row ( wrong side) work in left edge ribbing for 17 stitches. Left edge ribbing set up row (wrong side) states P12 K1 P1 K1 P2 then purl to center put in the K1 P1 K1 purl to 17 stitches from edge work in right edge ribbing ( wrong side) P2 K1 P1 K1 P12 which puts my ribbing towards the center of the shirt not towards my edges.
I am wondering on the ease of the garment. The pattern has size 32 and 36. I am a 34. Which size should I make for the best fit?
Hi Lisa…
Thanks for writing in.
Yes, there has been some confusion over this. It is actually work in Right Edge Ribbing and then the center portion and then Left Edge Ribbing, all on the wrong side.
Does that help?
Let me know!
Laura
Hi Melissa,
Great question.
It could really go either way. The tank is definitely supposed to be fit, be snug, but not skin tight. A 0 to +1 inch ease. If I were you I would make the 36-inch size.
Laura
To Lisa's question about the confusion on the Row 1 instuctions. The problem is that the directions are written for four markers, not the three the pattern has instructed to put in place by that point. It appears the directions are missing the placement of the third marker ending the center rib.
Beautiful design, thanks for sharing it.
To add to my original comment, the directions for the "Basic Rib Pattern" are also a problem. Looks to me like the only bit of rib at the bottom is the center detail, but the instructions suggest otherwise, especially considering the discrepancy in markers.
Okay, my third comment, and I hate to be a stickler, but Caroline is right…the ribbing directions are incorrect too.
Clare.
Thank you for writing. We really appreciate you taking the time. Being a stickler is great!
– In the set up row, initially, the Right and Left Edge Ribbing were switched, but that was corrected nearly immediately.
– I added a "pm" for the fourth marker in the set up row.
– The Basic Rib Pattern is used on the Back for the top of the tank straps. On the Front it starts on the wrong side, on the Back is starts on the right side. This might be what's confusing.
The pattern has been sent back to our technical editor and I will keep you posted!
Thank you again for taking the time.
Laura
Hi! I have one more question: The back ribbing pattern has – at least- 32 rows but when you shape the back armholes the pattern says to bind off the central 15 sts after the 16th row (for XS size). So what? you dont knit the whole back ribbing pattern or have I completely misunderstood? Help please!!! I am about to finish the tank and I am stuck!!!
Beautiful pattern. Wondering if it would work in Louet MerLin Sport yarn? I have 3 skeins on hand.
Thanks for your thoughts
Gwenn
Hi Gwenn,
I have neer worked with Louet's MerLin Sprot Yarn, but after reading about it, these are my thoughts… It might be a hair thick, I knit this yarn on a larger size needle than suggested and got 7 stitches to the inch, I think you would have to work in a smaller size than the manufacturer suggests to get the correct gauge. Also the linen blend will not have the same bounce or elasticity as the yarn I used, so It might hold the ribbing differently (aka, not pull in as much). My biggest suggestion is to swatch and see how the yarn behaves and if you can hit gauge.
Let me know if you have any other questions. I do love a linen blend; I'm sure it would be beautiful.
Laura
Shouldn't there be 31 stitches left after the following instructions for the XSmall :
"Row 4 (Decrease Row): Continuing to work patterns as established, bind off 2 stitches, work to end. [33 (36, 41, 46, 49) stitches remain]
Size XSmall Only
Row 5 (Decrease Row): Bind off 3 stitches, work to last 2 stitches, k2tog. [29 stitches remain]"
36-5= 31. Please advise.
Thanks
Concerning my last question about the number of stitches….
I figured it out!
Thanks!
Melissa
I'm to row 28 of the front shoulder ribbing and not sure what to do next for a size small. I'm guessing I just repeat rows 26 and 27 until I reach length but would like to confirm. Size small isn't referenced in the either section of directions while the large is in both.
Hi Carolyn,
You are correct about repeating Rows 26 and 27. Thank you so much for writing in. Small should be listed with XS and Medium.
Laura
Annalda,
Please know we have corrected the last row of pattern under Shape Armholes on the BACK section.
Thank you for your comment / question and taking the time to let us know.
Laura
Concerning the Rib-Wise Tank, I am not understanding why the pattern only calls for a size 3 16" circular needle when making a tank sweater. Could you let me know?
thx
Hi Gwen,
Great question. I am going to edit the pattern.
I used a 16-inch circular needle, it is my favorite needle length and tend to use it for as many projects as possible, but you could use a straight needle for sure!
Thanks for writing in!
Laura
Hi Laura, great pattern! I've been looking all over for the perfect knit tank top and this looks EXACTLY like what I was wanting.
I have a question about gauge – would you be able to list the row gauge as well? Milky Way is beautiful but it's too pricey for me, so I'm looking at other options and want to make sure I get something that can work up to the correct type of fabric.
Also, I've read a couple different descriptions of Milky Way that describe it as lace-weight or light fingering. In the pictures of the Rib-Wise Tank it certainly looks thicker than a true lace-weight, and from reading the comments it sounds like you were aiming for a drapier fabric and so went up a needle size from what was recommended to create a looser fabric (indicating that even if I could get proper gauge in a standard fingering weight yarn, that might not be ideal?). Any clarification you could add would be really helpful.
Thanks!
–Amanda
Hi Amanda,
Thank you for the kind words. As for the row gauge, it is 8 rows = 1 inch. Milky Way is a touch thicker than a typical lace weight, but it is quite thing. I definitely went up in needle size from the recommended US1 to a US3 to accomplish a drapier fabric. A yarn on the thin end of fingering weight would work well if it is a naturally drappy yarn. The Milky Way is not and that was another reason for the needle size choice.
Hope that helps. Please let me know if you have any other questions.
Laura
Laura – I'm finishing up my tank & very happy with it so far. Thank you for the pattern!
One question – how many stitches did you use for the attached I-cord? Originally I started with 4, as is indicated in the attached I-cord instructions, but it seems a bit wider to me than what is pictured for the tank. Thanks!
Hi Lyndi.
I casted on 2 stitches, which ends up being 3 once you start to attach the i-cord. I found that 4-stitches was too heavy for the fabric.
Laura
Beautiful pattern. Just so you know another site has this up without linking to you. They credit you, but it's basically your photo so people will pin to their page instead of here. I hate stuff like that. Just wanted to let you know. Here's the site: http://diyti.me/2013/10/07/lauras-loop-rib-wise-tank-free-pattern-on-purl-bee/
Hello, My daughter is moving to cold Toronto and I'd love to make this for her. Can you suggest some yarn for cold weather tank wearing?
Thanks
Gina
Thanks for this most beautiful sight. I love it to the nth degree.
Gina!
You are too kind. Thank you for writing in.
Regarding alternate yarns for cold weather… how about…
Anzula's Squishy
https://www.purlsoho.com/purl/products/item/7124-Anzula-Squishy
Koigu's KPM
https://www.purlsoho.com/purl/products/item/410-Koigu-Wool-Designs-Koigu-Premium-Merino-KPM
Purl Soho's Line Weight
https://www.purlsoho.com/purl/products/item/9249-Purl-Soho-Line-Weight
Brooklyn Tweed's Loft
https://www.purlsoho.com/purl/products/item/8430-Brooklyn-Tweed-Loft
Please let us know if you have any questions about any of these yarns or others.
Best,
Laura
simplicity at its finest. thank you.
Dear Laura,
I love this top and the material. I'm an adventurous intermediate beginner, and I'm ready to begin a new adventures aside from squares, rectangles, circles and triangles. I can knit on circulars and double points. Never ever made an article of clothing except the pretty wonderful hats for babies you posted. I want to make it for my son's girlfriend as a belated & future birthday present. Laura do you think this pattern is do-able for a person in my skill-set?
Hi there, as it's coming into winter over here in Australia I was wondering your thoughts on knitting this in a heavier wool- perhaps a worsted weight- to wear over a long sleeve top? Thanks for the great patterns, I'm a big fan of your site 🙂
Marie.
I think you can do it!
I suggest reading through the entire pattern very slowly and carefully before casting on. Maybe print it out and write notes for yourself in the margins. If it helps, sketch a diagram of the piece so you know where you are and what's happening. But I definitely think you can handle this. I am here to answer any questions you may have along the way. Don't hesitate to write back in!
Thanks for writing in.
Keep my posted!
Laura
Hi Leah.
Thanks for writing in. This pattern is written at a gauge of 7 stitches to the inch in stockinette stitch… a worsted weight wool will require you to heavily modify the pattern. Here are some suggestions for wool yarns in a similar weight as the yarn I used here:
Anzula's Squishy
https://www.purlsoho.com/purl/products/item/7124-Anzula-Squishy
Koigu's KPM
https://www.purlsoho.com/purl/products/item/410-Koigu-Wool-Designs-Koigu-Premium-Merino-KPM
Purl Soho's Line Weight
https://www.purlsoho.com/purl/products/item/9249-Purl-Soho-Line-Weight
Brooklyn Tweed's Loft
https://www.purlsoho.com/purl/products/item/8430-Brooklyn-Tweed-Loft
Please let us know if you have any questions about any of these yarns or others.
Thanks again for writing in.
Best,
Laura
Hi there, Love this pattern. Simple yet classy. I have a question though about the marker placement on the front piece at the end of row 136. Your patterns says to remove the first and last markers and place them at 13(17, 22, 22, 28) and 28(32, 37, 45, 51) from each side edge. Is there some reason why these markers are placed asymmetrically? I’m modifying the pattern a bit to raise the front neckline just a bit and I’m wondering what I’m missing here. Thanks!
Hi Cynthia.
I’m so glad you like the pattern!
The markers are in fact placed symmetrically. You are to place 2 new markers in from each side, so both the Left and Right edge will get a marker that is 13 (17, 22, 22, 28) stitches in and another marker that is 28 (32, 37, 45, 51) stitches in. 4 markers total. So it is symmetrical!
Please let me know if you have any questions. Good luck with the modifications!
Best,
Laura
I noticed that Anzula’s Milky Way is no longer available on your site. Do you have any other suggestions for a similar look that works with this pattern? Thanks!!
Hi Amy.
Thanks for writing in! I will be sure to edit the pattern to include some alternates since we no longer have Milky Way. I really appreciate you bringing this up!!
I would take a look at the following yarns. And please let us know if you have any questions about them!
Laura
Anzula’s Squishy
https://www.purlsoho.com/purl/products/item/7124-Anzula-Squishy
Woolfolk’s Tynd
https://www.purlsoho.com/purl/products/item/9608-Woolfolk-Yarn-Tynd
I thought this tank was beautiful when I saw the pictures. Now that I am knitting it and seeing it transform in front of me, I am even more in awe of the design. The details are subtle and absolutely perfect. Please keep making these amazing patterns and thank you so much for offering them! I am making a size M and am at the front right shoulder. The pattern says to continue knitting until the armhole measures 7 1/2 inches. Should the measurment be taken along the edge of the arm hole, or straight up from the edge of the top? Thanks again!
Hi Stacy.
What a wonderful comment to receive! I’m thrilled to hear you’re enjoying the pattern.
Regarding the underarm, take the measurement by placing the tape measure at the height of those first bound off underarm stitches and pulling it straight up, parallel with the knit stitches, to the needle.
Let me know if you have any questions!
Laura
Beautiful pattern! I have only knit 45 rows at this point but I am already having a lot of trouble with my garment rolling due to the stockinette pattern. Will the I-cord fix this problem so that the garment lays flay when finished?
Hi Paige.
The i-cord will help with the rolling edge!
May I ask what yarn you’re using? Anzula’s Milky Way, the yarn I used here, has milk protein in it. Milk protein, like silk or linen, have less elasticity than sheep’s wool fiber. They help fabrics to relax, especially once blocked. If you’re using 100% merino, you may have yourself a more stubborn edge that’s determined to roll up a bit. But again, yes the i-cord will help. If you’re worried about the rolling though, you can make the i-cord one stitch larger. It won’t change the look of the top too much and the extra weight will help pull that bottom edge flat!
Let us know if you have any questions.
Laura
I am using Manos del Uruguay’s Fino. It’s quite beautiful and very soft, but it certainly does like to roll! I will take your advice and consider making the I-cord wider. Thanks!
Hello. I have started and stopped this pattern twice now. I am very confused about the left and right side ribbing pattern and the shape that I start making is the reverse in the picture. Instead of the purls starting on the sides, they start near the sides and then go towards the sides instead of the other way around. Help!
Hi Sarah!
Thank you so much for writing in and my apologies for the delay in responding.
I sent the pattern back to my editor!
I think in fixing a smaller error earlier on, I flip flopped the subsequent rows. The pattern is now correct!
The set-up rows were (and are) correct, but the following rows in each section were flip flopped. In other words, Rows 1 – 136 under the Left Ribbing should have been (and now are) under the Right Ribbing and Rows 1 – 136 for the Right Ribbing should (and now are) under the Left Ribbing!
Thank you so very much for writing in.
Please let us know if you have any questions!
Laura
Under the shape armholes section of the back, row 8 says to repeat row 6, which would mean repeating row 5, which says to bind off 4 stitches when making a medium. However, that won’t correctly decrease the number down from 93 to the intended 91. I think you meant repeat row 7, which evens everything up. Just wanted to let you know! I think I will finish this pattern eventually 🙂
Paige!
Thank you so much for writing in!! You are absolutely correct.
Laura
deseo recibir instrucciones. muy bellos los modelos. Gracias,
Maria
Hello Maria.
Unfortunately, at the moment, we are only offering this free pattern in English.
Thank you for writing in and for your interest.
Best,
Laura
My elderly arms won’t like this – but *I* sure do!!
When I was young and thin there was never time for me to really knit as I would have liked.
Now, when I have the time, I want to do everything!!
You are so generous with your creativity and very much appreciated.
Hi! Thank you for the great pattern!
I’m not sure if I read the pattern correct. So when I’m working on the front pattern it says “continue to work in patterns as established until Right and Left Edge Ribbing patterns are completet”. Do I overlook something in the Right Edge and Left Edge Ribbing or when do I have to increase stiches to get the shape of the waist line ( 32″ to 27″ to 32″) or is it just an “optical increase because of the Ribbing” and the waist line is straight? I hope you understand what I mean. 🙂
Hello Dagmar,
Thanks for writing us and for your kind words. There is no traditional waist shaping in this pattern, as in decreasing and increasing. You are correct that the ribbing does the waist shaping for you. Best of luck! This pattern is beautiful.
Best,
Adam
3 markers or 2 markers??
“DIVIDE FOR FRONT LEFT AND FRONT RIGHT
Row 1 (Decrease Row, right side): Bind off 5 (7, 8, 9, 13) stitches in pattern, knit to 5 (7, 8, 9, 9) stitches before third marker”
Where did the 3rd marker come from? Previously it is said: “Place new markers 13 (17, 22, 22, 28) and 28 (32, 37, 45, 51) stitches in from each side edge, to mark Front Shoulder Ribbing.”
You mention only 2 new markers. So where did the 3rd come from?
Hi Anna,
Thanks for writing in! I am sorry to hear that you are having difficulties. In the Set-up row at the beginning of the pattern, you place 4 markers and then you place an additional 2 markers for a total of 6 markers. So in row 1 of the Divide for Front Left and Front Right, you will be knitting to the indicated number of stitches before the 3rd out of the 6 markers.
I hope that this clears things up and let us know if you have any further questions!
Cassy
The section SHAPE FRONT RIGHT ARMHOLE AND NECK ends with “work even until armhole measures 6 1/2 (7, 7 1/2, 8, 8 1/2) inches, ending with a right-side row.”
And then what? Bind off?
Hi Anna,
Thanks for writing in! After completing this section you will move onto Shape Front Right Shoulder section. In the first row, you will bind of a number of stitches and then work to the end. Follow the rest of this section at the conclusion of which, you will be binding off all remaining stitches!
I hope that this helps!
Cassy
But my yarn is at the end of Front Left Shoulder – how do I move from there to Front Right Shoulder without binding off first?
Oh, sorry, I get it! Thanks!!
This pattern calls for size 3 circulars or straights and size 2 dpns but nowhere in the pattern does it indicate when to use which needles! A clarification would be greatly appreciated. Thanks! 🙂
Hi Linda,
Thanks for writing in. You’ll use the US 3 for the entire piece until the end when you use the US 2 DPNs to finish the hems. You’ll see this direction at the end of the pattern. Thanks!
-Adam
I love this tank top but as a beginner, I find it too confusing to follow the instructions. I would be prepared to pay for this pattern if it had line by line instructions. I really hate patterns that require you to jump back and forth – it just leaves more room for error. I guess you assume that we are all experts at pattern reading.
Hi Linda,
I’m sorry you are not happy with the format. This pattern is written as such because it would otherwise be too wordy, long and redundant if everything were written out. Most patterns with as many row by row instructions like this one are formatted like this to save space and paper. Lots of knitters, however, prefer to make spreadsheets of their patterns so they can check off each line as they do it. Hope you’ll try it!
-Adam
Hello, Laura, and thank you for sharing your beautifully elegant tank top pattern! I am wanting to use Purl Soho’s Field Linen, but am unable to find the yardage required anywhere :/
Can you suggest how many skeins of that I would need for the size 36?
Thank you!
Hello Julie,
I love that idea! I believe you will need four skeins of the Field Linen to make this Tank Top. Anzula’s Milky Way Yarn is approximately 500 yards so this tank top will take about 1,000 yards to complete in size 36.
Let me know if you have any further questions!
-Marilla
I love it, I’m not a teen but I am definitely making this one for myself.
Hello! I am knitting this one in size 40. I am almost finished, but have 2 doubts as to the back instructions…
DOUBT 1
BACK / SHAPE ARMHOLES
Instructions /
Repeat Rows 9 and 10 five more times. [89 stitches remain.
Work even in pattern as established for 20 rows, ending with a wrong-side row.
Doubt
After repeting rows 9 and 10 five times (ends in row 20), some extra 20 more rows are to be knitted, until a total of 40 rows? Because the center rib pattern step (23stitches) after 40rows is visible longer than the one on the instructions photo… I end up with 16 rows of the last rib pattern width when each new change in rib width is 8 rows…
DOUBT 2
SHAPE BACK LEFT NECK
Instructions
Row 2: Purl.
Row 3 (Decrease Row): Bind off 4 stitches, work to end. [30 stitches remain]
Row 4: Purl.
Row 5 (Decrease Row): Bind off 3 stitches, k1, pm, work Basic Rib Pattern to last 2 stitches, work in stockinette stitch to end. [27 stitches remain]
Continuing to work first and last 2 stitches in stockinette stitch and stitches between markers in Basic Rib, work even until armhole measures 8 inches (20cm), ending with a right-side row.
Doubt
The 8 inches are counted since the beginning of the reductions to shape the armholes, right?
I hope the doubts are understandable… 😉
Thank you so much!
Hello GIsela,
Thanks for reaching out and for giving us so much information! To answer your first question, yes. The photo is of a smaller size so it will not match up exactly with the size 40 instructions. I hope this answers your first question, but is it doesn’t let us know.
The answer to your second question is also yes, these 8″ are measured from where the decreases for the armhole begin.
I hope this helps and happy knitting!
-Marilla
Oh thank you so much Marilla ?
All is clear and now I can relax, knowing I understood the instructions well, and end this sweet project.
Thank you for all the knowledge you share at Purl Soho and the lovely patterns (free and purchasable). I do wish it would be more easy to visit you in NY. I absolutely love all your wool / fiber options.
Wooly warm regards!!
Gisela
I was wondering if I could use cotton yarn. however the stretch will not be the same as merino superwash, so please tell me if it will work as an alternative yarn. Thanks!
Hi Thelma,
Thanks for writing in! As long as you swatch carefully and keep in mind that cotton doesn’t hold its shape quite as well as wool, you could certainly substitute a cotton yarn for this top! Because cotton tends to stretch out when worn, I would also recommend making sure you choose a size that has zero or slightly negative ease so that your top has a tailored fit, even if it the cotton stretches out a bit.
Happy knitting!
Julianna
Hi –
I love this tank top pattern and much of the esthetic of everything I see on this site. It’s all so timeless, elegant and classic.
Would this top pattern work with a yarn like Burnish or the Habu Silk Wrap Paper N-94? I think either would be fantastic as a lightweight summer option.
I’m a size 40 and am wondering how many skeins would be required for a one-color version. Based on everything I’ve read my guess is about four if Burnish and about 10 for the Habu.
What would you recommend and can you confirm how much yarn would be needed? Any advice on things to look out for given these yarn choices would also be welcome.
Thanks so much!
Helen
Hi Helen,
Thank you so much for the kind words and for writing in! Although you will have to knit a gauge swatch to make sure, I think Burnish and Silk Wrap Paper would both be great options for this top! The two yarns will result in very different tops, however. Burnish is super drapey and will result in a flowing top, while Silk Wrap Paper is much more structured and even somewhat stiff, though it will soften up after washing. For size 40, you will need 1,005 yards of a single color, which would be 3 skeins of Burnish or 9 balls of Silk Wrap Paper.
I hope that helps, and happy knitting!
Julianna